xG22-EK8200A Getting Started Guide#
This document guides you through the first unboxing experience of the EFR32xG22E Energy Harvesting Explorer Kit, setting up a battery-less demo application, and reading values from a mobile phone. The EFR32xG22E Energy Harvesting Explorer Kit comes with this demo application pre-loaded.
Hardware Setup#
To run the demo application, you will need the following items, all included in this kit:
BRD2710A - EFR32xG22E Explorer Board
BRD8201A - Dual Harvester Energy Harvesting Shield
TPLC-3R8/10MR8X1 - Lithium Hybrid Capacitor 10F 3.8 V
AM-1417CA-DGK-E - Indoor Solar Cell 18.75 µW 2.4 V
In addition to the items above, you will need the following equipment:
A flat screwdriver, 2mm
A smart phone
USB-C cable and charger (optional)
Voltmeter (optional)
Safety note: Be careful when handling the Lithium Capacitor - Risk of shortage. Shortening the capacitor's leads might permanently damage the capacitor and expose users to health hazards.
Inspect the items above, locate the MikroBUS™, STO, and SRC2 connectors.
Familiarize yourself with polarity markings by the board's connectors, capacitor, and solar cell.

Connect the Dual Harvester Energy Harvesting Shield (BRD8201A) to the EFR32xG22E Explorer Board, aligning the polarity markings on the top-left corner of each board.
Connect the capacitor to the STO connector of the shield and gently tighten the two screws.
Safety note: Make sure the polarity shown on the capacitor case matches the polarity signs on the board
Connect the solar cell to the SRC2 connector of the shield and gently tighten the two screws.
Note: Make sure the red wire is connected to the positive input, and the black wire is connected to the negative input. Reverse polarity might permanently damage the IC.
Depending on the state of charge of the capacitor at the time of unboxing, it might take some time for the solar cell to charge it so that the application can start. The following two steps are optional and are meant for those who do not want to wait.
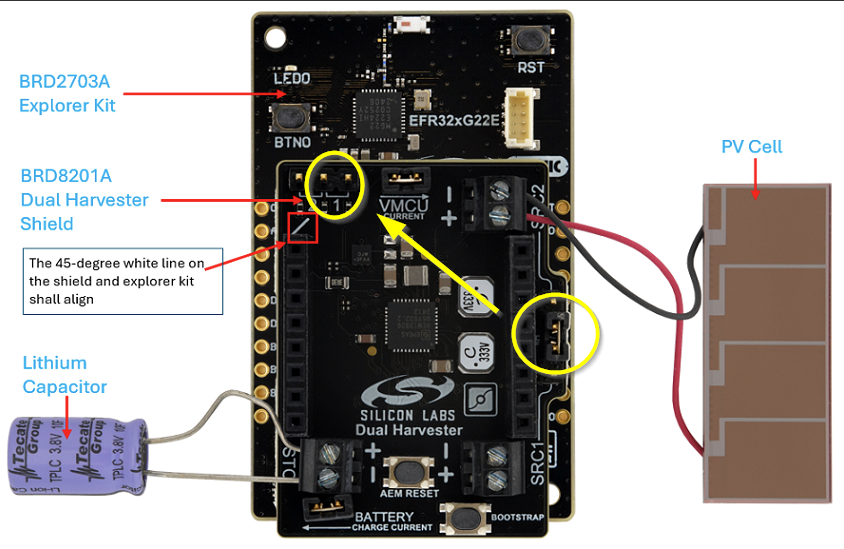
To enable fast charge, move the jumper from the auxiliary connector (right side) to the charge current limit selector (top-left corner of the shield).
Connect the EFR32xG22E Explorer Board to a charger through the USB-C port.
Check the voltage at STO connector by using a voltmeter to check the state charge of the capacitor. Voltage range is 2.5 V (0%) – 3.8 V (100%).
The Mobile App#
The demo app is pre-loaded in the SoC. By now, the kit is beaconing BLE packets reporting the capacitor voltage every 25 seconds. The easiest way to read these packets is using the Simplicity Connect App, developed by Silicon Labs and free of charge.
Simplicity Connect Mobile App - Silicon Labs
Download the Simplicity Connect Mobile Application for iOS on the App Store or Android on Google Play.
Open the application. There might be many BLE devices nearby so filtering might be a good option.

Press the filter button.
Type 'EH' or 'EH Sensor' to filter other devices than the battery-less kit.
By now, the kit is beaconing BLE packets reporting the capacitor voltage every 25 seconds. These are displayed as 2 bytes, hex format, big endian, in the Manufacturing Specific Data field, according to:

Note: Make sure your phone is not in a low-power mode or power-save mode that might impact Bluetooth scan frequency, hence the ability to capture beaconing.
Experimenting Further#
Visit the Silicon Labs GitHub site and see the other battery-less sample apps available for this kit. Download the pre-compiled apps or the sources files from Silicon Labs' SDK Energy harvesting Extension on GitHub as start point to develop your own code with this kit:
Battery-less Bluetooth Beacon app, based on BLE stack
Battery-less Bluetooth Beacon app, based on Silicon Labs' RAIL stack (Radio Abstraction Interface Layer)
Battery-less Zigbee Green Power sensor device
Battery-less Zigbee Green Power Switch
Battery-less Bluetooth switch
The kit is also compatible with MikroBUS™ and QWIIC® add-on boards that support 1.8 V – 2.2 V operation.
e-peas' AEM13920 PMIC can be configured to harvest powers from several different sources you might want to explore.
Find out more about energy harvesting applications with Silicon Labs SoCs, software optimization, measurement methods, and more in Energy Harvesting Applications with EFR32xG22E.
Visit the EFR32xG22E Energy Harvesting Explorer Kit page to download hardware design documents, datasheets, and more documentation.
Learn more and download Simplicity Studio Software, Silicon Labs' software development tool.
The user guide UG591 provides more insight into other applications relevant to this kit, electrical specifications, guidance for measuring currents, and details about the hardware.