Getting Started with SiWT917 in RCP Mode#
This guide describes how to get started with the SiWT917 Linux driver in RCP mode.
Note: The output images in this guide are for illustration purposes only. Details such as board names and version numbers may not exactly match the product.
Hardware Requirements#
The hardware requirements are as follows:
Wi-Fi Access Point (802.11 b/g/n/ax)
One of the following Host radio boards
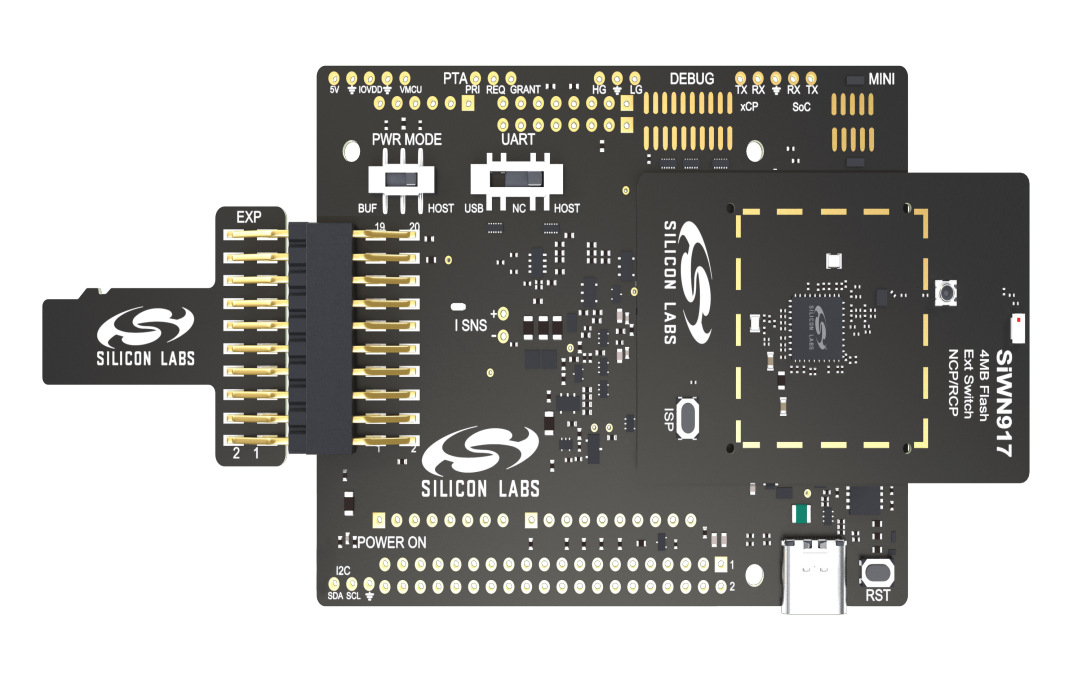
SIWX917-RB4346A - SiWx917 Wi-Fi 6 and Bluetooth LE 4 MB Flash Co-Processor Radio Board (hereafter referred to as SiWx917 radio board)
SiW917Y-RB4357A - SiWx917 Wi-Fi 6 and Bluetooth LE 4 MB Flash Co-Processor Radio Board (hereafter referred to as SiWx917 radio board)
SiW917Y-RB4357C - SiWx917 Wi-Fi 6 and Bluetooth LE Co-Processor Radio Board (hereafter referred to as SiWx917 radio board)
SI-EB8045A - EXP Adapter Board for SiWx917 Co-Processors (hereafter referred to as adapter board)
SI-EB8045B - EXP Adapter Board for SiWx917 Co-Processors (hereafter referred to as adapter board)
Laptop/PC with SDIO slot or any embedded platform with Linux Board support package for BRD8045A.
SDIO adapter connector 8046A for BRD8045A.
Raspberry Pi 4 with Raspberry Pi 4 OS for BRD8045B.
Note: If the laptop has a full SDIO slot, procure a micro SD adapter. If the Laptop/PC does not have an SDIO slot, a SDHC/SD/MMC to CardBus Adapter like the one available at http://www.hwtools.net/cardreader/SDCBA_C01.html can be used.
Software Requirements#
The software requirements are as follows:
Supported Linux Kernel versions are mentioned in the Release Notes – should enable the open source Enable SDIO stack.
DHCP Server (for Wi-Fi Access Point mode)
Bluetooth supported commands bluetoothctl and bluetoothd must be present.
Compatible Bluetooth Host Stack, e.g., the Open Source BlueZ Stack v:5.56
wpa_supplicant (for Wi-Fi Client mode)
hostapd (for Wi-Fi Access Point mode)
Software Package Contents#
The driver package is delivered in the format: SiWT917.w.x.y.z.zip, where the naming convention is as follows:
'w' is Major version
'x' is Minor version
'y' is Patch number
'z' is Build number
The driver package contains the following files/folders:
Readme.txt
Makefile
release
Firmware
rsi (contains driver source code)
apps
The drivers can be found under each product in our github repo.
Setup Diagram#
There are two variants of SiWx917 RCP Evaluation boards:
Board | Description | Contents |
|---|---|---|
SIWX917_RB4346A, SI-EB8045A & BRD8046A | SiWx917 Wi-Fi 6 and Bluetooth LE Co-Processor EXP Expansion Kit | 1x BRD4346A SiWx917 Wi-Fi 6 and Bluetooth LE Co-Processor Radio Board 1x BRD8045A Adapter Board for Co-Processors 1x BRD8046A EXP-to-SDCard Adapter board |
SIWX917_RB4346A, SI-EB8045B | SiWx917 Wi-Fi 6 and Bluetooth LE Co-Processor Raspberry Pi Expansion Kit | 1x BRD4346A SiWx917 Wi-Fi 6 and Bluetooth LE Co-Processor Radio Board 1x BRD8045B Adapter Board for Co-Processors |
SIWX917_RB4346A, SI-EB8045A & BRD8046A
SIWX917_RB4346A, SI-EB8045B
i.MX6 Wandboard Connectivity Diagram with SiWx917_RB4346A + SI-EB8045A + BRD8046A#
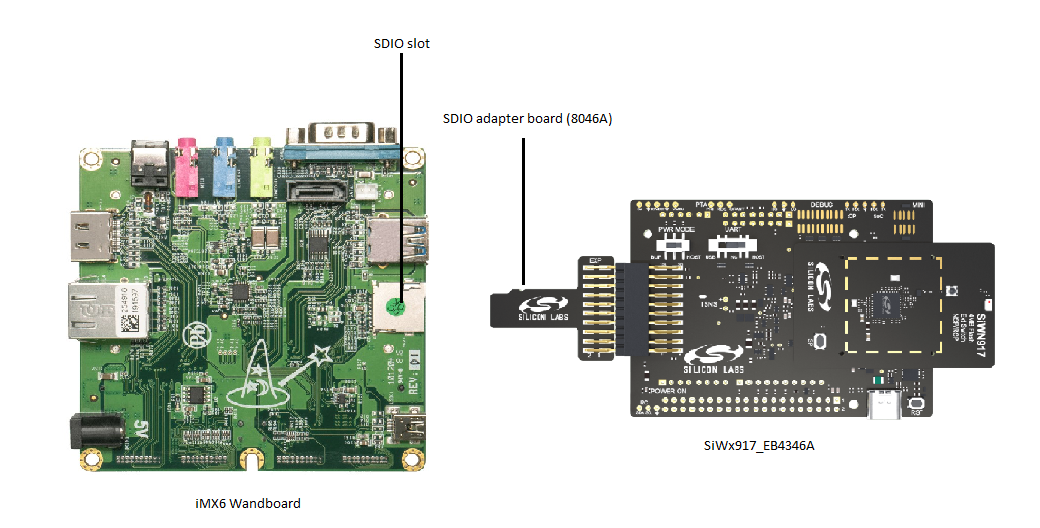
Note: Above setup diagram shows the connectivity of SiWx917-EB4346A with the i.MX6 Wandboard host (referance platform) using a SDIO adapter board 8046A.
RPi4 connectivity diagram with SIWX917_RB4346A + SI-EB8045B#
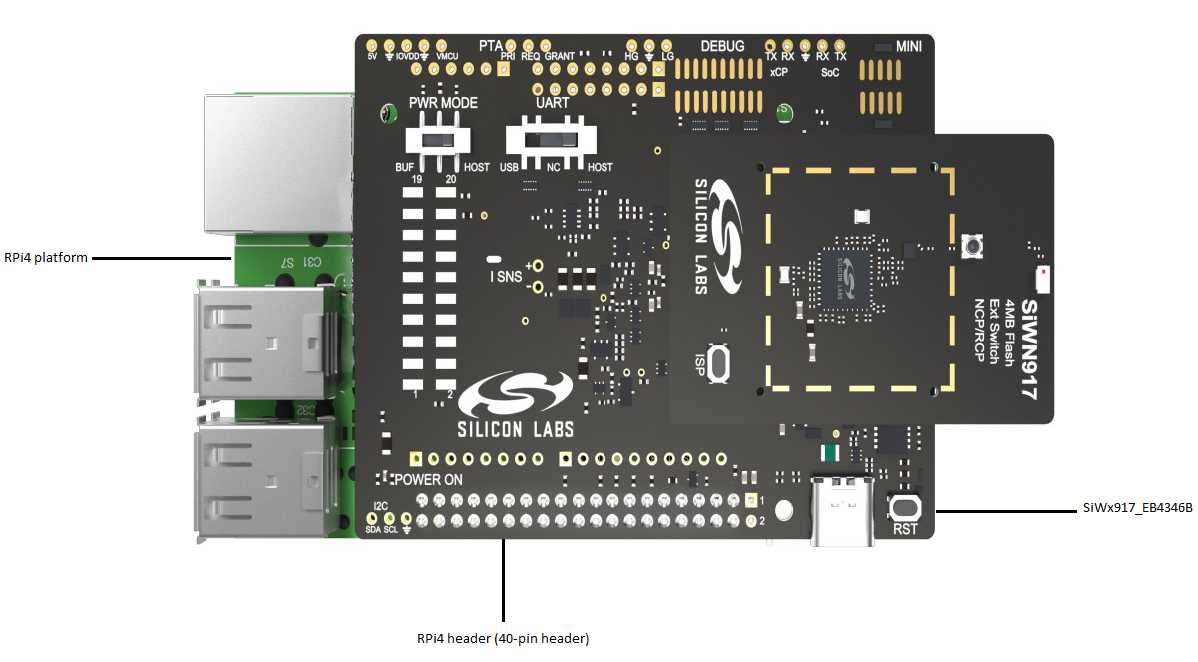
See the SiWT917 RCP Getting Started Guide with Raspberry Pi for more details, Steps to flash Demo RPi4 image and configure in STA mode.
Note: Above setup diagram shows the connectivity of SiWx917_EB4346B with Raspberry Pi4 host platform using Raspberry pi 40 pin header.
Compilation Steps#
This section describes the steps to be followed to compile the driver for different platforms. The steps are outlined below:
Extract the package using the following command:
# unzip SiWT917.w.x.y.z.zipNavigate to the package folder and run the following command in order to copy all the files present in Firmware folder to
'/lib/firmware':# cd SiWT917.w.x.y.z/ # cp Firmware/* /lib/firmwareThere are two ways in which you can build the driver.
Compile from Local Path#
Configure build flags in driver source. Open Makefile at driver path 'SiWT917.w.x.y.z/' and configure build flags.
# vim MakefileBelow are the build flags to be set based on the usage of driver. Selecting the required options shall reduce the binary size which is important for kernel modules particularly on embedded platforms.
KERNELDIR : Provide the kernel source path here. For example on X-86 below path is used.
KERNELRELEASE=$(Shell uname -r) KERNELDIR=/lib/modules/$(KERNELRELEASE)/buildCONFIG_RSI_COEX_MODE : Enable this flag when Wi-Fi and BLE coexistence mode is used.
CONFIG_RSI_BT_ALONE : Enable this flag when only BT LE only mode is used.
Build the driver using make command.
# make clean; make
Compile on an Embedded Platform#
For embedded platforms, add the Kernel path for target platform and toolchain path as cross compilation option to the "make" command.
For example, if the target platform is iMX6 add the kernel path as below :
KERNELDIR=home/test/Wand/armv7-multiplatform/KERNEL For example, if the target platform is ARM and tool chain path is "/opt/freescale/usr/local/gcc-4.4.4-glibc-2.11.1-multilib-1.0/arm-fsl-linux-gnueabi/bin/arm-none-linux-gnueabi-", then the command is:
# make ARCH=arm CROSS_COMPILE=/opt/freescale/usr/local/gcc-4.4.4-glibc-2.11.1-multilib-1.0/arm-fsl-linux-gnueabi/bin/arm-none-linux-gnueabi- Compile from Kernel Source#
Copy the driver 'rsi' to <kernel_source_path> /drivers/net/wireless/.
(Ex : linux-5.7.0/drivers/net/wireless/rsi )
Navigate to the rsi directory and move Makefile_ker to Makefile.
# cd linux-5.7.0/drivers/net/wireless/rsi/ # mv Makefile_ker MakefileRun 'make menuconfig' command from kernel source directory. (Ex : linux-5.7.0 )
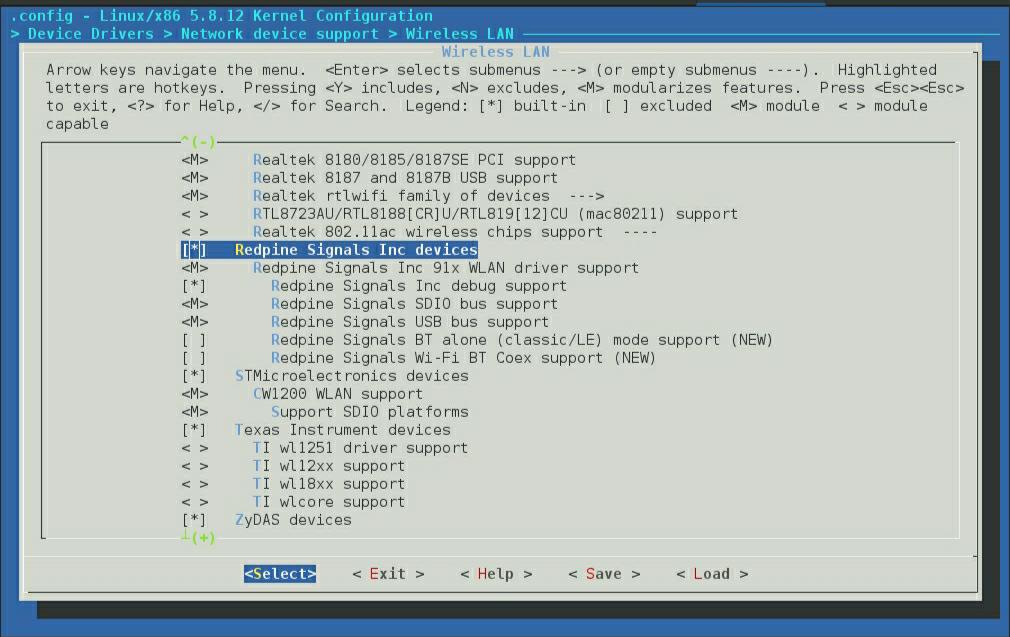
# make menuconfigNavigate to 'Device Drivers->Network device support->Wireless LAN'.
Select 'Redpine Signals Inc' devices.
Select the SDIO bus support. You will see the below screen with all the build options mentioned above. Select the required options.
Note: When Redpine Signals Wi-Fi STA PLUS AP support is enabled , run make oldconfig, followed by make prepare.
To build the driver, run the following command:
# make M=drivers/net/wireless/rsi
On successful compilation, make will generate rsi_91x.ko , and rsi_sdio.ko according to the configuration.
Installing the Driver#
Installing Modules#
After a successful compilation, the driver generates the following modules in the 'SiWT917.w.x.y.z/release' folder according to the configuration. They are outlined below:
rsi_91x.ko
rsi_sdio.ko
To change the directory, run the following command:
# cd SiWT917.w.x.y.z/release/To install the driver, run the following commands.
Install the dependencies:
#modprobe mac80211 #modprobe bluetoothInsert rsi_91x.ko with the required module params (configuration):
#insmod rsi_91x.ko dev_oper_mode=<mode> rsi_zone_enabled=<val> ...
Module params are used by the driver to take initial configuration required. If not provided, default configuration is used. For most of the applications, default values of these module params will be sufficient. Supported module params with their configurable limits are explained in the Developer's Guide in section Common Parameters
In the above command example, module param rsi_zone_enabled is to enable debug prints in dmesg. Default value of rsi_zone_enabled value is 1, which prints errors (only) in terminal. Please refer Debug Prints, to enable more debug prints.
dev_oper_mode : Device operating mode indicates the possible combination of the wireless protocols that can configured with the device.
The table below provides the operating mode details with its constraints.
S.No | Operating Mode | Protocol Support | Maximum No. of Clients for WLAN AP | Maximum No. of BT Connections | Maximum No. of BLE Connections | ||||
|---|---|---|---|---|---|---|---|---|---|
STA | AP | BT LE | |||||||
1 | 1 | √ | X | X | N/A | N/A | N/A | ||
2 | 2 | X | √ | X | 10 clients | N/A | N/A | ||
3 | 3 | √ | √ | X | 8 clients | N/A | N/A | ||
4 | 8 | X | X | √ | N/A | N/A | 2 (Can be as 2 BLE peripherals or 2 BLE Centrals or 1 Central+1peripheral connections) | ||
5 | 9 | √ | X | √ | N/A | N/A | 2 | ||
If any invalid mode is passed to the module, driver returns error and exit. You can check the error message debug logs.
Note:
For mode 8, build flag CONFIG_RSI_BT_ALONE should be enabled in the driver Makefile.
For mode 9, build flag CONFIG_RSI_COEX_MODE should be enabled in the driver Makefile.
For the SDIO interface, run the following command:
#insmod rsi_sdio.ko sdio_clock=<clk_val>In this case,
clk_valcan have a value ranging from 1 to 50 (in MHz).
After a successful installation, a new wireless interface shall be created or WLAN and/or BLE as per the dev_oper_mode selection.
a. If WLAN is selected, run one of the following commands to verify the interface details.
To see the name of the Wi-Fi interface created after successful driver installation:
# ifconfig -a You should expect an output like the sample shown below with all other available interfaces included.
wlan0 flags=4163<UP,BROADCAST,RUNNING,MULTICAST> mtu 1500
inet6 fe80::8da:1aff:fe1e:d1c8 prefixlen 64 scopeid 0x20<link>
ether 88:da:1a:1e:d1:c8 txqueuelen 1000 (Ethernet)
RX packets: 3 bytes 372 (372.0 B)
RX errors 0 dropped 0 overruns 0 frame 0
TX packets: 6 bytes 696 (696.0 B)
TX errors 0 dropped 0 overruns 0 collisions:0 The iw utility can also be used to retrieve the interface and physical device details:
# iw dev <interface_name> info The sample output for this command is shown below.
Interface wlan0
ifindex 5
wdev 0x100000001
addr 88:da:1a:1e:d1:c8
type managed
wiphy 1 channel 6 (2437 MHz), width: 20 MHz (no HT), center1: 2437 MHzAs can be seen, in this case, phy<X> is termed as wiphy 1.
b. If BLE is selected, run the following command to verify the interface details.
To see the name of the BLE interface created after successful driver installation:
# hciconfig -a
hci0: Type: BR/EDR Bus: USB
BD Address: 88:DA:1A:00:00:C2 ACL MTU: 1021:3 SCO MTU: 64:3
UP RUNNING
RX bytes:1006 acl:0 sco:0 events:55 errors:0
TX bytes:0 acl:0 sco:0 commands:55 errors:0
Features: 0xbf 0xfe 0x0d 0xfe 0xdb 0xff 0x5b 0x87
Packet type: DM1 DM3 DM5 DH1 DH3 DH5 HV1 HV2 HV3
Link policy: RSWITCH SNIFF
Link mode: SECONDARY ACCEPT
Name: 'lapt64'
class: 0x0c010c
service Classes: Computer, Laptop
HCI Version: (0x9) Revision: 0x0
Manufacturer: internal use (65535) Configuring the Driver#
Configure in Wi-Fi Station Mode#
This section provides the steps to configure Wi-Fi station mode using startup script or Manual commands using wpa_supplicant. Both procedures are given below. The user can choose any method.
Before installation, the user needs to stop the existing network manager and unblock WLAN from rfkill. Run the following commands to stop the network-manager on different Linux distribution.
For Ubuntu:
# service network-manager stopFor Fedora/Raspberry Pi4 OS:
# service NetworkManager stopTo stop rfkill blocking WLAN:
# rfkill unblock wlan (or) #rfkill unblock all
Startup Script for Wi-FI Station Mode#
User can use the script at path 'SiWT917.w.x.y.z/release' to run Wi-Fi STA mode after Configure Station Using WPA supplicant.
#./start_SiWT917.sh STASee the Startup Script section for more details about Startup script file to configure in different operating modes.
Manual Configuration of Wi-Fi Station Mode#
For station mode connectivity, ensure that the dev_oper_mode is set in installation as given below and interface is detected after the installation. See the Installing the Driver section.
dev_oper_mode = 1Install the modules manually using the below commands to configure in Wi-Fi STA mode, debug zone=0x601 and SDIO clock=50 Mhz
#insmod rsi_91x.ko dev_oper_mode=1 rsi_zone_enabled=0x601 #insmod rsi_sdio.ko sdio_clock=50
Configure Station Using WPA Supplicant#
a) Create a sta_settings.conf file with the information below. Also, fill the information like SSID, psk etc corresponding to the AP you intend to connect in this file. Sample sta_settings.conf file is available within the 'SiWT917.w.x.y.z/release' directory of release package with basic configurations required. The user may use this file and edit the information as explained below for Open and WPA2-PSK (CCMP) secure modes. For the details of all configurations available please refer to the open source supplicant wpa_supplicant.conf file.
ctrl_interface=/var/run/wpa_supplicant
update_config=1 Also, add network block to the sta_settings.conf file as per the AP security. An example network block for different security modes is listed below.
i. For Open (non-Secure) mode:
network={
ssid="\<SSID of Access Point\>"
key_mgmt=NONE
priority=3
} ii. For WPA2-PSK (CCMP) mode:
network={
ssid="\<SSID of Access Point\>"
key_mgmt=WPA-PSK
psk=\<passphrase specified in the Access Point\>
proto=WPA2
pairwise=CCMP
group=CCMP
}The pass phrase can be input either in ASCII or Hexadecimal formats:
ASCII Format: psk="very secret passphrase"
Hexadecimal Format: psk=06b4be19da289f475aa46a33cb793029d4ab3db7a23ee92382eb0106c7
See the section Configuring the Driver in Wi-Fi Station Mode for more security mode configurations and running Wi-Fi STA mode using Network manager.
b) To start the supplicant, run the following command:
# wpa_supplicant -i <interface_name> -D nl80211 –c sta_settings.conf –dddt > supp.log & For example :
# wpa_supplicant -i wifi0 -D nl80211 –c sta_settings.conf –dddt > supp.log &"–i" option specifies the Wi-Fi interface name
<interface_name> - This name as listed in iw dev output (here wifi0)
"-D" specifies the driver interface to be used. In open source driver it is nl80211.
"-c" specifies the supplicant configuration file.
"-d" specifies the log level of supplicant. You can apend more d's to it for more detailed logs.
c) To check the scan results, run the following command:
# wpa_cli -i <interface_name> scan_resultsFor example, above command will give scan results output as follows.
bssid / frequency / signal level / flags/ ssid
50:d4:f7:1e:5a:40 2457 -21 [WPA2-PSK-CCMP][ESS] TP_LINK
04:79:70:72:03:e7 2412 -31 [ESS] honor_9i
38:A4:ED:DE:BB:00 2412 -26 [WPA2-PSK-CCMP][ESS] Ranged) To check whether the connection is successful or not, run the following command:
# iwconfig <interface_name> For example, if the connection is successful, we will see the output below.
wlan0 IEEE 802.11bgn ESSID:"Range" Nickname:""
Mode:Managed Frequency:2.412 GHz AccessPoint:38:A4:ED:DE:BB:00
Bit Rate:39 Mb/s Tx-Power=16 dBm
Retry short limit:7 RTS thr:2353 B Fragment thr:2352 B
Encryption key:off
Power Management:off
Link Quality=80/80 Signal level=-28 dBm Noise level:0 dBm
Rx invalid nwid:0 Rx invalid crypt:0 Rx invalid frag:0
Tx excessive retries:0 Invalid misc:0 Missed beacon:0If the connection is successful, then the connected Access point SSID along with the MAC address is displayed as shown above. If it is not connected to an Access point, a message "Not Associated" is displayed as shown below.
wlan0 IEEE 802.11 ESSID:off/any
Mode:Managed Access Point: Not-Associated Tx-Power=0 dBm
Retry short limit:7 RTS thr:off Fragment thr:off
Encryption key:off
Power Management:off e) IP address for the device can be set in two ways either get IP address dynamically from AP or set static IP address. To obtain dynamic IP address from AP, run the following commands:
# dhclient <interface_name> -r
# dhclient <interface_name> -v To set static IP address to STA, run the following command:
# ifconfig <interface_name> <IP_address> f) To check whether IP is assigned or not, run the following command:
# ifconfig <interface_name>Output:
wlan0: flags=4163<UP,BROADCAST,RUNNING,MULTICAST> mtu 1500
inet 192.168.1.114 netmask 255.255.255.0 broadcast 192.168.1.255
inet6 fe80::224:d7ff:fe56:54dc prefixlen 64 scopeid 0x20<link>
ether 00:24:d7:56:54:dc txqueuelen 1000 (Ethernet)
RX packets 31160 bytes 31082515 (29.6 MiB)
RX errors 0 dropped 0 overruns 0 frame 0
TX packets 23356 bytes 3367496 (3.2 MiB)
TX errors 0 dropped 0 overruns 0 carrier 0 collisions 0 g) To check data transfer by pinging another station, run the following command:
# ping <IP_address>
Ex : ping 192.168.1.1Configure in Wi-Fi Station + BLE Mode#
This section describes Startup script and manual ways to configure the driver to run both as a Wi-Fi Station and in BLE mode.
Startup Script for Wi-Fi Station + BLE Mode#
User can use the script at path rsi to run Wi-Fi STA + BLE mode.
#./start_SiWT917.sh STA_BLE See the Startup Script section for more details about Startup script file to configure in different operating modes.
Manual Configuration of Wi-Fi Station + BLE Mode#
Ensure that the dev_oper_mode is set as below.
dev_oper_mode = 9 (Wi-Fi STA + BLE)Run the following commands to install the modules manually. These commands configure the Wi-Fi STA + BLE mode, debug zone=0x601 and SDIO clock=50 Mhz
#insmod rsi_91x.ko dev_oper_mode=9 rsi_zone_enabled=0x601
#insmod rsi_sdio.ko sdio_clock=50Once the installation completed and interface of Wi-Fi and Bluetooth are detected follow below procedure to install Wi-Fi and BLE.
For Wi-Fi STA, follow the instructions given in Configure Station Using WPA Supplicant to configure in Wi-Fi STA mode.
Also for Bluetooth LE protocol, follow the instructions in the Configure Using HCI Commands section.
Uninstalling the Driver#
To uninstall the driver, follow the procedure below.
If wpa supplicant method is used to connect in STA mode, run the following command to kill wpa supplicant:
# killall wpa_supplicant To kill hostapd application, run the following command:
# killall hostapdTo remove the driver, run the following command:
# rmmod rsi_sdio
# rmmod rsi_91x After uninstalling the driver, the created wireless interface disappears.