Application Development Walkthrough#
The purpose of this document is to guide you through using and configuring the Amazon Sidewalk solution and implementing an Amazon Sidewalk application. Before going through this document, you should go through the Getting Started to familiarize yourself with the Amazon Sidewalk flow.
Amazon Sidewalk - SoC Empty Sample Application#
Create and Compile the Application#
You can create and compile the Amazon Sidewalk Empty sample application just like any other Amazon Sidewalk application. This bare application only initializes the Amazon Sidewalk Stack.
Provision your Device using Scripts#
To automate device creation for prototyping, scripts are available to create the necessary objects in the cloud and generate the manufacturing page. These scripts are provided in the Silicon Labs extension for Amazon Sidewalk Github repository. To set up a prototype device and register it to the network, the following steps are necessary:
Deploy your application in AWS.
Compile and flash an application for your embedded device.
Create a device profile in AWS.
Create a wireless device in AWS.
Generate a manufacturing page.
Flash the manufacturing page to your embedded device.
You can deploy your AWS application automatically using dedicated tools like Amazon CloudFormation. You can compile and flash your application using Simplicity Studio 5. To create the device profile, wireless device, and manufacturing page you can use Silicon Labs' prototyping script.
Remember to install the requirements listed in the requirements.txt file under amazon_dependencies with pip3 install -r requirements.txt.
The script configuration is handled by a JSON file like the following:
{
"awsAccount": {
"awsRegion": "us-east-1",
"awsProfile": "default"
},
"commanderPath": "C:\\SiliconLabs\\SimplicityStudio\\v5_4\\developer\\adapter_packs\\commander\\commander.exe",
"generationRequests": [
{
"deviceProfileId": null,
"deviceName": null,
"destinationName": "CFSDestination",
"targetPart": null,
"quantity": 1
}
]
}An example configuration file is provided at the root of the repository.
The first block awsAccount is used to configure the connection to AWS cloud:
awsRegion: The AWS region you would like to add your devices to (Note that only theus-east-1region is supported at the moment).awsProfile: Used to choose the AWS CLI profile linking to the correct credentials. If you do not use profiles, you can leave the default.
The second block defines the toolchain used to create the manufacturing page:
commanderPath: Should link to the the Simplicity Commander executable file.
The third block generationRequests controls the target device details:
deviceProfileId: If this is your first time running the script, it should be empty. If not, it contains your Device Profile ID (this field is filled automatically).deviceName: This is optional, you can choose to give a custom name to your device.destinationName: Should be the name of the destination used by your AWS cloud application.targetPart: The OPN of the target part. If empty, manufacturing pages for all supported radio boards will be generated.quantity: The quantity of devices you want to create (default value is 1).
On the first run, the script creates a prototyping device profile and fills the deviceProfileId with the resulting device ID. All subsequent wireless devices will be created using this device profile. Note that during prototyping, a device profile can be linked to a maximum of 1000 wireless devices.
To start the script, execute the following:
python3 generate_prototype.py --input <.> --output <output_folder> --config example_config.jsonThe script creates a directory structure as follows in the chosen output folder under mfg_output:
DeviceProfile_7c51bc6b-0556-2083-6f0d-aeb750c94508
├── DeviceProfile.json
└── WirelessDevice_db57b1c9-22ad-c052-07ae-1e1cae9bb384
├── SiLabs_MFG.nvm3
├── Silabs_xG21.s37
├── Silabs_xG23.s37
├── Silabs_xG24.s37
├── Silabs_xG28.s37
└── WirelessDevice.jsonThe first directory is named with the device id of your device profile and contains DeviceProfile.json, which contains your device profile information. Then a directory is created for every wireless device you created. One wireless device contains manufacturing pages for all supported platforms and a WirelessDevice.json file containing your device information (including private keys).
To use the script with command-line arguments instead of a configuration file, simply drop the --config parameter.
usage: generate_prototype.py [-h] -in INPUT -out OUTPUT [-p AWS_PROFILE] [-n NAME] [-d DST_NAME] [-t TARGET] [-c COMMANDER] [-cfg CONFIG]
optional arguments:
-h, --help show this help message and exit
-in INPUT, --input INPUT
Path of the input directory
-out OUTPUT, --output OUTPUT
Path of the output directory
-p AWS_PROFILE, --aws-profile AWS_PROFILE
Name of your AWS profile from .aws/credentials (default: default)
-n NAME, --name NAME Specified name for the newly created device (default: sidewalk_[user]_device)
-d DST_NAME, --dst-name DST_NAME
Destination name used for uplink traffic routing (default: CFSDestination)
-t TARGET, --target TARGET
Target part number for which the MFG page generation has to be done (default: all)
-c COMMANDER, --commander COMMANDER
Path to commander executable, not needed if already in system PATH
-cfg CONFIG, --config CONFIG
Configuration file, if provided other arguments are ignoredProvision your Device with Secure Vault#
On Silicon Labs EFR32 Series 2 platforms, you can leverage Secure Vault to store sensitive data (private keys) in a secure place. Amazon Sidewalk can leverage the Secure Vault to store the device private keys. Silicon Labs provides scripts to provision a device directly using Secure Vault for the manufacturing and during prototyping phase: Provision your prototyping device with Secure Vault.
From initializing to Sending a Message Through Sidewalk#
Note that in Amazon Sidewalk, you can add the support for an external radio for the FSK and CSS modulation. For instructions on configuring Sidewalk stack to use the external radio transceiver, refer to the dedicated section.
Initialize Sidewalk Protocol Stack#
You can find an example of Sidewalk initialization in the main_thread function in app_process.c.
To initiate a link with Amazon Sidewalk, it is essential to first populate the sid_config structure with the necessary configuration details. This structure is defined as follows:
struct sid_config {
uint32_t link_mask;
struct sid_event_callbacks *callbacks;
const struct sid_ble_link_config *link_config;
const struct sid_sub_ghz_links_config *sub_ghz_link_config;
};The link_mask in the sid_config structure specifies which Sidewalk radio links the device will set up and use. For instance, to configure a single link, you would assign SID_LINK_TYPE_1 to link_mask. For multiple links, you would combine them using the bitwise OR operator, such as SID_LINK_TYPE_1 | SID_LINK_TYPE_2 | SID_LINK_TYPE_3. The enumeration sid_link_type list possible values that can be combine for the link_mask.
enum sid_link_type {
/** Bluetooth Low Energy link */
SID_LINK_TYPE_1 = 1 << 0,
/** 900 MHz link for FSK */
SID_LINK_TYPE_2 = 1 << 1,
/** 900 MHz link for LORA */
SID_LINK_TYPE_3 = 1 << 2,
/** Any Link Type */
SID_LINK_TYPE_ANY = INT_MAX,
};The callbacks member holds the event callbacks for the selected link, which must be stored in static const storage since the Sidewalk stack accesses this member without making a copy.
For BLE link-specific configuration, a pointer to struct sid_ble_link_config is passed. Similarly, the sub_ghz_link_config is used for configuring the Sub-Ghz link.
Once the sid_config structure is correctly filled out, the sid_init function can be called with this configuration to initiate the link. The function must be called only once for a given link type unless sid_deinit() is called to deinitialize it.
sid_error_t sid_init(const struct sid_config *config, struct sid_handle **handle);This initialization process is crucial as it sets up the foundational parameters for the Sidewalk stack to operate correctly. It ensures that the device is ready to start communication over the Sidewalk network according to the specified configurations. Remember, proper initialization must precede any attempt to start a link using sid_start. This structured approach to initialization and starting links ensures a robust and error-free operation of the Amazon Sidewalk stack.
You can find an example code to initialize Amazon Sidewalk stack in the main_thread function of app_process.c. Below is also a small example.
the sub_ghz_link_config can be removed if the application should only support BLE radio.
// Set configuration parameters
struct sid_config config =
{
.link_mask = SID_LINK_TYPE_1 | SID_LINK_TYPE_2, //BLE and FSK
.callbacks = &event_callbacks,
.link_config = &ble_config,
.sub_ghz_link_config = &sub_ghz_link_config,
};
struct sid_handle *sidewalk_handle = NULL;
sid_error_t ret = sid_init(&config, &sidewalk_handle);
if (ret != SID_ERROR_NONE) {
SL_SID_LOG_APP_ERROR("sidewalk initialization failed, link mask: %x, error: %d", (int)config.link_mask, (int)ret);
goto error;
}The ble_config parameter controls the configuration of the BLE stack, including the name of your device, the advertising and connection parameters and the output power. The sub_ghz_link_config field controls the Sub-GHz radio configuration, including maximum output power and registration over Sub-GHz enablement.
The details for the event_callbacks structure will be elaborated upon in the subsequent sections.
Start and Stop the Sidewalk Protocol Stack#
Once the platform for Amazon Sidewalk is initialized, the Sidewalk stack can be activated using the sid_start API. This action is contingent upon the prior initialization of the link. Thanks to the multi-link and auto connect features, multiple links can be initiated simultaneously, but only a single link will be used for uplink and downlink at a given moment. The stack can be started by the main_thread function in app_process.c of the Amazon Sidewalk Empty application.
sid_error_t sid_start(struct sid_handle *handle, uint32_t link_mask);The sid_start function is versatile, allowing for the initiation of one or multiple links simultaneously. For a single link, you would set link_mask to the specific link type, such as SID_LINK_TYPE_1. For multiple links, you would use the bitwise OR operator to combine them, like SID_LINK_TYPE_1 | SID_LINK_TYPE_3.
However, it's crucial to remember that you can only start a link type that was previously initialized with sid_init.
In summary, sid_start is the function that activates the Sidewalk stack, enabling it to perform its intended tasks and ensuring that the device is ready for communication over the Sidewalk network.
Here is an example code to start the Amazon Sidewalk stack:
uint32_t link_mask = SID_LINK_TYPE_1 | SID_LINK_TYPE_2; // BLE and FSK
sid_error_t ret = sid_start(sidewalk_handle, link_mask);
if (ret != SID_ERROR_NONE) {
SL_SID_LOG_APP_ERROR("sidewalk start failed, link mask: %x, error: %d", (int)config.link_mask, (int)ret);
goto error;
}To halt the operations of the Sidewalk stack, use the sid_stop function. When this function is called, the stack will cease to send or receive messages, and all notifications will be suspended. The link status will be updated to reflect a disconnected state, and the time synchronization status will be preserved for future use.
sid_error_t sid_stop(struct sid_handle *handle, uint32_t link_mask);The function allows for stopping either a single link or multiple links at once. For example, to stop a single link, set link_mask to SID_LINK_TYPE_1. To stop multiple links, combine them using the bitwise OR operator, like SID_LINK_TYPE_1 | SID_LINK_TYPE_3.
It's important to note that sid_stop can only be used to stop links that were previously initialized with sid_init. This ensures that the stack is properly configured and that the stop operation is performed on an active link.
In essence, sid_stop is a control function that provides the ability to gracefully shut down the Sidewalk stack's operations, ensuring that the device can safely transition to a non-operational state while preserving essential status information for future operations.
Here is an example code to stop the Amazon Sidewalk stack:
uint32_t link_mask = SID_LINK_TYPE_1 | SID_LINK_TYPE_2;
sid_error_t ret = sid_stop(sidewalk_handle, link_mask);
if(ret != SID_ERROR_NONE) {
SL_SID_LOG_APP_ERROR("failed to stop the stack: %d", (int)ret);
return false;
}Amazon Sidewalk and RTOS#
The Amazon Sidewalk stack operates on a real-time OS (FreeRTOS). To manage events and ensure the stack remains operational, you need to implement a loop in the main thread. In the main_thread function, there's already a while(1) loop that can be utilized for this purpose. Essentially, you need to handle events as they occur. The primary event to keep the stack running is EVENT_TYPE_SIDEWALK, and you must process this event to maintain the stack's operation. Additional events can be defined as needed for other purposes. A basic structure for the main loop could be as follows:
At the top of app_process.c, initialize a few structures:
static QueueHandle_t g_event_queue;
// Sidewalk Events
enum event_type{
EVENT_TYPE_SIDEWALK = 0,
EVENT_TYPE_SEND_MESSAGE,
//Add your custom event types here
EVENT_TYPE_INVALID
};
#define MSG_QUEUE_LEN (10U)Then, main_thread will display as follows:
g_event_queue = xQueueCreate(MSG_QUEUE_LEN, sizeof(enum event_type));
app_assert(g_event_queue != NULL, "app: queue creation failed");
while (1) {
// Add your code
enum event_type event = EVENT_TYPE_INVALID;
if (xQueueReceive(g_event_queue, &event, portMAX_DELAY) == pdTRUE) {
switch (event) {
case EVENT_TYPE_SIDEWALK:
sid_process(sidewalk_handle);
break;
case EVENT_TYPE_SEND_MESSAGE:
//call to sid_put_msg here
break;
default:
SL_SID_LOG_APP_ERROR("app: unexpected evt: %d", (int)event);
break;
}
}
}Finally the on_sidewalk_event callback should be implemented to add the EVENT_TYPE_SIDEWALK to the queue.
static void on_sidewalk_event(bool in_isr,
void *context)
{
UNUSED(in_isr);
UNUSED(context);
queue_event(g_event_queue, EVENT_TYPE_SIDEWALK);
}The queue_event function used in this example is the same as the one implemented in Hello Neighbor:
static void queue_event(QueueHandle_t queue,
enum event_type event)
{
// Check if queue_event was called from ISR
if ((bool)xPortIsInsideInterrupt()) {
BaseType_t task_woken = pdFALSE;
xQueueSendFromISR(queue, &event, &task_woken);
portYIELD_FROM_ISR(task_woken);
} else {
xQueueSend(queue, &event, 0);
}
}This consists of the minimum to have the Sidewalk stack running.
Check Sidewalk Protocol Status#
To check the current status of the Amazon Sidewalk stack, use the on_status_changed or the sid_get_status API. Both return detailed information encapsulated within the sid_status structure.
Here is the on_status_changedcallback trace. You can find it in app_process.c file of the Amazon Sidewalk Empty sample application:
void (*on_status_changed)(const struct sid_status *status, void *context);Here is the sid_get_status function trace:
sid_error_t sid_get_status(struct sid_handle *handle, struct sid_status *current_status);Here is the sid_status structure definition:
struct sid_status {
/** The current state */
enum sid_state state;
/** Details of Sidewalk stack status */
struct sid_status_detail detail;
};To use the function, pass the handle obtained from sid_init() and a pointer to a sid_status structure where the current status will be stored. If the function succeeds, the current_status will contain the latest status information from the Sidewalk library.
The sid_state enumeration and the sid_status_detail structure provide a comprehensive overview of the current status and state of the Sidewalk stack. Here's an explanation of their components:
The sid_state enumeration describes the operational state of the Sidewalk stack:
SID_STATE_READY: Indicates that the Sidewalk stack is operational and ready to send and receive messages.SID_STATE_NOT_READY: Used when the Sidewalk stack cannot send or receive messages, such as when the device is not registered, the link is disconnected, or time is not synchronized.SID_STATE_ERROR: Signifies that the Sidewalk stack has encountered an error. In this case,sid_get_error()should be called to obtain a diagnostic error code.SID_STATE_SECURE_CHANNEL_READY: This state means that the Sidewalk stack can send and receive messages with a secure channel established, but the device is not registered, and time is not synchronized.
The sid_status_detail structure contains several fields:
registration_status: This indicates the registration status of the Sidewalk device.time_sync_status: This indicates whether the Sidewalk device has successfully synchronized its time with the Sidewalk network.link_status_mask: This is a bitmask used to determine which links are currently active. If the bit corresponding to a link is set, that link is up; otherwise, it is down. For example, to check ifSID_LINK_TYPE_1is up, the expression!!(link_status_mask & SID_LINK_TYPE_1)needs to be true.supported_link_modes: This array holds the supported modes for each link type, where a link type may support more than one mode simultaneously.
These components are crucial to understand the status and state of the Sidewalk stack, as they provide insights into the device's connectivity, registration, and readiness to function within the Sidewalk network.
Here is an example code to check the Amazon Sidewalk stack status:
struct sid_status state = {};
sid_error_t ret = sid_get_status(sidewalk_handle, &state);
if(ret != SID_ERROR_NONE) {
SL_SID_LOG_APP_ERROR("Sidewalk stack is not initialized: %d", (int)ret);
return false;
}Here is an example of the on_status_changed callback implementation to display the Sidewalk status in the logs:
static void on_sidewalk_status_changed(const struct sid_status *status,
void *context)
{
SL_SID_LOG_APP_INFO("app: REG: %u, TIME: %u, LINK: %lu",
status->detail.registration_status,
status->detail.time_sync_status,
status->detail.link_status_mask);
}Send a Message Through Sidewalk#
The sid_put_msg function is designed to queue a message for transmission in the Sidewalk stack.
sid_error_t sid_put_msg(struct sid_handle *handle, const struct sid_msg *msg, struct sid_msg_desc *msg_desc);Here's an explanation of how it works:
When you call sid_put_msg, you need to provide it with three parameters:
handle: This is a pointer to the handle that you received when you calledsid_init(). It's essentially a reference to the initialized Sidewalk stack.msg: This is the actual message data that you want to send.msg_desc: This is a message descriptor that the function will fill out. It serves as an identifier for the message you're sending.
In summary, sid_put_msg is a function that queues messages for transmission over the Sidewalk network. Here is an example code to send a message over Amazon Sidewalk:
static void send_sidewalk_message(struct sid_handle *app_context)
{
char message_buff[15] = "Hello Sidewalk!";
struct sid_msg msg = {
.data = (void *)message_buff,
.size = sizeof(message_buff)
};
struct sid_status status = {};
sid_error_t ret = sid_get_status(app_context, &status);
if(ret != SID_ERROR_NONE) {
SL_SID_LOG_APP_ERROR("Sidewalk stack is not initialized: %d", (int)ret);
return;
}
if (status.state == SID_STATE_READY || status.state == SID_STATE_SECURE_CHANNEL_READY) {
SL_SID_LOG_APP_INFO("sending message through Sidewalk");
struct sid_msg_desc desc = {
.type = SID_MSG_TYPE_NOTIFY,
.link_type = SID_LINK_TYPE_ANY,
};
sid_error_t ret = sid_put_msg(app_context, &msg, &desc);
if (ret != SID_ERROR_NONE) {
SL_SID_LOG_APP_ERROR("queueing data failed: %d", (int)ret);
} else {
SL_SID_LOG_APP_INFO("queued data msg id: %u", desc.id);
}
} else {
SL_SID_LOG_APP_ERROR("sidewalk is not ready yet");
}
}You can call the send_sidewalk_message function from the previously implemented main loop. Just add the function call to the EVENT_TYPE_SEND_MESSAGE event type and set up a trigger to queue this event (such as a CLI command, button press, or timer).
Silicon Labs also provides a software component that implements a lightweight message format scheme. You can find more information on this component in the dedicated section.
Receive a Message Through Sidewalk#
When a message is received from the Sidewalk network, the on_msg_received callback is called. You can find its definition in app_process.c of the Amazon Sidewalk Empty application.
void (*on_msg_received)(const struct sid_msg_desc *msg_desc, const struct sid_msg *msg, void *context);When a message is received, the Sidewalk stack will invoke this callback, passing in the message descriptor and payload. We can then use these parameters to process the message accordingly. It is crucial to handle the received message within the callback efficiently to ensure the application responds correctly to incoming data from the Sidewalk network.
Here is an example of the on_msg_received callback implementation:
static void on_sidewalk_msg_received(const struct sid_msg_desc *msg_desc,
const struct sid_msg *msg,
void *context)
{
UNUSED(context);
SL_SID_LOG_APP_INFO("downlink message received");
SL_SID_LOG_APP_INFO("msg (type: %d, id: %u, size: %u)", (int)msg_desc->type, msg_desc->id, msg->size);
if (msg->size != 0) {
SL_SID_LOG_APP_INFO("received message: %.*s", msg->size, (char *)msg->data);
}
}Amazon Sidewalk Callbacks#
The Amazon Sidewalk stack operates on an event-driven architecture, which enables applications to respond to events as they occur in real-time. This architecture relies heavily on the use of callbacks to handle various events. Ensuring that these callbacks are implemented correctly is crucial for the reliable functioning of devices that utilize the Sidewalk network. As seen above during Sidewalk stack initialization, the list of callbacks is defined within the struct sid_event_callbacks as follows:
struct sid_event_callbacks {
void *context;
void (*on_event)(bool in_isr, void *context);
void (*on_msg_received)(const struct sid_msg_desc *msg_desc, const struct sid_msg *msg, void *context);
void (*on_msg_sent)(const struct sid_msg_desc *msg_desc, void *context);
void (*on_send_error)(sid_error_t error, const struct sid_msg_desc *msg_desc, void *context);
void (*on_status_changed)(const struct sid_status *status, void *context);
void (*on_factory_reset)(void *context);
void (*on_control_event_notify)(const struct sid_control_event_data *data, void *context);
};Each callback serves a specific purpose within the Sidewalk stack's lifecycle, from handling events and message reception to dealing with errors and status changes. The .context is a pointer to the application context, which provides a reference that can be used within the callbacks to access application-specific data. For example, the callback on_status_changed can be used to update the status of the stack in the context user-defined structure. The callbacks prefixed with on_ represent the functions that will be called when the corresponding event occurs, ensuring that the application can handle these events appropriately.
The event_callbacks structure is already present in the Amazon Sidewalk Empty example with all function callbacks already present but not implemented. The callbacks are defined as follows:
on_event: is called for any generic Sidewalk event not already handled by another callback.on_msg_received: is triggered when a message is received by Sidewalk.on_msg_sent: is triggered when a message is effectively sent and corresponding ACK (from the MAC layer) is received.on_send_error: is triggered for any error during message sending including if message was sent but ACK (from the MAC layer) was not received.on_status_changed: when the Sidewalk status changes, for example when the stack changes from unregistered to time sync registered state (SIDEWALK_NOT_READY > SIDEWALK_READY).on_factory_reset: is triggered when a factory reset command was issued. A factory reset unregisters a Sidewalk device.
Amazon Sidewalk Physical Layer and Configuration#
Switch Between BLE, FSK, and CSS#
When Multi-link or Auto connect is enabled, the system automatically switches between links based on certain criteria, such as a timeout during time synchronization attempts. For more details on these features, refer to the dedicated section on the Multi-link feature.
If you prefer to manually switch between radio links, you can stop the Sidewalk stack using sid_stop and restart it with sid_start, specifying a different sid_link_type link_mask parameter.
Additionally, it is possible to run another protocol alongside Amazon Sidewalk. The Amazon Sidewalk - SoC Dynamic Multiprotocol Light application demonstrates Client BLE working alongside Sidewalk BLE and Client BLE working alongside Sidewalk FSK. You can also implement double advertising in Amazon Sidewalk or perform an OTA using the standard BLE stack. For implementation details, refer to our Multiprotocol documentation.
Change Radio Configuration#
In the Amazon Sidewalk Empty sample application, the radio is pre-configured with selected parameters. You can modify these parameters by editing the parameter of the sid_platform_init function call in app_init.c.
sid_error_t sid_platform_init ( const void * platform_init_parameters );The BLE configuration is managed in the component/ble_subghz/radio/ble/app_ble_config.c file of the Sidewalk extension, with the main configuration structure being sid_ble_config_t ble_cfg. The sub-GHz configuration is divided between different sub-GHz solutions: one for the native radio for Silicon Labs parts that support FSK modulation, and one for the external radio when using an external Semtech radio transceiver. The sub-GHz parameters can be found in the sidewalk_<extension8version>/component/ble_subghz/radio/subghz/ folder, specifically in rail/app_subghz_config.c for the native radio, with radio_efr32xgxx_device_config_t radio_efr32xgxx_cfg as the base structure, and in the semtech/app_subghz_config.c folder for the Semtech radio, with sid_sub_ghz_links_config sub_ghz_link_config as the base structure.
Change Amazon Sidewalk Power Profile#
With sub-GHz radio, besides adjusting the radio parameters, you can also select a configuration profile, known as a power profile. This profile alters the protocol behavior by modifying aspects such as the number of listening windows or their periodicity.
For FSK, refer to our documentation on FSK Configuration
For CSS, refer to our documentation on CSS Configuration
Modifying the power profile or parameters of the radio link affects the performance of the Amazon Sidewalk protocol. For more details, refer to our study on Amazon Sidewalk performance.
Configure an External Module for SubGHz Radio#
To support an external radio transceiver like the Semtech SX1262, you need to configure the communication between the EFR32 and the SX1262. This communication is carried out via SPI. The following section provides examples of the pinout connections between the EFR32 and the SX1262 and how to configure them.
By default, the Semtech SX1262 driver is added to the Sidewalk Empty application for hardware that supports it. To know which radio board supports the Semtech transceiver, refer to the Hardware Prerequisite page.
If you wish to add support for the Semtech LR1110 radio transceiver, refer to the Semtech documentation here.
Configure Transceiver GPIOs#
These instructions explain how to configure the EFR32 to communicate with the Semtech SX1262 for sub-GHz protocol support. When designing custom hardware, the same procedure can be followed, but the pinout can be adjusted as needed. It's important to consider that each pin has different availability depending on the sleep level. If you want the EFR to wake up on a radio event, choose the pinout accordingly.
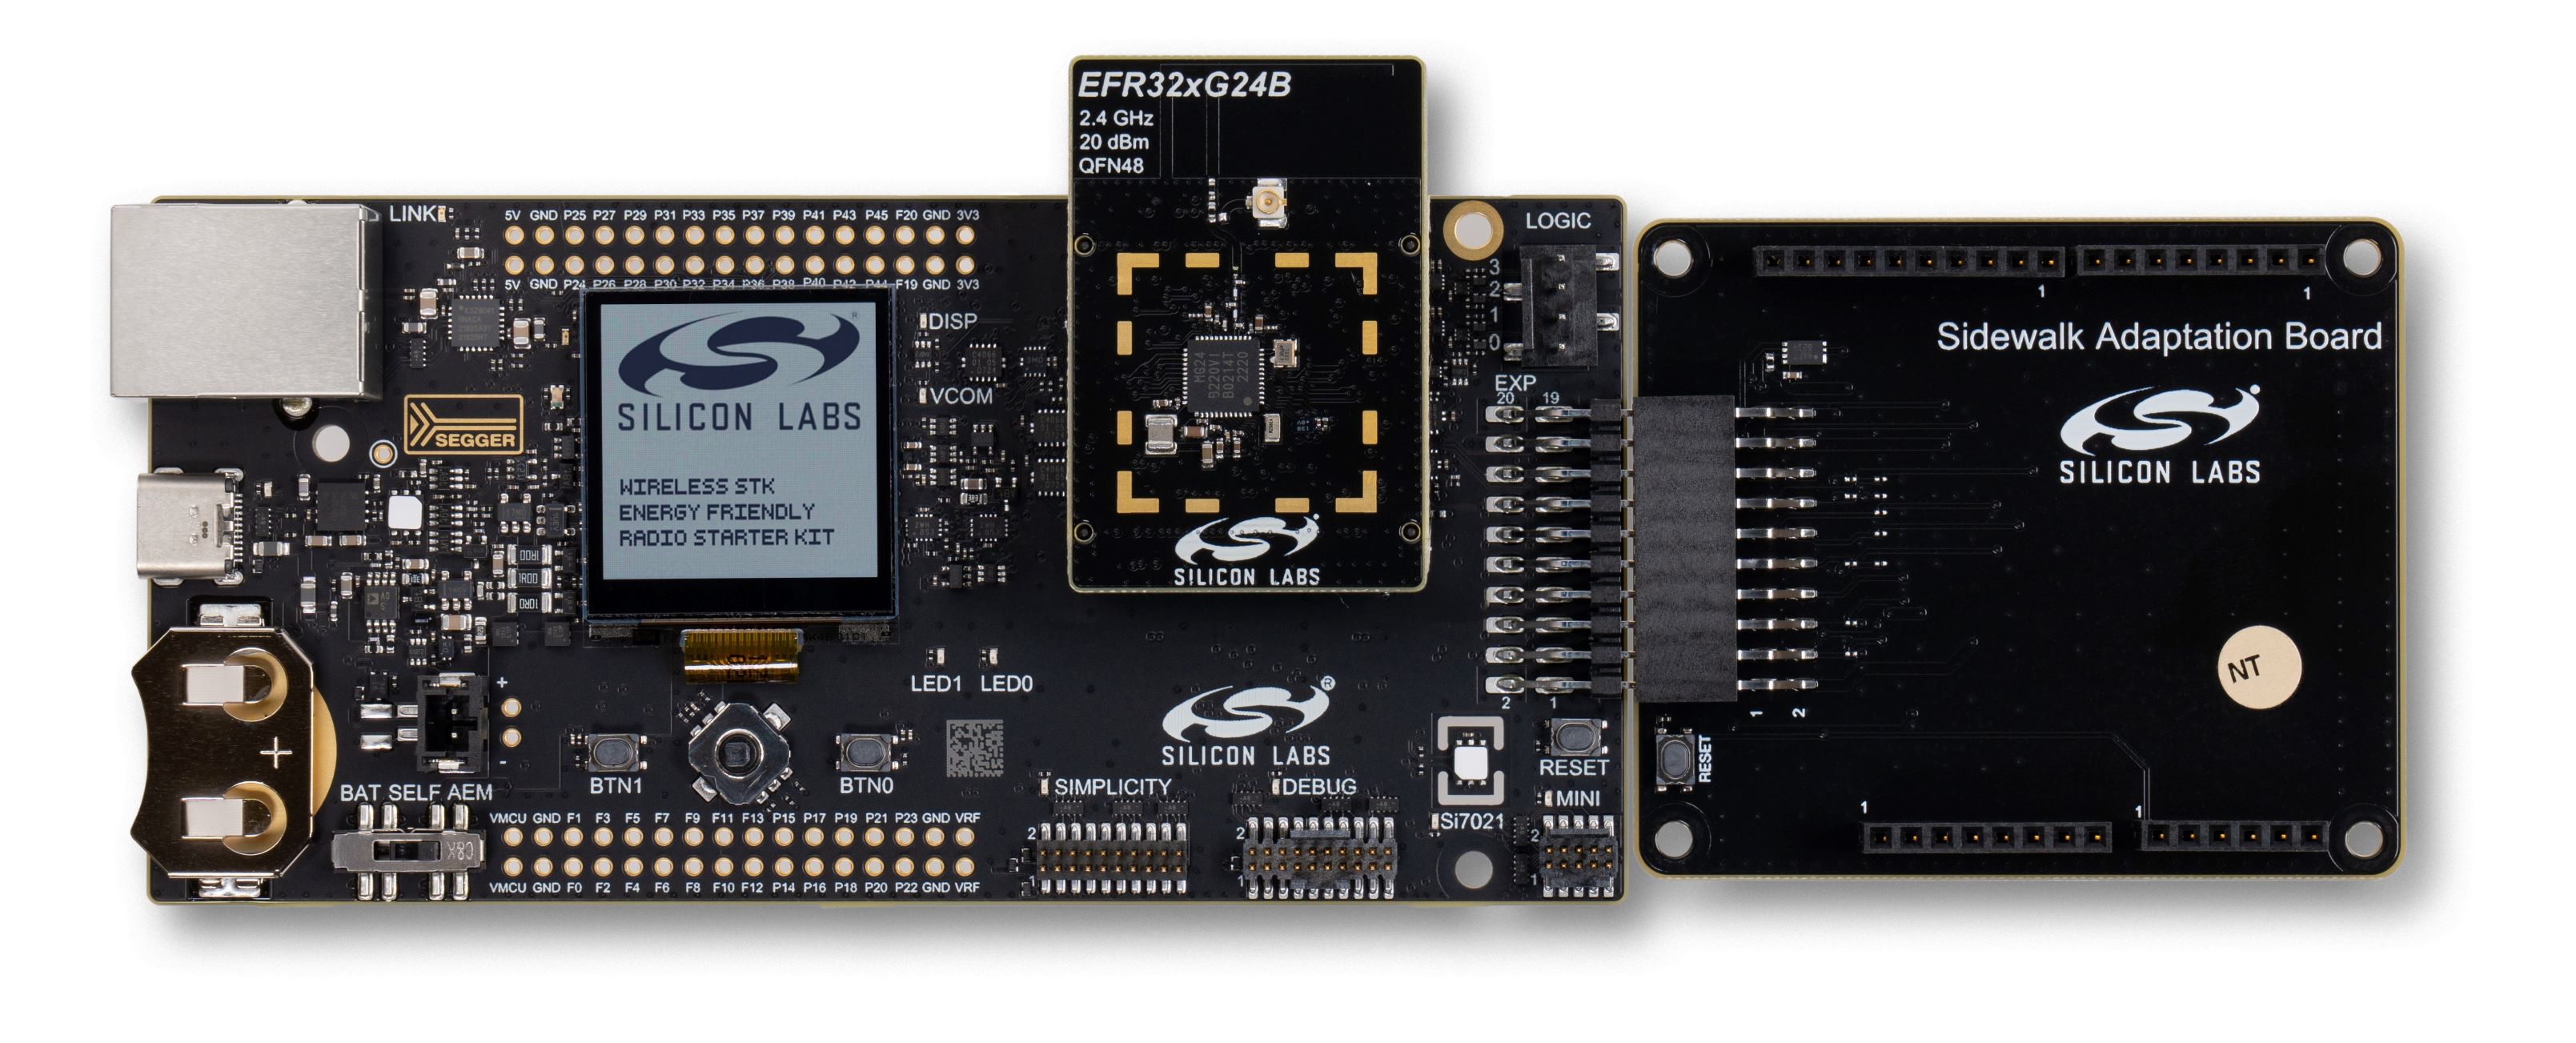
Some Silicon Labs devices, like those in the EFR32xG28 family, support the FSK sub-GHz Sidewalk protocol natively (see the Hardware section in Getting Started: Prerequisites for more info). Other devices require an external transceiver for Sidewalk FSK support, which also provides support for the other sub-GHz Sidewalk protocol: CSS. For development purposes, this transceiver is conveniently available on the Semtech SX1262MB2CAS LoRa shield. The Semtech shield can be connected to a main board using either an adapter board (recommended) or 10 female-to-female jumper wires (if adapter board is not available). Using this third-party sub-GHz radio module enables sub-GHz Sidewalk communication (CSS and FSK) for EFR32xG21, EFR32xG24 and EFR32xG26 radio boards. Note that the Semtech shield is not necessary with the KG100S, as a Semtech transceiver is already integrated in that module.
Ⓘ INFO Ⓘ: For superior signal integrity, ease of use, and a more robust development platform, Silicon Labs recommends the Sidewalk Adaptation Board (BRD8042A, included in the Silicon Labs Pro Kit for Amazon Sidewalk) instead of jumpered wire connections with the radio boards.
When using the Sidewalk Adaptation Board, connect it to the main board Expansion Header as shown below, and mount the Semtech shield to the female pin headers on the Adaptation Board.
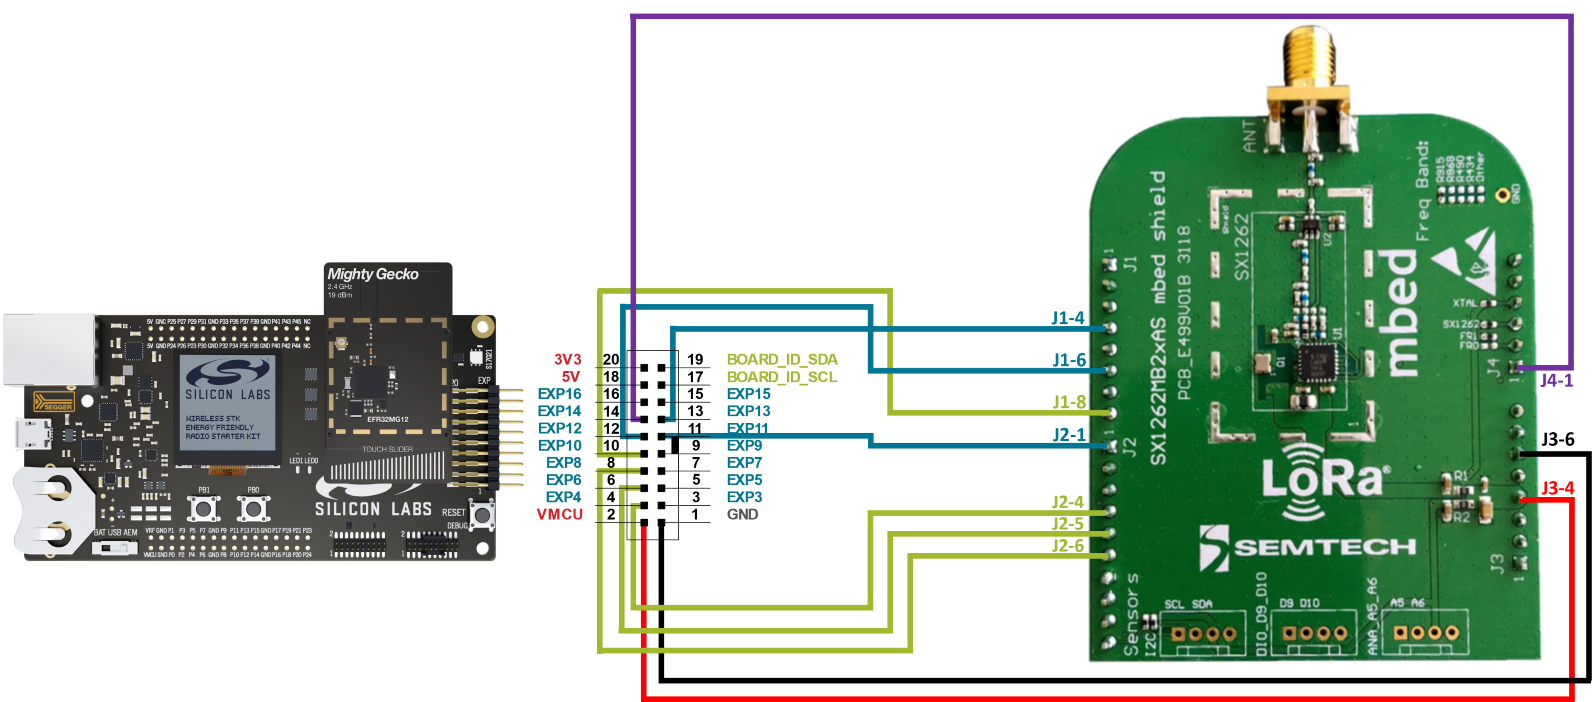
When using jumper wires, connect the Semtech shield to the main board Expansion Header with the following scheme:
EFR32 Mainboard Exp. Pin | Semtech Shield Pin | Function |
|---|---|---|
EXP_HEADER 1 | J3-6 | GND |
EXP_HEADER 4 | J2-4 | SPI MOSI |
EXP_HEADER 6 | J2-5 | SPI MISO |
EXP_HEADER 8 | J2-6 | SPI SCK |
EXP_HEADER 10 | J1-8 | SPI NSS |
EXP_HEADER 11 | J2-1 | ANT_SW |
EXP_HEADER 12 | J1-6 | DIO1 |
EXP_HEADER 13 | J1-4 | BUSY |
EXP_HEADER 14 | J4-1 | SX NRESET |
EXP_HEADER 2 | J3-4 | VMCU |
The information in the table is also represented in the following image.
If you wish to customize the wiring between your sub-GHz chip and the EFR32, you can implement such changes in your application with the Pin Tool (in Simplicity Studio).
⚠ WARNING ⚠: In KG100S applications Silicon Labs recommends not using the SPI peripheral, because the multi-chip module (MCM) design already leverages it for communication between the EFR32 and the Semtech radio transceiver. Sharing the SPI bus with additional devices or peripherals can negatively impact time-critical radio control signals and lead to message failure in sub-GHz protocols.
For the SX1262, you can edit the pinout to define the corresponding GPIO for the busy pin, the antenna, DIO, reset, and chip select. Here is an example for the EFR32xG24 configuration in config/app_gpio_config.h:
// BUSY on PA07
// Used to indicate the status of internal state machine
#define SL_BUSY_PIN 7
#define SL_BUSY_PORT gpioPortA
// ANT_SW on PA06
// External antenna switch to control antenna switch to RECEIVE or
// TRANSMIT.
#define SL_ANTSW_PIN 6
#define SL_ANTSW_PORT gpioPortA
// DIO1 on PA08
// IRQ line from sx126x chip
// See sx126x datasheet for IRQs list.
#define SL_DIO_PIN 8
#define SL_DIO_PORT gpioPortA
// SX NRESET on PA09
// Factory reset pin. Will be followed by standard calibration procedure
// and previous context will be lost.
#define SL_NRESET_PIN 9
#define SL_NRESET_PORT gpioPortA
#define SL_SX_CS_PIN SL_SPIDRV_EXP_CS_PIN
#define SL_SX_CS_PORT SL_SPIDRV_EXP_CS_PORTOnce you have defined the pinout, you should also update the gpio lookup table in autogen/app_gpio_config.c accordingly.
On supported platforms, you should have the following symbols to your build: SL_FSK_SUPPORTED, SL_CSS_SUPPORTED and SL_RADIO_EXTERNAL. If you wish to remove the sub-GHz support from your example, remove the three symbols instead as follows:
In the Project Explorer panel, right-click on your project and open Properties.
In the left panel, navigate to C/C++ General > Path and Symbols.
In the central panel, navigate to Symbols and select GNU C.
In the list of symbols create
SL_FSK_SUPPORTED,SL_CSS_SUPPORTEDandSL_RADIO_EXTERNALwith value 1 to add the external transceiver support. Or delete them if you wish to remove sub-GHz support.Click Apply and Close.
SPI Configuration#
Once the SX1262 GPIOs are mapped, configure the SPI bus to communicate with the SX1262. To do so, open the SLCP file of your project and go to software components. Search for the SPIDRV component, it should already be installed, and click Configure. Under SL_SPIDRV_EXP, choose the USART module you want to use for the corresponding mapping. For example, the EFR32xG24 SPI driver configuration is as follows:
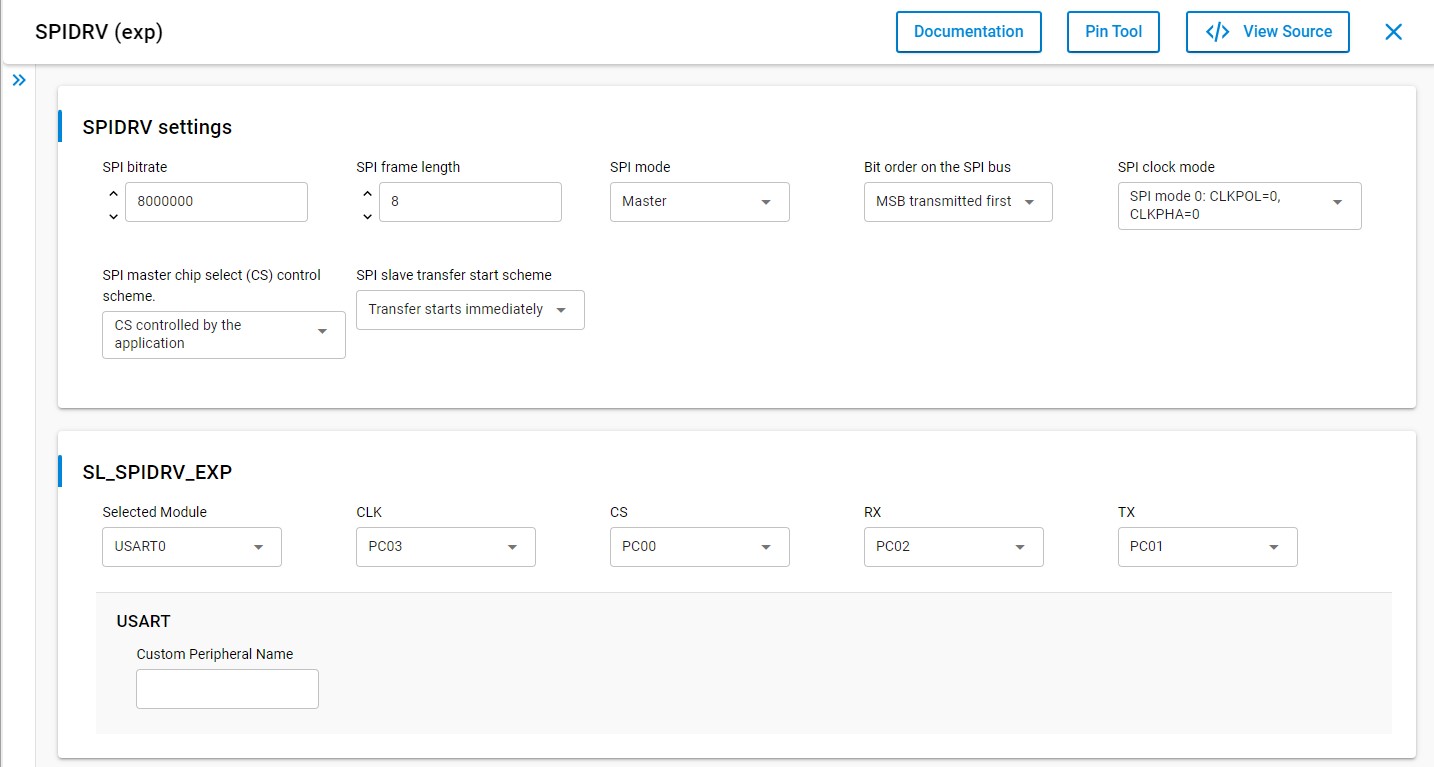
Use the pintool to help you choose available pins in your custom hardware.
Non-Volatile Memory Management in Sidewalk Context#
Amazon Sidewalk example applications use non-volatile memory to store the application code, registration information, and manufacturing data. This section describes how this memory is used for each type of data stored.
⚠ WARNING ⚠: Starting Sidewalk extension 2.x.x, a change was made to the NVM3 usage in Sidewalk. This change is not backward compatible, you should be careful to use the manufacturing page generation that corresponds to the Sidewalk version that you are using.
In addition to the application code, one other NVM3 instance is used in an Amazon Sidewalk project: Default. The default instance is also used by the Simplicity SDK Suite for BLE stack status and cryptographic storage. This is where the wrapped private keys are stored when using Secure Vault. For more information, see section 2.1 of AN1135: Using Third Generation Non-Volatile Memory (NVM3) Data Storage.
The default instance consists of the following logical partitions and subpartitions:
Partition | Subpartition | Key Range | Comments |
|---|---|---|---|
Simplicity SDK | BLE stack metadata | 0x40000 - 0x4FFFF | Used internally by Simplicity SDK for BLE stack |
PSA crypto metadata | 0x83100 - 0x870FF | Used internally by Simplicity SDK for PSA crypto | |
PSA crypto wrapped keys | 0x83100 - 0x870FF | When using Secure Vault, Sidewalk ED25519 and P256R1 device private keys are wrapped in this subpartition | |
Sidewalk | Application specific | 0xA0000 - 0xA1FFF | Sidewalk applications can store data on this partition |
KV-storage | 0xA2000 - 0xA8FFF | Reserved for sidewalk stack usage | |
Manufacturing data | 0xA9000 - 0xAFFFF | Reserved for sidewalk stack usage |
The manufacturing (MFG) partition is used to store the manufacturing page generated for every device. The manufacturing page contains various information such as device public keys, signatures, and Sidewalk Manufacturing Serial Number (SMSN). This instance is read-only from application code.
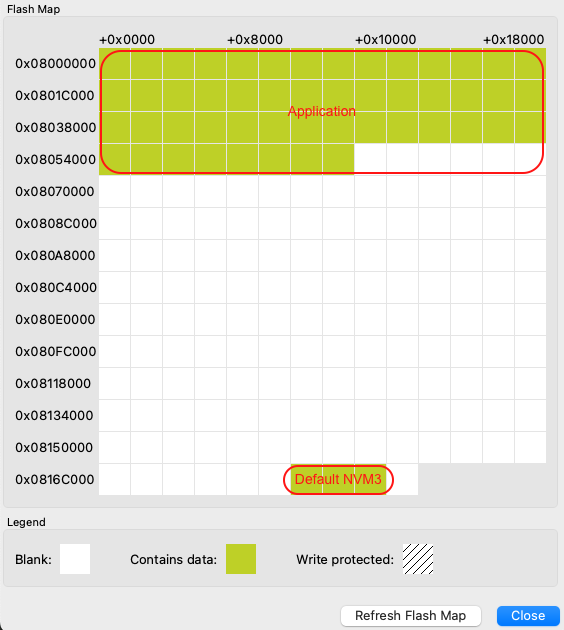
The Key-value (KV) storage partition contains information about the Amazon Sidewalk stack. The way the key-value pairs are stored on NVM3 is a bit different from the way the manufacturing information is stored. Objects are stored under groups, so there is actually one NVM3 object (so-called group) to store different information. The size of this instance depends on the needs of the stack (depending on the link layer). The values stored in the instance are not part of the public Amazon Sidewalk APIs. This instance is accessible in read-write from application code.
You can see an example of the memory layout in the following picture:
For more information on Silicon Labs NVM driver, see the dedicated documentation NVM3 - NVM Data Manager. For background on NVM3, see the Platform Resources section.
Memory Map for EFR32xG21 Series#
Region | Base Address | End Address | Size | Description |
|---|---|---|---|---|
Application | 0x00000000 | - | - | Application code - size depends on application |
Default NVM3 Instance | 0x000EC000 | 0x000F2000 | 0x6000 | Used for BLE stack. Wrapped keys are stored here when using Secure Vault. |
Those addresses are given as an example for an EFR32xG21 with a flash size of 1024 kB. Base addresses can change to adapt to smaller flash sizes. You can use Simplicity Commander to display the memory layout of your application:
With your kit selected, go to Device Info panel.
Select Flash Map in Main Flash panel.
Memory Map for EFR32xG24 Series#
Region | Base Address | End Address | Size | Description |
|---|---|---|---|---|
Application | 0x08000000 | - | - | Application code - size depends on application |
Default NVM3 Instance | 0x0816C000 | 0x08172000 | 0x6000 | Used for BLE stack. Wrapped keys are stored here when using Secure Vault. |
Those addresses are given as an example for an EFR32xG24 with a flash size of 1536 kB. The base addresses can change to adapt to smaller flash sizes or other radio boards. You can use Simplicity Commander to display the memory layout of your application:
With your kit selected, go to Device Info panel.
Select Flash Map in Main Flash panel.
Handle Logs Level and Preferred Outputs#
A specific set of components were created to handle the Sidewalk logs. You can find more information about this components in the Platform Abstraction Layer documentation.
To display logs or switch the log output from RTT to UART, refer to Testing and Debugging documentation.
Amazon Sidewalk Multi-link and Auto Connect Feature#
Since the release of Sidewalk SDK 1.16, a feature called Multi-link has been introduced. This feature abstracts the process of connection establishment and maintenance for the radio links supported by the Sidewalk stack, making it easier for developers. It offers developers varying degrees of flexibility to control not only the connection behavior of the links but also the transfer of messages over them.
You can find the dedicated page on Multi-link in our documentation here.
Additional Documentation#
Power Consumption Analysis: For more information on power consumption and optimization
Sidewalk Performances: For more information on Sidewalk performances and how to configure Sidewalk for your use case
Amazon Sidewalk API: For more details on Amazon Sidewalk API
AWS API Reference for Amazon Sidewalk: For AWS Sidewalk Cloud Documentation
Sidewalk and Bluetooth FUOTA: For more information on FUOTA solutions in Amazon Sidewalk context
What's Next?
Amazon Sidewalk - SoC Qualification sample application that contains all the necessary CLI commands to pass the qualification with Amazon