Sidewalk Assistant User Guide#
The Sidewalk Assistant tool abstracts multiple underlying scripted interactions performed using AWS CLI (or manual interactions with the AWS Management Console) into an intuitive graphical user interface that significantly simplifies these operations. Using this tool allows you to focus on the high-level results of your development, rather than the details of each step. You can delve deeper into these details later when you are ready to move beyond the simplified AWS constructs used in our example applications.
AWS Connection#
The AWS cloud connection section covers how the Sidewalk Assistant interacts with AWS IoT Wireless to deploy a minimal cloud example and create devices. The Sidewalk Assistant automatically scans your system for appropriate AWS credentials established when the AWS CLI was installed and configured. The AWS CLI status panel can be found in the bottom left corner of the Assistant.
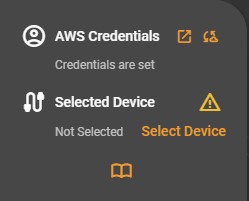
You can configure the Sidewalk Assistant to look for your AWS credentials either in your environment variables named AWS_ACCESS_KEY_ID and AWS_SECRET_ACCESS_KEY or in your credentials file under $HOME$/.aws/credentials. If you open the AWS Credentials panel, you will be able to choose the source of your credentials and verify the chosen credentials. It is also possible to choose which AWS profile to use to connect. This can be useful if you have several AWS users with different access rights or on different accounts.
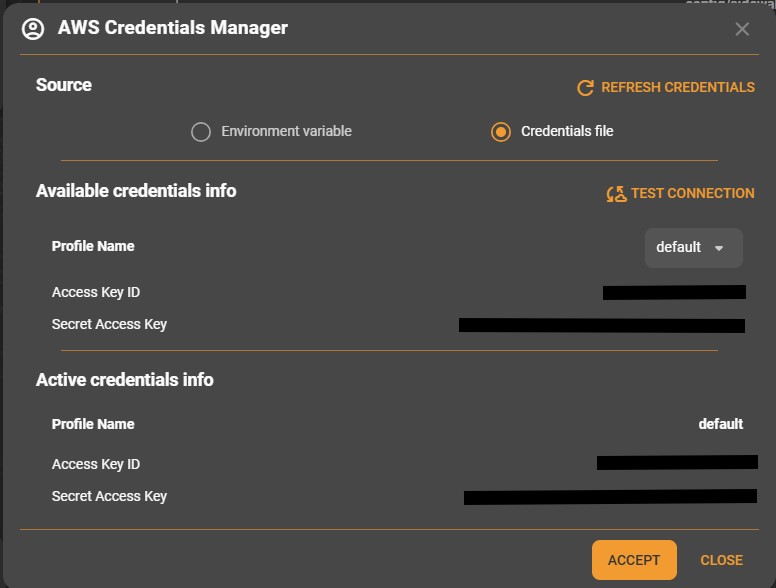
Ⓘ INFO Ⓘ: Always verify AWS credentials and region configuration before initiating provisioning. You can set the region in the environment variable named
AWS_REGIONor in$HOME$/.aws/config.
Device Connection#
The Device Connection section describes how the Sidewalk Assistant connects to and manages communication with your device under development using Simplicity Commander. The Sidewalk Assistant needs to connect to your device to generate and flash the manufacturing page and to trigger messages between the device and the cloud.
By default, the tool indicates that no target device is yet selected:
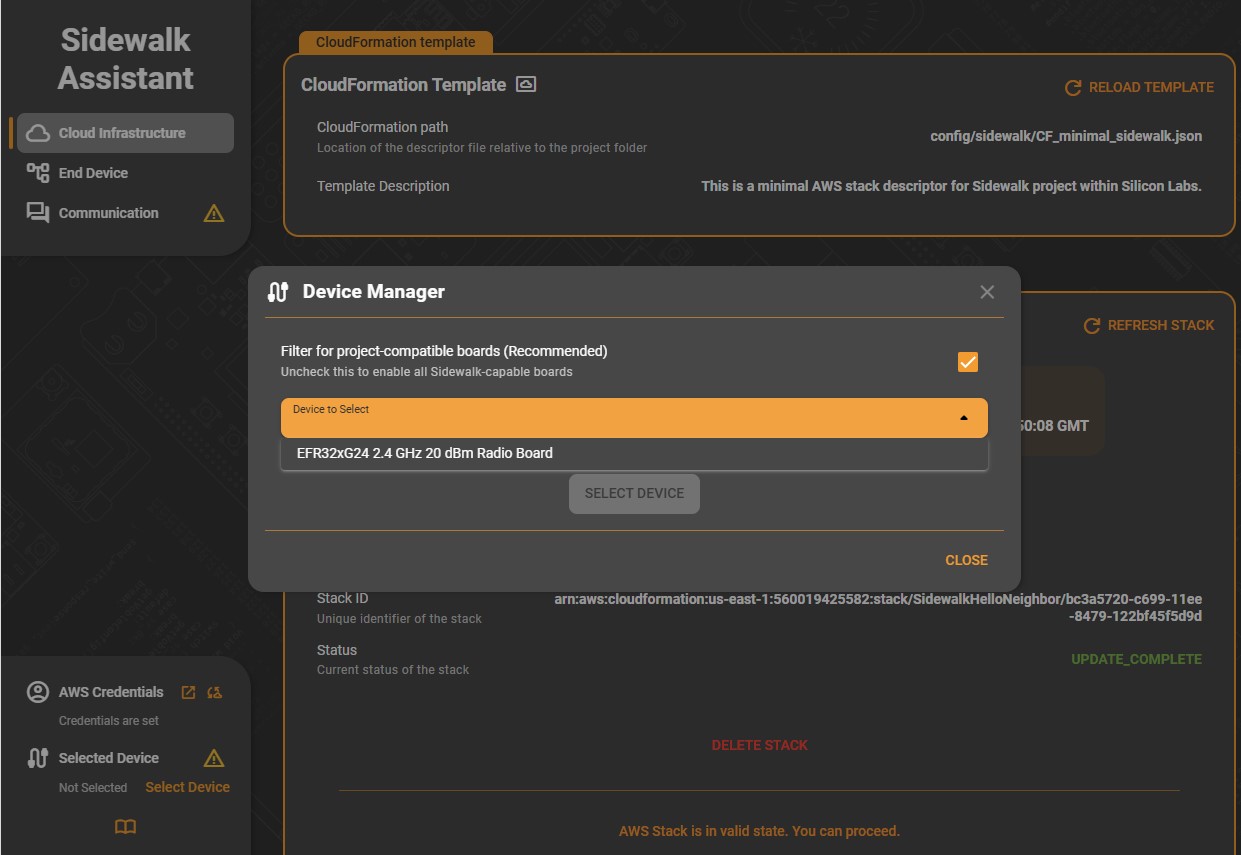
Click Select Device to open the Connection Manager dialog and choose from the attached devices. The checkbox at the top filters the list to devices supported by your current project. The Sidewalk Assistant can work on any Sidewalk supported radio board, but because it is part of a sample application, it filters project-compatible devices by default. Uncheck the box to see all Sidewalk supported devices.
Cloud Infrastructure Tab#
The Cloud Infrastructure tab in the Sidewalk Assistant is where you manage the AWS cloud-side components of your Sidewalk project. This interface simplifies the deployment and management of AWS resources through CloudFormation, enabling you to set up the necessary cloud infrastructure required for device provisioning and communication. Today, all the applications are using the same cloud infrastructure. Once deployed, all the applications will be able to use it.
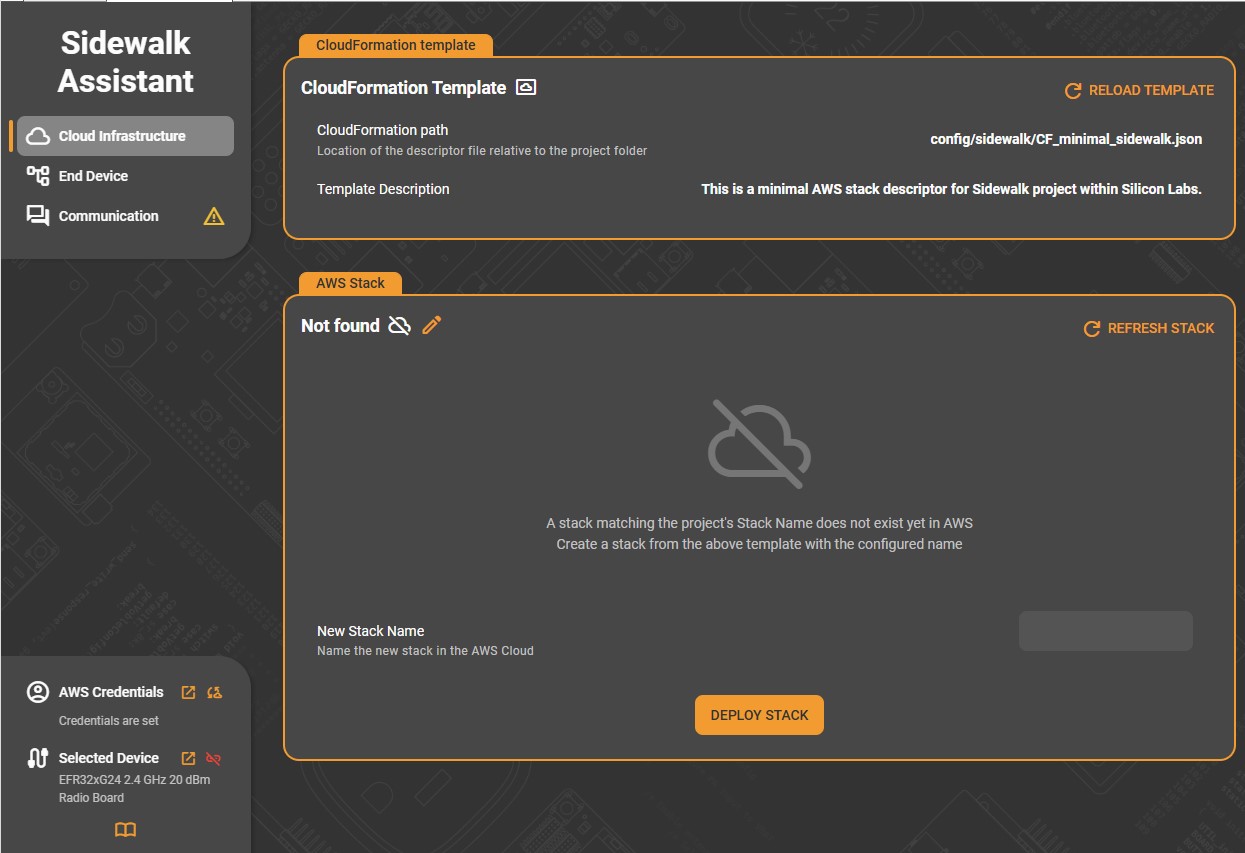
The tab is divided into two main sections: CloudFormation Template and AWS Stack.
The CloudFormation Template panel defines the AWS infrastructure blueprint used to deploy your Sidewalk environment.
CloudFormation Path: Displays the path to the CloudFormation descriptor file, typically located within the project’s configuration directory (for example,
config/sidewalk/CF_minimal_sidewalk.json).Template Description: Provides a short explanation of the template’s purpose: for example, “This is a minimal AWS stack descriptor for Sidewalk project within Silicon Labs.”
Use Reload Template to refresh the configuration if the template file has been modified or replaced. This ensures the Assistant always references the most up-to-date descriptor before stack deployment.
⚠ WARNING ⚠: The Sidewalk Assistant is not designed to create, deploy and maintain custom cloud applications. It is intended as a tool to easily get started on Silicon Labs examples with a ready-to-use template. It is not recommended to modify the template.
The AWS Stack section manages the actual deployment and lifecycle of the Sidewalk stack defined by the CloudFormation template.
If no stack currently exists for the project, the interface indicates “Not Found” and prompts you to create one. In this case:
(Optional)Enter a New Stack Name to define the stack’s identity in AWS.
Click Deploy Stack to begin the deployment process.
During deployment, the Assistant provisions the resources defined in the template — such as AWS IoT Core Destination, roles, and Sidewalk service integrations. A progress message indicates that stack creation is in progress. Once complete, the AWS Stack section automatically updates to show details of the newly created stack.
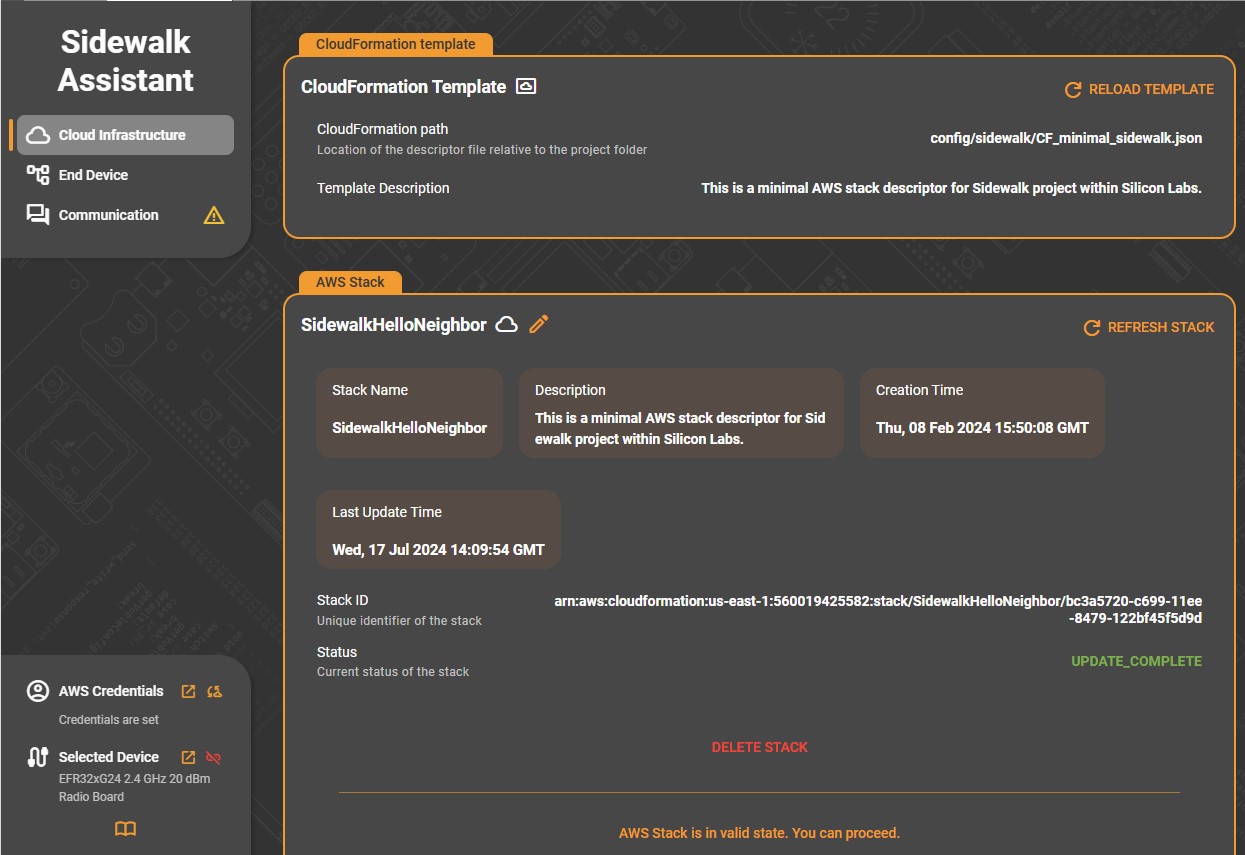
After deployment, the AWS Stack panel displays comprehensive information about the active stack:
Stack Name: The configured AWS stack identifier.
Description: Pulled from the CloudFormation template to describe the stack’s purpose.
Creation Time and Last Update Time: Shows when the stack was created and most recently modified.
Stack ID: The full Amazon Resource Name (ARN) uniquely identifying the stack in AWS.
Status: Indicates the current state (for example, UPDATE_COMPLETE).
Use Refresh Stack to synchronize the display with the current AWS status. When the message “AWS Stack is in valid state. You can proceed.” appears, the environment is ready for use by the End Device and Communication tabs.
You can also manage the lifecycle of the stack directly from this section:
Update Stack: Refreshes the configuration using the same template.
Delete Stack: Removes the deployed resources from AWS if you need to reset or recreate your setup.
Sometimes, the cloud formation stack deployment can fail. In most cases, it is either because of insufficient access rights for the AWS user or because the stack was already deployed once and not deleted properly. Please see our Troubleshooting guide for debugging steps.
Example Workflow#
Verify that your AWS credentials are set in the left-hand status panel.
If no stack exists, enter a New Stack Name and click Deploy Stack.
Wait for the Creation in Progress status to complete.
Once the stack shows as UPDATE_COMPLETE or CREATE_COMPLETE, confirm that the AWS Stack section displays valid information.
Proceed to the End Device tab to create and flash your device credentials.
End Device Tab#
The End Device tab in the Sidewalk Assistant manages the connection between your physical device and its corresponding virtual representation in the AWS cloud. This interface guides you through the creation, synchronization, and flashing of device credentials necessary for secure operation on the Amazon Sidewalk network.
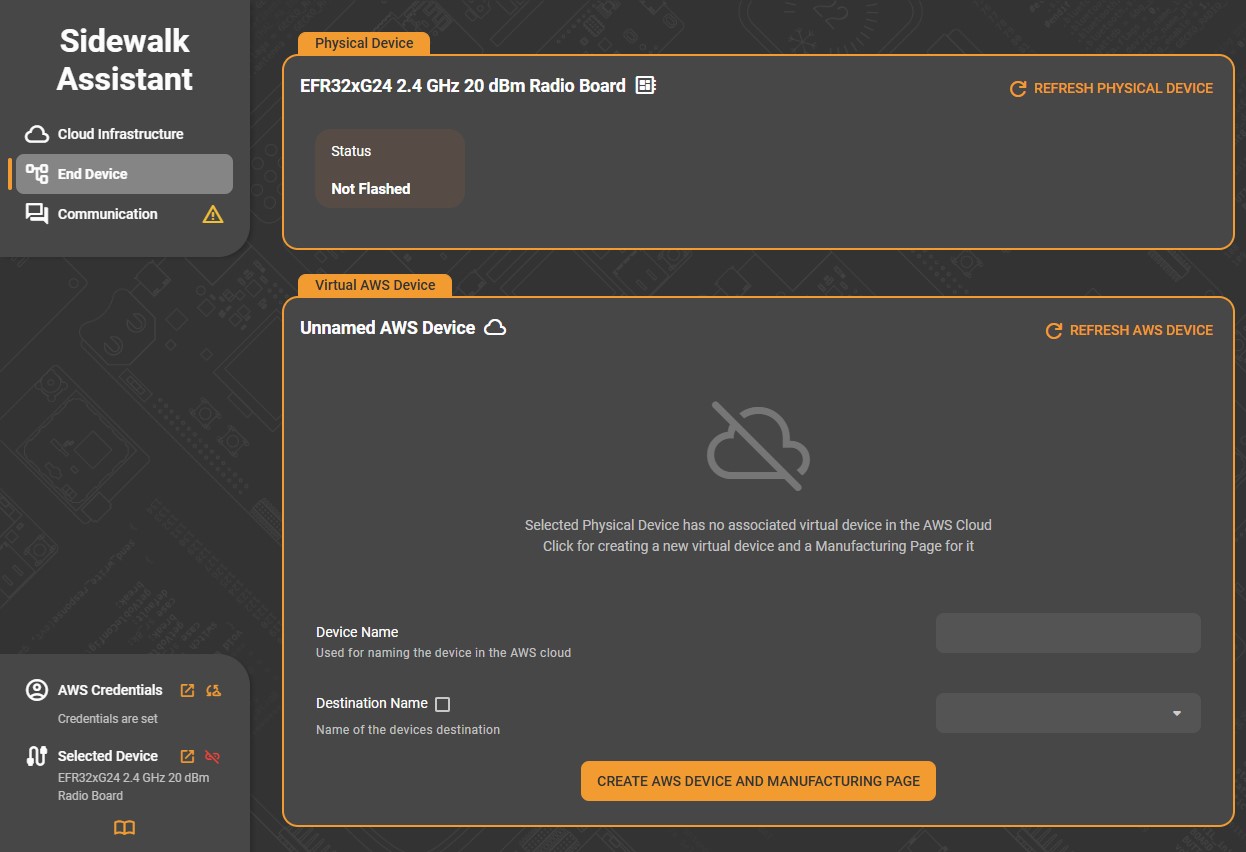
The tab is divided into two main sections: Physical Device and Virtual AWS Device. Each section reflects the state of the hardware and its associated virtual counterpart.
Ⓘ INFO Ⓘ: Instead of using the Sidewalk Assistant, Silicon Labs also provides scripts to provision a device. You can find the documentation for the script here.
The Physical Device panel needs to be connected to your hardware. It reads and displays its unique provisioned identifiers if already present on the device or flashes them if they are generated.
Status: Indicates whether the device has been flashed with a valid manufacturing page. A status of Not Flashed means no credentials are currently programmed.
SMSN: The device’s Sidewalk Manufacturing Serial Number, a unique identifier generated by the hardware.
SMSN Match: Compares the hardware identifier with the one stored in the virtual AWS device. A No Match status indicates that the physical device was flashed with a manufacturing page that differs from the one generated.
Refresh Physical Device: Use this control to re-scan the connected hardware if the device has just been attached or reprogrammed.

This section ensures that your hardware connection is active and ready to be associated with an AWS virtual device.
The Virtual AWS Device panel represents the digital counterpart of your device within the Amazon Sidewalk ecosystem. If no virtual device is currently associated, the interface displays a notice stating that the physical device has no corresponding AWS record.
To create a new virtual device:
(Optional) Enter a Device Name (used to identify the device in AWS).
Enter a Destination Name, representing the logical destination for message routing (the default destination name is the one created with the Cloud Infrastructure tab).
Click Create AWS Device and Manufacturing Page.
The Sidewalk Assistant will then:
Create a new virtual device in AWS cloud.
Generate a manufacturing page — a .s37 binary containing cryptographic keys and certificates unique to the device.
During creation, the interface shows progress indicators and disables related controls until the operation completes. Once successful, the Virtual AWS Device panel refreshes to display full device details, including identifiers and tags.
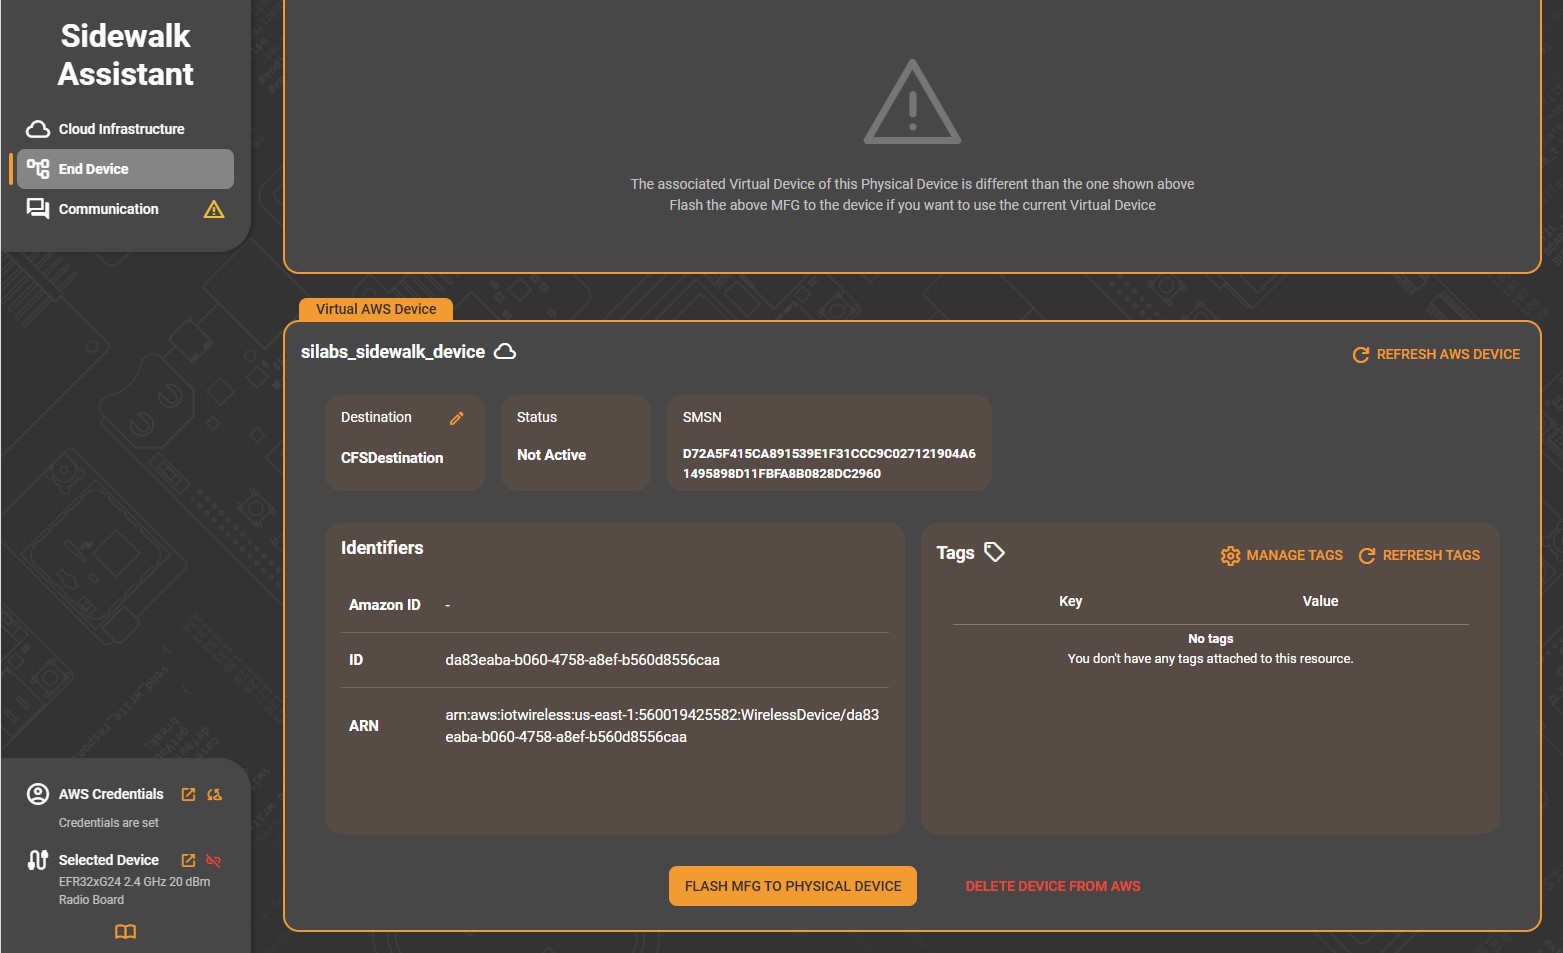
After the virtual device is created, the Virtual AWS Device panel shows:
Destination and Status fields (for example, Not Active).
SMSN and Amazon ID identifiers.
The device’s ARN (Amazon Resource Name), linking it to your AWS account.
A Tags section, where you can manage metadata keys and values for organization or automation purposes.
Use Refresh AWS Device to update the displayed information from AWS if any changes occur externally.
To program the physical hardware with the generated manufacturing page, click Flash MFG to Physical Device. This operation writes the .s37 file to the connected device, provisioning it with credentials that enable secure Sidewalk communication.
Once flashing completes successfully, the Physical Device section updates to show a Flashed status and an SMSN Match, confirming that the local device and its AWS counterpart are now synchronized.
If necessary, you can also remove the virtual record from the cloud using Delete Device from AWS to reset the configuration.
Example Workflow#
Connect the physical device to the Sidewalk Assistant.
Verify that it appears in the Physical Device section.
If no virtual device exists, create one using Create AWS Device and Manufacturing Page.
After generation, click Flash MFG to Physical Device to program the credentials.
Confirm that the Status changes to Flashed and that the SMSN Match reads Match.
Proceed to the Communication tab to exchange messages and validate device connectivity.
Communication Tab#
The Communication tab in the Sidewalk Assistant provides an interactive interface for exchanging messages with a registered Sidewalk end device through the cloud. It allows you to monitor uplink (device-to-cloud) and downlink (cloud-to-device) messages, test message delivery, and verify that your endpoint is properly connected to the Amazon Sidewalk network.
The page is divided into two main panels: Target Device and Console.

The Target Device section lets you select which connected device to communicate with.
Target Device to Select: Choose the desired device from the drop-down list. Each entry shows the AWS-registered device name and its unique ID.
Refresh Device List: Click this control to reload the list of available devices if a new one has recently been created or connected.
Filter Messages for Selected Device: Enable this option to display only the messages exchanged with the chosen device, helping focus the console output when multiple devices are active.
This section ensures that all messages sent or received are correctly associated with the selected virtual-physical device pair configured in the earlier setup steps.
The Console panel displays live communication logs between the selected device and the cloud. When idle, the console shows “No Up/Downlink Messages available”. Once communication begins, each entry lists the message number, direction (uplink or downlink), message content, and timestamp. Successful transmissions are indicated with a checkmark beside the timestamp.
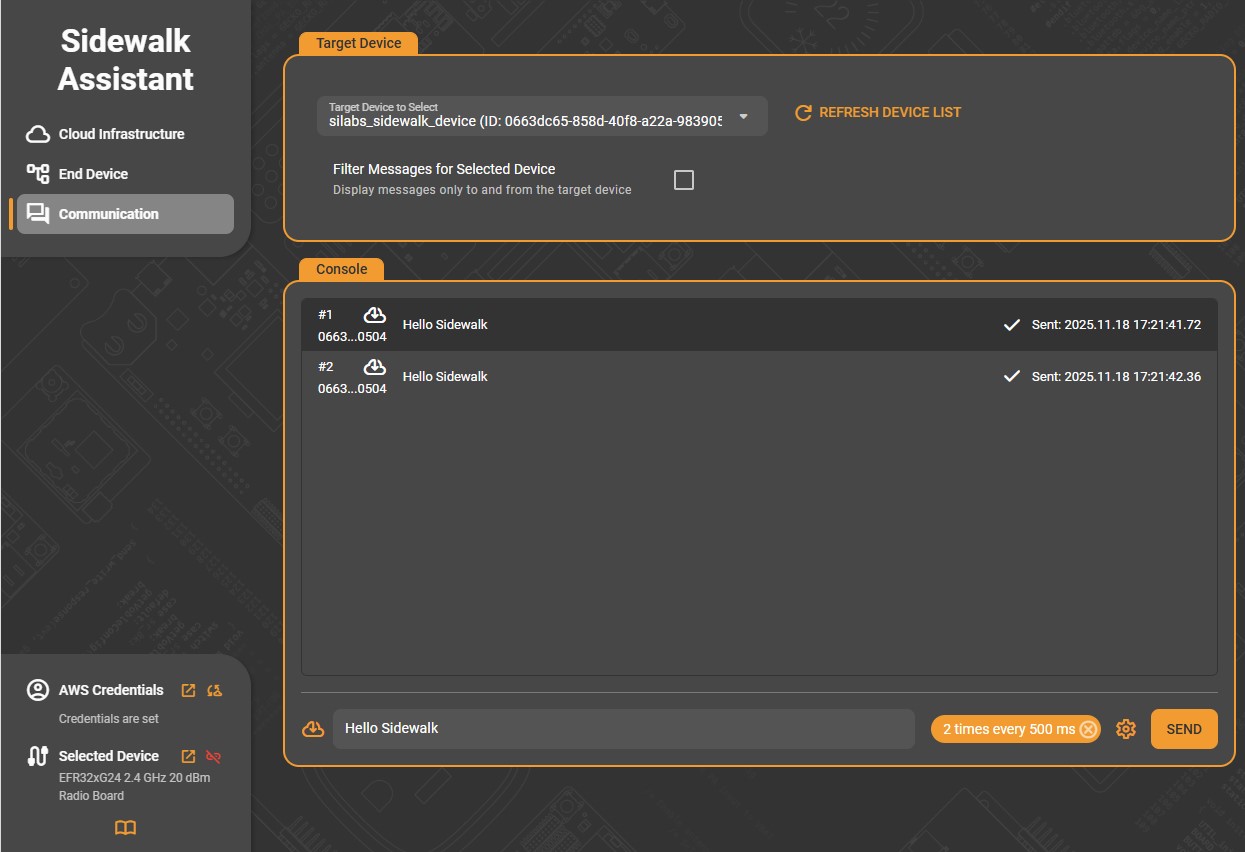
At the bottom of the console is an input bar for composing messages to send to the selected device. After typing your message, click Send to transmit it immediately. The sent message appears in the console with its status and time of delivery.
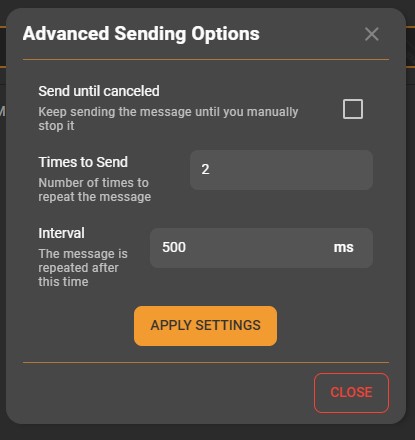
Next to the Send button is a gear icon that opens the Advanced Sending Options dialog.
Here you can configure automated message sending behavior:
Send until canceled: Continuously repeats the message until manually stopped.
Times to Send: Specifies the number of times to resend the same message.
Interval: Defines the delay between repeated messages (in milliseconds).
After setting your preferences, click Apply Settings to confirm. The configured repeat interval and count are summarized next to the Send button (e.g., “2 times every 500 ms”).
These options are useful for verifying link stability or demonstrating communication between the cloud and your Sidewalk device.
Example Workflow#
You need to have generated and flashed a manufacturing page to your device for the Communication tab to be working.
Select your device from the Target Device list.
(Optional) Enable message filtering to focus on that device’s traffic.
Enter a test message in the Console input field.
Click Send or use Advanced Sending Options to automate multiple sends.
Observe uplink/downlink exchanges in real time to confirm successful communication.