Manufacturing a Product#
This section provides information on how to mass manufacture a Silicon Labs Sidewalk-enabled product. It is based on Amazon's documentation called Manufacturing Amazon Sidewalk devices for mass production and describes the Silicon Labs specific steps in detail as well as a short summary of the global production flow in the factory.
To enable the production of your Sidewalk-based product, it needs to be certified (see corresponding documentation on qualification). Amazon provides a set of tools to facilitate production and this section describes the specific Silicon Labs tools that integrate with them. For more information on those tools and how to obtain them, check Amazon documentation on manufacturing or contact your Amazon Sidewalk business representative.
Standard Amazon Manufacturing Flow#
Amazon documentation describes how a manufacturer can mass produce Sidewalk products. This flow is used to manufacture a large number of devices, and can be divided into 4 phases:
The Silicon Labs added-value elements described in the following sections impact the "Manufacturing at the factory" phase. All other steps stay unchanged and follow the Amazon standard flow described in the figure below.
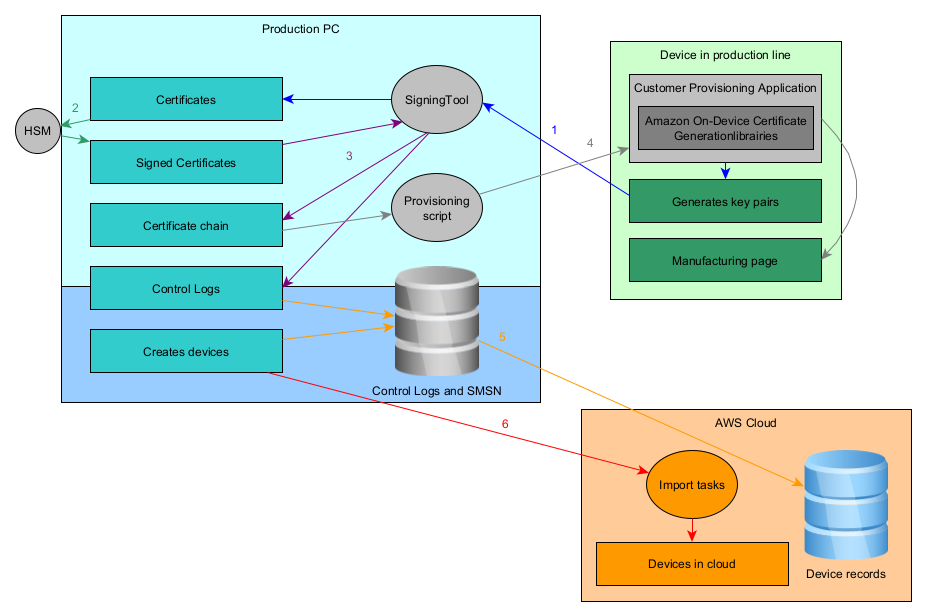
The endpoint key pair is generated directly on the device. A custom application (leveraging Amazon Provisioning Libraries) triggers the certificates generation by calling the Signing Tool provided by Amazon.
The HSM, provisioned by Amazon, is used to sign the Certificate Signing Request (CSR) and outputs the certificate.
The signing tool is used along with the HSM to create the certificate chain from the endpoint certificate to the Sidewalk Network server and Application certificates. Control logs are generated as well.
Once the certificate chain is generated, it can be added to the manufacturing page generated during this flow.
Control logs are assembled into a database and can be uploaded to the cloud to populate the devices record.
Once all devices are entered into the record, the devices are known to the backend and can be created using the import tasks. A list of all SMSNs of created devices can be uploaded to the cloud to create the corresponding virtual devices in IoT Core.
For added security, the step requiring AWS connection can be done periodically on another computer. This way, the production PC can be totally offline and only the control logs database is shared to the computer handling AWS and connectivity tasks.
Silicon Labs Security Added Value#
On Silicon Labs EFR32 Series 2 platforms, you can leverage Secure Vault to store sensitive data (private keys) in a secure place. A set of scripts and a device application, called Production Device Provisioner (PDP), is provided to use the Secure Element in the Amazon Sidewalk context.
The goal of the production scripts is to facilitate data provisioning by providing ready-to-use scripts and a way of communicating with the embedded device from a host computer. The production flow for development and manufacturing setups stays the same, which makes the transition from development to manufacturing transparent.
In addition to the production scripts, to communicate between the device and the production line PC, Silicon Labs provides a PDP application. It is used to exchange certificate data and to communicate with the Secure Element through APIs. The PDP application can be used for provisioning and is automatically deleted upon reboot, as it is a transient application running in RAM.
Generating the key pair directly on the device reduces exposure of the private key. Amazon security requirements are evolving to require on-device private key generation for new products. Starting with Amazon Sidewalk SDK 1.16, all products must use on-device certificate generation. In addition, all YubiHSM requests submitted after the release of Amazon Sidewalk SDK 1.16 must use on-device certificate generation.
Provisioning Methods#
All available methods to provision a device appear in the following table. It includes the prototyping method used during development, and the two manufacturing methods (depending on your Amazon Sidewalk SDK version). All of these methods can be used alongside the Secure Vault to store the credentials.
Method Name | Certificate Generation Method | Flow | YubiHSM | Crypto Library | Security Level | Usage |
|---|---|---|---|---|---|---|
On-device | Manufacturing | Yes | HIGH | Volume Production | ||
Cloud | Prototyping | No | OpenSSL | LOW | Development only | |
OpenSSL Private Key Provisioning | Offline/Production PC | Legacy Manufacturing | Yes | OpenSSL | MEDIUM | Volume Production (Deprecated as of 1.16) |
For information about the Secure Vault–based prototyping flow, see Prototyping Private Key Provisioning.
On-Device Certificate Generation#
Amazon Sidewalk SDK 1.16 introduced on-device certificate generation. In this flow, the device generates the private key locally and communicates only the certificate signing request (CSR) and public certificate to the production PC. The private key never leaves the device.
Silicon Labs provides a tool that extends the on-device certificate generation flow by using Secure Vault to store the keys securely. The following figure illustrates this enhanced flow.
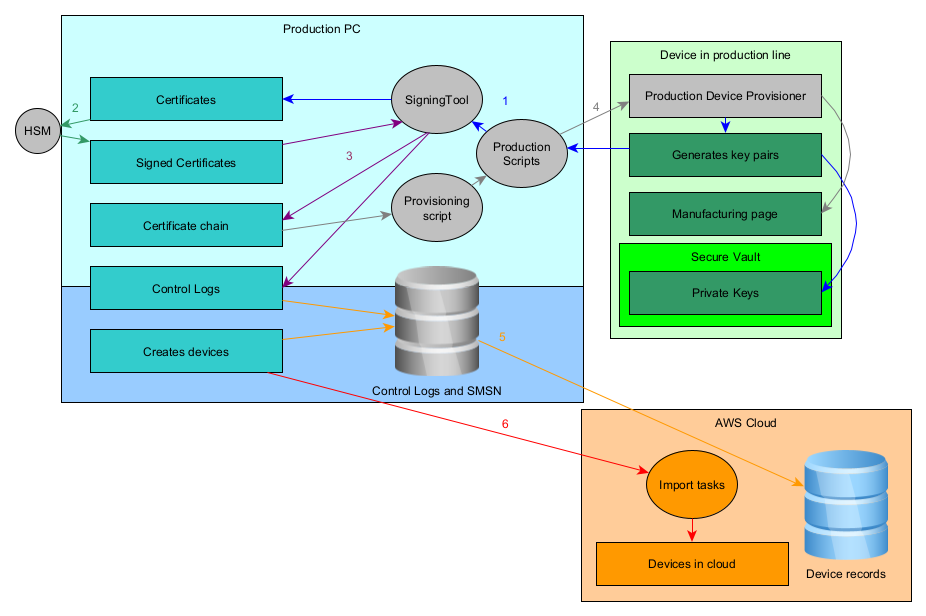
The endpoint key pair is generated directly on the device. The private keys are wrapped by the Secure Element as described in the Secure Vault documentation section 3.3.2 using the Production Device Provisioner application provided by Silicon Labs.
The HSM, provisioned by Amazon, is used to sign the Certificate Signing Request (CSR) and outputs the certificate.
The signing tool is used along with the HSM to create the certificate chain from the endpoint certificate to the Sidewalk Network server and Application certificates. Control logs are generated as well.
Once the certificate chain is generated, it can be added to the manufacturing page generated during this flow. The manufacturing page, containing the private keys ID from Secure Vault, is written to the device flash.
Control logs are assembled into a database and can be uploaded to the cloud to populate the devices record.
Once all devices are entered into the record, the devices are known to the backend and can be created using the import tasks. A list of all SMSNs of created devices can be uploaded to the cloud to create the corresponding virtual devices in IoT Core.
Silicon Labs Production Provisioning Walkthrough#
Both on-device and offline manufacturing certificate generation flows use the production scripts and application.
Production provisioning scripts consist of two functions: initialization and provisioning.
The initialization script generates an image with the static data of a Sidewalk device (the common part of the Amazon Sidewalk certificate) and optionally a Sidewalk application. The generated image is identical for all the devices in question. In the case of on-device certificate generation, the output of this script is just the custom application binary without any static data added.
The provisioning script, on the other hand, flashes the initialization image generated in the previous step, flashes the Production Device Provisioner RAM application, and provisions device-specific information via this application. Each device is provisioned with a unique set of security credentials (device-specific part of the Sidewalk certificate).
The scripts can be used in two certificate generation modes:
On-device certificate generation: Device certificate is generated and private keys are wrapped by the Secure Element on the device.
Private key provisioning: Device certificate is generated outside of the device and private keys are wrapped by the Secure Element. Deprecated since Amazon Sidewalk SDK 1.16.
The production scripts are located in tools/scripts/public/pdp folder of the extension.
Enabling the Secure Element#
For starters, the Secure Vault should be enabled in your Sidewalk application. To enable Secure Vault in the application, you must modify the config/sl_sidewalk_common_config.h file in your project as follows:
In file config/sl_sidewalk_common_config.h, add definition for SV_ENABLED.
#ifndef SV_ENABLED
#define SV_ENABLED 1
#endif //SV_ENABLEDCompiling the Production Device Provisioner Application#
The production scripts communicate between the Amazon Signing Tool and with a device through the Production Device Provisioner application.
The PDP application runs on the device, while the PDP script runs on the host computer. Together, they enable communication during the provisioning process. By default, communication uses RTT, but it can be switched to UART by removing the iostream RTT software component.
The PDP application runs entirely from RAM, which means it is removed when the device reboots. This makes it well suited for provisioning because both the application and any temporary provisioning traces disappear after reboot, leaving only the production application stored in flash memory.
The provisioning flow works as follows:
The PDP script running on the host requests the device to generate the Sidewalk SMSN and send it back to the host.
The host requests the device to generate a key pair and create a CSR, which is then sent back to the host.
The host signs the CSR using the Amazon-provisioned YubiHSM, accessed through the YubiHSM Connector WebSocket interface, and generates a device certificate.
The host sends the generated certificate to the device.
The host sends the application server public key to the device.
The host instructs the device to store the shared provisioning information in the Sidewalk NVM3 instance (manufacturing page section).
The host communicates with the YubiHSM through the YubiHSM Connector, which exposes a WebSocket interface used by the provisioning script.
For every command exchanged between the host and the device, the device returns a status code. A return value of 0x00000000 indicates success, while any other value indicates an error.
To create a Production Device Provisioner application, follow the getting started documentation and compile the Production Device Provisioner instead of the Hello Neighbor application: Create an Amazon Sidewalk Project.
To compile the application, go to your newly created Production Device Provisioner application folder in the PROJECTS page. Double click on the project, then in the right view, on the top menu click Open in VS Code. In VS Code, open the Si (Silicon Labs) view, if it is not opened by default, then search the project within the workspace, left click on it, and click the hammer icon to build. When the compilation is finished, you will find the compiled binary in your Simplicity Studio workspace under your_pdp_project_name/Binaries/your_project_name.s37. This file is needed by the production provisioning script in the next step.
On-Device Certificate Generation#
For On-Device Certificate Generation, we generate the private keys on the device; only the CSR and public certificate are communicated to the production PC. Private data never leaves the device. Only the public data needed to create the device on the cloud is communicated to the production PC.
Here is a detailed description of the steps:
Production Device Provisioner (PDP) script sends a command to the device that triggers Amazon on-device certificate generation module's init API, which initializes the process context.
PDP script sends a command to the device that triggers amazon on-device certificate generation module's generate SMSN API. It sends the command along with the device type (provided by Amazon), device serial number (generated per device), and ApID (provided by Amazon) parameters. The device sends back generated SMSN.
PDP script sends a command to the device that triggers Amazon on-device certificate generation module's generate CSR API, two times in a row, one for ED25519 elliptic curve and another for P256R1 elliptic curve. It's at this stage that the device private keys (two keys, one for each curve) are generated in Secure Vault and wrapped with the device private key before being stored on the default NVM3 instance.
PDP script calls Sidewalk signing tool provided by Amazon. It passes production tag, HSM connection address, HSM PIN, ED25519 CSR, p256r1 CSR and ApID parameters to the signing tool.
Signing tool sends back signed CSRs (certificate chain for each curve) to the PDP script. PDP script sends a command to the device that triggers Amazon on-device certificate generation module's write certificate chain API to insert signed CSRs to the device.
PDP script sends a command to the device that triggers Amazon on-device certificate generation module's write application server public key API to insert the application server public key to the device.
PDP script sends a command to the device that triggers Amazon on-device certificate generation module's verify and store API. This basically writes all the generated manufacturing information onto the manufacturing image NVM3 instance.
In this walkthrough, we are going to use the manufacturing provisioning script that leverages Secure Vault to store the private keys.
Running the Provisioning Script#
The provisioning script takes an SoC family, Sidewalk application image, Production Device Provisioner image, and YubiHSM related information as input arguments, and provisions the end device with device credentials generated on the device. This script must be run on each device in production, using the following steps:
Connect your device with a supported EFR32 chip.
Connect the YubiHSM key.
Run the following command in as administrator:
sudo yubihsm-connector -d.Navigate to
tools/scripts/public/pdpdirectory.Fill the configuration file with the product information.
Run the following commands.
Ⓘ INFO Ⓘ: If you prefer to flash the initialization image before the provisioning, leave the
sid-init-imgfield empty.
⚠ WARNING ⚠: Simplicity Commander version 1v16 and JLink RTT version 7.96 are the minimum required versions to run the scripts.
{
"part": "part_number_like_efr32zg28b322f1024im68",
"sid_init_img": "out/sid_init_img.s37",
"pdp_img": "/path/to/pdp/app.s37",
"dev_type": "dev_type_like_A232AX65BNIW2J",
"apid": "advertised_product_id_like_zGhh",
"app_srv_pub_key": "app_srv_pub_key_like_887fc49bb23ffbbdb98550040506c7eddf696707519b0c1c603e4bf8801631c6",
"sst_prod_tag": "prod_tag_like_RNET_DAK_DUMMY",
"sst_hsm_conn_addr": "hsm_yubi_connector_addr_like_http://localhost:12345",
"sst_hsm_pin": "yubi_hsm_pin_like_1234"
}python3 provision_silabs.py \
--dsn <device_serial_no_like_G6F1JN06119201GP> \
--prod-config template_prod_config.json
--pdp-mode on_dev_cert_genWith fields as follows:
part: Part number (efr32zg28b322f1024im68)
sid_init_img: Sidewalk custom application binary (
.s37file)pdp_img: Sidewalk Production Device Provisioner application binary (
.s37file)dev_type: This field is provided by Amazon upon HSM provisioning request
apid: This value can be extracted from the device profile associated to your HSM
app_srv_pub_key: This value can be extracted from the device profile associated to your HSM
sst_prod_tag: This field is provided by Amazon upon HSM provisioning request
sst_hsm_conn_addr: This is the socket address connected to your HSM usb key, it is
http://localhost:12345by default in yubico toolkitsst_hsm_pin: This field is provided by Amazon upon HSM provisioning request
And arguments as follows:
dsn: This field is used to generate the Sidewalk SMSN, it shall be unique for each device
pdp-mode: Should be on_dev_cert_gen
prod-config: Path to the configuration file
To use command-line arguments instead of a configuration file, omit the --prod-config parameter and specify all configuration fields as command-line arguments.
After completing this step, the Sidewalk end device is now provisioned and all public information is stored in the out/ folder for the device upload to the cloud following the standard Amazon flow.
Prototyping Private Key Provisioning#
For prototyping, the private keys are generated by the cloud when creating a device. They are then injected in the device and wrapped by the Secure Vault. The manufacturing page contains references to the Secure Vault slots storing the private keys. The method can be used to test the secure vault implementation.
The main difference from the production flow is the way the private keys of the Sidewalk device are generated.
A prototyping device is generated in the cloud, either through the Sidewalk Assistant or the generate protype scripts.
The endpoint key pair is generated by the cloud and the Signing Tool provided by Amazon is called to start certificate generation.
Once the certificate chain is generated, it can be used to generate the manufacturing page with the provisioning script. The private keys are wrapped by the Secure Element as described in the Secure Vault documentation section 3.3.1. The manufacturing page, containing the private keys ID from Secure Vault, is flashed to the device.
Leveraging Secure Vault does not use the manufacturing page (MFG) generated by the prototyping scripts. Instead, it uses the WirelessDevice.json and DeviceProfile.json files obtained as outputs from the prototyping scripts. The steps are as follows:
The initialization script creates an output file (.s37) containing a part of the manufacturing page that is identical for all the devices created using the same Device Profile.
The output of this initialization script can optionally include the Sidewalk application binary.
The device-specific information is provisioned to the device using the provisioning script. Here, the rest of the manufacturing page on the device will be completed with the device-specific information.
To summarize, the initialization script generates an output file that can be flashed to all devices. Then the provisioning script is used to provision the device credentials. The credentials are wrapped by keys contained in the Secure Vault and stored in the Default NVM3 Instance as described in the Non-Volatile Memory Use section.
Prototyping Private Key Provisioning Walkthrough#
Device certificate is generated outside of the device so it is intrinsically less secure, this process should only be used for development purposes.
Here is an overview of what happens in this mode:
All dynamic data is sent to the device.
ED25519 and P256R1 device private keys are wrapped by the Secure Vault.
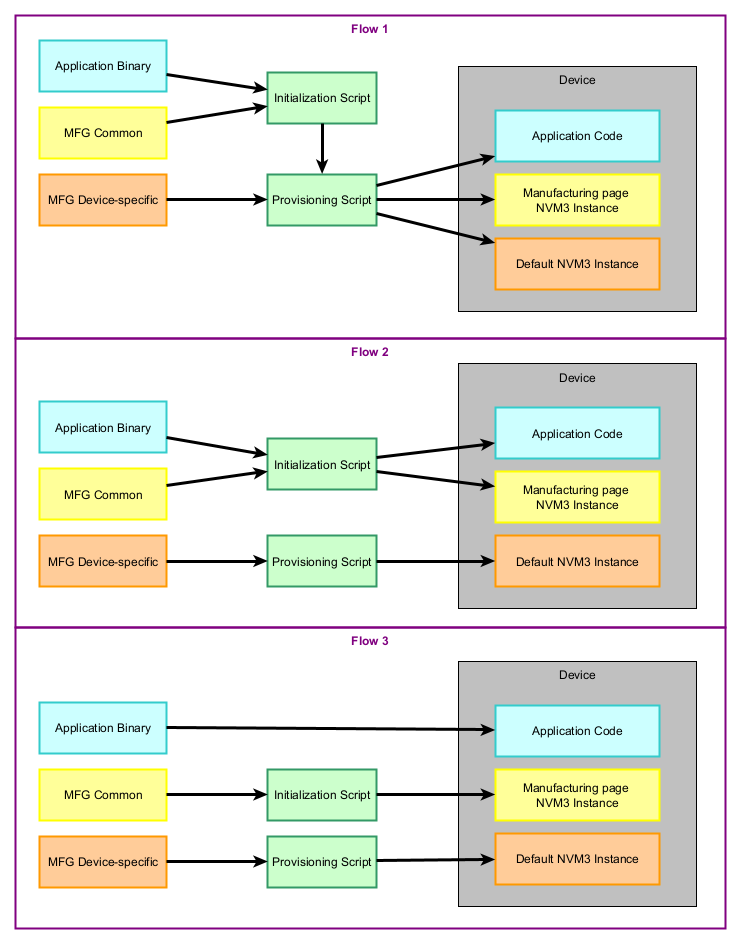
The production provisioning scripts support two functions: initialization and provisioning. You can use the scripts in the following configurations:
You can include the application binary in the initialization script and use the output of the script in the provisioning script. This flashes both binaries containing the application, MFG common section, and MFG device-specific section.
You can call the initialization script with the application binary. Flash the resulting image, which contains the application and MFG common section, on your device. Then call the provisioning script without the initialization image (sid-init-img) option to flash the remaining MFG device-specific information.
You can omit the application binary in the initialization script (sid-app option). You will have to flash the output of the initialization script (MFG common section) before calling the provisioning one. Then you can call the provisioning script (MFG device-specific section). The application binary can be flashed at any point or added as an argument of the provisioning script (using the sid-init-img option).
In all the flows, the only hard requirement is to flash the output of initialize_silabs.py (sid.s37) before calling silabs_provision.py. The common information in the manufacturing page must be on the device before the device-specific one. For more information, see the following diagram:
The production script folder contains several python scripts (initialization_silabs.py and provision_silabs.py).
Before provisioning the device, enable Secure Vault in your Sidewalk application and compile the Production Device Provisioner application, which is needed in the next steps.
⚠ WARNING ⚠: Simplicity Commander version 1v16 and JLink RTT version 7.96 are the minimum required versions to run the scripts.
Running the Initialization Script#
The initialization script takes an Amazon Sidewalk device certificate, SoC family and Sidewalk application binary as input arguments and generates a binary file that contains the static (common) part of the Sidewalk certificate and the Sidewalk application provided as input arguments. The output binary file is common to all the product instances so it does not contain any device-specific information (device-specific information is provisioned in the next step). This script can be run once to generate a common binary, following these steps:
Navigate to
tools/scripts/public/pdpdirectory.Run the following commands:
pip3 install -r requirements.txt
python3 initialize_silabs.py --sid-cert </path/to/WirelessDevice.json> --sid-cert-type proto --sid-dev-prof </path/to/DeviceProfile.json> --part <part> --sid-usr-app-img </path/to/user/sid/app.s37> --pdp-mode priv_key_provWith arguments as follows:
sid-cert: Wireless Device JSON file from AWS.
sid-cert-type: Should be proto.
sid-dev-prof: Device Profile JSON file from AWS.
part: Part number (like efr32zg28b322f1024im68).
sid-usr-app-img: Sidewalk custom application (optional).
pdp-mode: Should be priv_key_prov.
At the end of this step, an output file (in tools/scripts/public/pdp/out) that contains the static (common) part of the Sidewalk certificate and the Sidewalk application (if provided) is generated. It will be used as an input argument in the next step.
Running the Provisioning Script#
The provisioning script takes a Sidewalk device certificate, SoC family, initialization image (generated in the previous step), and provisioning image (Production Device Provisioner sample application) as input arguments and provisions the end device with device credentials extracted from the Sidewalk device certificate. Run the script separately for each device by following these steps:
Connect your device with a supported EFR32 chip.
Navigate to
tools/scripts/public/pdpdirectory.Run the following commands:
Ⓘ INFO Ⓘ: If you prefer to flash the initialization image before the provisioning, you can skip the
--sid-init-imgargument.
python3 provision_silabs.py --sid-cert </path/to/WirelessDevice.json> --sid-cert-type proto --part <part> --sid-init-img out/sid_init_img.s37 --pdp-img </path/to/pdp/app.s37> --pdp-mode priv_key_provWith arguments as follows:
sid-cert: Wireless Device JSON file from AWS.
sid-cert-type: Should be proto.
part: Part number (like efr32zg28b322f1024im68)
sid-init-img: Initialization image generated in the previous step (optional)
pdp-img: Sidewalk Production Device Provisioner application
pdp-mode: Should be priv_key_prov.
After completing this step, the Sidewalk end device is now provisioned.