OOB Example#
Background#
You can find the specification of the Out Of Band pairing process in the Bluetooth specification: Bluetooth spec v5.
Description#
Purpose of the Example#
OOB with legacy pairing and OOB with secure connection pairing are the two OOB pairing modes. This example implements both modes for user’s reference.
Implementing the central and peripheral roles are the two projects in the example.
Central#
It has the master role of the connection.
Implements the GATT client.
It sends the write request to the server every 3 seconds and receives the notification from the server side.
Peripheral#
It has the slave role of the connection
Implements the GATT server, with 1 service containing 2 characteristics:
Notification characteristic – the property of this characteristic is “notify”, which doesn’t require authentication.
Write characteristic – the property of this characteristic is “Authenticated write”, which requires authenticated connection to write a value to this characteristic.
It sends notification to the client every 3 seconds and receives write request from the client.
Because of the different properties of these two characteristics, if the pairing and bonding procedure succeeds, the client will receive notifications and the server will receive write requests. Otherwise, if pairing and bonding procedure fails, the client should not be able to write the characteristic value due to an unauthenticated connection, but it should be able to receive notifications because it doesn’t require authentication.
Key Points of the Example#
Pairing Modes#
In both projects, a symbol definition, PAIRING_MODE, can either be LEGACY_PAIRING or SECURE_CONNECTION_PAIRING. This symbol determines which pairing mode will be used in the connection.
#define LEGACY_PAIRING 1
#define SECURE_CONNECTION_PAIRING 2
#define PAIRING_MODE SECURE_CONNECTION_PAIRINGBehaviors of Both Roles#
Central: It scans for the advertisement containing the service UUID “4880c12c-fdcb-4077-8920-a150d7f9b907” and establishes a connection if found. After a connection is made, it goes through the pairing and bonding procedure and discovers services and characteristics. It also sends a write request to the peer device every 3 seconds after the specified characteristic is found and enables the CCC of the specified characteristic the peer device to enable notifications.
Peripheral: It won’t start advertising after boot until it receives the OOB data from the serial terminal. For OOB with legacy pairing, the OOB data is 16-bytes in length. For OOB with secure connection pairing, the length is 32-bytes, containing 16-byte OOB data and 16-byte confirm value. It will go through the pairing and bonding procedure after the connection is established with the central device and send notifications to central every 3 seconds after CCC is enabled by the central device.
Setting up#
As shown above, the example requires two devices (e.g., BRD4104a Rev A00) and serial terminal, VCOM has been enabled in the example. Therefore, the serial print information will go out from the USB cable.
Central device (#D1)
Create a soc-empty project and copy the attached app_central.c file into it, replacing the existing app.c.
Set the DEBUG_LEVEL to 1 in the app.h file.
Build and flash it to a device.
Peripheral device (#D2)
Create an SoC-empty project and copy the attached app_peripheral.c file into it, replacing the existing app.c.
Import the attached gatt_peripheral.xml on the GATT configurator tab and generate the database.
Set the DEBUG_LEVEL to 1 in the app.h file.
Build and flash it to the other device.
Serial terminal (#S1): connect to the central device.
Serial terminal (#S2): connect to the peripheral device.
Usage#
Power on both devices (#D1 and #D2) by the USB cable.
Open the serial terminals connected to both devices; the port name should be “JLink CDC UART Port (COMxx)”.
Recognize which serial terminal connects to #D1 and which connects to #D2 by the print information after boot. Enter the right OOB data shown on #S1 to #S2. #D2 should start advertising if it receives enough length of data.
#D1 will connect and start pairing and bonding to #D2 automatically.
Below are 4 different test results:
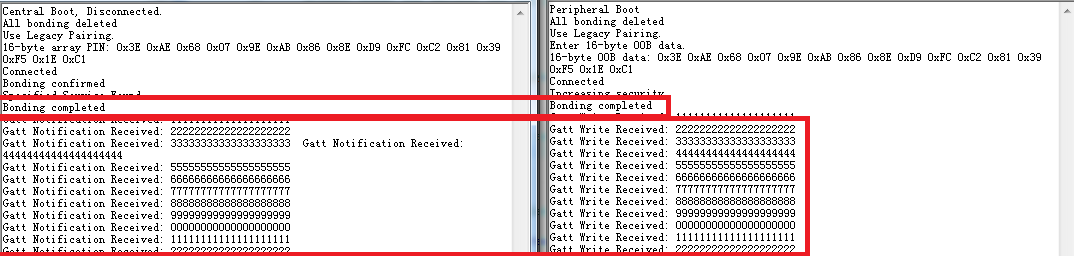
Figure 1 shows what happened if the correct OOB data was input while using the legacy pairing mode. Both sides can receive the GATT data from the remote peer device.
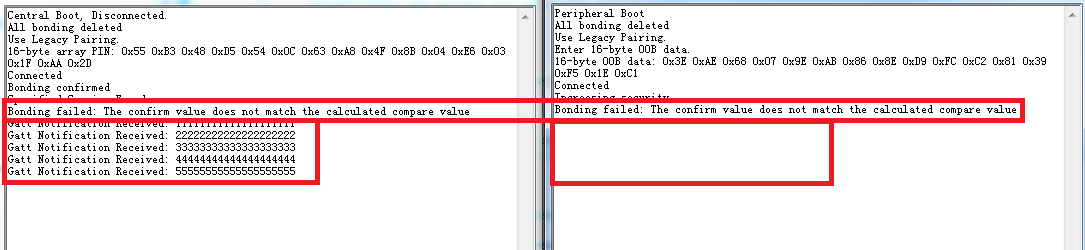
Figure 2 shows what happened if incorrect OOB data was input while using the legacy pairing mode. Only the notification can be received. The write characteristic can’t be written because of unauthenticated connection.
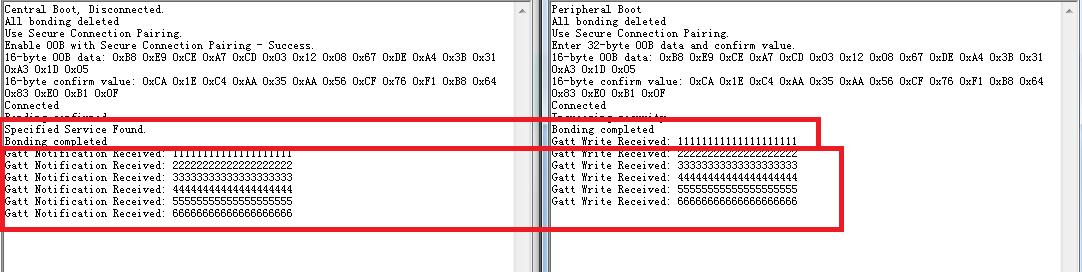
Figure 3 shows what happened if the correct OOB data was input while using the secure connection pairing mode. Both sides can receive the GATT data from the remote peer.
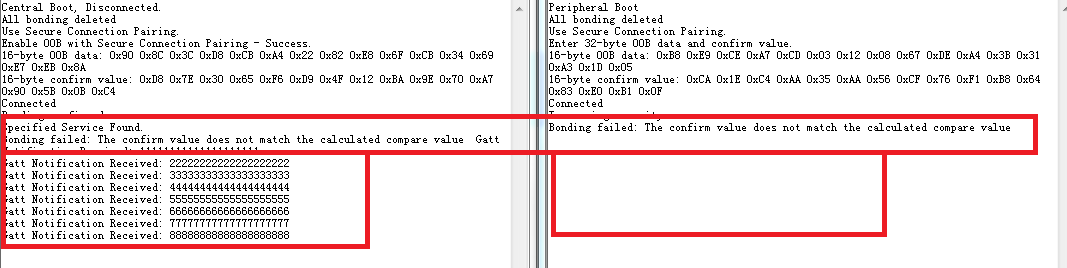
Figure 4 shows what happened if incorrect OOB data was input while using the secure connection pairing mode. Only the notification can be received. The write characteristic can’t be written because of unauthenticated connection.