Usage: Basic Use Cases#
The API is provided with support objects that help the user manage the Bluetooth mesh network. These are:
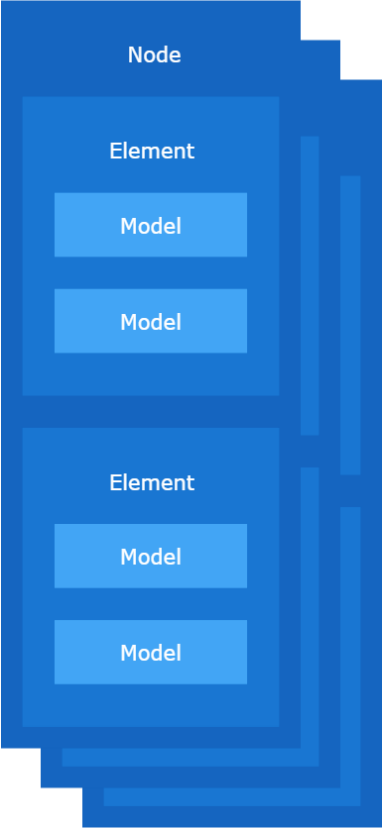
Network – the main container in the mesh structure. Network is the owner of subnets and nodes.
Subnet – a specific subnet belongs to a network.
Node – a node can be added to many subnets. A node contains elements.
Element – an addressable entity within a device containing models.
Model – defines a set of States, State Transitions, State Bindings, Messages, and other associated behaviors.
Application developers are responsible for keeping track of any changes in the Bluetooth mesh structure. Objects are mutable and will change over time.
Full API documentation and the reference applications’ source code are provided in the ADK package - see ADK Structure for its location.
Provisioning a Device (Over GATT Bearer)#
Bluetooth device discovery must be done on the application side. Devices that can be provisioned advertise themselves with the Unprovisioned Device beacon and Bluetooth Mesh Provisioning Service shall be present in the GATT database.
To provision a new node, the ADK expects that object implementing:
iOS: SBMConnectableDevice
Android: ConnectableDevice
Represents the device you want to provision, which can be connected to before provisioning.
and
iOS: SBMSubnet
Android: Subnet
Represents the target subnet to which to provision node.
are provided.
The subnet can be created using:
iOS: SBMNetwork.createSubnet
Android: Network.createSubnet
To initiate the provisioning process, create
iOS: SBMProvisionerConnection
Android: ProvisionerConnection
Initiate the provisioning session using:
iOS: SBMProvisionerConnection.provision
Android: ProvisionerConnection.provision
Proxy Connection and Configuration#
To configure provisioned nodes, the application must connect to subnet via proxy node.
The newly provisioned device will accept incoming proxy connection only for 60 seconds. If you intend to keep it as a proxy node you have to confirm its proxy role in this time window. Once you have one or more proxy nodes in your subnet, you may connect to that subnet and change settings of any node (including its proxy role) at any time.
To establish a proxy connection, initialize:
iOS: SBMProxyConnection
Android: ProxyConnection
object using:
iOS: SBMConnectableDevice
Android: ConnectableDevice
object, which represents a Bluetooth device advertising with a Bluetooth Mesh Proxy Service. This device will be used to send messages to the network.
After initializing ProxyConnection object, function:
iOS: SBMProxyConnection.connect
Android: ProxyConnection.connectToProxy
must be invoked to establish the connection. There is an overloaded ProxyConnection.connectToProxy method in Android with an additional boolean refreshBluetoothDevice argument, which supports deciding if BluetoothDevice should be refreshed before connecting to the proxy node. This is needed to obtain current GATT services after they have been changed during the provisioning process, because subsequent discoverServices method calls on the BluetoothGatt object can result in cached services from the first call (even if device was disconnected). Refreshing BluetoothDevice before connecting to the proxy node is required only during the first connection and configuration after provisioning.
After establishing the connection, class:
iOS: SBMConfigurationControl
Android: ConfigurationControl
can be used to set proxy service and get device composition data using:
iOS: SBMConfigurationControl.setProxy
Android: ConfigurationControl.setProxy
and
iOS: SBMConfiruationControl.getDeviceCompositionData
Android: ConfigurationControl. getDeviceCompositionData
After getting raw Device Composition Data it should be passed to node using:
iOS: SBMNode.overrideDeviceCompositionData
Android: Node.overrideDeviceCompositionData
It will parse raw data into elements and models.
After establishing a connection with a proxy node, using the proxy server creates a filter list, which can be used to reduce the number of packets exchanged with the proxy node. This can be done using:
iOS: SMBProxyControl.accept, SBMProxyControl.reject
Android: ProxyControl.accept, ProxyControl.reject
which adds addresses to or removes them from the proxy filter list, depending on the list type.
The filter list can be either an accept list or a reject list. An Accept list is a list of destination addresses of the packets which the Proxy Server passes through to the Client. Other packets will not be received. Reject list is a list of destination addresses of the packets which the Proxy Server will not pass through to the Client. All other packets will be received.
By default, the Proxy Server always initiates the filter as an empty accept list. The type of list can be changed using:
iOS: SBMProxyControl.setFilterType
Android: ProxyControl.setFilterType
Whenever the Proxy Client sends a message to the network, the source address is added to its accept list or removed from its reject list, to let the Client receive a response. The following method can be used to get the current filter list type and number of entries in list on the Proxy Server:
iOS: SBMProxyControl.getFilterStatus
Android: ProxyControl.getFilterStatus
Binding Models#
Supported mesh models are listed in ModelIdentifier class.
To bind application key to a model within the node, the following steps should be done:
An application key exists within the subnet to which the node belongs. An application key can be created using:
iOS: SBMSubnet.createAppKey
Android: Subnet.createAppKey
An application key must be bound to node using:
iOS: SBMNodeControl.bind
Android: NodeControl.bind
An application key must be bound to model using:
iOS: SBMFunctionalityBinder.bindModel
Android: FunctionalityBinder.bindModel
Models can be found within elements of the node. The property
iOS: SBMNode.elements
Android: Node.elements
contains elements of a node. Each element contains an array of sigModels and vendorModels.
For example, to send Generic OnOff get message to the node, first we need to find:
iOS: SBMSigModel
Android: SigModel
in that Node’s sigModels array, where the modelIdentifier is equal to:
iOS: SBMModelIdentifier.genericOnOffServer
Android: ModelIdentifier.GenericOnOffServer
Sending the Message#
To send the Generic message use:
iOS: SBMControlElement
Android: GenericClient
Initialize it with:
iOS: SBMElement and SBMApplicationKey
which contains the previously found GenericOnOffServer model.
To send get message use:
Initialize it with iOS: SBMControlElement.getStatus
Initialize it with Android: ControlElement.getStatus
Since we want to receive Generic OnOff status, the first argument needs to be:
Initialize it with iOS: SBMGenericOnOff.self.
Initialize it with Android: ModelIdentifier.GenericOnOffClient
The response will be received in the success callback on iOS side and related flow on Android side.