Matter Scenes Quick Start Guide#
This quick start guide walks through a simple application example of a Matter network with two lighting devices. It will be used to create and manage a simple scene using the Scenes cluster for Matter.
What is the Scenes Cluster?#
The Scenes Management Cluster is defined by the CSA in the Matter Application Cluster Specification. It allows you to store a set of attribute-value pairs pertaining to one or more clusters on the same endpoint as the Scenes Management Cluster. The Matter controller can recall a stored scene which results in these values being written to the specified attributes to express the desired scene.
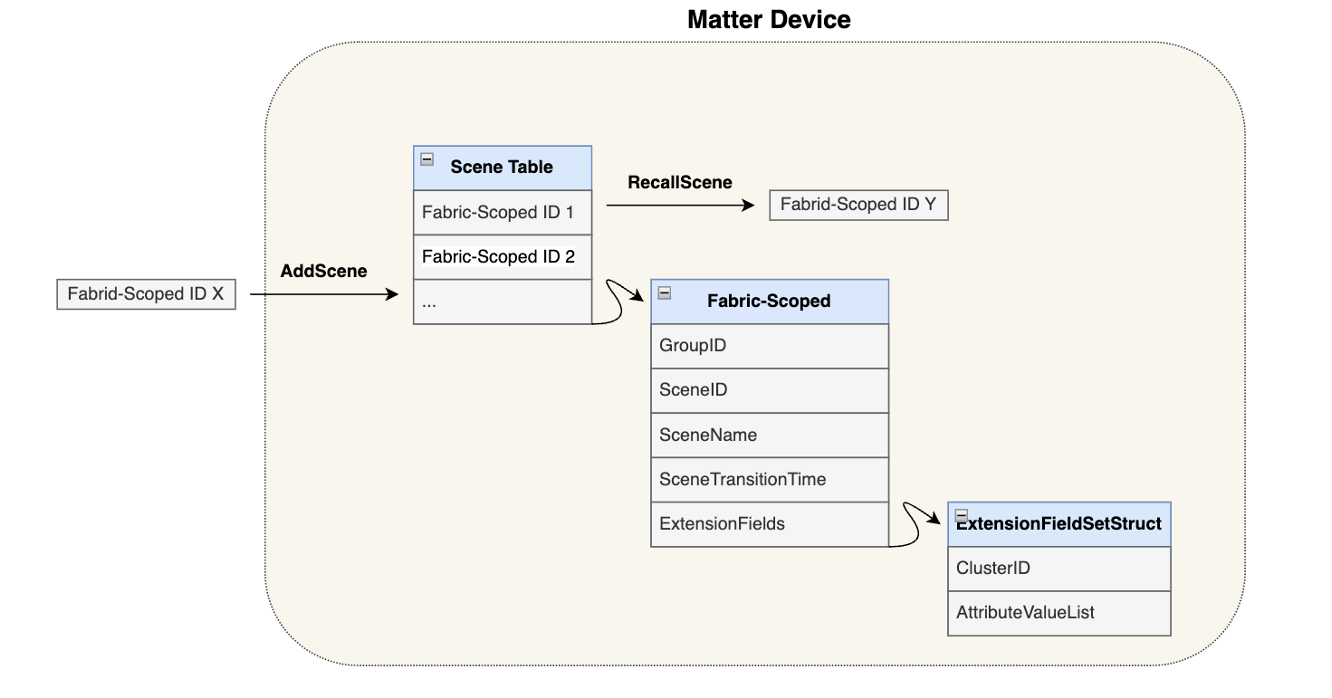
The Scene Table stores Fabric-Scoped IDs, which contain all the information associated with a given scene, in particular:
GroupID: identifier for the group the scene applies to; this is 0 if there is no group associated
SceneID: unique identifier for a particular scene
SceneName: name of the scene
SceneTransitionTime: the amount of time (in milliseconds) that it takes a cluster to change from the current state to the requested state
ExtensionFields: a struct containing the ClusterIDs and Attribute Values for a cluster that participate in a scene
Fabric Consumption of the SceneTable#
Another crucial aspect to consider is how Fabrics interact with the SceneTable. Each endpoint must have its own SceneTable. Fabrics are only allowed to consume half of the SceneTable. For example, if an endpoint has the standard maximum value of 16 scenes, a single fabric can only utilize up to 8 of those scenes. This limitation is in place to prevent a single fabric from monopolizing all the available slots. It serves as a compromise to avoid the scenario where the maximum number of fabrics, multiplied by the number of endpoints and the maximum scenes per endpoint, would consume excessive flash memory.
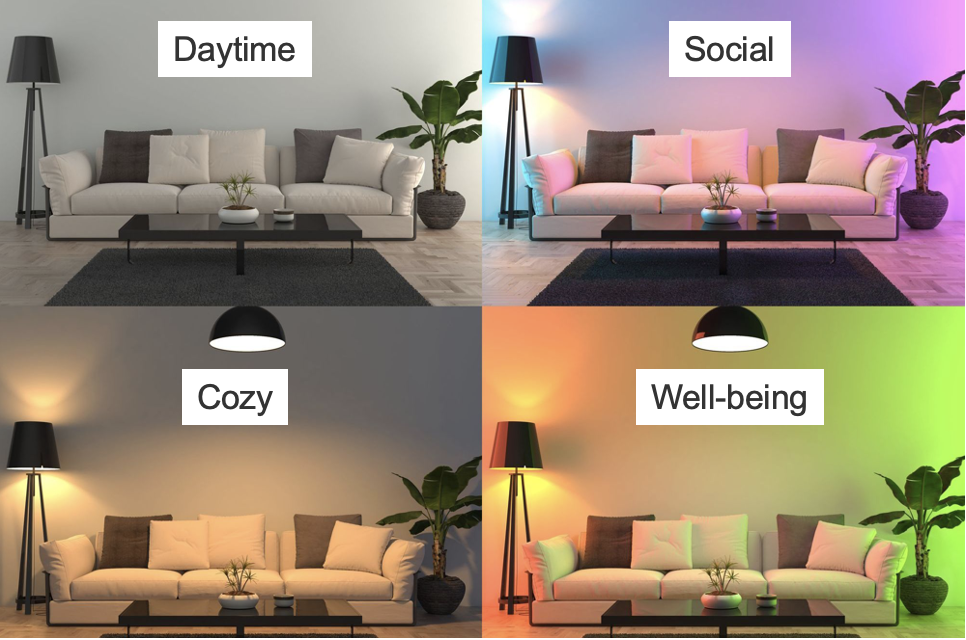
Use Cases#
A common use case for using the scenes cluster is in lighting. A combination of colors across a group of Matter light bulbs can be configured as a scene and recalled on demand.
Hands-On Tutorial - Thread#
The following hands-on tutorial walks through the process of storing and recalling a scene for a group of Matter lighting over Thread devices.
Prerequisites#
Familiarity with the Simplicity Studio Matter Extension
Understanding of how to use the Matterhub
Requirements#
Gecko SDK 4.4.2 + Matter extension 2.3.0 (or newer)
Raspberry Pi 4 + MatterHub Image
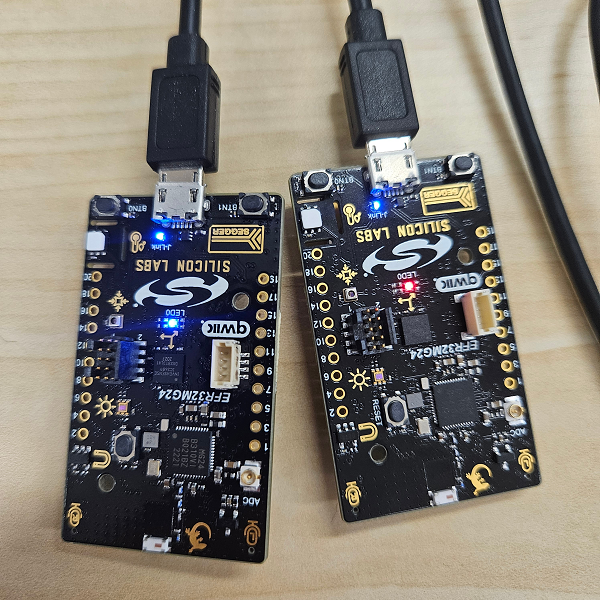
1x Silabs WTSK EFR32xG21 (BRD4108B) in RCP configuration
Note: The procedure is largely the same if WPK + MG24 radio boards are used as the Matter lighting devices; however, the drivers for the LED and handler code may change depending on the board.
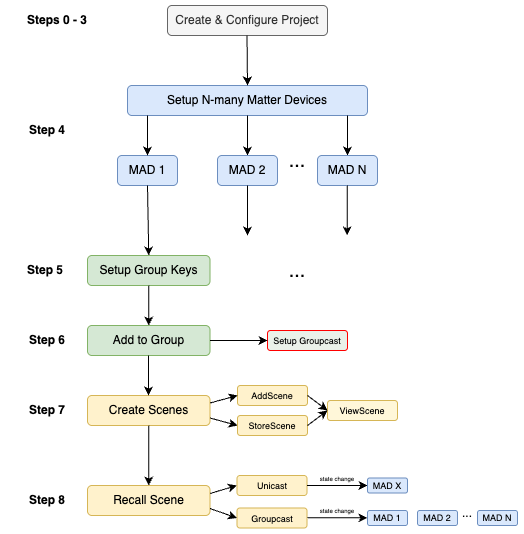
Overview#
Step 1: Create and Configure the Lighting Project#
ZAP Configuration#
In Simplicity Studio, create a new MatterLightOverThread application. From the application .slcp file, navigate to Configuration Tools > ZCL Advanced Platform (ZAP).
The Group Key Management cluster (under General) should already be enabled as a server on Endpoint 0.
On Endpoint 1:
Enable Scenes Management cluster (under General) as a Server
Ensure Color Control cluster (under Lighting) is enabled* Ensure the Groups cluster (under General) is enabled as a server on Endpoint 1
NOTE: Any ZCL attribute that is to be included in a scene must be marked with the Scenes ("S") designation in the Quality column of the cluster specification.
RGB PWM Configuration#
The BRD2601B has RGB PWM LED capabilities. To make use of the drivers and APIs, you must follow these steps.
Uninstall the WSTK LED Support component in Software Components > Silicon Labs Matter v2.3.0 > Platform > WSTK LED. This automatically removes the Simple LED driver under Platform > Driver > LED, and prevent Pin Tool conflicts.
Install the RGB PWM LED component under Software Components > Platform > Driver > LED > Simple RGB PWM LED. This generates the APIs and drivers for the RGB PWM LED.
The component should look like this:
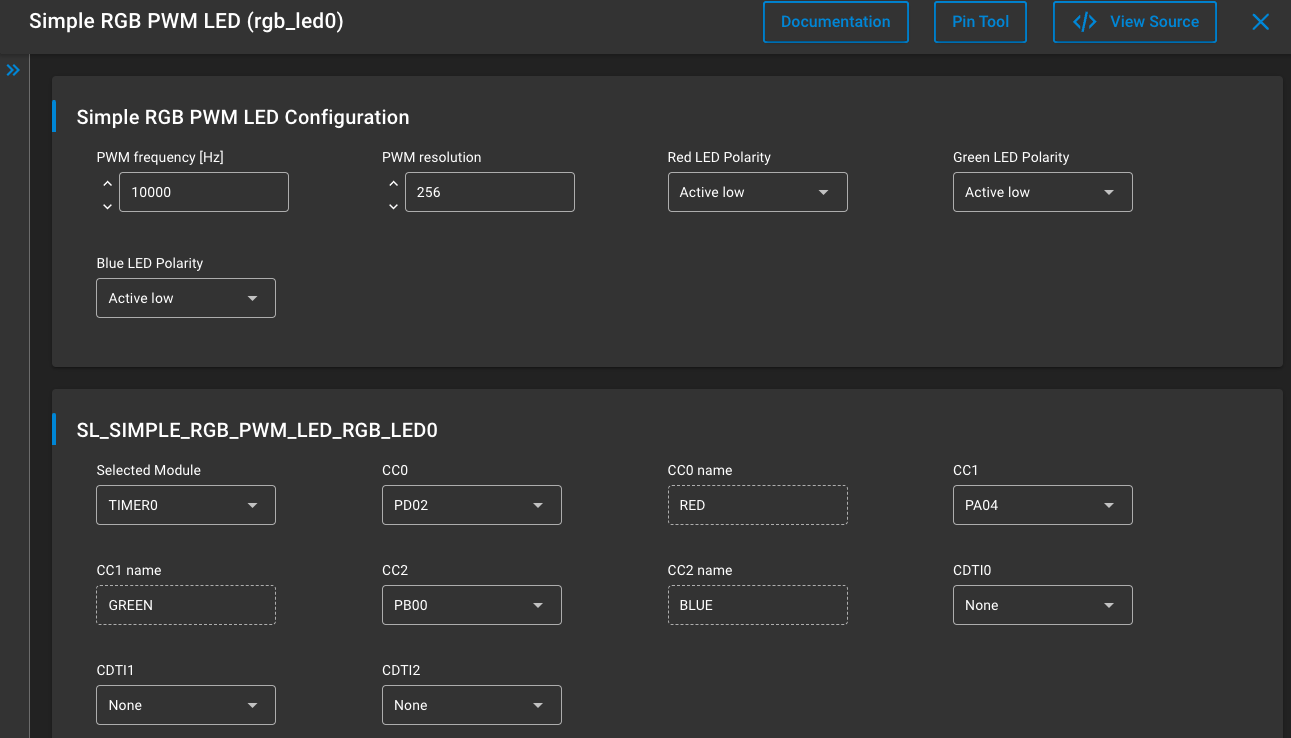
The RGB PWM LED instance that has been created can be found in MatterLightOverThread/autogen/sl_simple_rgb_pwm_led_instances.h.
The documentation for the APIs that have been generated can be found here: Simple RGB PWM LED Driver. The file that contains these APIs can be found in the directory: MatterLightOverThread/simplicity_sdk_xxxx/platform/driver/leddrv/inc/sl_simple_rgb_pwm_led.h.
Step 2: Add the ColorTransformer Class#
The RGB PWM LED operates in the RGB color space; however, the Matter Color Control Cluster does not operate in the RGB color space, so a transformation is required to convert the RGB values into something that can be recognized by Matter. In this example, use the xyY color space as defined by the Commission Internationale de l’Éclairage (CIE) specification which is also recognized in the Matter specification.
Inside the src/ directory of the MatterLightOverThread project, create a new class called ColorTransformer with the corresponding .cpp and .h files. Copy and paste the following to the ColorTransformer.h file.
Click to expand and view the ColorTransformer.h file
/*
* ColorTransformer.h
*
*/
#include <cstdint>
#include <algorithm>
#include <cmath>
#ifndef SRC_COLORTRANSFORMER_H_
#define SRC_COLORTRANSFORMER_H_
#define MATTER_COLOR_MAX 65535.0
#define PRECISION 255.0
// look up table for gamma correction [0, 128]
const uint8_t gamma_lut[256] = {
0, 0, 0, 0, 0, 0, 0, 0, 0, 0, 0, 0, 0, 0, 0, 0,
1, 1, 1, 1, 1, 1, 1, 1, 1, 1, 1, 1, 2, 2, 2, 2,
2, 2, 2, 2, 3, 3, 3, 3, 3, 3, 3, 4, 4, 4, 4, 4,
5, 5, 5, 5, 5, 6, 6, 6, 6, 6, 7, 7, 7, 7, 8, 8,
8, 8, 9, 9, 9, 9, 10, 10, 10, 10, 11, 11, 11, 12, 12, 12,
13, 13, 13, 14, 14, 14, 15, 15, 15, 16, 16, 16, 17, 17, 17, 18,
18, 19, 19, 19, 20, 20, 20, 21, 21, 22, 22, 23, 23, 23, 24, 24,
25, 25, 26, 26, 26, 27, 27, 28, 28, 29, 29, 30, 30, 31, 31, 32,
32, 33, 33, 34, 34, 35, 35, 36, 36, 37, 37, 38, 39, 39, 40, 40,
41, 41, 42, 43, 43, 44, 44, 45, 45, 46, 47, 47, 48, 49, 49, 50,
50, 51, 52, 52, 53, 54, 54, 55, 56, 56, 57, 58, 58, 59, 60, 60,
61, 62, 62, 63, 64, 64, 65, 66, 67, 67, 68, 69, 70, 70, 71, 72,
73, 73, 74, 75, 76, 76, 77, 78, 79, 80, 80, 81, 82, 83, 84, 84,
85, 86, 87, 88, 88, 89, 90, 91, 92, 93, 94, 94, 95, 96, 97, 98,
99, 100, 101, 101, 102, 103, 104, 105, 106, 107, 108, 109, 110, 111, 112, 112,
113, 114, 115, 116, 117, 118, 119, 120, 121, 122, 123, 124, 125, 126, 127, 128,
};
class ColorTransformer
{
public:
ColorTransformer ();
// Function to convert CIE xy to RGB
static void xyToRGB(uint16_t cx, uint16_t cy, uint16_t *pr, uint16_t *pg, uint16_t *pb)
{
// Conversion
float x = static_cast<float>(cx) / MATTER_COLOR_MAX;
float y = static_cast<float>(cy) / MATTER_COLOR_MAX;
float Y = MATTER_COLOR_MAX;
float X = x * (Y / y);
float Z = (1.0f - x - y) * (Y / y);
float r = X * 3.2404542f + Y * -1.5371385f + Z * -0.4985314f;
float g = X * -0.9692660f + Y * 1.8760108f + Z * 0.0415560f;
float b = X * 0.0556434f + Y * -0.2040259f + Z * 1.0572252f;
float max = std::max(std::max(r, g), b);
uint8_t r_i= static_cast<uint8_t>(r * PRECISION / max);
uint8_t g_i = static_cast<uint8_t>(g * PRECISION / max);
uint8_t b_i = static_cast<uint8_t>(b * PRECISION / max);
// Gamma correction
*pr = gamma_lut[r_i];
*pg = gamma_lut[g_i];
*pb = gamma_lut[b_i];
}
virtual
~ColorTransformer ();
};
#endif /* SRC_COLORTRANSFORMER_H_ */Step 3 Implement Callbacks#
Make the following additions to the src/ZclCallbacks.cpp file:
Click to expand and view the ZclCallbacks.cpp file
// Color Transformer
#include "ColorTransformer.h"
// Customer Application
#include "sl_simple_rgb_pwm_led.h"
#include "sl_simple_rgb_pwm_led_instances.h"
#include "sl_led.h"
.
.
// Initialize color mode x-y
uint16_t cx = 0xFFFF;
uint16_t cy = 0xFFFF;
// Initialize RGB
uint16_t r = 0xFFFF;
uint16_t g = 0xFFFF;
uint16_t b = 0xFFFF;
// Initialize xy color mode flag
bool xyFlag = false;Then, inside MatterPostAttributeChangeCallback in src/ZclCallbacks.cpp, implement the on/off functionality of the LED:
if (clusterId == OnOff::Id && attributeId == OnOff::Attributes::OnOff::Id)
{
/* code to add */
if (*value) { // turn on LED
sl_led_turn_on((sl_led_t *)&sl_simple_rgb_pwm_led_rgb_led0);
} else {// turn off LED
sl_led_turn_off((sl_led_t *)&sl_simple_rgb_pwm_led_rgb_led0);
}
/* ----------- */
#ifdef DIC_ENABLE
dic_sendmsg("light/state", (const char *) (value ? (*value ? "on" : "off") : "invalid"));
#endif // DIC_ENABLE
LightMgr().InitiateAction(AppEvent::kEventType_Light, *value ? LightingManager::ON_ACTION : LightingManager::OFF_ACTION);
}Similarly, add code to handle the attributes: EnhancedColorMode, CurrentX, and CurrentY of the Color Control Cluster:
else if (clusterId == ColorControl::Id)
{
ChipLogProgress(Zcl, "Color Control attribute ID: " ChipLogFormatMEI " Type: %u Value: %u, length %u",
ChipLogValueMEI(attributeId), type, *value, size);
// get the color mode
if ((attributeId == ColorControl::Attributes::EnhancedColorMode::Id)) {
xyFlag = (bool)*value;
}
else if (xyFlag && (attributeId == ColorControl::Attributes::CurrentX::Id)) {
cx = *(reinterpret_cast<uint16_t*>(value));
xSet = true;
}
else if (xyFlag && (attributeId == ColorControl::Attributes::CurrentY::Id)) {
cy = *(reinterpret_cast<uint16_t*>(value));
ySet = true;
}
if (xyFlag && xSet && ySet) {
ColorTransformer::xyToRGB(cx, cy, &r, &g, &b);
sl_led_set_rgb_color(&sl_simple_rgb_pwm_led_rgb_led0, r, g, b);
xSet = false;
ySet = false;
}
}Lastly, it is necessary to initialize the LED. In src/AppTask.cpp, add the following:
#include "sl_simple_rgb_pwm_led.h"
#include "sl_simple_rgb_pwm_led_instances.h"
#include "sl_led.h"Then, inside the init function AppTask::Init() of src/AppTask.cpp, add the following:
CHIP_ERROR AppTask::Init()
{
CHIP_ERROR err = CHIP_NO_ERROR;
sLightLED.Set(LightMgr().IsLightOn());
/* code to add */
// Initialize LED
sl_led_init((sl_led_t *)&sl_simple_rgb_pwm_led_rgb_led0);
// Set initial color to white and turn off
uint16_t red = 255; // max red
uint16_t green = 255; // no green
uint16_t blue = 255; // max blue
sl_led_set_rgb_color(&sl_simple_rgb_pwm_led_rgb_led0, red, green, blue);
sl_led_turn_off((sl_led_t *)&sl_simple_rgb_pwm_led_rgb_led0);
/* ----------- */
// Update the LCD with the Stored value. Show QR Code if not provisioned
return err;
}This initializes the LED to be white.
Step 4: Build and Flash#
Build the project and flash the binary to as many Matter devices as you wish to have in your scene. This demo includes two lighting devices. Ensure that the devices have been flashed with a bootloader prior to flashing the application for the first time.
Step 5: Set up Group Keys#
Setting up the group keys can become tedious as the number of devices increases. As such, the process can be scripted to alleviate this. This script can be used on the Matterhub to quickly set up the group keys:
# setUpGroupKeys.sh
# usage: ./setUpGroupKeys.sh -groupID -nodeID
# ex: ./groupKeySetup.sh 1 1
#!/bin/bash
# check valid format
if [[ $# -ne 2 ]]
then
echo "Invalid format. ARG1 = GroupID, ARG2 = NodeID"
echo "Example <GroupID = 1> <NodeID = 1>: ./groupKeySetup.sh 1 1"
exit 1
fi
# take in a node ID
groupID="$1"
nodeID="$2"
# set up group keys
$HOME/scripts/matterTool.sh accesscontrol write acl '[{"fabricIndex": 1, "privilege": 5, "authMode": 2, "subjects": [112233], "targets": null },{"fabricIndex": 1, "privilege": 4, "authMode": 3, "subjects": [1], "targets": null }]' $nodeID 0
$HOME/scripts/matterTool.sh groupkeymanagement key-set-write '{"groupKeySetID": 42, "groupKeySecurityPolicy": 0, "epochKey0": "d0d1d2d3d4d5d6d7d8d9dadbdcdddedf", "epochStartTime0": 2220000,"epochKey1": "d1d1d2d3d4d5d6d7d8d9dadbdcdddedf", "epochStartTime1": 2220001,"epochKey2": "d2d1d2d3d4d5d6d7d8d9dadbdcdddedf", "epochStartTime2": 2220002 }' $nodeID 0
$HOME/scripts/matterTool.sh groupkeymanagement write group-key-map '[{"groupId": '$groupID', "groupKeySetID": 42, "fabricIndex": 1}]' $nodeID 0It is important to set up the group keys in groupkeymanagement before adding groups because devices need an associated keyset in order to receive and decrypt encrypted multicast commands that are sent to groups. Without a properly configured keyset, devices will not be able to join the group and receive groupcast messages. The server will return an error (status code 139 = 0x8b: UNSUPPORTED_ACCESS) if a group is added without a corresponding keyset. Setting the keys first allows groups to be encrypted and devices to listen for and decrypt group commands.
Access Control List (ACL) entries define the access rights of different subjects (devices) on a fabric. Each entry includes a fabric index, privilege level, authentication mode, subjects, and targets. These fields are configurable depending on your setup. More info on accesscontrol commands can be found here.
If not using the script, the following commands are used to set up the group keys.
To write Access Control List (ACL) entries:
mattertool accesscontrol write acl '[{"fabricIndex": 1, "privilege": 5, "authMode": 2, "subjects": [112233], "targets": null },{"fabricIndex": 1, "privilege": 4, "authMode": 3, "subjects": [1], "targets": null }]' <NodeID> <Endpoint>The group key set includes a group key set ID, security policy, and epoch keys with their start times. To write a group key:
mattertool groupkeymanagement key-set-write '{"groupKeySetID": 42, "groupKeySecurityPolicy": 0, "epochKey0": "d0d1d2d3d4d5d6d7d8d9dadbdcdddedf", "epochStartTime0": 2220000,"epochKey1": "d1d1d2d3d4d5d6d7d8d9dadbdcdddedf", "epochStartTime1": 2220001,"epochKey2": "d2d1d2d3d4d5d6d7d8d9dadbdcdddedf", "epochStartTime2": 2220002 }' <NodeID> <Endpoint>The following command is used to map a group key set to a group. The mapping includes a group ID, group key set ID, and fabric index.
$ mattertool groupkeymanagement write group-key-map '[{"groupId": <GroupID>, "groupKeySetID": 42, "fabricIndex": 1}]' <NodeID> <Endpoint>For the commands above, replace NodeID with the NodeID of your Matter device and GroupID for the Group you wish to add. The Endpoint corresponds to the endpoint that contains the Group Key Management cluster; this is Endpoint 0 by default.
Step 6: Add Groups to the Group Table#
Before adding any scenes to a device, you must first add the device to a group.
mattertool groups add-group <GroupID> <GroupName> <NodeID> <Endpoint>For example, we can add two (or more) devices pertaining to a group:
mattertool groups add-group 1 "LightsGroup" 1 1
mattertool groups add-group 1 "LightsGroup" 2 1After adding devices to a group, the following is visible in the Matter Hub logs:

A status of 0 indicates success. To further verify this, you can read the group table:
mattertool groupkeymanagement read group-table <NodeID> <Endpoint>To allow groupcasting, we must add and bind the keyset:
mattertool groupsettings add-keysets 0x0042 0 0x000000000021dfe0 hex:d0d1d2d3d4d5d6d7d8d9dadbdcdddedf
mattertool groupsettings bind-keyset 0x0001 0x0042Step 7 Creating a Scene#
Adding a Scene#
mattertool scenesmanagement add-scene <GroupID> <SceneID> <TransitionTime> <SceneName> <ExtensionFieldSets> <NodeID> <Endpoint>Note: The ExtensionFieldSet can take on one or more cluster(s) with each cluster taking on one or more attribute(s).
The format of the ExtensionFieldSets argument is as follows:
'[{"clusterID": "<ClusterID1>", "attributeValueList":[{"attributeID": <AttributeID1>, "attributeValue": <AttributeValue1>}, {attributeID": <AttributeID2>, "attributeValue": <AttributeValue2>}]}]'For example, the Level Control Cluster has a clusterID 0x0008. The attribute is CurrentLevel with attributeID 0x0000. The type value is INT8U. For maximum illumination, the value should be set to 0xFE. The ExtensionFieldSets for this would then look like:
'[{"clusterID": "0x0300", "attributeValueList":[{"attributeID": "0x0001", "attributeValue": "0xFE"}]}]'For a more realistic example, suppose we wish to add a scene with the following attributes configured:
On/Off (Cluster ID: 0x0006):
OnOff (Attribute ID: 0x0000, attributeValue: 0x01)
Level Control (Cluster ID: 0x0008):
CurrentLevel (Attribute ID: 0x0000, attributeValue: 0xFE)
Color Control (Cluster ID: 0x0300):
CurrentX (AttributeID: 0x0003, attributeValue: 0x45a2)
CurrentY (AttributeID: 0x0004, attributeValue: 0x1be7)
EnhancedColorMode (AttributeID: 0x4001, attributeValue: 0x01)
Note: The EnhancedColorMode attribute must have a value 0x01 when using the XY color space as per the specification.
The resulting add-scene command is as follows:
mattertool scenesmanagement add-scene 1 1 1 "Purple" '[{"clusterID": "0x0006", "attributeValueList":[{"attributeID": "0x0000", "attributeValue": "0x01"}]},{"clusterID": "0x0008", "attributeValueList":[{"attributeID": "0x0000", "attributeValue": "0xfe"}]},{"clusterID": "0x0300", "attributeValueList":[{"attributeID": "0x0003", "attributeValue": "0x45a2"},{"attributeID": "0x0004", "attributeValue": "0x1be7"},{"attributeID": "0x4001", "attributeValue": "0x01"}]}]' 1 1You might also want a scene that simply turns off all the lights:
mattertool scenesmanagement add-scene 1 2 1000 "Off" '[{"clusterID": "0x0006", "attributeValueList":[{"attributeID": "0x0000", "attributeValue": "0x00"}]},{"clusterID": "0x0008", "attributeValueList":[{"attributeID": "0x0000", "attributeValue": "0x00"}]}]' 1 1After executing an add-scene command, a response is returned with status: 0 in the CHIP TOOL logs. This indicates that a scene has been successfully created.
The following helper script takes the following arguments: groupID, sceneID, transitionTime, R, G, B, nodeID and outputs the appropriately formatted add-scene command. This can be copied and pasted directly into the CLI to run the Mattertool command to add the scene.
Click to expand and view the createColorScene.c file
#include <stdint.h>
#include <stdio.h>
#include <math.h>
#include <stdlib.h>
#define MAX 65536.0
int main(int argc, char *argv[]) {
// Verify arguments
if (argc != 9) {
printf("Usage: %s <groupID> <sceneID> <transitionTime> <sceneName> <R> <G> <B> <nodeID>\n", argv[0]);
return 1;
}
int groupID = atoi(argv[1]);
int sceneID = atoi(argv[2]);
int transitionTime = atoi(argv[3]);
char *sceneName = argv[4];
int r = atoi(argv[5]);
int g = atoi(argv[6]);
int b = atoi(argv[7]);
int nodeID = atoi(argv[8]);
// Check argument datatype
if (sscanf(argv[1], "%d", &groupID) != 1 ||
sscanf(argv[2], "%d", &sceneID) != 1 ||
sscanf(argv[3], "%d", &transitionTime) != 1 ||
sscanf(argv[5], "%d", &r) != 1 ||
sscanf(argv[6], "%d", &g) != 1 ||
sscanf(argv[7], "%d", &b) != 1 ||
sscanf(argv[8], "%d", &nodeID) != 1) {
printf("Error: Invalid integer argument(s). <groupID> <sceneID> <transitionTime> <R> <G> <B> <nodeID> must be integers\n");
return 1;
}
// Check range of RGB values
if (!(r >= 0 && r <= 255 && g >= 0 && g <= 255 && b >= 0 && b <= 255)) {
printf("Error: RGB values must be in the range [0, 255].\n");
return 1;
}
// Convert RGB to xy, then from xy to CurrentX and CurrentY
float R = r/255.0;
float G = g/255.0;
float B = b/255.0;
float X = R * 0.4124564 + G * 0.3575761 + B * 0.1804375;
float Y = R * 0.2126729 + G * 0.7151522 + B * 0.0721750;
float Z = R * 0.0193339 + G * 0.1191920 + B * 0.9503041;
float sum = X + Y + Z;
float x = X/sum;
float y = Y/sum;
float currentX = (int)round(x*MAX);
float currentY = (int)round(y*MAX);
// Return command format
printf("mattertool scenesmanagement add-scene %d %d %d \"%s\" '[{\"clusterID\": \"0x0006\", \"attributeValueList\":[{\"attributeID\": \"0x0000\", \"attributeValue\": \"0x01\"}]}, \
{\"clusterID\": \"0x0008\", \"attributeValueList\":[{\"attributeID\": \"0x0000\", \"attributeValue\": \"0xfe\"}]},{\"clusterID\": \"0x0300\", \
\"attributeValueList\":[{\"attributeID\": \"0x0003\", \"attributeValue\": \"0x%04x\"},{\"attributeID\": \"0x0004\", \"attributeValue\": \"0x%04x\"},{\"attributeID\": \"0x4001\", \
\"attributeValue\": \"0x01\"}]}]' %d 1\n", groupID, sceneID, transitionTime, sceneName, (unsigned int)currentX, (unsigned int)currentY, nodeID);
return 0;
}Storing a Scene#
Instead of adding a new scene from scratch, we can also store the current state of the group as its own scene. This will save the ExtensionFieldSet which contains all the clusters and attribute-value pairs that associate it with a scene.
mattertool scenesmanagement store-scene <GroupID> <SceneID> <NodeID> <Endpoint>For example:
mattertool scenesmanagement store-scene 1 2 1 1To verify the scene in the CHIP-TOOL logs, you can use a ViewScene command:
mattertool scenesmanagement view-scene <GroupID> <SceneID> <NodeID> <Endpoint>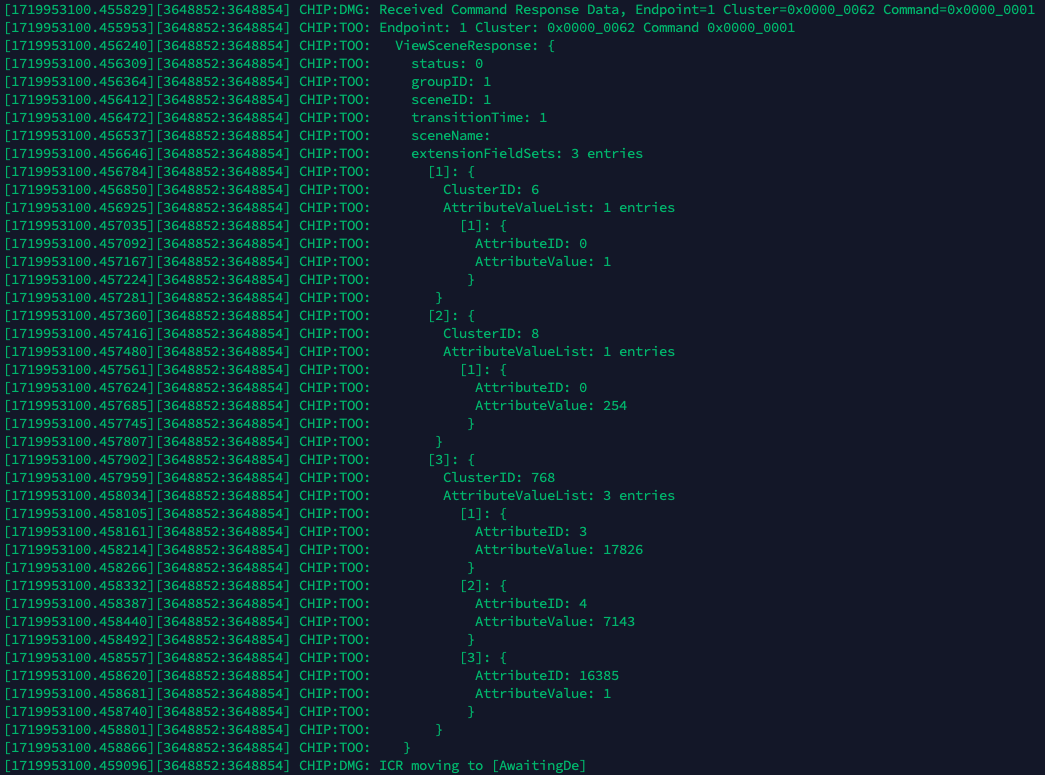
Step 8: Recalling a Scene#
Recalling a scene will write the attributes stored in the scenes table to the requested endpoint attributes.
Unicast Recall#
mattertool scenesmanagement recall-scene <GroupID> <SceneID> <NodeID> <Endpoint>Groupcast Recall#
mattertool scenesmanagement recall-scene <GroupID> <SceneID> 0xFFFFFFFFFFFF+<GroupID> <Endpoint>Example:
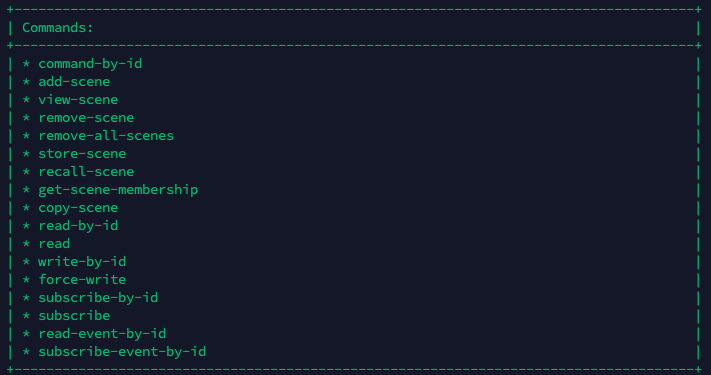
mattertool scenesmanagement recall-scene 1 1 0xFFFFFFFFFFFF0001 1There are many more commands that can be used from the Scenes Management cluster. To see these commands, simply do mattertool scenesmanagement on the matterhub.
Demo#
Finally, in this example, toggle between two scenes comprising a set of two Matter Light devices to demonstrate everything discussed above. The following script combines everything into a single tool. Assuming that steps 1-4 are complete:
Click to expand and view the automateScenes.c file
/*
AUTOMATION SCRIPT FOR SCENES Demo
This script is used to automate the process of:
1) setting up the group keys of a new matter device to be added to a group
2) add the new matter device to a specified group
3) setup groupcasting capabilities (note that this only needs to be executed once)
4) convert RGB values to CurrentX and CurrentY attributes of the Color Control Cluster, to then:
a) directly add the scene to the device
b) parse the command to be copy-pasted
5) recall the newly created scene, either by:
a) groupcast. Requires extra option [-groupcast]
b) unicast. Default option, Requires no extra option
*/
#include <stdint.h>
#include <stdio.h>
#include <math.h>
#include <stdlib.h>
#include <string.h>
#define MAX 65536.0
int main(int argc, char *argv[]) {
// Check if required amount of arguments were given
if (argc < 9) {
printf("Usage: %s <groupID> <sceneID> <transitionTime> <sceneName> <R> <G> <B> <nodeID> [-setupGroupKeys] [-addGroup] [-setupGroupcast] [-addScene] [-recallScene] [-groupCast]\n", argv[0]);
printf("IMPORTANT: Please ensure that the options are listed in the order above.\n");
printf("Default: If no options are provided, the script will only return the parsed addScene command as a string.\n");
return 1;
}
// Access the arguments
int groupID = atoi(argv[1]);
int sceneID = atoi(argv[2]);
int transitionTime = atoi(argv[3]);
char *sceneName = argv[4];
int r = atoi(argv[5]);
int g = atoi(argv[6]);
int b = atoi(argv[7]);
int nodeID = atoi(argv[8]);
// Check if arguments passed are integers
if (sscanf(argv[1], "%d", &groupID) != 1 ||
sscanf(argv[2], "%d", &sceneID) != 1 ||
sscanf(argv[3], "%d", &transitionTime) != 1 ||
sscanf(argv[5], "%d", &r) != 1 ||
sscanf(argv[6], "%d", &g) != 1 ||
sscanf(argv[7], "%d", &b) != 1 ||
sscanf(argv[8], "%d", &nodeID) != 1) {
printf("Error: Invalid integer argument(s). <groupID> <sceneID> <transitionTime> <R> <G> <B> <nodeID> must be integers\n");
return 1;
}
// Check if RGB values are in proper range
if (!(r >= 0 && r <= 255 && g >= 0 && g <= 255 && b >= 0 && b <= 255)) {
printf("Error: RGB values must be in the range [0, 255].\n");
return 1;
}
// Convert RGB to xy, then from xy to CurrentX and CurrentY
float R = r/255.0;
float G = g/255.0;
float B = b/255.0;
float X = R * 0.4124564 + G * 0.3575761 + B * 0.1804375;
float Y = R * 0.2126729 + G * 0.7151522 + B * 0.0721750;
float Z = R * 0.0193339 + G * 0.1191920 + B * 0.9503041;
float sum = X + Y + Z;
float x = X/sum;
float y = Y/sum;
float currentX = (int)(x*MAX);
float currentY = (int)(y*MAX);
// command buffer
char command[512];
// Go through all options
int options = argc - 9;
if (options >= 1) {
for (int i = 9; i < argc; i++) {
char * option = argv[i];
if (strcmp(option,"-setupGroupKeys") == 0) {
// command 1
snprintf(command, sizeof(command), "$HOME/scripts/matterTool.sh accesscontrol write acl \'[{\"fabricIndex\": 1, \"privilege\": 5, \"authMode\": 2, \"subjects\": [112233], \"targets\": null },{\"fabricIndex\": 1, \"privilege\": 4, \"authMode\": 3, \"subjects\": [1], \"targets\": null }]\' %d 0", nodeID);
system(command);
// command 2
snprintf(command, sizeof(command), "$HOME/scripts/matterTool.sh groupkeymanagement key-set-write \'{\"groupKeySetID\": 42, \"groupKeySecurityPolicy\": 0, \"epochKey0\": \"d0d1d2d3d4d5d6d7d8d9dadbdcdddedf\", \"epochStartTime0\": 2220000,\"epochKey1\": \"d1d1d2d3d4d5d6d7d8d9dadbdcdddedf\", \"epochStartTime1\": 2220001,\"epochKey2\": \"d2d1d2d3d4d5d6d7d8d9dadbdcdddedf\", \"epochStartTime2\": 2220002 }\' %d 0", nodeID);
system(command);
// command 3
snprintf(command, sizeof(command), "$HOME/scripts/matterTool.sh groupkeymanagement write group-key-map \'[{\"groupId\": %d, \"groupKeySetID\": 42, \"fabricIndex\": 1}]\' %d 0", groupID, nodeID);
system(command);
}
else if (strcmp(option,"-addGroup") == 0) {
// command 1
snprintf(command, sizeof(command), "$HOME/scripts/matterTool.sh groups add-group %d \"LightGroup\" %d 1", groupID, nodeID);
system(command);
}
else if (strcmp(option,"-setupGroupcast") == 0) {
// command 1
snprintf(command, sizeof(command), "$HOME/scripts/matterTool.sh groupsettings add-keysets 0x0042 0 0x000000000021dfe0 hex:d0d1d2d3d4d5d6d7d8d9dadbdcdddedf");
system(command);
// command 2
snprintf(command, sizeof(command), "$HOME/scripts/matterTool.sh groupsettings bind-keyset 0x0001 0x0042");
system(command);
}
else if (strcmp(option,"-addScene") == 0) {
// command 1
snprintf(command, sizeof(command), "$HOME/scripts/matterTool.sh scenesmanagement add-scene %d %d %d \"%s\" '[{\"clusterID\": \"0x0006\", \"attributeValueList\":[{\"attributeID\": \"0x0000\", \"attributeValue\": \"0x01\"}]},{\"clusterID\": \"0x0008\", \"attributeValueList\":[{\"attributeID\": \"0x0000\", \"attributeValue\": \"0xfe\"}]},{\"clusterID\": \"0x0300\",\"attributeValueList\":[{\"attributeID\": \"0x0003\", \"attributeValue\": \"0x%04x\"},{\"attributeID\": \"0x0004\", \"attributeValue\": \"0x%04x\"},{\"attributeID\": \"0x4001\",\"attributeValue\": \"0x01\"}]}]' %d 1\n", groupID, sceneID, transitionTime, sceneName, (unsigned int)currentX, (unsigned int)currentY, nodeID);
system(command);
}
else if (strcmp(option,"-recallScene") == 0) {
// options
if (strcmp(option,"-groupCast") == 0) {
// command 1
snprintf(command, sizeof(command), "$HOME/scripts/matterTool.sh scenesmanagement recall-scene %d %d 0xFFFFFFFFFFFF%04x 1", groupID, sceneID, (unsigned int)groupID);
system(command);
} else { // assume unicast
// command 1
snprintf(command, sizeof(command), "$HOME/scripts/matterTool.sh scenesmanagement recall-scene %d %d %d 1", groupID, sceneID, nodeID);
system(command);
}
}
}
} else {
//default option: parse add scene to string
printf("mattertool scenesmanagement add-scene %d %d %d \"%s\" '[{\"clusterID\": \"0x0006\", \"attributeValueList\":[{\"attributeID\": \"0x0000\", \"attributeValue\": \"0x01\"}]},{\"clusterID\": \"0x0008\", \"attributeValueList\":[{\"attributeID\": \"0x0000\", \"attributeValue\": \"0xfe\"}]},{\"clusterID\": \"0x0300\",\"attributeValueList\":[{\"attributeID\": \"0x0003\", \"attributeValue\": \"0x%04x\"},{\"attributeID\": \"0x0004\", \"attributeValue\": \"0x%04x\"},{\"attributeID\": \"0x4001\",\"attributeValue\": \"0x01\"}]}]' %d 1\n", groupID, sceneID, transitionTime, sceneName, (unsigned int)currentX, (unsigned int)currentY, nodeID);
}
return 0;
}./automateScenes <groupID> <sceneID> <transitionTime> <sceneName> <R> <G> <B> <nodeID> [-setupGroupKeys] [-addGroup] [-setupGroupcast] [-addScene] [-recallScene] [-groupCast]Where the supplied arguments are:
groupID = minimum value of 1
sceneID = (uint8)
transitionTime = (uint32) (ms)
sceneName = (string) (max 16)
R = (uint8) Red value of RGB
G = (uint8) Green value of RGB
B = (uint8) Blue value of RGB
nodeID = node ID you want the scene to apply to (this is determined when the node is commissioned)
The options are
-setupGroupKeys : prints the command to set up the group keys
-addGroup : prints the command to add the nodes to the group
-setupGroupcast : prints the command to set up the groupcast
-addScene : prints the command to add the scene
-recallScene : prints the command to recall the added scene
Using this tool with groupID = 1, two scenes (sceneID 1 and 2), and two nodes (nodeID 1 and 2), the tool provides the following commands:
mattertool scenesmanagement add-scene 1 1 1 "Blue" '[{"clusterID": "0x0006", "attributeValueList":[{"attributeID": "0x0000", "attributeValue": "0x01"}]},{"clusterID": "0x0008", "attributeValueList":[{"attributeID": "0x0000", "attributeValue": "0xfe"}]},{"clusterID": "0x0300", "attributeValueList":[{"attributeID": "0x0003", "attributeValue": "0x2666"},{"attributeID": "0x0004", "attributeValue": "0x0f5c"},{"attributeID": "0x4001", "attributeValue": "0x01"}]}]' 1 1
mattertool scenesmanagement add-scene 1 2 1 "Red" '[{"clusterID": "0x0006", "attributeValueList":[{"attributeID": "0x0000", "attributeValue": "0x01"}]},{"clusterID": "0x0008", "attributeValueList":[{"attributeID": "0x0000", "attributeValue": "0xfe"}]},{"clusterID": "0x0300", "attributeValueList":[{"attributeID": "0x0003", "attributeValue": "0xa3d7"},{"attributeID": "0x0004", "attributeValue": "0x547b"},{"attributeID": "0x4001", "attributeValue": "0x01"}]}]' 1 1This sets up node 1 to be Blue in Scene 1 and Red in Scene 2.
mattertool scenesmanagement add-scene 1 2 1 "Blue" '[{"clusterID": "0x0006", "attributeValueList":[{"attributeID": "0x0000", "attributeValue": "0x01"}]},{"clusterID": "0x0008", "attributeValueList":[{"attributeID": "0x0000", "attributeValue": "0xfe"}]},{"clusterID": "0x0300", "attributeValueList":[{"attributeID": "0x0003", "attributeValue": "0x2666"},{"attributeID": "0x0004", "attributeValue": "0x0f5c"},{"attributeID": "0x4001", "attributeValue": "0x01"}]}]' 2 1
mattertool scenesmanagement add-scene 1 1 1 "Red" '[{"clusterID": "0x0006", "attributeValueList":[{"attributeID": "0x0000", "attributeValue": "0x01"}]},{"clusterID": "0x0008", "attributeValueList":[{"attributeID": "0x0000", "attributeValue": "0xfe"}]},{"clusterID": "0x0300", "attributeValueList":[{"attributeID": "0x0003", "attributeValue": "0xa3d7"},{"attributeID": "0x0004", "attributeValue": "0x547b"},{"attributeID": "0x4001", "attributeValue": "0x01"}]}]' 2 1This sets node 2 to be Red in Scene 1 and Blue in Scene 2.
To recall scene 1, use:
mattertool scenesmanagement recall-scene 1 1 0xFFFFFFFFFFFF0001 1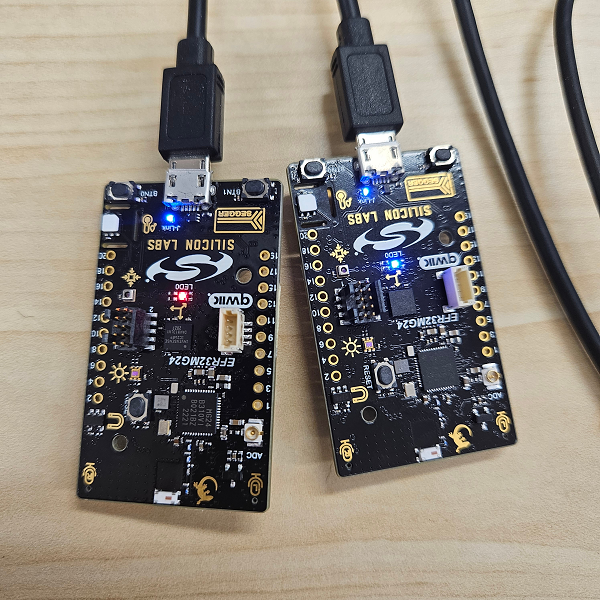
To recall scene 2, use:
mattertool scenesmanagement recall-scene 1 2 0xFFFFFFFFFFFF0001 1