Kernel Programming Guide#
The following sections provide an overview of the usage of the kernel's features.
Initialization of the Kernel#
The kernel uses the initialization methods described in Stacks Initialization Methods , and it is initialized by calling OSInit(). The Kernel Run-Time Application Specific Configurations page describes the default values used by the kernel.
If the standard initialization method is used, several configuration functions are available to the application for fine-tuning certain aspects of the kernel. The Table - Kernel Configuration Functions in the Initialization of the Kernel page provides an overview of those functions and their purpose.
Table - Kernel Configuration Functions#
Function | Description |
|---|---|
OS_ConfigureMemSeg() | Specify the memory segment used by the kernel to allocate objects and stacks. (Optional. If not called, default values will be used.) |
OS_ConfigureISRStk() | Specify the buffer used for the ISR stack. |
OS_ConfigureMsgPoolSize() | Specify the number of messages managed by the kernel. (Optional. If not called, default values will be used.) |
OS_ConfigureStkLimit() | Specify the stack limit, in percentage to full, before issuing an exception. |
OS_ConfigureStatTask() | Specify the Statistics Task's stack, priority, and execution rate. (Optional. If not called, default values will be used.) |
OS_ConfigureTmrTask() | Specify the Timer Management Task's stack, priority, and execution rate. (Optional. If not called, default values will be used.) |
If the advanced initialization method is used, the kernel assumes that the global OS_InitCfg variable is available and configured to the liking of the application. When using the advanced configuration, the OS_Configure...() functions are not available.
Example#
Below is an example that shows how to change the number of messages, and the configuration of the Timer Task.
Listing - Example of call to OSInit()#
:
:
/* Application defines. */
#define APP_KERNEL_MAX_MESSAGES 200u
#define APP_KERNEL_TIMER_TASK_STK_SIZE 256u
#define APP_KERNEL_TIMER_TASK_PRIO 10u
:
:
CPU_STK App_TimerTaskStk[APP_KERNEL_TIMER_TASK_STK_SIZE];
:
:
int main (void)
{
RTOS_ERR err;
OS_TASK_CFG tmr_task_cfg;
:
:
/* Configure the number of messages */
OS_ConfigureMsgPoolSize(APP_KERNEL_MAX_MESSAGES); /* managed by the kernel. */
/* Configure the Tmr Task: */
tmr_task_cfg = OS_InitCfgDflt.TmrTaskCfg; /* Get default values for Timer Task. */
tmr_task_cfg.Prio = APP_KERNEL_TIMER_TASK_PRIO; /* Set the priority of the Timer Task. */
tmr_task_cfg.StkBasePtr = App_TimerTaskStk; /* Set buffer to use for Timer Task stack. */
tmr_task_cfg.StkSize = APP_KERNEL_TIMER_TASK_STK_SIZE; /* Set Timer Task stack size. */
OS_ConfigureTmrTask(&tmr_task_cfg);
/* Initialize the Kernel. */
OSInit(&err);
if (err.Code != RTOS_ERR_NONE) {
/* Handle error on kernel init. */
}
:
:
}Kernel Basic Services#
You can start the kernel once it has been initialized, and all other setup operations have been made. Starting the kernel also starts the preemptive scheduler and executes the highest-priority task. An example call to OSStart() is shown below.
Listing - Example of call to OSStart()#
RTOS_ERR err;
OSStart(&err); /* Start the preemptive scheduler. */
if (err.Code != RTOS_ERR_NONE) {
/* Should not happen, unless critical error. */
}To force the kernel to recalculate the highest-priority task and switch to it pre-preemptively, call OSSched():
Listing - Example of call to OSSched()#
/* Schedule highest-priority task for */
/* execution and switch to it. */
OSSched();Note: This function is called automatically by the kernel when the user calls a blocking function from a task (OS???Pend() functions, time delay functions, etc.).
The user can obtain the version of the currently executing kernel by calling RTOS_Version():
Listing - Example of call to OSVersion()#
CPU_INT32U version;
version = RTOS_Version(); /* Get Micrium OS version. */Task Management Kernel Services#
This section showcases the kernel's task management features.
Task Components#
A task usually has an implementation function, a priority and a stack. Tasks also access the CPU's registers and sometimes its peripherals, or I/O devices. The figure below showcases the interactions between a task and its components.
Figure - Interactions between a task and its components#
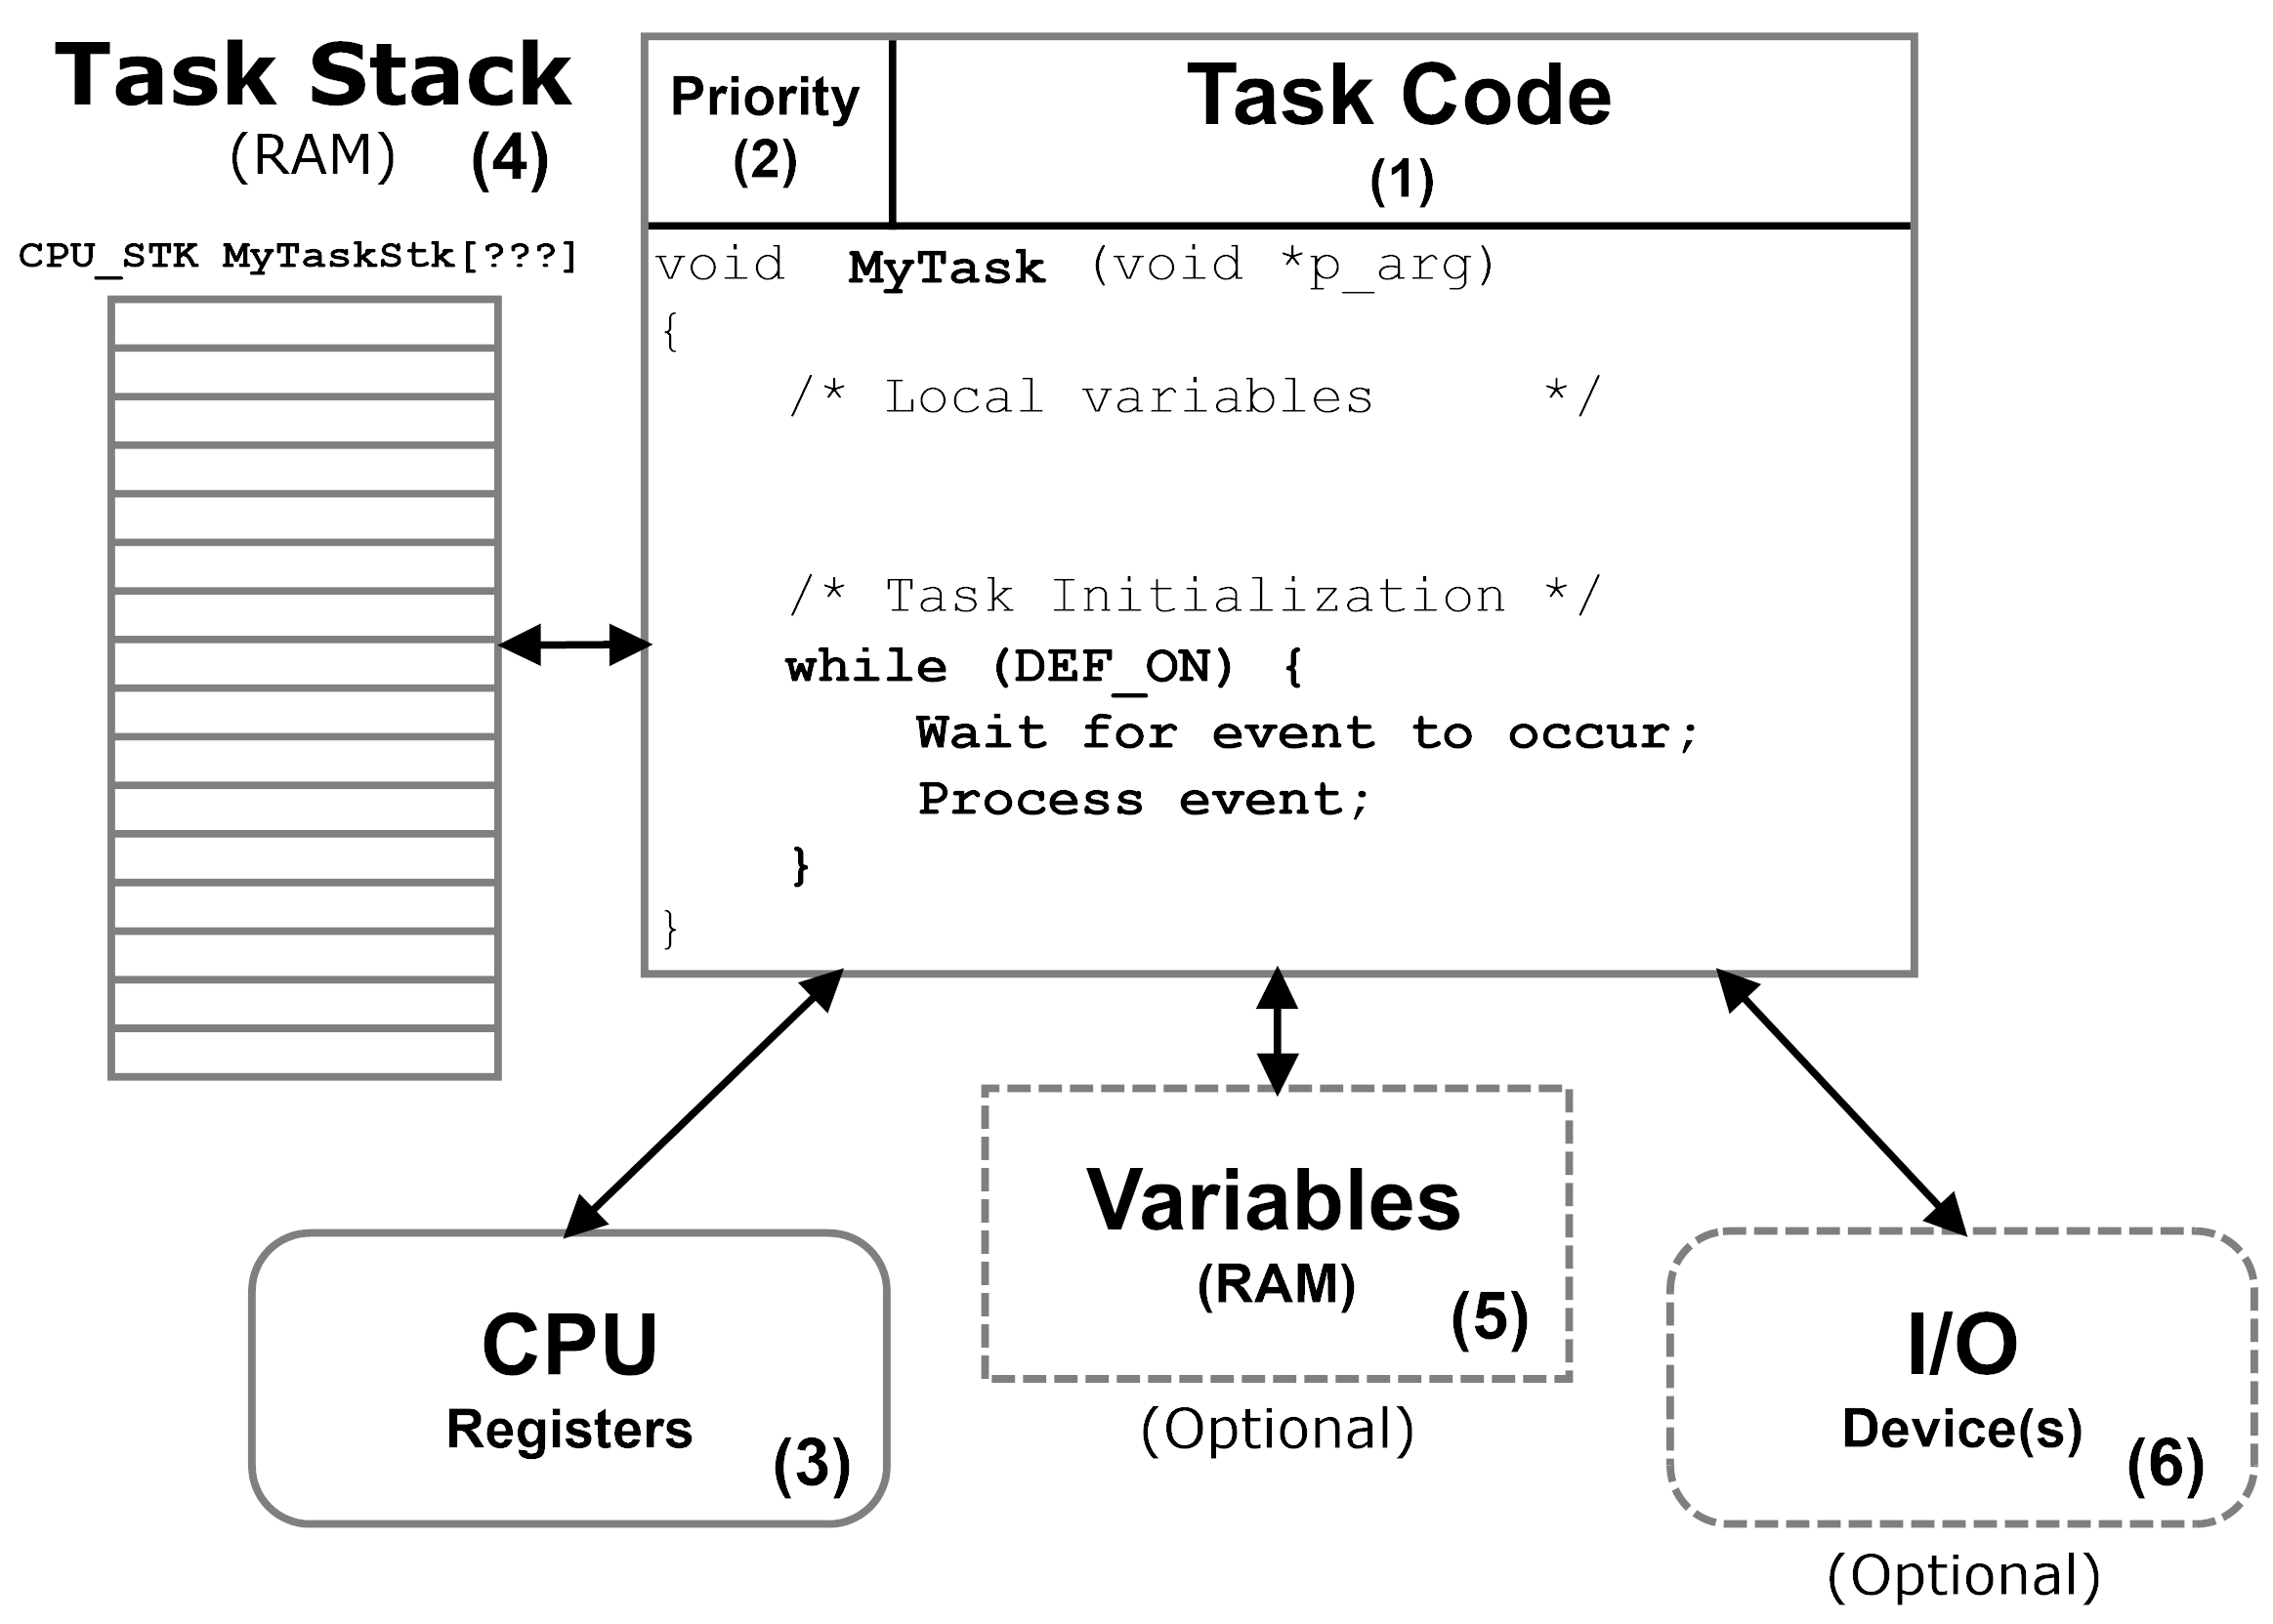
(1) The task's implementation looks like any other C function, except that it is typically implemented as an infinite loop, and is not allowed to return.
(2) Each task is assigned a priority based on its importance within the application. For more information on how to assign a priority to a task, see Task Priority .
(3) A task has its own set of CPU registers. As far as a task is concerned, the task thinks it has the CPU to itself.
(4) Because the Kernel is preemptive, each task must have its own stack area. This stack area can be allocated at compile-time using a static buffer or at run-time using a memory manager. Care must be taken while using a dynamic memory manager in order to avoid memory segmentation and to prevent the de-allocation of a currently in-use buffer. The stack always resides in RAM and is used to keep track of local variables, function calls, and possibly ISR nesting as explained in Task Stack.
(5) A task can have access to global variables. However, code that accesses such global variables should be protected since a global variable can be shared among many tasks.
(6) A task may also have access to one or more Input/Output (I/O) devices (also known as peripherals). In fact, it is common practice to assign tasks to manage I/O devices.
Creating and Deleting Tasks#
To create a task, you must first allocate the task's TCB and stack, then use a single function to represent a task's entry point. The snippet below shows how to create a task using OSTaskCreate().
Listing - Example of call to OSTaskCreate()#
/* Example Task Defines: */
#define APP_EXAMPLE_TASK_PRIO 21u /* Task Priority. */
#define APP_EXAMPLE_TASK_STK_SIZE 256u /* Stack size in CPU_STK. */
/* Example Task Data: */
OS_TCB App_ExampleTaskTCB; /* Task Control Block. */
CPU_STK App_ExampleTaskStk[APP_EXAMPLE_TASK_STK_SIZE]; /* Stack. */
/* Example Task Code: */
void App_ExampleTask (void *p_arg); /* Function. */
void App_TaskCreate (void)
{
RTOS_ERR err;
OSTaskCreate(&App_ExampleTaskTCB, /* Pointer to the task's TCB. */
"Example Task.", /* Name to help debugging. */
&App_ExampleTask, /* Pointer to the task's code. */
DEF_NULL, /* Pointer to task's argument. */
APP_EXAMPLE_TASK_PRIO, /* Task's priority. */
&App_ExampleTaskStk[0], /* Pointer to base of stack. */
(APP_EXAMPLE_TASK_STK_SIZE / 10u), /* Stack limit, from base. */
APP_EXAMPLE_TASK_STK_SIZE, /* Stack size, in CPU_STK. */
10u, /* Messages in task queue. */
0u, /* Round-Robin time quanta. */
DEF_NULL, /* External TCB data. */
OS_OPT_TASK_STK_CHK, /* Task options. */
&err);
if (err.Code != RTOS_ERR_NONE) {
/* Handle error on task creation. */
}
}
void App_ExampleTask (void *p_arg)
{
/* Use argument. */
(void)&p_arg;
while (DEF_TRUE) {
/* All tasks should be written as infinite loops. */
}
}The App_TaskCreate() function above creates a single task (named Example Task) with a priority of 21 and a stack of 256 CPU_STK elements.
The illustration below explains the steps taken by OSTaskCreate() to initialize both the TCB and the task's stack.
Figure - OSTaskCreate() initialization of the TCB and task's stack#
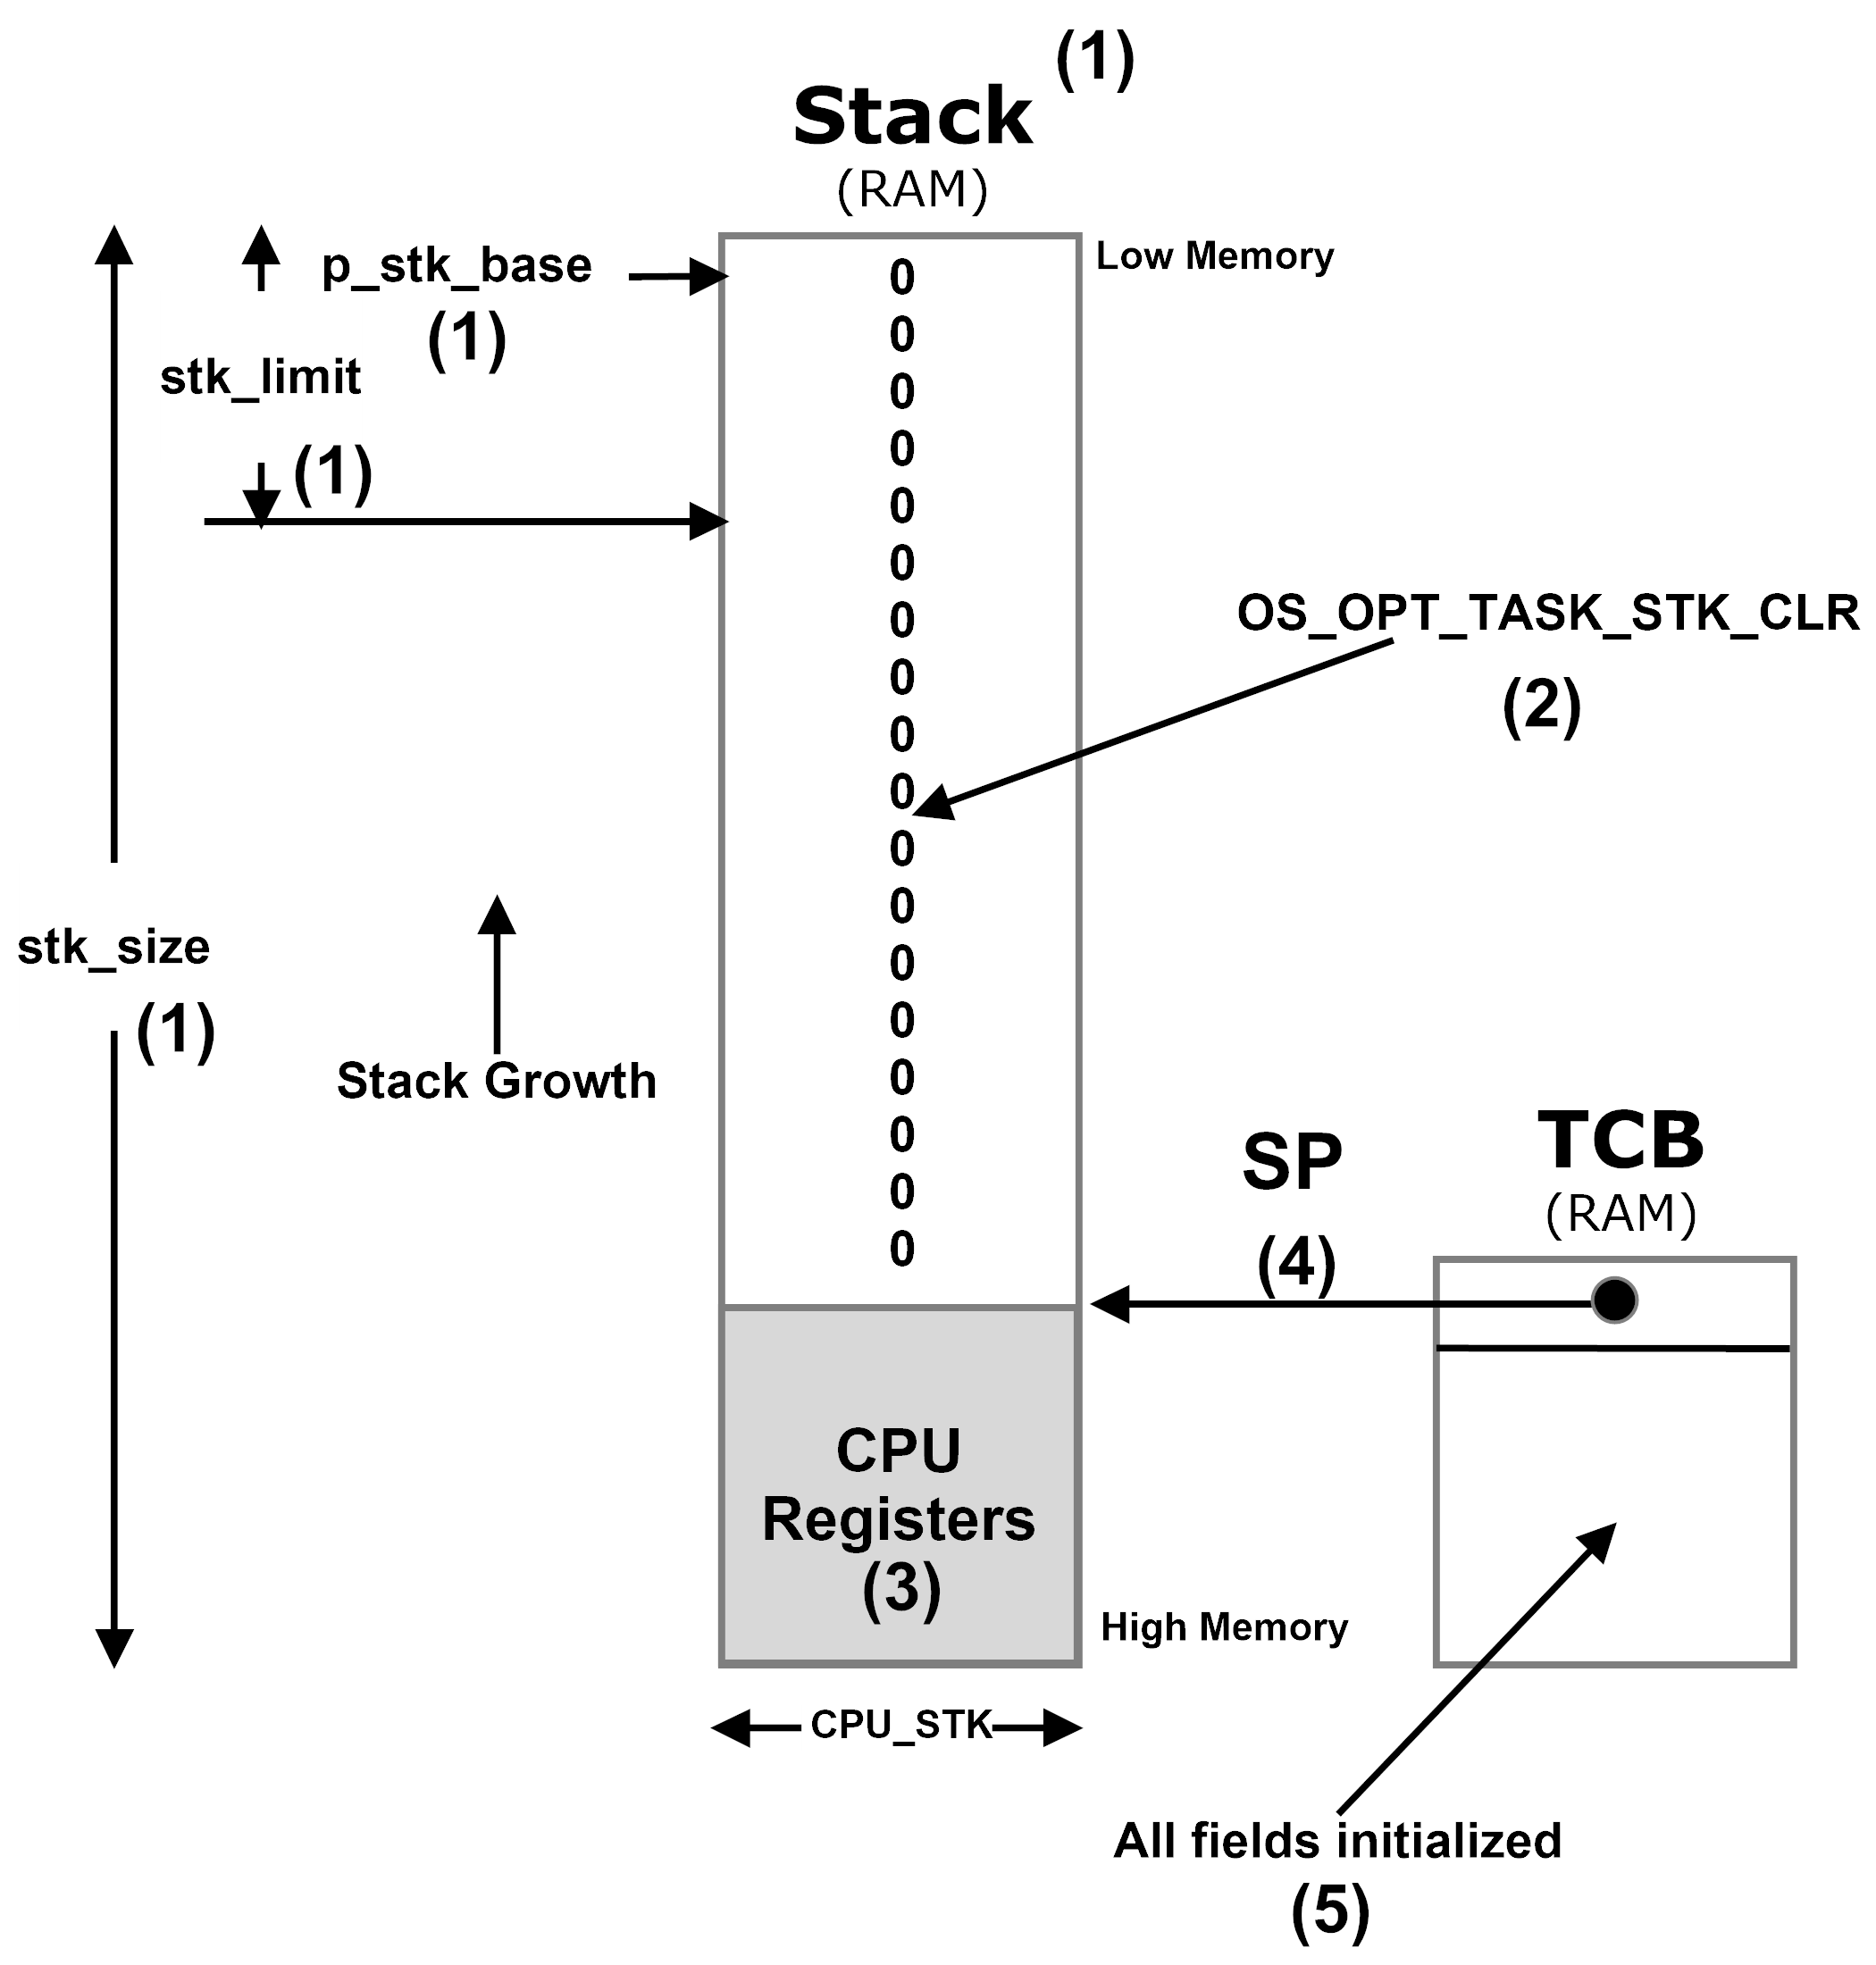
(1) When calling OSTaskCreate(), you pass the base address of the stack (p_stk_base) that will be used by the task, the watermark limit for stack growth (stk_limit) which is expressed in number of CPU_STK entries before the stack is empty, and the size of stack (stk_size), also in terms of CPU_STK elements.
(2) When specifying OS_OPT_TASK_STK_CHK | OS_OPT_TASK_STK_CLR in the opt argument of OSTaskCreate(), the task's stack will be zeroed.
(3) The top of the task’s stack is initialized with a copy of the CPU registers in the same stacking order as if they were saved in a context switch-out operation.
(4) The new value of the stack pointer (SP) is saved in the TCB.
(5) The remaining fields of the TCB are initialized: task priority, task name, task state, internal message queue, internal semaphore, and many others.
Assuming the previously created Example Task is used, calling OSTaskDel() with the Example Task's TCB would delete the task, after which the task's stack and TCB would be available to be re-used.
Listing - Example of call to OSTaskDel()#
/* Example Task Data: */
OS_TCB App_ExampleTaskTCB; /* Task Control Block. */
:
:
RTOS_ERR err;
:
:
OSTaskDel(&App_ExampleTaskTCB, /* Pointer to the task's TCB. */
&err);
if (err.Code != RTOS_ERR_NONE) {
/* Handle error on task deletion. */
}Round-Robin Scheduler#
The kernel offers a simple Round-Robin Scheduler. The functions related to the Round-Robin Scheduler can be separated in two categories: Configuration and Usage.
Configuration#
A single function, OSSchedRoundRobinCfg() configures the Round-Robin Scheduler with parameters as described below:
Listing - Example of call to OSSchedRoundRobinCfg()#
RTOS_ERR err;
OSSchedRoundRobinCfg( DEF_TRUE, /* DEF_TRUE to enable, DEF_FALSE to disable */
/* Round-Robin scheduling. */
100u, /* Default time amount per task, in OS Ticks. */
&err);
if (err.Code != RTOS_ERR_NONE) {
/* Handle error on Round-Robin Scheduler configuration. */
}Usage#
Once the Round-Robin Scheduler is properly configured, tasks can change the amount of time they need, or change the amount of time for another task with the OSTaskTimeQuantaSet() function:
Listing - Example of call to OSTaskTimeQuantaSet()#
RTOS_ERR err;
OSTaskTimeQuantaSet( DEF_NULL, /* DEF_NULL will change the time for the current */
/* task. Otherwise, specify the task's TCB. */
25, /* New time amount for the task, in OS Ticks. */
&err);
if (err.Code != RTOS_ERR_NONE) {
/* Handle error on time change. */
}Tasks can also yield to the CPU with OSSchedRoundRobinYield() if they do not need their allocated time, as illustrated below:
Listing - Example of call to OSSchedRoundRobinYield()#
RTOS_ERR err;
/* In any Task: */
OSSchedRoundRobinYield(&err);
if (err.Code != RTOS_ERR_NONE) {
/* Handle error on yield. */
}Example#
The figure below shows a timing diagram with tasks running at the same priority. There are three tasks that are ready-to-run at priority X. For sake of illustration, the time quanta is 4 Kernel ticks. This is shown as a darker tick mark.
Figure - Round-Robin Scheduling#
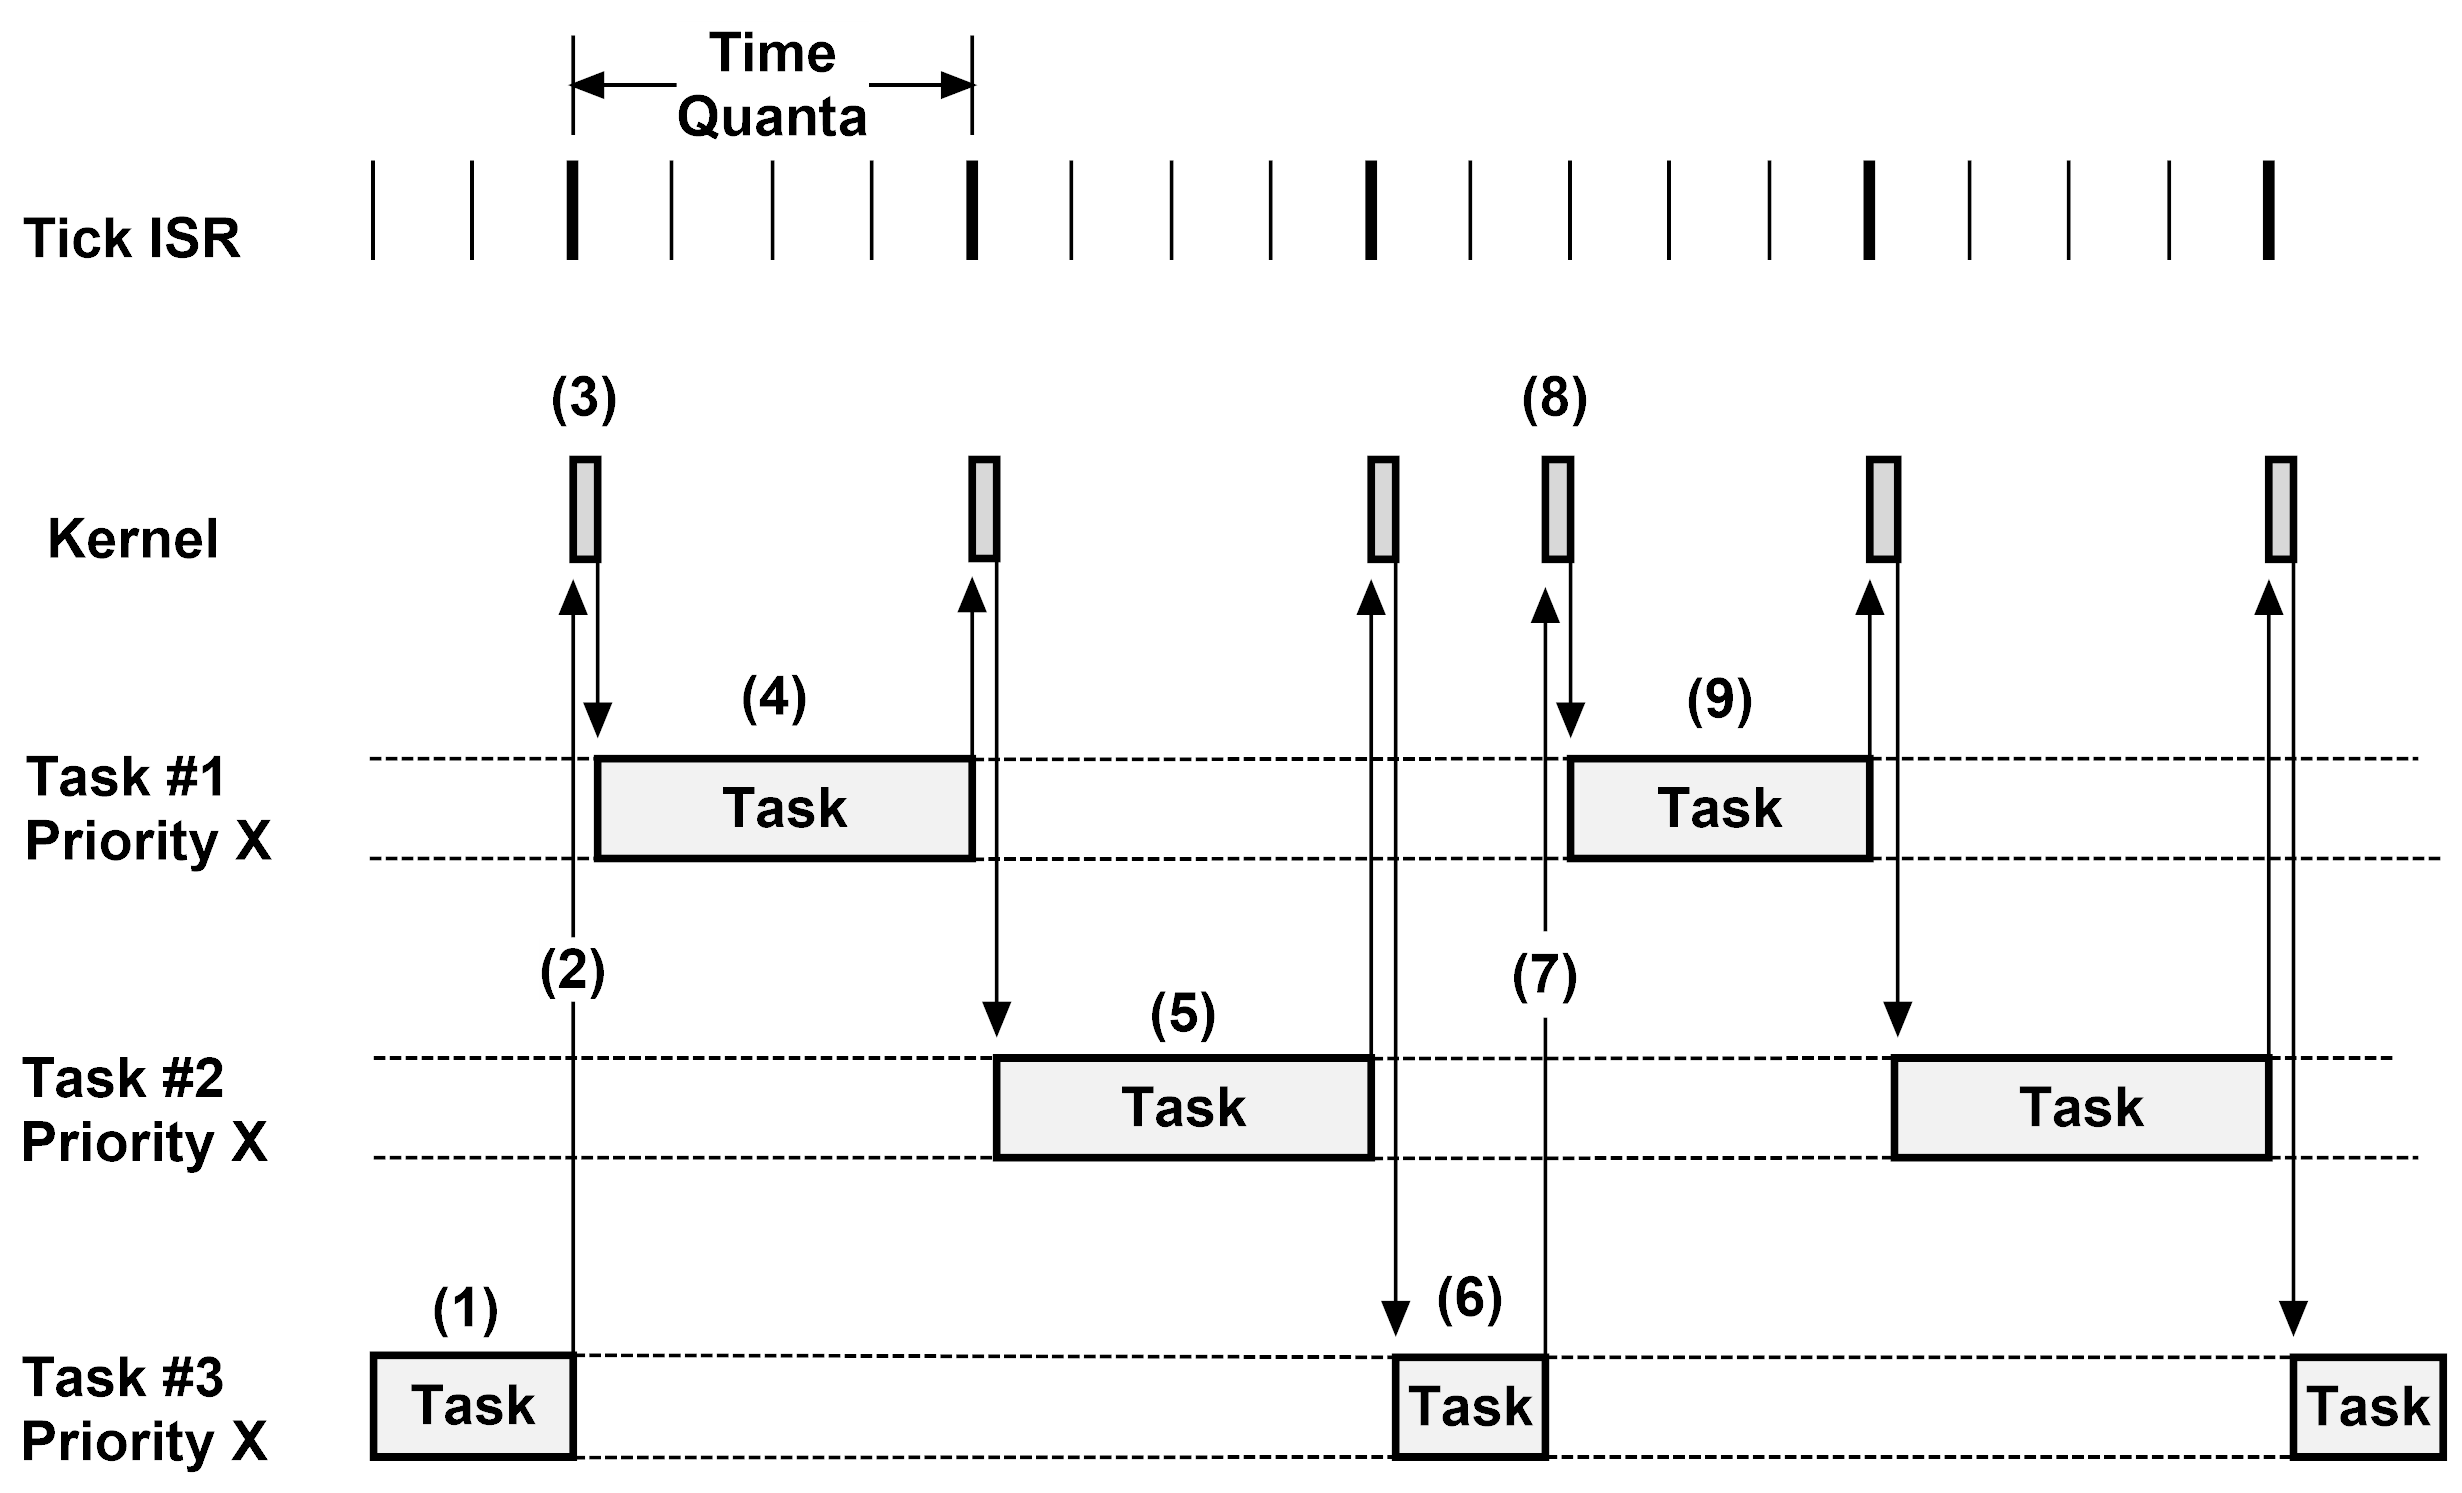
(1) Task #3 is executing. During that time, a tick interrupt occurs but the time quanta has not expired yet.
(2) On the 4th tick interrupt, the time quanta for Task #3 expires.
(3) The Kernel resumes Task #1 since it was the next task in the list of tasks at priority X that was ready-to-run.
(4) Task #1 executes until its time quanta expires, which is four ticks.
(5) After Task #1 uses its time quanta, Task #2 executes.
(6) After Task #2 uses its time quanta, Task #3 executes.
(7) Task #3 decides to give up its time quanta by calling OSSchedRoundRobinYield().
(8) This causes the Kernel to resume Task #1.
(9) Task #1 executes for its full time quanta.
Task Registers#
Applications can have task-specific variables (such as errno). The kernel provides OS_CFG_TASK_REG_TBL_SIZE task registers (see Kernel Compile-Time and Data Type Configurations ). To use task-specific registers, you must first request an ID using OSTaskRegGetID(). This ID is shared among all tasks so that it refers to the same variable across all created tasks. With the ID, the user can get the value of a task-specific register with OSTaskRegGet() and set the value of the task-specific register with OSTaskRegSet() as shown in the example below.
Listing - Example usage of OSTaskRegGetID(), OSTaskRegSet() and OSTaskRegGet()#
OS_REG value;
OS_REG_ID id;
RTOS_ERR err;
/* Request a Task Register ID number. */
id = OSTaskRegGetID(&err);
if (err.Code != RTOS_ERR_NONE) {
/* Handle error on task register allocate ID. */
}
value = 0xC0FFEE;
/* Set Task Register: */
OSTaskRegSet( DEF_NULL, /* DEF_NULL refers to the current task, */
/* otherwise specify the task's TCB. */
id, /* Task Register ID. */
value, /* Task Register value. */
&err);
if (err.Code != RTOS_ERR_NONE) {
/* Handle error on task register set. */
}
/* Get Task Register: */
value = OSTaskRegGet( DEF_NULL, /* DEF_NULL refers to the current task, */
/* otherwise specify the task's TCB. */
id, /* Task Register ID. */
&err);
if (err.Code != RTOS_ERR_NONE) {
/* Handle error on task register get. */
}Execution Control#
The kernel offers the ability to suspend a task (which can also be nested) and resume its execution. A suspended task is effectively removed from the list of tasks that can be scheduled. Use the OSTaskSuspend() function to suspend a task and the OSTaskResume() function to resume a task. The example below shows that a task can suspend itself.
Listing - Example usage of OSTaskSuspend() and OSTaskResume()#
/* In Example Task: */
RTOS_ERR err;
OSTaskSuspend( DEF_NULL, /* DEF_NULL refers to current task. */
/* otherwise specify the task's TCB. */
&err);
/* This check will only be executed once Example */
/* Task is resumed. */
if (err.Code != RTOS_ERR_NONE) {
/* Handle error on task suspend. */
}
/* In any other Task: */
RTOS_ERR err;
OSTaskResume(&App_ExampleTaskTCB, /* Resume Example Task using its TCB. */
&err);
if (err.Code != RTOS_ERR_NONE) {
/* Handle error on task resume. */
}Stack Checking#
The OSTaskStkChk() function checks the current size of the free and used space of a task's stack.
Note: The task must be created with the OS_OPT_TASK_STK_CHK option in order to check its stack usage.
Listing - Example of call to OSTaskStkChk()#
CPU_STK_SIZE free_space;
CPU_STK_SIZE used_space;
RTOS_ERR err;
OSTaskStkChk( DEF_NULL, /* DEF_NULL refers to the current task, otherwise */
/* specify the task's TCB. */
&free_space, /* Will contain the amount of free CPU_STK elements. */
&used_space, /* Will contain the amount of used CPU_STK elements. */
&err);
if (err.Code != RTOS_ERR_NONE) {
/* Handle error on stack checking. */
}Kernel Interrupt Services#
When an Interrupt Service Routine (ISR) needs to wake up a task (using the allowed OS???Post() calls), the ISR must inform the kernel that it is going to service an interrupt. The following example shows how to use the OSIntEnter() and OSIntExit() calls.
Listing - Example usage of OSIntEnter() and OSIntExit()#
void App_MyISR (void)
{
OSIntEnter();
/* Process interrupt. */
OSIntExit();
}Resource Management Using the Kernel#
The kernel offers the following services that control the access to a shared resource among many tasks.
Simple#
Critical Section (Deprecated)#
Critical Section handling is no longer provided by the kernel. See the EMLIB / CORE section of your MCU documentation at https://docs.silabs.com to learn more about the types of critical sections offered.
Locking the Scheduler#
A safer approach to resource arbitration is locking the scheduler. During that time, the kernel cannot schedule another task.
Be sure that the shared resource is not used in an ISR. Interrupts are not disabled while the scheduler is locked, so an ISR and a task could access the resource at the same time. The following is an example of a shared resource being accessed while the scheduler is locked with OSSchedLock() and unlocked with OSSchedUnlock().
Listing - Example of call to OSSchedLock() and OSSchedUnlock()#
CPU_INT32U App_GlobalCounter;
:
:
void App_SomeTask (void *p_arg)
{
RTOS_ERR err;
:
:
OSSchedLock(&err); /* Lock the scheduler. */
if (err.Code == RTOS_ERR_NONE) {
App_GlobalCounter++;
OSSchedUnlock(&err); /* Unlock the scheduler. */
}
:
:
}Semaphores#
A counting semaphore can be used to protect a resource that is shared by multiple tasks. Before you can use the semaphore, you must create it with OSSemCreate(). A semaphore can be deleted with OSSemDel(), as shown below.
Listing - Example of call to OSSemCreate() and OSSemDel()#
OS_SEM App_Semaphore;
:
:
void App_SomeTask (void *p_arg)
{
RTOS_ERR err;
OS_OBJ_QTY qty;
:
:
/* Create the semaphore. */
OSSemCreate(&App_Semaphore, /* Pointer to user-allocated semaphore. */
"App Semaphore", /* Name used for debugging. */
1, /* Initial count: available in this case. */
&err);
if (err.Code != RTOS_ERR_NONE) {
/* Handle error on semaphore create. */
}
:
:
:
/* Delete the semaphore. */
qty = OSSemDel(&App_Semaphore, /* Pointer to user-allocated semaphore. */
OS_OPT_DEL_NO_PEND, /* Option: delete if 0 tasks are pending. */
&err);
if (err.Code != RTOS_ERR_NONE) {
/* Handle error on semaphore delete. */
}
:
:
}A task can acquire the right to use the protected resource by calling OSSemPend(). Once the task is done, it can release the resource with OSSemPost().
Listing - Example of call to OSSemPend() and OSSemPost()#
OS_SEM App_Semaphore;
:
:
void App_SomeTask (void *p_arg)
{
RTOS_ERR err;
OS_SEM_CTR ctr;
:
:
/* Acquire resource protected by semaphore. */
ctr = OSSemPend(&App_Semaphore, /* Pointer to user-allocated semaphore. */
1000, /* Wait for a maximum of 1000 OS Ticks. */
OS_OPT_PEND_BLOCKING, /* Task will block. */
DEF_NULL, /* Timestamp is not used. */
&err);
if (err.Code == RTOS_ERR_NONE) {
/* Resource acquired. 'ctr' contains number of available resources. */
:
:
/* Release resource protected by semaphore. */
ctr = OSSemPost(&App_Semaphore, /* Pointer to user-allocated semaphore. */
OS_OPT_POST_1, /* Only wake up highest-priority task. */
&err);
if (err.Code != RTOS_ERR_NONE) {
/* Handle error on semaphore post. */
}
} else {
/* Handle error on semaphore pend. */
}
:
:
}If the kernel configuration permits it, a task can force the pends on a semaphore to abort with OSSemPendAbort().
Listing - Example of call to OSSemPendAbort()#
OS_SEM App_Semaphore;
:
:
void App_SomeTask (void *p_arg)
{
RTOS_ERR err;
OS_OBJ_QTY qty;
:
:
/* Abort the highest-priority task's pend. */
qty = OSSemPendAbort(&App_Semaphore, /* Pointer to user-allocated semaphore. */
OS_OPT_PEND_ABORT_1,/* Only abort the HP task's pend. */
&err);
if (err.Code != RTOS_ERR_NONE) {
/* Handle error on semaphore pend abort. */
}
:
:
}Finally, a task may explicitly set the number of available resources by calling OSSemSet().
Listing - Example of call to OSSemSet()#
OS_SEM App_Semaphore;
:
:
void App_SomeTask (void *p_arg)
{
RTOS_ERR err;
:
:
/* Set the number of available resources to 10. */
OSSemSet(&App_Semaphore, /* Pointer to user-allocated semaphore. */
10, /* 10 resources. */
&err);
if (err.Code != RTOS_ERR_NONE) {
/* Handle error on semaphore set count. */
}
:
:
}Use cases#
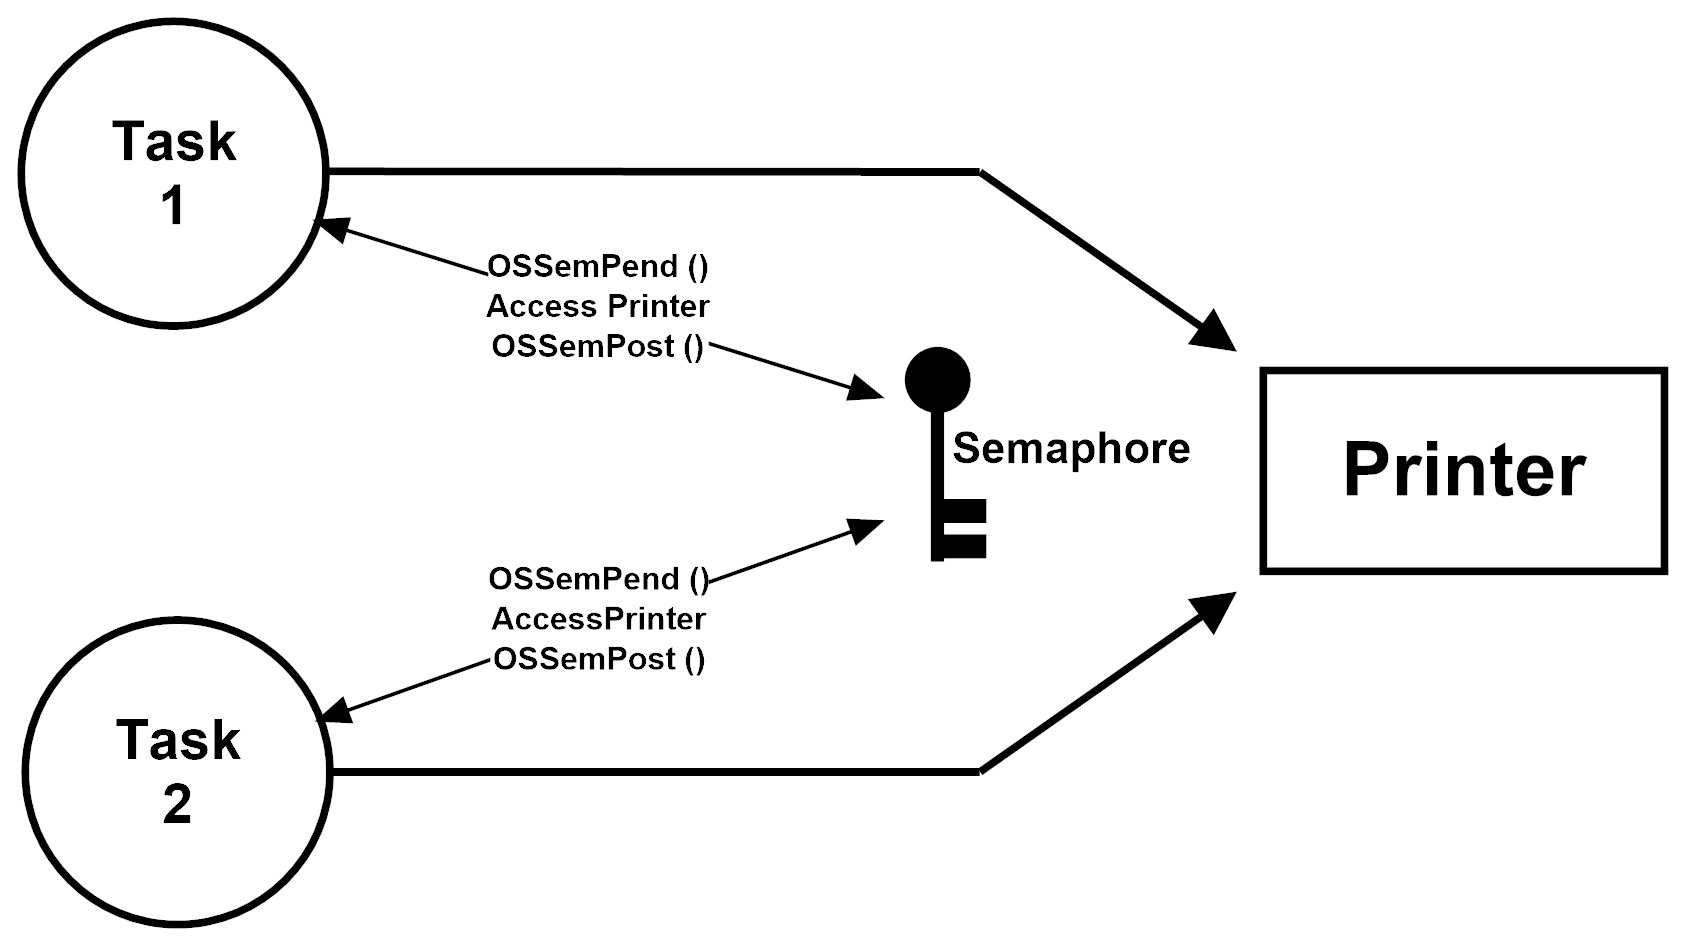
In the example below, the application uses a global semaphore object to properly share a resource, a Printer, among two tasks, Task 1 and Task 2.
Figure - Protecting a Shared Hardware Resource
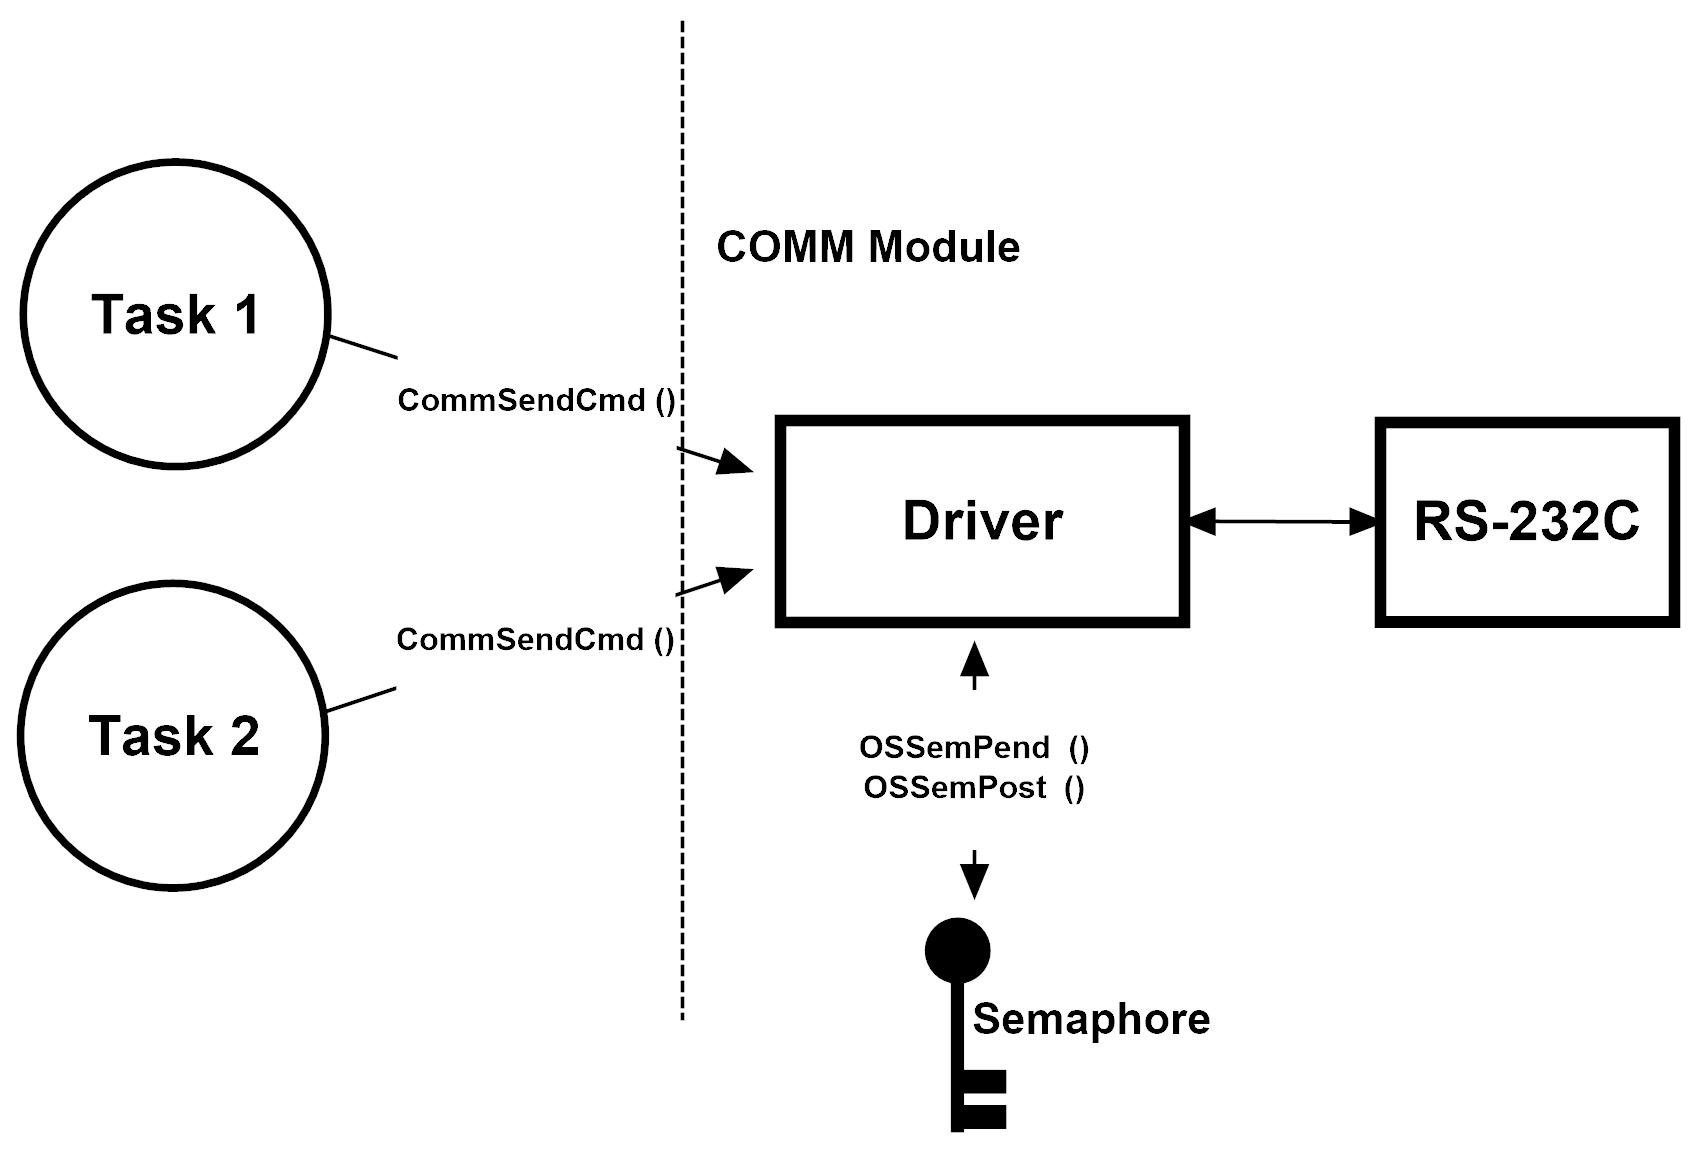
A disadvantage arises in that particular use-case. Indeed, the semaphore object itself needs to be shared and known by all tasks that need it. Furthermore, it needs to be created before any of the tasks tries to use it. It would be beneficial in terms of maintainability, and usability, if the semaphore object was encapsulated within a module that would export the services needed by the tasks. The illustration below shows a serial communications module, called COMM Module, that encapsulates the required locking. The tasks simply use the provided services to send commands and messages.
Figure - Encapsulating the Protection of a Shared Resource
A semaphore can also be used to protect a shared resource that is composed of more than one element. The semaphore is first initialized with the total number of available elements. When a task needs an element, it uses the semaphore to take an element. When it no longer needs the element, it gives it back through the semaphore. If a task tries to acquire an element and there is none left, the task will block until an element becomes available. An example of a counting semaphore can be found below.
Figure - Counting Semaphore Usage#
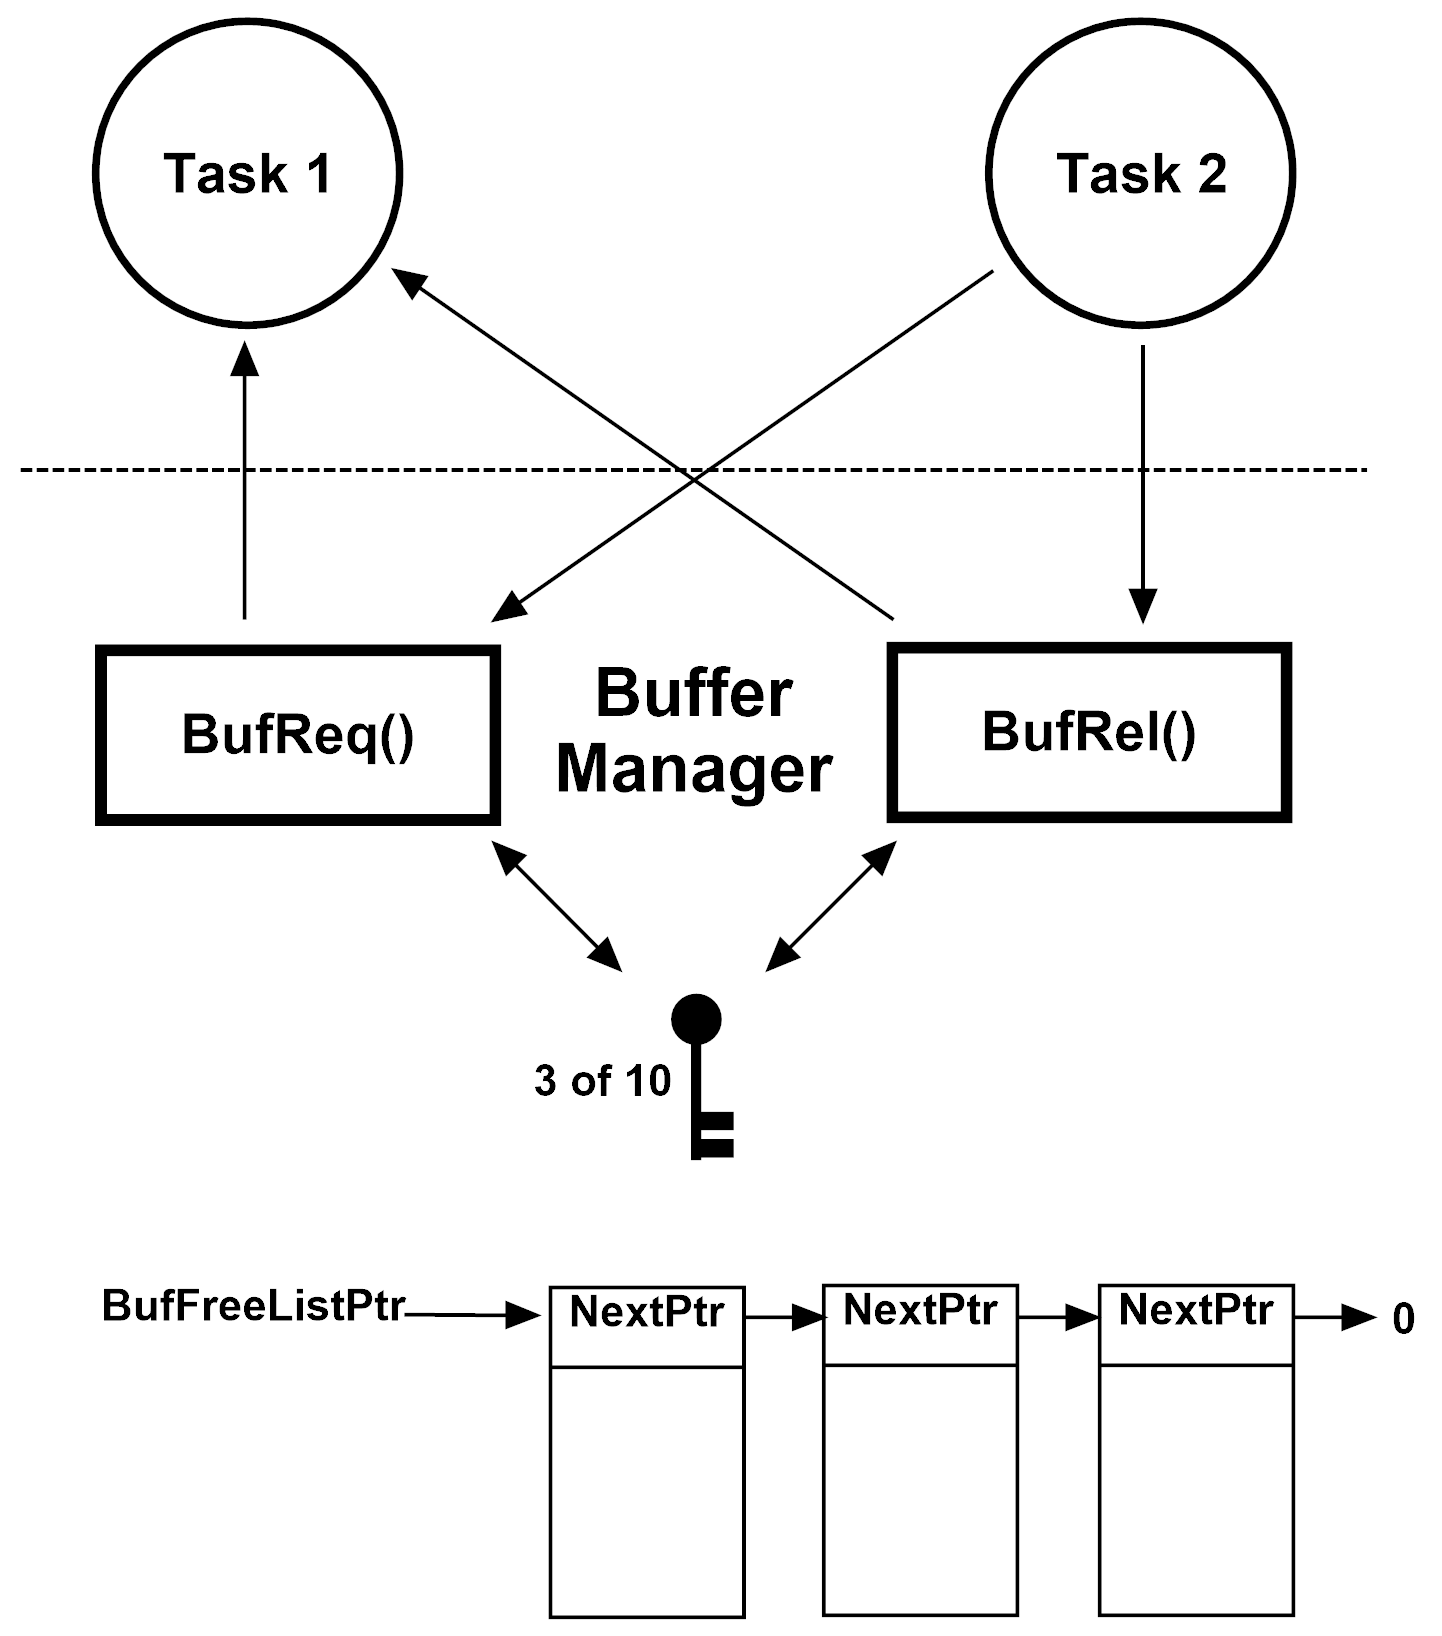
In this example, the application defines a module called Buffer Manager that manages 10 buffers. When a task needs a buffer, it calls BufReq(). When the task no longer needs the buffer, it releases the buffer with BufRel(). Internally, the BufReq() and BufRel() methods use the Kernel's OSSemPend() service to allocate a buffer to the calling task, and the OSSemPost() service to put the buffer back in the pool.
Mutual Exclusion Semaphore (Mutexes)#
If a shared resource can be used by only one task at a time, use a mutex. Because the semaphores are vulnerable to the priority-inversion problem, the mutex implementation in the kernel prevents priority inversions by using priority inheritance. You can use OSMutexCreate() to create a mutex and delete it with OSMutexDel(), as shown below.
Listing - Example of call to OSMutexCreate() and OSMutexDel()#
OS_MUTEX App_Mutex;
:
:
void App_SomeTask (void *p_arg)
{
RTOS_ERR err;
OS_OBJ_QTY qty;
:
:
/* Create the mutex. */
OSMutexCreate(&App_Mutex, /* Pointer to user-allocated mutex. */
"App Mutex", /* Name used for debugging. */
&err);
if (err.Code != RTOS_ERR_NONE) {
/* Handle error on mutex create. */
}
:
:
:
/* Delete the mutex. */
qty = OSMutexDel(&App_Mutex, /* Pointer to user-allocated mutex. */
OS_OPT_DEL_NO_PEND, /* Option: delete if 0 tasks are pending.*/
&err);
if (err.Code != RTOS_ERR_NONE) {
/* Handle error on mutex delete. */
}
:
:
}A task can use the protected resource by calling OSMutexPend(). Once the task is done, it can release the resource with OSMutexPost().
A mutex can be nested, which means that you can perform severals consecutive calls of OSMutexPend() on a given mutex. This will increment an internal nesting counter and set the error to RTOS_ERR_IS_OWNER. This error could actualy be used as a nesting indicator. The resource will be released after the same number of OSMutexPost() calls.
Listing - Example of call to OSMutexPend() and OSMutexPost()#
OS_MUTEX App_Mutex;
:
:
void App_SomeTask (void *p_arg)
{
RTOS_ERR err;
:
:
/* Acquire resource protected by mutex. */
OSMutexPend(&App_Mutex, /* Pointer to user-allocated mutex. */
1000, /* Wait for a maximum of 1000 OS Ticks. */
OS_OPT_PEND_BLOCKING, /* Task will block. */
DEF_NULL, /* Timestamp is not used. */
&err);
if (err.Code == RTOS_ERR_NONE) {
/* Resource acquired. */
:
:
/* Release resource protected by mutex. */
OSMutexPost(&App_Mutex, /* Pointer to user-allocated mutex. */
OS_OPT_POST_1, /* Only wake up highest-priority task. */
&err);
if (err.Code != RTOS_ERR_NONE) {
/* Handle error on mutex post. */
}
} else {
/* Handle error on mutex pend. */
}
:
:
}If the kernel configuration permits it, a task can force the pends on a mutex to abort with OSMutexPendAbort().
Listing - Example of call to OSMutexPendAbort()#
OS_MUTEX App_Mutex;
:
:
void App_SomeTask14 (void *p_arg)
{
RTOS_ERR err;
OS_OBJ_QTY qty;
:
:
/* Abort the highest-priority task's pend. */
qty = OSMutexPendAbort(&App_Mutex, /* Pointer to user-allocated mutex. */
OS_OPT_PEND_ABORT_1, /* Only abort the HP task's pend. */
&err);
if (err.Code != RTOS_ERR_NONE) {
/* Handle error on mutex pend abort. */
}
:
:
}Synchronization with Task Semaphores#
Since semaphores are sometimes used as a synchronization mechanism, the kernel allows all tasks to have a built-in semaphore. This means that instead of creating an external object and using it to synchronize, a task may pend on its built-in semaphore until some other task posts it.
The following example shows a task pending on itself using OSTaskSemPend() and another task waking it with OSTaskSemPost().
Listing - Example of call to OSTaskSemPend() and OSTaskSemPost()#
OS_TCB App_SomeTaskTCB;
:
:
void App_SomeTask (void *p_arg)
{
RTOS_ERR err;
OS_SEM_CTR ctr;
:
:
/* Block until another task signals this task. */
ctr = OSTaskSemPend( 1000, /* Wait for a maximum of 1000 OS Ticks.*/
OS_OPT_PEND_BLOCKING, /* Task will block. */
DEF_NULL,
&err);
if (err.Code == RTOS_ERR_NONE) {
/* Task has been signaled by App_SomeOtherTask. */
:
:
} else {
/* Handle error on task semaphore pend. */
}
:
:
}
void App_SomeOtherTask (void *p_arg)
{
RTOS_ERR err;
OS_SEM_CTR ctr;
:
:
/* Post the pending App_SomeTask task. */
ctr = OSTaskSemPost(&App_SomeTaskTCB, /* Pointer to App_SomeTask's TCB. */
OS_OPT_POST_NONE, /* No special option. */
&err);
if (err.Code != RTOS_ERR_NONE) {
/* Handle error on task semaphore post. */
}
:
:
}Like the regular semaphore, a pend on a task semaphore can be aborted with OSTaskSemPendAbort().
Listing - Example of call to OSTaskSemPendAbort()#
OS_TCB App_SomeTaskTCB;
:
:
void App_SomeOtherTask (void *p_arg)
{
RTOS_ERR err;
OS_OBJ_QTY qty;
:
:
/* Abort App_SomeTask's pend. */
qty = OSTaskSemPendAbort(&App_SomeTaskTCB, /* Pointer to App_SomeTask's TCB. */
OS_OPT_POST_NONE, /* No special option. */
&err);
if (err.Code != RTOS_ERR_NONE) {
/* Handle error on task semaphore pend abort. */
}
:
:
}Finally, a task can set the task's semaphore counter by calling OSTaskSemSet() to simulate the effect of calling OSTaskSemPost() multiple times without calling OSTaskSemPend().
Listing - Example of call to OSTaskSemSet()#
OS_TCB App_SomeTaskTCB;
:
:
void App_SomeOtherTask (void *p_arg)
{
RTOS_ERR err;
:
:
/* Set App_SomeTask's semaphore counter 10. */
OSTaskSemSet(&App_SomeTaskTCB, /* Pointer to App_SomeTask's TCB. */
10, /* 10 counts. */
&err);
if (err.Code != RTOS_ERR_NONE) {
/* Handle error on task semaphore set count. */
}
:
:
}Using Event Flags#
Event flags allow your application to use a bitmask, where each bit is a flag that represents a certain condition.
Creating and Deleting#
Before using an event flag, it must be created with OSFlagCreate(). An event flag can be deleted with OSFlagDel() as shown in the example below.
Listing - Example of call to OSFlagCreate() and OSFlagDel()#
OS_FLAG_GRP App_Flags;
:
:
void App_SomeTask (void *p_arg)
{
RTOS_ERR err;
OS_OBJ_QTY qty;
:
:
/* Create the event flag. */
OSFlagCreate(&App_Flags, /* Pointer to user-allocated event flag. */
"App Flags", /* Name used for debugging. */
0, /* Initial flags, all cleared. */
&err);
if (err.Code != RTOS_ERR_NONE) {
/* Handle error on event flag create. */
}
:
:
:
/* Delete the event flag. */
qty = OSFlagDel(&App_Flags, /* Pointer to user-allocated event flag. */
OS_OPT_DEL_NO_PEND, /* Option: delete if 0 tasks are pending. */
&err);
if (err.Code != RTOS_ERR_NONE) {
/* Handle error on event flag delete. */
}
:
:
}Using an Event Flag#
A task can wait for a certain flag combination before doing any work. The example below shows three tasks: a task that waits with OSFlagPend() and two other tasks that set a flag with OSFlagPost().
Listing - Example of call to OSFlagPend() and OSFlagPost()#
OS_FLAG_GRP App_Flags;
:
:
/* Application Flags. */
#define APP_FLAG_A (1u << 0)
#define APP_FLAG_B (1u << 1)
#define APP_FLAG_ALL (APP_FLAG_A | APP_FLAG_B)
:
:
void App_SomeTask (void *p_arg)
{
RTOS_ERR err;
OS_FLAGS flags;
:
:
/* Wait until all flags are set. */
flags = OSFlagPend(&App_Flags, /* Pointer to user-allocated event flag. */
APP_FLAG_ALL, /* Flag bitmask to match. */
100, /* Wait for 100 OS Ticks maximum. */
OS_OPT_PEND_FLAG_SET_ALL |/* Wait until all flags are set and */
OS_OPT_PEND_BLOCKING |/* task will block and */
OS_OPT_PEND_FLAG_CONSUME, /* function will clear the flags. */
DEF_NULL, /* Timestamp is not used. */
&err);
if (err.Code == RTOS_ERR_NONE) {
/* Flags were set by the other tasks. */
:
:
} else {
/* Handle error on flag pend. */
}
:
:
}
void App_SomeOtherTaskA (void *p_arg)
{
RTOS_ERR err;
OS_FLAGS flags;
:
:
/* Set Application Flag A. */
flags = OSFlagPost(&App_Flags, /* Pointer to user-allocated event flag. */
APP_FLAG_A, /* Application Flag A bitmask. */
OS_OPT_POST_FLAG_SET, /* Set the flag. */
&err);
if (err.Code != RTOS_ERR_NONE) {
/* Handle error on flag post. */
}
:
:
}
void App_SomeOtherTaskB (void *p_arg)
{
RTOS_ERR err;
OS_FLAGS flags;
:
:
/* Set Application Flag B. */
flags = OSFlagPost(&App_Flags, /* Pointer to user-allocated event flag. */
APP_FLAG_B, /* Application Flag B bitmask. */
OS_OPT_POST_FLAG_SET, /* Set the flag. */
&err);
if (err.Code != RTOS_ERR_NONE) {
/* Handle error on flag post. */
}
:
:
}If the kernel configuration allows it, the pend on a flag combination can be aborted with OSFlagPendAbort().
Listing - Example of call to OSFlagPendAbort()#
OS_FLAG_GRP App_Flags;
:
:
void App_SomeTask (void *p_arg)
{
RTOS_ERR err;
OS_OBJ_QTY qty;
:
:
/* Abort the highest-priority task's pend. */
qty = OSFlagPendAbort(&App_Flags, /* Pointer to user-allocated event flag. */
OS_OPT_PEND_ABORT_1, /* Only abort the HP task's pend. */
&err);
if (err.Code != RTOS_ERR_NONE) {
/* Handle error on flag pend abort. */
}
:
:
}A task can use OSFlagPendGetFlagsRdy() to get the currently active flags.
Listing - Example of call to OSFlagPendGetFlagsRdy()#
OS_FLAG_GRP App_Flags;
:
:
void App_SomeTask (void *p_arg)
{
RTOS_ERR err;
OS_FLAGS flags;
:
:
/* Get flags that readied this task. */
flags = OSFlagPendGetFlagsRdy(&err);
if (err.Code == RTOS_ERR_NONE) {
/* 'flags' contains the flags that woke up this task. */
} else {
/* Handle error on get ready flags. */
}
:
:
}Using Message Queues#
Message queues allow your application to send messages between tasks.
Creating and Deleting#
Before using a message queue, it must first be created with OSQCreate(). A message queue can be deleted with OSQDel(). For examples of both, see the example below.
Listing - Example of call to OSQCreate() and OSQDel()#
OS_Q App_MessageQ;
:
:
void App_SomeTask (void *p_arg)
{
RTOS_ERR err;
OS_OBJ_QTY qty;
:
:
/* Create the message queue. */
OSQCreate(&App_MessageQ, /* Pointer to user-allocated message queue. */
"App MessageQ", /* Name used for debugging. */
10, /* Queue will have 10 messages maximum. */
&err);
if (err.Code != RTOS_ERR_NONE) {
/* Handle error on message queue create. */
}
:
:
:
/* Delete the message queue. */
qty = OSQDel(&App_MessageQ, /* Pointer to user-allocated message queue. */
OS_OPT_DEL_NO_PEND, /* Option: delete if 0 tasks are pending. */
&err);
if (err.Code != RTOS_ERR_NONE) {
/* Handle error on message queue delete. */
}
:
:
}Using Message Queues#
A task can wait for a message to be added to the queue by calling OSQPend(). Tasks can send messages by calling OSQPost(). The example below shows one task waiting for a message, while another task posts a message.
Note: The content of the message is allocated in the sending task's stack. Only a pointer to the message is sent to the waiting task, rather than the message itself.
Listing - Example of call to OSQPend() and OSQPost()#
typedef struct app_message {
CPU_INT08U type;
CPU_INT08U *p_buf;
} APP_MESSAGE;
:
:
OS_Q App_MessageQ;
:
:
void App_SomeTask (void *p_arg)
{
RTOS_ERR err;
void *p_raw_msg;
OS_MSG_SIZE msg_size;
APP_MESSAGE *p_msg;
:
:
/* Wait until task receives a message. */
p_raw_msg = OSQPend(&App_MessageQ, /* Pointer to user-allocated message queue. */
100, /* Wait for 100 OS Ticks maximum. */
OS_OPT_PEND_BLOCKING, /* Task will block. */
&msg_size, /* Will contain size of message in bytes. */
DEF_NULL, /* Timestamp is not used. */
&err);
if (err.Code == RTOS_ERR_NONE) {
/* Got message, handle. */
p_msg = (APP_MESSAGE *)p_raw_msg;
} else {
/* Handle error on message queue pend. */
}
:
:
}
void App_SomeOtherTask (void *p_arg)
{
RTOS_ERR err;
APP_MESSAGE msg;
:
:
/* Fill test message. */
msg.type = 42;
msg.p_buf = "Test Message";
/* Send message to the waiting task. */
OSQPost(&App_MessageQ, /* Pointer to user-allocated message queue. */
(void *)&msg, /* The message is a pointer to the APP_MESSAGE. */
(OS_MSG_SIZE)sizeof(void *), /* Size of the message is the size of a pointer. */
OS_OPT_POST_FIFO, /* Add message at the end of the queue. */
&err);
if (err.Code != RTOS_ERR_NONE) {
/* Handle error on message queue post. */
}
:
:
}If the kernel configuration allows it, the wait for a message can be aborted with OSQPendAbort().
Listing - Example of call to OSQPendAbort()#
OS_Q App_MessageQ;
:
:
void App_SomeTask (void *p_arg)
{
RTOS_ERR err;
OS_OBJ_QTY qty;
:
:
/* Abort the highest-priority task's pend. */
qty = OSQPendAbort(&App_MessageQ, /* Pointer to user-allocated message queue. */
OS_OPT_PEND_ABORT_1, /* Only abort the HP task's pend. */
&err);
if (err.Code != RTOS_ERR_NONE) {
/* Handle error on message queue pend abort. */
}
:
:
}An application can remove all messages from a message queue by using OSQFlush().
Listing - Example of call to OSQFlush()#
OS_Q App_MessageQ;
:
:
void App_SomeTask (void *p_arg)
{
RTOS_ERR err;
OS_MSG_QTY qty;
:
:
/* Flush (empty) the message queue. */
qty = OSQFlush(&App_MessageQ,
&err);
if (err.Code != RTOS_ERR_NONE) {
/* Handle error on message queue flush. */
}
:
:
}Using Task Message Queues#
Since message queues are often used to send messages to a single task, a task can have its own built-in message queue. The example call OSTaskCreate() in Task Management Kernel Services shows how to create a task which can have up to 10 messages pending.
A task can wait on its built-in message queue by calling OSTaskQPend(). Another task can send a message to the waiting task by calling OSTaskQPost().
Listing - Example of call to OSTaskQPend() and OSTaskQPost()#
typedef struct app_message {
CPU_INT08U type;
CPU_INT08U *p_buf;
} APP_MESSAGE;
:
:
OS_TCB App_SomeTaskTCB;
:
:
void App_SomeTask (void *p_arg)
{
RTOS_ERR err;
void *p_raw_msg;
OS_MSG_SIZE msg_size;
APP_MESSAGE *p_msg;
:
:
/* Wait until task receives a message. */
p_raw_msg = OSTaskQPend( 100, /* Wait for 100 OS Ticks maximum. */
OS_OPT_PEND_BLOCKING, /* Task will block. */
&msg_size, /* Will contain size of message in bytes.*/
DEF_NULL, /* Timestamp is not used. */
&err);
if (err.Code == RTOS_ERR_NONE) {
/* Got message, handle. */
p_msg = (APP_MESSAGE *)p_raw_msg;
} else {
/* Handle error on task message queue pend. */
}
:
:
}
void App_SomeOtherTask (void *p_arg)
{
RTOS_ERR err;
APP_MESSAGE msg;
:
:
/* Fill test message. */
msg.type = 42;
msg.p_buf = "Test Message";
/* Send message to the waiting task. */
OSTaskQPost(&App_SomeTaskTCB, /* Pointer to pending task's TCB. */
(void *)&msg, /* Message is a pointer to the APP_MESSAGE. */
(OS_MSG_SIZE)sizeof(void *), /* Size of message is the size of a pointer. */
OS_OPT_POST_FIFO, /* Add message at the end of the queue. */
&err);
if (err.Code != RTOS_ERR_NONE) {
/* Handle error on task message queue post. */
}
:
:
}If the kernel configuration allows it, the wait for a message can be aborted with OSTaskQPendAbort().
Listing - Example of call to OSTaskQPendAbort()#
OS_TCB App_SomeTaskTCB;
:
:
void App_SomeOtherTask (void *p_arg)
{
RTOS_ERR err;
CPU_BOOLEAN aborted;
:
:
/* Abort the task's pend. */
aborted = OSTaskQPendAbort(&App_SomeTaskTCB, /* Pointer to pending task's TCB. */
OS_OPT_POST_NONE, /* No special options. */
&err);
if (err.Code != RTOS_ERR_NONE) {
/* Handle error on task message queue pend abort. */
}
:
:
}Your application can remove all messages from a task message queue by using OSTaskQFlush().
Listing - Example of call to OSTaskQFlush()#
OS_TCB App_SomeTaskTCB;
:
:
void App_SomeOtherTask (void *p_arg)
{
RTOS_ERR err;
OS_MSG_QTY qty;
:
:
/* Flush (empty) the message queue. */
qty = OSTaskQFlush(&App_SomeTaskTCB, /* Pointer to pending task's TCB. */
&err);
if (err.Code != RTOS_ERR_NONE) {
/* Handle error on task message queue flush. */
}
:
:
}Using Monitors#
As previously discussed in Advanced Task Synchronization , monitors allow a task to pend on a certain condition.
Creating and Deleting#
Before using a monitor, you must create it with OSMonCreate(). You can delete a monitor with OSMonDel(), as shown in the example below.
Listing - Example of call to OSMonCreate() and OSMonDel()#
OS_MON App_Mon;
CPU_INT32U App_State;
:
:
void App_SomeTask (void *p_arg)
{
RTOS_ERR err;
OS_OBJ_QTY qty;
:
:
/* Create Monitor. */
OSMonCreate(&App_Mon, /* Pointer to user allocated monitor. */
"App Monitor", /* Name used for debugging. */
(void *)&App_State, /* Global monitor data: the State. */
&err);
if (err.Code != RTOS_ERR_NONE) {
/* Handle error on monitor create. */
}
:
:
:
/* Delete Monitor. */
qty = OSMonDel(&App_Mon, /* Pointer to user allocated monitor. */
OS_OPT_DEL_NO_PEND, /* Option: delete if 0 tasks are pending. */
&err);
if (err.Code != RTOS_ERR_NONE) {
/* Handle error on monitor delete. */
}
:
:
}Using a Monitor#
Tasks can use OSMonOp() to operate on a monitor. This function will register two callbacks:
One is called immediately: the Enter callback
The other is called every time the monitor is accessed after the current call: the Evaluate callback.
Some applications only require either one of the two functions.
In the examples below, one task uses the Enter callback to change the state of the monitor, while the other task uses the Evaluate callback to determine if the current state matches the one it requires.
The last section illustrates the usage of both callbacks.
Listing - Example of call to OSMonOp(), pend-like operation#
OS_MON App_Mon;
:
:
/* Application States. */
#define APP_MON_PEND_ON_STATE 0xC0FFEEu
:
:
OS_MON_RES App_MonPend (OS_MON *p_mon,
void *p_eval_data,
void *p_arg)
{
CPU_INT32U *p_state;
OS_MON_RES res;
/* Prevent compiler warning. */
PP_UNUSED_PARAM(p_arg);
/* Get State variable. */
p_state = (CPU_INT32U *)p_mon->MonDataPtr;
/* If new state matches, wake up the pending task. */
if (*p_state == (CPU_INT32U)p_eval_data) {
res = OS_MON_RES_ALLOW;
} else {
res = OS_MON_RES_BLOCK;
}
return (res);
}
:
:
void App_SomeTask (void *p_arg)
{
RTOS_ERR err;
:
:
/* Wait for State. */
OSMonOp(&App_Mon, /* Pointer to user allocated monitor. */
500, /* Timeout: 500 OS Ticks. */
(void *)APP_MON_PEND_ON_STATE, /* Wait for this state. */
DEF_NULL, /* Function used on entering the monitor. */
&App_MonPend, /* Function used for evaluation. */
0, /* Option: none. */
&err);
if (err.Code == RTOS_ERR_NONE) {
/* Operation successful. */
} else {
/* Handle error on monitor operation. */
}
:
:
}Listing - Example of call to OSMonOp(), post-like operation#
OS_MON App_Mon;
:
:
/* Application States. */
#define APP_MON_PEND_ON_STATE 0xC0FFEEu
:
:
OS_MON_RES App_MonPost (OS_MON *p_mon,
void *p_arg)
{
CPU_INT32U *p_state;
/* Get State variable. */
p_state = (CPU_INT32U *)p_mon->MonDataPtr;
/* Change state. */
*p_state = (CPU_INT32U)p_arg;
return (OS_MON_RES_ALLOW);
}
:
:
void App_SomeOtherTask (void *p_arg)
{
RTOS_ERR err;
:
:
/* Change State. */
OSMonOp(&App_Mon, /* Pointer to user allocated monitor. */
0, /* Timeout: none, this is a post operation. */
(void *)APP_MON_PEND_ON_STATE, /* Change state to new value. */
&App_MonPost, /* Function used on entering the monitor. */
DEF_NULL, /* Function used for evaluation. */
0, /* Option: none. */
&err);
if (err.Code != RTOS_ERR_NONE) {
/* Handle error on monitor operation. */
}
:
:
}Callback Usage Details#
The kernel offers a generic framework for creating monitors. Your application must implement both an enter and an eval callback to create the desired effect. The following sub-sections describe the interactions between both callbacks. Note that the kernel example contains an example usage of a monitor that illustrates how tasks could wait until a Finite-State Machine is in a specific state.
Enter Callback#
The enter callback has the following prototype:
Listing - Enter callback prototype#
OS_MON_RES EnterCallback(OS_MON *p_mon,
void *p_data);When calling OSMonOp(), the enter callback is called before anything else. The first parameter is a pointer to the monitor that is being operated on and the second parameter is the p_arg parameter passed to OSMonOp() .
Depending on the callback's return value, different actions will be taken. The following table describes the return values for the enter callback.
Return Value | Description |
|---|---|
OS_MON_RES_ALLOW | The calling task will not be blocked. |
OS_MON_RES_BLOCK | The calling task will be blocked. The p_on_eval argument passed to OSMonOp() will be saved as the task's evaluation callback. OSMonOp() 's p_arg argument will be saved as the task's evaluation data argument. |
OS_MON_RES_STOP_EVAL | Returning this will prevent the evaluation callback of the waiting tasks from being executed. Can be ORed with the previous return values. |
If the p_enter argument of the OSMonOp() call is DEF_NULL, the default return value of OS_MON_RES_BLOCK | OS_MON_RES_STOP_EVAL will be used instead.
Evaluation Callback#
The evaluation callback has the following prototype:
Listing - Evaluation callback prototype#
OS_MON_RES EvaluationCallback(OS_MON *p_mon,
void *p_eval_data,
void *p_arg);After a monitor operation, if the enter callback does not prevent the evaluation from taking place, the monitor calls the evaluation callback of every task waiting for a specific condition. The callback's first parameter, p_mon, is a pointer to the monitor that is being operated on. The second parameter, p_eval_data, is the p_arg parameter that was passed to the OSMonOp() call that blocked the task, and the third parameter, p_arg, is the the p_arg parameter passed to the OSMonOp() call that caused the evaluation callback to be executed.
Like the enter callback, depending on the evaluation callback's return value, different actions will be taken. The following table describes the return values for the evaluation callback.
Return Value | Description |
|---|---|
OS_MON_RES_ALLOW | It was determined, based on p_eval_data, p_arg and the monitor's data that the waiting task's specific condition is met, it must be readied. |
OS_MON_RES_BLOCK | The waiting task cannot be resumed because its specific condition was not met. |
OS_MON_RES_STOP_EVAL | Prevent the evaluation of the monitor by the other waiting tasks. Can be ORed with the previous return values. |
The OS_MON_RES_STOP_EVAL return value is used to prevent multiple tasks from becoming ready at the same time.
Kernel Time Management#
Time Base Management#
An application can request the current time (measured in OS Ticks) from the kernel by calling OSTimeGet().
Listing - Example of call to OSTimeGet() and OSTimeSet()#
void App_SomeTask (void *p_arg)
{
RTOS_ERR err;
OS_TICK time;
:
:
/* Get kernel time, in OS Ticks. */
time = OSTimeGet(&err);
if (err.Code != RTOS_ERR_NONE) {
/* Handle error on time get. */
}
}Time Delays#
Basic Delays#
A task can pause itself for a specified amount of time, specified either in OS Ticks or in Wall Clock time. The snippet below showcases the usage of OSTimeDly() and OSTimeDlyHMSM().
Listing - Example of call to OSTimeDly() and OSTimeDlyHMSM()#
void App_SomeTask (void *p_arg)
{
RTOS_ERR err;
:
:
/* Delay task for 100 OS Ticks. */
OSTimeDly( 100, /* Delay the task for 100 OS Ticks. */
OS_OPT_TIME_DLY, /* Delay is relative to current time. */
&err);
if (err.Code != RTOS_ERR_NONE) {
/* Handle error on time delay. */
}
:
:
}
void App_SomeTask2 (void *p_arg)
{
RTOS_ERR err;
:
:
/* Delay task for 1:03:04.250. */
OSTimeDlyHMSM( 1, /* 1 hour, */
3, /* 3 minutes, */
4, /* 4 seconds and */
250, /* 250 milliseconds. */
OS_OPT_TIME_DLY, /* Delay is relative to current time. */
&err);
if (err.Code != RTOS_ERR_NONE) {
/* Handle error on time delay in HMSm format. */
}
:
:
}Care must be taken when using relative delays. Indeed, these delays are not accurate since they begin counting down at the next Kernel tick which could occur immediately. The figure below illustrates the imprecision caused by relative delays.
Figure - OSTimeDly() Accuracy#
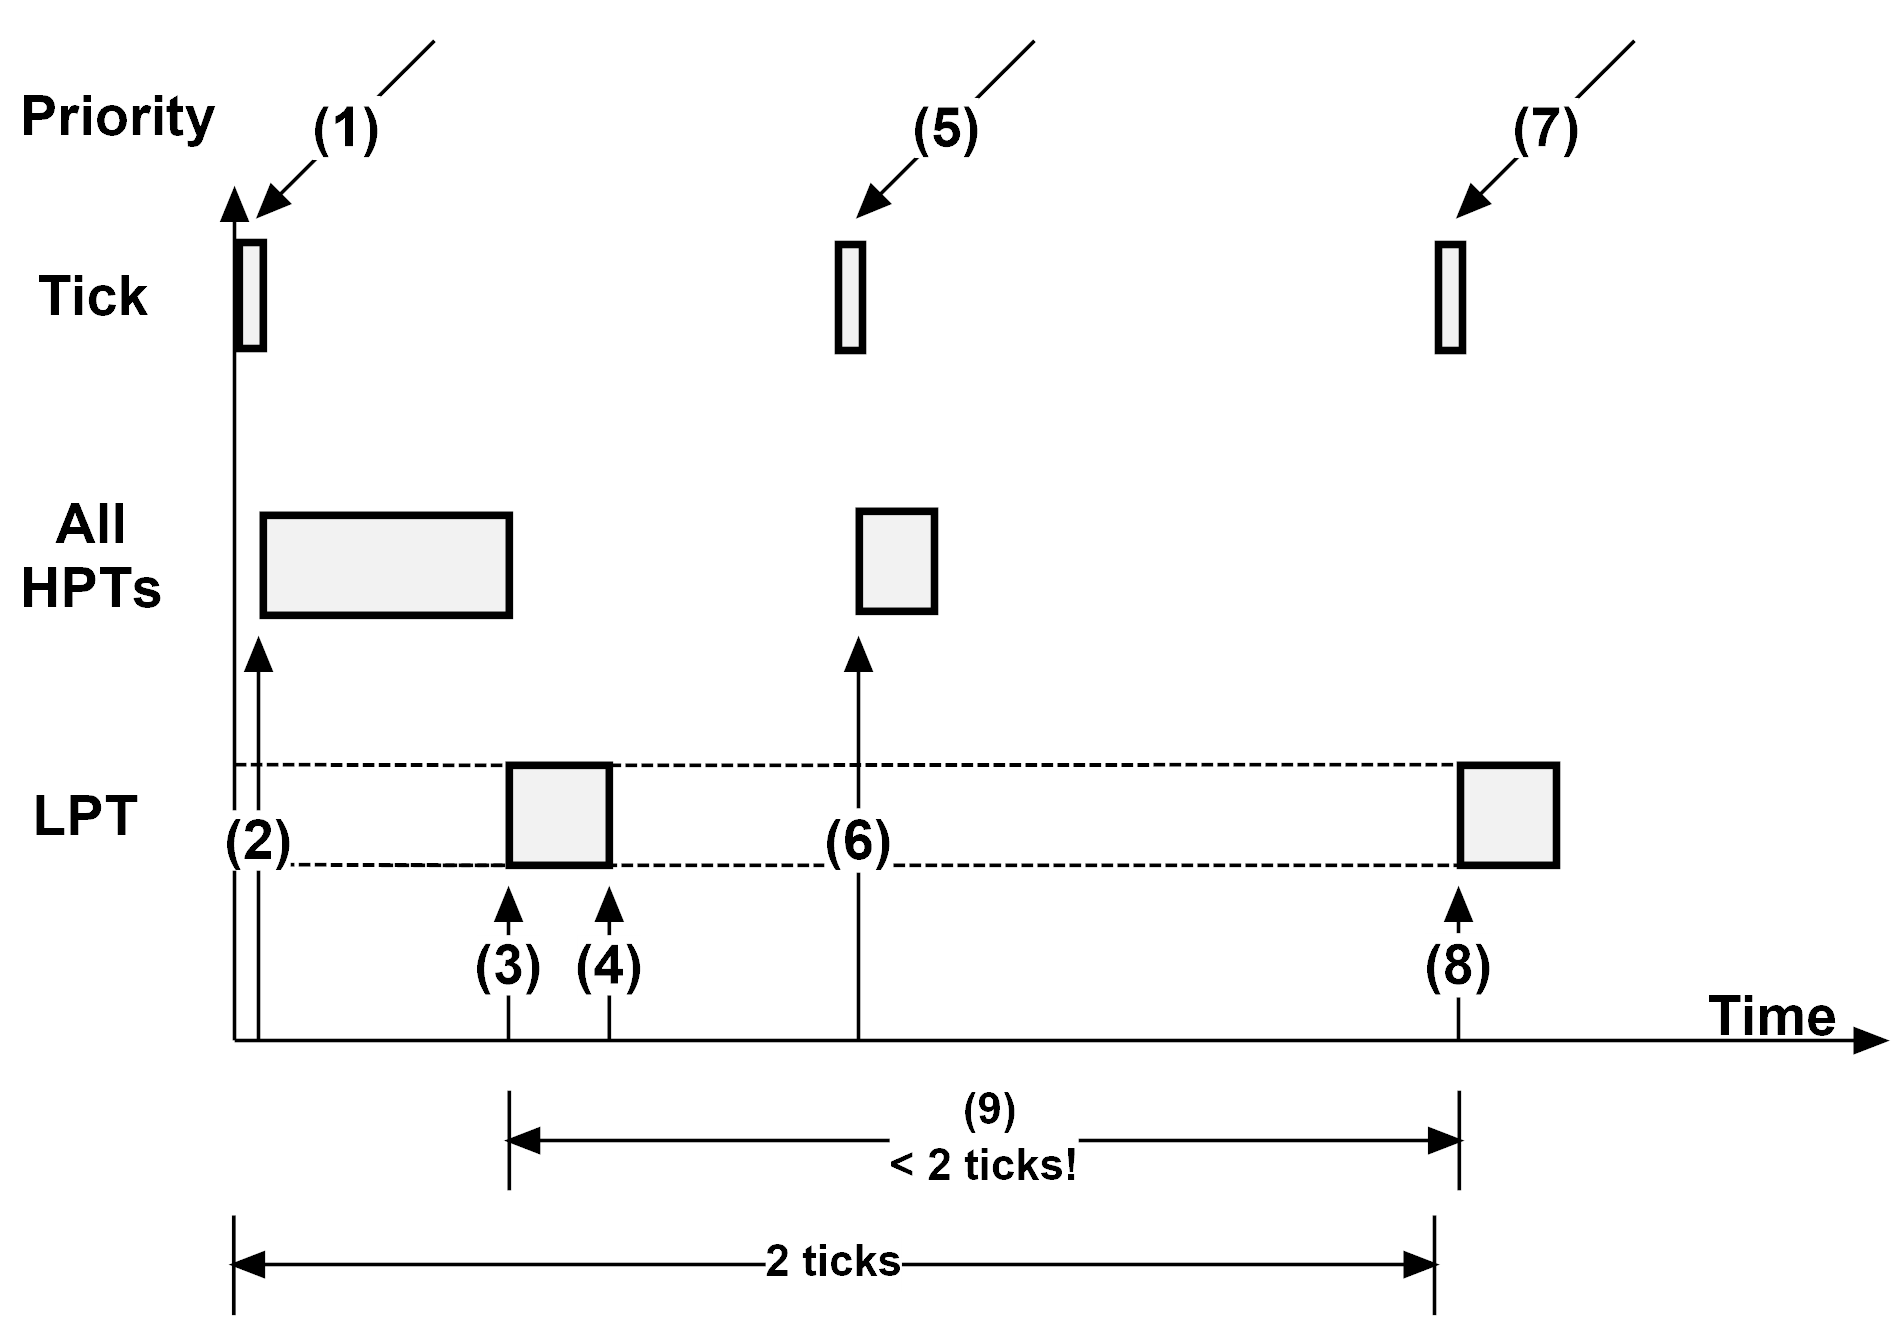
(1) A tick interrupt occurs and the Kernel services the ISR.
(2) At the end of the ISR, all Higher Priority Tasks (HPTs) execute. The execution time of HPTs is unknown and can vary.
(3) Once all HPTs have executed, the Kernel runs the task that has called OSTimeDly(). For the sake of discussion, it is assumed that the task is a lower priority task (LPT).
(4) The task calls OSTimeDly() and specifies to delay for two ticks in “relative” mode. At this point, the Kernel places the calling task in the tick list where it will wait for two kernel ticks to expire. The delayed task consumes zero CPU time while waiting for the time to expire.
(5) The next tick occurs. If there are HPTs waiting for this particular tick, the Kernel will schedule them to run at the end of the ISR.
(6) The HPTs execute.
(7) The next tick interrupt occurs. This is the tick that the LPT was waiting for and will now be made ready-to-run by the Kernel.
(8) Since there are no HPTs to execute on this tick, the Kernel switches to the LPT.
(9) Given the execution time of the HPTs, the time delay is not exactly two ticks, as requested. In fact, it is virtually impossible to obtain a delay of exactly the desired number of ticks. You might ask for a delay of two ticks, but the very next tick could occur almost immediately after calling OSTimeDly(). Imagine what might happen if all HPTs took longer to execute and pushed (3) and (4) further to the right. In that case, the delay would actually appear as one tick instead of two.
Resuming a Task#
If the kernel configuration allows it, a task can abort the delay requested by another task with OSTimeDlyResume().
Listing - Example of call to OSTimeDlyResume()#
OS_TCB App_SomeTaskTCB;
:
:
void App_SomeOtherTask (void *p_arg)
{
RTOS_ERR err;
:
:
/* Cancel the requested delay. */
OSTimeDlyResume(&App_SomeTaskTCB, /* Pointer to the waiting task's TCB. */
&err);
if (err.Code != RTOS_ERR_NONE) {
/* Handle error on time delay abort. */
}
:
:
}Periodic Delays#
A task can specify that the delay will be periodic. The listing below shows an example call to OSTimeDly() with a periodic delay.
Listing - Example of call to OSTimeDly() and OSTimeDlyHMSM()#
void App_SomeTask3 (void *p_arg)
{
RTOS_ERR err;
:
:
while (DEF_ON) {
/* Delay task for 4 OS Ticks. */
OSTimeDly( 4, /* Delay the task for 4 OS Ticks. */
OS_OPT_TIME_PERIODIC, /* Delay is periodic since last call. */
&err);
if (err.Code != RTOS_ERR_NONE) {
/* Handle error on time delay. */
}
:
:
}
}This will cause the Kernel to schedule the task when at least 4 Kernel ticks have occurred since the last time the task called OSTimeDly(). The image below illustrates a periodic delay of 4 Kernel ticks.
Figure - Periodic Delay#
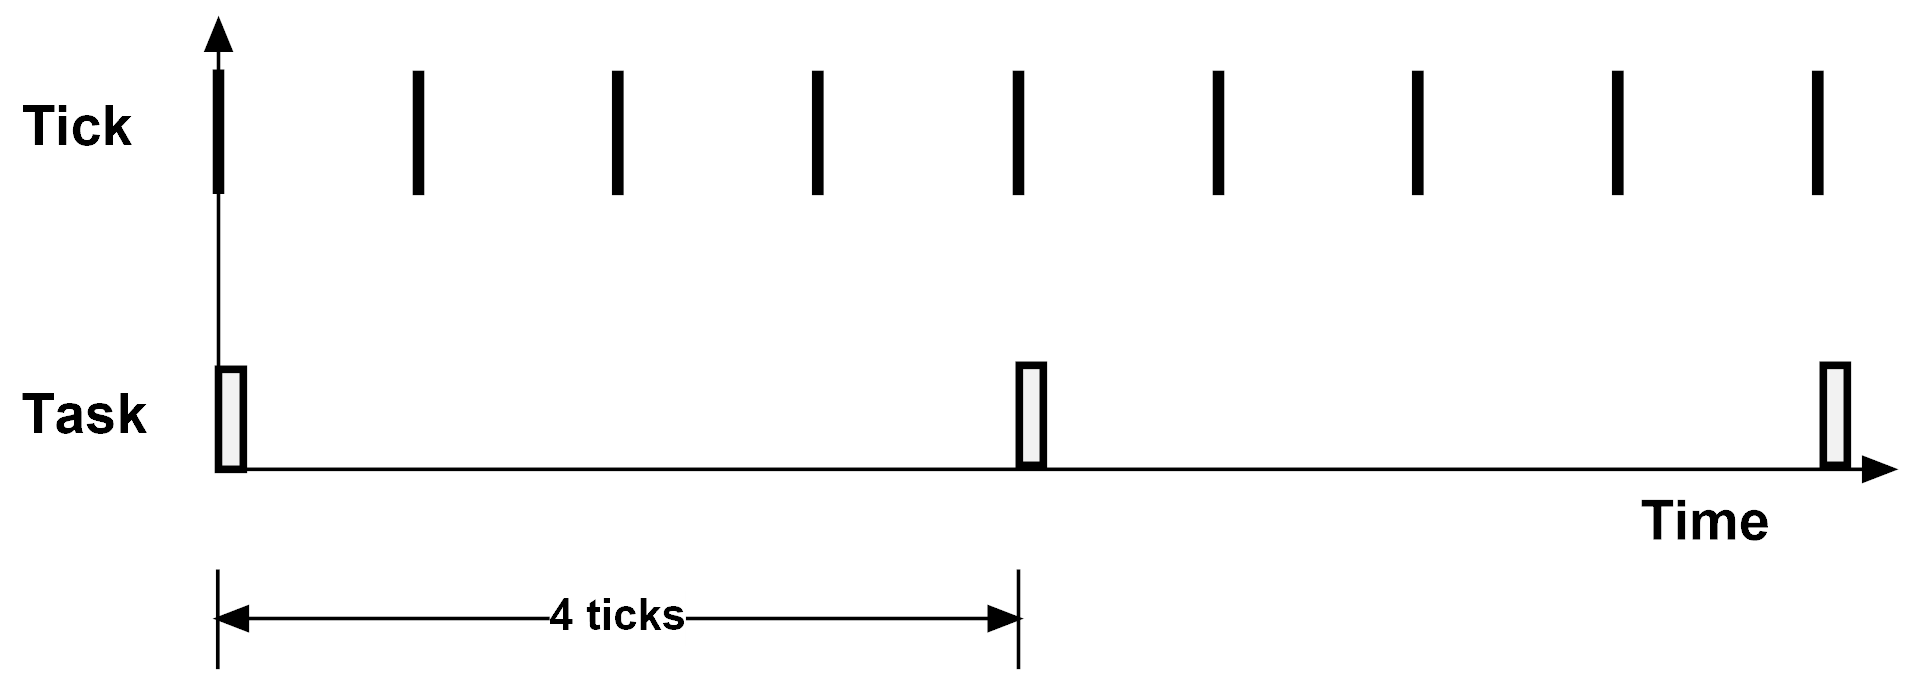
When using periodic delays, the Kernel will determine the precise OS Tick value at which the task must wake up to ensure the needed period elapsed. At the same time, the Kernel will account for the variance in CPU usage
Using the Kernel Timers#
The kernel allows your application to define software countdown timers that call a user-defined function once the timer expires.
Overview#
The Kernel timers are handled by a task, which is known as the Timer Task. This task manages a list of user-defined software timers and calls the user-registered callback when the timer expires. By default, the Timer Task will execute 10 times per second, or at 10 Hz. This allows the software timers to use a timebase of 100 ms. This rate, known as the Timer Task Rate can be changed at run-time. See the Timer Task row in the Kernel Run-Time Application Specific Configurations page for more information. The software timers use this timebase to define periods and delays. For example, a one second, one-shot software timer would use a delay of 10 Timer ticks, because 10*100 ms equals one second.
Figure - The Timer Task#
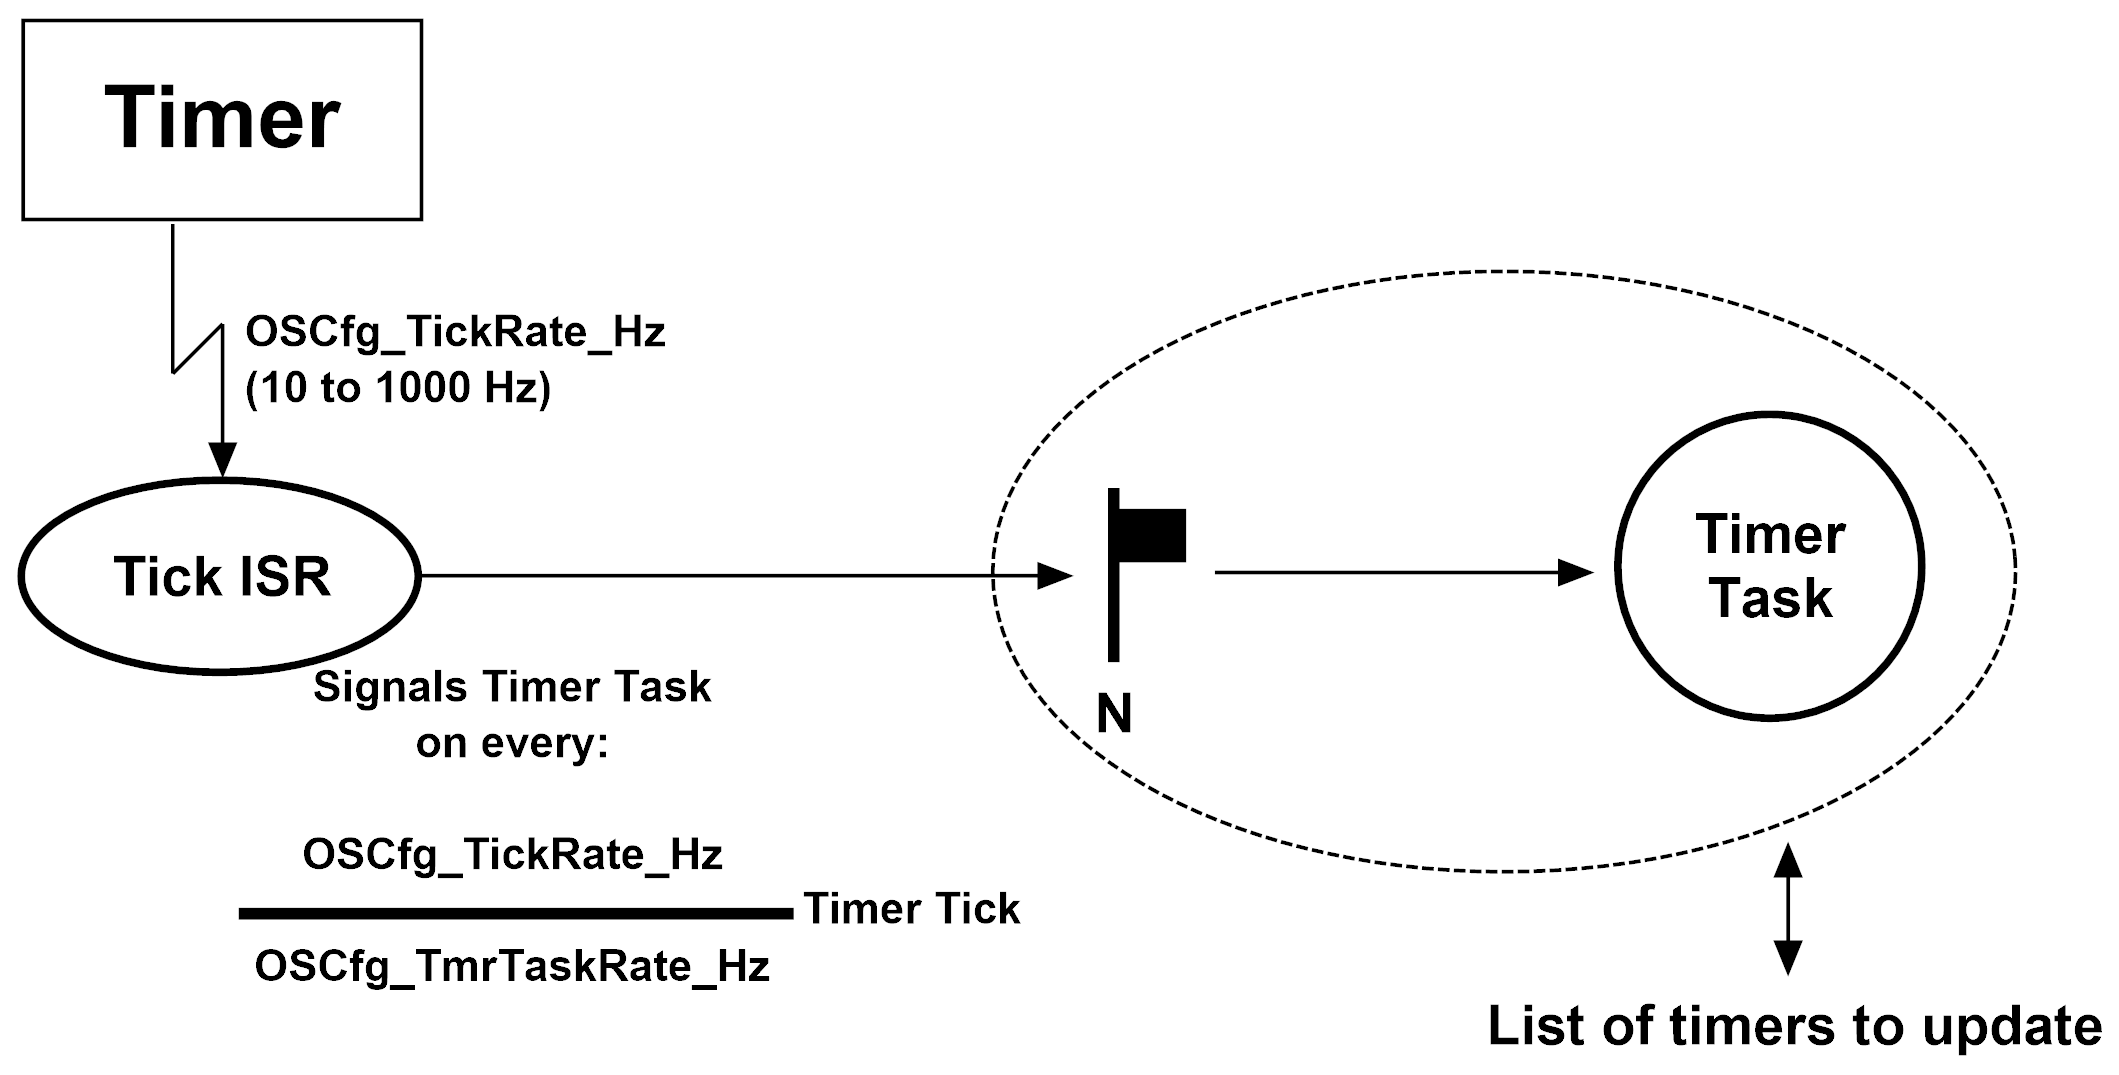
As seen in the figure above, the Timer Task is executed every OSCfg_TickRate_Hz/OSCfg_TmrTaskRate_Hz Kernel tick. By default, the Tick Rate is 1000 Hz and the Timer Tick Rate is 10 Hz, this means that the Timer Task is signaled once every 100 Kernel tick.
Creating and Deleting Timers#
Your application can create a periodic timer or a one-shot timer with OSTmrCreate(). The timer can be deleted with OSTmrDel() (see the example below).
Listing - Example of call to OSTmrCreate() and OSTmrDel()#
OS_TMR App_Timer;
:
:
void App_TimerCallback (void *p_tmr,
void *p_arg)
{
/* Called when timer expires: */
/* 'p_tmr' is pointer to the user-allocated timer. */
/* 'p_arg' is argument passed when creating the timer. */
}
:
:
void App_SomeTask (void *p_arg)
{
RTOS_ERR err;
CPU_BOOLEAN deleted;
:
:
/* Create a periodic timer. */
OSTmrCreate(&App_Timer, /* Pointer to user-allocated timer. */
"App Timer", /* Name used for debugging. */
0, /* 0 initial delay. */
100, /* 100 Timer Ticks period. */
OS_OPT_TMR_PERIODIC, /* Timer is periodic. */
&App_TimerCallback, /* Called when timer expires. */
DEF_NULL, /* No arguments to callback. */
&err);
if (err.Code != RTOS_ERR_NONE) {
/* Handle error on timer create. */
}
:
:
:
/* Delete the periodic timer. */
deleted = OSTmrDel(&App_Timer, /* Pointer to user-allocated timer. */
&err);
if (err.Code != RTOS_ERR_NONE) {
/* Handle error on timer delete. */
}
:
:
}Using Timers#
Once a timer is created, it can be started with OSTmrStart().
Listing - Example of call to OSTmrStart()#
OS_TMR App_Timer;
:
:
void App_SomeTask (void *p_arg)
{
RTOS_ERR err;
CPU_BOOLEAN started;
:
:
/* Start the timer. */
started = OSTmrStart(&App_Timer, /* Pointer to user-allocated timer. */
&err);
if (err.Code != RTOS_ERR_NONE) {
/* Handle error on timer start. */
}
:
:
}A running timer can be stopped by calling OSTmrStop().
Listing - Example of call to OSTmrStop()#
OS_TMR App_Timer;
:
:
void App_SomeTask (void *p_arg)
{
RTOS_ERR err;
CPU_BOOLEAN stopped;
:
:
/* Stop the timer. */
stopped = OSTmrStop(&App_Timer, /* Pointer to user-allocated timer. */
OS_OPT_TMR_NONE, /* Do not execute callback. */
DEF_NULL, /* No arguments to callback. */
&err);
if (err.Code != RTOS_ERR_NONE) {
/* Handle error on timer stop. */
}
:
:
}Finally, your application can use OSTmrSet() to reuse an existing timer and change its delay, period, or callback function.
Listing - Example of call to OSTmrSet()#
OS_TMR App_Timer;
:
:
void App_NewTimerCallback (void *p_tmr,
void *p_arg)
{
/* Called when timer expires: */
/* 'p_tmr' is pointer to the user-allocated timer. */
/* 'p_arg' is argument passed when creating the timer. */
}
:
:
void App_SomeTask (void *p_arg)
{
RTOS_ERR err;
:
:
/* Change callback and set period to 250. */
OSTmrSet(&App_Timer, /* Pointer to user-allocated timer. */
0, /* 0 initial delay. */
250, /* 250 Timer Ticks period. */
&App_NewTimerCallback, /* Called when timer expires. */
DEF_NULL, /* No argument to callback. */
&err);
if (err.Code != RTOS_ERR_NONE) {
/* Handle error on timer set. */
}
:
:
}Timer Modes of Operation#
One-Shot#
As said before, a software timer can be either one-shot, periodic with no initial delay or periodic with an initial delay. A one-shot timer is created when the OS_OPT_TMR_ONE_SHOT option is used when creating the timer. The timeline of a one-shot timer is illustrated below.
Figure - One-Shot Timer#
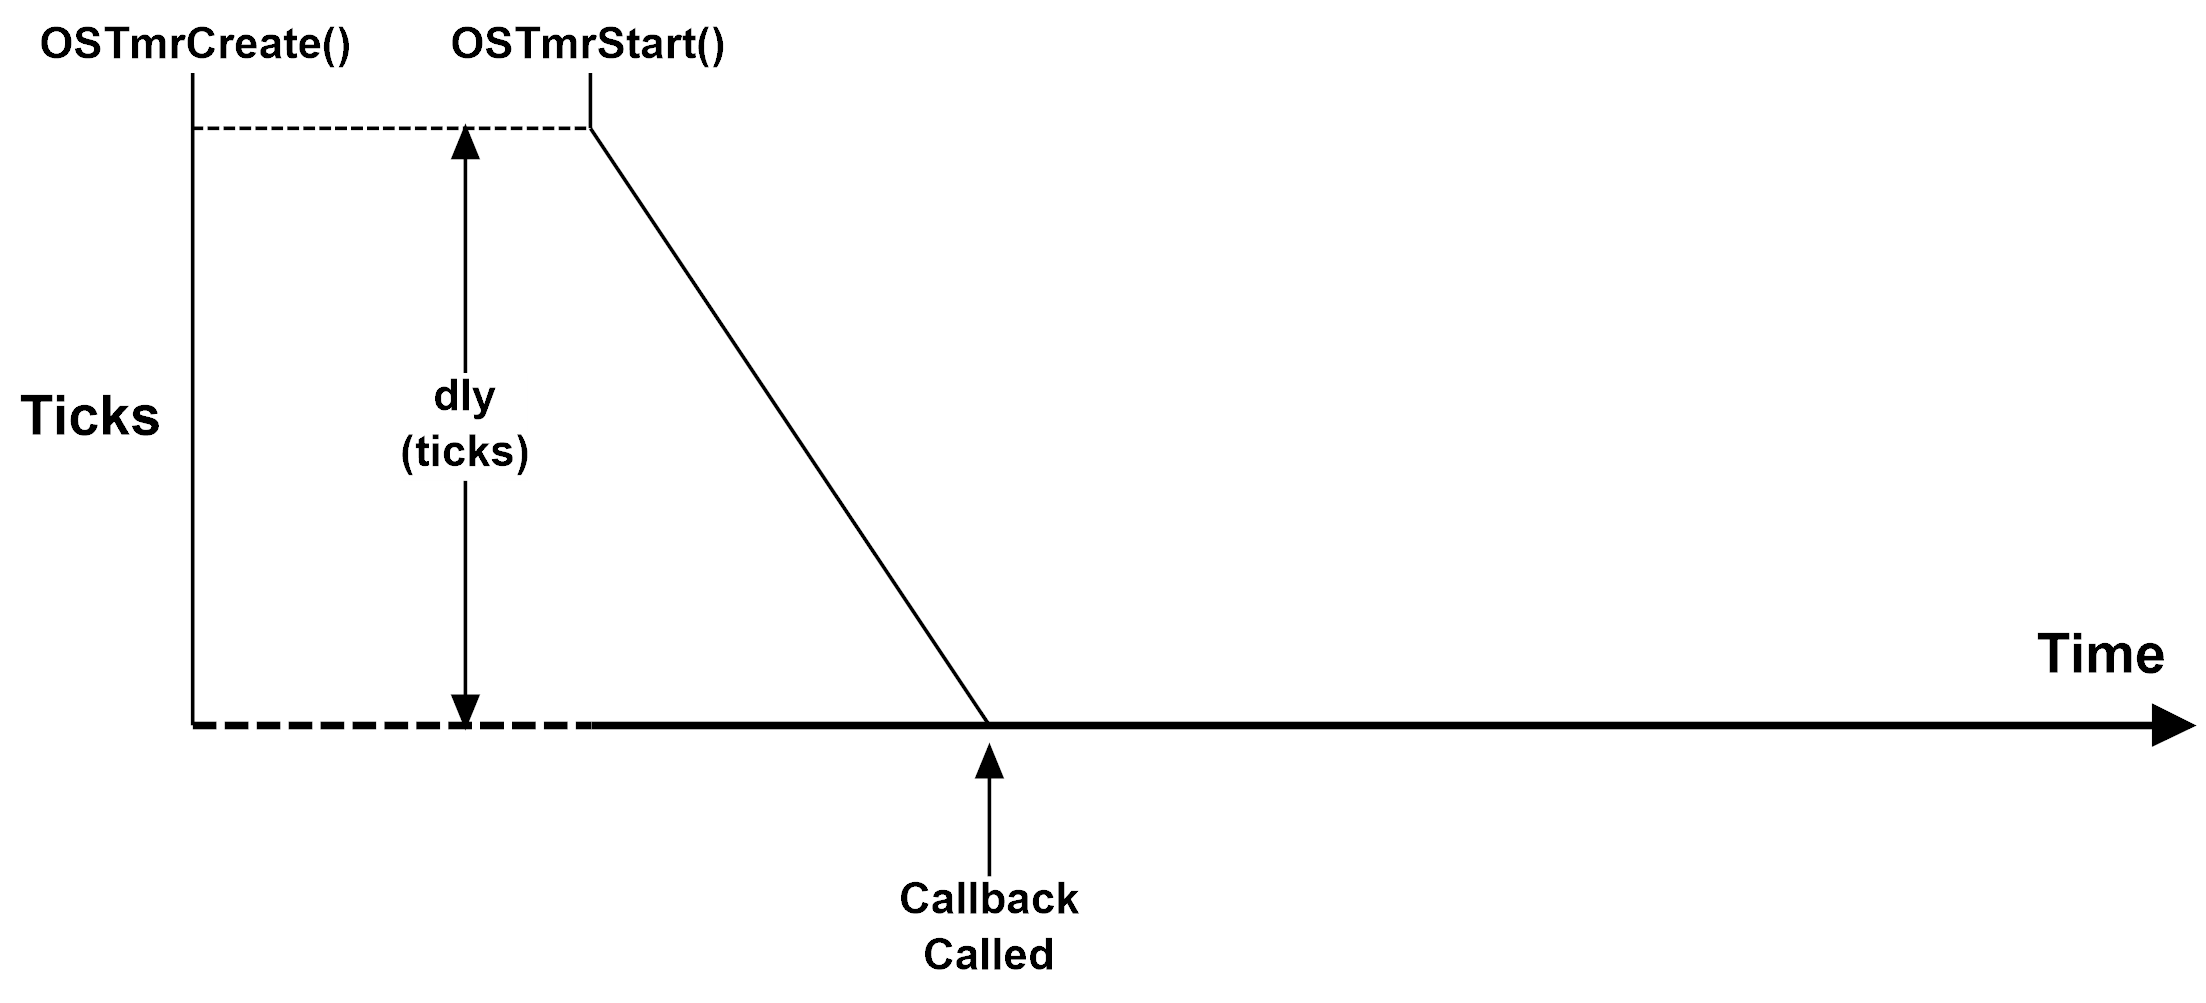
This timer will expire after dly Timer Ticks have elapsed. When the timer expires, it will call the callback once.
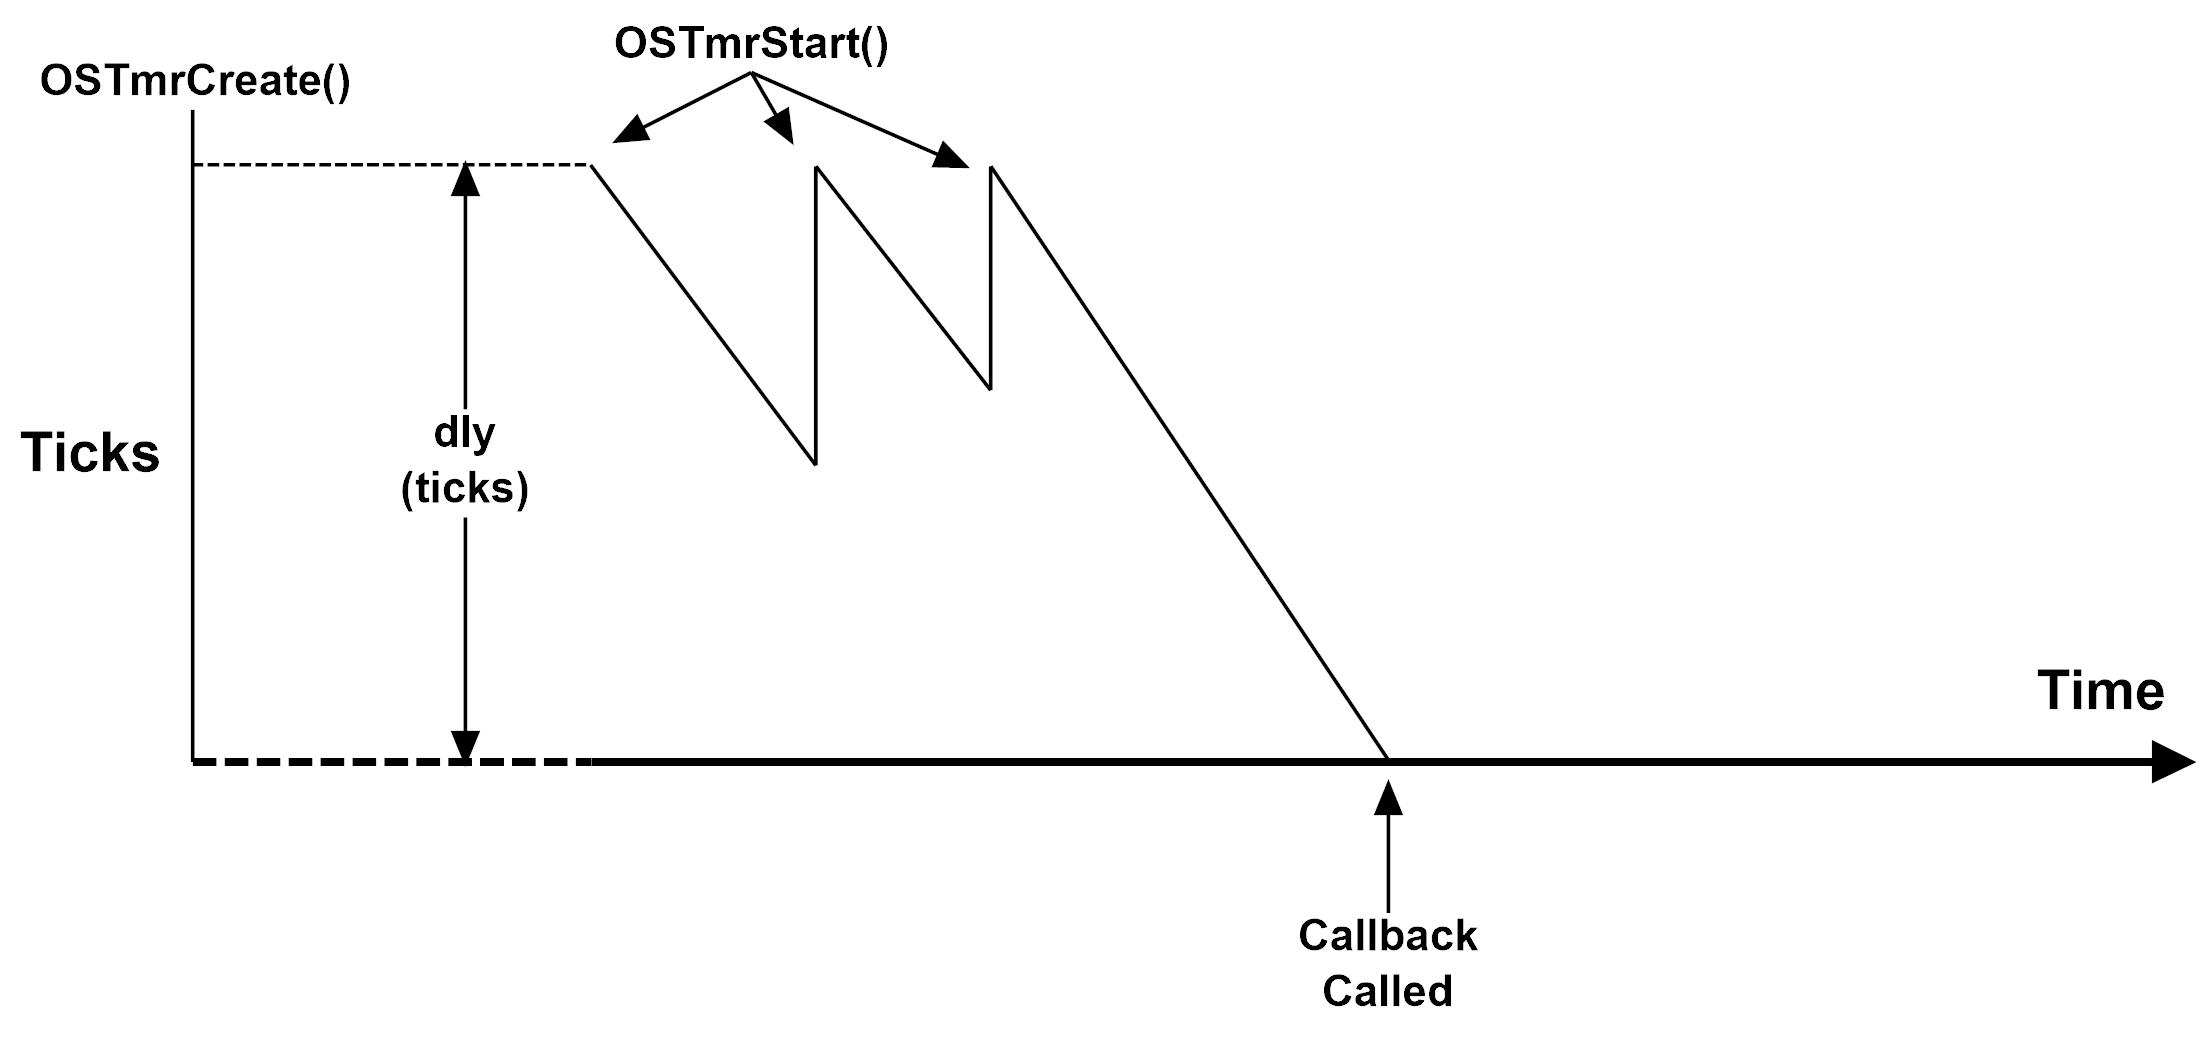
You can reset the elapsed time of a running timer. For example, if your application calls OSTmrStart() on a currently running timer, it will reset the delay to the value set when the timer was created. The figure below shows the state of a one-shot timer being retriggered two times after the initial start.
Figure - Retriggering a One-Shot Timer#
Periodic Without an Initial Delay#
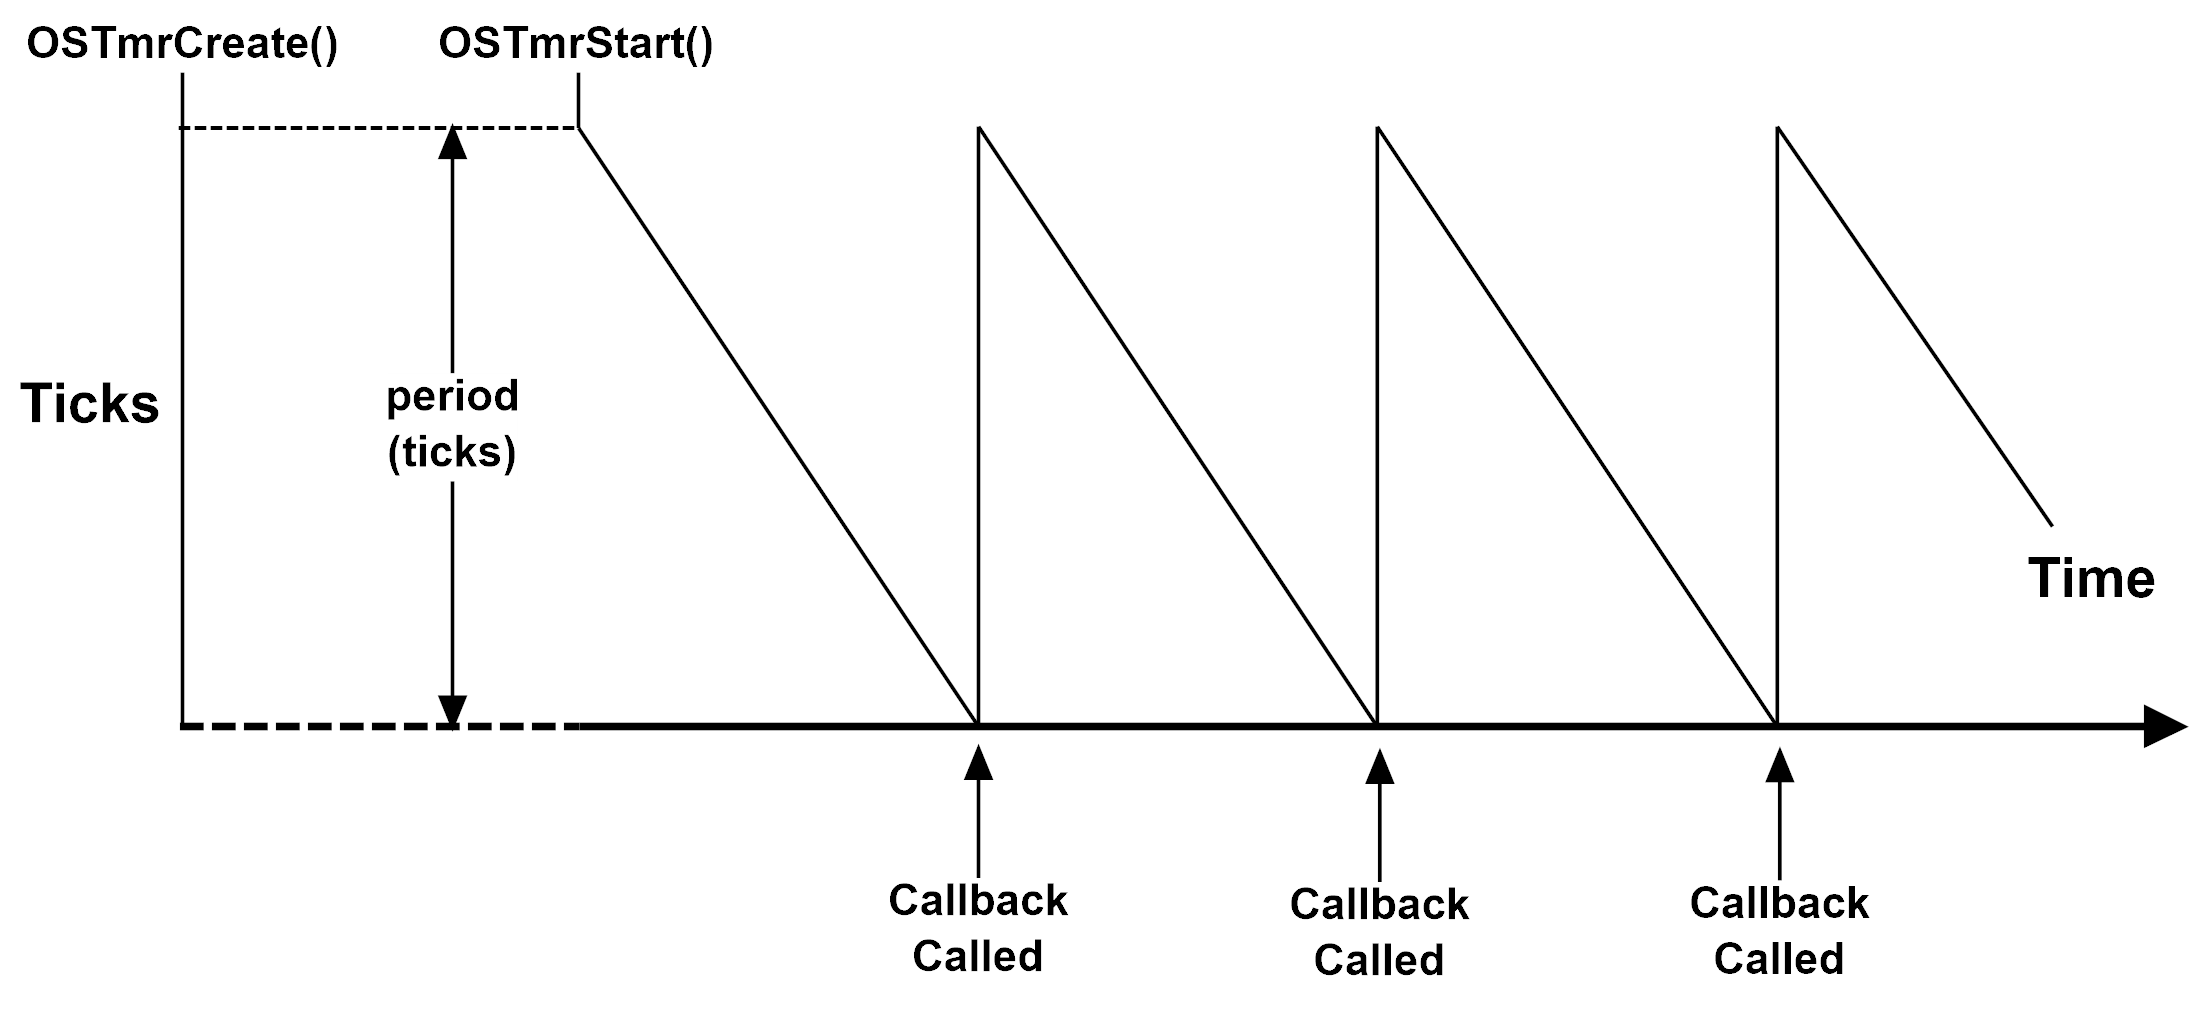
A timer created with the OS_OPT_TMR_PERIODIC option is a periodic timer. When the timer's period has expired, the timer's callback will be called. Once the callback returns, the timer will be reset to trigger the callback again once the same period has elapsed. This mode of operation is shown below. The callback is indeed called when period Timer Ticks have elapsed.
Figure - Periodic Timer Without Initial Delay#
Periodic With an Initial Delay#
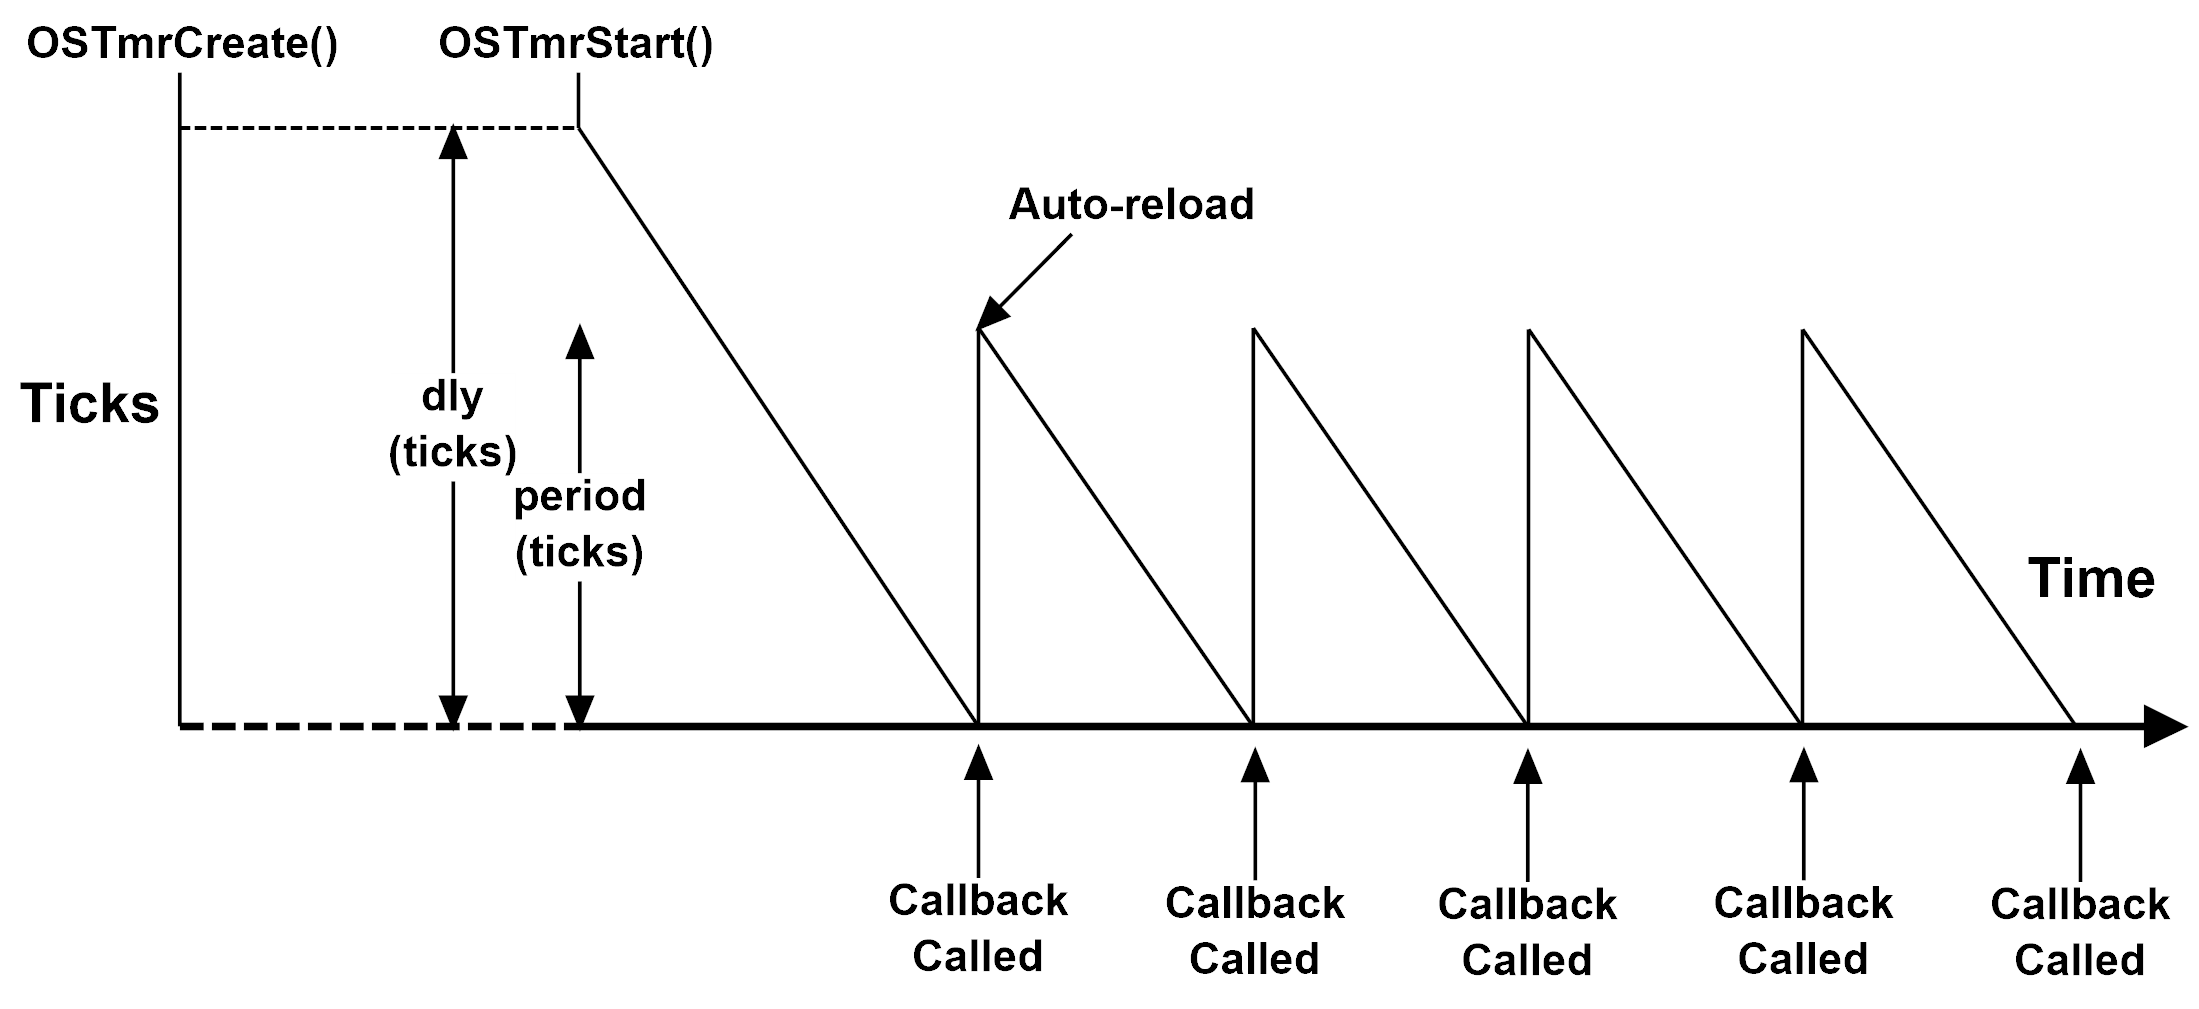
A periodic timer can also be created with an initial delay. This means that the timer will wait until a specified amount of time has elapsed before starting the timer in the previously described periodic mode. The figure below shows the usage of a periodic timer with an initial delay of dly Timer Ticks and a period of period Timer Ticks. The first call to the callback will be made once dly Timer Ticks have elapsed. All subsequent calls to the callback will be made when period Timer Ticks have elapsed.
Figure - Periodic Timer With Initial Delay#
Getting State Information#
Your application can query the state of a timer by calling OSTmrStateGet().
Listing - Example of call to OSTmrStateGet()#
OS_TMR App_Timer;
:
:
void App_SomeTask (void *p_arg)
{
RTOS_ERR err;
OS_STATE state;
:
:
/* Get timer state. */
state = OSTmrStateGet(&App_Timer, /* Pointer to user-allocated timer. */
&err);
if (err.Code != RTOS_ERR_NONE) {
/* Handle error on timer state get. */
}
:
:
}The figure below and its listing explain the different states used by the Kernel software timers.
Figure - Timer States#
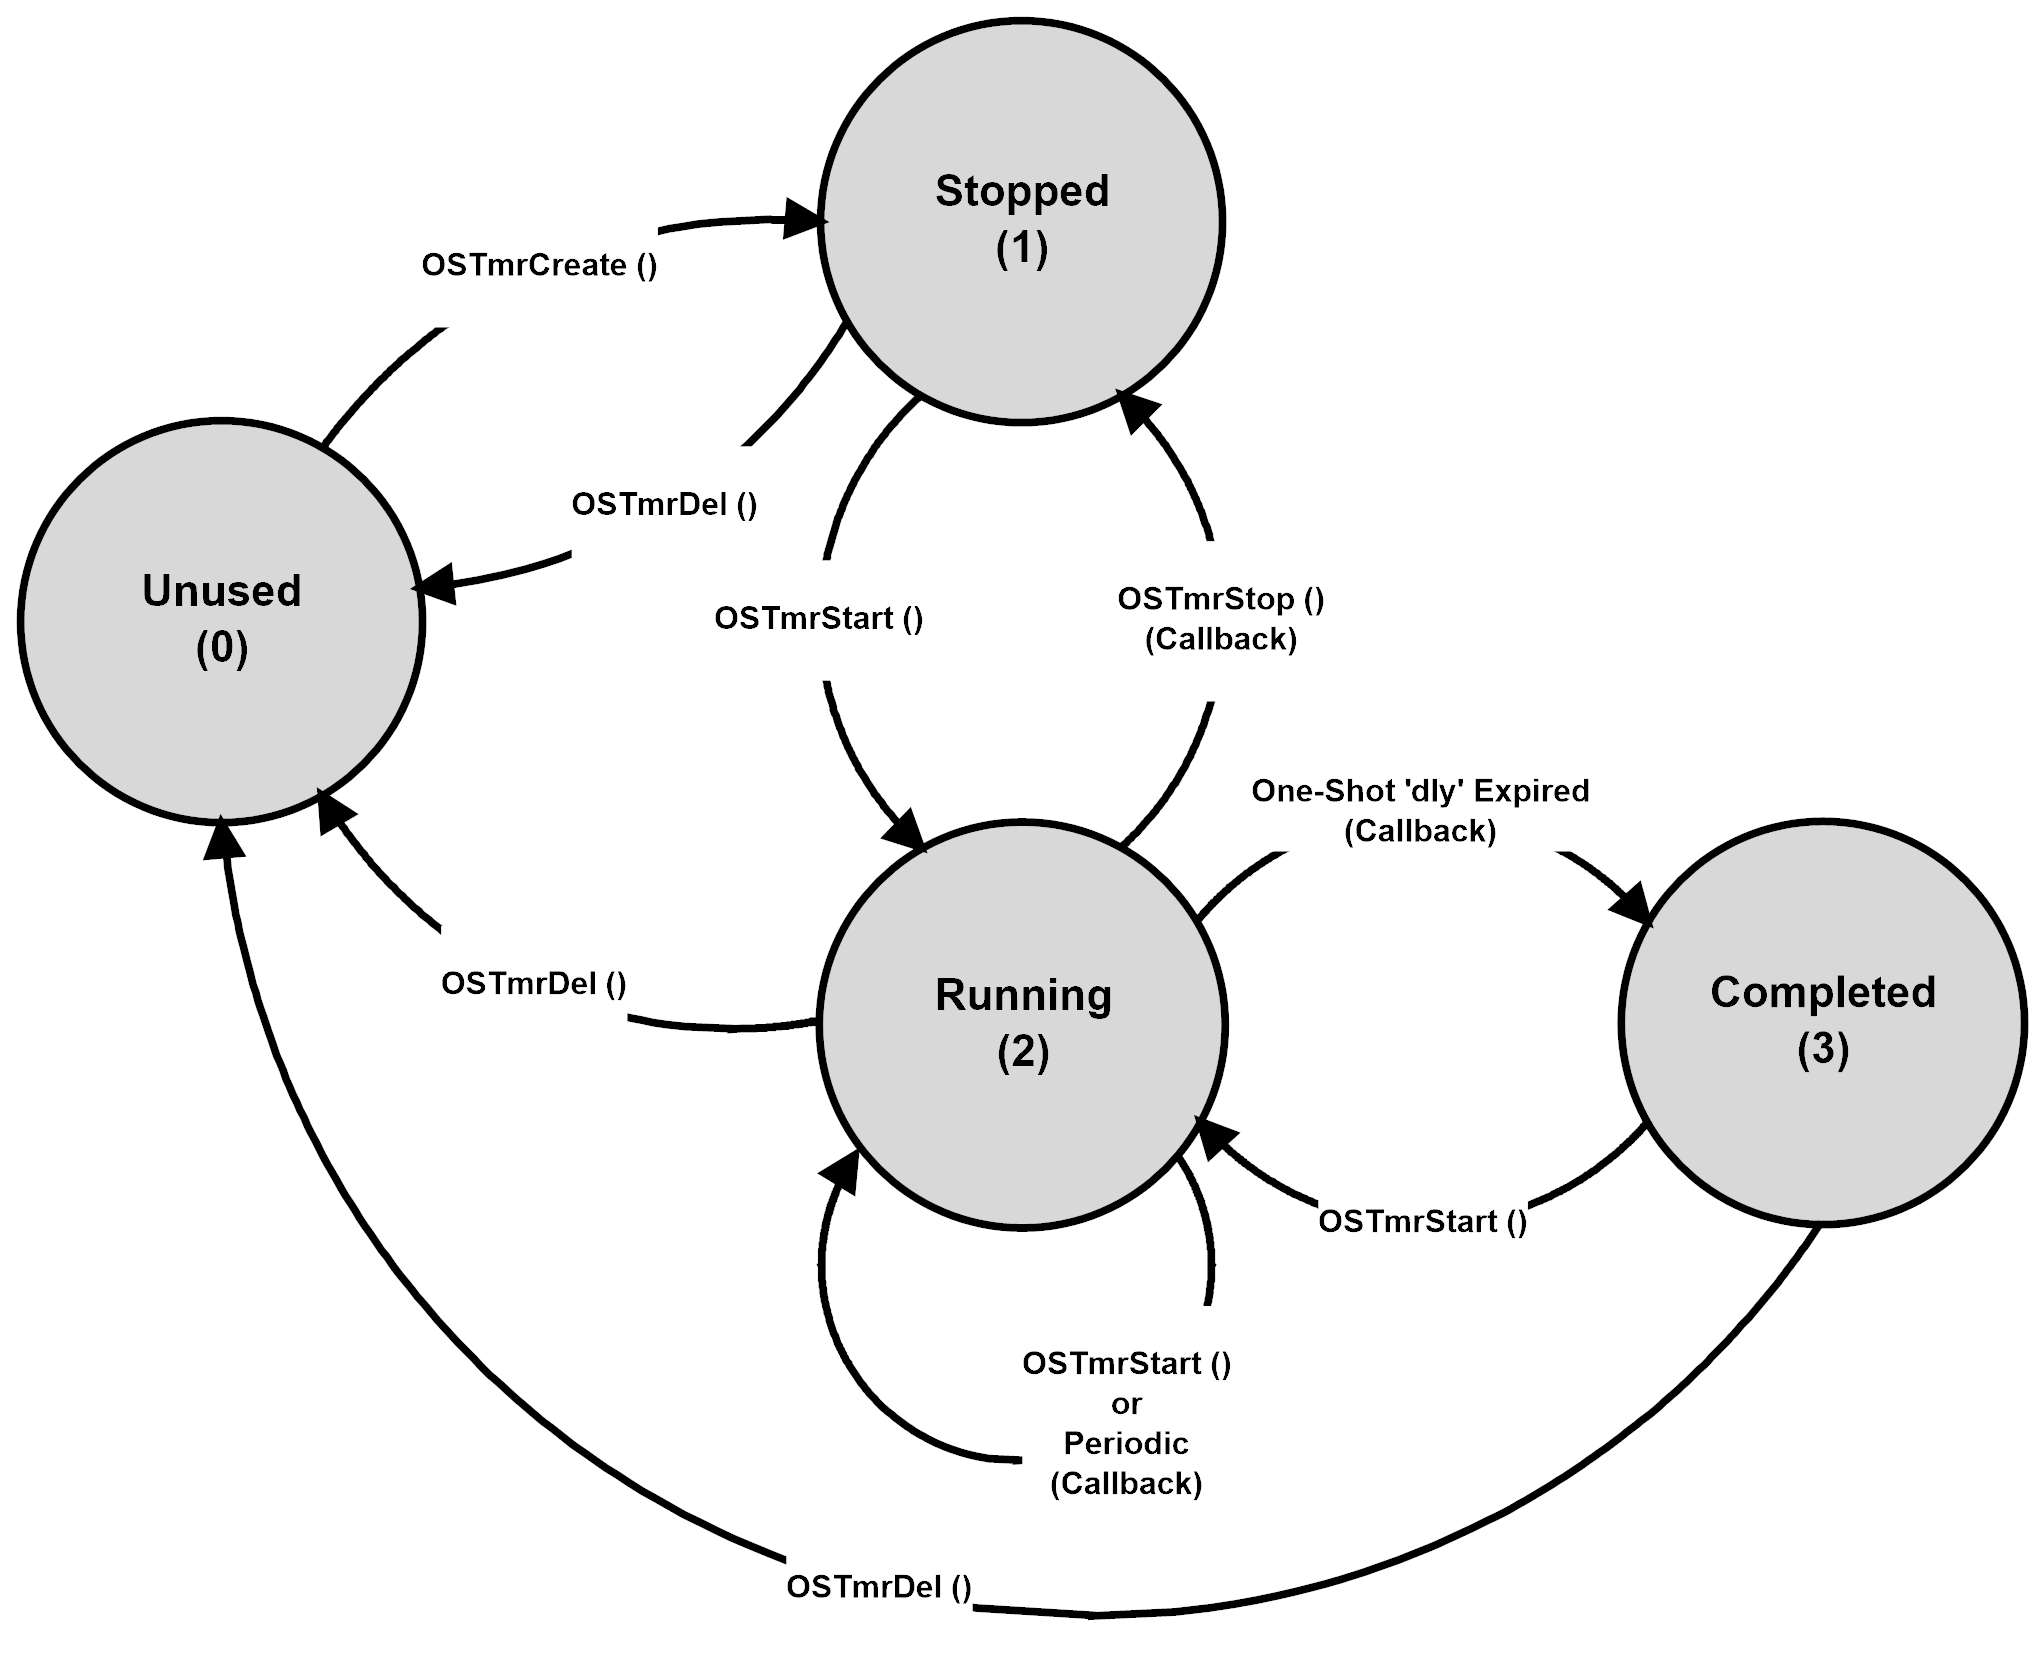
(0) The “Unused” state is used by a timer that has not been created or that has been deleted. In other words, the Kernel does not manage this timer.
(1) When creating a timer or calling OSTmrStop(), the timer is placed in the “Stopped” state.
(2) A timer is placed in the "Running" state when calling OSTmrStart(). The timer stays in that state unless it’s stopped, deleted, or completes its one shot.
(3) The “Completed” state is the state of a one-shot timer once its delay expires.
To get the number of Timer Ticks before a timer expires, your application can use OSTmrRemainGet().
Listing - Example of call to OSTmrRemainGet()#
OS_TMR App_Timer;
:
:
void App_SomeTask (void *p_arg)
{
RTOS_ERR err;
OS_TICK remain;
:
:
/* Get remaining time, in Timer Ticks. */
remain = OSTmrRemainGet(&App_Timer, /* Pointer to user-allocated timer. */
&err);
if (err.Code != RTOS_ERR_NONE) {
/* Handle error on timer time remaining. */
}
:
:
}Timer Processing#
As explained earlier in the Overview section, the Kernel's Timer Task is used to manage the software timers created by your application. The illustration below shows the interaction between the Tick ISR, the Timer Task and three software timers.
Figure - Software Timer Management#
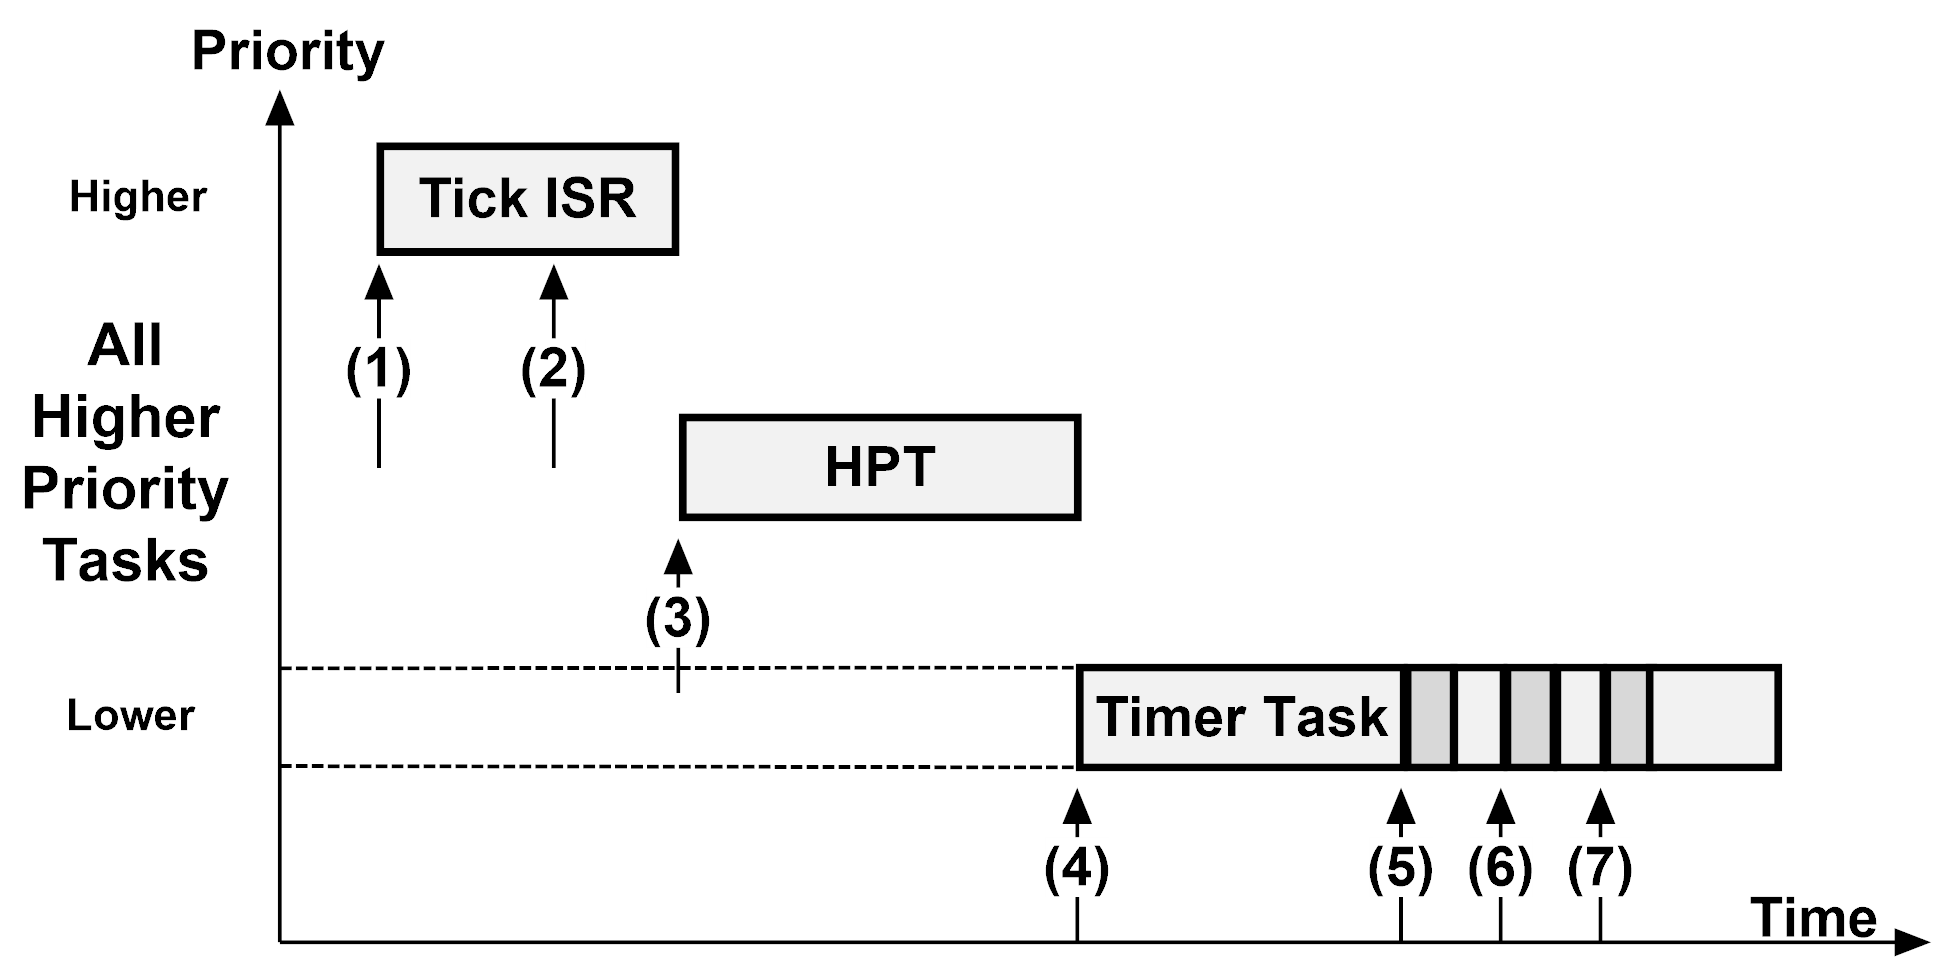
(1) A Tick occurs and its corresponding ISR is executed.
(2) The Tick ISR signals the Timer Task that it is time for it to update the software timers.
(3) The Tick ISR terminates, however there might be higher priority tasks that need to execute since the Timer Task may have a lower priority. The Kernel then runs the higher priority task(s).
(4) When all higher priority tasks have executed, the Kernel switches to the Timer Task and determines that there are three timers that expired.
(5) The callback for the first timer is executed.
(6) Once the callback for the first timer returns, the callback for the second expired timer is executed.
(7) When the callback for the second timer returns, the callback for the third expired timer is executed.
Notes on Timer Processing#
The Timer Task is responsible for calling the application-defined callbacks. As such, a few points are worth noting:
Execution of the callback functions is performed within the context of the Timer Task. This means that the application code will need to make sure that there is sufficient stack space for the Timer Task to handle these callbacks.
The callback functions are executed one after the other based on the order they are found in the Timer processing list.
The execution time of the Timer Task depends on how many timers expire and how long each of the callback functions take to execute.
The timer callback functions must never modify the timer object, or wait on events or other Kernel objects, or make any blocking calls, because this would delay the Timer Task for excessive amounts of time – or worse, forever.
Since the execution time of the Timer Task mostly depends on the application-defined callbacks, they should execute as quickly as possible.
Extending the Kernel with Application Hooks#
Application hooks allow your application code to extend the functionality of the kernel.
Table - Kernel Hooks#
The Kernel Port Hook | Calls the Application-defined Hook |
|---|---|
OSTaskCreateHook() | OS_AppTaskCreateHookPtr |
OSTaskDelHook() | OS_AppTaskDelHookPtr |
OSTaskReturnHook() | OS_AppTaskReturnHookPtr |
OSRedzoneHitHook() | OS_AppRedzoneHitHookPtr |
OSStatTaskHook() | OS_AppStatTaskHookPtr |
OSTaskSwHook() | OS_AppTaskSwHookPtr |
Application hook functions can be declared as shown in the code below.
void App_OS_TaskCreateHook (OS_TCB *p_tcb)
{
/* Your code here */
}
void App_OS_TaskDelHook (OS_TCB *p_tcb)
{
/* Your code here */
}
void App_OS_TaskReturnHook (OS_TCB *p_tcb)
{
/* Your code here */
}
void App_OS_RedzoneHitHook (OS_TCB *p_tcb)
{
/* Your code here */
}
void App_OS_StatTaskHook (void)
{
/* Your code here */
}
void App_OS_TaskSwHook (void)
{
/* Your code here */
}You must define the value of the pointers so that they point to the appropriate functions (as shown below). The pointers do not have to be set in main(), but they must be set after you called OSInit() and before OSStart().
void main (void)
{
RTOS_ERR err;
OSInit(..., &err);
:
:
OS_AppTaskCreateHookPtr = (OS_APP_HOOK_TCB )App_OS_TaskCreateHook;
OS_AppTaskDelHookPtr = (OS_APP_HOOK_TCB )App_OS_TaskDelHook;
OS_AppTaskReturnHookPtr = (OS_APP_HOOK_TCB )App_OS_TaskReturnHook;
OS_AppRedzoneHitHookPtr = (OS_APP_HOOK_VOID)App_OS_RedzoneHitHook;
OS_AppStatTaskHookPtr = (OS_APP_HOOK_VOID)App_OS_StatTaskHook;
OS_AppTaskSwHookPtr = (OS_APP_HOOK_VOID)App_OS_TaskSwHook;
:
:
OSStart(&err);
}Note: There is no need to define every hook function; you can define only the ones that are placed in your application code.
If you do not intend to extend the kernel through these application hooks, you can set OS_CFG_APP_HOOKS_EN to DEF_DISABLED to save RAM (i.e., the pointers).