Updating RS9116W Firmware#
The steps below assume that the RS9116 EVK is connected to the PC and Tera Term is setup to communicate with the board as described in: Getting Started with RS9116 EVK and WiSeConnect™
Note! Faster firmware upload speeds can be acheived by using the RS9116 EVK's USB-CDC interface instead of the UART interface.
STEP 1. After power-up or reset, enter the bootloader as follows (this sequence sends the key combination |U).
press and hold
Shiftpress then release
|(the 'vertical line' or 'pipe' character)press then release
urelease
Shift
The console displays the bootloader menu after the characters |UU as shown in the following example.
|UU

WELCOME TO REDPINE SIGNALS

BootLoader Version 1.0

1 Load Default Wireless Firmware
A Load Wireless Firmware (Image No : 0-f)
B Burn Wireless Firmware (Image No : 0-f)
5 Select Default Wireless Firmware (Image No : 0-f)
K Check Wireless Firmware Integrity (Image No : 0-f)
7 Enable GPIO Based Bypass Mode
8 Disable GPIO Based Bypass Mode
Q Update KEY
Z JTAG Selection
STEP 2. Press B to write new firmware, a console prompt appears Enter Wireless Image No (0-f). Press 0 to select the first image. The console then prompts for the firmware image as shown in the following example. Characters appear twice because both Tera Term and the RS9116 bootloader echo any character typed.
|UU

WELCOME TO REDPINE SIGNALS

BootLoader Version 1.0

1 Load Default Wireless Firmware
A Load Wireless Firmware (Image No : 0-f)
B Burn Wireless Firmware (Image No : 0-f)
5 Select Default Wireless Firmware (Image No : 0-f)
K Check Wireless Firmware Integrity (Image No : 0-f)
7 Enable GPIO Based Bypass Mode
8 Disable GPIO Based Bypass Mode
Q Update KEY
Z JTAG Selection

BB

Enter Wireless Image No (0-f)
00

Send RS9116.NBZ.WC.GENR.x.x.x.rps
Note! The RS9116 bootloader has the ability to load multiple firmware images, depending on the size of the images. It is not typical for multiple images to be required therefore, for the purposes of this documentation, image 0 is always used.
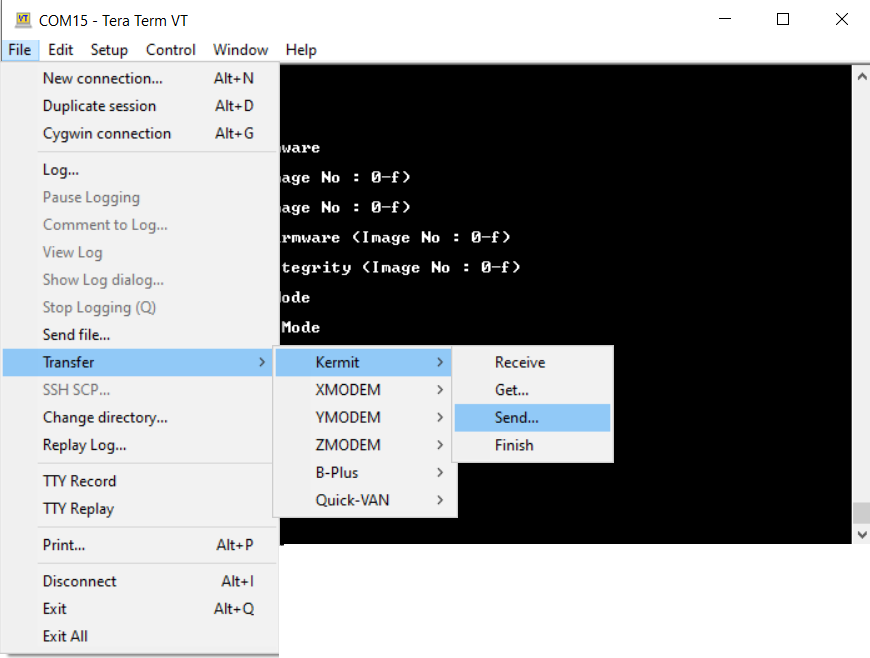
STEP 3. In the Tera Term menu select File -> Transfer -> Kermit -> Send....


STEP 4. Navigate to the firmware image to be loaded.
Note!
The latest firmware image is provided in the RS9116 WiSeConnect software package at the path <SDK>/firmware.
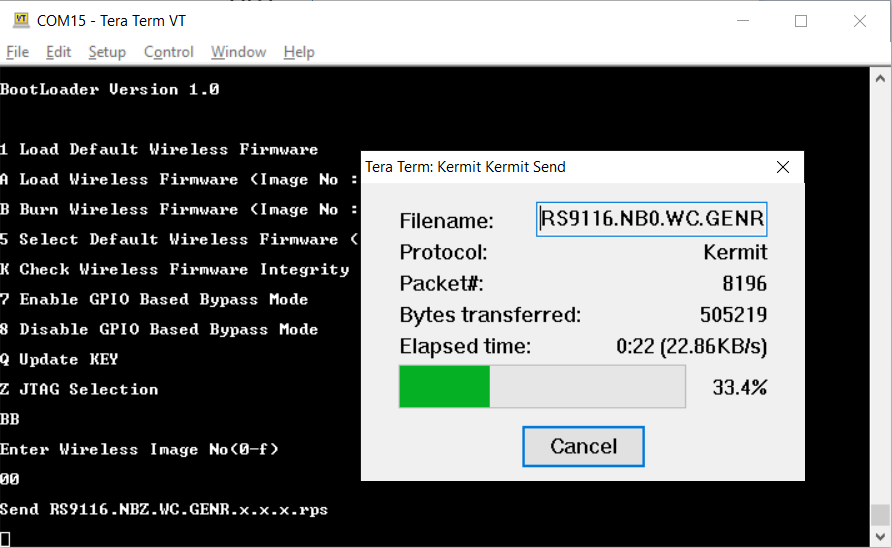
A progress bar appears during the transfer as shown in the following example.


STEP 5. Once the update is complete, the device prompts to enter another bootloader command. Press 1 to load the default firmware. The console displays Loading... followed by Loading Done as shown in the following example.
...

Loading...
Loading Done
Note! The bootloader automatically loads the default firmware after 20 seconds if a selection is not made beforehand.
STEP 6. Verify the new firmware version by typing the command at+rsi_fwversion? as shown below.
...

at+rsi_fwversion?
OK1610.2.4.0.0036