Security Commands#
Get Device Status#
This command prints Secure Element device information status, including:
Firmware version
Serial number
Device erase status
Secure debug unlock status
Tamper status
Secure boot status
Command Line Syntax
$ commander security status [--trustzone --verbose]Command Line Input Example
$ commander security statusCommand Line Output Example
SE Firmware version : 1.1.3
Serial number : 0000000000000000d0cf5efffe68a68b
Debug lock : Disabled
Device erase : Enabled
Secure debug unlock : Disabled
Tamper status : OK
Secure boot : Disabled
Boot status : 0x20 - OK
DONEDebug lock: indicates whether debug access is Enabled (locked) or Disabled (unlocked).Device erase: indicates whether or not it is possible to regain debug access using thedevice erasecommand. If the device erase is enabled, this is possible. If the device is disabled, it is not possible.Security debug unlock: Enabled means that if the device is locked, debug access can be regained using thesecurity unlockcommand. If bothdevice eraseandsecure debug unlockare Disabled, it is not possible to regain debug access if the device is locked.Tamper status: indicates whether or not a tamper event is detected by the device. OK means no tamper event is detected.Secure boot: Enabled means that all images running on the device must be signed with the private sign key corresponding to the public sign key written to the device. Disabled means that images do not have to be signed with the sign key.Boot status: shows if secure boot failed or if the secure boot is OK.
Command Line Input Example
$ commander security status --trustzoneShow the TrustZone status of the device.
Command Line Output Example
SE Firmware version : 1.1.3
Serial number : 0000000000000000d0cf5efffe68a68b
Debug lock : Disabled
Device erase : Enabled
Secure debug unlock : Disabled
Debug lock state: Unlocked
Non-secure, invasive debug lock (DBGLOCK) : Unlocked
Non-secure, non-invasive debug lock (NIDLOCK) : Unlocked
Secure, invasive debug lock (SPIDLOCK) : Unlocked
Secure, non-invasive debug lock (SPNIDLOCK): Unlocked
Non-secure, invasive debug lock state (DBGLOCK) : Unlocked
Non-secure, non-invasive debug lock state (NIDLOCK) : Unlocked
Secure, invasive debug lock state (SPIDLOCK) : Unlocked
Secure, non-invasive debug lock state (SPNIDLOCK): Unlocked
Tamper status : OK
Secure boot : Disabled
Boot status : 0x20 - OK
DONEDebug lock state indicates whether the debug port is locked or unlocked.
The TrustZone debug lock configuration consists of the four modes SPNIDLOCK, SPIDLOCK, NIDLOCK and DBGLOCK. The top configurations specifies which mode has been locked by the security lock --trustzone command. The bottom configuration specifies the actual state of the mode, whether or not it has been unlocked.
Command Line Input Example
$ commander security status --verboseShow verbose output of the security status.
Command Line Output Example
SE Firmware version : 1.1.3
Serial number : 0000000000000000d0cf5efffe68a68b
Debug lock : Disabled
Device erase : Enabled
Secure debug unlock : Disabled
Tamper status : OK
Secure boot : Disabled
Boot status : 0x20 - OK
Verbose output: 00000000 00000000 00000000 FFFFFFFF 00000020 03020200 00000000 00000002 FFFFFFFF
DONEVerbose output is the entire output from the Secure Element of the device.
Generate Key Pair#
This command has been deprecated. For more information on how to generate keys, see Generate a Signing Key and Key Generation.
Write Public Key to Device#
IMPORTANT: This is a one-time command. It cannot be run more than once per device.
This one-time command permanently locks the device to this key pair. There are two different public keys that can be written to the device.
Command key: the corresponding private key is used to create certificates to perform secure debug unlock.
Sign key: the corresponding private key must sign all code that is to run on the device when Secure Boot is enabled.
When Secure Debug Unlock is enabled, a locked device may temporarily unlock debug access by creating a certificate signed by the private command key.
When Secure Boot is enabled, all code that runs on the device must be signed by the private sign key.
Command Line Syntax
$ commander security writekey [--command <public key PEM file>] [--sign <public key PEM file>]Command Line Input Example
$ commander security writekey --command command_public_key.pemCommand Line Output Example
Device has serial number 000000000000000014b457fffed50c35
================================================================================
Please look through any warnings before proceeding.
THIS IS A ONE-TIME command, all code to be run on the device must be signed by this key.
Type 'continue' and hit enter to proceed or Ctrl-C to abort:
================================================================================
continue
DONERead Public Key from Device#
This command reads out a public key from the device. There are two different public keys that can be stored on the device using the commander security writekey command.
Command key: the corresponding private key is used to create certificates to perform secure debug unlock or disable tamper.
Sign key: the corresponding private key must sign all code that is to run on the device when Secure Boot is enabled.
By providing an output file, the key will be written to the file. Otherwise, the key will be printed to the Command Line Interface (CLI) as a byte array.
If the optional --nostore option is not used, the key will also be stored in the Security Store.
Command Line Syntax
$ commander security readkey [--command] [--sign] [--outfile <filename>] [--nostore]Command Line Input Example
$ commander readkey --command --outfile command_public_key.pemCommand Line Output Example
Writing public key file in PEM format to key.pem...
DONEConfigure Lock Options#
The security lockconfig command enables or disables secure debug unlock. When secure debug unlock is enabled, a locked device may be temporarily unlocked by running a commander security unlock command. If secure debug unlock is disabled, the only way to unlock a locked device is to run a commander security erasedevice command, given that device erase has not been disabled. If both device erase and secure debug unlock are disabled, there is no way to unlock debug access to a locked device.
Note: Secure debug unlock must be enabled before the device is locked.
Command Line Syntax
$ commander security lockconfig --secure-debug-unlock <enable/disable>Command Line Input Example
$ commander security lockconfig --secure-debug-unlock enableCommand Line Output Example
Secure debug unlock was enabled.
DONELock Debug Access#
The lock command locks the debug interface on the device. If secure debug unlock has been enabled, the device may be unlocked using the unlock command. If device erase has not been disabled, the debug access may also be unlocked using the commander security erasedevice command. However, this also triggers a mass erase on the device.
The --trustzone option may be used to lock debug access to specific TrustZone modes. The bitmask to set TrustZone debug lock is defined as <SPNIDLOCK, SPIDLOCK, NIDLOCK, DBGLOCK>. If the bit is set to 1, debug access to the corresponding TrustZone mode will be locked. Set the bit to 0 to keep it open. By default all modes are open.
Command Line Syntax
$ commander security lock [--trustzone <xxxx>]Command Line Input Example
$ commander security lockCommand Line Output Example
Device is now locked.
DONECommand Line Input Example
$ commander security lock --trustzone 0011Debug access to TrustZone modes DBGLOCK and NIDLOCK are locked.
Command Line Output Example
Writing debug restriction bits:
DBGLOCK: 1
NIDLOCK: 1
SPIDLOCK: 0
SPNIDLOCK: 0
Device is now locked.
DONESecure Debug Unlock#
The security unlock command opens debug access on a locked device temporarily without erasing the flash content. When running the commander security unlock command, Simplicity Commander will use all available files in the Security Store and from command line options in an attempt to unlock debug access. If anything is missing, you will be asked to provide the file as an option to the command. All files generated or given as command line options are stored in the Security Store, unless the --nostore option is used.
For more information about Secure Debug, see AN1190: EFR32xG21 Secure Debug.
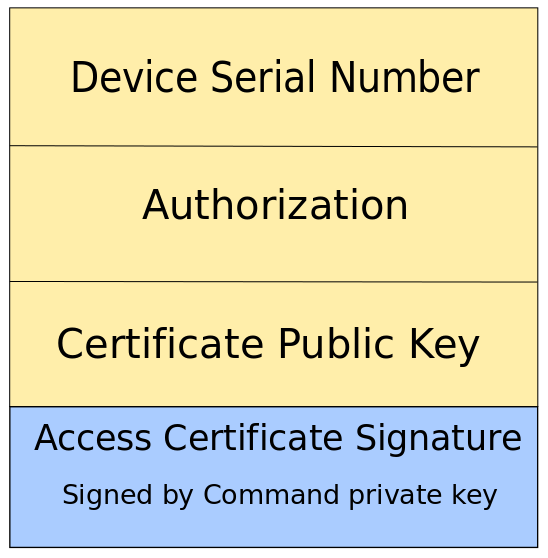
There are several different ways to unlock the debug access, as illustrated in the following figure. The blue fields are actions and the red fields are artifacts.

Command Line Syntax
$ commander security unlock [--cert <signed access certificate> --cert-signature <signature> --command-signature <signature> --cert-privkey <keyfile> --cert-pubkey <keyfile> --command-key <keyfile> --nostore]Command Line Input Example
$ commander security unlock --command-key command_key.pemThis example uses and generates a certificate and command signature on-the-fly using the provided command key to sign the certificate. All the generated files and the command key are stored in the Security Store.
Command Line Output Example
Command public key stored in:
/Users/example/Library/Preferences/SiliconLabs/commander/SecurityStore/device_0000000000000000d0cf5efffe68a68b/command_pubkey.pem
Command private key stored in:
/Users/example/Library/Preferences/SiliconLabs/commander/SecurityStore/device_0000000000000000d0cf5efffe68a68b/command_key.pem
Authorization file written to Security Store:
/Users/example/Library/Preferences/SiliconLabs/commander/SecurityStore/device_0000000000000000d0cf5efffe68a68b/certificate_authorizations.json
Generating ECC P256 key pair...
Cert public key stored at:
/Users/example/Library/Preferences/SiliconLabs/commander/SecurityStore/device_0000000000000000d0cf5efffe68a68b/cert_pubkey.pem
Cert private key stored at:
/Users/example/Library/Preferences/SiliconLabs/commander/SecurityStore/device_0000000000000000d0cf5efffe68a68b/cert_key.pem
Command key matches public command key found on device. Signing certificate...
Certificate was signed with key:
test-cases/common/security_testfiles/command_key.pem
Successfully stored certificate
Certificate written to Security Store:
/Users/example/Library/Preferences/SiliconLabs/commander/SecurityStore/device_0000000000000000d0cf5efffe68a68b/access_certificate.bin
Created unsigned unlock command
Signed unlock command using
/Users/example/Library/Preferences/SiliconLabs/commander/SecurityStore/device_0000000000000000d0cf5efffe68a68b/cert_key.pem
Secure debug successfully unlocked
Command unlock payload was stored in Security Store
DONECommand Line Input Example
$ commander security unlock --cert access_certificate.bin --cert-privkey cert_key.pemThis example unlocks the device with a signed access certificate and the private certificate key corresponding to the public key in the access certificate. The certificate and key are stored in the Security Store.
Command Line Output Example
/Users/example/Library/Preferences/SiliconLabs/commander/SecurityStore/device_0000000000000000d0cf5efffe68a68b/access_certificate.bin
Cert key written to Security Store:
/Users/example/Library/Preferences/SiliconLabs/commander/SecurityStore/device_0000000000000000d0cf5efffe68a68b/cert_pubkey.pem
Created unsigned unlock command
Signed unlock command using
/Users/example/Library/Preferences/SiliconLabs/commander/SecurityStore/device_0000000000000000d0cf5efffe68a68b/cert_key.pem
Secure debug successfully unlocked
Command unlock payload was stored in Security Store
DONECommand Line Input Example
$ commander security unlock --cert-signature cert_signature.bin --command-signature command_signature.binThis example uses externally generated signatures for both the access certificate and command file. The access certificate signature is appended to the certificate and stored in the Security Store. The command signature is validated against the public key in the certificate.
Command Line Output Example
Using certificate from Security Store:
/Users/example/Library/Preferences/SiliconLabs/commander/SecurityStore/device_0000000000000000d0cf5efffe68a68b/access_certificate.bin
Certificate in Security Store is not signed.
Moved existing file to:
/Users/example/Library/Preferences/SiliconLabs/commander/SecurityStore/device_0000000000000000d0cf5efffe68a68b/archive/access_certificate.bin
Signed certificate written to Security Store:
/Users/example/Library/Preferences/SiliconLabs/commander/SecurityStore/device_0000000000000000d0cf5efffe68a68b/access_certificate.bin
Command signature is valid
Secure debug successfully unlocked
Command unlock payload was stored in Security StoreCommand Line Input Example
$ commander security unlockWhen the device has been unlocked with the current challenge, the unlock payload is stored in the Security Store. The next time the unlock command is run, the device is unlocked directly with the unlock payload.
Command Line Output Example
Unlocking with unlock payload:
/Users/example/Library/Preferences/SiliconLabs/commander/SecurityStore/device_0000000000000000d0cf5efffe68a68b/challenge_4329288395adfc4eea436e5d64dd296b/unlock_payload_0000000000111110.bin
DONEDisable Tamper#
Secure Vault products are capable of detecting certain types of tamper events and responding to mitigate the attack. This provides an extra layer of protection against attacks that rely on physically tampering with the product.
Before this command can be executed, the tamper sources must be configured in the One-Time-Programmable (OTP) settings of the devices. See Write User Configuration for more information about how this is done.
The process of disabling tamper follows the same flow as the security unlock command. For more information about the flow, see Secure Debug Unlock.
A certificate and a signed challenge are required to disable tamper. The certificate—including tamper authorizations—is generated and signed with a command key. The certificate contains a public key and the corresponding private key must be used to sign a challenge from the device to disable tamper sources. The --disable-param option determines which tamper sources to disable. If this option is not provided, Simplicity Commander will extract the tamper authorizations from the certificate and disable everything allowed by the certificate. If the certificate is not available, all sources will be disabled.
The tamper sources are disabled until the next Power On Reset.
Command Line Syntax
$ commander security disabletamper [--disable-param <disable-mask> --cert <signed access certificate> --cert-signature <signature> --commandsignature <signature> --cert-privkey <keyfile> --cert-pubkey <keyfile> --command-key <keyfile> --nostore]Command Line Input Example
$ commander security disabletamper --cert access_certificate.bin --cert-privkey cert_key.pemCommand Line Output Example
Using tamper parameters from certificate in Security Store: 0xffffffb6
Certificate written to Security Store:
/Users/matundal/Library/Preferences/SiliconLabs/commander/SecurityStore/device_0000000000000000000d6ffffead3617/access_certificate.bin
Cert key written to Security Store:
/Users/matundal/Library/Preferences/SiliconLabs/commander/SecurityStore/device_0000000000000000000d6ffffead3617/cert_pubkey.pem
Using tamper parameters from certificate in Security Store: 0xffffffb6
Created unsigned disable tamper command
Signed disable tamper command using
/Users/matundal/Library/Preferences/SiliconLabs/commander/SecurityStore/device_0000000000000000000d6ffffead3617/cert_key.pem
Tamper successfully disabled.
Command disable tamper payload was stored in Security Store
DONEDevice Erase using Secure Element#
This command performs a device mass erase and resets the debug configuration to its initial unlocked state.
The complete flash and RAM of the system is cleared, excluding the user data page and one-time programmable commissioning information in the Secure Element.
If device erase has been disabled, this command is not available.
Note: After a device erase, the DCI interface is unavailable until the device has been reset
Command Line Syntax
$ commander security erasedeviceCommand Line Input Example
$ commander security erasedeviceCommand Line Output Example
Successfully erased device
DONEDisable Device Erase#
IMPORTANT: This is a one-time command. It cannot be run more than once.
This command permanently disables device erase. When device erase is disabled, the commander security erasedevice command is no longer available. This means that if debug access is locked, debug access can only be opened if secure debug unlock has been enabled before the device was locked. If not, there is no way to regain debug access. This command can be run after the device has been locked.
Confirmation is required from the user to execute this command, except if the --noprompt option is used.
Command Line Syntax
$ commander security disabledeviceerase [--noprompt]Command Line Input Example
$ commander security disabledeviceeraseCommand Line Output Example
================================================================================
THIS IS A ONE-TIME command which Permanently disables device erase.
If secure debug lock has not been set, there is no way to regain debug access to this device.
Type 'continue' and hit enter to proceed or Ctrl-C to abort:
================================================================================
continue
Disabled device erase successfully
DONERoll Challenge#
This command makes the Secure Element roll or update its challenge data. The challenge is random data that must be read from the device before an unlock command can be executed. Rolling the challenge renders existing command signatures invalid. For more information, see Challenge and Command Signing.
The challenge cannot be rolled before it has been used at least once; that is, by running the security unlock command or the disable tamper command.
$ commander security rollchallengeCommand Line Input Example
$ commander security rollchallengeCommand Line Output Example
Challenge was rolled successfully.
DONEGenerate Example Authorization File
This command generates a default authorization file to be used in the certificate. The authorization file will be stored in Security Store unless the --nostore option is used.
Default Authorization File for Devices without Secure Vault
{
"debug_authorizations":{
"ENABLE_DEBUG_PORT": true
}
}Default Authorization File for Devices with Secure Vault
{
"debug_authorizations":{
"ENABLE_DEBUG_PORT": true
},
"tamper_authorizations":{
"FILTER_COUNTER": 1,
"WATCHDOG": 1,
"SE_RAM_CRC": 1,
"SE_HARDFAULT": 1,
"SOFTWARE_ASSERTION": 1,
"SE_CODE_AUTH": 1,
"USER_CODE_AUTH": 1,
"MAILBOX_AUTH": 1,
"DCI_AUTH": 1,
"OTP_READ": 1,
"AUTO_CODE_AUTH": 1,
"SELF_TEST": 1,
"TRNG_MONITOR": 1,
"PRS0": 1,
"PRS1": 1,
"PRS2": 1,
"PRS3": 1,
"PRS4": 1,
"PRS5": 1,
"PRS6": 1,
"PRS7": 1,
"DECOUPLE_BOD": 1,
"TEMP_SENSOR": 1,
"VGLITCH_FALLING": 1,
"VGLITCH_RISING": 1,
"SECURE_LOCK": 1,
"SE_DEBUG": 1,
"DGLITCH": 1,
"SE_ICACHE": 1
}
}Debug Authorization
Enable Debug Port must be set to true in order to perform a secure debug unlock. For more information about secure debug unlock, see Secure Debug Unlock.
Tamper Authorizations
The Tamper Authorizations indicate which sources may be disabled. By default all sources may be disabled. For more information about disabling tamper sources, see Disable Tamper.
Command Line Syntax
$ commander security genauth [-o <filename>] [--nostore]Command Line Input Example
$ commander security genauth -o certificate_authorization.json --nostoreCommand Line Output Example
Authorization file stored in:
certificate_authorization.json
DONEGenerate Access Certificate#
Access certificates are used to unlock debug access or disable tamper on the device. For more information, see Secure Debug Unlock or Disable Tamper. The certificate and the keys provided to or generated by Simplicity Commander are stored in Security Store unless the --nostore option is used. If --cert-pubkey or --authorization are not used as options on the command line, Simplicity Commander checks if the files are stored in Security Store. If the files are not in Security Store, Simplicity Commander generates a default authorization file that may be edited. If the file is edited, a new certificate must be generated. Simplicity Commander will also generate a pair of certificate keys if the --cert-pubkey option is not used. If the certificate keys are generated, the --nostore option cannot be used. If the --command-key option is not used on the command line and not located in Security Store, the --extsign option should be used for Simplicity Commander to generate an unsigned certificate. To use the certificate to unlock debug access, a certificate signature must be generated and provided. If the device for which the certificate is made is connected, Simplicity Commander retrieves the device serial number directly.
Note: Before Simplicity Commander version 1.11.2 unsigned certificates were created with all zeros in replace of the signature. This was fixed in version 1.11.2 making it compatible with external signing using tools such as OpenSSL.
Command Line Syntax
$ commander security gencert [--cert-pubkey <public key file>] [--authorization <auth-file>] [--command-key <private key file>][--extsign][--devserialno <serial number>] [-o <filename>] [--nostore]Command Line Input Example
$ commander security gencert --extsignThis example generates an unsigned certificate, as the command private key is not provided as a command option, nor is it located in Security Store. The public certificate key is not provided either, so Simplicity commander generates a pair of certificate keys and stores them in Security Store. A default authorization file is also generated and stored in Security Store.
Command Line Output Example
Authorization file written to Security Store:
/Users/example/Library/Preferences/SiliconLabs/commander/SecurityStore/device_0000000000000000d0cf5efffe68a68b/certificate_authorizations.json
Generating ECC P256 key pair...
Cert public key stored at:
/Users/example/Library/Preferences/SiliconLabs/commander/SecurityStore/device_0000000000000000d0cf5efffe68a68b/cert_pubkey.pem
Cert private key stored at:
/Users/example/Library/Preferences/SiliconLabs/commander/SecurityStore/device_0000000000000000d0cf5efffe68a68b/cert_key.pem
Successfully stored certificate
Created an unsigned certificate in Security Store:
/Users/example/Library/Preferences/SiliconLabs/commander/SecurityStore/device_0000000000000000d0cf5efffe68a68b/access_certificate.extsign
DONECommand Line Input Example
$ commander security gencert --cert-pubkey cert_pubkey.pem --authorization certificate_authorizations.json --command-key command_key.pem -o access_certificate.bin --nostoreIn this example, all files needed to generate the certificate are provided as command line options. The device serial number is taken directly from the connected device. The certificate is signed with the private command key, and is ready to be used to unlock debug access.
Command Line Output Example
Command key matches public command key found on device. Signing certificate...
Certificate was signed with key:
command_key.pem
DONECommand Line Input Example
$ commander security gencertThis example uses files already located in Security Store to generate a signed certificate. The certificate is stored in Security Store.
Command Line Output Example
Using authorizations from Security Store:
/Users/example/Library/Preferences/SiliconLabs/commander/SecurityStore/device_0000000000000000d0cf5efffe68a68b/certificate_authorizations.json
Using public key from Security Store:
/Users/example/Library/Preferences/SiliconLabs/commander/SecurityStore/device_0000000000000000d0cf5efffe68a68b/cert_pubkey.pem
Found command key in Security Store:
/Users/example/Library/Preferences/SiliconLabs/commander/SecurityStore/device_0000000000000000d0cf5efffe68a68b/command_key.pem
Certificate was signed with key:
/Users/example/Library/Preferences/SiliconLabs/commander/SecurityStore/device_0000000000000000d0cf5efffe68a68b/command_key.pem
DONEGenerate Unsigned Command File#
The commander security gencommand command retrieves the security challenge from the device and stores it in a file with other data. The signature of this file using the private certificate key can be used as part of the payload to perform a secure debug unlock.
Unless the --nostore option is used, the unsigned command file will be stored in the Security Store.
If the user has the private certificate key, Simplicity Commander automatically generates the command file and signature using the commander security unlock command. If the command file is signed by an external process—for example, an HSM—the command signature needs to be passed as a command line option when executing the commander security unlock command.
Command Line Syntax
$ commander security gencommand --action debug_unlock [-o <output file>] [--nostore]Command Line Input Example
$ commander security gencommand --action debug-unlock -o unlock_command_to_be_signed.bin --nostoreCommand Line Output Example
Unsigned command file written to:
unlock_command_to_be_signed.bin
DONEGenerate Example Configuration File#
This command generates a default configuration file to be used with the security_writeconfig command. The file is stored in Security Store unless the --nostore option is used.
Default Configuration File for Devices without Secure Vault
{
"mcu_flags": {
"SECURE_BOOT_ENABLE": true,
"SECURE_BOOT_VERIFY_CERTIFICATE": false,
"SECURE_BOOT_ANTI_ROLLBACK": true,
"SECURE_BOOT_PAGE_LOCK_NARROW": false,
"SECURE_BOOT_PAGE_LOCK_FULL": true
}
}Default Configuration File for Devices with Secure Vault
{
"mcu_flags": {
"SECURE_BOOT_ENABLE": true,
"SECURE_BOOT_VERIFY_CERTIFICATE": false,
"SECURE_BOOT_ANTI_ROLLBACK": true,
"SECURE_BOOT_PAGE_LOCK_NARROW": false,
"SECURE_BOOT_PAGE_LOCK_FULL": true
},
"tamper_levels": {
"FILTER_COUNTER": 0,
"WATCHDOG": 4,
"SE_RAM_CRC": 4,
"SE_HARDFAULT": 4,
"SOFTWARE_ASSERTION": 4,
"SE_CODE_AUTH": 4,
"USER_CODE_AUTH": 4,
"MAILBOX_AUTH": 0,
"DCI_AUTH": 0,
"OTP_READ": 0,
"AUTO_CODE_AUTH": 0,
"SELF_TEST": 4,
"TRNG_MONITOR": 0,
"PRS0": 0,
"PRS1": 0,
"PRS2": 0,
"PRS3": 0,
"PRS4": 0,
"PRS5": 0,
"PRS6": 0,
"PRS7": 0,
"DECOUPLE_BOD": 4,
"TEMP_SENSOR": 1,
"VGLITCH_FALLING": 0,
"VGLITCH_RISING": 0,
"SECURE_LOCK": 4,
"SE_DEBUG": 0,
"DGLITCH": 0,
"SE_ICACHE": 4
},
"tamper_filter" : {
"FILTER_PERIOD": 0,
"FILTER_THRESHOLD": 0,
"RESET_THRESHOLD": 0
},
"tamper_flags": {
"DGLITCH_ALWAYS_ON": false
}
}MCU settings
Secure Boot Enable: Enables Secure Boot on the device if set. Requires all applications running on the device to be signed.
Secure Boot Verify Certificate: Applications running on the device must be signed using an intermediary certificate if this option is set. It is still possible to use certificates for signing even if this option is not set. For more information, see Signing an Application for Secure Boot using an Intermediary Certificate.
Secure Boot Anti Rollback: If set, application images with a lower version than the image currently stored in flash will not run on the device.
Secure Boot Page Lock Narrow: Flash pages validated by the Secure Boot process are locked down to prevent re-flashing by means other than through Root Code. Pages from 0 through the page where the Secure Boot signature of the application is located are locked down, not including the last page if the signature is not on a page boundary.
Secure Boot Page Lock Full: Flash pages validated by the Secure Boot process are locked down to prevent re-flashing by means other than through Root Code. Pages from 0 through the page where the Secure Boot signature of the application is located are locked down, including the last page if the signature is not on a page boundary.
Tamper Levels
The different tamper sources are listed under tamper levels. The default configuration is an absolute minimum. The Root Code will never set tamper levels to a lower setting than the default configuration. The tamper levels are listed in the following table.
Table: Tamper Levels
Tamper Level | Description |
|---|---|
1 | No action taken |
2 | Generate SE interrupt |
3 | Increment filter counter |
4 | System Reset |
5 | Reserved |
6 | Reserved |
7 | Erase OTP (Makes the device unrecoverable; it will never boot again.) |
Command Line Syntax
$ commander security genconfig [-o <filename>] [--nostore]Command Line Input Example
$ commander security genconfig -o user_configuration.json --nostoreCommand Line Output Example
Configuration file stored in:
user_configuration.json
DONEWrite User Configuration#
IMPORTANT: This is a one-time command. It cannot be run more than once.
The commander security writeconfig command sets the configurations determined in the configuration file in the Root Code.
Secure Boot is enabled through this command. Before Secure Boot is enabled, you must write the public sign key to the device. For more information on writing keys to the device, see Write Public Key to Device. In addition, a configuration file must be generated and the Secure Boot Enabled flag must be set to true. If no configuration file is provided, a default configuration will be generated.
In Simplicity Commander version 1.9, tamper configuration is supported on devices with Secure Vault. The tamper configuration determines the response from the Secure Element in the occurrence of a tamper event. For more information about the configuration file and tamper configuration, see Generate Example Configuration File.
For more information about Secure Boot, see AN1218: Series 2 Secure Boot with RTSL.
For more information about tamper events, see Disable Tamper.
Command Line Syntax
$ commander security writeconfig [--configfile <config file>] [--nostore] [--nopromt]Command Line Input Example
$ commander security writeconfig --configfile user_configuration.jsonCommand Line Output Example
================================================================================
THIS IS A ONE-TIME configuration: Please inspect file before confirming:
/Users/example/Library/Preferences/SiliconLabs/commander/SecurityStore/device_0000000000000000d0cf5efffe68a68b/user_configuration.json
Type 'continue' and hit enter to proceed or Ctrl-C to abort:
================================================================================
continue
DONERead User Configuration#
This command returns the One-Time Programmable (OTP) setting from the device. If the device has not been configured with the Write User Configuration command, no OTP settings are available to read.
Command Line Syntax
$ commander security readconfigCommand Line Input Example
$ commander security readconfigCommand Line Output Example
MCU Flags
Secure Boot : Enabled
Secure Boot Verify Certificate : Disabled
Secure Boot Anti Rollback : Enabled
Secure Boot Page Lock Narrow : Disabled
Secure Boot Page Lock Full : Enabled
Tamper Levels
FILTER_COUNTER : 0
WATCHDOG : 4
SE_RAM_CRC : 4
SE_HARDFAULT : 4
SOFTWARE_ASSERTION : 4
SE_CODE_AUTH : 4
USER_CODE_AUTH : 4
MAILBOX_AUTH : 0
DCI_AUTH : 0
OTP_READ : 0
AUTO_CODE_AUTH : 0
SELF_TEST : 4
TRNG_MONITOR : 0
PRS0 : 0
PRS1 : 0
PRS2 : 0
PRS3 : 0
PRS4 : 0
PRS5 : 0
PRS6 : 0
PRS7 : 0
DECOUPLE_BOD : 4
TEMP_SENSOR : 1
VGLITCH_FALLING : 0
VGLITCH_RISING : 0
SECURE_LOCK : 4
SE_DEBUG : 0
DGLITCH : 0
SE_ICACHE : 4
Tamper Filter
Filter Period : 0
Filter Treshold : 0
Reset Treshold : 0
Tamper Flags
Digital Glitch Detector Always On: Disabled
DONEGet Security Store Path#
Get the path to the security store. If a device is connected or the --deviceserialno option is provided, the device specific path is returned. Otherwise, the path to Security Store is returned.
Command Line Syntax
$ commander security getpath [--deviceserialno <deviceserialno>]Command Line Input Example
$ commander security getpathCommand Line Output Example
/Users/example/Library/Preferences/SiliconLabs/commander/SecurityStore/device_0000000000000000d0cf5efffe68a68b
DONEWrite AES Decryption Key#
Important: This is a one-time command. It cannot be run more than once per device.
The symmetric 128-bit AES key is used to decrypt GBL files. This key is also known as the MFG_BOOTLOAD_AES_KEY. All encrypted images on this device must be encrypted with the same AES key.
Command Line Syntax
$ commander security writekey --decrypt <filename>Command Line Input Example
$ commander security writekey --decrypt key.txtCommand Line Output Example
Device has serial number 000000000000000014b457fffed50c35
================================================================================
Please look through any warnings before proceeding.
THIS IS A ONE-TIME command, all code to be run on the device must be signed by this key.
Type 'continue' and hit enter to proceed or Ctrl-C to abort:
================================================================================
continue
DONERead Device Certificates#
This command reads out a X509 certificate from the device. The available certificates are:
batch: same for each manufacturing batch
SE: unique per device
MCU: unique per device
The certificates form a root-of-trust certificate chain up to the Silicon Labs Root Certificate issued by Silicon Labs. The SE and MCU Certificates are issued by a Batch Certificate. The Batch Certificate is issued by a Factory Certificate, and the Factory Certificate is issued by the Silicon Labs Root Certificate.
Key information about the certificate is printed to the command line if no outfile is given. The certificate may be read out in entirety by providing the outfile argument. The available encodings are pem and der.
Command Line Syntax
$ commander security readcert <cert type> [--outfile <filename>]Command Line Input Example
$ commander security readcert batchCommand Line Output Example
Version : 3
Subject : CN=Batch 1001317 O=Silicon Labs Inc. C=US
Issuer : CN=Factory O=Silicon Labs Inc. C=US
Valid From : October 17 2019
Valid To : September 16 2118
Signature algorithm: SHA256
Public Key Type : ECDSA
Public key : b0c113190bba3d1ee507d954e878957ad5cc8903ec7785525b8c0b2c2185514cd1421498487c5ea554801924468f8534e027e6496fcbdecef3659cde2a7aaea0
DONECommand Line Input Example
$ commander security readcert se --outfile se_cert.pemCommand Line Output Example
Writing certificate to se_cert.pem...
DONEVault Device Attestation#
Attestation of a device is used to cryptographically prove to a remote party that they are the system they say they are, and ensure that the device they are talking to is the same device as the one that got produced in the factory.
The attestation process starts with authenticating the certificate chain up to the Silicon Labs Root certificate. For more information on certificates, see Read Device Certificates.
The attestation token is printed to the command line. The token consists of multiple claims as listed in the following table.
Claim ID | Claim friendly name | Present in token | Content |
|---|---|---|---|
-75000 | ARM PSA Profile ID | Always | ASCII 'SILABS_1' |
-75008 | ARM PSA nonce | Always | Copy of the nonce supplied as input to the token generation command. |
-75009 | ARM PSA/IETF EAT UEID | Always | The device's EUI-64 pre-pended with 0x06 and zeroes. |
-76000 | SE status | Always | Current SE status |
-76001 | OTP configuration | Always when provisioned | User configuration |
-76002 | MCU Sign key | Always when provisioned | Public sign key |
-76003 | MCU Command key | Always when provisioned | Public command key |
-76004 | Current applied tamper settings | Always | Currently applied tamper level per tamper signal (one nibble per tamper signal). |
Finally, the signature of the attestation token is verified as shown in the following examples.
$ commander security attestationCommand Line Input Example
$ commander security attestationCommand Line Output Example
Certificate chain successfully validated up to Silicon Labs device root certificate.
-75008 ARM PSA nonce : 1799c9296ac44a854b74fe50dc6f1546a5c1e17de73584afcc478739161db7d0
-75000 ARM PSA Profile ID : SILABS_1
-75009 ARM PSA/IETF EAT UEID : 0614b457fffe0f7789
-76000 SE status : 000000010000000000000000000000000000002000010202ffffffff00000002ffffffff
-76002 MCU sign key : fb2470314c0710f5a72e89a30d2af607770187568f80cffa7fc6516f61e0dc258a8606fe664a097eb94d3ea29e1b87262babdb969842da31512bdc7b9c63f4f6
-76003 MCU command key : a218c9615321567527e94ac1f01230604e231f1eabe699fb1d751af3e28d00feaa3dd823540a2452baa40dfb3475d3bb786b41e7880881b5a5427e71542694a2
-76004 Current applied tamper settings : 05044440040004040000000014000440
Successfully validated signature of attestation token.