Set Up Custom Boards#
There are two recommended workflows for developing with custom boards:
Start with a device-compatible "Empty" sample application project.
Start with a sample application project for a Silicon Labs development board, and retarget it to the device on your custom board.
When developing a project for a custom board, you must update settings in Simplicity Studio 6 Project Configurator and Simplicity Device Manager (SDM). In some cases, you may also need to adjust the debug configuration in the Visual Studio Code extension to ensure correct debug sessions.
The following sections describe the required changes for each workflow.
Device-Compatible Example for a Custom Board#
To create a project for a custom board, start by creating a project for the target device on your board.
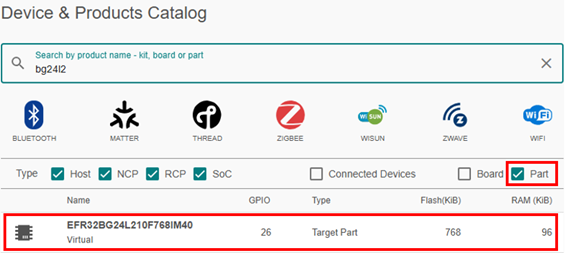
Use one of the board-independent "Empty" SiSDK sample applications, such as Bluetooth – SoC Empty or Empty C Project.
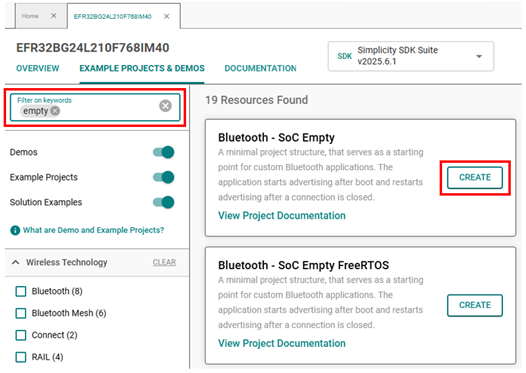
This approach configures your project with the correct memory map, clock settings, peripheral set, and device constraints from the start. You can begin application development immediately, and the "Empty" sample application project should build without errors.
From this baseline, add your own configurations to support your custom hardware and application requirements.
Project Retargeting for a Custom Board#
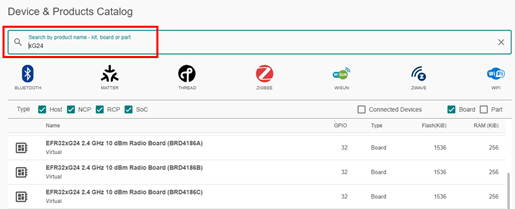
To create a project for a custom board using Project Retargeting, start by creating an example project for a Silicon Labs development board (such as a Radio Board or Explorer Kit) that uses a device similar to the target part on your custom board. You can then retarget the project to your custom board.
1. Add a Virtual Device#
You don’t need to purchase a physical board—Silicon Labs boards can be added as virtual devices. These boards typically use superset target devices to maximize feature coverage, including additional pins, increased memory, enhanced peripherals, and expanded system capabilities.
For custom boards using devices from with the same device family, the retargeting workflow supports transitions between superset and subset devices.
To find a compatible board:
Go to Devices and click + Add Virtual Device.
Ensure both Board and Part checkboxes are selected.
In the Search by product name box, begin typing the target device number.
If no boards match, delete the last character to broaden the search.
If still no matches appear, try selecting a more general device family rather than one tied to a specific wireless protocol.
2. Select an Example Project#
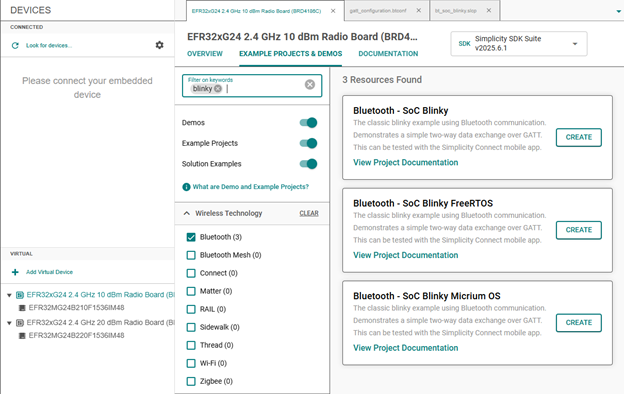
Once the virtual device is added:
Open the Example Projects & Demos tab to view examples projects for that board.
If few examples are listed, try selecting a different board.
Use filters to narrow down the list.
Click Create for a project that closely matches the application you are developing or uses similar peripherals to your project.
Review the project documentation to understand its functionality before proceeding.
3. Retarget the Project#
After creating the project, ensure it builds successfully in Visual Studio Code.
You have flexibility on when to retarget the project to the actual device; however, retargeting early helps minimize rework, especially if the target part lacks resources (such as pins or peripherals) as the part on the original board.
Retargeting requires removing the board and selecting the actual target part from the project configurator (.slcp file). This process involves two separate save operations: one after removing the board, and another after setting the desired target part.
To retarget:
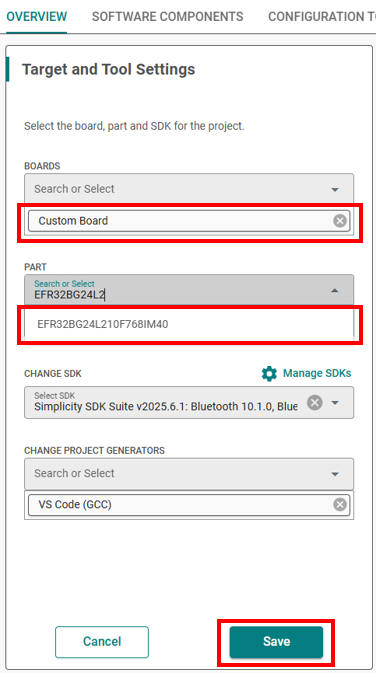
Open the Overview tab and locate the Target and Tool Settings card.
Select Change Target/SDK/Generators.
Enter
custom boardin the boards Search or Select field.In the Part Search or Select field, start entering the desired target part and select it from the drop-down list. Remove any listed boards by clicking the small “x” next to each.
Click Save.
The project will regenerate for the selected part.
Retargeting from a Silicon Labs board example carries over board configurations, software components, and drivers (such as LEDs, buttons, HFXO, LFXO, RF front-end, and sensors) from the original board. This eliminates the need to manually create a Board Support Package (BSP) using the Pintool—provided the custom board’s pin configuration matches the Silicon Labs board.
If the pin configuration differs (e.g., an LED is assigned to a different pin), you must update the configuration using the Pintool based on your custom board’s schematics.
4. Resolve Misconfigurations#
After retargeting, address any configuration issues:
Pin differences: Update pin definitions based on your custom board’s schematic.
Hardware features: When retargeting to a target device with the same hardware features (e.g., peripherals, power modes, and memory), the configuration from the original example is retained. However, when retargeting to a device with fewer hardware features, resulting in the loss of a peripheral, remove or replace unsupported components to prevent build failures.
Memory density: The project configurator modify and define the Linker file to reflect changes in memory.
If your custom board's hardware matches that of the Silicon Labs board, system behavior and performance should remain consistent.
To verify configuration, generate a Project Configuration Report. This report summarizes installed board components and helps verify the project setup.
Simplicity Device Manager (SDM)#
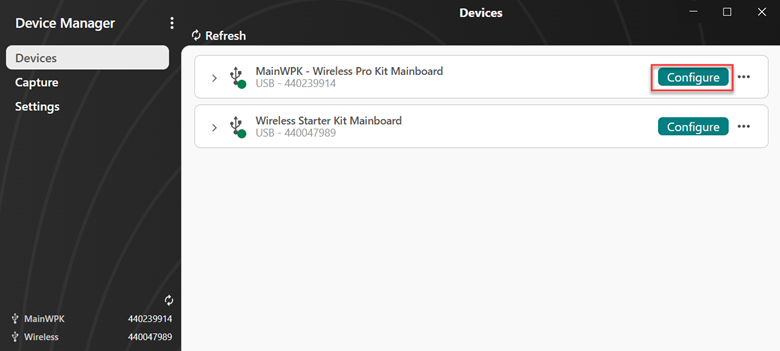
Simplicity Device Manager (SDM) is the central access point for debug adapters across all Silicon Labs software tools. It provides the current debug adapter configuration to any tool that requires access, making it the recommended location for configuring debug adapters for use with customer board designs.
You can launch SDM from the TOOLS menu in either Studio 6 or the VS Code extension. In SDM, select Devices, then click the Configure button for the desired debug adapter.
Debug Adapters#
The following Silicon Labs debug adapters are supported for programming and debugging custom boards and hardware:
Wireless Pro Kit Mainboard (WPK) — Si-MB4002A
Wireless Starter Kit Mainboard (WSTK)
Simplicity Link Debugger — Si-DBG1015A
Details about each debug adapter are shown in SDM, along with options for various operations.
When using a Wireless Starter Kit Mainboard (WSTK BRD4001A) with a custom board, set the Adapter Debug Mode to OUT using the dropdown menu.
When using a Wireless Pro Kit Mainboard (WPK BRD4002A, OPN: Si-MB4002A) with a custom board, set the Adapter Debug Mode to either:
MINI – to use the built-in mini-Simplicity connector located on the corner of the board.
OUT – to use the debug connectors on the side of the board.
In OUT mode for either WSTK or WPK, the standard method is to insert the Simplicity Debug Adapter Board (OPN: SLSDA001A) into the Debug Connector and Simplicity Connector, then use a 10-pin ribbon cable to connect to the debug connector on the custom board. See AN958 for more details and additional debug connector options.
When using the Simplicity Link Debugger (Si-DBG1015A), set the Adapter Debug Mode to OUT, then connect your custom board either via the mini-Simplicity connector or through the header pins using jumper wires.
Custom Board Setup#
In the Configuration section:
The Device Hardware area displays the hardware that has been automatically detected.
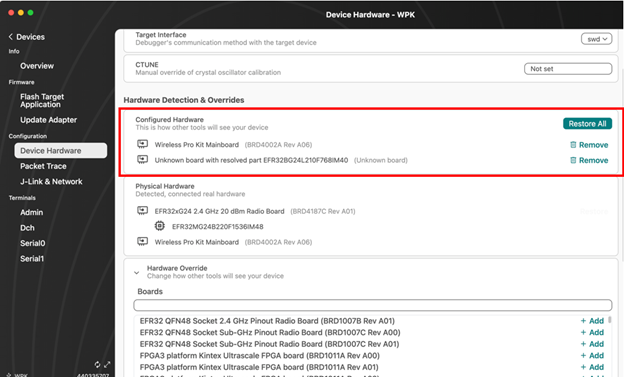
The Configured Hardware section shows the debug adapter configuration that is shared with all other software tools.
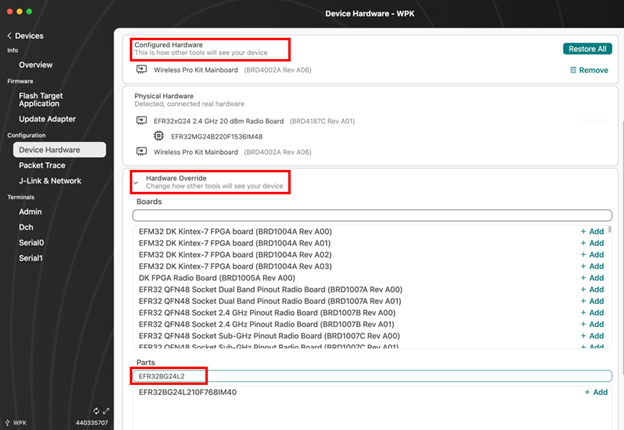
When using a debug adapter with a custom board, set the target part in the Hardware Override section:
Start typing the part number in the search box.
When the correct part appears, click Add to include it in the configured hardware.
This ensures the debug adapter is correctly configured for all tools.
If the target part changes in the future, click Restore All to reset the debug adapter to the physical hardware configuration. You can then apply new overrides as needed.

VS Code Extension Debug Configuration#
The VS Code extension automatically retrieves the debug adapter configuration from SDM, so no additional setup is typically required to flash and debug a custom board. The debug adapter configured for the custom board will appear under Devices in the Simplicity VS Code extension.
If the default settings are not sufficient, use the project-specific Debug Configurator:
Right-click the project folder.
Select Open Configurators 2.0.
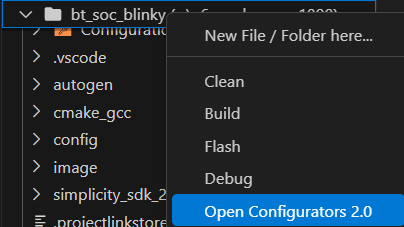
Choose Debug Configurator.
The standard debug configuration fields will be pre-filled. Expand the bottom section of the dialog to view optional fields for the debug session, including configuration options for RTT and SWO terminals.
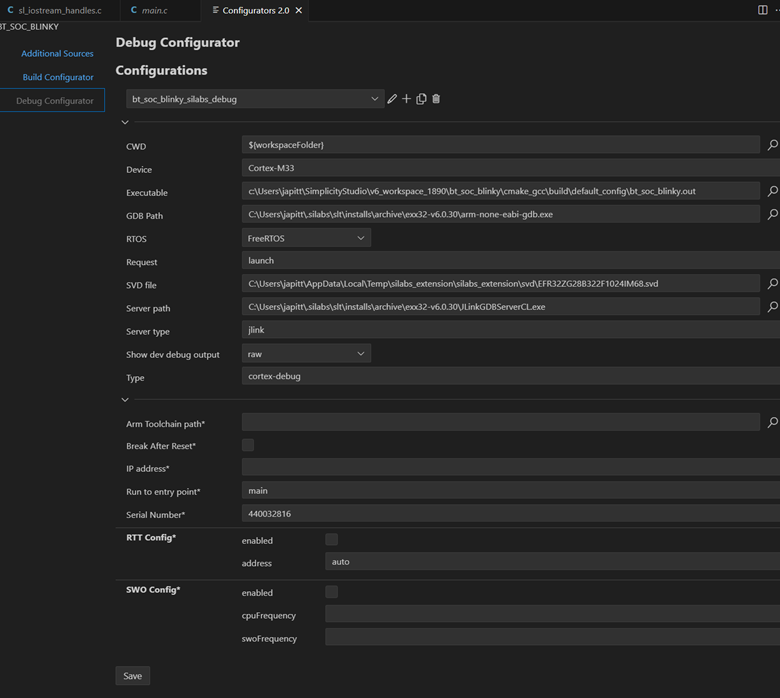
Common Settings#
Break after Reset – Stops code execution after a reset instead of running to
main.Run to entry point – Defaults to
main, but can be changed for special debugging scenarios.
Enable the RTT Config and/or SWO Config sections to apply custom settings for those terminals. The default settings are typically sufficient.