Usage Guidelines#
Steps to bring up in Concurrent Mode#
Download the SiWT917 Driver.
Unzip the driver using the following command.
# unzip SiWT917.x.x.x.x.zipNext the user needs to enter the root-user mode by giving the following command and providing the correct username and password.
# sudo suThe section below provides the steps to configure Wi-Fi Concurrent mode using a startup script or by manual commands. The user can choose either method.
Using Startup Scripts#
Use the script at the path “<system_path>/SiWT917.x.x.x.x/release/” to run Wi-Fi concurrent mode.
# ./start_SiWT917.sh AP_STAFor more details about the startup script file, refer to the Startup Script section of SiWT917 RCP Developer’s Guide.
Using Manual Steps#
To enable the concurrent mode, the user need to compile the source by enabling the CONFIG_STA_PLUS_AP in Makefile at
<system_path>/SiWT917.x.x.x.x/.#Uncomment below line for using Concurrent mode CONFIG_STA_PLUS_AP = yNote:
<system_path>is the location where the user has downloaded/placed the SiWT917 driver in the system.After enabling CONFIG_STA_PLUS_AP flag in Makefile, save the file and compile the driver follow.
#make clean; makeNote: For compiling from kernel source or for other embedded platforms like iMX6 , the user can refer to the section Compilation Steps.
Before installing the driver, install the dependencies using the following commands
# modprobe mac80211
# modprobe bluetooth
Before installation, the user needs to stop the existing network manager and unblock WLAN from rfkill. The commands below are used to stop the network-manager on different Linux distribution.
For Ubuntu, use the following command:
# service network-manager stopFor Fedora/Raspberry Pi, use the following command:
# service NetworkManager stopTo stop rfkill blocking WLAN, use the following command :
#rfkill unblock wlan (or)
# rfkill unblock all
Go to the driver package and copy all the files present in the
<system_path>/SiWT917.x.x.x.x/Firmware folder to/lib/firmwareby following the commands below.# cd <system_path>/SiWT917.x.x.x.x/ # cp Firmware/* /lib/firmwareAfter compiling the driver go to
<system_path>/ SiWT917.x.x.x.x/releasefolder and give the following commands.Enter the following command :
# insmod rsi_91x.ko dev_oper_mode = 3 rsi_zone_enabled = 0x601
# insmod sdio.ko sdio_clock = 50
Check for the interface created using the following command:
# ifconfig -aFor example, if the driver is loaded successfully and the wireless interface is created ,then the user will see the following output :
wlan0: flags=4098<BROADCAST,MULTICAST> mtu 1500 ether 94:b2:16:98:ac:dc txqueuelen 1000 (Ethernet) RX packets 0 bytes 0 (0.0 B) RX errors 0 dropped 0 overruns 0 frame 0 TX packets 0 bytes 0 (0.0 B) TX errors 0 dropped 0 overruns 0 carrier 0 collisions 0Note: In this test case, the wireless interface created after loading of the driver is “wlan0". The interface name may vary across the systems.
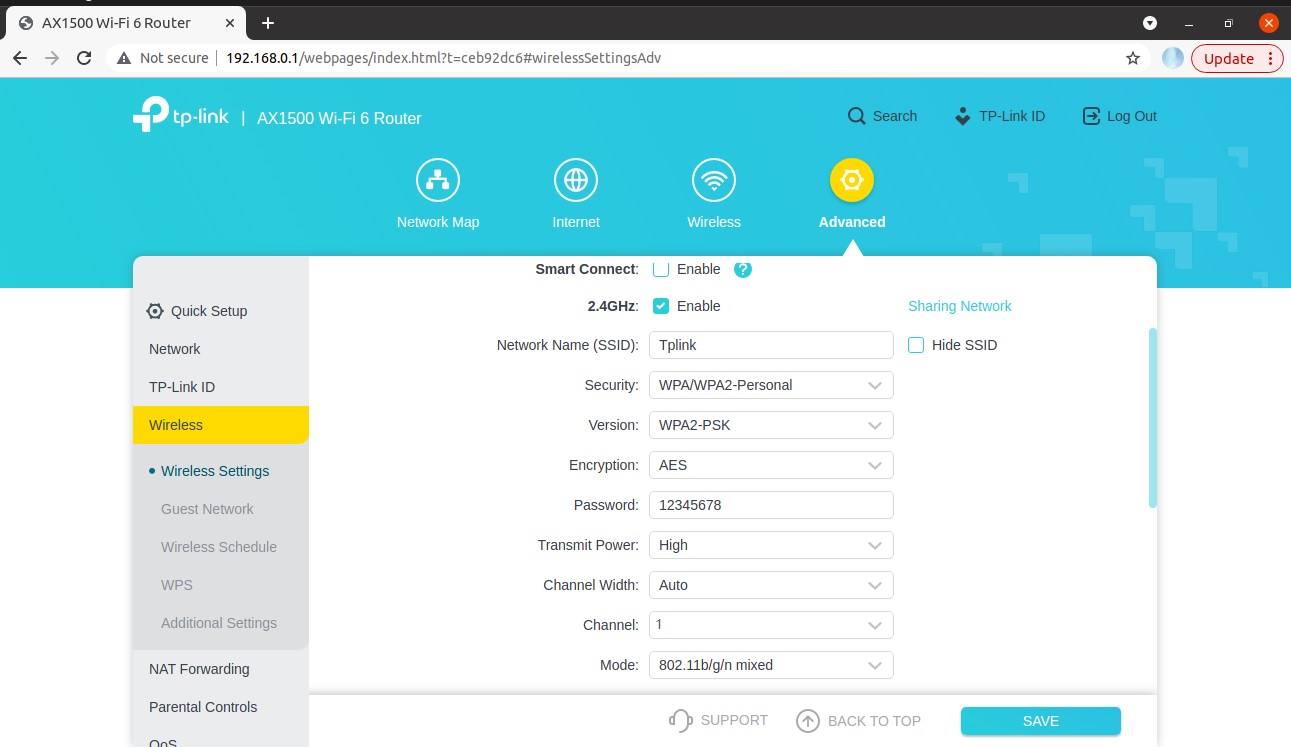
Bring up the third-party access point in the desired channel and security. For this test case setup, the TP-Link AX1500 Wi-Fi 6 Router is configured with the following credentials as shown in the below figure.


Edit the network block present in the
<system_path>/SiWT917.x.x.x.x/release/ sta_settings.conffile present in the<system_path>/ SiWT917.x.x.x.x/releasefolder with the credentials of the third-party WLAN access point. For this test case, the network block is updated in the following manner:ctrl_interface = /var/run/wpa_supplicant update_config = 1 #Enable this network block for CCMP/TKIP mode network = { ssid = "Tplink" pairwise = CCMP TKIP group = CCMP TKIP key_mgmt = WPA-PSK psk = "12345678" # bgscan = "simple:15:-45:20" proto = WPA2 WPA }For more details regarding how to update the network block for other security modes in
<system_path>/ SiWT917.x.x.x.x/release/sta_settings.conf file, the user needs to follow the section Configure Station Using WPA Supplicant of the SiWT917 RCP Developer’s Guide.Run wpa_supplicant to connect SiWT917-STA to the TAP.
#wpa_supplicant -i <interface_name> -D nl80211 -c
        <system_path>/SiWT917.x.x.x.x/release/sta_settings.conf -ddddt > log &
        Example : wpa_supplicant -i wlan0 -D nl80211 -c /home/
        SiWT917.x.x.x.x/release/sta_settings.conf -ddddt > supp.log &
To check whether the connection is successful or not use below command:
# iwconfigIf the connection is successful, then the connected access point SSID along with the MAC address is displayed as shown below.
wlan0 IEEE 802.11 ESSID:"Tplink"
Mode:Managed Frequency:2.412 GHz Access Point: B0:A7:B9:C4:52:CA
Bit Rate = 39 Mb/s Tx-Power = 16 dBm
Retry short limit:7 RTS thr = 2353 B Fragment thr=2352 B
Encryption key:off
Power Management:off
Link Quality = 80/80 Signal level = -28 dBm
Rx invalid nwid:0 Rx invalid crypt:0 Rx invalid frag:0
Tx excessive retries:0 Invalid misc:18 Missed beacon:0
If it is not connected to an access point, a message Not Associated is displayed as shown below.
wlan0 IEEE 802.11 ESSID:off/any
Mode: Managed
Access Point: Not-Associated Tx-Power = 0 dBm Retry short limit:7 RTS thr:off Fragment thr:off
Encryption key:off
Power Management:off
After successful connection, check the IP address using the below commands
# dhclient wlan0 -r
# dhclient wlan0 -v
To check if the SiWT917-STA has assigned an IP address from the third-party wlan access point, the user can give the following command:
#ping <IP_adrress of TAP>
         Example : ping 192.168.0.1
For example, if SiWT917-STA has successfully received an IP, we will see the following output.
PING 192.168.0.1 (192.168.0.1) from 192.168.0.228 wlan0:
56(84) bytes of data.
64 bytes from 192.168.0.1: icmp_seq = 1 ttl = 64 time = 26.8 ms
64 bytes from 192.168.0.1: icmp_seq = 2 ttl = 64 time = 10.8 ms
64 bytes from 192.168.0.1: icmp_seq = 3 ttl = 64 time = 4.00 ms
64 bytes from 192.168.0.1: icmp_seq = 4 ttl = 64 time = 6.25 ms
64 bytes from 192.168.0.1: icmp_seq = 5 ttl = 64 time = 1.77 ms
64 bytes from 192.168.0.1: icmp_seq = 6 ttl = 64 time = 5.05 ms
64 bytes from 192.168.0.1: icmp_seq = 7 ttl = 64 time = 2.18 ms
64 bytes from 192.168.0.1: icmp_seq = 8 ttl = 64 time = 5.63 ms
64 bytes from 192.168.0.1: icmp_seq = 9 ttl = 64 time = 2.72 ms
64 bytes from 192.168.0.1: icmp_seq = 10 ttl = 64 time = 3.01 ms
64 bytes from 192.168.0.1: icmp_seq = 11 ttl = 64 time = 2.32 ms
64 bytes from 192.168.0.1: icmp_seq = 12 ttl = 64 time = 3.14 ms
--- 192.168.0.1 ping statistics ---
12 packets transmitted, 12 received, 0 % packet loss, time 11019 ms
rtt min/avg/max/mdev = 1.766/6.133/26.773/6.665 ms
For example, if SiWT917-STA has not assigned with an IP address, we will see the following output for the ping command.
# ping: connect: Network is unreachableCreate the AP vap, using the following command:
# iw dev wlan0 interface add wlan1 type __apCheck the interface name created by using the following command:
# ifconfig -aIf the interface is successfully created , we will get the following output :
wlan1: flags = 4098<BROADCAST,MULTICAST> mtu 1500 ether 94:b2:16:98:ac:dd txqueuelen 1000 (Ethernet) RX packets 0 bytes 0 (0.0 B) RX errors 0 dropped 0 overruns 0 frame 0 TX packets 0 bytes 0 (0.0 B) TX errors 0 dropped 0 overruns 0 carrier 0 collisions 0Note: In this test case the interface name for SiWT917-AP is created as "wlan1". The naming convention is system specific. The user can get the same name or a different name depending upon the target host.
Configure the fields present in ap_open.conf or ap_wpa.conf file and bring up RSI-AP as follows that is, change the interface field value present in
<system_path>/SiWT917.x.x.x.x/release/ /ap_open.conffile or<system_path>/SiWT917.x.x.x.x/release/ap_wpa.conffile with the new interface name created for AP vap.For example, we brought the RSI-AP in open security mode with the following credentials.
interface = wlan1
driver = nl80211
ctrl_interface = /var/run/hostapd
ctrl_interface_group = 0

ssid=bionic_test ignore_broadcast_ssid = 0
hw_mode = g channel = 1 beacon_int = 100
dtim_period = 2
max_num_sta = 4
rts_threshold = 2347
fragm_threshold = 2346
auth_algs = 1
# Country Related
#ieee80211d = 1
country_code = IN
wmm_enabled = 1
wmm_ac_bk_cwmin = 4
wmm_ac_bk_cwmax = 10
wmm_ac_bk_aifs = 7
wmm_ac_bk_txop_limit = 0
wmm_ac_bk_acm = 0
wmm_ac_be_aifs = 3
wmm_ac_be_cwmin=4 wmm_ac_be_cwmax = 10
wmm_ac_be_txop_limit = 0 wmm_ac_be_acm = 0
wmm_ac_vi_aifs = 2
wmm_ac_vi_cwmin = 3
wmm_ac_vi_cwmax = 4
wmm_ac_vi_txop_limit = 94
wmm_ac_vi_acm = 0
wmm_ac_vo_aifs = 2
wmm_ac_vo_cwmin   = 2
wmm_ac_vo_cwmax = 3
wmm_ac_vo_txop_limit = 47
wmm_ac_vo_acm = 0
eap_server  = 0
Then bring up the ap_vap with the following command:
# hostapd ap_open.conf -dddt >log1 &To check whether the AP is up or not, use the following command:
# iw devFor example, if bringing up of the AP mode is successful, we will see the following output.
phy#1
Interface wlan1
    ifindex 12
    wdev 0x400000002 addr 94:b2:16:98:ac:dd
    ssid bionic_test
    type AP
    channel 1 (2412 MHz), width: 20 MHz (no HT), center1: 2412 MHz
    txpower 20.00 dBm
Interface wlan0
    ifindex 9 wdev
    0x300000001
    addr 94:b2:16:98:ac:dc
    ssid Tplink type managed
    channel 1 (2412 MHz), width: 20 MHz, center1: 2412 MHz
    txpower 20.00 dBm
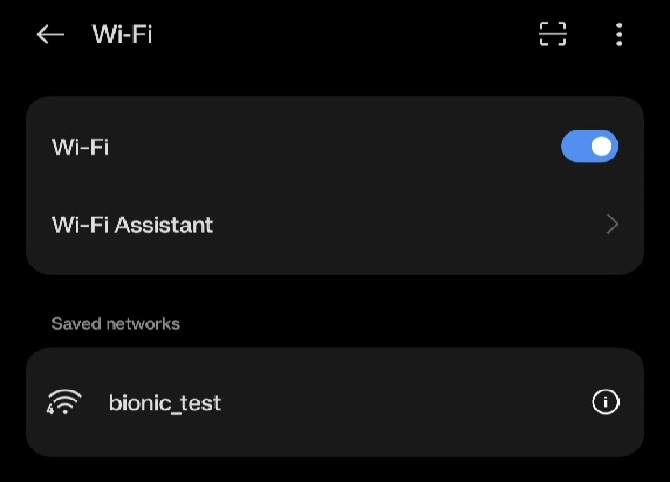
In the example above, we can see for Interface wlan1 ,the type is AP. The user can now check the SiWT917-AP is up with the ssid bionic_test .
Run the dhcp server for AP vap.
# sh dhcp_server.sh wlan1Connect third-party STA to SiWT917-AP. For example, you can see the below image:


Limitations#
Following are the limitations:
Always start SiWT917-STA first, let the SiWT917-STA connection happen to TAP, and then start the SiWT917-AP mode.
In concurrent mode, if SiWT917-STA interface goes down, then SiWT917-AP interface must be put down to restart the SiWT917-STA mode.
SiWT917-STA cannot use radio for scanning once it is acquired by SiWT917-AP for beacon emission for regular interval.
Background scan(bg-scan) and power save features are not supported for the station mode vap in concurrent mode.
SiWT917-AP will always operate in channel in which the SiWT917-STA [corresponding to other VAP] connects. For example, if the station connects in channel 6, then AP mode should be created in channel 6, irrespective of the channel configured; however, SiWT917-AP and SiWT917-STA can operate in different security modes.
