Debug Lock and Unlock Process#
The following sections will describe the debug lock and unlock process, the debug token format, and how unlocking is accomplished using only a private key.
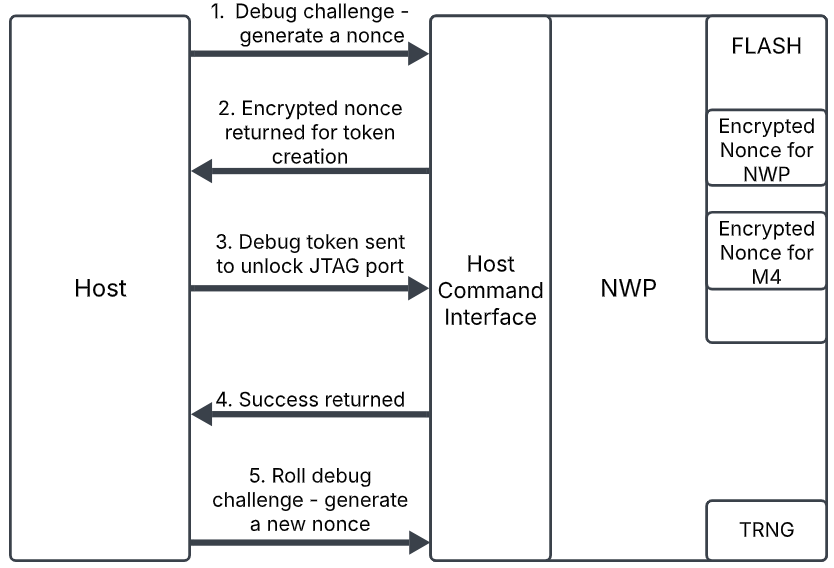
The first step in starting the debug lock process is to initiate a debug challenge. This is done by sending a lock command to the device, either through Simplicity Commander or the ISP bootloader. When a lock command is sent, a nonce is generated by the TRNG on the device. Once generated, the nonce is encrypted with the NWP's PUF-derived intrinsic key, and is stored in flash. The nonce generation and encryption process is the same for each core, except for the separate flash locations where each core's encrypted nonce is stored.
Once stored in flash, a copy of the encrypted nonce is returned to the host to create a debug token. The corresponding debug port will be locked after a power cycle. More details on the debug token format are covered in the following section.
Note: The debug lock register is a write-once register that can only be written to by the NWP after reset. For a change of state to occur when debug locking and unlocking, the device must be power cycled to set or clear the debug lock register.
When the debug port needs to be unlocked, the debug token is sent from the host to the NWP to initiate the unlock sequence. Upon receipt of the debug token, the NWP will verify the signature on the debug token, then will place the encrypted nonce in flash. The two encrypted nonces, one previously stored in flash when locking the device, and one received from the debug token, will be decrypted by the NWP's intrinsic key and compared. If the values match, the debug port for the corresponding core will be unlocked. If they do not match, the debug port will remain locked.
Once a debug session is complete, the debug challenge should be rolled. This initiates the generation of a new nonce, which starts the debug lock process again. When the challenge is rolled, a new encrypted nonce will be stored in flash, and the nonce in flash from the previous debug token will no longer be valid. The device will need to be power cycled to lock the debug port again. Once locked, a valid debug token or a private key is needed to unlock the device.
Unlocking with a Private Key#
As shown in the following examples, a user has the option to either unlock the device using the debug token generated when locking the device, or by unlocking the debug port using only the core-specific private key. The process for unlocking the device using only the private key is the same process behind the scenes as what is documented in the previous section. When initiating an unlock using the private key, the device will be prompted to generate and store a new encrypted nonce, return a copy of the encrypted nonce, create a token to be signed by the specified private key, then send the debug token created back to the NWP. This process happens in the background, so it is not seen by the user. After a debug session is complete, the debug challenge should be rolled and a power cycle should occur so that the debug port is locked again.
Debug Token#
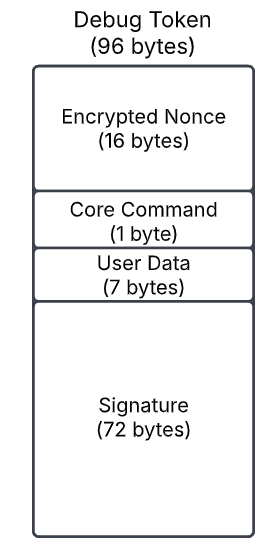
A debug token is created during debug locking, and can be saved by the user for unlocking at a later time. The debug token is specific to each core and comprises four data fields: an encrypted nonce, a core command, user data, and a signature.
The encrypted nonce is a 16 byte field in the debug token which guarantees uniqueness of the debug token. When unlocking, the encrypted nonce from the debug token will be passed to the device, decrypted with the device's PUF-derived intrinsic key, and compared to the decrypted value of the nonce generated during debug locking. This guarantees that debug tokens are only usable on the device that generated the encrypted nonce.
The core command is a 1 byte field used to indicate which core to unlock when the debug token is sent. The core command can only be two values, either 0x74, indicating a "t" in ASCII, which corresponds to the NWP core, or 0x6D, indicating an "m" in ASCII, which corresponds to the M4 core.
The user data field is a 7 byte field of padding that can be optionally used to store user data. For example, a user may want to implement a versioning scheme to track versions of debug tokens.
The signature field is a 72 byte ECDSA P-256 signature, and the last field of data in the debug token. The signature is used for authentication, to ensure the user sending the token is authorized to unlock the debug port. The signature is created using the core-specific private key, and is verified on the device by the NWP using the corresponding public key. If the signature verification fails when a debug token is sent, the debug port will remain locked.