Build Wi-SUN - SoC Empty and Connect to any Wi-SUN Network#
The Development Walkthrough begins with Simplicity Studio.
Starting Simplicity Studio#
It is best to keep the code separate from other projects for the sake of clarity. For this reason, start by creating a Development_Walkthrough folder to serve as a workspace folder for Simplicity Studio.
In Windows, the default path for Simplicity Studio workspaces is C:\Users\username\SimplicityStudio, so create C:\Users\username\SimplicityStudio\Development_Walkthrough.
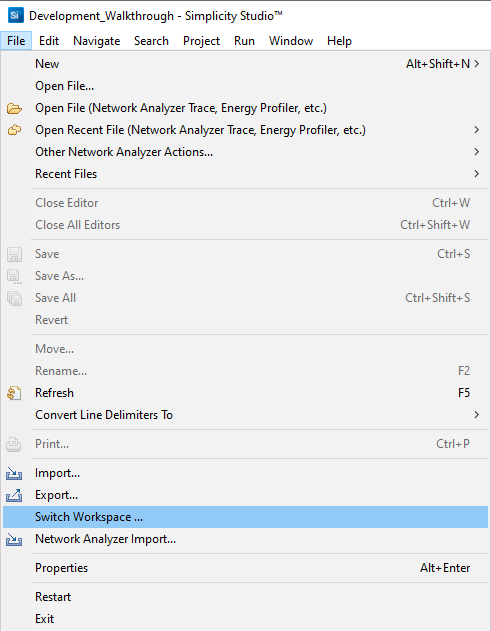
Now, start Simplicity Studio and switch to the workspace, if not already selected, by selecting File > Switch Workspace.
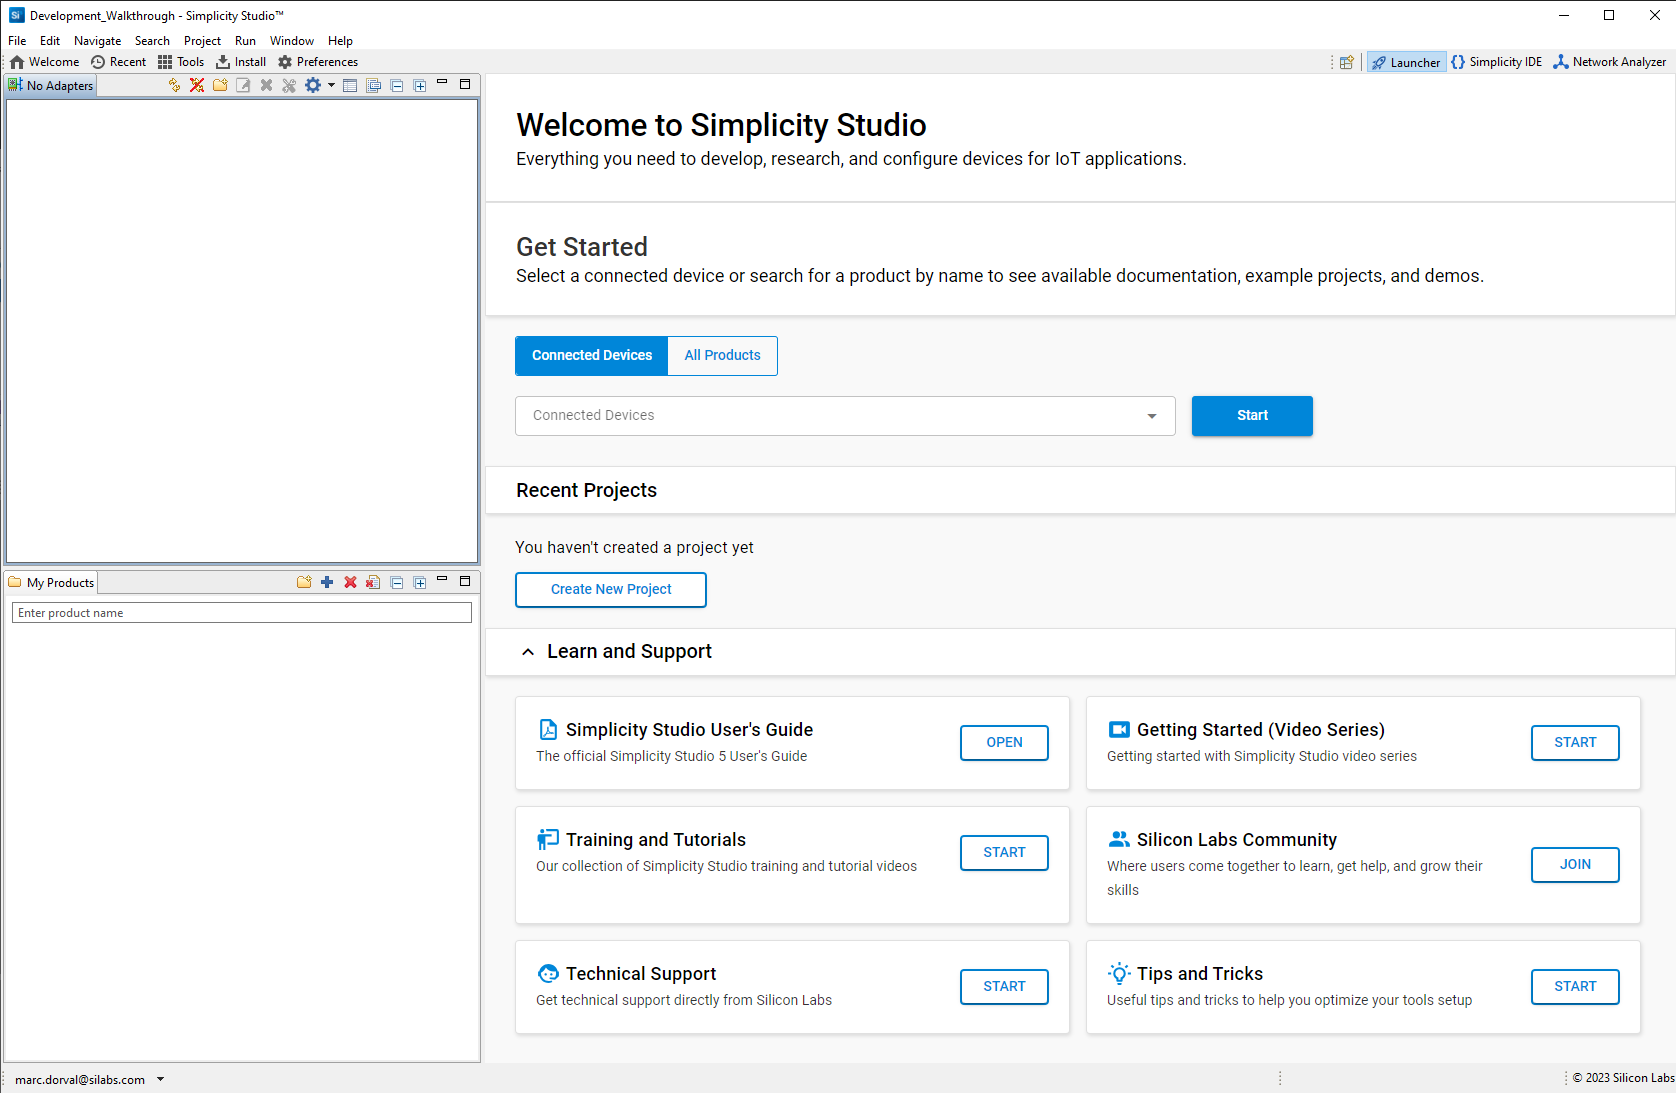
Once in the new workspace, you see the Simplicity Studio Welcome Screen.
Connecting a Wi-SUN Development Kit#
At this point, you have no Adapter Board connected, so fit a Wi-SUN compatible Radio Board to a Silicon Labs WSTK/WPK from a Wi-SUN Development Kit and plug it into a USB port on the PC to get it displayed in the Debug Adapters frame.

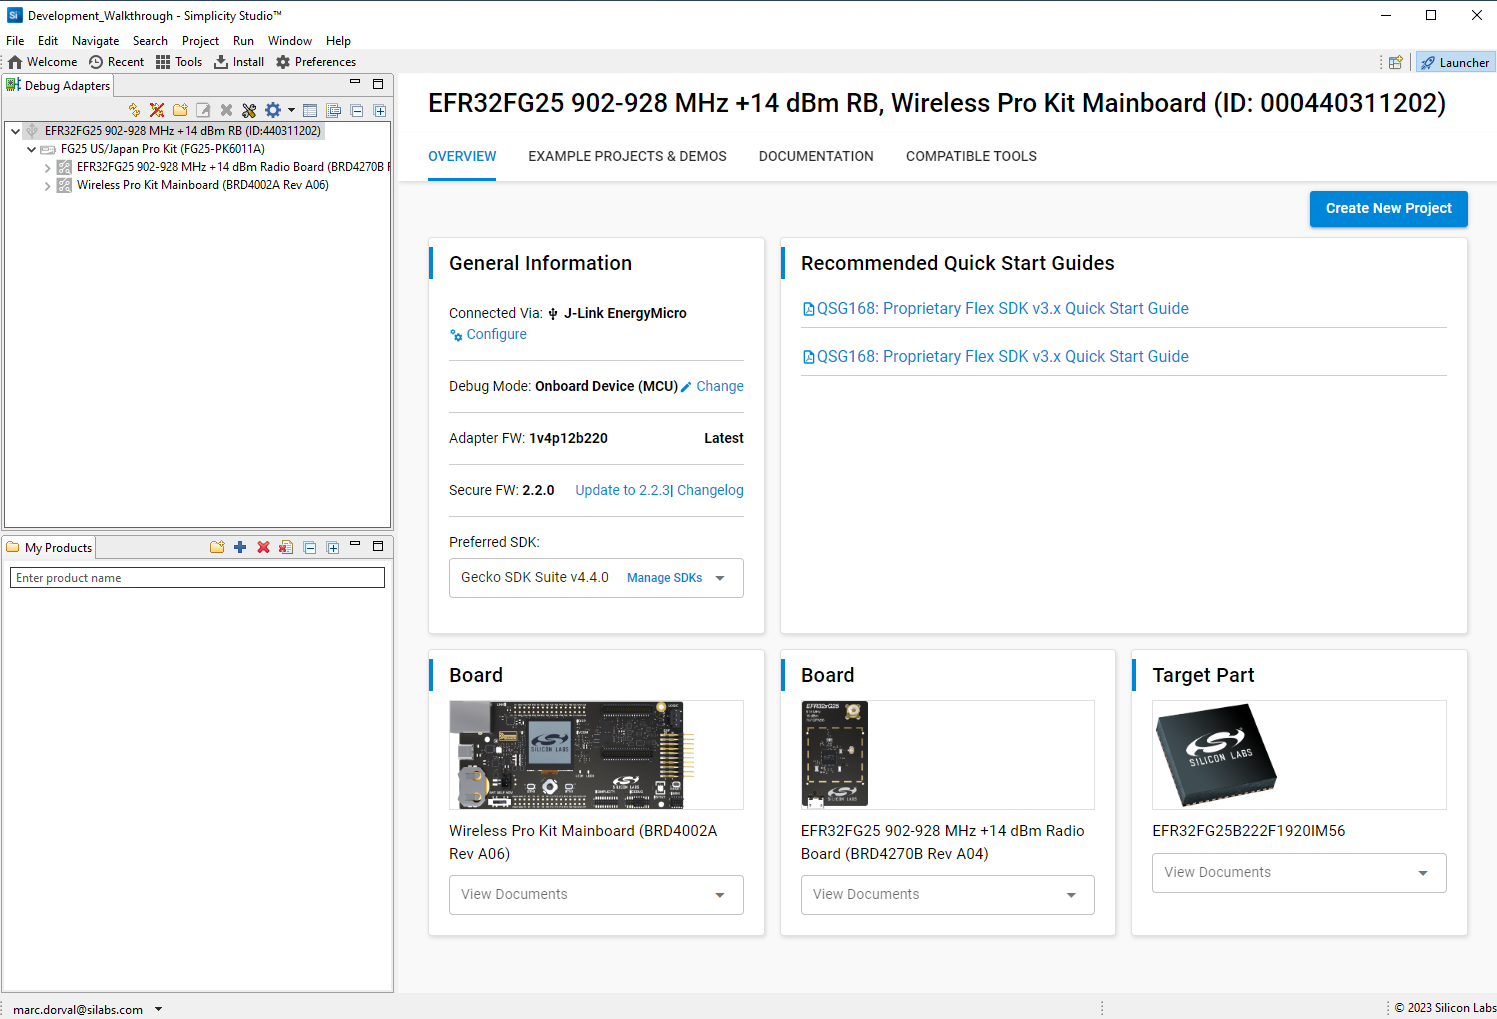
You can expand the Adapter information to check the kit's information, including the Radio Board reference, the exact part number, and the Main board information.

TIP: Additional information on the Wi-SUN kits is available on the Silicon Labs Wi-SUN webpage.
Creating the Wi-SUN - SoC Empty Application#
Wi-SUN - SoC Empty is the recommended application to start development from, since it contains the necessary resources to easily connect Wi-SUN devices to any Wi-SUN network.
In this example:
Use console
printfcalls to help follow the application progress. It makes application development easier to get console traces. Any C developer will know how to make these optional in a 'release' build, if required, although minimal traces are always helpful for maintenance reasons, if only to display the application and version information at startup.Don't add a CLI (Command Line Interface) through the console, because:
In a Wi-SUN network, the only access to the devices is through the Wi-SUN network itself.
Generally, access to a device console will not be possible. It requires physical access to the device.
Not adding a CLI makes the console impossible to use to take control of the device, making the application more secure.
TIP: A typical WI-SUN device also requires OTA DFU capability for updates/upgrades. Silicon Labs recommends adding OTA DFU once the Wi-SUN SoC Empty application is working as expected.
After connecting a Wi-SUN Development Kit and selecting it, Simplicity Studio opens the  perspective, where information on the selected Adapter is displayed, and Simplicity Studio is ready to help create matching projects.
Simplicity Studio only displays information relevant to the context it is in, so here, because the target Debug Adapter is selected, it shows the Launcher perspective and the OVERVIEW tab for the evaluation kit. You also have easy access to the corresponding documentation and tools.
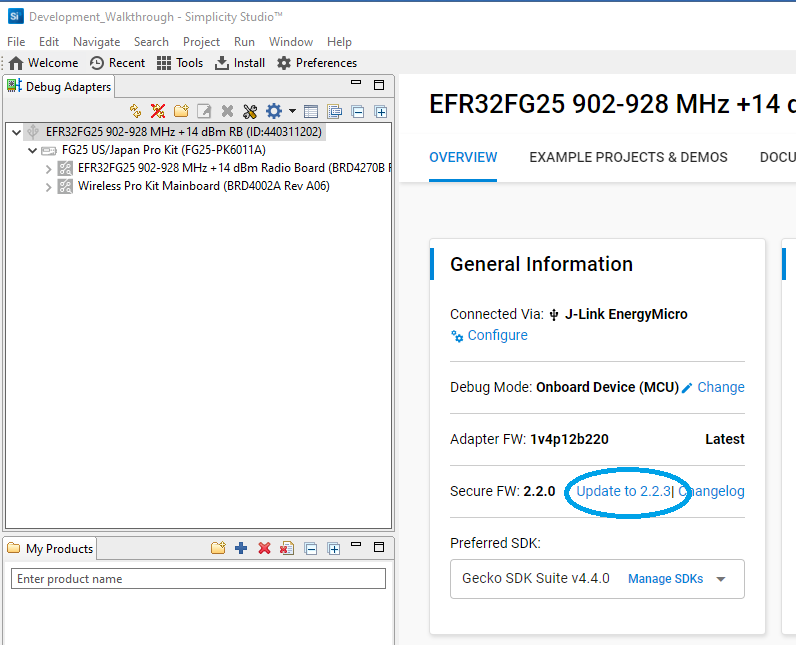
TIP: When the General Information box indicates the need to update the Adapter FW or the Secure FW to newer versions, it is recommended to do so. New releases generally improve stability.
To get started with the Wi-SUN SoC Empty application, select the EXAMPLE PROJECTS & DEMOS tab, still in the Launcher perspective, and wait for Simplicity Studio to display the examples. It can take a couple seconds.
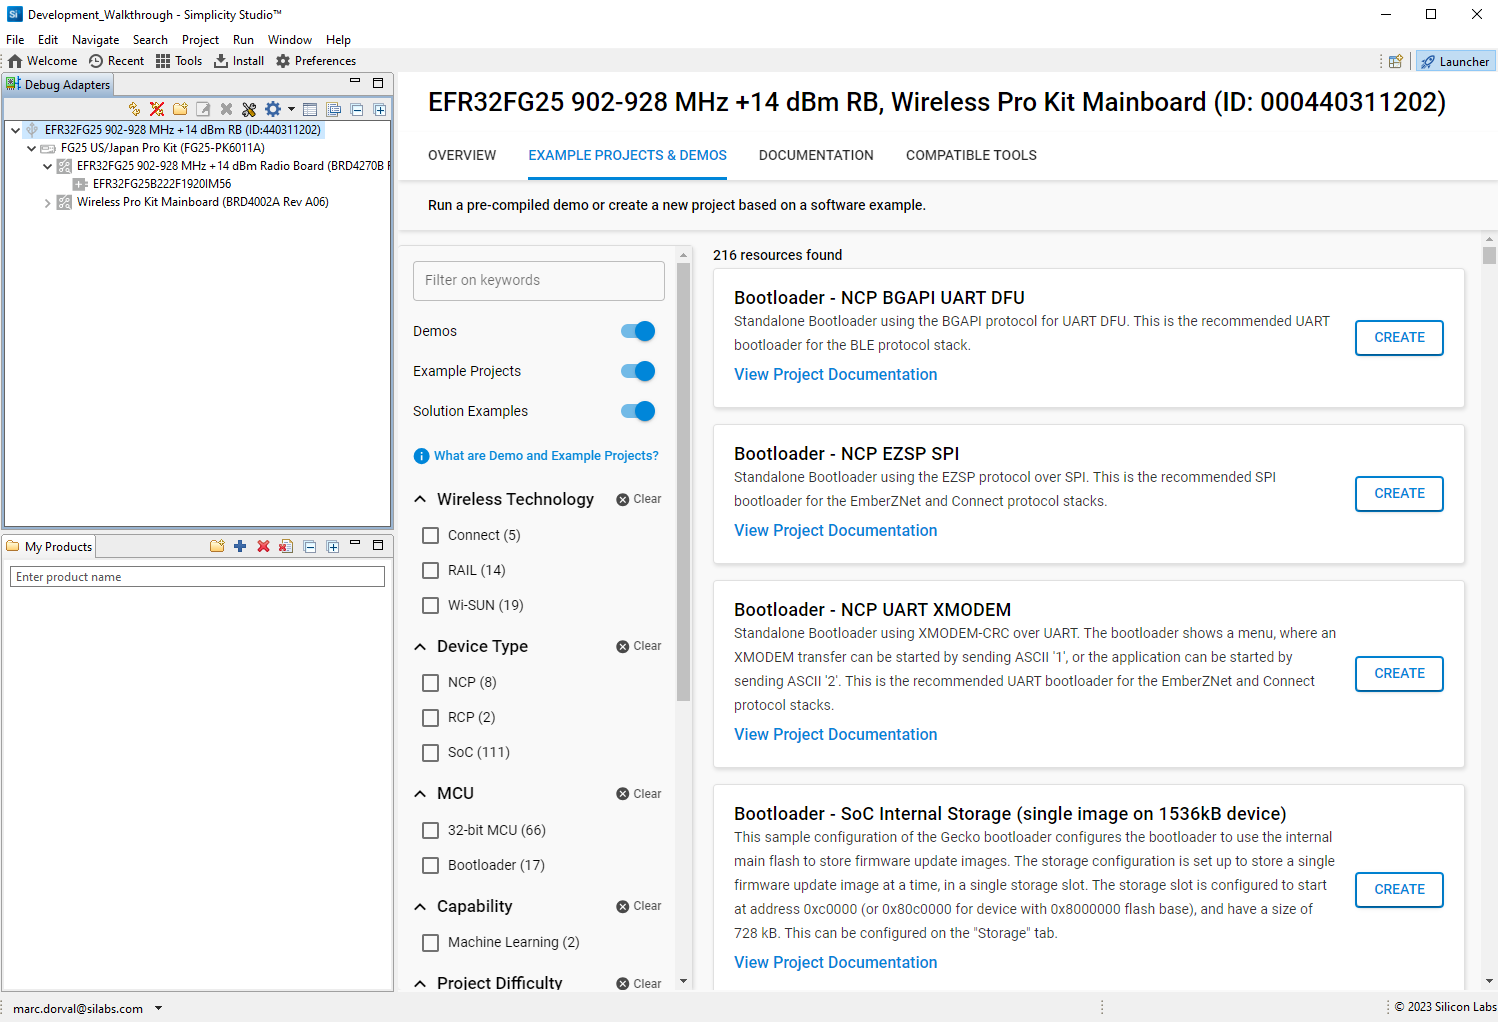
Filter the projects by clicking the following items:
Under Wireless Technology: Wi-SUN
Under Device Type: SoC
To further limit to items containing 'empty', type 'empty' in the Filter on keywords box, and press Enter.
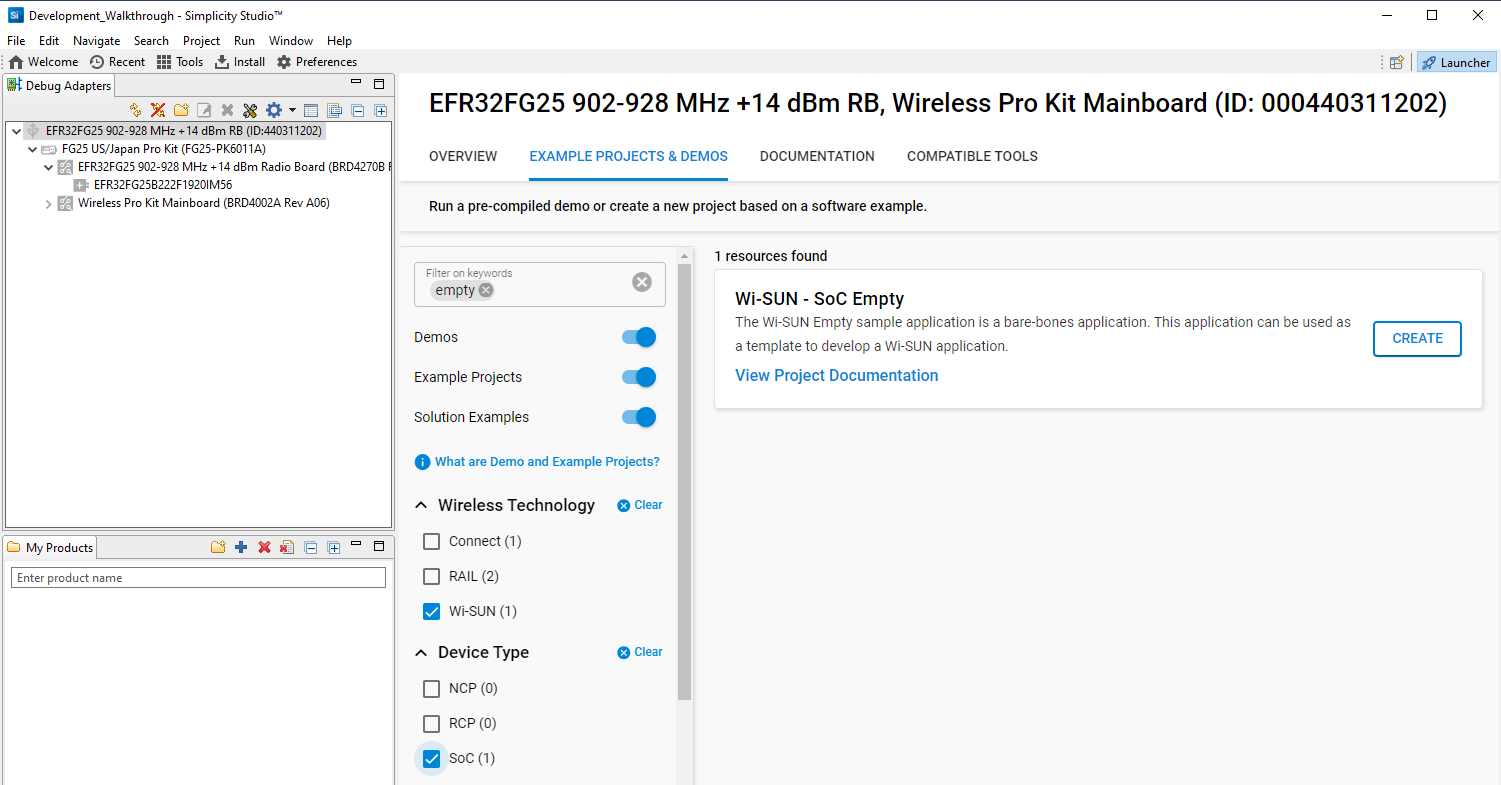
This makes it easy to locate the Wi-SUN - SoC Empty project.
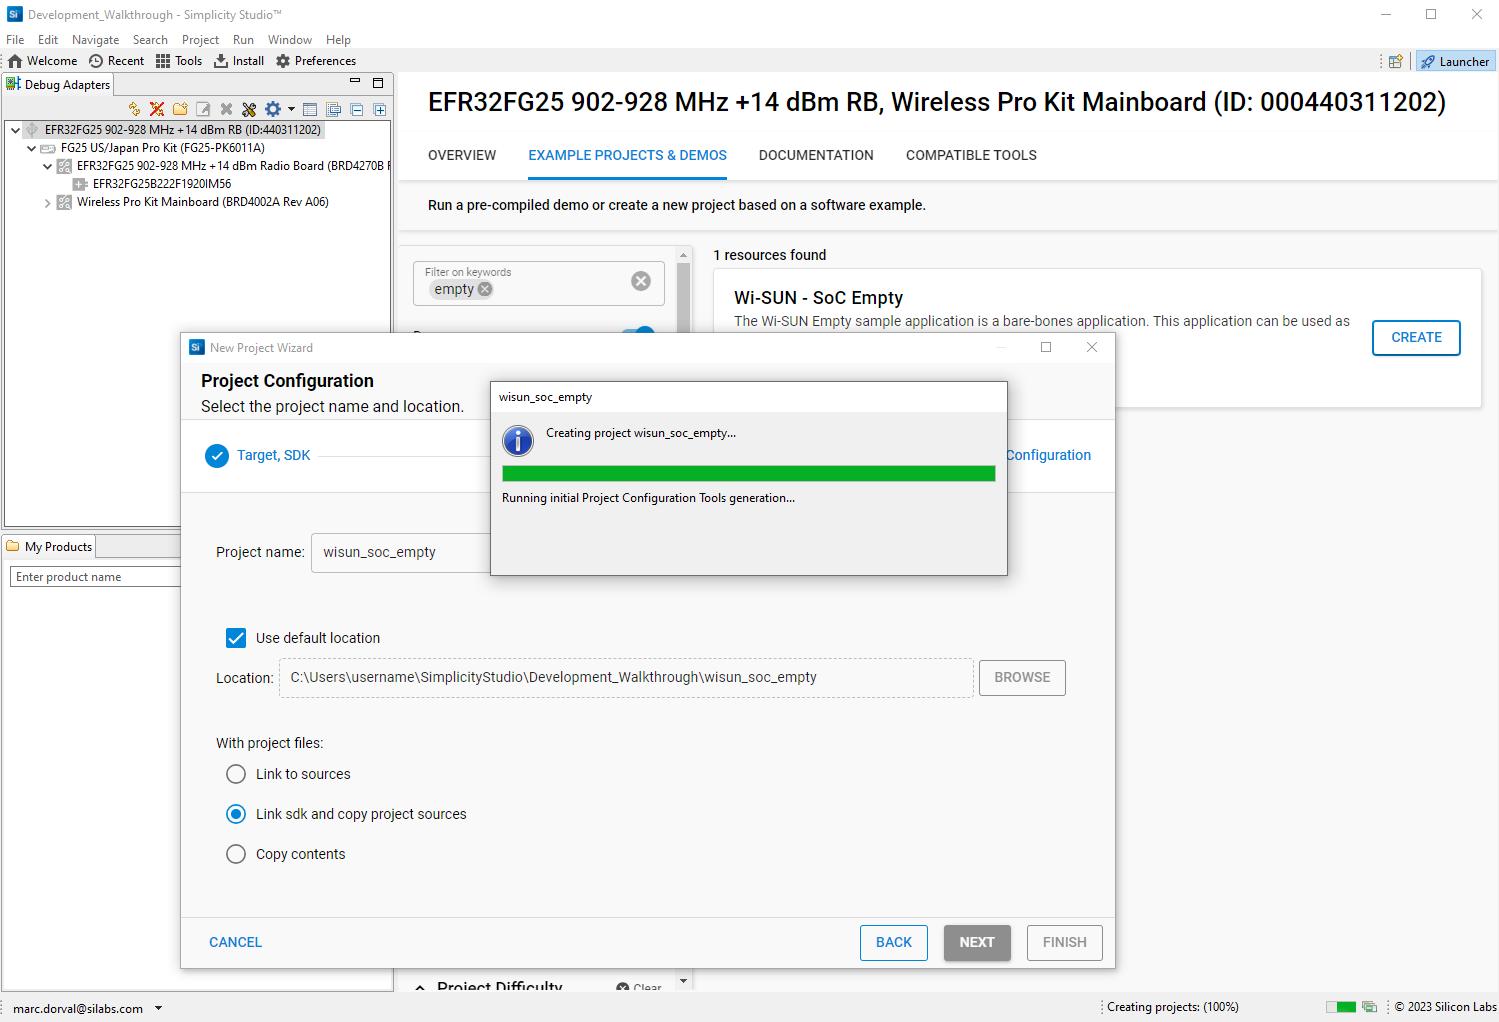
Now click CREATE in the Wi-SUN - SoC Empty box to start creating your project.
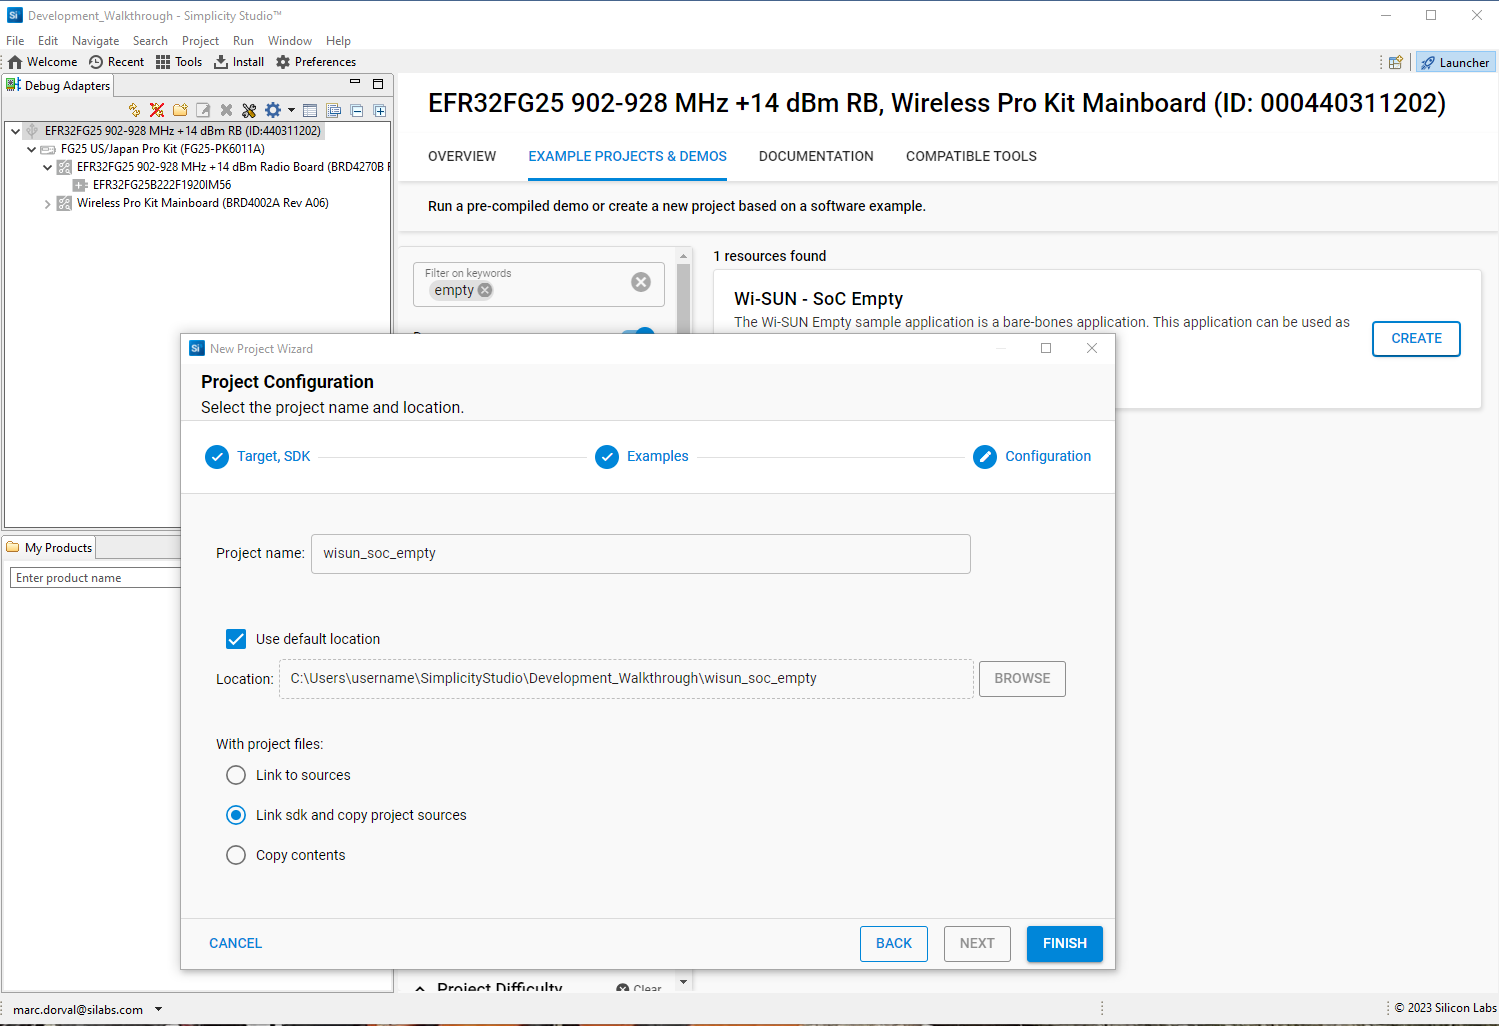
Since you are happy with the default project name and location, click FINISH to create the project.
TIP: An alternate path to project creation is File > New > Silicon Labs Project Wizard. If you use this path after selecting your development kit in the Debug Adapter window, the settings will be pre-filled for it as well. You will be at the Target/SDK selection step
in this case, two steps higher in the process than the Configuration step above (
). When using the Launcher path just described, you can still click the Back button twice to go back to the Target/SDK selection step, which allows you to select an IDE (to edit your code) and a toolchain (to compile your code) if the default IDE (Simplicity IDE) and toolchain (GNU ARM) are not what you want to use.
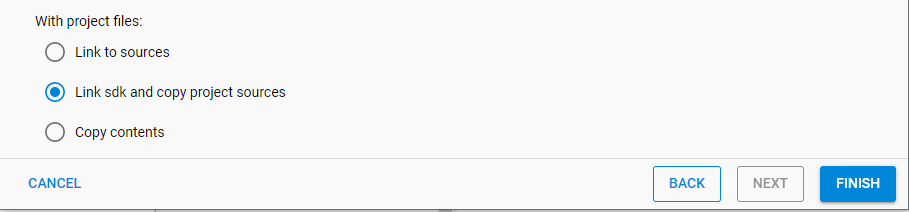
Notes on the 'With project files' Options#
Part of the code in the application is the Wi-SUN Stack. This is delivered as pre-compiled libraries matching each Stack_application/Part/Compiler/Configuration combination. Customers don't have access to the source code for this part, to keep it under control by Silicon Labs. It's complex, and the Wi-SUN stack developers are responsible for keeping it working and up to date, and they add new features over time. These will be linked with the rest of the object files in the project. You will check this after compiling your first project.
Another part of the code is the GSDK (Gecko Software Development Kit) code which is common to all projects. Customers are given access to this code. When a new project is created in your workspace, the preferred method consists of creating symbolic links to those 'sdk' sources, to save space and allow updating the GSDK version in the future. It ensures that all the projects use the same Wi-SUN Stack code, and it can be easily updated.
The final part of the code is the application code. Customers need to add their own application code there. The preferred method here is to copy the 'project sources' code from the GSDK to your project's folder, such that changing it will keep changes local to your project. This is why the default option is Link sdk and copy project sources, which is fine for most cases.
Created Project#
Once project creation is complete, Simplicity Studio switches to the ![]() perspective (see the top-right corner), and is ready for project configuration and compilation.
perspective (see the top-right corner), and is ready for project configuration and compilation.
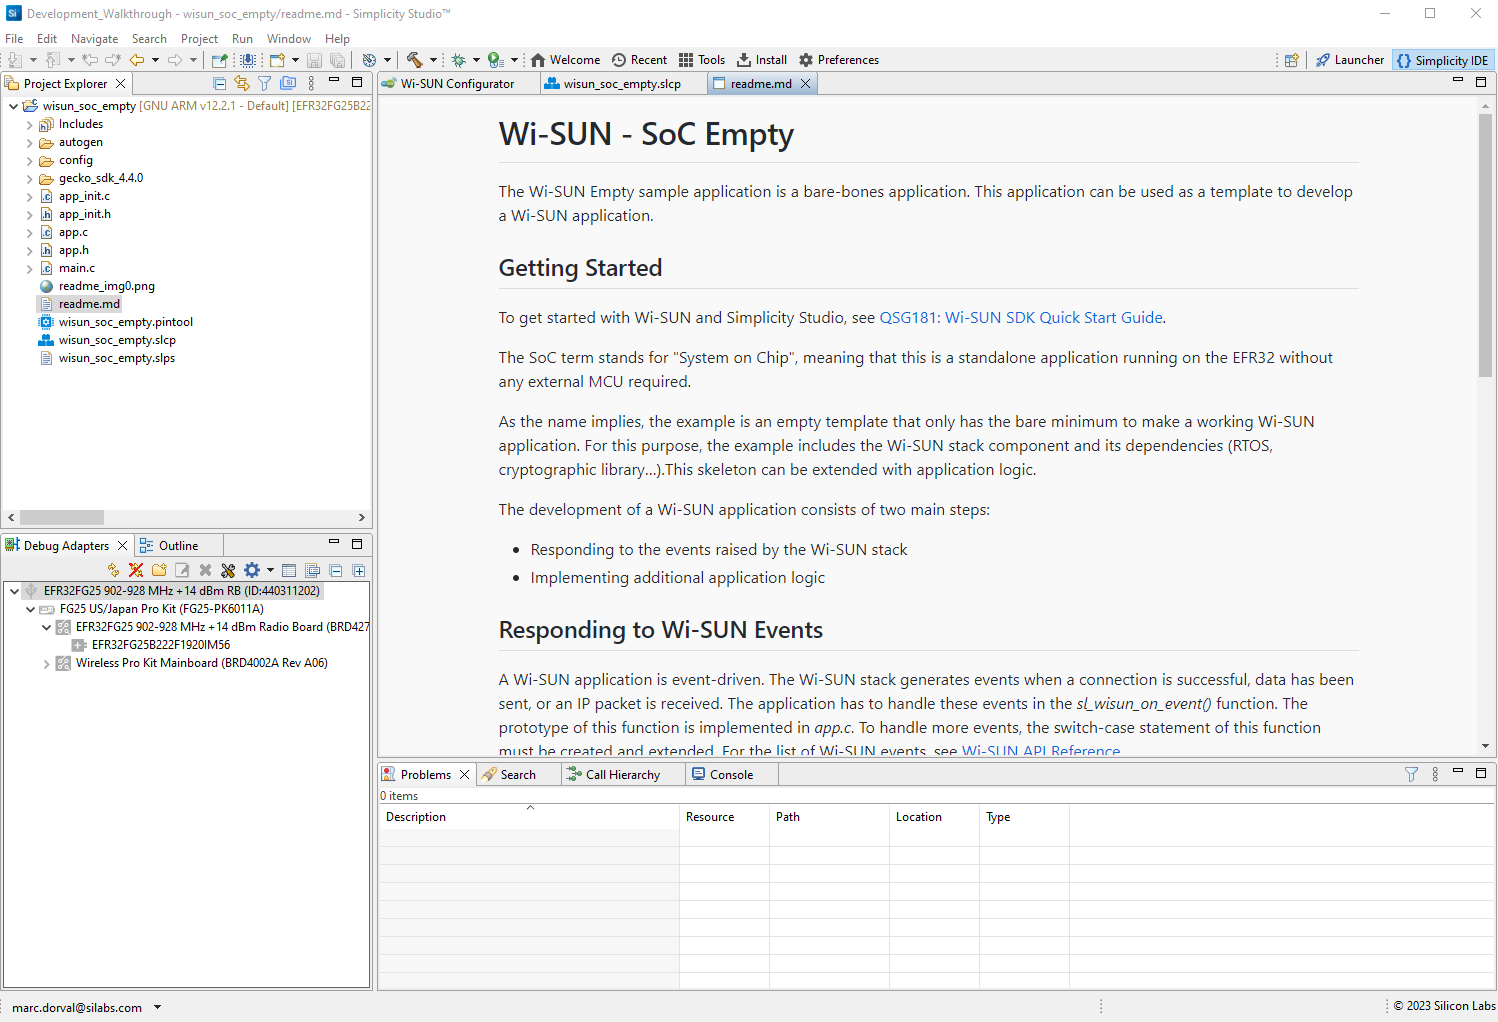
Three tabs are present in this perspective:
Wi-SUN Configurator: Used to set your Network / Security / Radio options via three tabs.
TIP: You can always get access to the Wi-SUN Configurator by double-clicking on
config/wisun/wisun_settings.wisunconf, if you ever close it.
wisun_soc_empty.slcp: Your access to the previous view with the Overview / Software Components / Configuration Tools tabs.
TIP: Similarly, you can always access this tab by double-clicking on the
wisun_soc_empty.slcpfile in the Project Explorer tab.
readme.md: The project's documentation, with links to the Quick Start guide and additional details on docs.silabs.com.
TIP: Open the
readme.mdfile in the Project Explorer tab to re-open it.
You can see the pre-compiled libraries, which will be linked with your object files.

Project Explorer#
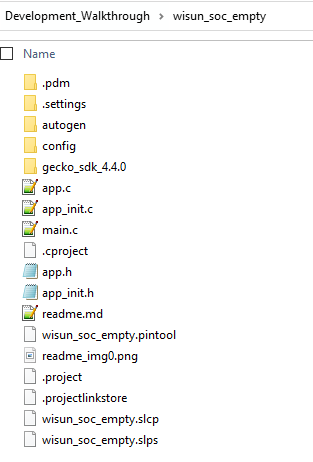
Now look at what you have in your Project Explorer view when selecting the project.
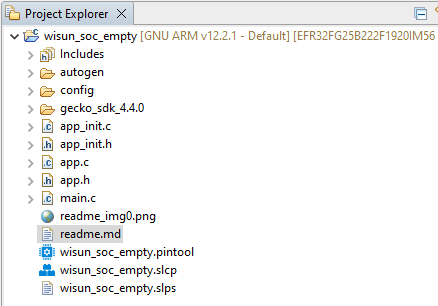
This matches the files in your workspace folder, since it's a file view. Note that, if using the Show hidden files, folders, and drives folder option in Windows, you also see the .* folders and files below.
Project Sub-Folders#
includescontains links to the sdk and stack API header files relevant to your project.autogencontains all files copied from the GSDK which contain the application code you may want to customize, plus component configuration files.configcontains the files giving access to the Wi-SUN Configurator and to the RAIL configuration, plus some low-level stack configuration files.gecko_sdk_x.y.zcontains links to the GSDK files required by your project. Only links to files relevant to your use case are included, not the entire GSDK.
TIP: If you want to modify one of the GSDK files, the IDE will ask you whether you want to edit the GSDK file or create a copy of the file (i.e. replacing the symbolic link to the file by a copy of the file). With the first option, changes you make will be shared with all other projects, and possibly lost with GSDK updates. The second option will keep your changes local to the current project.
Using Git to Track Changes#
For the sake of documenting/understanding what happens when you act on your project and tracking changes, Silicon Labs recommends using Git to track changes.
The following actions are required for this:
Open a Git Bash command window in the
Development_Walkthrough/wisun_soc_emptyfolder.Make it a Git-controlled folder using
git init.Copy the
gitignorefile to this folder and rename it to.gitignore. This is to avoid tracking object files, git files. Renaming the file is necessary to include this git-specific file to this documentation.Use
git config core.autocrlf falseto avoid changing the line endings.Use
git add --allto add all selected files to git.Use
git commit -m "Initial Commit"to commit the initial files.
TIP: Later on, opening the
Development_Walkthrough/wisun_soc_emptyfolder with Visual Studio Code is a nice way to get access to a revision control interface, for those not familiar with git's command line.
First Compilation#
Back to Simplicity Studio's Simplicity IDE perspective, with your project selected, build your project with all settings by default.
TIP: Click either on the project or in any of its opened files to select it. Check that it's the current project in the top bar.
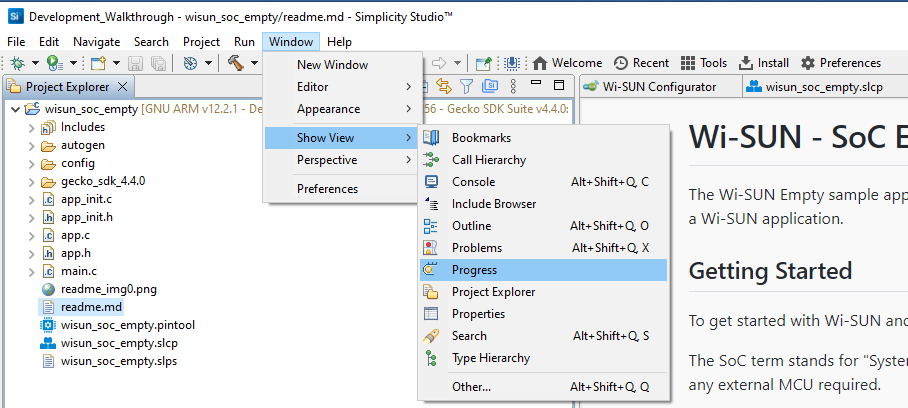
TIP: Open the Progress view to check what Simplicity Studio is working on, and check when compilation is complete. Undock this window and move it next to Simplicity Studio to see progress at any time, while reducing the window dimensions. For multi-screen users, move it to a second screen.
Time to Build#
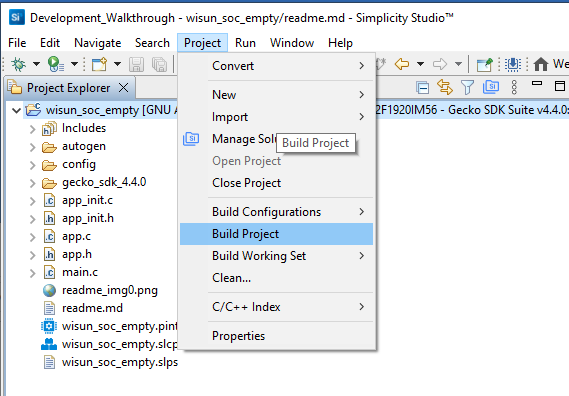
Use Project > Build Project to launch your first build of the project.
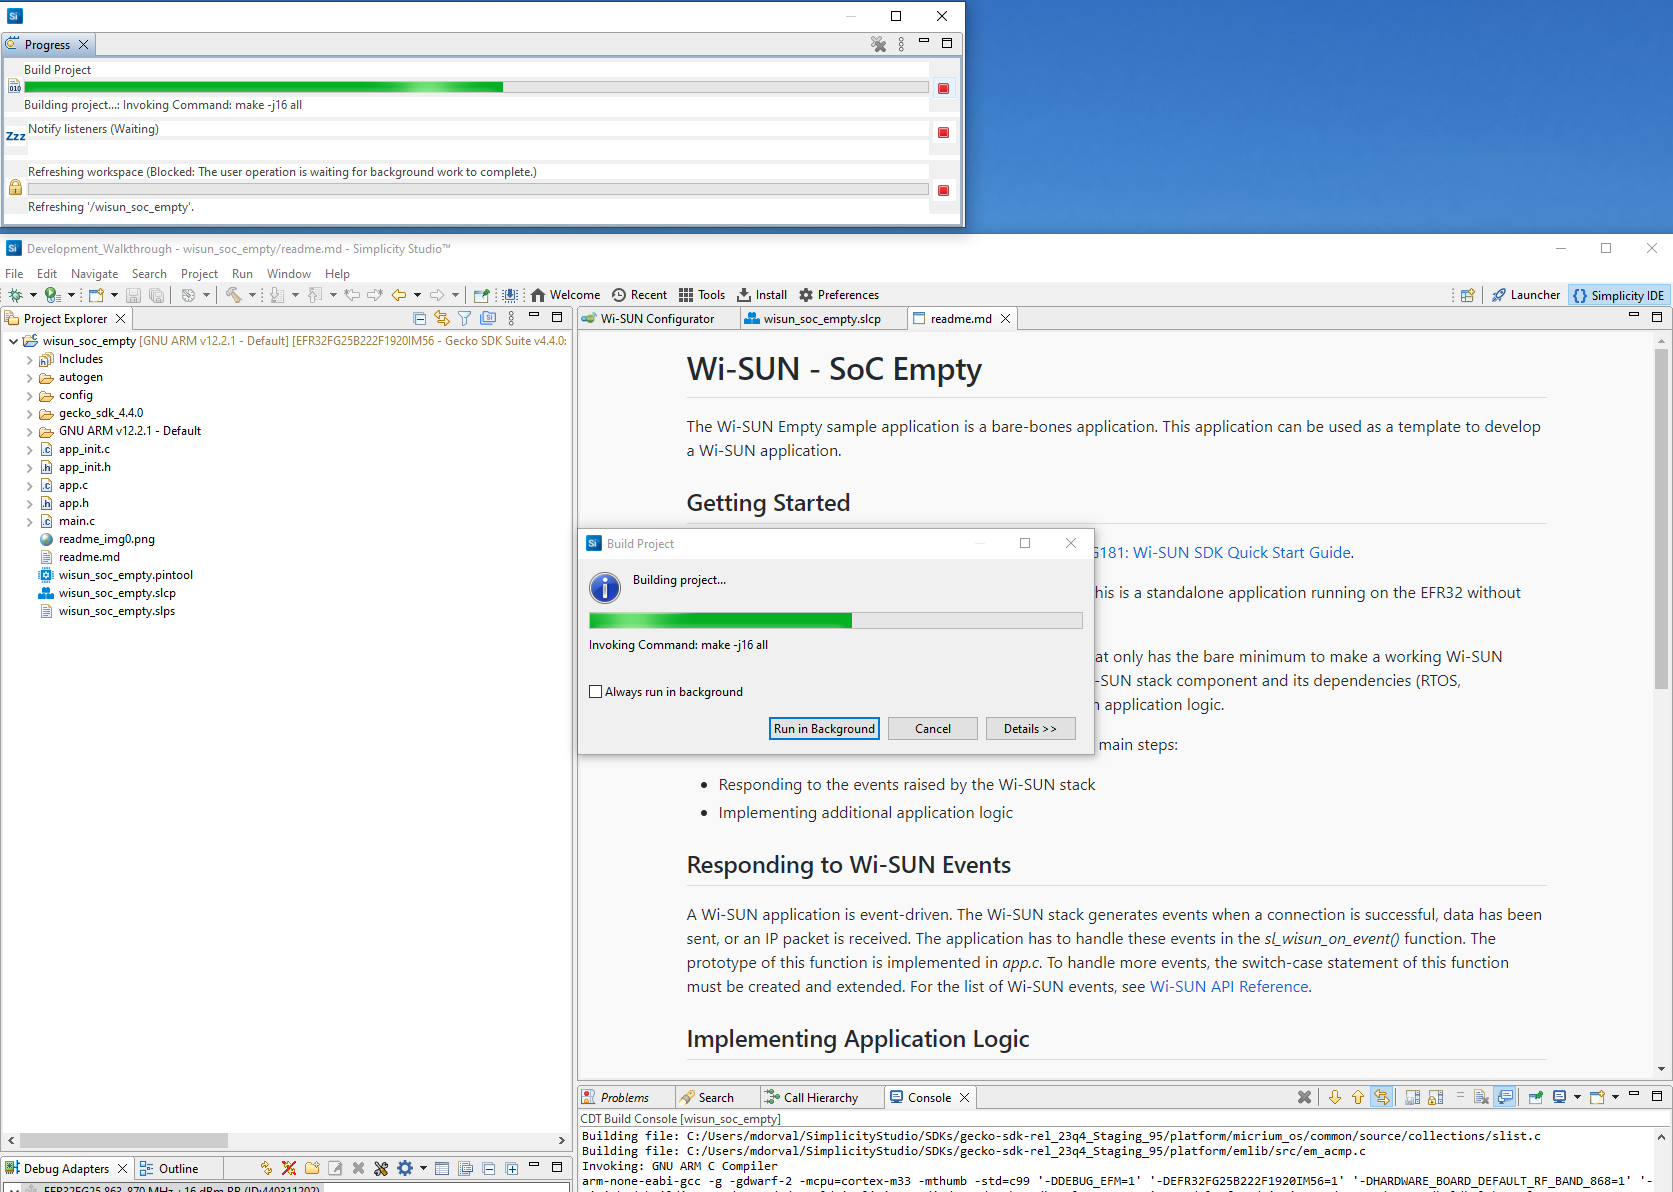
Hopefully, the project compiles without errors. Since this was a first-time full build, it takes approximately 1 min. Subsequent builds are generally smaller, if only adding minor changes to a couple files (only files impacted by the changes are recompiled).

What Happened#

Two new folders were added to your project folder:
Binariescontains the executable files in various formats.GNU ARM vx.y.z - Defaultcontains all the.ofiles corresponding to the.cfiles compiled. There are a lot of files in there, but you don't need to look at them. It's a storage area for the compiler.
The Console window shows the results of the compilation.
This is where you will need to check for any compilation issue.
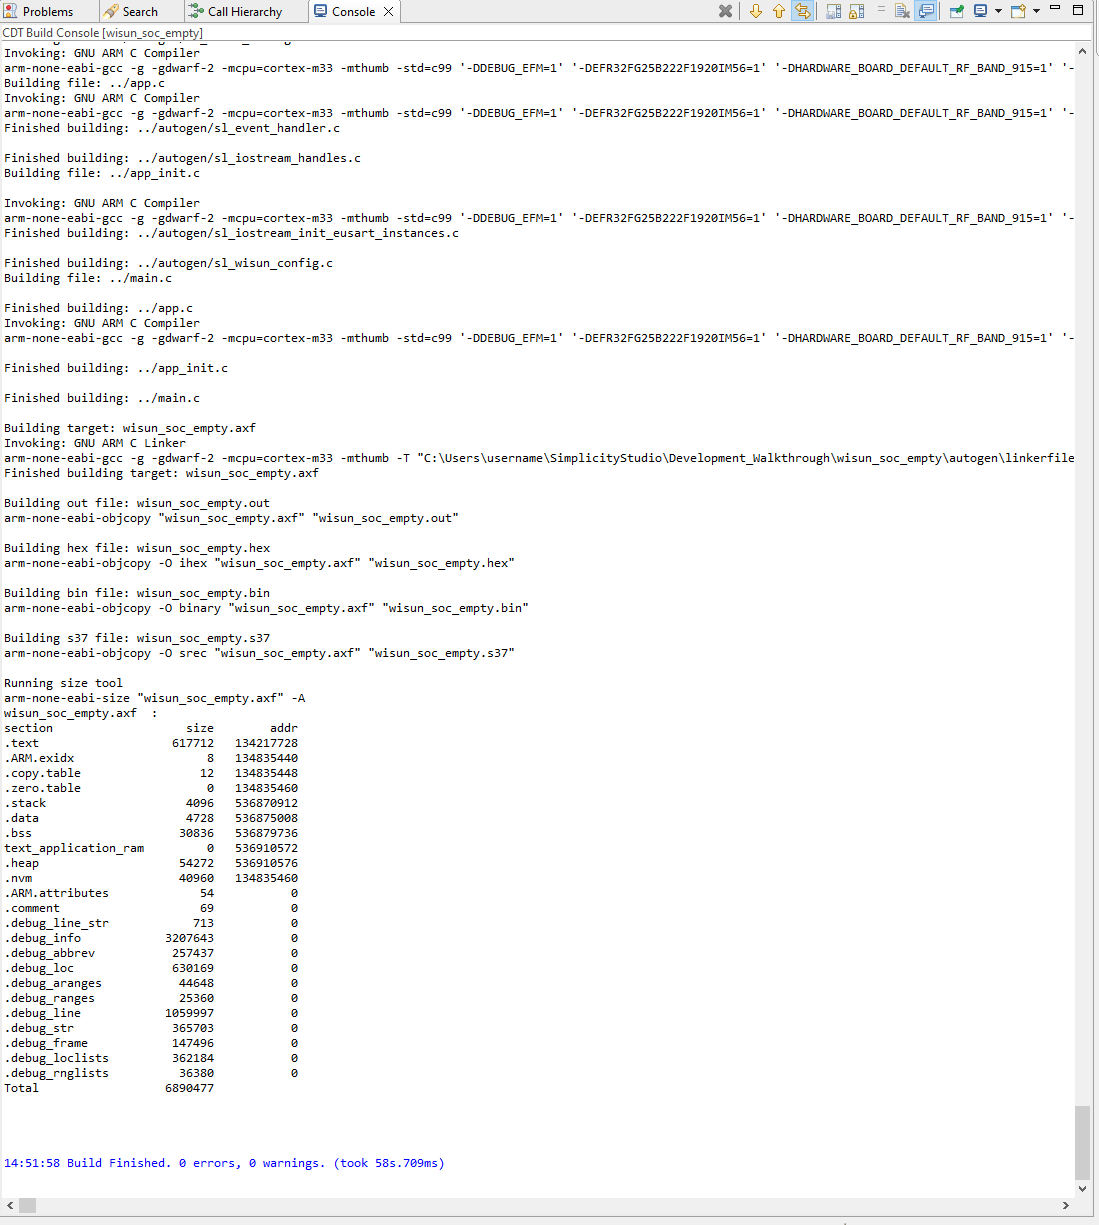
You can see all 'build' commands (there are many, one per .c files) starting with:
Invoking: GNU ARM C Compiler
arm-none-eabi-gcc ...
You can see the 'link' command (there is only one link command) starting with:
Invoking: GNU ARM C Linker
arm-none-eabi-gcc ...
You can see the creation of all binary files (those stored in Binaries):
Building target: wisun_soc_empty.axf
Invoking: GNU ARM C Linker
arm-none-eabi-gcc -g3 -gdwarf-2 -mcpu=cortex-m33 -mthumb ...
Finished building target: wisun_soc_empty.axf

Building out file: wisun_soc_empty.out
arm-none-eabi-objcopy "wisun_soc_empty.axf" "wisun_soc_empty.out"

Building hex file: wisun_soc_empty.hex
arm-none-eabi-objcopy -O ihex "wisun_soc_empty.axf" "wisun_soc_empty.hex"

Building bin file: wisun_soc_empty.bin
arm-none-eabi-objcopy -O binary "wisun_soc_empty.axf" "wisun_soc_empty.bin"

Building s37 file: wisun_soc_empty.s37
arm-none-eabi-objcopy -O srec "wisun_soc_empty.axf" "wisun_soc_empty.s37"
Last, a check is done on the code size using the arm-none-eabi-size tool:
Running size tool
arm-none-eabi-size "wisun_soc_empty.axf" -A
wisun_soc_empty.axf  :
section                   size        addr
.text                   617712   134217728
.ARM.exidx                   8   134835440
.copy.table                 12   134835448
.zero.table                  0   134835460
.stack                    4096   536870912
.data                     4728   536875008
.bss                     30836   536879736
text_application_ram         0   536910572
.heap                    54272   536910576
.nvm                     40960   134835460
.ARM.attributes             54           0
.comment                    69           0
.debug_line_str            713           0
.debug_info            3207643           0
.debug_abbrev           257437           0
.debug_loc              630169           0
.debug_aranges           44648           0
.debug_ranges            25360           0
.debug_line            1059997           0
.debug_str              365703           0
.debug_frame            147496           0
.debug_loclists         362184           0
.debug_rnglists          36380           0
Total                  6890477
TIP: To find the FLASH footprint of your application, add
.textto.data. For the RAM usage, add.bssto.data(.datais used in both cases since it is copied from FLASH to RAM before execution).
You can run this same command on the .axf file whenever you want. arm-none-eabi-size.exe is normally installed with Simplicity Studio, under C:\SiliconLabs\SimplicityStudio\v5\developer\toolchains\gnu_arm\12.2.rel1_2023.7\bin (the gnu_arm release may vary).
TIP: To get the values displayed in hex, use the '-x' flag. This can be convenient to understand where each piece of code will reside in Flash.
Checking the Linker Command#
In the linker command, you can see several interesting things.
The command line is very long, so only an abstract is provided below, with line breaks for easier reading.
Invoking: GNU ARM C Linker
arm-none-eabi-gcc
 -g3
 -gdwarf-2
 -mcpu=cortex-m33
 -mthumb
 -T "C:\Users\username\SimplicityStudio\Development_Walkthrough\wisun_soc_empty\autogen\linkerfile.ld"
-Xlinker
 --gc-sections
  -Xlinker
  -Map="wisun_soc_empty.map"
  -mfpu=fpv5-sp-d16
  -mfloat-abi=hard
  --specs=nano.specs
 -o wisun_soc_empty.axf
 -Wl,--start-group "./app.o" "./app_init.o" "./main.o"... <all `.o` files having been previously compiled from `.c` files>
  "C:/Users/username/SimplicityStudio/SDKs/gecko_sdk/platform/emdrv/nvm3/lib/libnvm3_CM33_gcc.a"
  "C:/Users/username/SimplicityStudio/SDKs/gecko_sdk/platform/radio/rail_lib/autogen/librail_release/librail_efr32xg25_gcc_release.a"
  "C:/Users/username/SimplicityStudio/SDKs/gecko_sdk/protocol/wisun/stack/libwisun_router_efr32xg2x_micriumos_gcc_debug.a"
   -lgcc -lc -lm -lnosys -Wl,--end-group -Wl,--start-group -lgcc -lc -lnosys -Wl,--end-group
All linker configuration flags (refer to GCC GNU DOC for details on these flags).
Among these, you see that, by default, Simplicity Studio compiles with
-g3, which means 'optimize for debugging'.
The name of the linked file, here
-o wisun_soc_empty.axf.You see in the Console output that the other binary files are copied from this file using various
arm-none-eabi-objcopyoptions.
A very long list of all
.ofiles, compiled from your project's.cfiles.Three
.afiles matching your project's configuration. These correspond to pre-compiled libraries found in various libraries:The NVM library
libnvm3_CM33_gcc.aThe RAIL library for your hardware
librail_efr32xg25_gcc_release.aThe Wi-SUN library managed by Silicon Labs R&D:
libwisun_router_efr32xg2x_micriumos_gcc_debug.aLooking in
C:/Users/username/SimplicityStudio/SDKs/gecko_sdk/protocol/wisun/stack/, you see that there is a dedicated pre-compiled library per device_type/part/OS/Compiler/debug_or_release. Here, you linked with the library matching your project's default configuration.
Flashing the Binary to the Adapter Board#
To run the binary you just compiled, you need to flash (copy) it to your Radio Board, with the following steps.
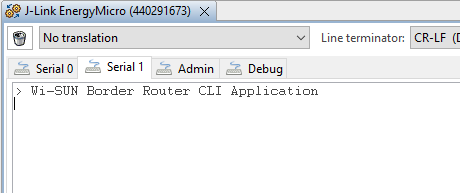
Open the Serial 1 UART Console#
In the Debug Adapters frame, select the Radio Board.
Select Launch Console to open a communication console with the Adapter Board.
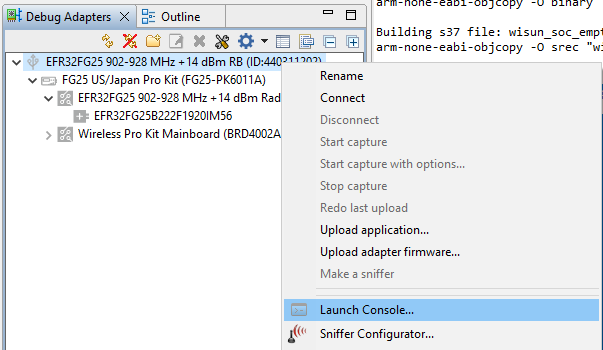
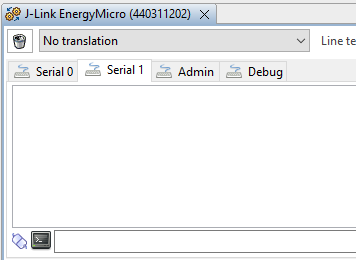
A new tab will open, with the name of the J-Link adapter and it's ID.
In this new tab, select the Serial 1 tab to access the application's UART console. This will show all strings printed from the application using
printf().TIP: Strings printed by the Wi-SUN Stack will not be sent to the Serial 1 console. These are accessible as RTT traces, using J-Link RTT Viewer.
When the Serial 1 console opens, it's in a non-connected state by default, as shown by the small icon in the bottom left corner.

Select the console's text area and press Enter to connect to the application. The icon changes to indicate a connected state.
The Console is now connected. You can flash your application, but you need to start a Border Router first to be able to connect over your Wi-SUN network.
TIP: Having the Serial 1 console ready to print the application output is important to check messages indicating proper application start. Most example applications will display the application's name at startup.
Time to Start a Border Router Demo#
To make your development walkthrough more pleasant, it's time now to start a Border Router with default settings, such that your Empty application will be able to connect to an existing Wi-SUN network.
Plug a second Development Kit.
Select it in the Debug Adapters view.
As above, open the Serial 1 console for this Development Kit.
Drag and drop the new console to the left side of the first one to see them side by side.

Click Enter in the new console to connect the UART.
Click Launcher at the top right to open the Launcher perspective.
Select the EXAMPLE PROJECTS AND DEMOS.
Leave only Demos selected.
Filter on Wi-SUN.
Filter on SoC.
Only three applications match.
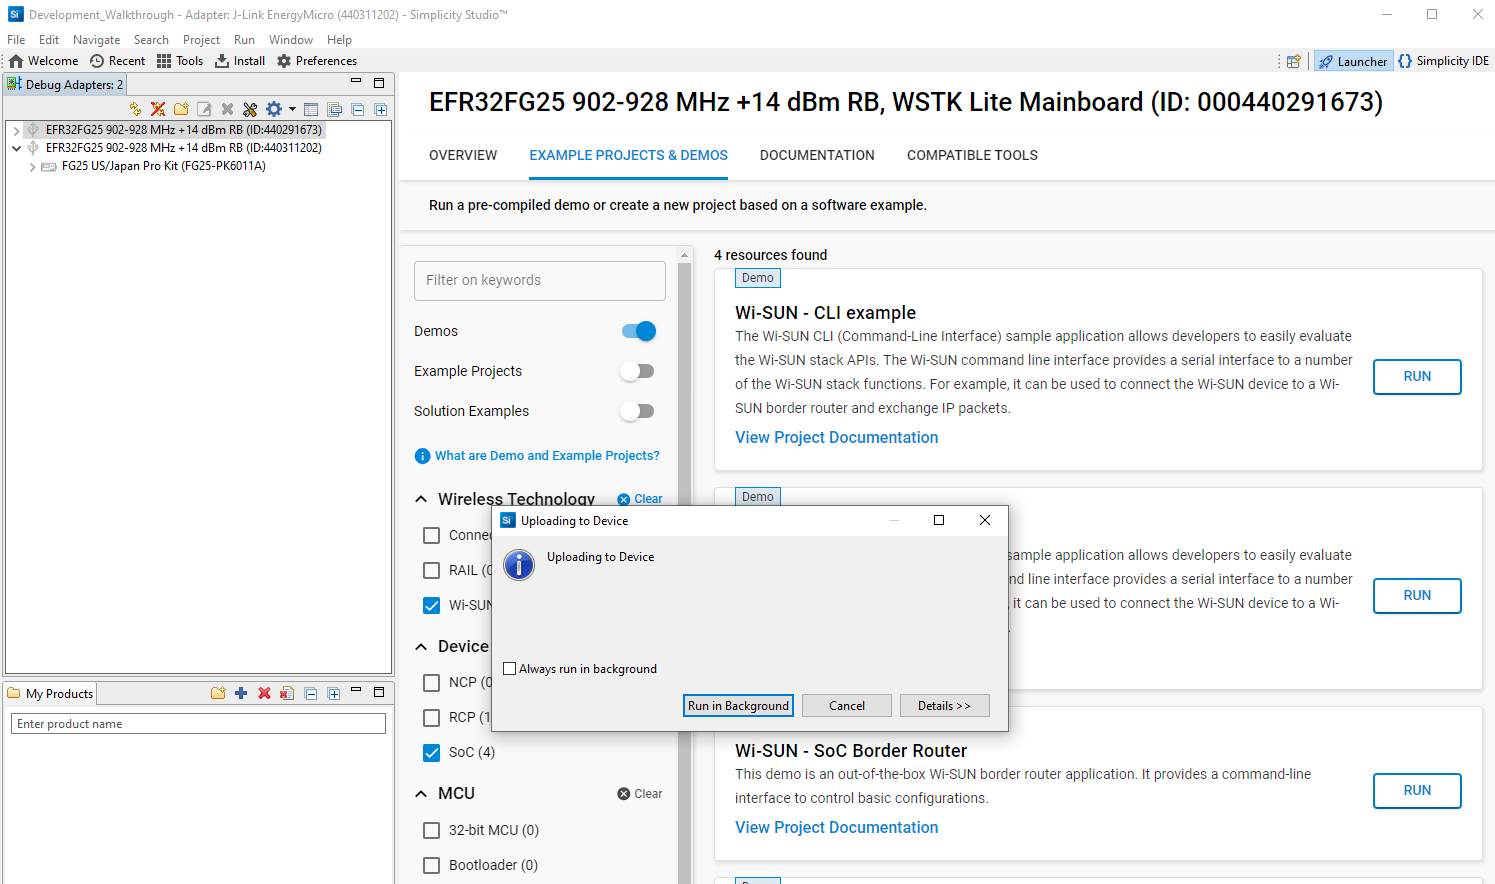
Move to the Wi-SUN - SoC Border Router frame and click RUN.
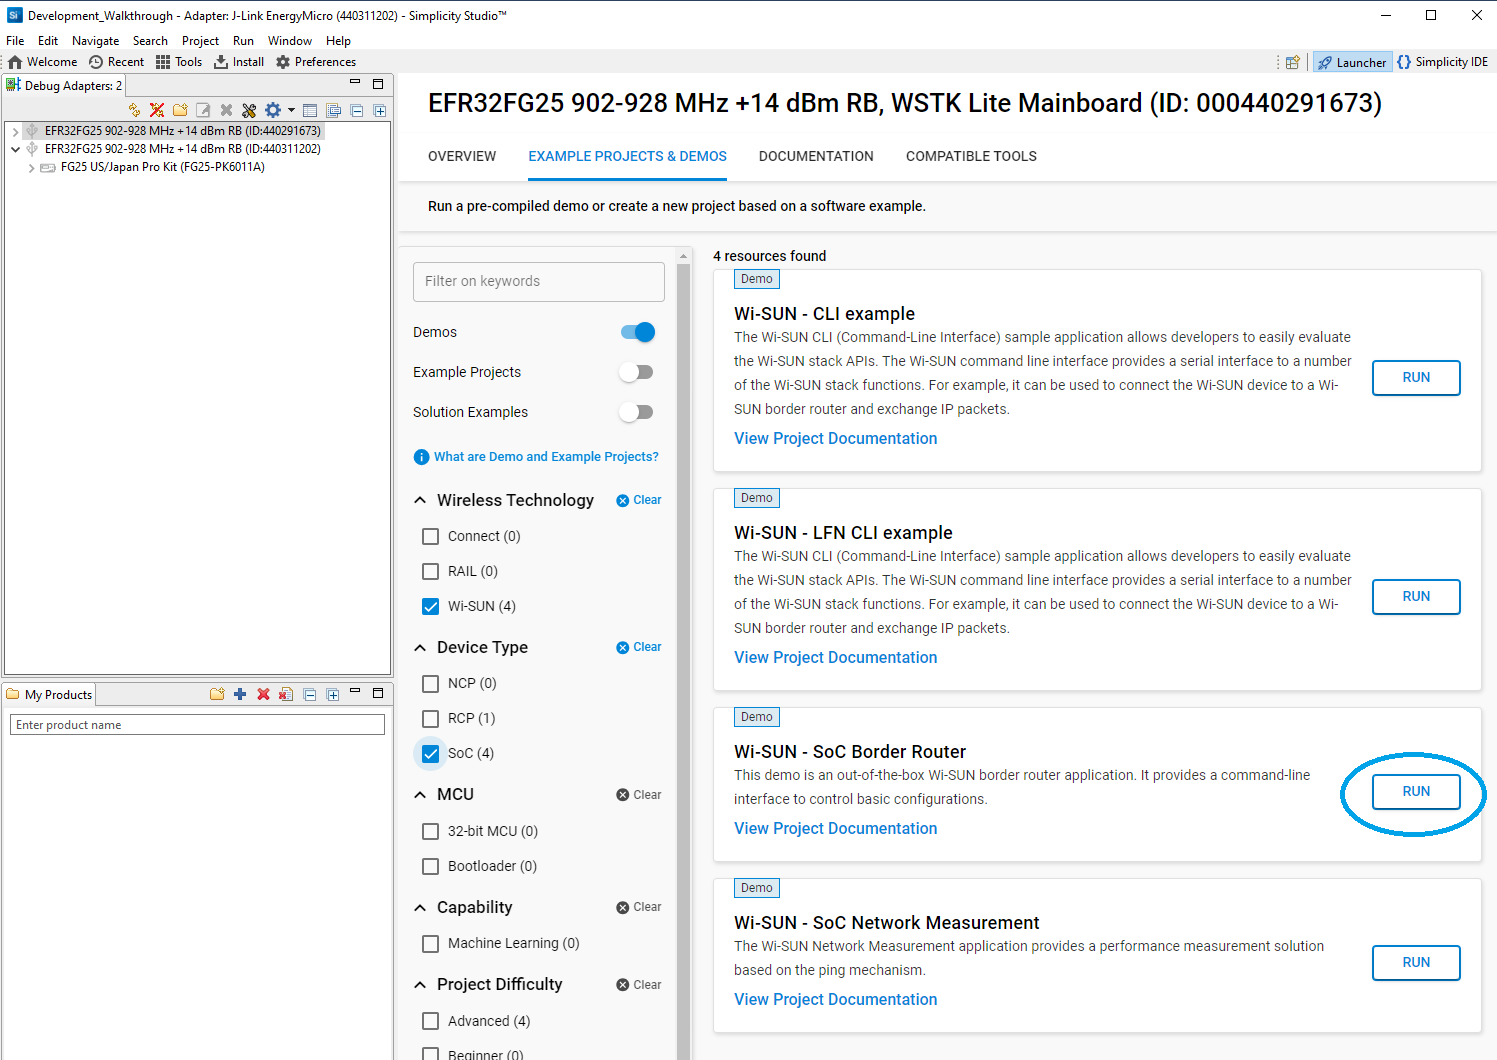
This immediately triggers flashing the corresponding pre-compiled binary to the target.
Go back to the Simplicity IDE perspective.
Check the Border Router Demo console, which should show the Border Router CLI initial message.
In this console, use
wisun start_fan11to start the Border Router with default FAN1.1 settings.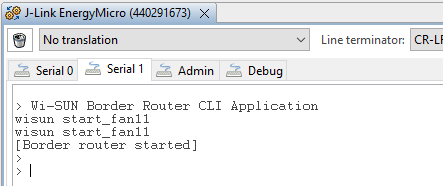
Flashing the Binary#
In the Project Explorer view select the wisun_soc_empty project, open the
Binariesfolder and right-click the.s37file.Select Flash To Device.
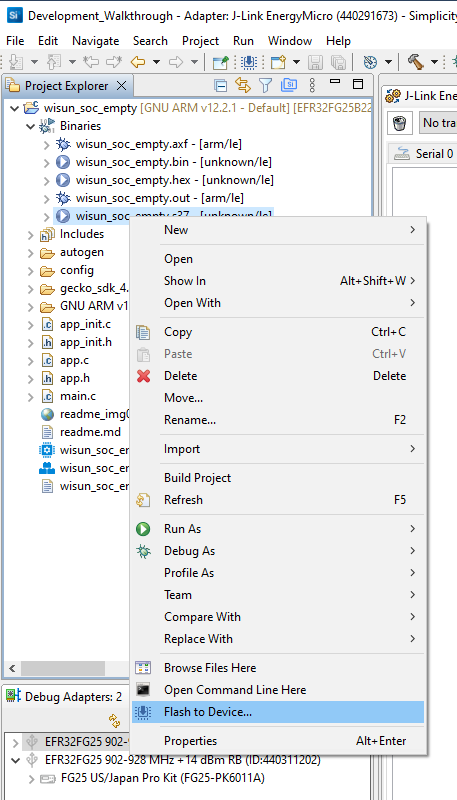
Select the device. Make sure not to select the one used as a Border Router.
TIP: For a first flash of a new application on a Radio Board where other application may have been running before, use the Erase button to clear any data possibly stored in flash. A progress bar appears and closes when done.
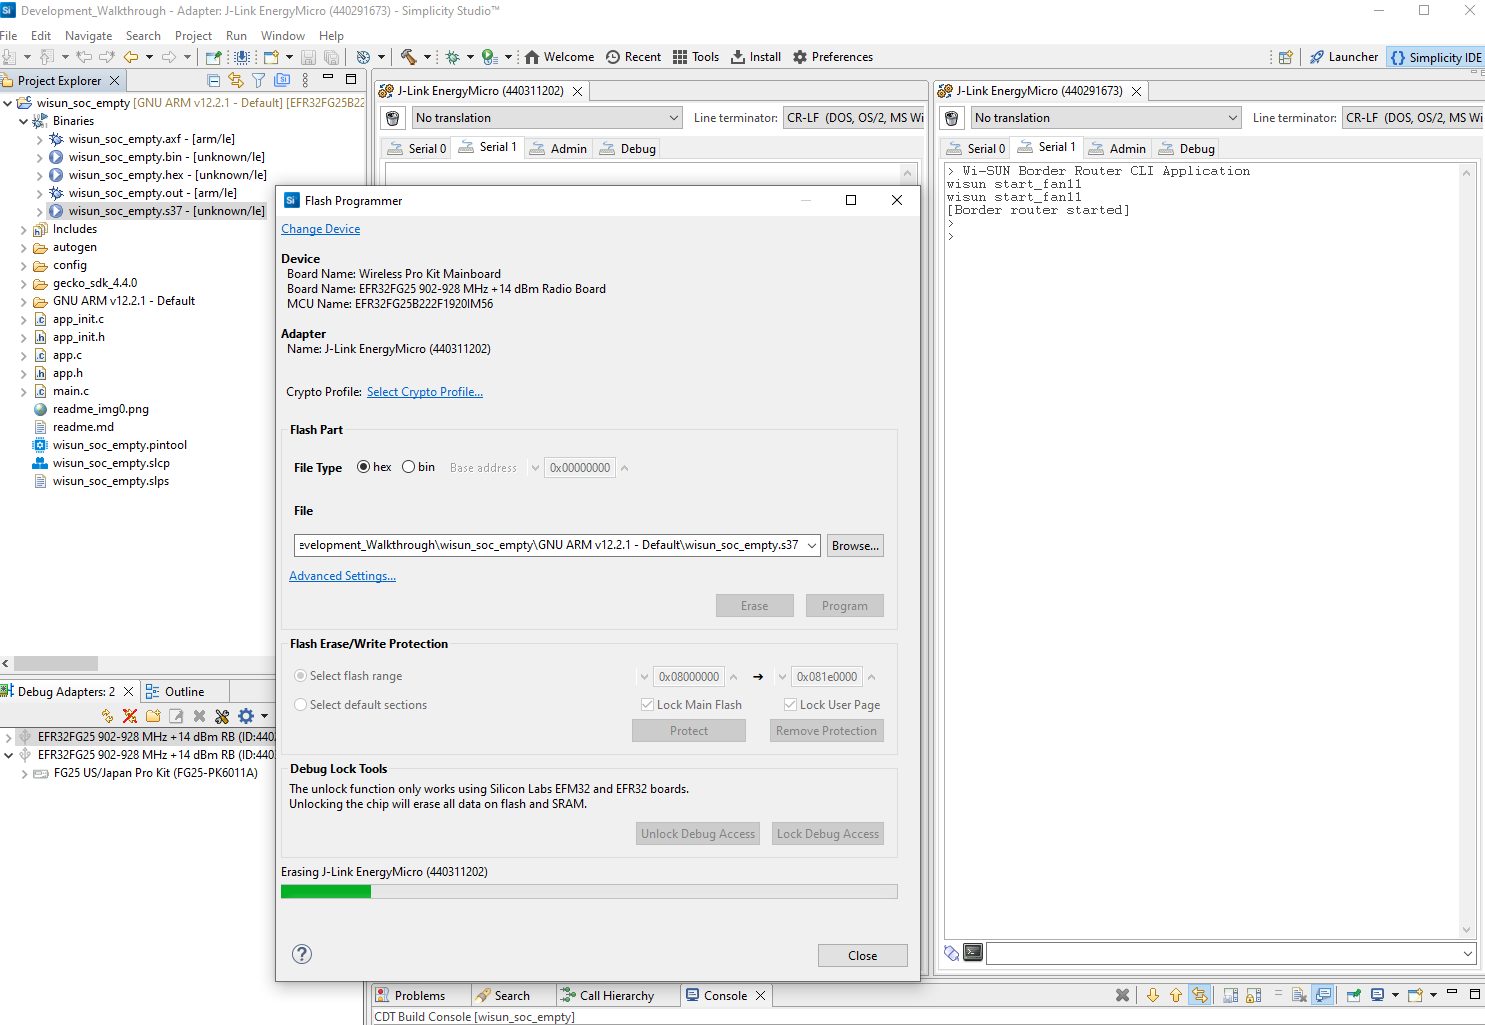
Use the Program button to flash the selected binary. A progress bar appears and closes when done.
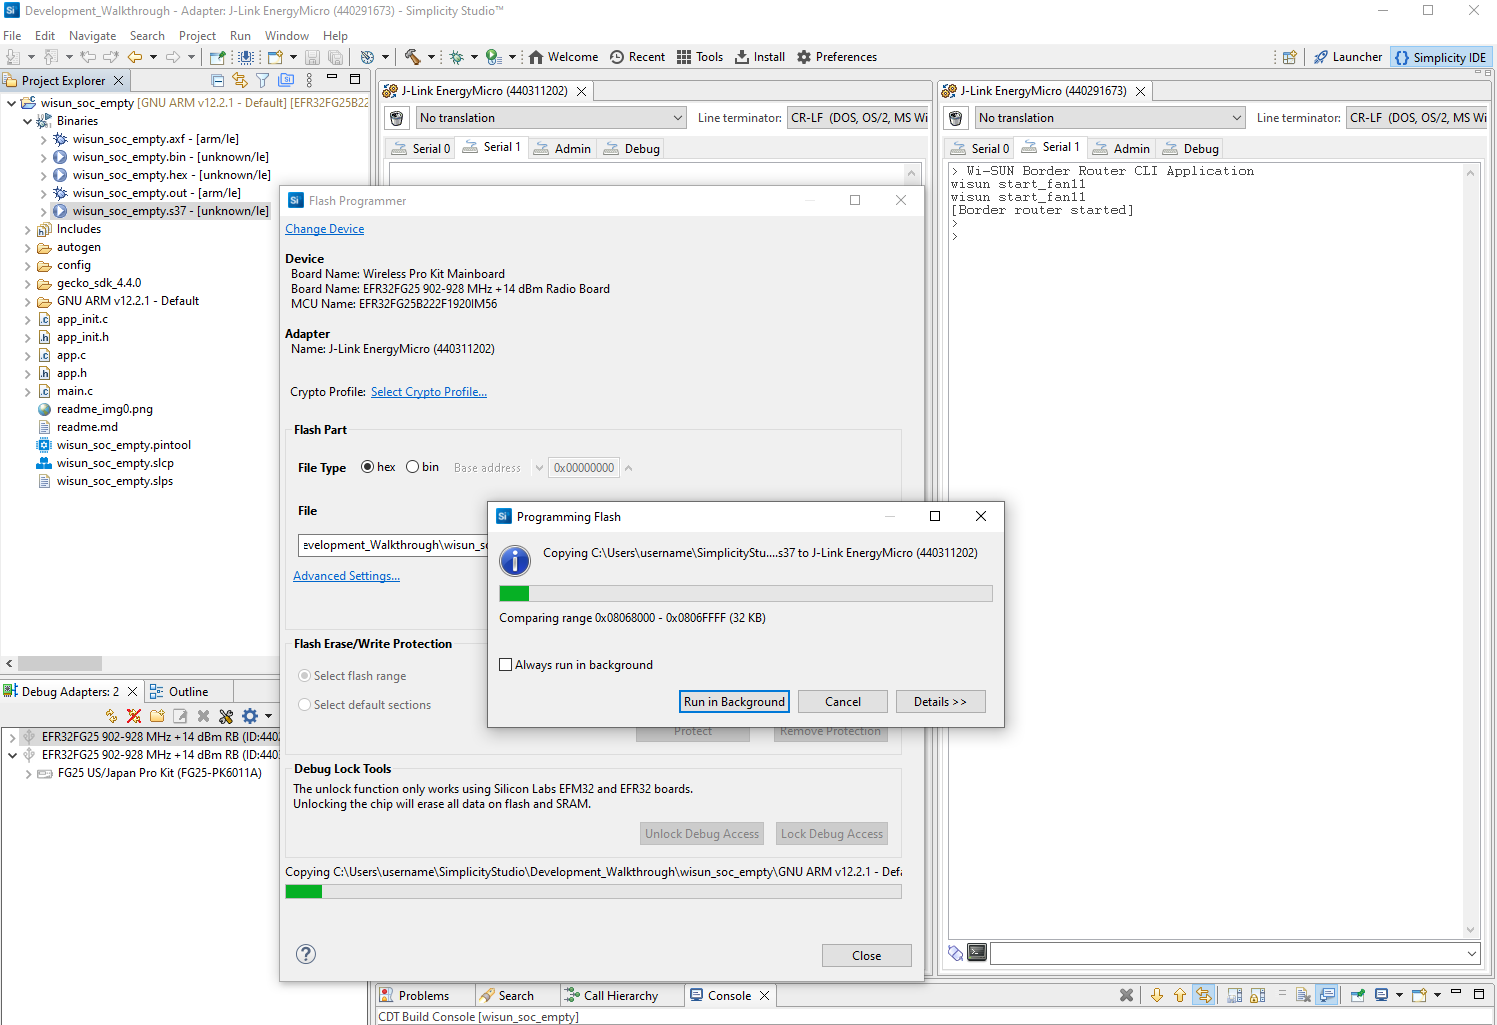
Close the Flash Programmer window.
Verifying Console Output#
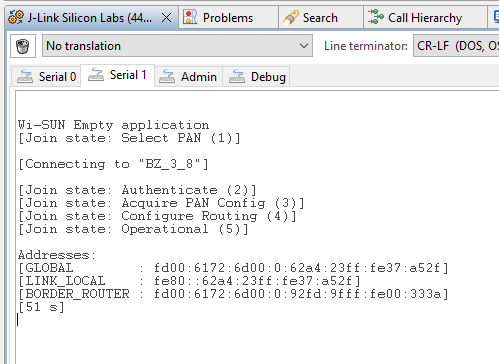
The Device Console now shows the startup message.
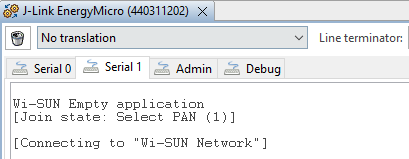
The name of the application is printed.
This comes from
app.c/app_task(), the entry point for the application code.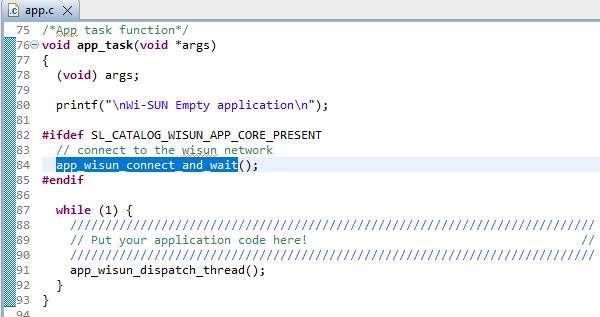
Then, you see the first message generated by the application:
[Join state: Select PAN (1)]This comes from the Application Core component, which is tracking join state change events.
A similar message will be printed every time the join state will change.
TIP: When a component is present in the project, the corresponding code is shown with normal colors. If a component is not present, the corresponding code is grayed out in the editor, meaning that it is not compiled and can be ignored.
Here, the fact that the
sl_wisun_on_event()function (lines 32-72) is grayed out indicates that this code is not compiled, meaning thatSL_CATALOG_WISUN_EVENT_MGR_PRESENTis not defined.This means that the Wi-SUN Event Manager component is not installed in your project.
Similarly, the fact that the
app_wisun_connect_and_wait()function call (line 84) is displayed with normal colors indicates that this code is compiled, meaning thatSL_CATALOG_WISUN_APP_CORE_PRESENTis defined.This means that the Wi-SUN Application Core component is installed in your project.
Last, you see a message coming from the application indicating the name of the Wi-SUN network that you are trying to connect to.
If a Wi-SUN Border Router is within range with a Wi-SUN network named
Wi-SUN Networkand the same PHY settings as your application defaults, you will connect.
Tracking the Connection Message#
For users not familiar with Simplicity Studio and C code in general, the following are some elementary code checks:
In
app.c/app_task(), you see that there is a call toapp_wisun_connect_and_wait();on line 84.Select
app_wisun_connect_and_waitand right-click to get access to the declaration of this function.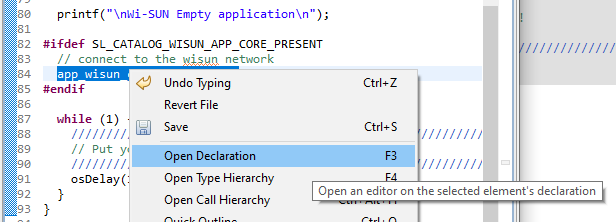
You end up in
/wisun_soc_empty/gecko_sdk_x.y.z/app/wisun/component/app_core/sl_wisun_app_core_util.c, in the code implementingapp_wisun_connect_and_wait()on lines 90-94.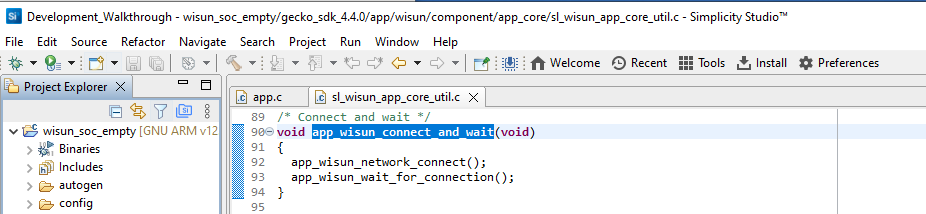
You find two function calls here. Given the function names, you get a pretty good idea of what they do. Since the Connecting to... message probably comes from
app_wisun_network_connect(), look for it's declaration as well.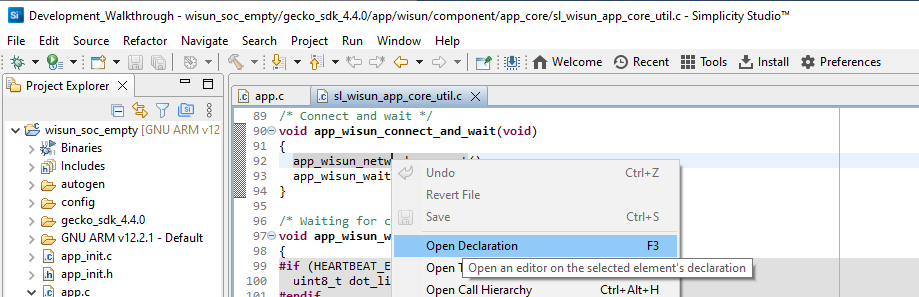
You end up in
/wisun_soc_empty/gecko_sdk_x.y.z/app/wisun/component/app_core/sl_wisun_app_core.c/app_wisun_network_connect(), which is a longer function (lines 389-454).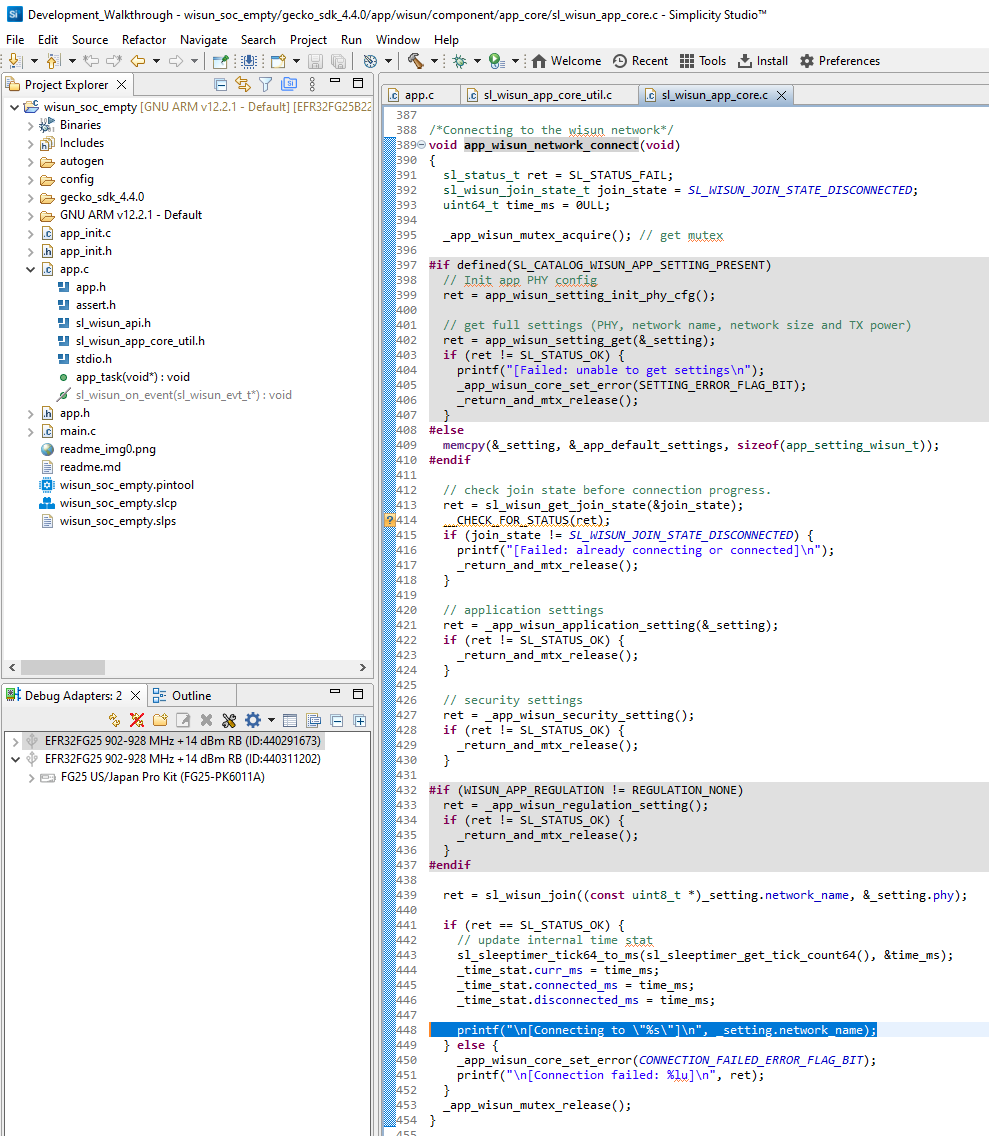
You can find the
Connecting tomessage on line 448.
While you are looking at app_wisun_network_connect(), you can see that there are several steps during the connection preparation:
Preparation of the PHY and network settings
Check of the current join state
Setting the network settings (to your project defaults)
Setting Security
Joining a network with a given name and PHY settings
So far, rely on the application components (i.e. Wi-SUN Application Core here) to do that.
More details on this later.
An alternative method to follow the function calls is to use the Open Call hierarchy for the
app_wisun_connect_and_wait()function.
The Call Hierarchy view proposes two modes, selectable using the 'tree' icons.
The Show Callers view shows which functions are calling
app_wisun_connect_and_wait():Here, a single function:
app_task(), as you've already seen.Using the Call Hierarchy, you are now sure that
app_wisun_connect_and_wait()is called from a single location, information you didn't have before.
The Show Callees view shows which functions are called by
app_wisun_connect_and_wait():
Here, two functions are called, as you've already seen:
app_wisun_network_connect()app_wisun_wait_for_connection()Using the Call Hierarchy, you can expand
app_wisun_network_connect()and check which functions it calls.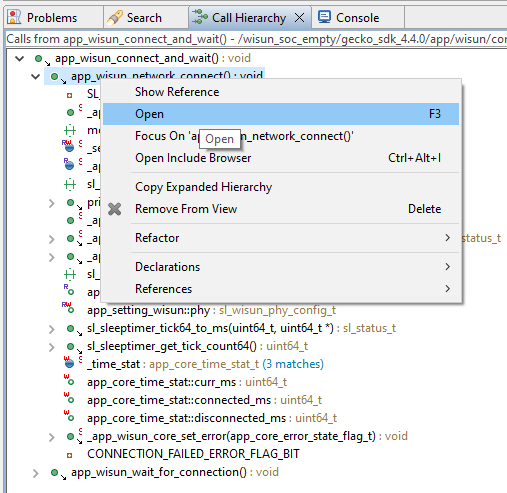
This view still shows that
app_wisun_network_connect()callsprintf, the function called to print your message.
TIP: Depending on the user, everyone prefers a method to find the call hierarchy based on personal preferences and the situation. The method above proposes two ways to follow the function calls in a Wi-SUN application.
TIP: When going down the call hierarchy, you will end in a situation where you can't go further and are left with the definition of a given function in a header file. It means that you have reached the tip of the Wi-SUN Stack API, that part of the Wi-SUN code which is under the responsibility of Silicon Labs R&D and where you don't have access to the source code.
GSDK Code vs User Code#
TIP: All files under
/wisun_soc_empty/gecko_sdk_x.y.z/are GSDK files, common to all projects. Consider that for all your projects,/<project_name>/gecko_sdk_x.y.z/is the same content. This is why there are blocks of code conditionally compiled depending on the project's configuration (settings and components). These files should normally not be modified. User code and changes should stay out of<project_name>/gecko_sdk_x.y.z/, since changing this code will impact all your projects the next time you build them.
What Has Changed#
If you started using Git, it's time to check the changes and commit the current state before proceeding.
Using git status, you see that no change has been made to the settings and source files. Since, thanks to the .gitignore file, many files generated at compilation time are not tracked (they would otherwise change on most commits), you can use Git to track your settings changes.
Use:
git add --allto 'stage' the changes (i.e. get them ready for committing).git commit -m "All defaults"to commit the changes (i.e save them to the repository) with a commit message.
Checking the Wi-SUN Connection#
While you were looking at the source code, time passed and there is a good chance that your device connected to the Wi-SUN Border Router. This should be visible in the Device's Serial 1 console.

The Wi-SUN connection took 86 seconds. This is extremely variable in a Wi-SUN environment, and depends on the network settings. Detailed connection times are provided in AN1330: Silicon Labs Wi-SUN Mesh Network Performance.
Once connected, the IPv6 addresses are displayed:
GLOBAL is the device's IPv6 to connect to it from anywhere, provided that IPv6 forwarding is allowed on the Border Router, which is not the case with the Border Router SoC Demo. To test pinging the device from the Border Router, Silicon Labs recommends our open source Linux Border Router.
LINK_LOCAL is the device's IPv6 address to communicate with its neighbors.
BORDER_ROUTER is the Border Router's IPv6 address. You can check this on the Border Router Demo using 'wisun get wisun.ip_addresses'. It is listed as the 'dodagid' address.
What's Next#
If you achieved a Wi-SUN connection, everything is fine in terms of Wi-SUN connectivity. The Wi-SUN stack will now maintain the connection, using the self-healing features of Wi-SUN to select an alternative path if the current parent fails or if there is a better option.
You can flash exactly the same application to many similar Adapter Boards. They will all end up connected to the Wi-SUN network. If you move the devices apart or you start more devices than what the Border Router can support directly, they will start creating hops to connect to the Border Router.
Basically, you have a working Wi-SUN network where you can add your custom application code to do whatever you need to.
There are still, however, a number of limitations in this approach:
All devices use the same security credentials. In production devices, each device should have its own set of device key/device certificate.
You didn't control the network name.
You used the default PHY settings (with lowest throughput).
You may not be using a PHY matching your region, so you may be transmitting in a forbidden frequency band.
It's time to learn how to check and change the settings, and then how to add your custom application.
Checking and Changing the Settings#
Border Router Settings#
To illustrate how to change the settings, using something different from the defaults regulatory_domain/chan_plan_id/phy_mode_id (NA/1/2 in our example), you will use BZ/3/8 and name your network 'BZ_3_8'.
Note: The previous steps are valid for all Wi-SUN development kits, with default settings, because Simplicity Studio selected the proper libraries to match the Radio Boards. There are several frequency ranges used for Wi-SUN, with only some valid for a given country. The first part of the Development Walkthrough used Radio Boards with the 902-928 MHz frequency range valid for North America (NA), Mexico (MX), and Brazil (BZ). Selecting BZ/3/8 is only possible when using Radio Boards for these regions. With 'EU' Radio Boards or any other region, it is necessary to select a valid PHY for the Radio Boards to go through the following part.
Using the Wi-SUN Border Router Demo, use the following to change the settings.
Hardware reset on the Border Router (to stop the Border Router):
> Wi-SUN Border Router CLI Application
wisun get wisun.state
wisun.state = initialized (0)
TIP: If the wisun.state is not
initialized (0)at this step, the new settings won't be applicable. Make sure you reset the Border Router.
> wisun set wisun.regulatory_domain BZ
wisun.regulatory_domain = BZ
> wisun set wisun.chan_plan_id 3
wisun.chan_plan_id = 3
> wisun set wisun.phy_mode_id 8
wisun.phy_mode_id = 8
> wisun start_fan11
[Border router started]
> wisun get wisun.state
wisun.state = operational (1)
Wi-SUN Router Settings#
Checks#
First observe what you have by default:
Open the Wi-SUN Configurator (double-click the
.slcpfile).Open the
autogen/sl_wisun_config.hfile, and move it aside to get a view on both.Open the
config/wisun_settings.wisunconffile with the option Open With > Text Editor, and move it below to see it also.
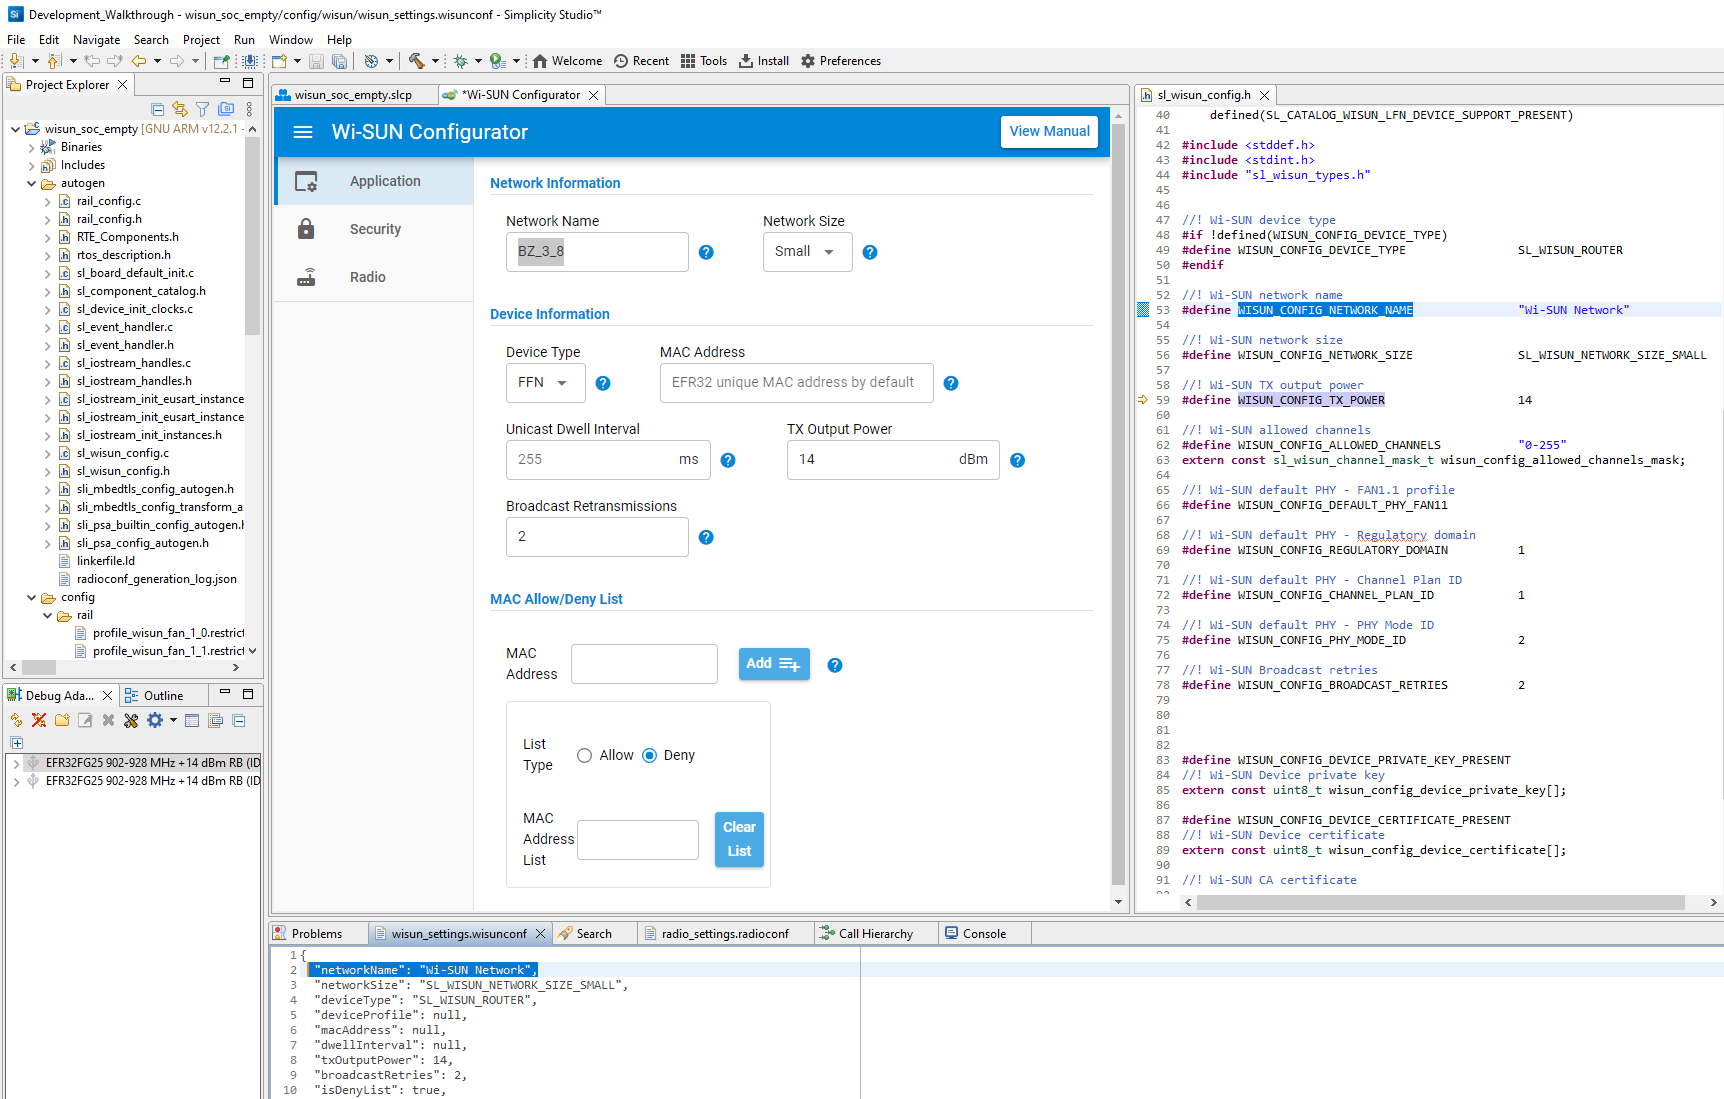
In the Wi-SUN Configurator, the Application tab gives access to:
The network name, which corresponds to
WISUN_CONFIG_NETWORK_NAMEinautogen/sl_wisun_config.hand"networkName"inconfig/wisun/wisun_settings.wisunconfThe network size, which corresponds to
WISUN_CONFIG_NETWORK_SIZEinautogen/sl_wisun_config.hand"networkSize"inconfig/wisun/wisun_settings.wisunconfThe device type, i.e.
WISUN_CONFIG_DEVICE_TYPEThe broadcast retransmission, i.e.
WISUN_CONFIG_BROADCAST_RETRIES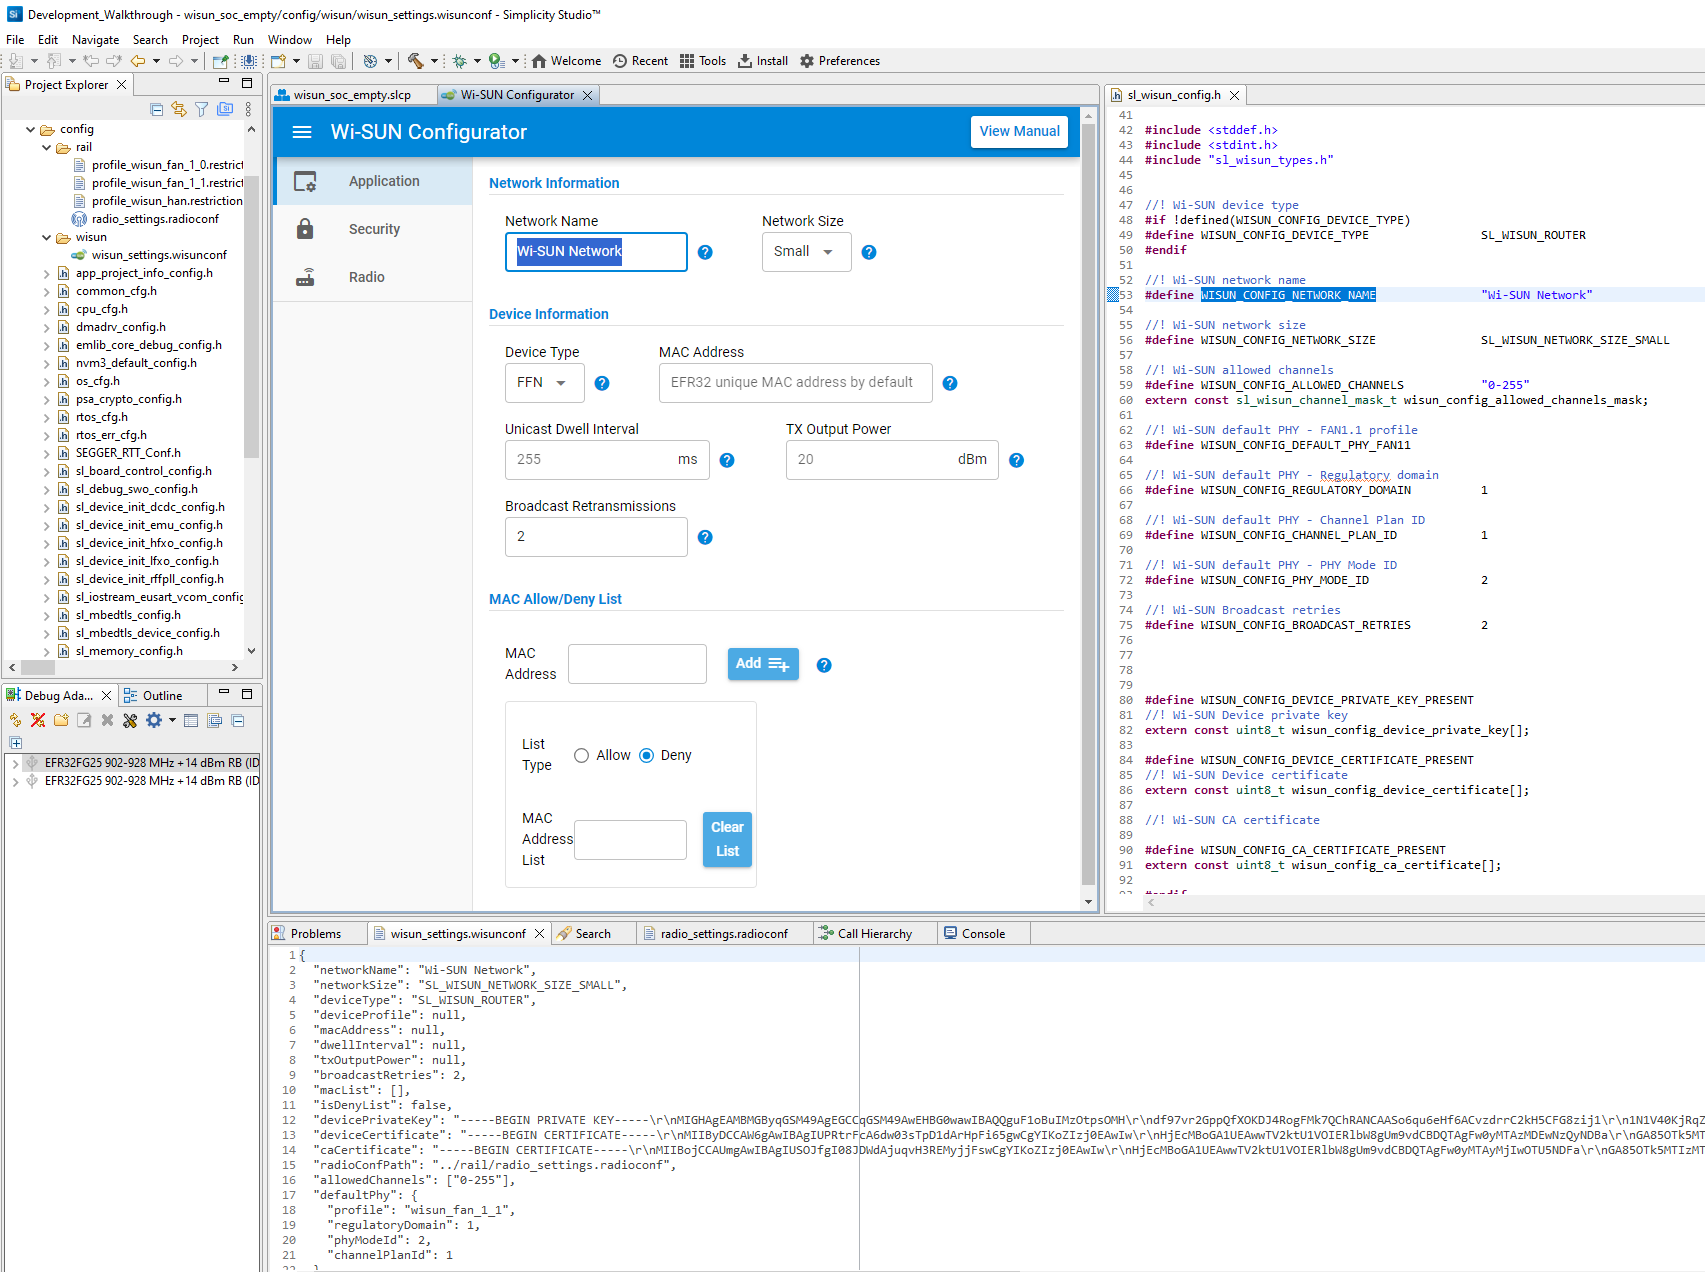
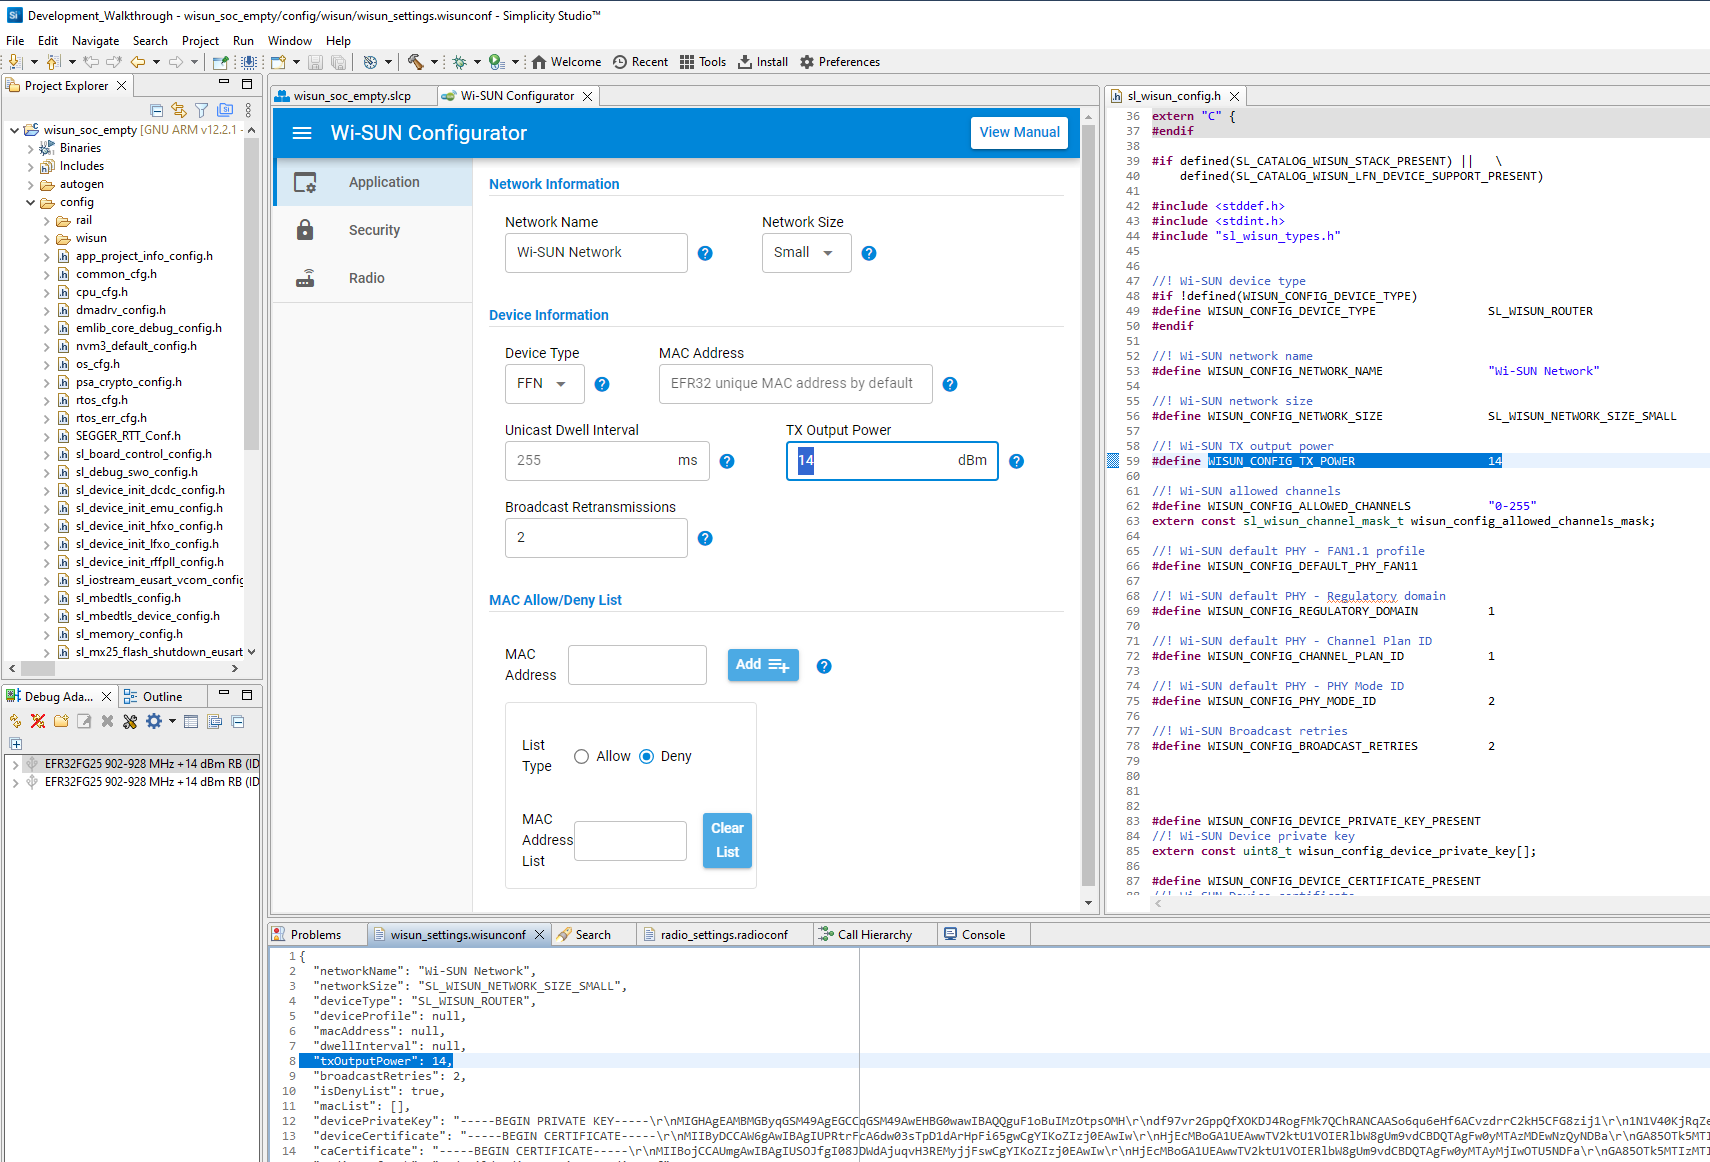
No Tx Output Power in the files?
This is because the default GUI value is set to the code's default value (20 dBm). If you change the Tx Output Power in the GUI, you will see new items added to the files:
WISUN_CONFIG_TX_POWERinautogen/sl_wisun_config.hand"txOutputPower"inconfig/wisun/wisun_settings.wisunconf
A quick search for
WISUN_CONFIG_TX_POWERwill show how this is handled bygecko_sdk_x.y.z/app/wisun/component/app_core/sl_wisun_app_core.c: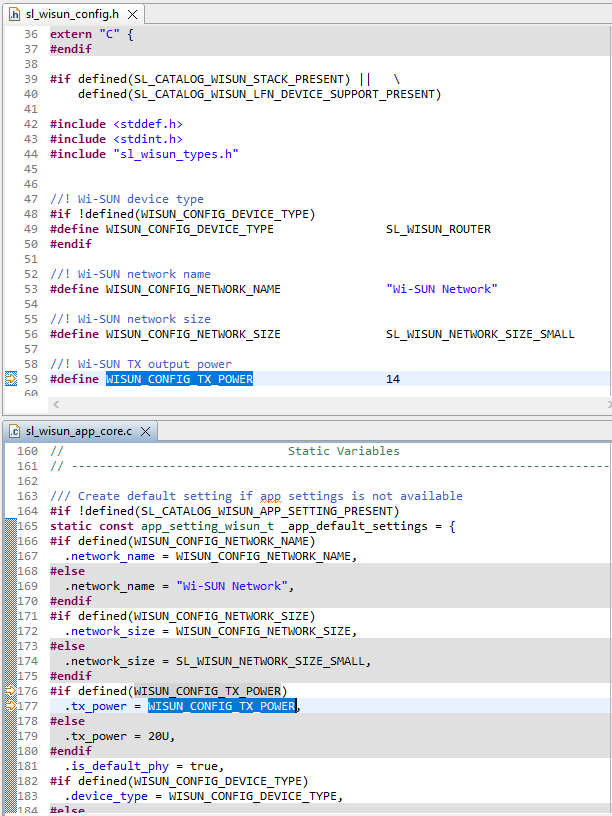
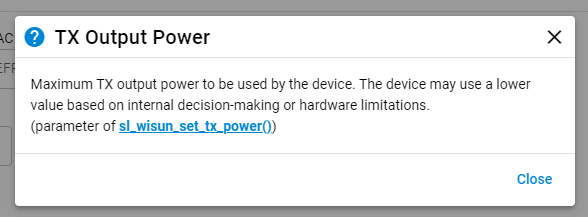
TIP: The code default Tx Output Power is 20. As explained by the helptext, when you click the
icon, the actual output power is generally less than that. Indeed, for best MCS6 performance (OFDM MCS6 uses a 16-QAM modulation) with EFR32xG25, do not go above 14 dBm to avoid clipping the outer edges of the constellation and get better performances.
There are close relationships between:
The GUI (the Wi-SUN Configurator)
It's control file
config/wisun_settings.wisunconfSome of the
.hand.cfiles which you will ultimately use to compile your application
The Security tab gives access to:
The Device Private Key, i.e.
wisun_config_device_private_key[];You can see its current value by hovering over it, as shown above.
You can also right-click it and select Open Declaration. This opens
autogen/sl_wisun_config.c, wherewisun_config_device_private_key[]is declared on lines 47-53.You can check that the text string:
Is identical to the one in the GUI
Starts with
-----BEGIN PRIVATE KEY-----Ends with
-----END PRIVATE KEY-----
The Device Certificate, i.e.
wisun_config_device_certificate[];The CA Certificate, i.e.
wisun_config_ca_certificate[];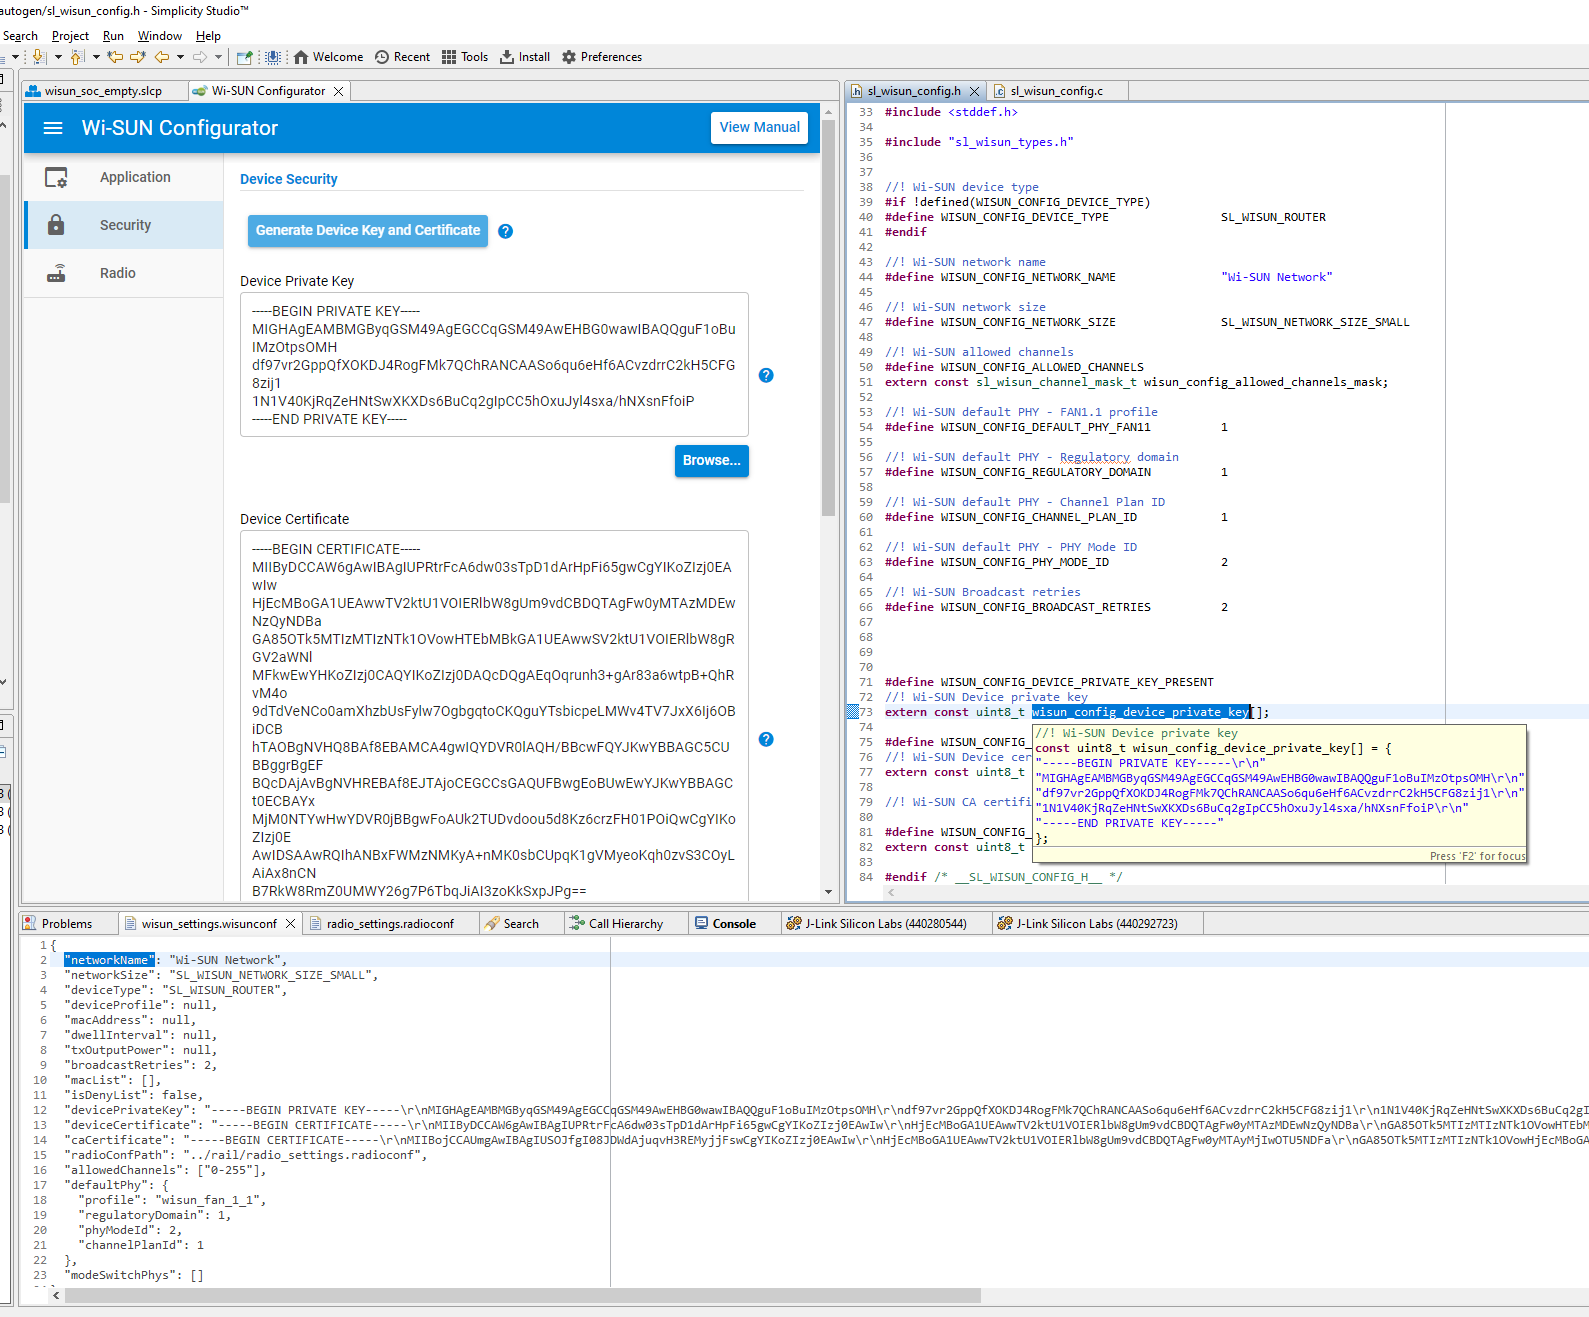
You can cross-check these three values.
TIP: As already stated, in a production application, these will need to be different per device. The CA certificate may be shared, but the Device key and certificate should be device-specific.
Open the config/rail/radio_settings.radioconf file with Open With > Text Editor, and move it in the same frame as config/wisun/wisun_settings.wisunconf.
The Radio tab gives access to:
In the Selected Wi-SUN PHYs frame, the list of currently selected PHYs. Here, only the default
NA - 1 -2PHY is selected.In the Application's Default PHY Configuration frame, the default PHY.
Obviously, this needs to be present in the selected PHYs, and in your case (using a single PHY) is also
NA - 1 -2.
In Reference PHYs, tools to select the PHYs.
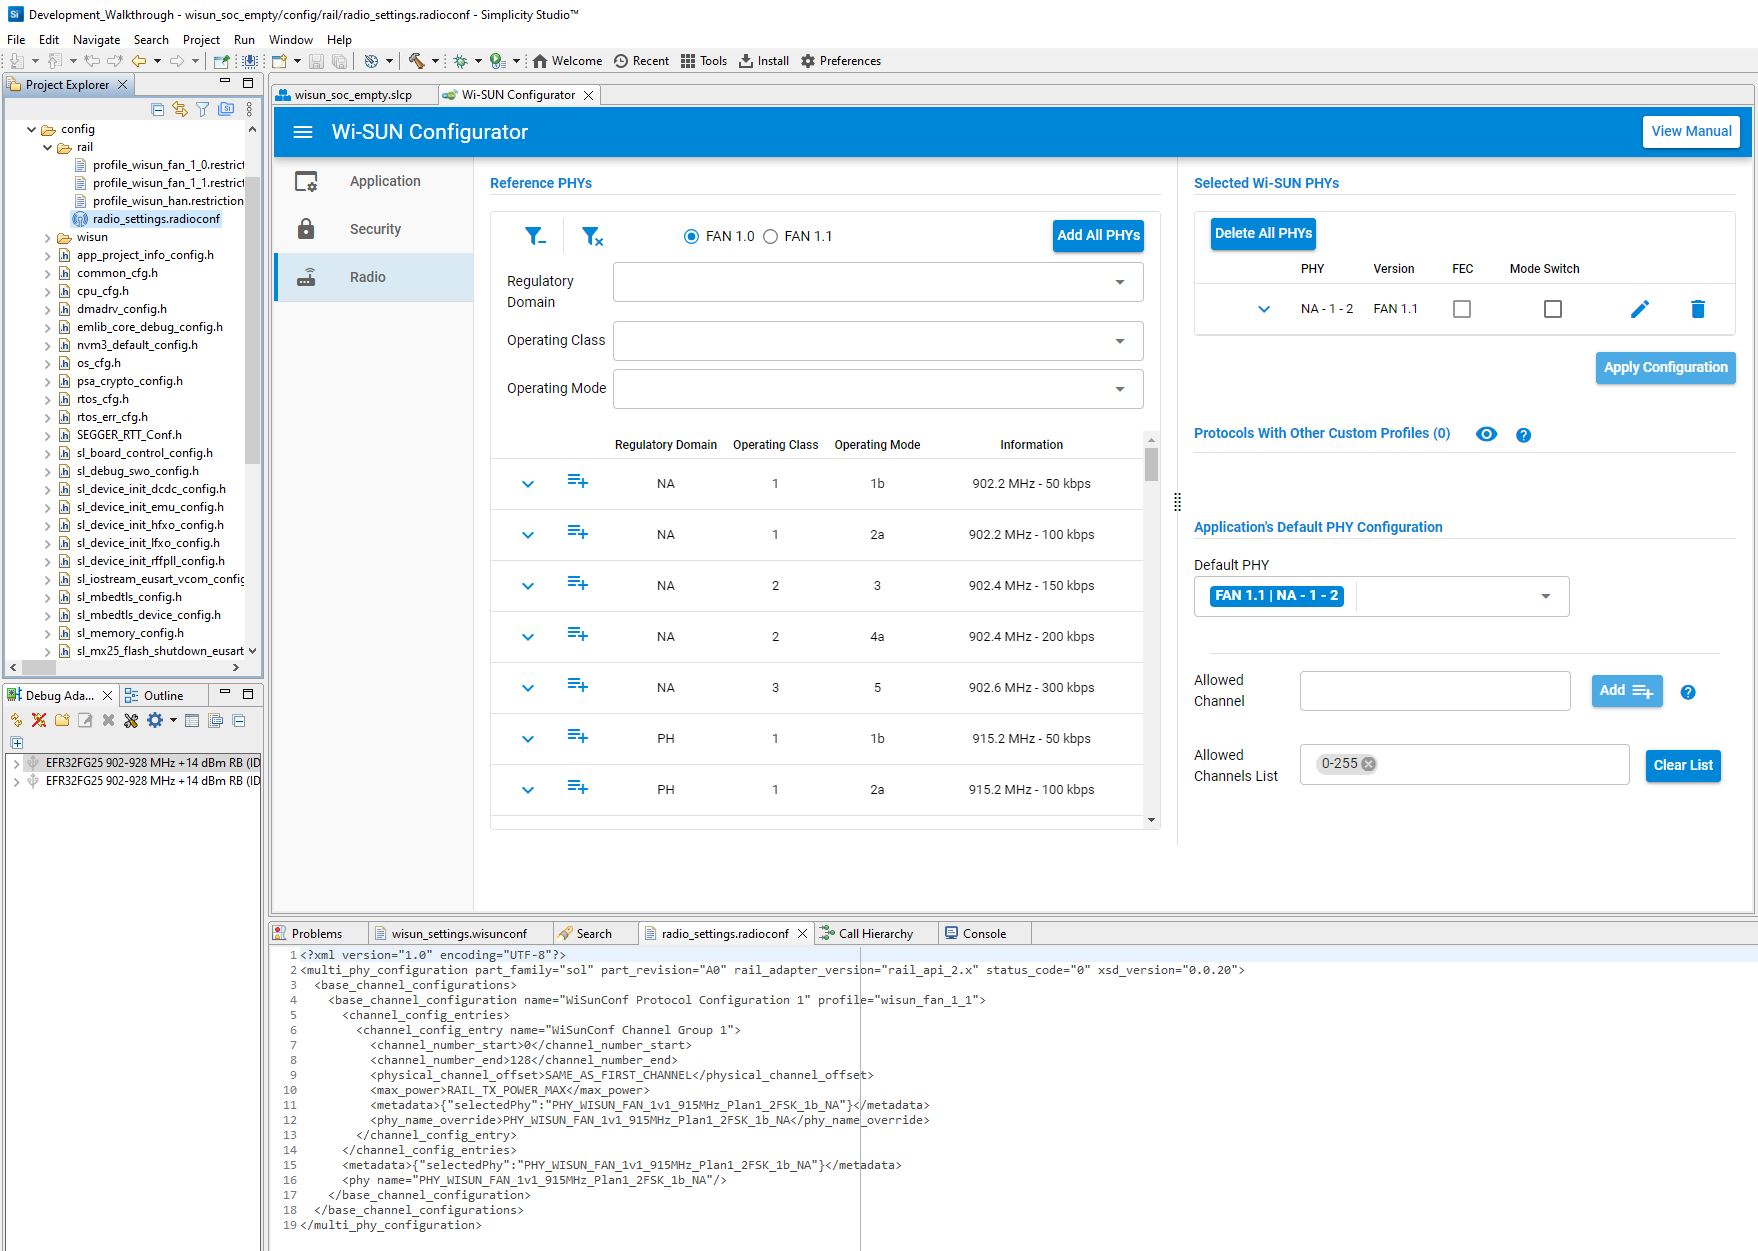
Observing config/rail/radio_settings.radioconf, you can check that <phy_name_override> matches the select PHY.
Once again, you see some relationship between the GUI, the control files, and the file used to compile.
Changes#
Now, change your Network name to BZ_3_8 in the Wi-SUN Configurator Application tab.
You can see an
*next to the Wi-SUN Configurator tab's name. This indicates that the settings are not saved yet.No change to the other files (
autogen/sl_wisun_config.handconfig/wisun_settings.wisunconf).
Click the  in Simplicity Studio or 'Ctrl-s' to save your changes.
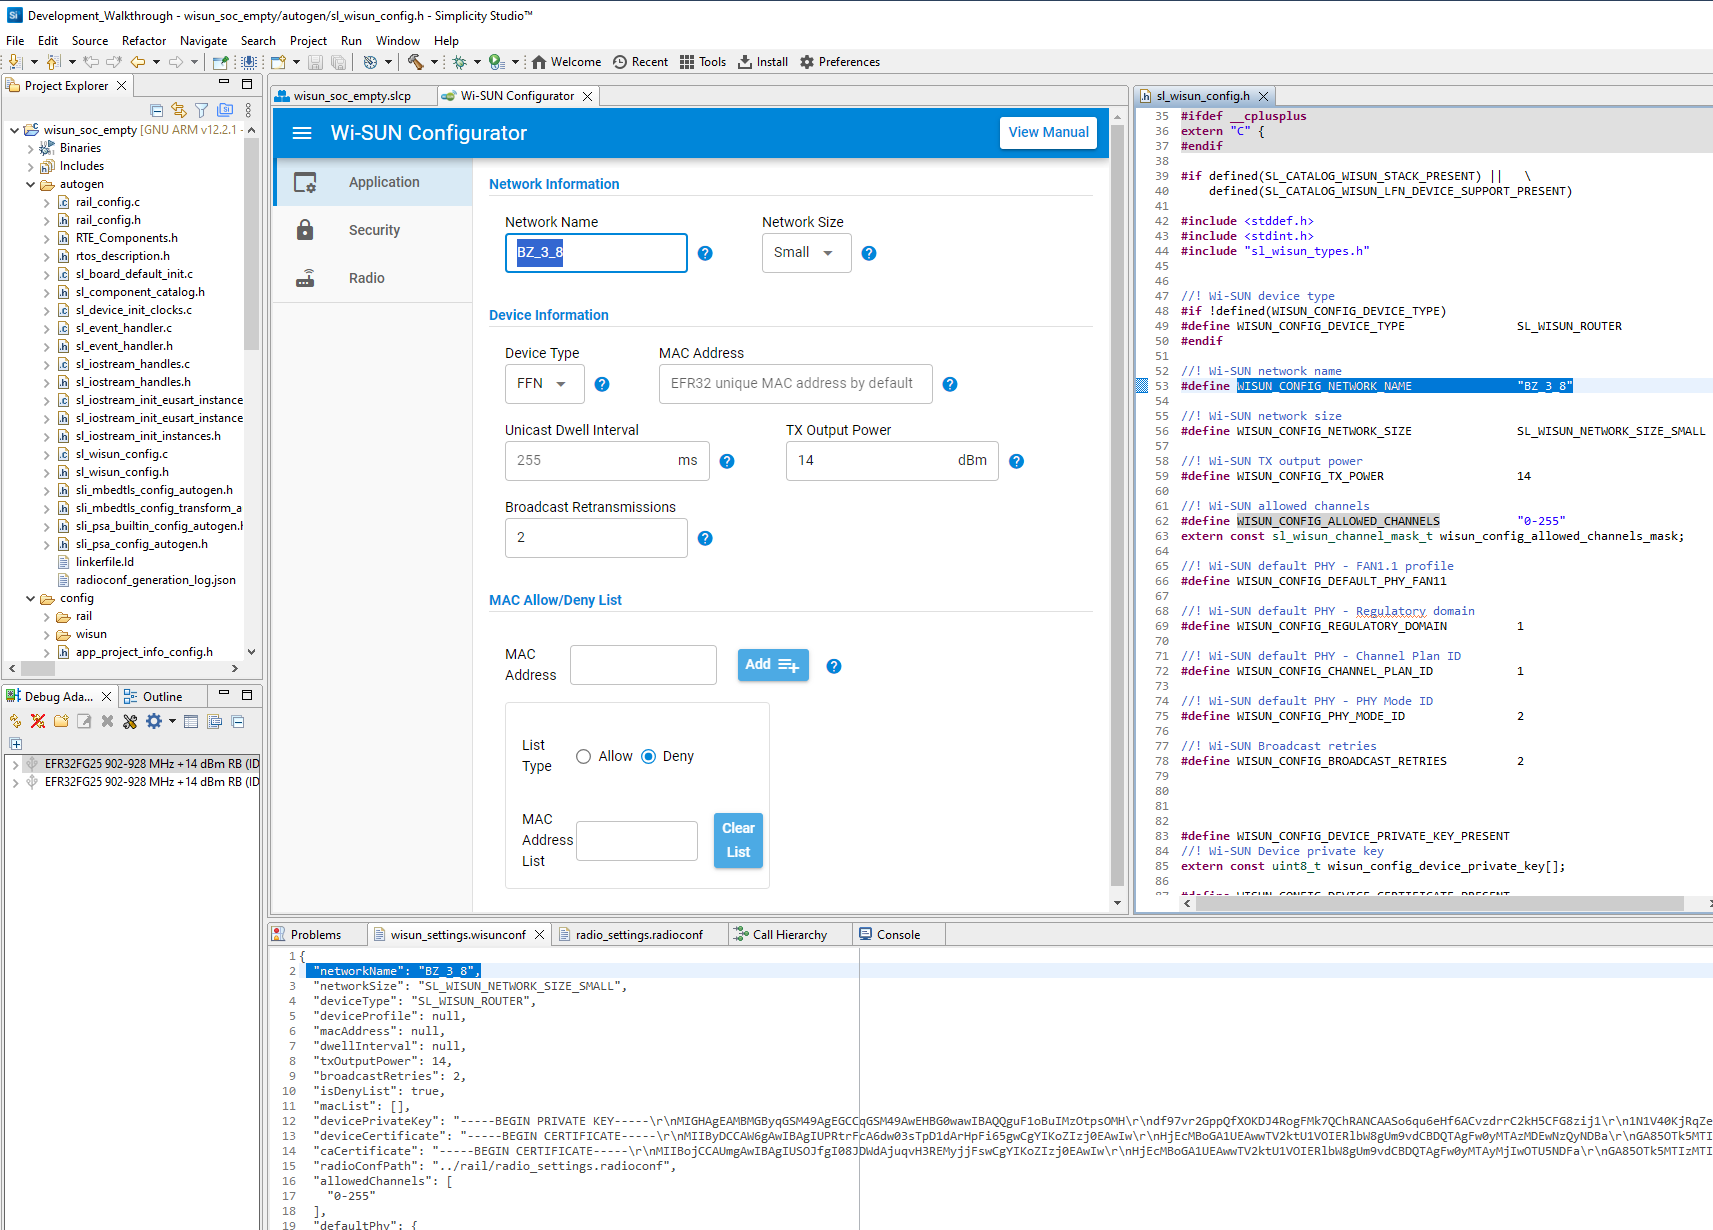
Changes are propagated to both autogen/sl_wisun_config.h and config/wisun_settings.wisunconf.
Now move to the Radio tab, since you won't change the security settings yet.
On the right side of the Radio tab, you see that you have by default only the NA - 1 - 2 PHY in the list.
Now add the BZ - 3 -8 PHY.
Slide left to see the Reference PHYs area.
Select the FAN 1.1 radio button. This changes the content of the frame to match FAN 1.1 parameters.
Select the Brazil (BZ - 0x07) option in the Regulatory Domain dropdown.
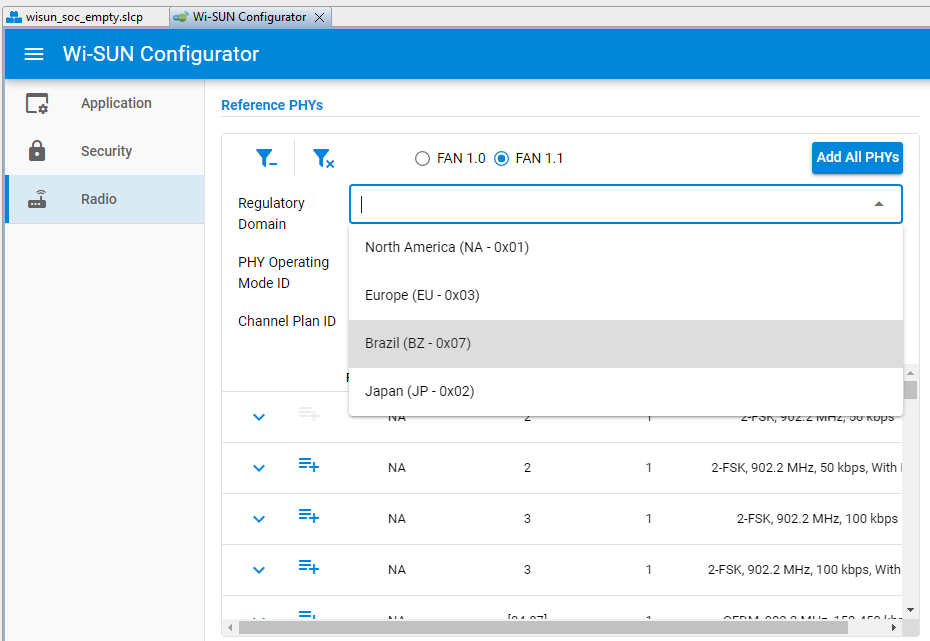
You may have noticed that the list of possible PHYs at the bottom is now reduced to 'BZ' PHYs.
Select phy_mode_id_8 in the PHY Operating Mode ID dropdown.
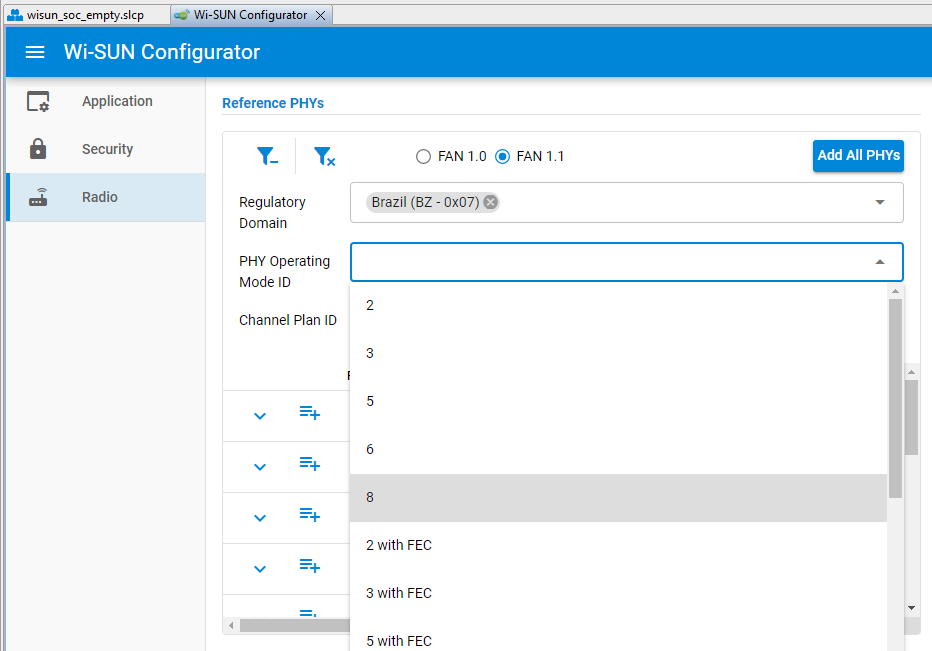
The list of possible PHYs at the bottom is further reduced to only those with '8' as their PHY Operating Mode ID (a single one).
You can continue by selecting 3 (902-928MHz - Channel Spacing 600 kHz) in the Channel Plan ID list.
This is not really required, since the above operations were used to reduce the list of possible PHYs, making it easy to select the desired PHY.
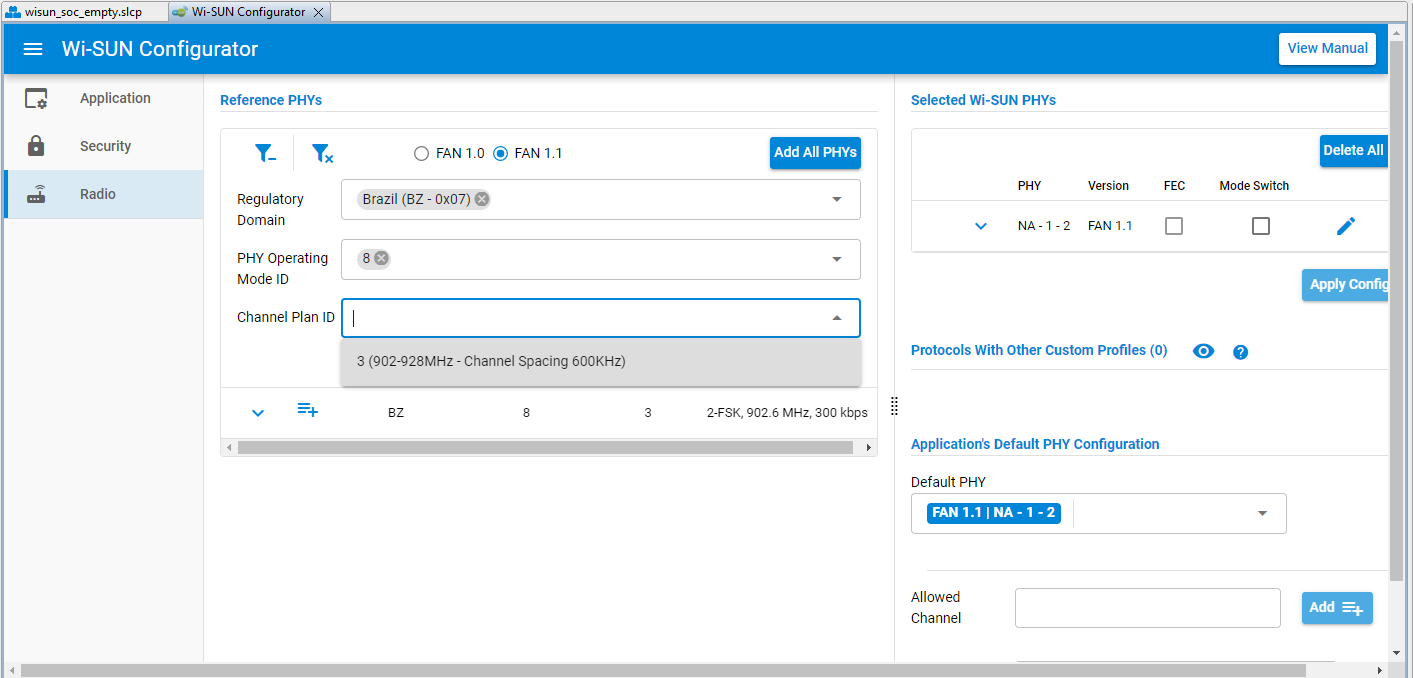
Click the blue
 icon on the PHY line to add it to the Selected Wi-SUn PHYs list.
The icon you just clicked turns light gray, indicating that this PHY is already in the list.
A message is present in Selected Wi-SUN PHYs to indicate unsaved changes.
A message informs you that you should save your new configuration by clicking the Apply Configuration button.
Once saved, you can check in the
config/rail/radio_settings.radioconffile that you now have two PHYs.In most cases, your Wi-SUN device will be targeting a single PHY, so also delete the
NA - 1 -2PHY from the list, using the icon. Confirm the deletion and save the configuration again.
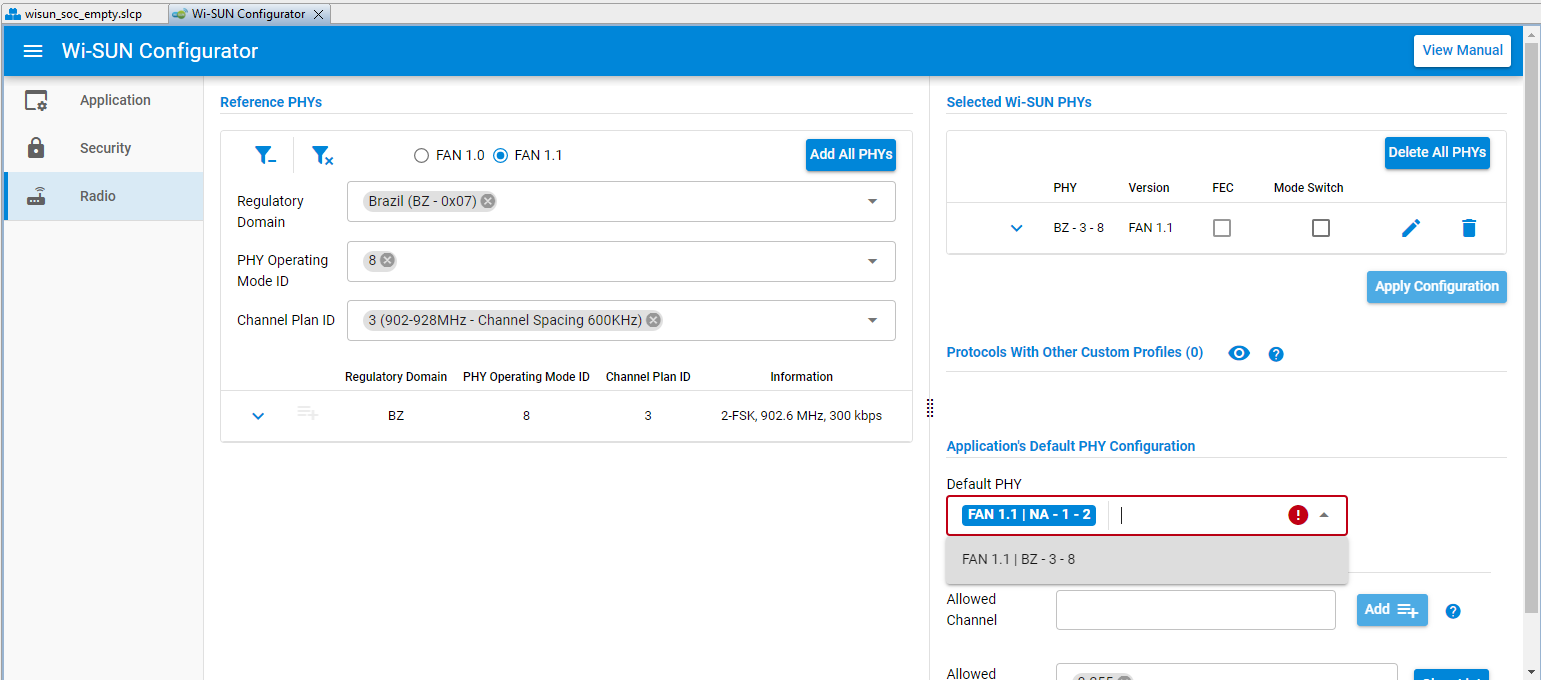
Only one PHY is now in
config/rail/radio_settings.radioconf, your 'BZ' PHY.
A red box appears around the Default PHY, because the selected default is not part of the list anymore, so select FAN 1.1 | BZ - 3 - 8 and save as instructed.

You can check in
config/wisun/wisun_settings.wisunconfthat your settings are now in the GUI control file, and also inautogen/sl_wisun_config.hthat the following items match your selection:WISUN_CONFIG_DEFAULT_PHY_FAN11
WISUN_CONFIG_REGULATORY_DOMAIN
WISUN_CONFIG_CHANNEL_PLAN_ID
WISUN_CONFIG_PHY_MODE_ID
Now, you can rebuild your project, and it will attempt to connect to your new 'BZ_3_8" Wi-SUN network.
While it's compiling, you can use 'git status' in your project folder to see which files have been modified.
$ git status
On branch master
Changes not staged for commit:
  (use "git add <file>..." to update what will be committed)
  (use "git restore <file>..." to discard changes in working directory)
        modified:   autogen/radioconf_generation_log.json
        modified:   autogen/rail_config.c
        modified:   autogen/rail_config.h
        modified:   autogen/sl_wisun_config.h
        modified:   config/rail/radio_settings.radioconf
        modified:   config/wisun/wisun_settings.wisunconf
You can use 'git diff' on any of these files to see the actual modifications.
$ git diff autogen/sl_wisun_config.h
diff --git a/autogen/sl_wisun_config.h b/autogen/sl_wisun_config.h
index 6c8cb63..3983737 100644
--- a/autogen/sl_wisun_config.h
+++ b/autogen/sl_wisun_config.h
@@ -41,7 +41,7 @@
 #endif

 //! Wi-SUN network name
-#define WISUN_CONFIG_NETWORK_NAME               "Wi-SUN Network"
+#define WISUN_CONFIG_NETWORK_NAME               "BZ_3_8"

 //! Wi-SUN network size
 #define WISUN_CONFIG_NETWORK_SIZE               SL_WISUN_NETWORK_SIZE_SMALL
@@ -54,13 +54,13 @@ extern const sl_wisun_channel_mask_t wisun_config_allowed_channels_mask;
 #define WISUN_CONFIG_DEFAULT_PHY_FAN11          1

 //! Wi-SUN default PHY - Regulatory domain
-#define WISUN_CONFIG_REGULATORY_DOMAIN          1
+#define WISUN_CONFIG_REGULATORY_DOMAIN          7

 //! Wi-SUN default PHY - Channel Plan ID
-#define WISUN_CONFIG_CHANNEL_PLAN_ID            1
+#define WISUN_CONFIG_CHANNEL_PLAN_ID            3

 //! Wi-SUN default PHY - PHY Mode ID
-#define WISUN_CONFIG_PHY_MODE_ID                2
+#define WISUN_CONFIG_PHY_MODE_ID                8

 //! Wi-SUN Broadcast retries
 #define WISUN_CONFIG_BROADCAST_RETRIES          2
These are the expected changes.
Take a minute to flash your new application to the Router to see if it displays the new network name and can connect to your new Wi-SUN network.
TIP: Before reloading, it's often useful to click the
icon in the Serial 1 Console to clear old messages.
The most convenient feature in Simplicity Studio to flash the same application after recompiling it is Redo last upload when selecting a Debug Adapter.
TIP: You can even select multiple targets and trigger the last upload for all in a click. It will work even if the binaries are different, reloading the previous binary for each target.
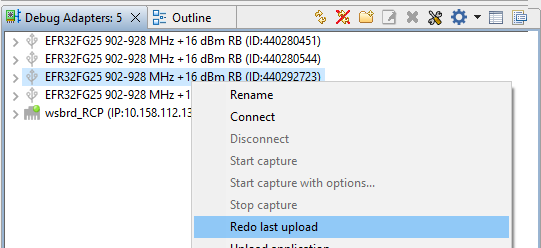
TIP: Understand 'redo last upload' as 'reload the binary from the same location, with the same name'. If the binary content changed (your case), it will be updated.
While it's connecting, you can go back to Git and commit your changes.
git add --all
git commit -m "After changing to BZ 3 8"
After this is done, you can track your next changes.
In the meantime, it connected!
If the device is connected to the Wi-SUN network, the Wi-SUN specific part of the application is complete.
Resources Once Wi-SUN SoC Empty is Connected#
PING capability
Listening to IPv6 Broadcast addresses:
The following IPv6 addresses are ready to receive broadcast messages:
Scope | IPv6 | nanostack #define | Send to |
|---|---|---|---|
Link Local (= neighbors) | FF02::1 | ADDR_LINK_LOCAL_ALL_NODES | BR + FFN (1 hop) + LFN (1 hop) |
Link Local (= neighbors) | FF02::2 | ADDR_LINK_LOCAL_ALL_ROUTERS | BR + FFN (1 hop) |
Realm Local (= all network) | FF03::1 | ADDR_REALM_LOCAL_ALL_NODES | BR + FFN (n hops) + LFN (n hops) |
Realm Local (= all network) | FF03::2 | ADDR_REALM_LOCAL_ALL_ROUTERS | BR + FFN (n hops) |
From this point, your device will:
Reconnect to your Wi-SUN network automatically in case it's powered down then up.
Regularly check for connection options within the surrounding Wi-SUN routers, and select a new parent if there is a better one or the current parent goes down. That is the self-healing part of Wi-SUN.
Once connected, advertise the Wi-SUN network for other routers to connect, and become a parent for other devices if need be.
If the Border Router goes down but another Border Router with the same Network name and credentials is within range, connect to this Border Router.
Adding several Border Routers to a Wi-SUN network (with Ethernet IPv6 connectivity between such Border Routers) is a good way to share the load within the network.
You can flash the same binary to several Evaluation kits. They will all connect in a tree-like fashion to the Border Router, routers being direct children of the Border Router acting as parents for devices located further away, and so on.
As explained earlier, in a production environment the credentials will need to be unique per device, but for development purposes, it is sufficient to use the same credentials for a number of devices.
TIP: On the Linux Border Router, you can use
watch wsbrd_cli statusto monitor the network topology. You can also use the wsbrd GUI to get a graphical representation of this Wi-SUN network topology.
It's now time to look at the Wi-SUN connection process in detail.