How to Use Bootloaders and OTA in Your Project#
Overview#
This lab describes how to create images for the Bootloader and OTA application updates, implement the OTA functionality in the user application, and perform firmware upgrade via OTA using the EFR Connect app.
Getting Started#
Ensure that you have the correct hardware and software to successfully complete the lab.
Prerequisites#
For this lab you need the following:
EFR32BG22 Thunderboard (SLTB010A)
Micro-USB to USB Type-A cable, which is not a power cable. This cable is not included with Thunderboard. It must include data lines.
Simplicity Studio v5
Gecko SDK Suite 3.1.1 or later
Bluetooth SDK 3.1.1 or later
EFR Connect Mobile App
Accept Location Access, which is required for the Traffic Browser. “While using the App” option will work.
File storage solution to access OTA files on the mobile device
Install the cloud storage app on your mobile device (i.e., iCloud, Google Drive, Dropbox or other cloud storage account)
Have cloud storage account access ready to upload files from your computer/laptop
Prepare Windows OS to Run Simplicity Commander#
Add the path of Simplicity Commander (C:\SiliconLabs\SimplicityStudio\v5\developer\adapter_packs\commander) to the path environment variable in your OS, so that the commander command can be called from any directory.
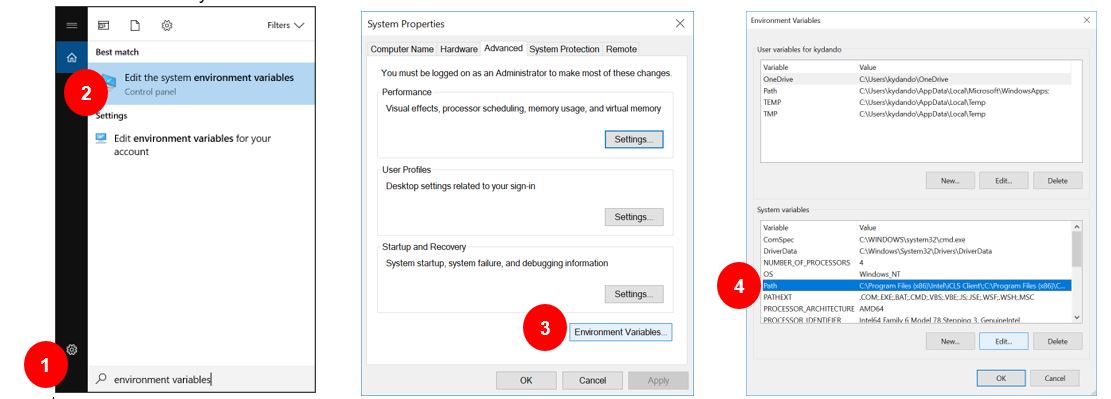
Use Search bar in Windows 10 OS to locate “Environment Variables” menu.
Select “Edit the system environment variables”.
Select “Environment Variables” in the System Properties window.
Select “Path” under System Variables. Click “Edit…”

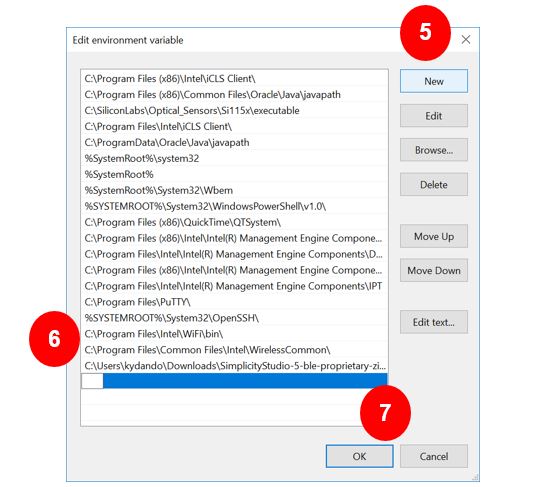
Click “New”.
Verify this is the valid path for your installation.
C:\SiliconLabs\SimplicityStudio\v5\developer\adapter_packs\commanderMost default installations will have this path. It will be different if you modify the installation folder for Simplicity Studio.
Paste the verified location of Simplicity Commander.
Click “OK” to accept addition to path and return to Environment Variables window.

Under the System variables, Click “New”.
Under the Variable name, enter “PATH_GCCARM”.
Under the Variable value, enter "C:\SiliconLabs\SimplicityStudio\v5\developer\toolchains\gnu_arm\7.2_2017q4"
Click “OK” to accept the new variable.
Under the System variable, Click “New”.
Under the Variable name, enter “PATH_SCMD”
Under the Variable value, enter “C:\SiliconLabs\SimplicityStudio\v5\developer\adapter_packs\commander” (VERIFIED IN STEP 5).
Click “OK” to accept the new variable.
Click “OK” 3 times to close the open windows.
Computer will need to be restarted for new PATH variable to be updated.
Prepare MacOS Catalina and Linux OS to Run Simplicity Commander#
The following section describes how to set up the Simplicity Commander to the path environment variable in a MacOS or Linux OS. In MacOS Catalina:
Open a terminal window.
Return to the root folder by typing cd ~
Use an editor, such as nano to edit the .zshrc file. Type nano .zshrc
Add the following to an existing PATH command or add it to the end of the file.
export PATH=$PATH:/Applications/Simplicity\ Studio.app/Contents/Eclipse/developer/adapter_packs/commander/Commander.app/Contents/MacOSExit and save the .zshrc file by clicking CTRL-X to exit, answer Y to save the file.
Source the file to make it the active path:
Type . ~/.zshrc
For Mojave and Linux OS, do the following:
Follow the same process above by only editing the .bashrc file in step 3:
For Linux OS, the path in step 4 is also different.
export PATH=$PATH:~/SimplicityStudio_v5/developer/adapter_packs/commanderSource the file to make it an active path in Mojave or Linux OS: Type . ~/.bashrc
Download the Workshop Source Files and Update Images#
gatt_configuration.btconf - GATT configuration to be imported.
app.c - Modified application source file.
application-crc.gbl - Updated Application GBL image.
corrupt.gbl - Corrupted GBL image.
bootloader-storage-internal-single-512k.s37 - Bootloader Internal Storage Image for Thunderboard BG22.
soc_ota_app.s37 - Application Application Image for flashing.
Creating a Bootloader#
The Silicon Labs Gecko Bootloader is a common bootloader for all newer MCUs and wireless MCUs from Silicon Labs. The Gecko Bootloader can be configured to perform a variety of bootload functions, from device initialization to firmware upgrades. The bootloader must be generated and flashed by the developer. The developer can select from many different configuration options to best match the product, memory, and security requirements of their designs. This lab uses the Internal Storage bootloader. This sample configuration of the Gecko bootloader sets the bootloader to use the internal main flash to store firmware update images. The storage configuration is set up to store a single firmware update image at a time, in a single storage slot. This lab integrates the OTA functionality into the application to upload a new firmware image into the storage slot configured by the bootloader.
Apploader: Alternatively, you can use Apploader. Apploader is a separate proven application provided by Silicon Labs that is initiated when OTA is started. Typically, Apploader is chosen when there is not sufficient on-chip space to store a second copy of the application and Apploader provides space optimization. However, it can also make the Application simpler because it offloads the OTA upgrade functions.
Set up Thunderboard Kit and Simplicity Studio#
Launch Simplicity Studio from your desktop.
Connect the Thunderboard BG22 to your PC using a micro-USB cable.
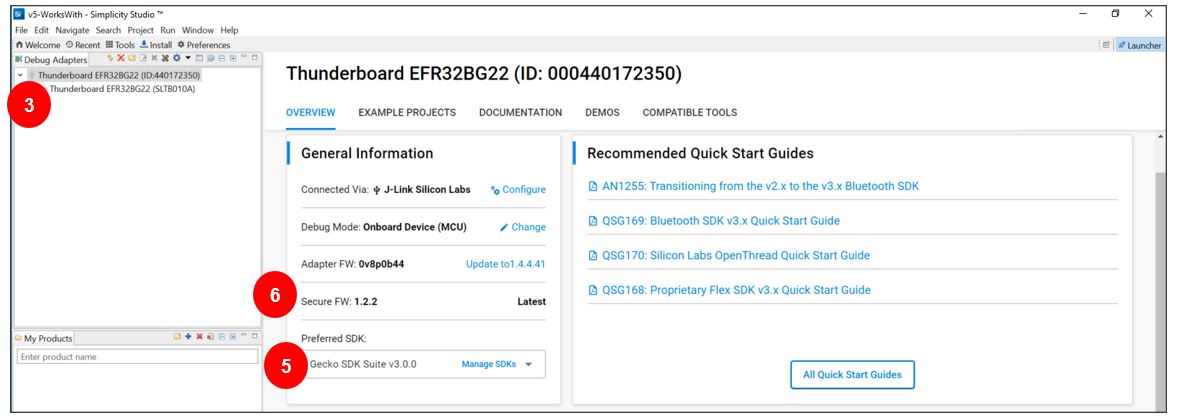
When the device is connected to your PC, you should see it listed in the Debug Adapters window in Simplicity Studio.
Select the J-link for the device to display the associated Overview, Example Projects, Documentation, and Demos.
Set the preferred SDK to Gecko SDK Suite v 3.1.1 or newer.
Ensure that the Secure Firmware Version is the latest one. Read and Update if not displayed.

Create Bootloader#
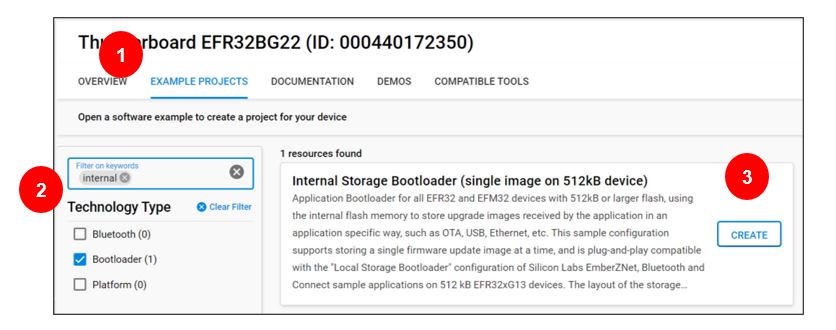
Open the Gecko Bootloader Examples under the Examples Projects on the Launcher screen in Simplicity Studio.
Select “Bootloader” from the Technology Type filters. Additionally, type “Internal” in Keywords to narrow results.
Select Internal Storage Bootloader (single image on 512kB device) from the Gecko Bootloader examples and click Create.
The new project wizard will pop up where you can change the project name of your bootloader. Click on finish. This will create the example project and files.
After the project is created, Simplicity studio will open the IDE perspective with the configuration file for the Bootloader project. The configuration of the Bootloader can be modified, such as storage and plugins. This lab needs default settings.
Click on generate on the top right corner.
After the generation is completed, build the project by clicking the build button “Hammer”.

Create the Project to Implement OTA in Application#
Silicon Labs provides different example projects as a starting point for Bluetooth Low Energy application development. This lab starts from the Bluetooth - SoC-empty example, which is the most common starting point because the example demonstrates the bare minimum needed for a Bluetooth C application.
The empty example also comes with the in-place OTA functionality using the Apploader by default. However, it will be modified to handle the OTA from the application using the bootloader interface because this provides different benefits and possibilities for the developer, such as the following:
The user application remains fully functional while the OTA image is uploaded.
Possibility to implement customer-specific OTA service/protocol (with application level security if needed)
EM2 deep sleep is supported during OTA upload
Normal BLE security features (link encryption, bonding...) can be used
Sleep and BLE encryption/bonding are not supported by AppLoader to reduce the flash footprint.
An obvious disadvantage of this solution is the requirement to have a dedicated flash space available as the download area.
Create Example Project#
Go to the Launcher perspective in Simplicity Studio by clicking on the “Launcher” icon on the top right corner. “Launcher” and “Simplicity IDE” options should be visible.
With the device connected to your PC, you should see it listed in the Debug Adapters window in Simplicity Studio.
Select the J-link device to display the associated Overview, Example projects & Demos, Documentation and Compatible tools. Be sure to set the preferred SDK to Gecko SDK Suite v 3.1.1 or newer.
Click on Example projects & Demo’s tab to browse the example projects.
Select “Bluetooth” from the Technology Type filters. Additionally, type “Empty” in Keywords to narrow results.
Select Bluetooth - SoC Empty from the Bluetooth examples and click Create. (Do not select the "demo").
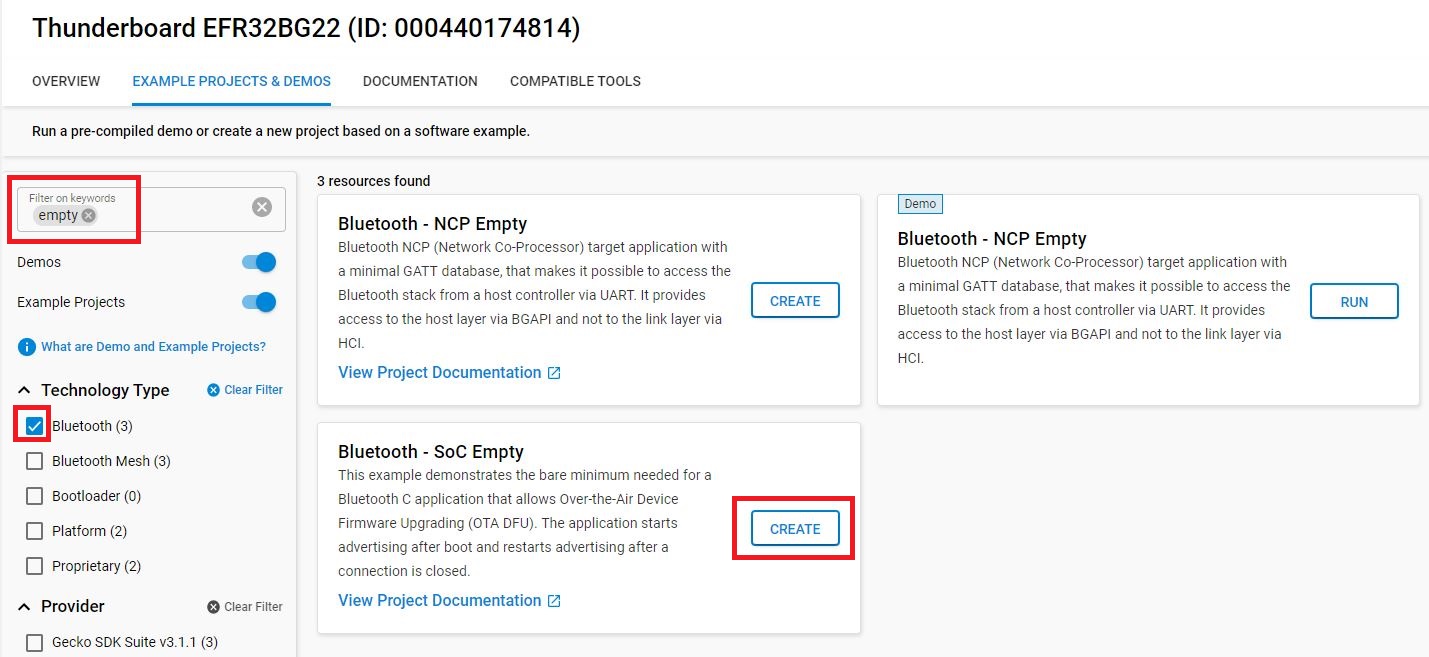

Change the name of the project to “soc_ota_app”.
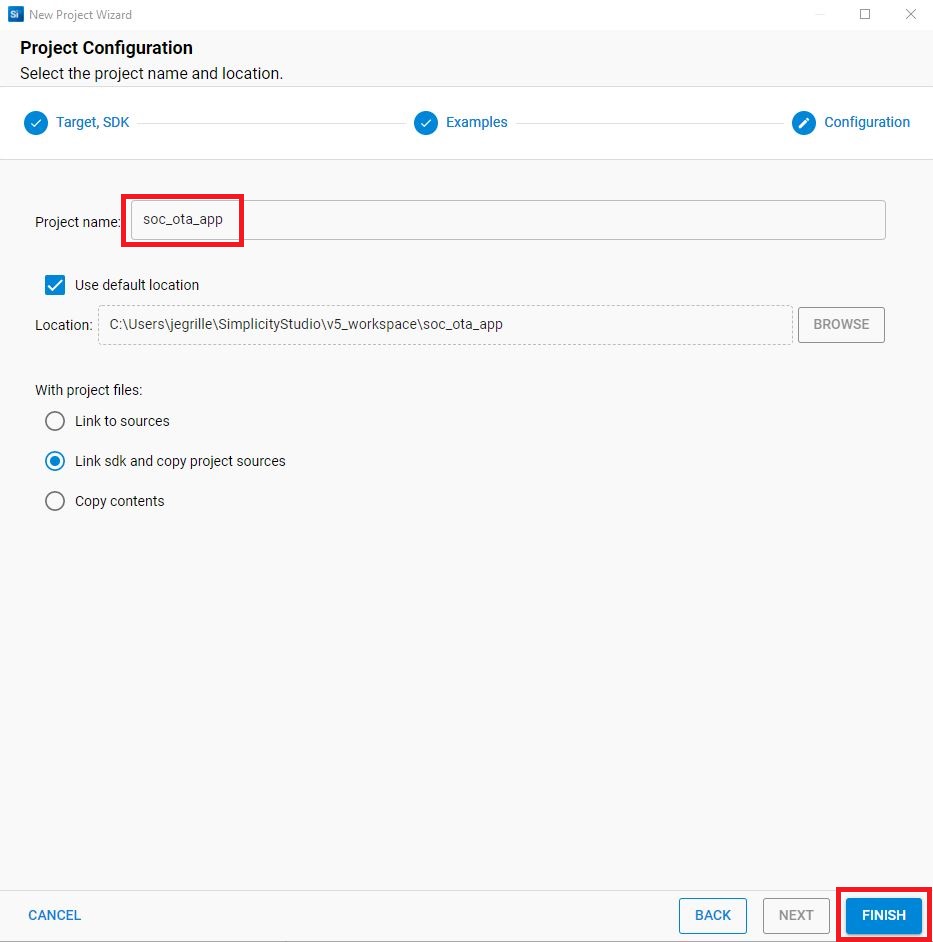

Click “Finish” on the following prompt to create the example project and switch to the Simplicity IDE perspective.
Modify the Project#
Remove the OTA service and component used by default in the SoC-empty application because they are meant for use with Apploader. Import a new GATT configuration with the OTA service and characteristics to transmit the new image file data to be handled by the application. Install the USART component and Log utility to enable debug prints to a terminal and overwrite the default application code of the SoC-empty example with the source code that includes the OTA functionality.
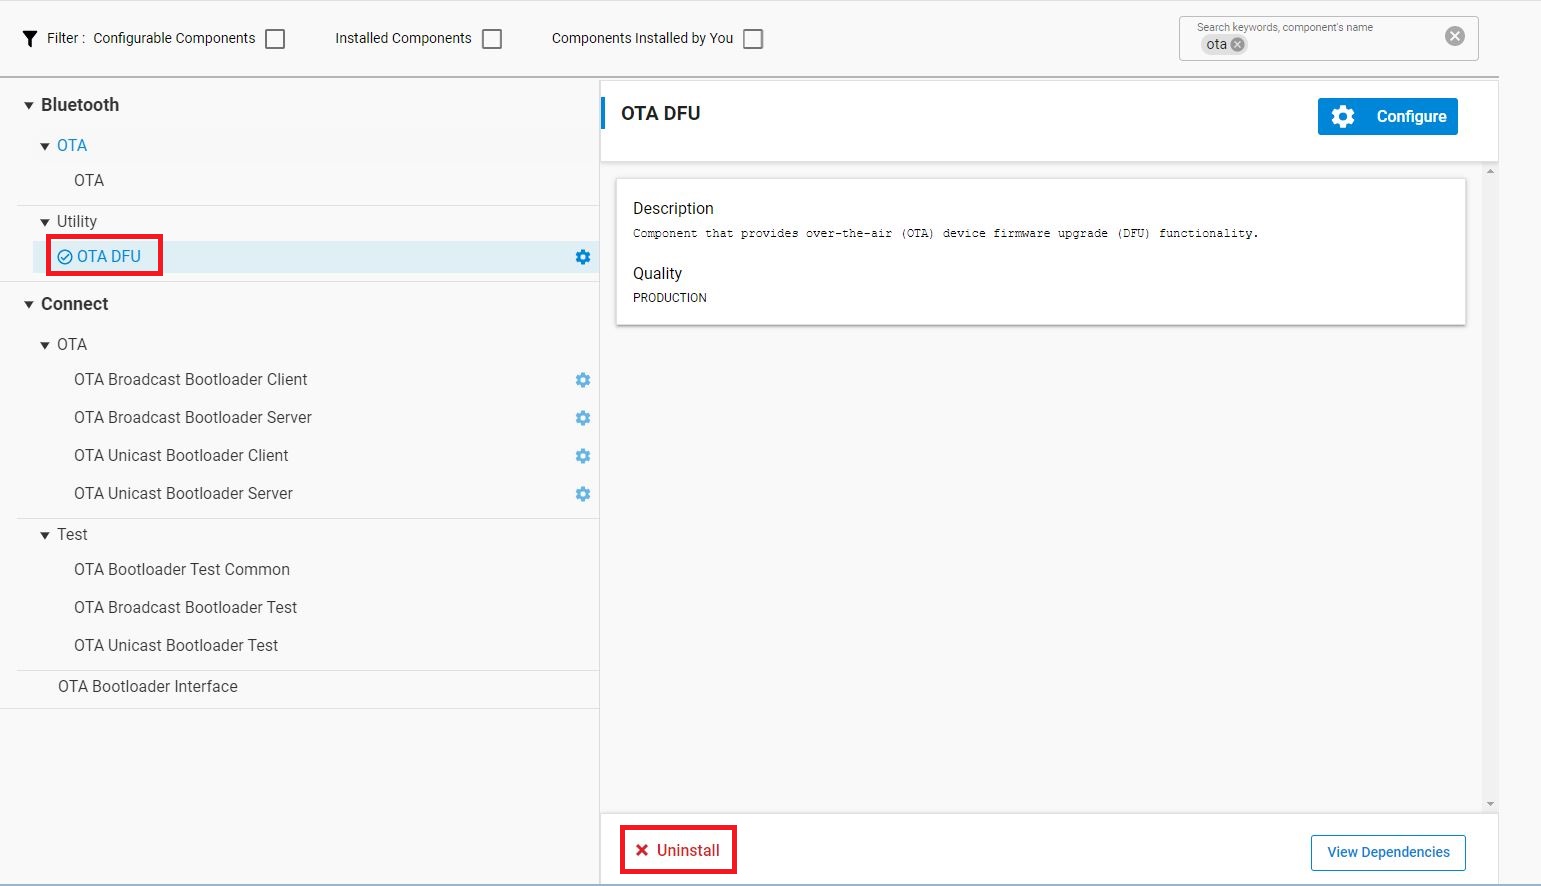
To remove the default OTA service, go into the Software Components tab in the project configurator.
a. Type OTA in the search bar.
b. Uninstall the component under Bluetooth > Utility > OTA DFU, which excludes the default OTA service that comes with the example project.

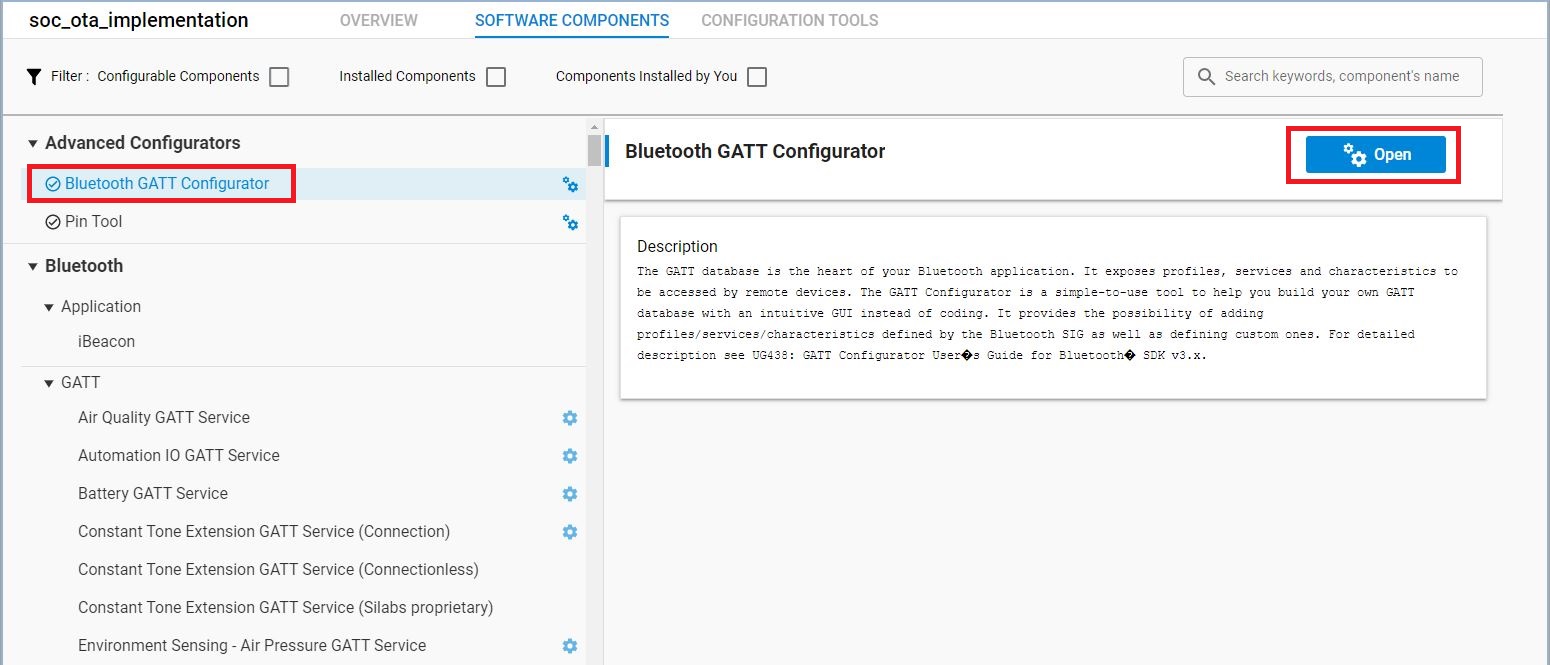
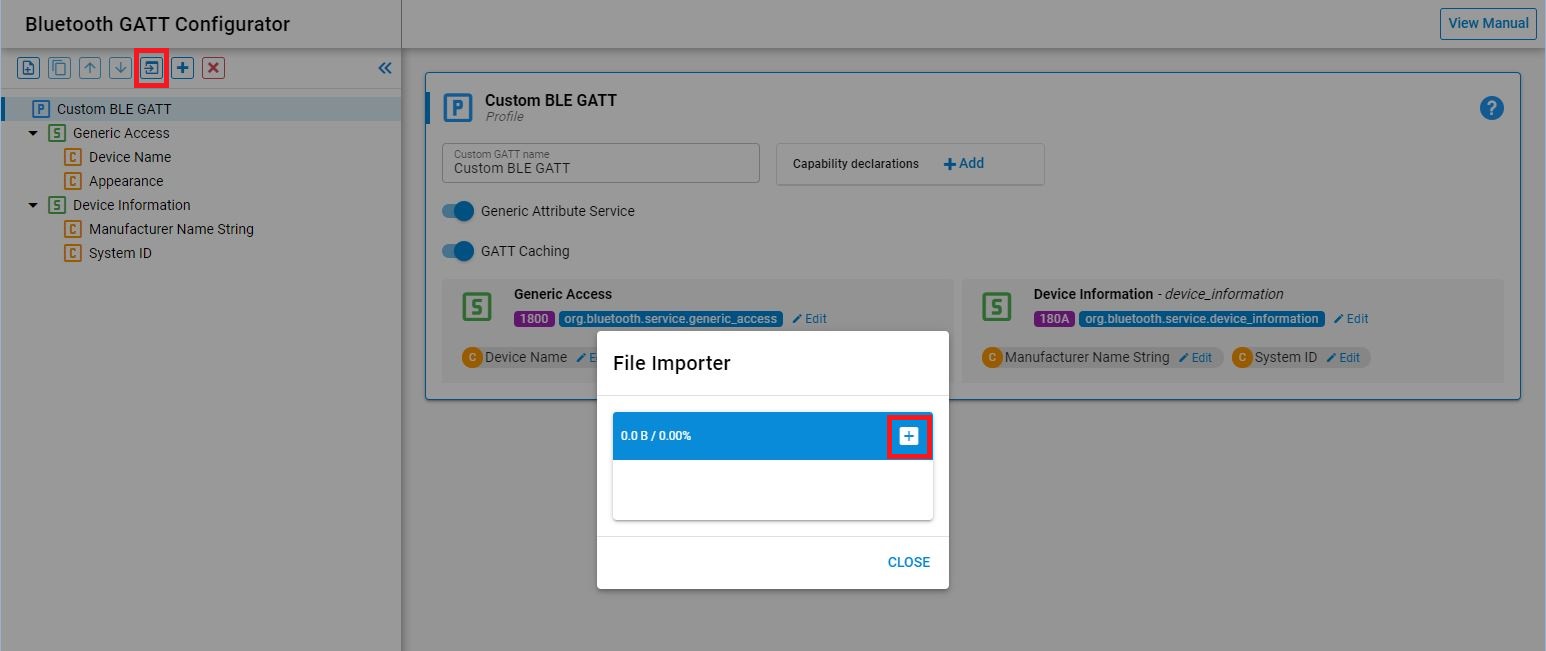
Import the attached GATT configuration file into the project which contains the modified OTA service to include the data characteristic.
a. In the Project Configurator go to the Software Components tab and browse to Advanced Configurators > Bluetooth GATT Configurator, you will see the button to open on the top right corner when you select the component. Click it.

b. Once in the GATT Configurator, click on the import icon.
c. When the File Importer window is opened, drag and drop the provided [gatt_configuration.btconf](source /gatt_configuration.btconf) file in the lab or alternatively press the + buttng in the file importer to browse files and search for the [gatt_configuration.btconf](source /gatt_configuration.btconf) in your folders.

d. Save (Ctrl+S) and close the GATT configurator.
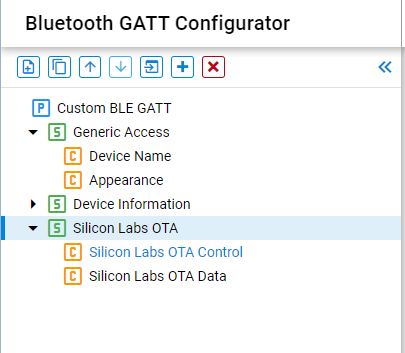

Debug prints will be enabled to see the stages of the OTA process by printing the current status to a terminal. To achieve this, enable the USART and the Log utility in the software components. The USART is enabled to use the VCOM port to communicate with a terminal in your desktop. The Log utility is an application logging interface that allows to print messages to the terminal by using an API command.
Open the Project Configurator and go into the Software Components tab.
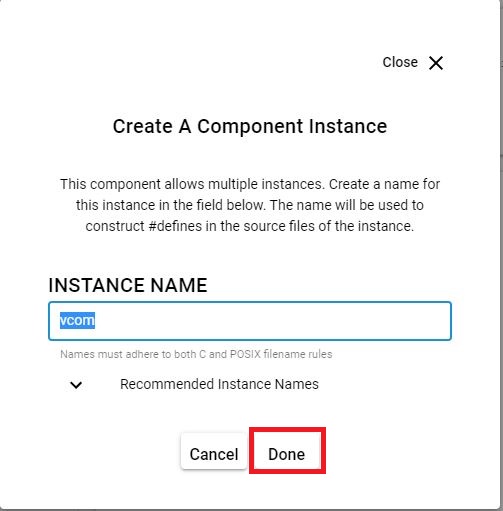
Find the I/O Stream: USART component (Services > IO Stream > IO Stream: USART) and click install. A window will prompt named Create A Component Instance, asking to choose the instance name, leave it as "vcom" the default value and click done.



Find the Log component (Bluetooth > Utility > Log) and install it.


Find the Board Control component and enable the Virtual COM UART.
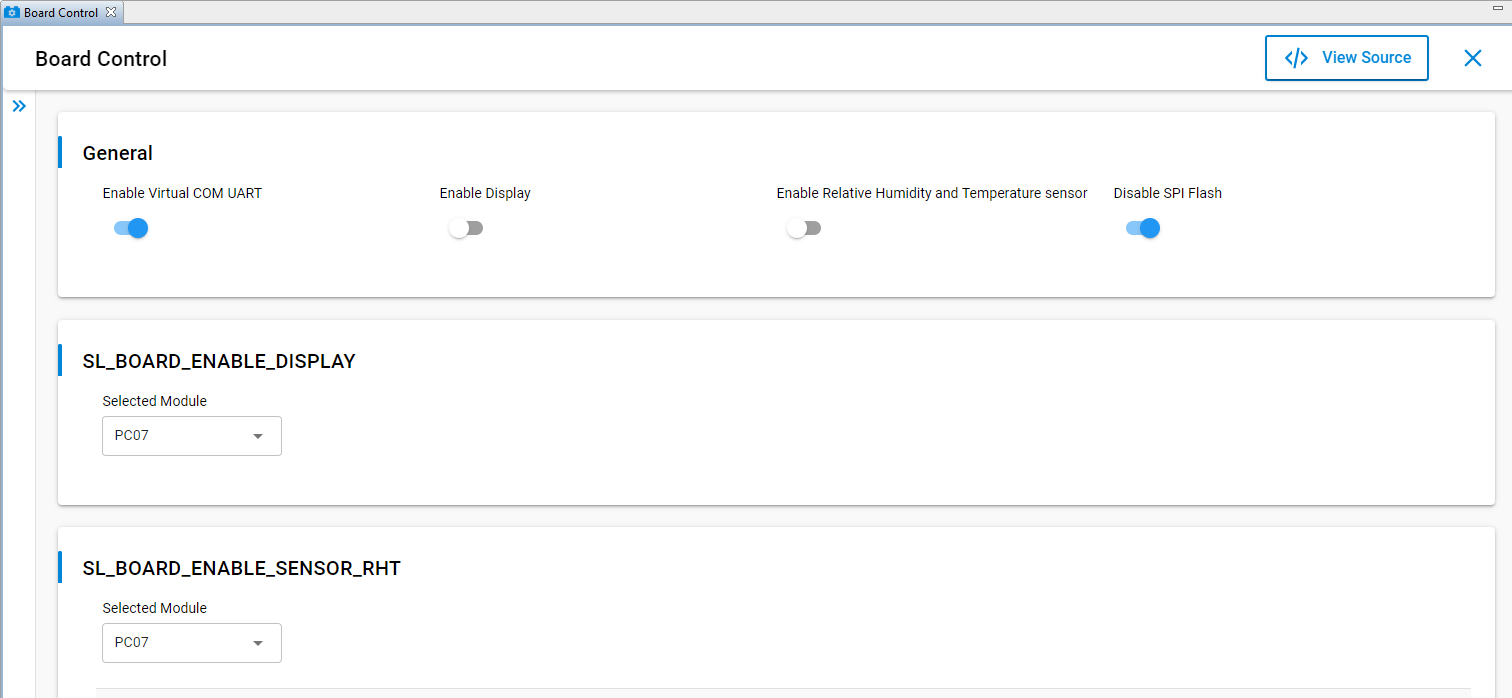

Note: Not installing the components in the above section causes errors when building the project because undefined references occur in the provided source code.
Finally, copy the provided source file “app.c” to the project, which overwrites the default app.c from the project. This modified file includes the code to handle the OTA in the application by using the Bootloader interface and print status messages. These sections are not included in the default SoC-empty project. More information in the changes made on the code review section of the lab.
Build the project by clicking on the hammer icon. This will generate the application image to be flashed to your device.
Program the Thunderboard BG22#
Flashing Images to Device#
This lab starts by programing the Thunderboard using the wired USB interface and Simplicity commander. The Flash Programmer Tool in the IDE can also be used. However, we will use the command line with simplicity commander to showcase this all-purpose tool to be used in a production environment. It is invoked using a simple Command Line Interface (CLI) that can also be scripted.
To flash the bootloader, Open a Command Line window by right clicking in the compiler output folder of the Bootloader project and then select to open a command line there.
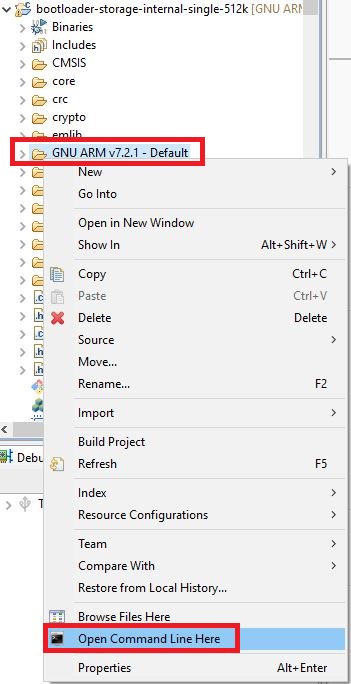

In the command line, type the following command to flash the bootloader to the Thunderboard BG22:
commander flash bootloader-storage-internal-single-512k.s37Note: If you have more than one device connected, you need to specify the device in the command by using -s
<serial number>(J-Link serial number) or -d<device>(The device, device family or platform to target. Examples of strings that are understood: "EFR32MG1P233F256GM48", “EFR32MG", "EFR32").

To flash the application, Open a Command Line window by right clicking in the compiler output folder of the Bluetooth project (.soc_ota_app/GNU ARM v7.2.1 – Default/ ). The soc_ota_app.s37 file is used to flash the application.
In the command line, Type the following command to flash the Application to the Thunderboard BG22:
commander flash soc_ota_app.s37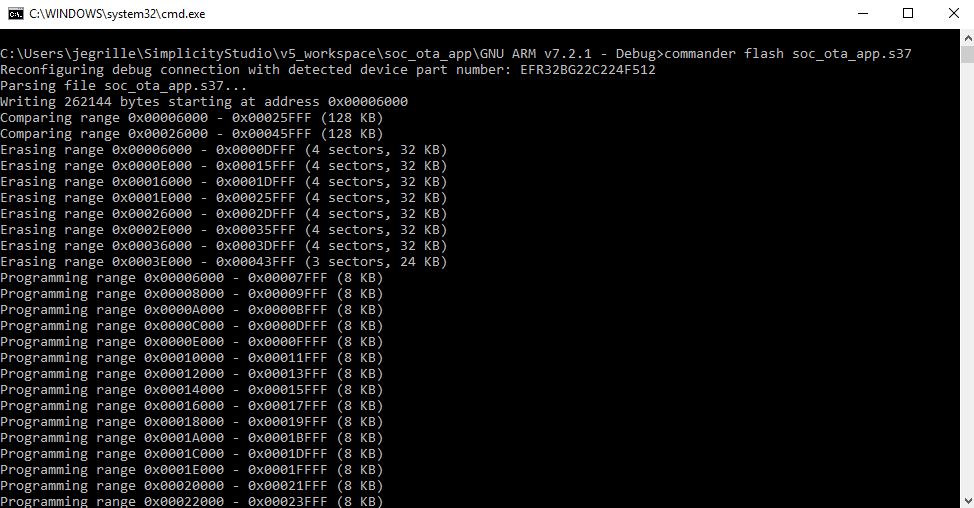

Important Note: If calling "commander" in the command line fails, most likely the path of Simplicity Commander has not been added to the path environment variable in your OS, so that the commander command can be called from any directory. Refer back to Prepare OS to run Simplicity Commander in the getting started section. You will need to restart your system after adding the path to your OS.
Use EFR Connect to Locate Thunderboard BG22#
First, open a terminal to communicate with the Thunderboard and receive debug prints. In this case Tera Term is used. When opening the connection to the COM port, select serial and look for the COM port that lists the J-Link UART port. The serial port speed parameter used is 115200.
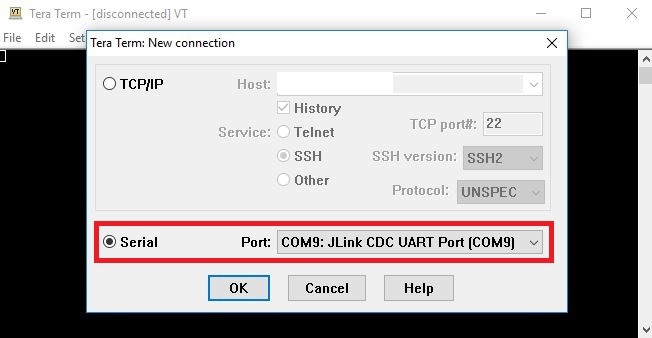

After opening the connection, reset your Thunderboard and see these printed messages in the terminal.
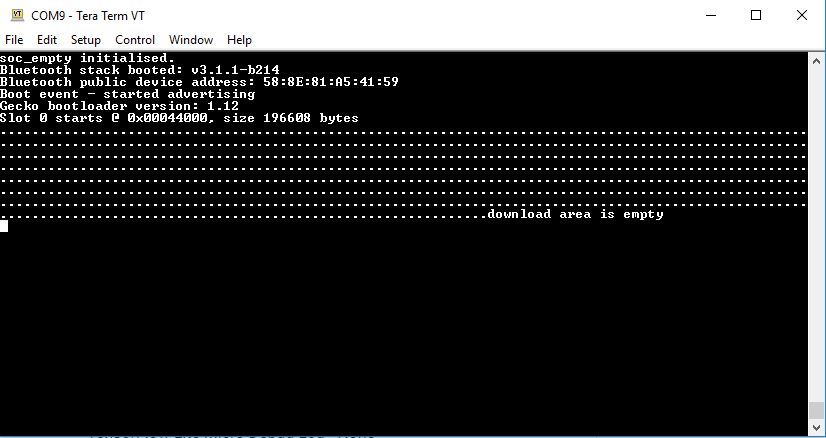

Go to your mobile device and open the EFR Connect app.
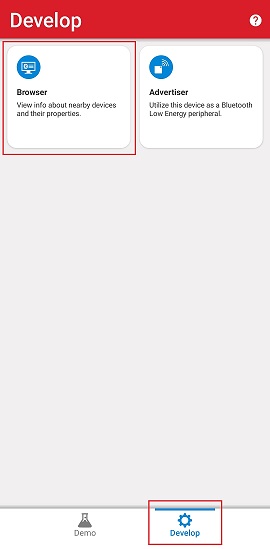
Select “Develop” at the bottom of the first screen.
Click “Browser” tile to begin scanning the area for Bluetooth devices.

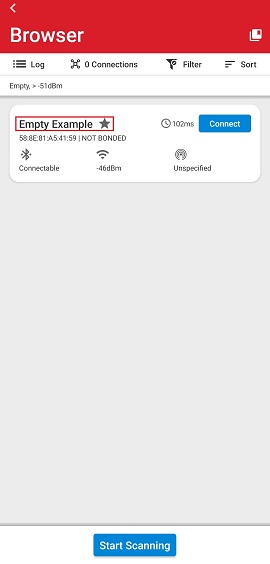
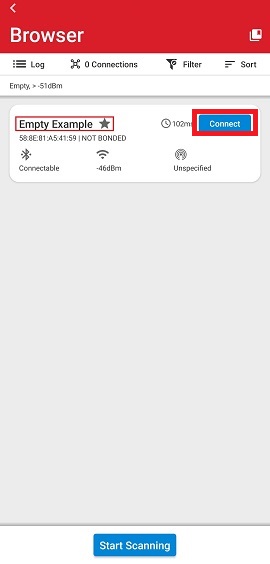
You should see your Thunderboard BG22 advertising as “Empty Example".

Performing an OTA Update of Firmware#
This section describes how BG22 features can be used to provide OTA firmware upgrade to devices in the field. The first step is to modify the existing project so that a change can be detected in the EFR Connect mobile app if the device is successfully updated. The next steps are to use the EFR Connect to perform the OTA update. Two use cases will be described, when the application fails the OTA because of a corrupt file and a Successful update.
Modify the Project to Create Update Files#
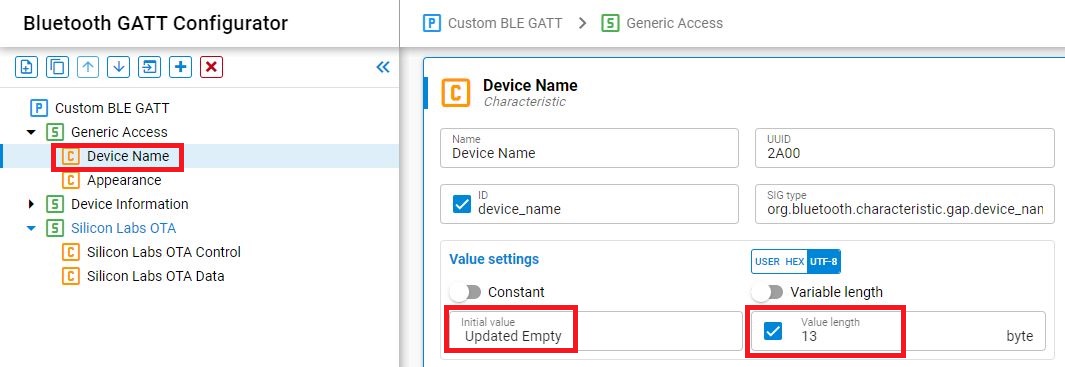
The easiest modification is to change the Device Name of your device in the GATT configurator. That way, when scanning with EFR connect app, a different name will be shown for the advertising Thunderboard. This can be done quickly to provide the new application image and generate the OTA files.
Go to the GATT Configurator by opening the gatt_configuration.btconf inside the config folder or by going to the Software Components tab and browse to Advanced Configurators > Bluetooth GATT Configurator.
Change the Device Name in the GATT Configurator to something different, i.e., “Updated Empty”. Adjust the value length depending on the based on the name you chose. Then, save/generate the new GATT configuration by pressing Ctrl+S.

Rebuild the modified project.
Next is generating the OTA update files. Gecko Bootloader uses a proprietary format for its update images, called GBL (Gecko Bootloader). These images are produced with the file extension “.gbl”. To generate the OTA files, run the create_bl_files.bat / create_bl_files.sh script found in the root folder of the Project. This script will parse the application image into ".gbl" format.
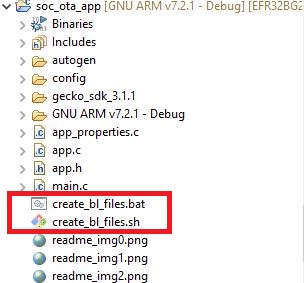

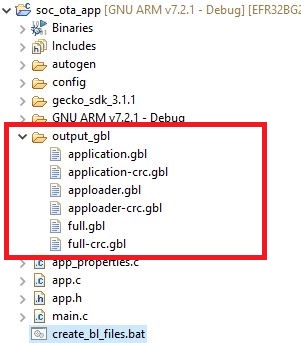
Running the script generates a new folder in your project directory that contains the OTA files for application, apploader and full, which contains both and also, the same files with CRC checksum. Use the application-crc.gbl in the OTA process because the application will verify the application image before installing it.

Place Application Images on Mobile Device Cloud Service#
This step loads two images to a cloud-based storage service that the EFR Connect app can access.
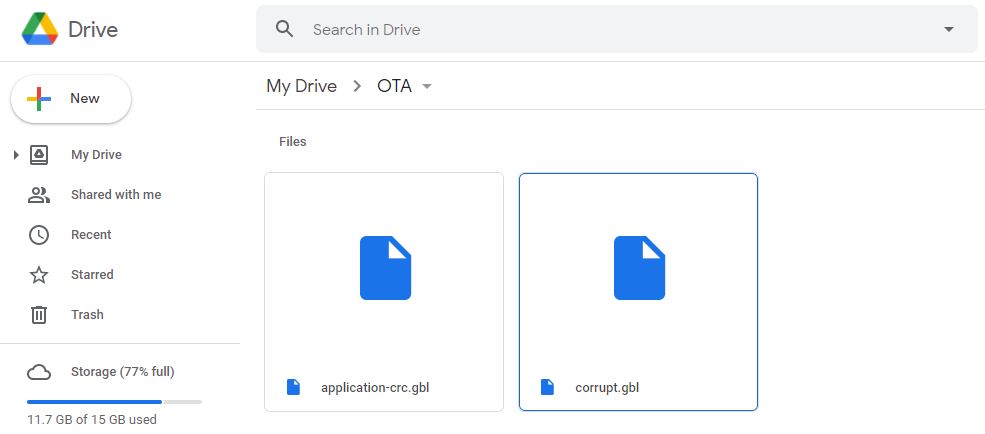
Upload the application-crc.gbl to a cloud storage service you can access on your mobile phone (i.e., iCloud, Dropbox, Google Drive).
Upload the provided corrupt.gbl to the same cloud storage service.

Use EFR Connect Mobile App to Connect and Perform OTA with a Corrupt File#
The first use case is the situation where an incorrect update .gbl file is used. The provided image corrupt.gbl was modified by changing the first few bytes of the original ".gbl" OTA image.
Start EFR Connect app on your phone.
Start Bluetooth Browser.
Connect to your device advertising as “Empty Example”.

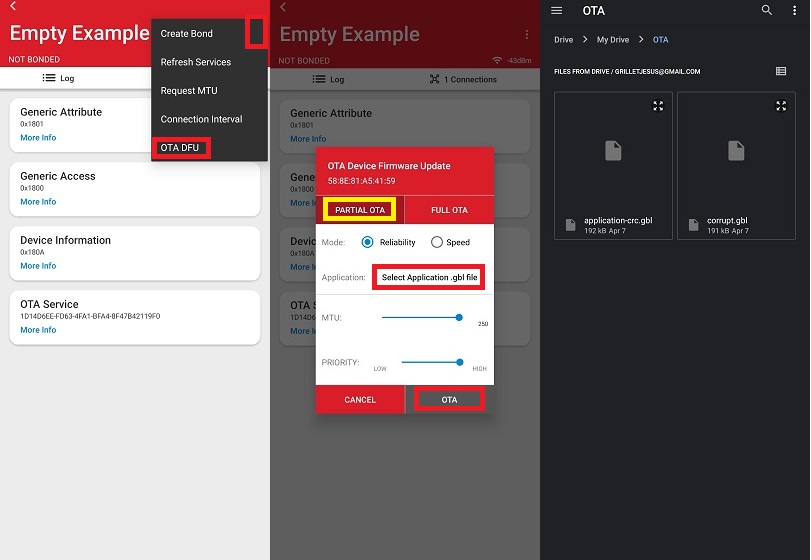
Open the local menu to find the OTA DFU option. Note that EFR Connect was developed to primarily support Apploader OTA DFU but when the device has the Silicon Labs OTA Service, even if it was replaced with a modified version to include a new characteristic, the app will show the OTA DFU option in the menu since they have the same service UUID that enables over-the-air firmware update of the device.
Select the Partial method for the OTA, which only changes the Application. Full method allows you to load a new Apploader along with the Application.
Select “CHOOSE FILE” in the App.
The mobile app will open a default folder view. Browse to your cloud storage folder where you uploaded the OTA files.
Locate and select your upgrade file named corrupt.gbl.
Press OTA to begin the partial update.

The OTA Progress will be shown in a window with detailed information about the file name, size and it will also show the transfer speed and the progress in percentage. When it reaches 100% click on the END button to finish the transmission process and close the connection to proceed with the image validation.
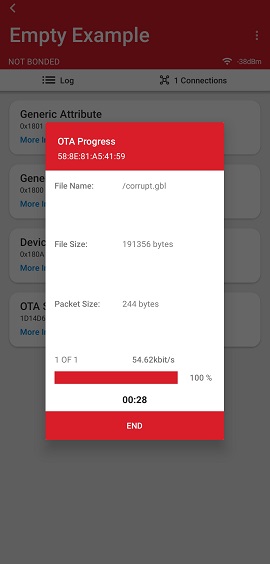

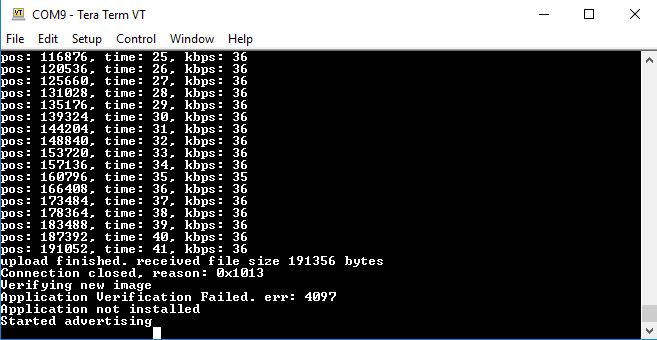
OTA will fail since the update image is corrupt and your device will start to advertise with the same name as before since there was no change in the application. (“Empty Example”).

Use EFR Connect Mobile App to Connect and Perform OTA#
This use case shows the completion of the OTA correctly.
Start EFR Connect app on your phone.
Start Bluetooth Browser.
Connect to your device advertising as “Empty Example”.
In the local menu find the OTA option.
Select Partial method for the OTA.
Select “CHOOSE FILE” in the App
The mobile app will open a default folder view. Click Browse to view more cloud storage options
Locate and select your upgrade file application-crc.gbl.
Press OTA to begin the partial update.


The OTA progress will be shown in a window with detailed information about the file name, size and it will also show the transfer speed and the progress in percentage. When it reaches 100%, click on the END button to finish the transmission process and close the connection to proceed with the image validation.
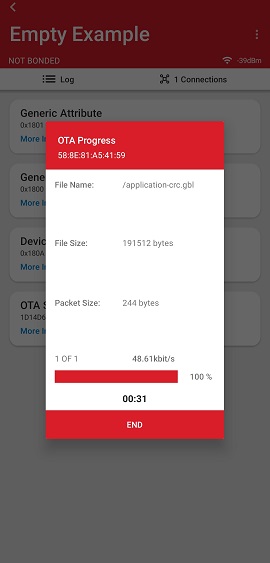

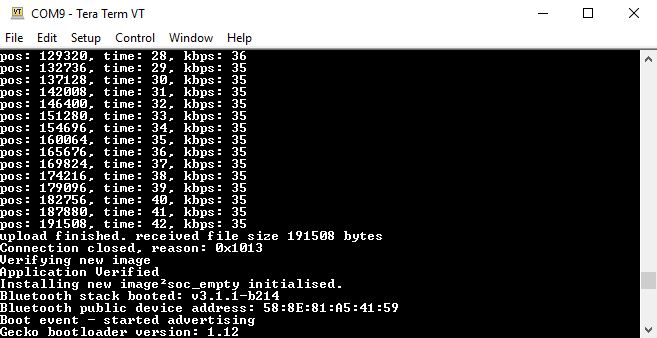
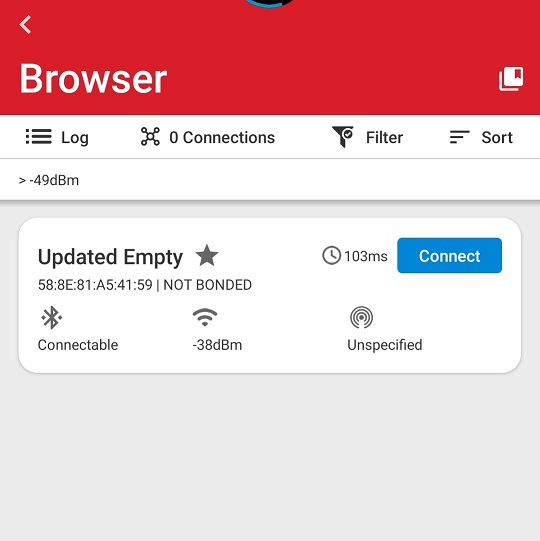
OTA will succeed and your device will advertise your modified Device Name (i.e., “Updated Empty”). Note that for some mobile devices, refresh the Bluetooth Browser for the name to change or check the device name characteristic.


Code Explanation#
This section reviews sections of the code that are important to understand in the example.
Bootloader Interface#
The bootloader interface component is already installed by default with the Bluetooth SoC-empty example. The Bootloader consists of functions and definitions that can be included in the application and will communicate with the bootloader. To make use of this interface, in app.c, the code has been added to integrate the OTA capabilities with the application.
In the app.c file the following code was added:
Include the header files of the bootloader interface and storage. Also we defined some variables for the OTA.
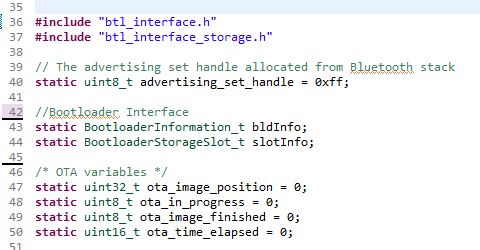

Variable to store the main bootloader information table:
static BootloaderInformation_t bldInfo;Variable to store the Storage slot information:
static BootloaderStorageSlot_t slotInfo;Utility functions have been created to perform tasks that are needed when using the bootloader interface to perform an OTA:
static int32_t get_slot_info()This function retrieves the information about the Bootloader and the storage slot.
This function uses API bootloader_getInfo(&bldInfo); to fetch the bootloader information such as type, version and capabilities. This information is printed using the log utility. Then, the storage slot information is retrieved using bootloader_getStorageSlotInfo(0, &slotInfo); , which returns information about storage slot size and location. Then, it verifies that the correct storage configuration is set and prints the information or an error message.


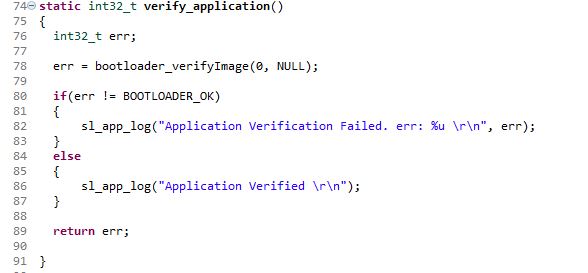
static int32_t verify_application()This function verifies that the application image received is valid to perform the OTA.
It will use the command bootloader_verifyImage(0, NULL); to check if the image stored in slot 0 is valid and then print if that image is valid or not.

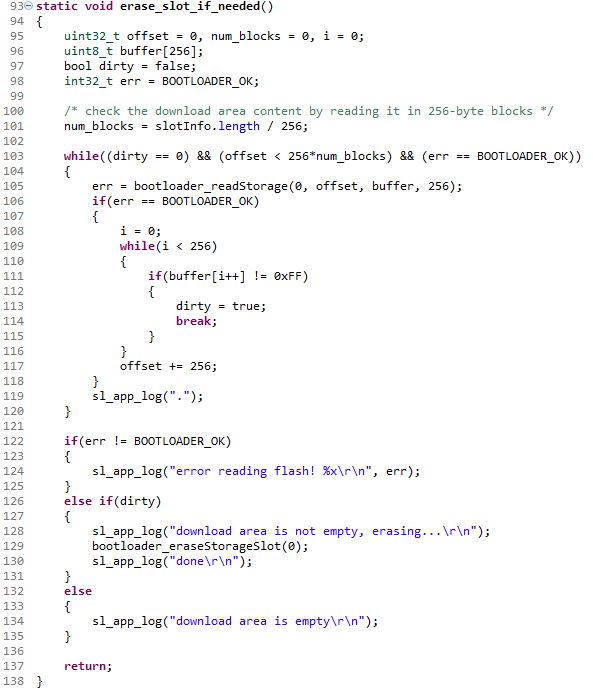
static void erase_slot_if_needed()This function erases and cleans the storage slot of the bootloader in the flash memory.
If you have already performed OTA updates before, the slot 0 will have an image already stored. So the function checks if there is already an image in the slot using bootloader_readStorage(0, offset, buffer, 256); and if so, process to command the delete of the slot by using bootloader_eraseStorageSlot(0);

static void print_progress()This function prints the progress of the current image data reception by using the log functionality.


OTA Code in Bluetooth Events#
In app.c, inside the void sl_bt_on_event(sl_bt_msg_t* evt) function, the code for handling the OTA steps is added. This includes initialization of the bootloader interface, use of the functions in the last section, reception of the data, verification, and installation of the image.
Describing the changes made and code included in the void sl_bt_on_event(sl_bt_msg_t* evt) function, is explained by each Bluetooth event that was modified.
In the
sl_bt_evt_system_boot_idInitialize components of the bootloader so the app can use the interface. This typically includes initializing serial peripherals for communication with external SPI flashes, and so on. This is done with the following command:
bootloader_init();Read the storage slot information from the bootloader using the previously described function:
get_slot_info()Initialize the timer for printing the OTA progress:
sl_bt_system_set_soft_timer(32768, 0, 0);This initializes a one second timer, that will trigger the
sl_bt_evt_system_soft_timer_idevent.In the
sl_bt_evt_system_soft_timer_id, the progress of the running OTA process is checked. It is only triggered when the update is started: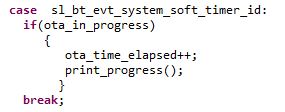

In the
sl_bt_evt_gatt_server_user_write_request_idevent, write requests sent by the client in this case the EFR connect app in the mobile phone are processed.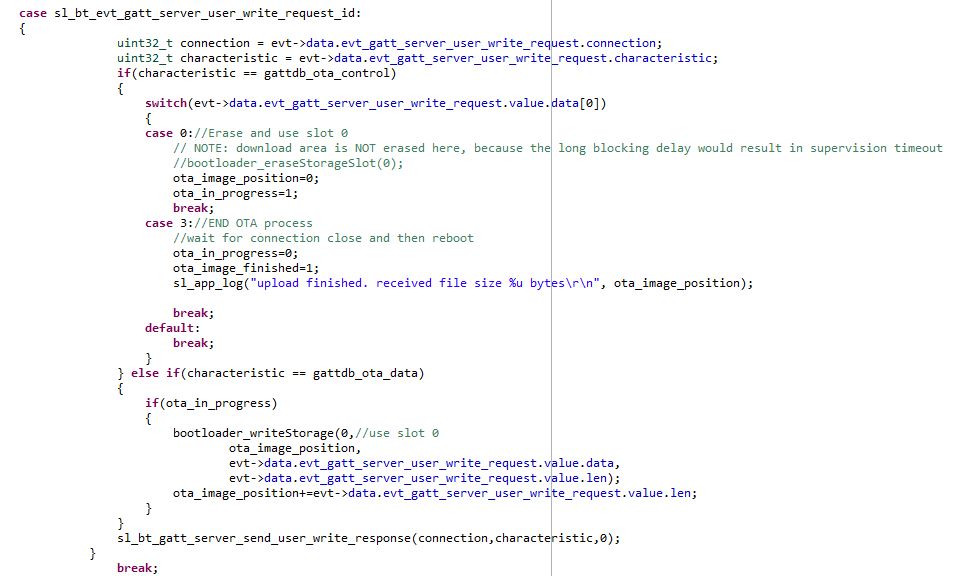

Depending on the characteristic that the request to write is made, different actions need to be taken.
The
gattdb_ota_controlcharacteristic refers to the control of the OTA process whether to start or finish it and thegattdb_ota_datacharacteristic is used to transmit the image data.characteristic == gattdb_ota_control"0" and "3" are two different use cases. Use case 0 means that the EFR connect app connected is signaling the start of the OTA process and that it will start the transmission of the update image.Use case 3 is when the EFR connect app signals that the image upload is finished (hitting “END” in the app when reaching 100%), which writes 3 to this characteristic and triggers the process to end the OTA, sets the
ota_image_finishedvariable, and closes the connection.characteristic == gattdb_ota_dataThis is where the data is received and written to the storage slot of the bootloader by using the API
bootloader_writeStorage.In the event
sl_bt_evt_connection_closed_idthe image is checked to make sure that is not corrupt and the installation and rebooting of the device proceeds.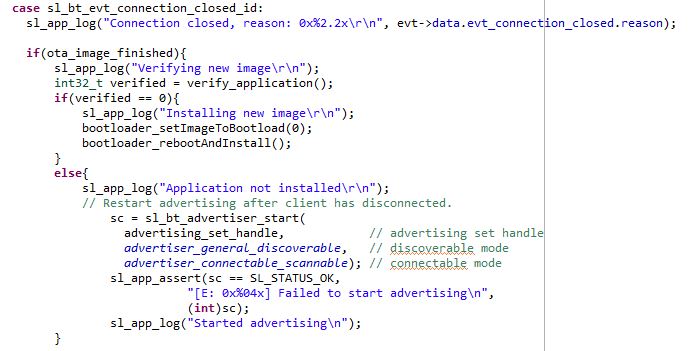

The variable
ota_image_finishedis checked to know if the transmission of the image was completed. If the image was received, it proceeds to verify the image by calling theverify_applicationfunction.If the image is valid, the application calls the
bootloader_setImageToBootLoad(0);which indicates to the bootloader to use the image in the storage slot 0. After, the application calls thebootloader_rebootAndInstall();, which makes the device reboot while indicating the bootloader to install the new application image.If the image is invalid or the image was not fully received, the application will start advertising again.
Source Files and Update Images#
gatt_configuration.btconf - GATT configuration to be imported.
app.c - Modified application source file.
application-crc.gbl - Updated Application GBL image.
corrupt.gbl - Corrupted GBL image.
bootloader-storage-internal-single-512k.s37 - Bootloader Internal Storage Image for Thunderboard BG22.
soc_ota_app.s37 - Application Application Image for flashing.
