Setting a Custom BT Address - Production Approach#
Introduction#
The Bluetooth LE stack usually derives the BT address (sometimes referred to as MAC address) of a device from its Unique Identifier, a 64-bit value located in the Device Information Page. This value is factory-programmed and not modifiable. Since the BT address is only 48-bit long, part of the Unique Identifier is removed while deriving the address. See your device's reference manual for more details on the Device Information page.
To extract the Unique Identifier from a radio board (e.g., BRD4182A - EFR32MG22), you can issue the following command using Simplicity Commander in a Windows command prompt.
$ commander device info
You should get an output similar to this, notice the Unique ID value:
Part Number    : EFR32MG22C224F512IM40
Die Revision   : A2
Production Ver : 2
Flash Size     : 512 kB
SRAM Size      : 32 kB
Unique ID      : 680ae2fffe2886c5
DONE
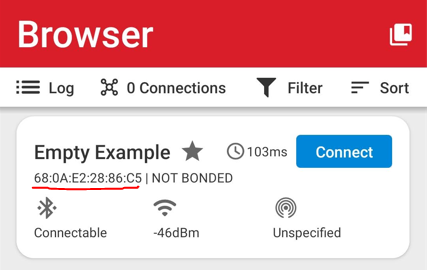
You can see the derived BT address after flashing the Bluetooth - SoC Empty example to the same device and scanning nearby advertisers using the EFR connect mobile application. The following figure shows the expected output:


Notice how the address is the same as the Unique ID except for the middle 16 bits (0xFFFE), hence why the BT address is a derived value. As mentioned before, this is the usual way for the BLE stack to acquire the BT address. Nonetheless, if a valid BT address entry is in the non-volatile region of the device (NVM3 for series 2 devices and PS Store or NVM3 for series 1), this value is used instead. For more details regarding non-volatile regions in the BLE stack, see the following documentation:
Chapter 7.1 in UG434: Bluetooth C Application Developer's Guide
Consult UG136 instead if you are using SSv4.
Chapter 6 in AN1135: Using Third Generation Non-Volatile Memory. This document explains two methods to modify the non-volatile region to set a custom BT address. Both could be suitable options in a production context:
Custom Application method: The running application reads a token located in the User Data page, derives the BT address from it, and stores it in the non-volatile region. This token is easily programmable through Simplicity Commander.
Simplicity Commander method: Create a custom non-volatile region (NVM3) with the desired BT address with Simplicity Commander. Flash the output binary to the device. This option is viable only if you're using NVM3 as the persistent storage solution.
Note: The solutions underneath were tested on a BRD4182A (EFR32MG22) using the Bluetooth - SoC Empty example as a baseline.
Methods#
Custom Application#
This approach uses a custom function that leverages the sl_bt_system_set_identity_address() and sl_bt_system_get_identity_address() APIs. The steps are as follows:
First, create a new Bluetooth - SoC Empty example for your board. Open the app.c file of the project and copy the following code snippet. This is the custom function responsible for updating the BT address.
#define MFG_CUSTOM_EUI_64_OFFSET 0x0002

static void sli_set_custom_bt_address(void)
{
  uint8_t *mfg_token = (uint8_t*)USERDATA_BASE + MFG_CUSTOM_EUI_64_OFFSET;
  bd_addr myaddr, cur_addr;
  uint8_t address_type;

  sl_status_t status;

  //Adjust token byte Endianness
  for(uint8_t i = 0; i < 6; i++) {
    myaddr.addr[i] = mfg_token[7-i];
  }

  //Get current BT address:
  //  Current address is derived from EUI64 in DEVINFO unless there's an NVM3
  //  valid entry
  status = sl_bt_system_get_identity_address(&cur_addr, &address_type);

  if (status != SL_STATUS_OK) {
      while(1); //Issue retrieving the status
  }

  //Compare current and desired BT address, IF NOT EQUAL update and reset
  //  reset needed to apply BT address changes in stack
  if((memcmp(&cur_addr, &myaddr, 6)) != 0) {
    status = sl_bt_system_set_identity_address(myaddr,0); // set new BT address

    if (status != SL_STATUS_OK) {
        while(1); //Issue setting the address
    }

    sl_bt_system_reset(0); // reset
  }
}
Then, still in the app.c file, call the function inside the system boot event sl_bt_evt_system_boot_id as follows:
  switch (SL_BT_MSG_ID(evt->header)) {
    // -------------------------------
    // This event indicates the device has started and the radio is ready.
    // Do not call any stack command before receiving this boot event!
    case sl_bt_evt_system_boot_id:

      //Set custom bt address address
      sli_set_custom_bt_address();
The following is a brief explanation of the function's operation:
Retrieve the
MFG_CUSTOM_EUI_64token from the user data page.Adjust the byte endianness of the token to form the new BT address.
Retrieve the current BT address.
Update the BT address if the new BT address is different from the current one.
Reset the system.
This step is needed because the BT address is determined during the BLE stack initialization.
The BT address is ultimately derived from the MFG_CUSTOM_EUI_64 token in the User Data page in this example. Therefore, you should flash the token before executing the application. To do this, use the following Simplicity Commander command:
$ commander flash --tokengroup znet --token "TOKEN_MFG_CUSTOM_EUI_64:0000AABBCCDDEE11"
Note that the two initial bytes are 0x0000. The reason is that the token is 8 bytes long but only 6 are needed. You should get an output similar to this:
Writing 1024 bytes starting at address 0x0fe00000
Comparing range 0x0FE00000 - 0x0FE003FF (1024 Bytes)
DONE
You can verify that the token was properly flashed using the following command:
$ commander tokendump --tokengroup znet --token TOKEN_MFG_CUSTOM_EUI_64
You should get an output similar to this:
#
# The token data can be in one of three main forms: byte-array, integer, or string.
# Byte-arrays are a series of hexadecimal numbers of the required length.
# Integers are BIF endian hexadecimal numbers.
# String data is a quoted set of ASCII characters.
#
MFG_CUSTOM_EUI_64: 0000AABBCCDDEE11
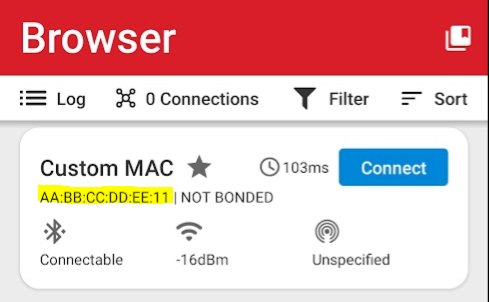
Finally, compile the modified Bluetooth - SoC Empty project and flash the application to your device. You'll also need a bootloader. Open the EFR connect application on your mobile phone and click on the Browser option to see a list of nearby advertisers. Figure 2 below shows the output of the application. It displays the new BT address after flashing the token and the custom Bluetooth - SoC Empty application.


Notice that the Device Name is Custom MAC. By default it should be Empty Example. You can modify this through the GATT configurator.
Simplicity Commander (Custom NVM3)#
This method is a more advanced approach as it requires an understanding of the NVM3 and the available keys. In this case, the application is not customized; instead, Simplicity Commander is used to create a blank NVM3 region in an image file. This image is modified to add the desired BT address and flashed to the device. Note that this method will overwrite your whole non-volatile memory area, only use it at production or if you are sure that your NVM is empty. The steps are as follows:
First, generate a blank NVM3 image file using the following command:
$ commander nvm3 initfile --address 0x00074000 --size 0xA000 --device EFR32MG22 --outfile nvm3_custom_mac.s37
To determine the size of the NVM3, use the configuration of the "NVM3 Default Instance" software component as a reference. The Silicon Labs example projects set 5 flash pages by default, seen in figure 3 below. The page size depends on the device. For the EFR32MG22 each flash page is 8-kB. See your device's reference manual for details.
To determine the starting address, subtract six flash pages from the end address of the main flash (5 pages for the NVM3 and 1 page for manufacturing tokens). See chapter 7.1 in UG434 for flash distribution details in the BLE stack.
The output of the command is a blank NVM3 .s37 binary that can be customized and flashed to the device, useful to create a default set of NVM3 data that can be written during production.


Next, add the desired BT address to the blank NVM3 image through a valid "key/value" pair. The "key" is specific to the BT address and defined in the BLE stack as 0x4002C. The "value" is the desired 48-bit address. You can add the entry to the blank NVM3 using two methods, the difference is the way the "key/value" pair is provided.
As an argument:
$ commander nvm3 set nvm3_custom_mac.s37 --object 0x4002c:1122334455AA --outfile nvm3_custom_mac.s37Using a .txt file:
$ commander nvm3 set nvm3_custom_mac.s37 --nvm3file custom_eui48.txt --outfile nvm3_custom_mac.s37
The .txt file has a specific format. The block below shows the contents of the .txt file used for this example. For more information, see the section "Write NVM3 Data Using a Text File" in UG162: Simplicity Commander Reference Guide.
0x4002c : OBJ : 1122334455AAOptionally, you can verify that the entry was created in the custom NVM3 file through the following command:
$ commander nvm3 parse nvm3_custom_mac.s37
You should get an output similar to this:
Parsing file nvm3_custom_mac.s37...
Found NVM3 range: 0x00074000 - 0x0007E000
Using 4096 B as maximum object size, based on given size of NVM3 area.
All NVM3 objects:
    KEY -       TYPE -     SIZE - DATA
0x4002c -       Data -      6 B - 11 22 33 44 55 AA
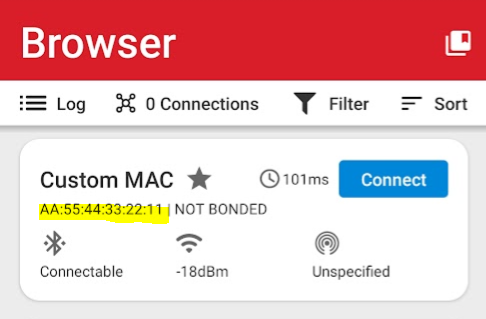
Finally, flash the custom NVM3 image to the device along with the desired application, in this case, the Bluetooth - SoC Empty example and a bootloader. Figure 4 below shows the output of the EFR connect application with the new BT address.


Example#
This guide has a related code example here: Setting a custom BT address.
