Secure OTA DFU#
Introduction#
This page shows how to securely upgrade Bluetooth application OTA (over-the-air) using signed+encrypted upgrade files. The process is tested with Bluetooth SDK v3.2.2.
Gecko Bootloader#
The Gecko Bootloader is a common bootloader for all Silicon Labs protocol stacks. It can load applications from different sources (internal flash, external flash, UART, SPI, over-the-air) using different protocols (XMODEM, BGAPI, EZSP SPI, Bluetooth, and so on.). It can be configured in a number of ways and its capabilities depend on the current configuration. This document shows how you can use it for loading a new application into the device sent over a Bluetooth connection.
Security Features#
The Gecko Bootloader has three security features:
Authenticated (signed) upgrade file
Encrypted upgrade file
Secure Boot
Upgrade files are in a custom GBL (Gecko Bootloader) format. An authenticated upgrade file means that an electronic signature is attached to the GBL file. The signature is produced with a public-private key pair. The public key is stored in the device, while the private key is kept secret by the manufacturer. The signature ensures that the upgrade file is from a trusted source.
An encrypted upgrade file means that the content of the GBL file is encrypted to protect against eavesdroppers.
Secure Boot means that a signature is attached to the firmware image (.s37) before it is packed into upgrade file formal (.gbl). Note that this differs from an authenticated upgrade file, as authenticated upgrade file means that a signature is attached to the upgrade file after the image was packed into GBL format. A signed image file (secure boot) ensures that the image was not modified since last boot and that it is from a trusted source. This is checked at every boot. Upgrade file authentication is only checked while upgrading.
The following content shows how to use these security features.
OTA DFU#
Over-The-Air Device Firmware Upgrade (OTA DFU) means that the device firmware can be updated via a Bluetooth connection.
To enable Bluetooth OTA update, the target device must be programmed with an appropriate Gecko Bootloader configuration and additionally with any Bluetooth application that supports OTA.
A Bluetooth application developed with Silicon Labs Bluetooth SDK comprises two parts.
Since Bluetooth SDK v2.7 the two parts are as follows:
The Apploader (provided as precompiled binary code), referred to as Apploader from now on.
The Bluetooth stack (provided as precompiled library) + user application, referred to as Application from now on.
The OTA functionality is built into the Apploader code. If the device is restarted in DFU mode, the Apploader is started instead of the user application. This makes it possible to perform OTA update without any involvement from the user application.
The only requirement for the user application is for a way to trigger a reboot into DFU mode. Reboot into DFU mode can be triggered in a variety of ways. It is up to the application developer to decide which is most applicable. Most of the example applications provided in the Bluetooth SDK already have OTA support built into the code (using the OTA DFU software component). In these examples, the DFU mode is triggered through the Silicon Labs OTA service that is included as part of the application’s GATT database (contributed by the OTA DFU software component). To restart the device in OTA mode, the following API is used: sl_bt_system_reset(2) is used.
The following processes are OTA DFU:
Partial OTA: In this case, only the user application is upgraded. This process is done in two steps as follows:
The device is restarted in OTA mode, and the Apploader is started.

The Apploader overwrites the old Application code with the new one.

Full OTA: In this case, the Apploader code and application are upgraded. Because the running code cannot overwrite itself, this process is done in four steps as follows:
The device is restarted in OTA mode and the Apploader is started.

The new Apploader code is uploaded into Slot0. This process is handled by the Apploader. Note that on 256 kB devices, Slot0 is in the user application area, which means that the Application is overwritten.

On reset, the bootloader copies the new Apploader code over the old one (extracting the binary from the stored GBL files).

The new Apploader overwrites the old Application code with the new one.

For more details regarding OTA DFU using the Apploader, see AN1086: Using the Gecko Bootloader with the Silicon Labs Bluetooth® Applications.
Create and Build the Bootloader#
Create the Bootloader Project#
Gecko Bootloader is included in the Gecko SDK Suite. A number of predefined configurations are available to help customers easily create new Bootloader projects for different purposes. Different bootloader configurations are recommended for different devices:
For 256 kB devices, use Bluetooth in-place OTA DFU Bootloader configuration.
For 512 kB devices, use Internal Storage Bootloader (single image on 512kB device).
For 1024 kB devices, use Internal Storage Bootloader (single image on 1MB device).
You can also use an SPI Flash Storage Bootloader (single image) if you have an SPI flash connected to the device. However, in this case it is better to implement an application level OTA DFU, see Uploading Firmware Images Using OTA DFU.
To create a new bootloader project:
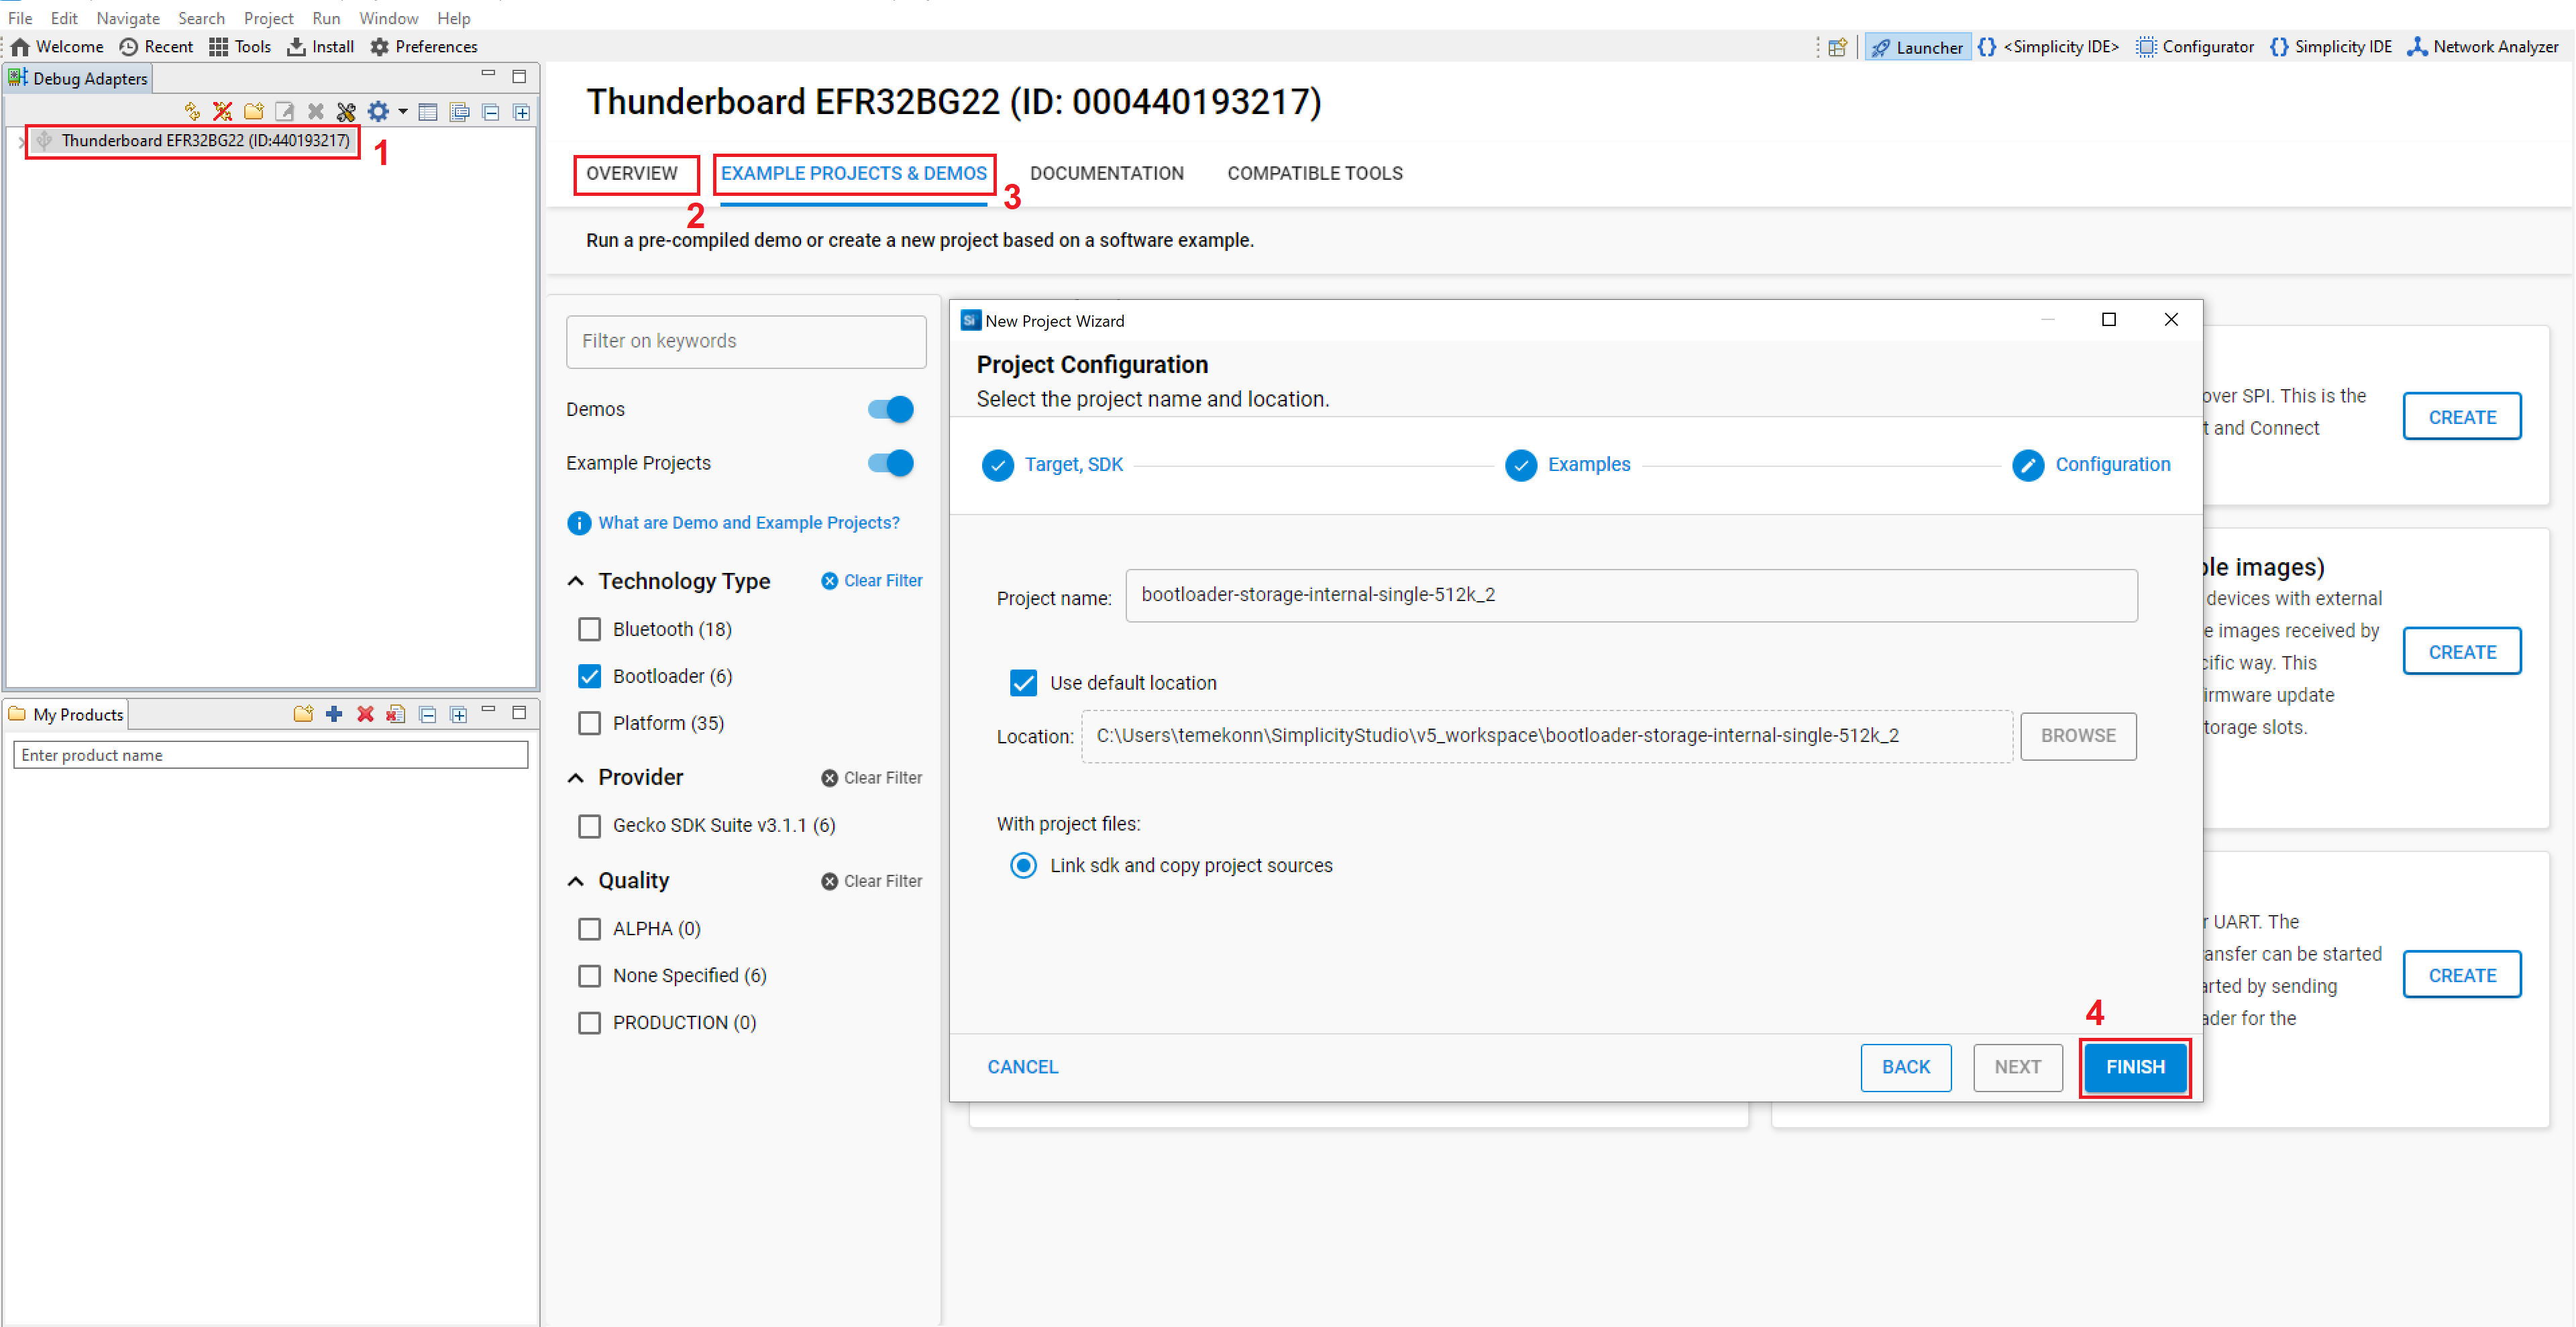
Open Simplicity Studio and select your device in the Devices or Debug Adapters tab.
Check the Preferred SDK under General Information in the OVERVIEW tab.
Click EXAMPLE PROJECTS & DEMOS tab, and select Bootloader under Technology Type section.
Select the appropriate Gecko Bootloader application type for your device (e.g., Internal Storage Bootloader), click FINISH.
Add Security Features#
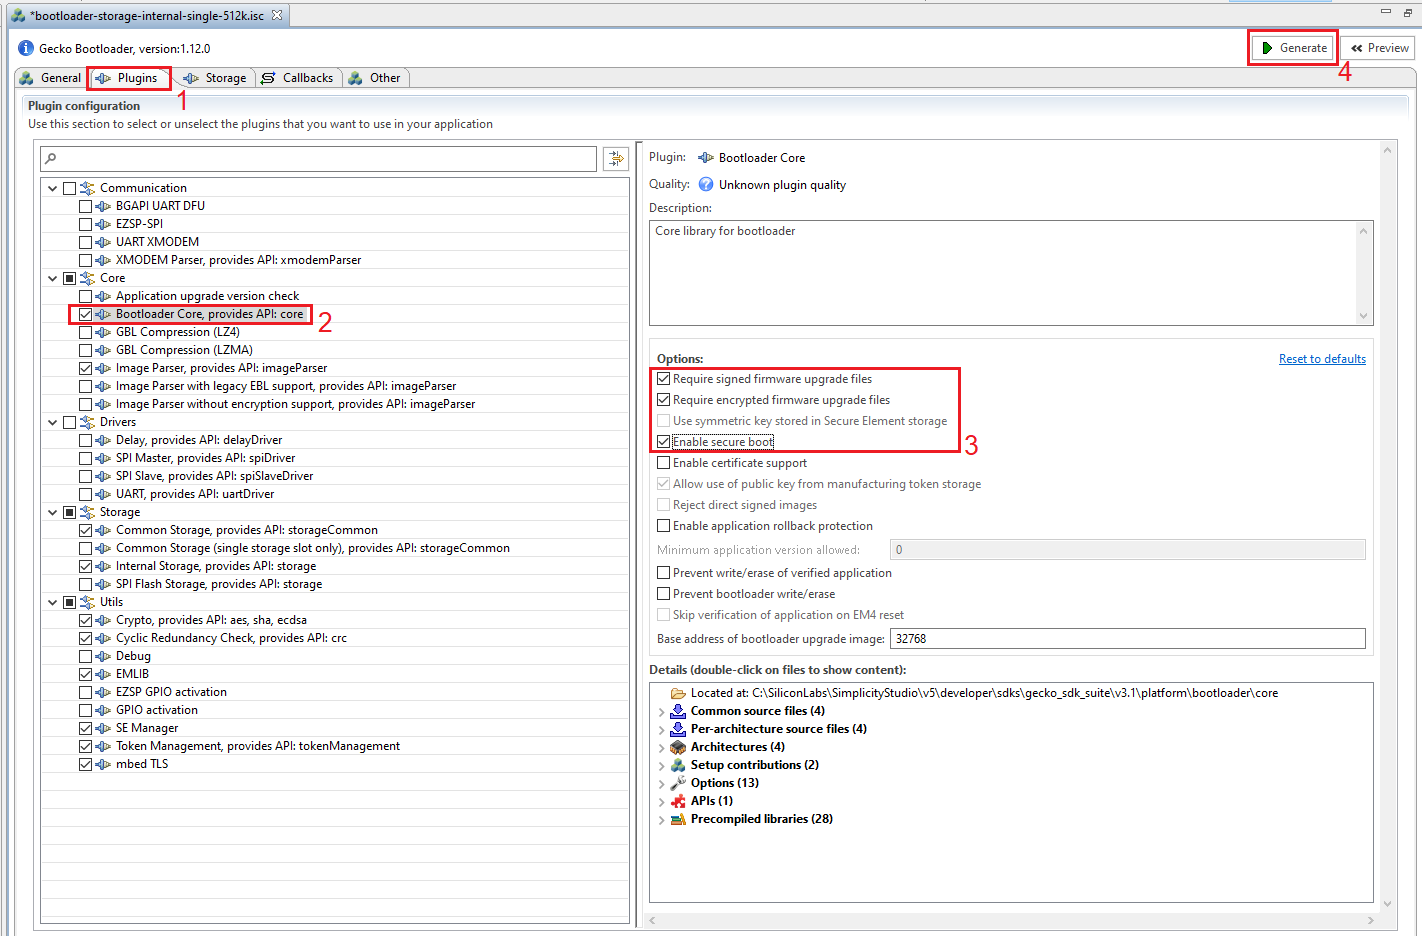
After the bootloader project is created, the Application Builder automatically opens up. To add security features, do the following:
Open the Plugins tab.
Click on Bootloader Core.
On the right side tick the checkboxes:
Require signed firmware upgrade files.
Require encrypted firmware upgrade files.
Enable secure boot.
Click Generate in the upper right corner.
Build the Bootloader#
After the bootloader code was generated by the AppBuilder, build your project:
Click the build icon.
Generate Security Keys#
To use the security features of the Gecko Bootloader, generate the encryption and signing keys. These keys must be then written to the EFR32 device. The encryption key is used with the GBL file for secure firmware update. The signing keys are used both with the GBL file for secure firmware update and to sign the application image for Secure Boot.
You can create security keys with Simplicity Commander:
For ease of use, add the Commander path (C:\SiliconLabs\SimplicityStudio\v5\developer\adapter_packs\commander) to the Path environment variable in your OS.
Generate the signing keys with the following command in the command line:
$ commander util genkey --type ecc-p256 --privkey app-sign-key.pem --pubkey app-sign-key.pem.pubThis creates two files: app-sign-key.pem and app-sign-key.pem.pub. The first contains the private key (keep it secret), the second contains the public key.
Generate a token text file from the public key with the following command:
$ commander util keytotoken app-sign-key.pem.pub --outfile app-sign-key.pem-token.txtThis creates the file "app-sign-key.pem-token.txt" which contains the public key in a token format suitable for flashing to the device.
Generate the encryption key with the following command:
$ commander util genkey --type aes-ccm --outfile app-encrypt-key.txtThis creates one file named app-encrypt-key.txt containing the decryption key in token format.
Flash Security Keys#
Write the two token files containing the encryption key and public key to the flash of the device using the following command:
$ commander flash --tokengroup znet --tokenfile app-encrypt-key.txt --tokenfile app-sign-key.pem-token.txt
For Series 1 devices (EFR32xG1x), the keys are stored in the lock bits page and for Series 2 devices (EFR32xG2x) they are stored in the last page of main flash.
Note: Series 2 devices include a Hardware Secure Element (HSE) or Virtual Secure Element (VSE) that allows to store the keys in a one-time-programmable (OTP) memory. In this case, the keys needs to be provisioned with a different command and special configurations are required in the bootloader. For more information see the following:
Key provisioning - AN1222: Production Programming of Series 2 Device
Bootloader configuration - UG489: Silicon Labs Gecko Bootloader User's Guide for GSDK 4.0 and Higher
Create and Build the Basic Application#
Because OTA DFU is not fully implemented in the Bootloader, a minimal Bluetooth application has to be created and flashed to the device along with the Bootloader to support the upgrade.
Create the Basic Application Project#
To create a basic application that supports OTA DFU, do the following:
Open Simplicity Studio and select your device in the Devices or Debug Adapters tab.
Check the Preferred SDK under General Information in the OVERVIEW tab.
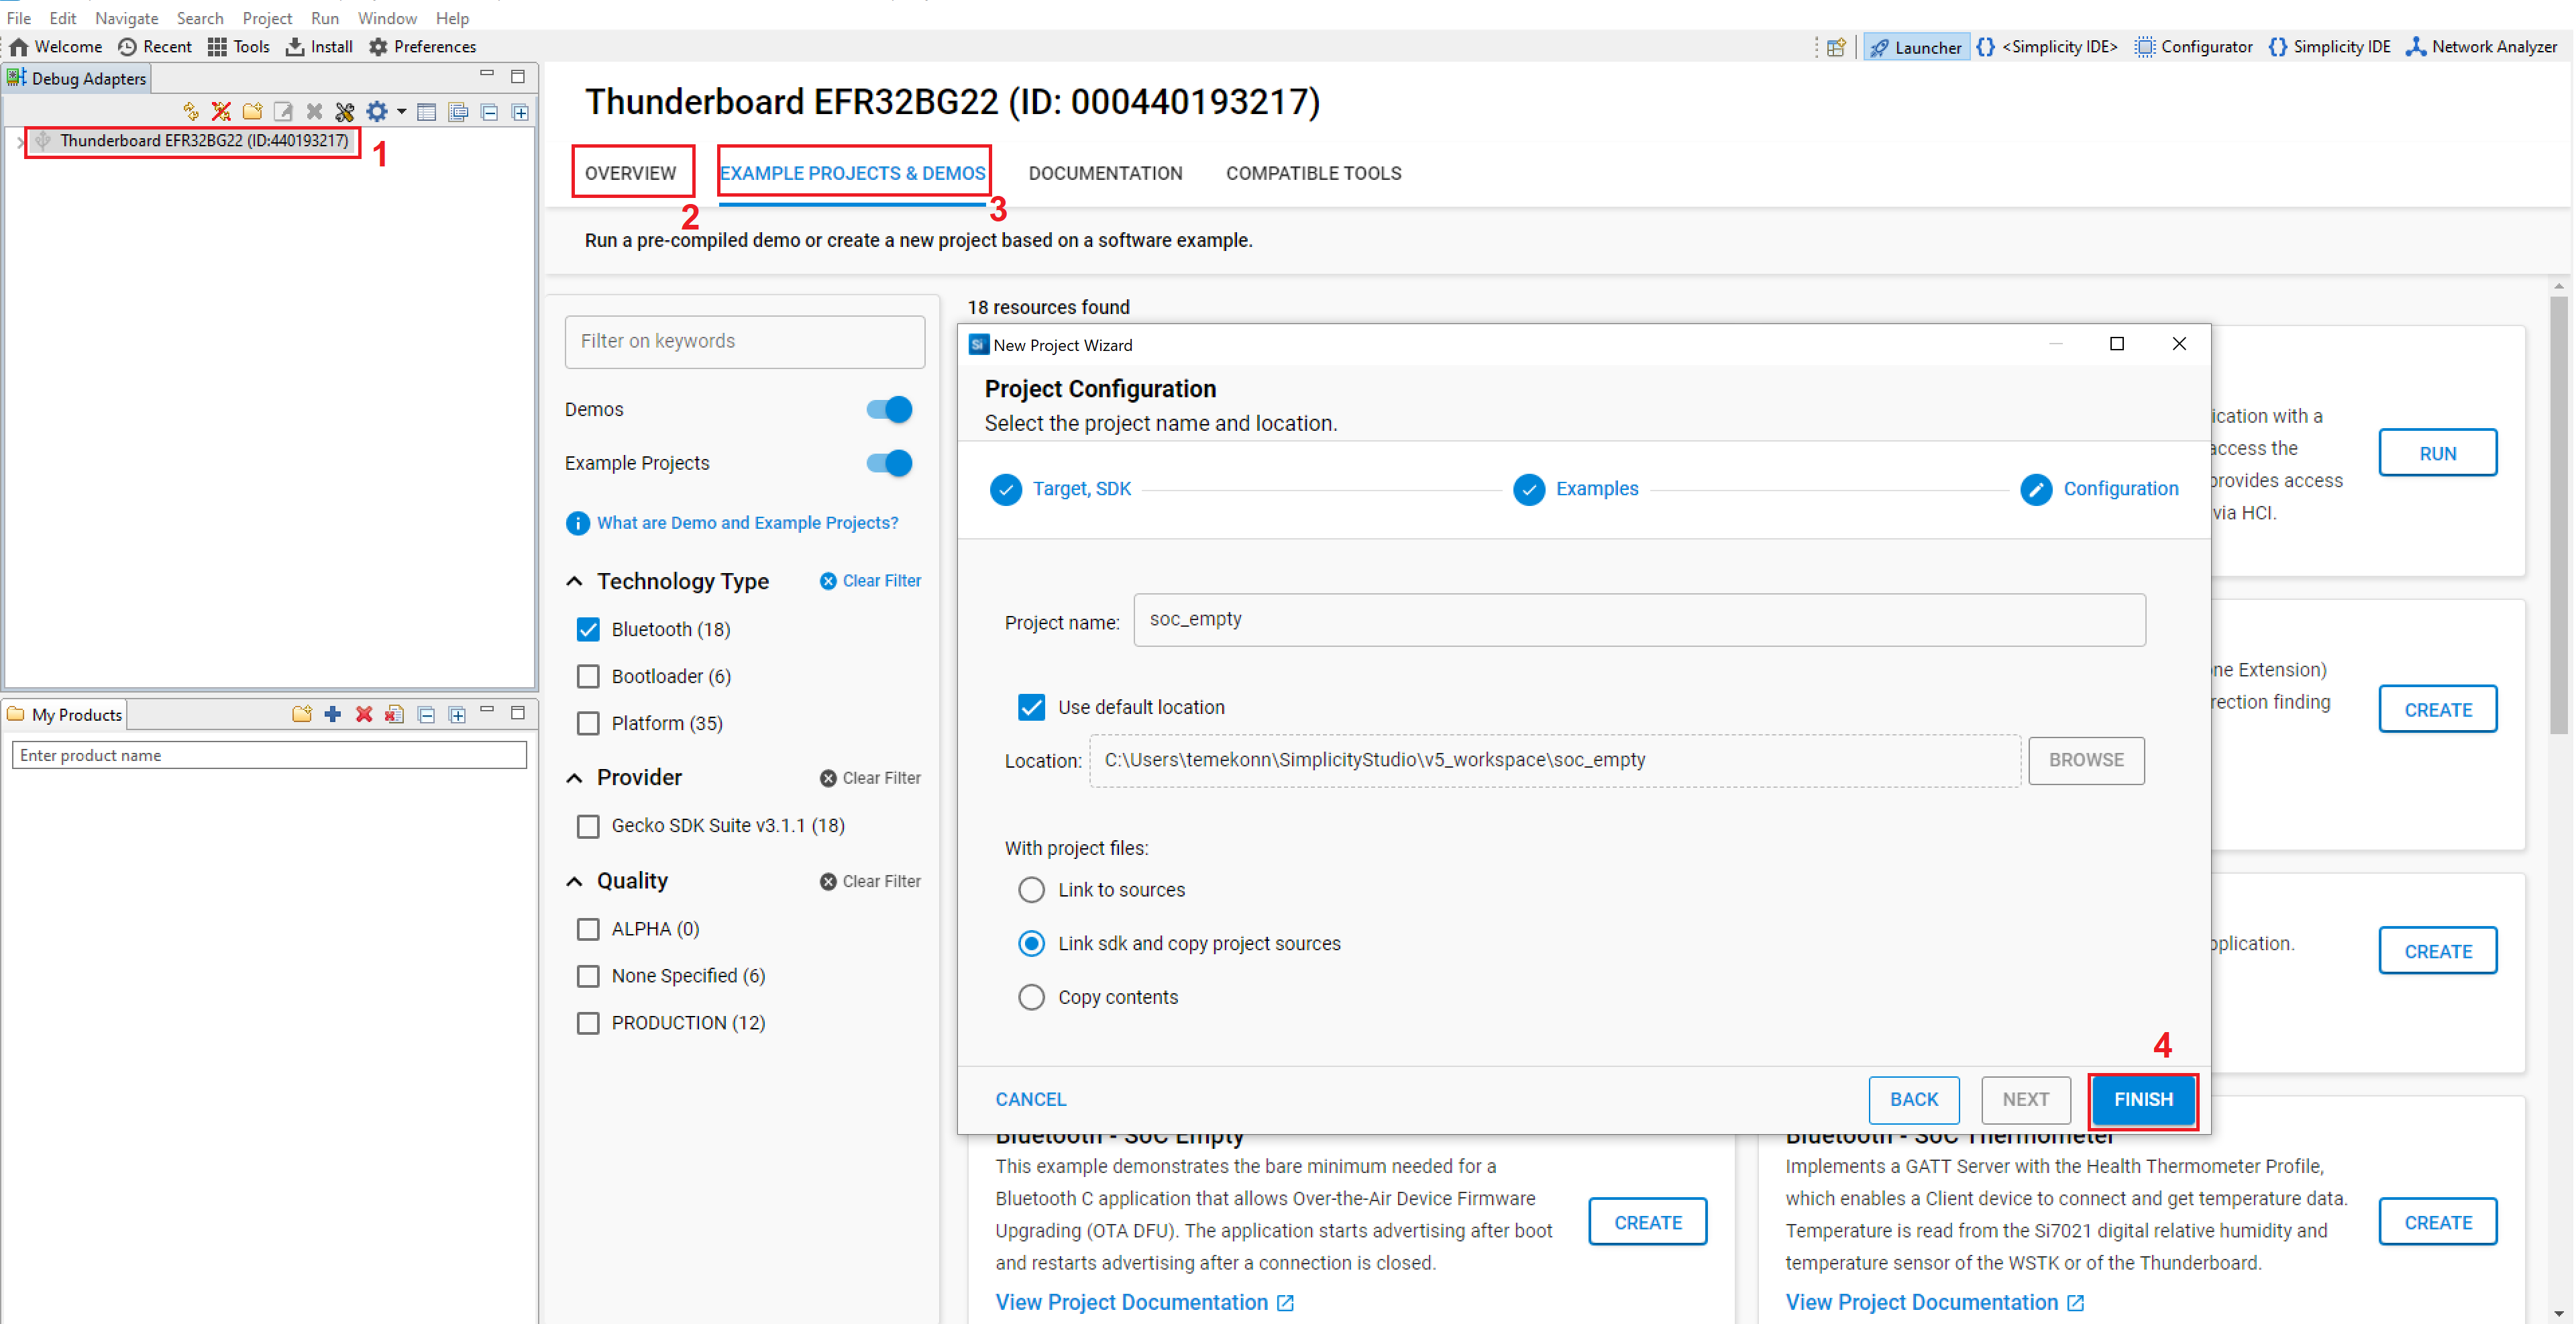
Click EXAMPLE PROJECTS & DEMOS tab, and select Bluetooth under Technology Type section.
Select Bluetooth - SoC Empty sample application, and click FINISH.
Build the Basic Application#
The application code is automatically generated after the project is created. The Bluetooth - SoC Empty sample application contains everything needed for OTA support (OTA service and characteristics + code to support to restart the device in DFU mode + Apploader image. These are all added by the OTA DFU software component). To build the application, do the following:
Click the build icon.
Sign the Application Image#
Because Secure Boot was enabled in the bootloader, only signed application images can be booted.
To use OTA DFU, you must sign the Apploader and the Application parts of the image separately because they will be updated separately.
To add a signature to the Apploader and to the Application image, do the following:
Copy app-sign-key.pem (from the folder in which you ran the commander util genkey) into your project.
Run the create_bl_files.bat batch file found in your project, which will create the signed GBL files into the output_gbl folder.
Note: To get batch file to work properly, you may have to set some environment variables. For more details, see AN1086: Using the Gecko Bootloader with the Silicon Labs Bluetooth® Applications.
Upload the Bootloader and the Basic Application#
After both the Bootloader image and the Application image are ready, upload them to the device:
Copy the .s37 file from the bootloader project to the output_gbl folder of the Bluetooth application project.
Note: On series 1 devices, the ...-combined.s37 file contains the full bootloader – while other output files in the bootloader project contain only the second stage of the bootloader. If you haven't flashed a bootloader to your device yet, it is recommended to use the combined image file.
Merge the Bootloader image with the Apploader and the Application images. Open a command line to the output_gbl folder, and use the following command:
$ commander convert bootloader-storage-internal-single.s37 apploader-signed.gbl application-signed.gbl --outfile bootloader+stack+app.s37Upload the merged image to your device (e.g. right click on the merged .s37 file in Simplicity Studio and select Flash to Device. You can also use Simplicity Commander for flashing).
Create and Build the Upgrade Application#
Create the Upgrade Application Project#
Create the application to upgrade the device to, for example the Thermometer sample application. Similarly to the creation of the Basic Application, do the following:
Open Simplicity Studio and select your device in the Devices or Debug Adapters tab.
Check the Preferred SDK under General Information in the OVERVIEW tab.
Click EXAMPLE PROJECTS & DEMOS tab, and select Bluetooth under Technology Type section.
Select the Bluetooth - SoC Thermometer (Mock) sample application, and click FINISH.
Build the Upgrade Application#
The application code is automatically generated after the project is created. To build the application, do the following:
Click the build icon.
Create Signed and Encrypted Upgrade Files from the Image#
The bootloader accepts upgrade images in .gbl format. To create a signed and encrypted .gbl file from the image, do the following:
Copy app-sign-key.pem and app-encrypt-key.txt into your project.
Run the create_bl_files.bat batch file found in your project, which will create the signed and encypted GBL files into the output_gbl folder.
Upgrade your Device#
At this point, your device can be upgraded OTA from the basic application to the upgrade application. For this, you need another device, which will send the new firmware to the target device via Bluetooth. In this example, a smartphone is used for this purpose.
Download and install the EFR Connect app to your smartphone.
Open the output_gbl folder in your project.
Copy the upgrade files from your computer to your smartphone.
Copy apploader-signed-encrypted.gbl and application-signed-encrypted.gbl.
Open the EFR Connect app in your mobile.
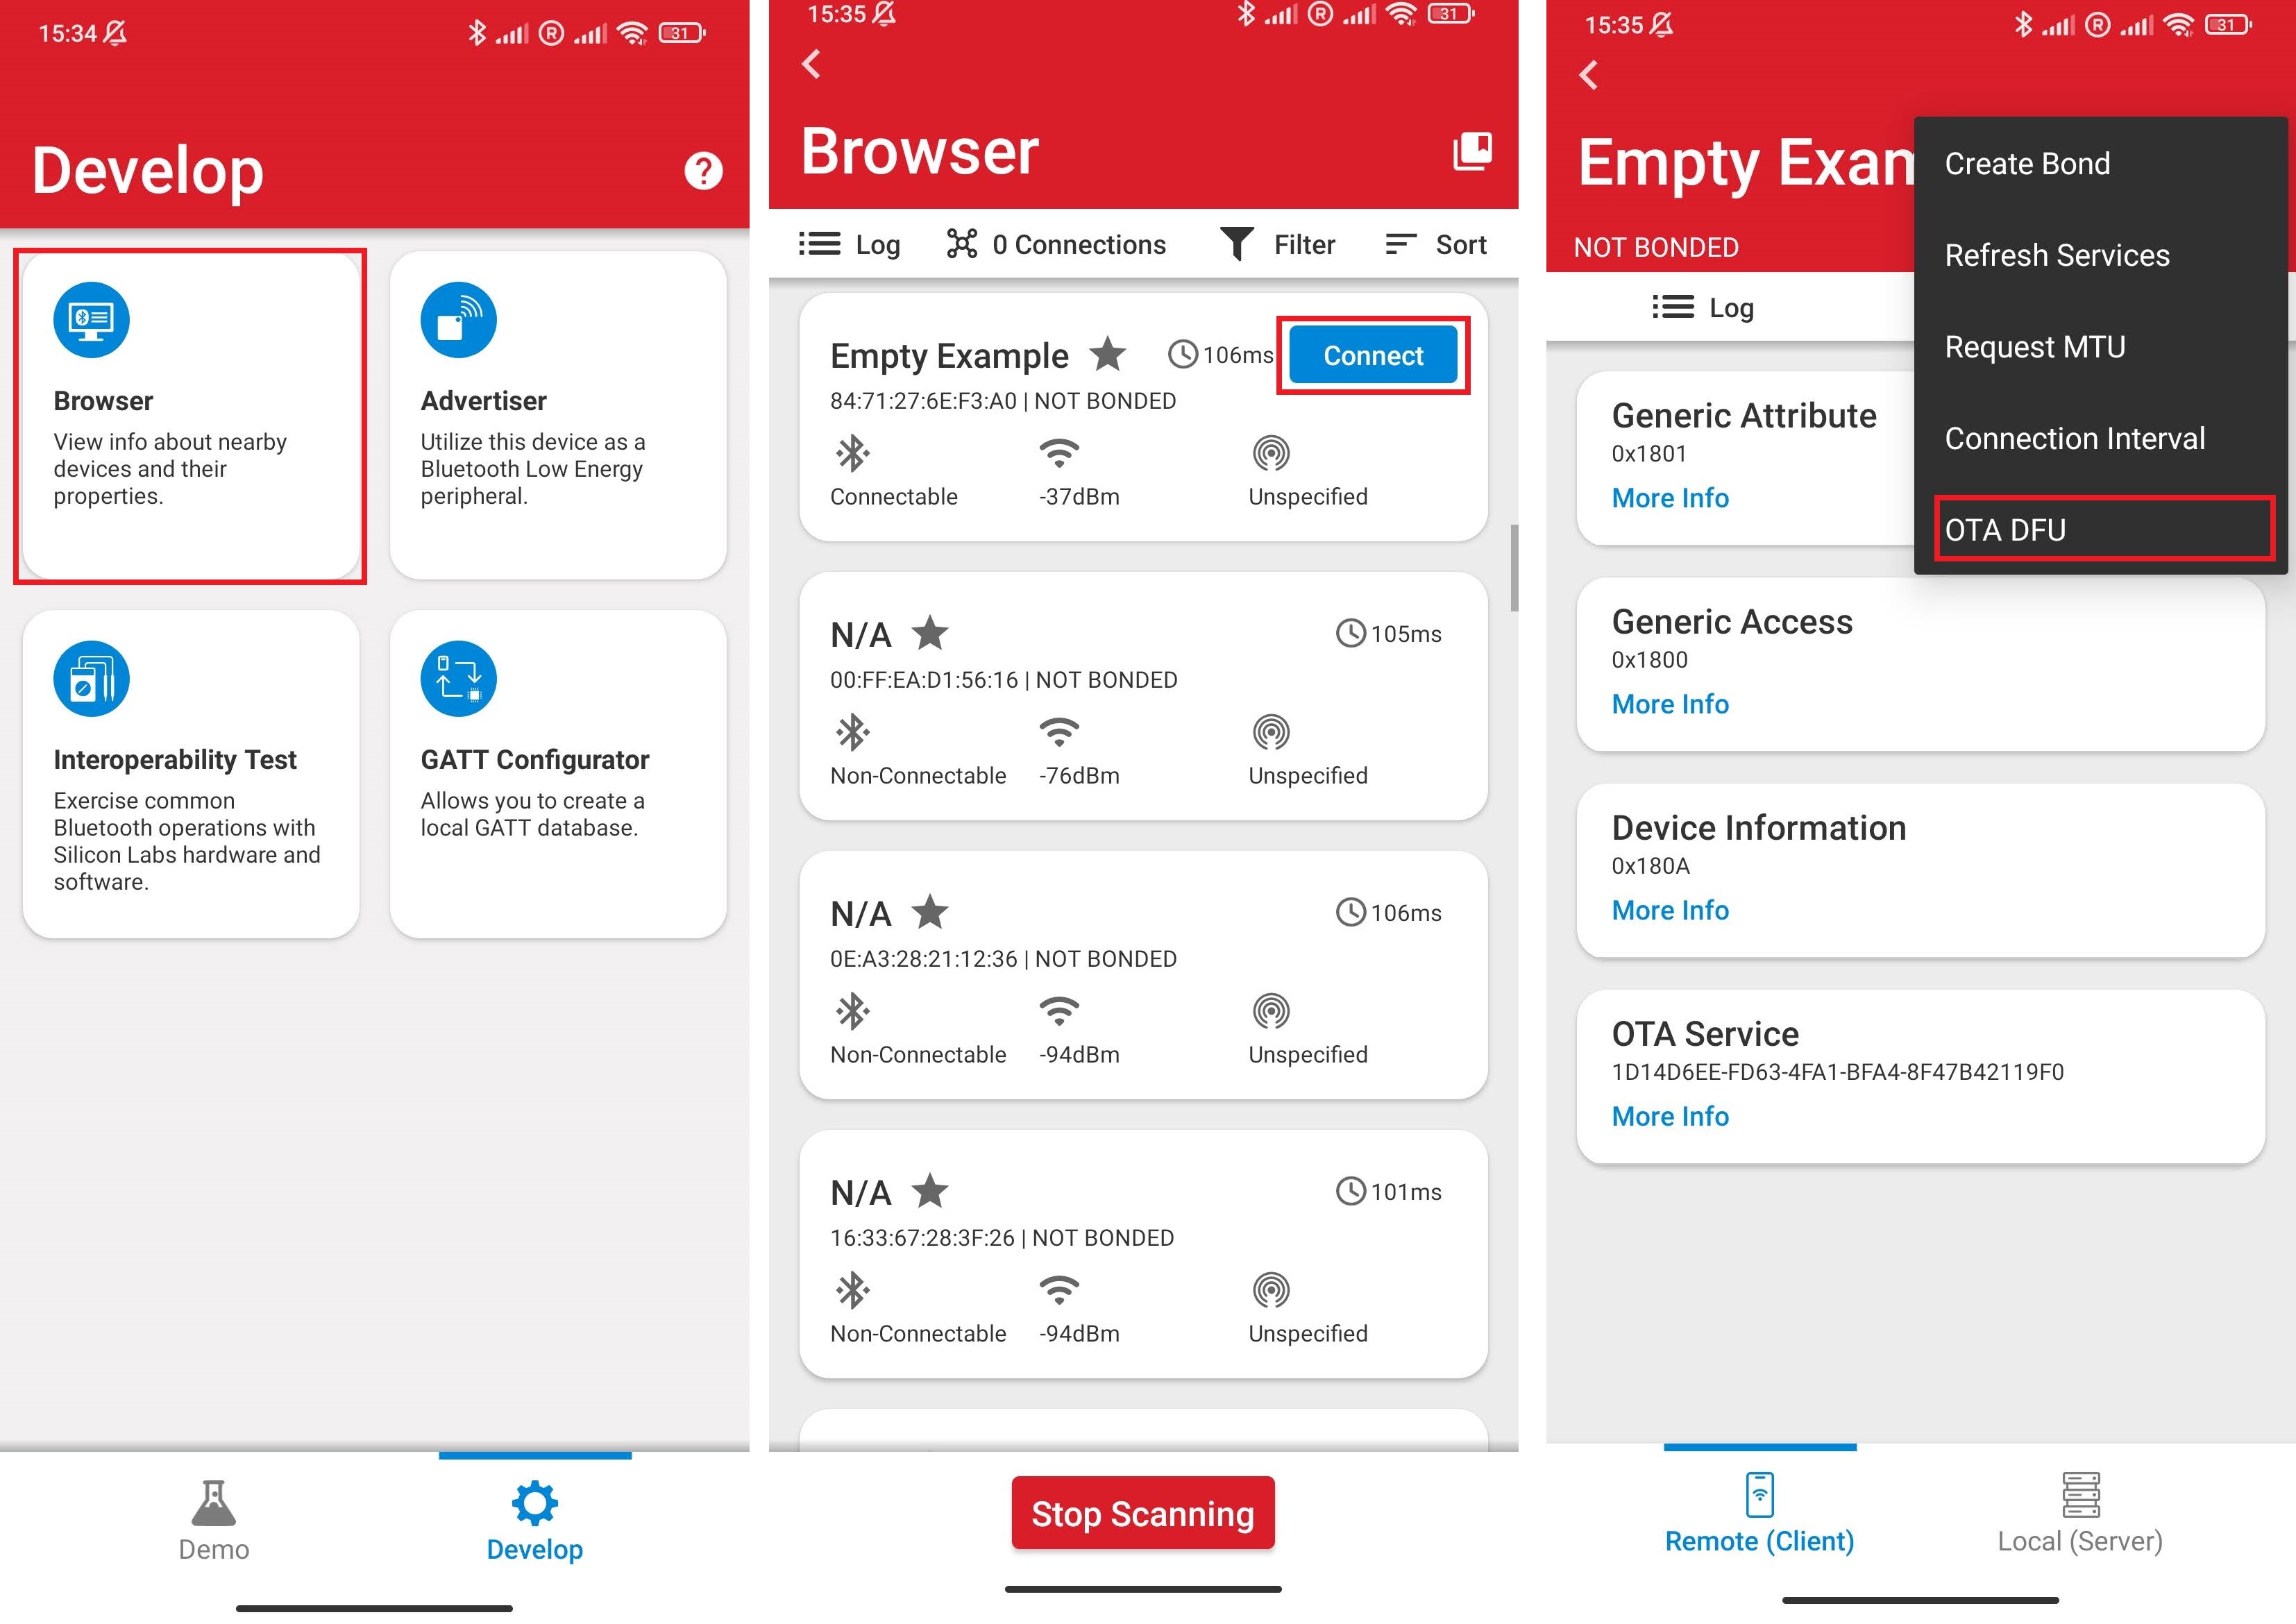
Select the Browser option.
Find your device. The basic app advertises itself as "Empty Example". Because there might be other devices advertising around you with the same name, place your smartphone close to your device and find the one with the highest RSSI.
Click on the "Connect" button to connect to the device.
Open the context menu in the upper right corner and select "OTA DFU".
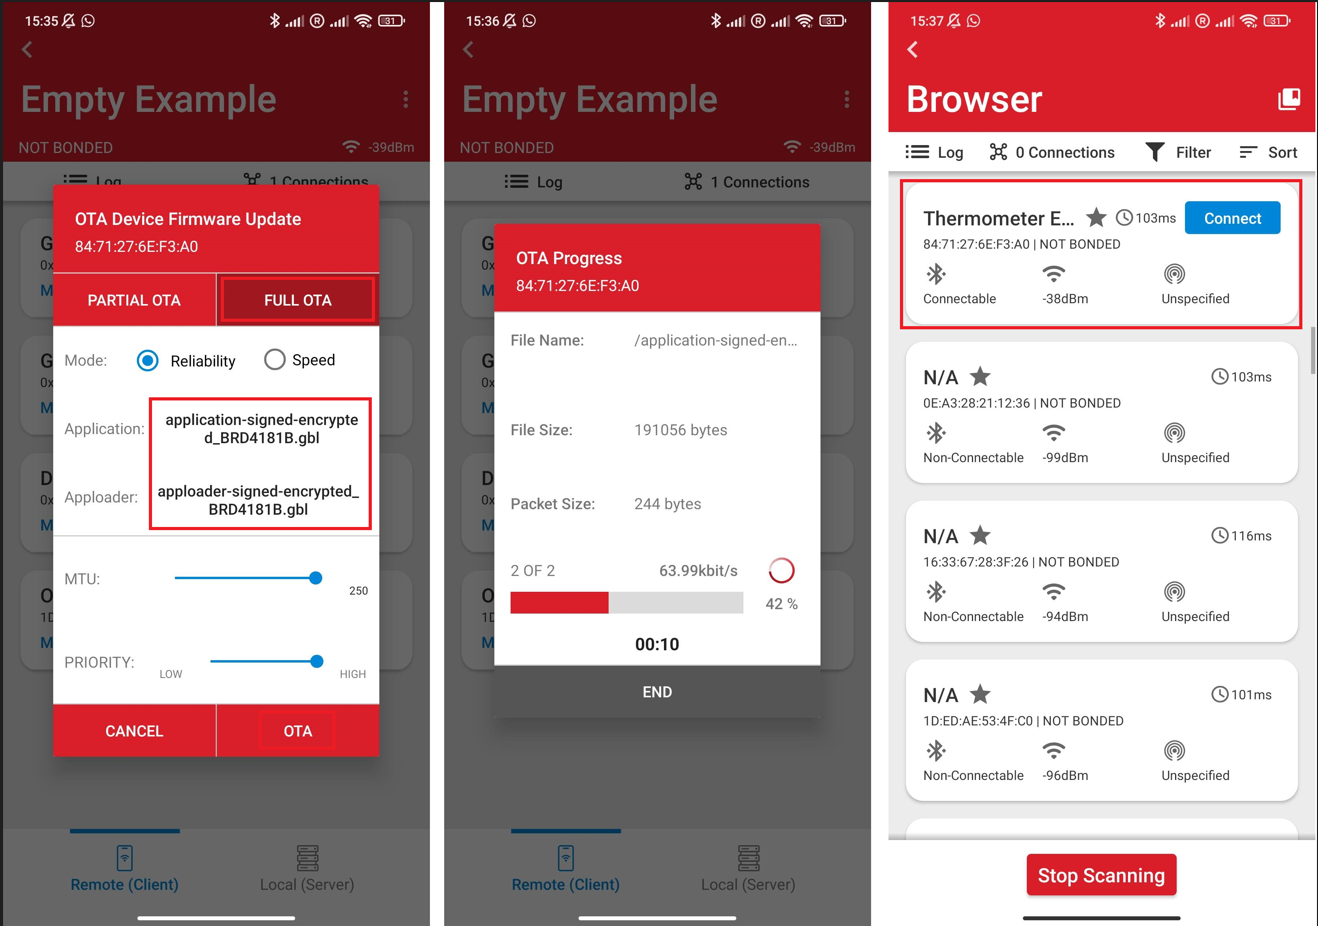
Choose "FULL OTA".
Select apploader-signed-encrypted.gbl as your apploader image and application-signed-encrypted.gbl as your application image.
Click OTA.
After the upload is finished, you should see your device advertising itself as Thermometer Example in the Bluetooth Browser.