Bluetooth Mesh Lighting Demonstration#
Requirements#
Bluetooth Mesh SDK 6.0.0 or later, distributed through Simplicity Studio 5.
The pre-built demo binaries and source code are included in the SDK.
Simplicity Studio has a Network Analyzer capable of capturing and decoding Bluetooth Mesh packets.
The actual code development can be done with Simplicity Studio, IAR EWARM, or command line tools.
Silicon Labs Bluetooth Mesh mobile application
Available for both iOS and Android.
Used for discovering and provisioning devices over GATT.
Includes network, group, and publish-subscribe setup.
Allows device configuration and control.
Requires iOS 14 or later (https://apps.apple.com/us/app/bluetooth-mesh-by-silicon-labs/id1411352948).
Requires Android 11 (API30) or later (https://play.google.com/store/apps/details?id=com.siliconlabs.bluetoothmesh&hl=en).
For the full experience, at least three Silicon Labs Blue Gecko SoC Wireless Starter Kits are needed.
2 kits are used as lights with proxy feature.
1 kit is used as a switch.
EFR32xG27, EFR32xG24, EFR32xG21, and EFR32xG22 SoCs as well as the BGM220P and BGM220S modules support Bluetooth Mesh software. Note that EFR32xG22, BGM220P, and BGM220S only support limited Bluetooth Mesh features.
See the QuickStart Guide for SDK v4.x and Higher for more information on obtaining required hardware and software, and running the demonstration.
The demonstration setup can, in principle, consist of any number of switch nodes and light nodes. A single switch node can control an arbitrary number of light nodes by sending commands to a group address. Similarly, a light node can receive on/off commands from multiple switches.
Mesh Network Implementation#
The demonstration implementation process can be divided into four main phases as follows:
Unprovisioned mode: After the demo firmware is installed, the device starts in unprovisioned mode.
Provisioning: The devices are provisioned to a Bluetooth Mesh network and network security is set up.
Configuration: The group, publish and subscribe, and application security are configured.
Normal operation: The light node(s) can be controlled by the switch node(s) and the smartphone application.
In the first phase, all the devices are unprovisioned and transmitting unprovisioned beacons. They do not have any network keys or application keys configured, and publish and subscribe settings are not set. In this state, the devices are simply waiting for the provisioner to assign them into a Bluetooth Mesh network and to configure publish and subscribe and mesh models. In this state, the devices can be detected by the smartphone application.
In the provisioning phase, the provisioner adds lights and switches to the Bluetooth Mesh network. A network key is generated and distributed to the nodes, and each node is assigned a unicast address.
In the configuration phase, the provisioner configures groups, publish and subscribe settings, application-level security, and mesh models.
After provisioning and configuration, the Bluetooth Mesh network is operational, and switches can be used to control the lights. The WSTK switch’s buttons can be used to control all the lights in a group. The same functionality can be done with the smartphone application, and it can also control individual lights using unicast addressing.
Code Walkthrough#
The Bluetooth Mesh SDK includes light and switch example projects, named Bluetooth Mesh – SoC Light CTL and Bluetooth Mesh – SoC Switch CTL. Both examples are implemented using the same event-driven architecture that is used in plain Bluetooth (non-mesh) applications.
For information about Bluetooth C application development, see Silicon Labs Bluetooth C Application Developer's Guide for SDK v7.x and Higher.
Unprovisioned Mode, Provisioning, and Configuration#
In unprovisioned mode, both light and switch examples behave the same way. The unprovisioned device simply starts sending unprovisioned beacons and waits for a provisioner to provision and configure it.
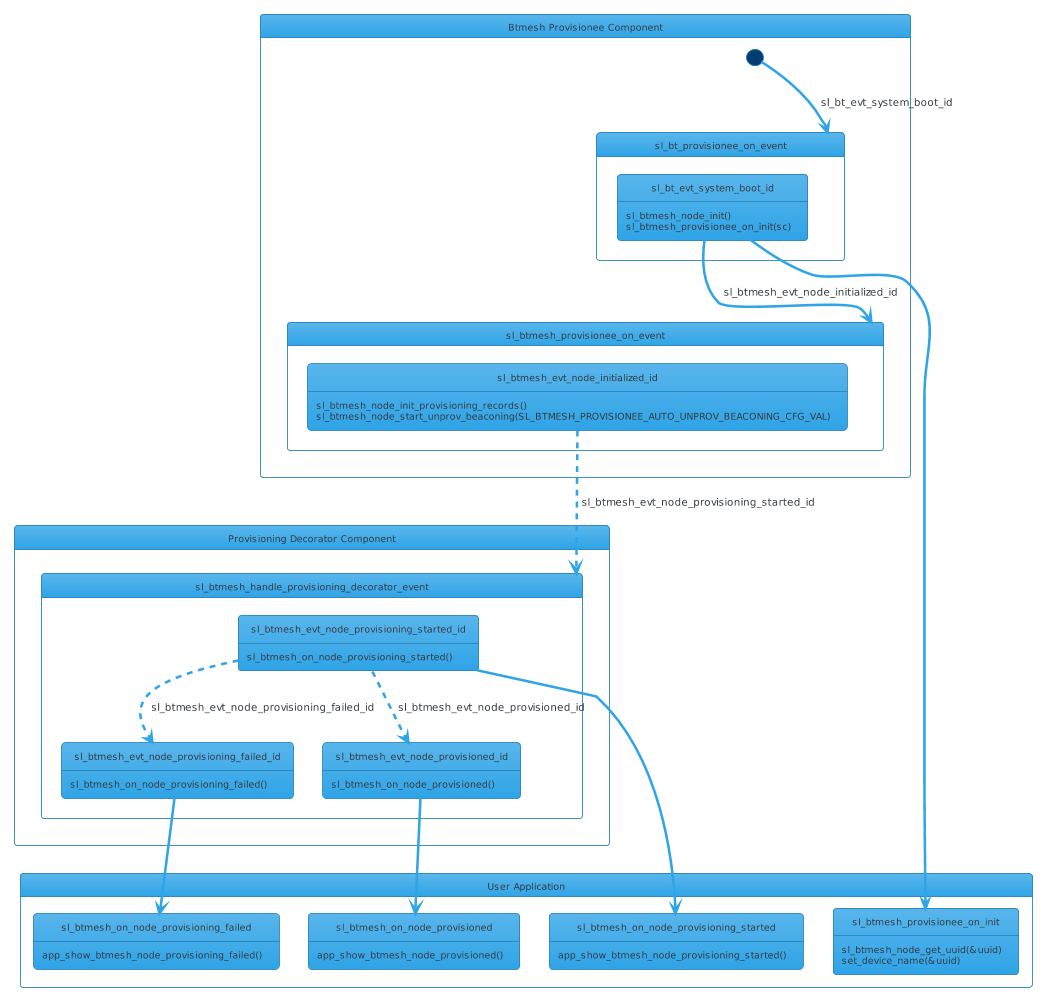
When the app_init is called, the application checks if a button is pressed in the handle_reset_conditions function. If yes, -depending on the pressed button(s)- it calls either the function sl_btmesh_initiate_full_reset(), which halts the system and performs a factory reset by erasing the NVM3 storage, or the function sl_btmesh_initiate_node_reset(), which does the same, except full NVM storage erasure. The factory reset is also done after receiving a node_reset event (sl_btmesh_evt_node_reset_id). This is handled within the Factory Reset component. If no button is pressed, then the name of the device is set based on the Bluetooth address, within the function sl_btmesh_provisionee_on_init(), when it is called to signal the initialization of the Bluetooth Mesh node stack.
The callback sl_btmesh_provisionee_on_init() indicates that the Bluetooth Mesh node stack initialization is complete. In the background, the sl_btmesh_evt_node_initialized_id is handled within the Provisionee component. The application first checks the provisioning status. If the node is not provisioned (the default state when the device is first powered up after programming), then the application starts unprovisioned beaconing by calling sl_btmesh_node_start_unprov_beaconing().
The API sl_btmesh_node_start_unprov_beaconing takes one parameter (bearer) that selects which bearers are used (PB-ADV, PB-GATT, or both). In this example, both bearers are used. Because the PB-GATT bearer is enabled, the device will begin advertising its provisioning GATT service. This allows the smartphone application to detect unprovisioned nodes.
When unprovisioned beaconing has been started, the application waits for the provisioner (in this case, the smartphone app) to start provisioning. The start of provisioning is indicated with the event sl_btmesh_evt_node_provisioning_started_id. When this event is raised, the callback function sl_btmesh_on_node_provisioning_started() is called.
During provisioning, no actions are required from the user application. The Bluetooth Mesh stack automatically handles network key configuration and other operations. Both the light and the switch application simply start blinking the two LEDs on the WSTK to indicate that provisioning is in progress. Then they wait for the event sl_btmesh_evt_node_provisioned_id that indicates provisioning is complete. When this event is raised, the callback function sl_btmesh_on_node_provisioned() is called.
Initialization of the Application:
The next step after provisioning is configuration of the node. As explained in the QuickStart Guide for SDK v4.x and Higher, the smartphone app is used to configure a node either as a switch or a light and assign it to a group. The configuration procedure consists of following steps:
Provisioner distributes an application key to the node.
The application key is bound to the selected Bluetooth Mesh model.
Publish address and settings are configured.
Subscribe address and settings are configured.
The configuration phase is mostly handled between the Bluetooth Mesh stack and the provisioner and it does not require any involvement from the user application in the node. The following events are generated by the stack to give status information about the ongoing configuration:
sl_btmesh_evt_node_key_added_id: generated when the provisioner has sent a new key (network or application)
sl_btmesh_evt_node_model_config_changed_id: indicates that the provisioner has modified configuration of the local model (either publish or subscribe settings changed)
Up to this point, the code in the examples Bluetooth Mesh – SoC Light CTL and Bluetooth Mesh – SoC Switch CTL is almost identical.
Switch Node Example#
This section describes basic operation of the Bluetooth Mesh – SoC Switch CTL example. It is assumed that the node is already provisioned and publish - subscribe settings have been configured by the smartphone app. The switch node has one simple task: listen for push-button presses and -based on the button press length- control the brightness, color temperature, or on/off state of the lights in the group. Short button presses (less than 250 ms) are used to adjust light brightness up (PB1) and down (PB0). Medium button presses (more than 250 ms and less than 1 s) are used to adjust light color temperature up (PB1) and down (PB0). A long press (more than 1 s and less than 5 s) or a very long press (more than 5 s) recalls the previous light lightness (PB1) or turns the light off (PB0).
The on/off control, the brightness control and the color temperature control uses the Light CTL Client model. The switch example also demonstrates the Low Power Node (LPN) feature. When the switch is provisioned into the network, it will start looking for a friend so that it can enter low-power mode. When a friendship is established, the switch can go to deep sleep, and it will wake up periodically to poll the friend node for any incoming messages.
Upon receiving the sl_btmesh_evt_node_initialized_id event, the Generic Client Models, the Lightness Client, the CTL Client components, and the mesh library are initialized. The Low Power Node (LPN) feature is then initialized and configured. After the LPN feature is initialized, the callback function sl_btmesh_lpn_on_init() is called and the application displays “LPN on” on the WSTK LCD. The LPN configuration has five parameters: lpn_queue_length, lpn_poll_timeout, lpn_receive_delay, lpn_request_retries, and lpn_retry_interval. The settings of these parameters are defined in sl_btmesh_lpn_config.h as
SL_BTMESH_LPN_MIN_QUEUE_LENGTH_CFG_VALSL_BTMESH_LPN_POLL_TIMEOUT_CFG_VALSL_BTMESH_LPN_RECEIVE_DELAY_CFG_VALSL_BTMESH_LPN_REQUEST_RETRIES_CFG_VALSL_BTMESH_LPN_RETRY_INTERVAL_CFG_VAL
respectively. After that, the node starts finding a friend node. The LPN feature status is displayed on the WSTK LCD display.
The LPN feature is mostly implemented in the mesh stack, so only a few informative events can be raised to the application through corresponding callback functions:
sl_btmesh_lpn_on_friendship_established: A friendship was successfully established. The application displays “LPN with friend” on the WSTK LCD.sl_btmesh_lpn_on_friendship_failed: The Friendship establishment failed. The application displays “No friend” on the WSTK LCD, and the node tries to establish a friendship again in 2 seconds.sl_btmesh_lpn_on_friendship_terminated: The friendship was terminated for some reason. The application displays “Friend lost” on the WSTK LCD, and the node tries to establish a friendship again in 2 seconds.
If a GATT connection is opened, the friendship is terminated and the LPN is de-initialized. In this case, the callback function sl_btmesh_lpn_on_deinit() is called, and the application displays “LPN off” on the WSTK LCD. After all GATT connections are closed, the LPN feature is re-initialized.
The sl_btmesh_ctl_client_set_lightness() function (used in the example) changes the lightness level and sends its value to the server for short button presses. Short presses are used to adjust light brightness up and down. The application sends a request using the Light CTL Client model. The last level that has been set is stored in a variable (type uint16), and the level is adjusted up or down each time a short button press is detected. Sending a single request is implemented in send_ctl_request(), detailed below.
A similar function (but just for lightness) is sl_btmesh_set_lightness(). Here, sending a single light lightness request is implemented in function send_lightness_request(), which is very similar to the send_onoff_request() that can be used for on/off requests. All of these use the same API mesh_lib_generic_client_publish() to publish the request. The differences are in the model ID that is passed as argument and the parameter data type.
The sl_btmesh_ctl_client_set_temperature() function changes the color temperature and sends its value to the server for medium button presses. Medium presses are used to adjust light color temperature up and down. The application sends a request using the Light CTL Client model. The last temperature that has been set is stored in a variable (type uint16), and the temperature is adjusted up or down each time a medium button press is detected.
Sending a single light CTL request is implemented in function send_ctl_request(), which is very similar to send_lightness_request() that can be used for light brightness requests. Both of these use the same API mesh_lib_generic_client_publish() to publish the request. The differences are in the model ID that is passed as argument and the parameter data type.
Sending a single on/off request is implemented in the function send_onoff_request(). A soft timer is used to trigger three calls to send_onoff_request() with a 50 ms delay between each call. In the example, the on-off functionality is implemented with the help of the sl_btmesh_ctl_client_set_lightness() function.
The mesh stack API used to send one on/off transaction is mesh_lib_generic_client_publish(). This is a common API used to publish data for several client models. It is not limited to the generic on/off client only. For example, publishing data as a generic transition time client would be done using the same API. The first parameter model_id selects which model is being used.
In addition to the desired on/off status, the publish API has some additional parameters such as transaction identifier, transition time, and delay.
The transaction identifier is a running number that is incremented for each transaction. In this example, each on/off state change triggers three consecutive on/off requests. The transaction identifier is the same for each of these requests so that, at the receiving end, duplicate requests can be filtered out. In other words, all three published messages are part of the same transaction, and they will trigger only one event at the receiving light node.
The delay parameter can be used to indicate that the on/off transition should not be executed immediately but after a given delay. In this example, the delay parameter is set to values of 100 ms/50 ms/0 in the first, second, and third request, respectively. The purpose is to ensure that all lights in the target group change their state simultaneously, regardless of which of the three on/off requests was captured on the receiving side.
The application code that implements the light switch functionality is relatively simple because many aspects are automatically handled by the mesh stack. For example, the switch node does not need to know anything about the light nodes that it is controlling. Any number of light nodes can be subscribed to the ctl requests that are published by the switch node.
The switch node does not need to know the group address that has been configured by the provisioning application. It simply publishes the ctl requests using the API mesh_lib_generic_client_publish(), and the stack automatically sends the requests using the group address that has been configured by the provisioner.
Light Node Example#
This section describes basic operation of the Bluetooth Mesh – SoC Light CTL example. It is assumed that the node is already provisioned and that the publish and subscribe settings have been configured by the smartphone app.
The main feature of the light node is that the development kit LEDs are turned on or off based on the requests that are received from switch nodes or from the smartphone application. The brightness of the LEDs can also be controlled. The On/off control is based on the Bluetooth Mesh Generic OnOff model, and the brightness control is based on the Light Lightness model. The Light CTL model supports color temperature requests, as well as lightness. Color temperature changes are shown on the WSTK LCD display. The light node also supports the friend feature. It can establish a friendship with a low-power switch node in the network so that the switch node can enter low-power mode.
The light node supports the following states:
Generic OnOff
Generic Level
Generic OnPowerUp
Generic Default Transition Time
Light Lightness
Light CTL
Upon receiving the sl_btmesh_evt_node_initialized_id event, the Generic Server, the Lightness Server, the CTL Server, and the mesh library are initialized. The mesh library is an adaptation layer between the mesh stack and the application code that enables using multiple models with a small set of generic API calls.
To support all the states listed above, the light node must store its internal state permanently so that it is preserved over reboots and power cycles. The Lighting Server holds Generic and Light Lightness states in the lightbulb_state struct. The Light CTL Server holds Light CTL states in the lightbulb_state struct as well. The state information is also held in the stack.
The light state initialization is implemented in sl_btmesh_lighting_server_init() and sl_btmesh_ctl_server_init(). The onpowerup state enables configuration of the default state after power is applied to the light node. The possible settings are listed below.
onpowerup state | Description (light node) |
|---|---|
MESH_GENERIC_ON_POWER_UP_STATE_OFF | Light is off after power up |
MESH_GENERIC_ON_POWER_UP_STATE_ON | Light is on after power up |
MESH_GENERIC_ON_POWER_UP_STATE_RESTORE | The state before light was powered down is restored at next power up |
The transition time model makes it possible to configure how long it takes for the light to transition from one state to another.
The lightbulb_state struct in the Lighting Server contains the following fields.
Struct Member Name | Description | Type |
|---|---|---|
onoff_current | Current generic on/off value | uint8_t |
onoff_target | Target generic on/off value | uint8_t |
transtime | Transition time | uint8_t |
onpowerup | On Power Up value | uint8_t |
lightness_current | Current lightness value | uint16_t |
lightness_target | Target lightness value | uint16_t |
lightness_last | Last lightness value | uint16_t |
lightness_default | Default lightness value | uint16_t |
lightness_min | Minimum lightness value | uint16_t |
lightness_max | Maximum lightness value | uint16_t |
pri_level_current | Current primary generic level value | int16_t |
pri_level_target | Target primary generic level value | int16_t |
The lightbulb_state struct in the Light CTL Server contains the following fields.
Struct Member Name | Description | Type |
|---|---|---|
temperature_current | Current temperature value | uint16_t |
temperature_target | Target temperature value | uint16_t |
temperature_default | Default temperature value | uint16_t |
temperature_min | Minimum temperature value | uint16_t |
temperature_max | Maximum temperature value | uint16_t |
deltauv_current | Current delta UV value | int16_t |
deltauv_target | Target delta UV value | int16_t |
deltauv_default | Default delta UV value | int16_t |
sec_level_current | Current secondary generic level value | int16_t |
sec_level_target | Target secondary generic level value | int16_t |
The friend functionality is then initialized to enable the friend feature implemented in the stack. After successful initialization, friend requests from Low Power Nodes can be accepted. The friend feature is mostly implemented in the stack, so after initialization only a few informative events can be raised to the application through corresponding callback functions:
sl_btmesh_friend_on_friendship_established: a friendship was established. The application displays “FRIEND” on the WSTK LCD and/or in UART logs.sl_btmesh_friend_on_friendship_terminated: the friendship was terminated. The application displays “NO LPN” on the WSTK LCD and/or in UART logs.
The light node registers callback functions for each of the supported models. This is done by calling the mesh_lib_generic_server_register_handler() function. The function has five parameters: the model ID, the element index, the client request handler function, the server state change handler function, and the server state recall handler function.
The light node registers handlers for the following models in the Lighting Server:
Generic OnOff Server
Generic PowerOnOff Server
Generic Default Transition Time Server
Light Lightness Server
Light Lightness Setup Server
Generic Level Server (on primary element)
The light node registers handlers for the following models in the Light CTL Server:
Light CTL Server
Light CTL Setup Server
Light CTL Temperature Server (on secondary element)
Generic Level Server (on secondary element)
On the server side, the mesh library works as follows. When any generic request from a client is received, the event sl_btmesh_evt_generic_server_client_request_id is raised. The application then calls the function mesh_lib_generic_server_event_handler from the mesh library and passes the event as the parameter. The mesh library decodes the model ID from the event and invokes the callback function that has been registered for that model.
For example, in the light node, a Generic OnOff request will invoke the callback function onoff_request().
The onoff_request() function is called whenever an on/off request is received either from one of the switch nodes or from the smartphone app. This is the piece of code in the light node that turns lights on and off.
If the request does not specify any transition time or delay, then the light state is changed immediately. Alternatively, the client may have requested a delay and/or a transition time, meaning that the transition does not happen instantly. In that case, the light node application starts a soft timer with the given delay. The light state is not changed until the soft timer expires.
Light Lightness requests are handled in function lightness_request(). The lightness request includes a parameter of type uint16 that indicates the light brightness on a scale of 0 – 65535. The example code uses pulse-width modulation (PWM) to drive the LEDs. The PWM is implemented using a 16-bit timer and the requested brightness value is directly mapped to the value of the Compare/Capture register of the timer. For example, the value 32768 will result in 32768/65536 ~ 50% brightness / PWM duty cycle. The duty cycle of the PWM signal is displayed on the LCD so that it is easy to compare the brightness that has been requested and the brightness that is currently set in the light node.
The Generic OnOff state is bound with the Light Lightness state. This means that, if the light is turned off with an on/off request, the last brightness value is saved by the application and is recovered after the application receives an on/off request that turns the light on. If brightness is set to 0 using lightness request, the generic on/off state is set to OFF. If brightness is set to a positive value, the generic on/off state is set to ON.
Brightness can be also changed using Generic Level requests handled in function pri_level_request(). The generic level request includes a parameter of type int16 that indicates brightness level. The conversion from level to lightness is made by adding 32768 to the level value.
Light CTL requests are handled in function ctl_request(). The CTL request includes three parameters that indicate the light brightness, color temperature, and delta UV. The first two parameters are of type uint16, and the third is of type int16. Actual color temperature and delta UV are displayed on the WSTK LCD below the lightness. Color temperature is limited by spec to scale 800 – 20000 K. Limits can be changed by ctl_setup_request() with type of request set to ctl_temperature_range. Also the default values for CTL state could be changed using ctl_setup_request() with type of request set to ctl_default .