Creating Example Certificate Authority and Device Certificate
This section describes how to create an example certificate authority and device certificate. The method described here is only intended for evaluation and should not be used in a production environment. For production, users are encouraged to obtain root certificates from a qualified certificate authority (CA). Users are strongly discouraged from acting as their own CA.
Certificate-Based Provisioning, as its name suggests, relies on certificates. Each device that participates in Certificate-Based provisioning must be preprogrammed with a:
private key, which can be used to prove the identity of the device.
Note: It is critical that the device private signing key be stored securely.
One of the following:
Corresponding device certificate, which holds the identity of the device (including the public key of the device), optionally with one or more intermediate certificates
URI pointing to a server where the device certificate can be downloaded
Additionally, the provisioner must know which are the trusted devices. Therefore, the provisioner must be preprogrammed with the root certificate(s) used to create the certificate chain of any device to be provisioned with a Certificate Authority (CA) Certificate, which can be used to validate any certificate that belongs to a trusted device.
Putting this into practice, the following steps must be done before Certificate-Based Provisioning can be applied:
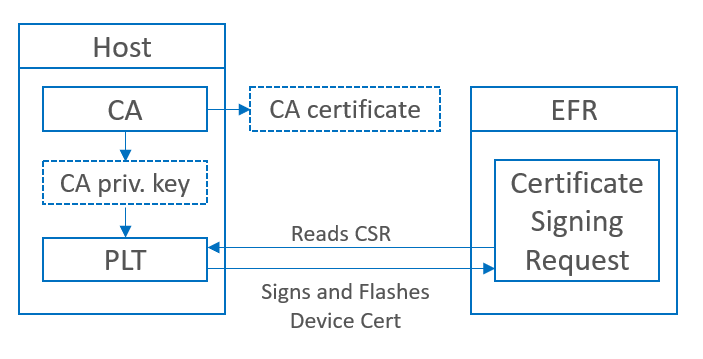
A CA Certificate must be created (with self-signing) along with a CA private key that will be used to sign all the device certificates. This is done on a computer. Note that the private key must be securely stored, preferably in a hardware security module (HSM). At a minimum, the private key must not leave this machine.
Each device must generate a private key. These private keys must be generated on the devices, and they must not leave the devices.
Each device must generate its device certificate signing request, which holds its public key (generated from its private key) and the credentials.
Each device must get its device certificate signing request signed by the CA. To do this, the certificate signing request must be transmitted to the central machine (this can be done via UART), and the signed certificate must be transmitted back to the device.
The CA certificate must be stored on the provisioner so that it can validate the device certificates of the provisionee devices.
Because this process is not easy to implement, Silicon Labs provides sample applications that do all the required steps.
The Bluetooth Mesh - SoC CSR Generator sample app generates the private key and the device certificate signing request on the device. It can also be used to connect to the certificate authority and send over the device certificate signing request to be signed.
The create_authority_certificate.py (CA) Python script can be used to generate the CA certificate along with the private key. It also creates a header file with the CA certificate that can be stored on the devices.
The production_line_tool.py (PLT) Python script can be used for reading out the device certificate signing requests (CSRs) from the requesting devices, signing the CSRs with the CA private key, and flashing them back to the device.
Note: the private key used by this script is visible in plain text, therefore this tool is not to be used in a secure production environment, a hardware security module (HSM) must be used instead.
The Python scripts can be found in the following folder: {SDK_folder}/app/bluetooth/script/certificate_authorities.
To generate the device certificate and get it signed, follow this process:
Factory-reset your device to make sure that no keys and certificates are stored on it. You can do this with Simplicity Commander using the Recover Bricked Device option in the GUI or with the following CLI command: commander device recover.
Flash an Internal Storage Bootloader to your device. (Must be generated and built as a separate project.) See Gecko Bootloader User’s Guide for Series 3 and Higher or Gecko Bootloader User Guide for specific instructions.
Create a new Bluetooth Mesh- SoC CSR Generator project in Simplicity Studio.
Open the slcp file of the project.
On the Overview tab, under Project Details, open the three-dots-menu, and click the Configuration button as shown below.
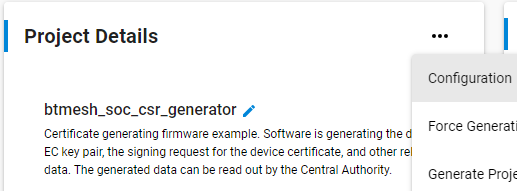
Modify the Certification Subject Data fields so that your certificate subject contains your company’s information.

Build and flash the project to your device. This will automatically generate the private-public key pair and the certificate signing request on startup.
Create a CA certificate. Skip this step if you already have a root certificate you wish to use. Install the Python modules cryptography and jinja2 as follows:
pip3 install cryptography pip3 install jinja2Once these modules have been installed, create the CA certificate with the following command:
python3 *{SDK\_folder}*\app\bluetooth\script\certificate authorities\create_authority_certificate.pyNote: This certificate will be created with factory default parameters to customize the certificate with your own unique identifiers. See the help menu for this script, which is available by running the following command:
python3 \<Gecko sdk root\>\app\bluetooth\script\certificate authorities\create_authority_certificate.py -h.The CA certificate can now be found in {SDK_folder}\app\bluetooth\script\certificate authorities\central_authority\certificate.pem.
Check the Jlink serial number of your debug adapter either with Simplicity Studio or with Simplicity Commander by using the command commander adapter probe.
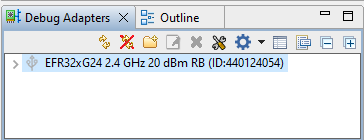
Run the production_line_tool.py python script on your computer with the following parameters:
Python3 {SDK_folder}\app\bluetooth\script\certificate authorities\production_line_tool.py --serial \<serialnumber\>This will read out the signing request, sign the device certificate, and flash the signed certificate on the device. Note: the 'serial' parameter is not required if only one device is connected to your PC.
Now the key pair and the signed certificate are stored on your device. You can flash a new application to the device. At this stage, it is important to ensure that the flash is not completely erased. Simply flashing a new application, and bootloader if required, are sufficient.
Note: It is important to add a bootloader to your new project that has secure boot enabled. This ensures that the firmware you programmed to the device cannot be changed. See Series 2 and Series 3 Secure Boot with RTSL for more information on secure boot.