Examples#
Overview#
The examples for HSE-SVH Anti-Tamper module are described in the following table.
| Example | Device (Radio Board) | HSE Firmware | Tool |
|---|---|---|---|
Provision Tamper configuration | EFR32MG21B010F1024IM32 (BRD4181C) | Version 1.2.9 | SE Manager |
Provision Public Command Key & Tamper configuration | EFR32MG21B010F1024IM32 (BRD4181C) | Version 1.2.9 | Simplicity Commander |
" | EFR32MG21B010F1024IM32 (BRD4181C) | Version 1.2.9 | Simplicity Studio 5 |
Tamper disable and Roll challenge | EFR32MG21B010F1024IM32 (BRD4181C) | Version 1.2.9 | SE Manager |
" | EFR32MG21B010F1024IM32 (BRD4181C) | Version 1.2.9 | Simplicity Commander |
Roll challenge | EFR32MG21B010F1024IM32 (BRD4181C) | Version 1.2.9 | Simplicity Studio 5 |
Note: Unless specified in the example, these examples can be applied to other HSE-SVH devices.
Using a Platform Example#
Simplicity Studio 5 includes the SE Manager platform example for tamper. This application note uses platform examples of GSDK v4.1.0. The console output may be different on the other version of GSDK.
Refer to the corresponding readme file for details about each SE Manager platform example. This file also includes the procedures to create the project and run the example.
Using Simplicity Commander#
This application note uses Simplicity Commander v1.14.6. The procedures and console output may be different on other versions of Simplicity Commander. The latest version of Simplicity Commander can be downloaded from .
commander --versionSimplicity Commander 1v14p6b1289 JLink DLL version: 7.70d Qt 5.12.10 Copyright (C) 2017 The Qt Company Ltd. EMDLL Version: 0v18p9b677 mbed TLS version: 2.16.6 DONEThe Simplicity Commander's Command Line Interface (CLI) is invoked by
commander.exein the Simplicity Commander folder. The location for Simplicity Studio 5 in Windows isC:\SiliconLabs\SimplicityStudio\v5\developer\adapter_packs\commander. For ease of use, it is highly recommended to add the path ofcommander.exeto the systemPATHin Windows.If more than one Wireless Starter Kit (WSTK) is connected via USB, the target WSTK must be specified using the
--serialno \<J-Link serial number>option.If the WSTK is in debug mode OUT, the target device must be specified using the
--device \<device name>option.
For more information about Simplicity Commander, see the Simplicity Commander Reference Guide.
Using Simplicity Studio#
The security operations are performed in the Security Settings of Simplicity Studio. This application note uses Simplicity Studio v5.4.0.0. The procedures and pictures may be different on the other version of Simplicity Studio 5.
Right-click the selected debug adapter RB (ID:J-Link serial number) to display the context menu.
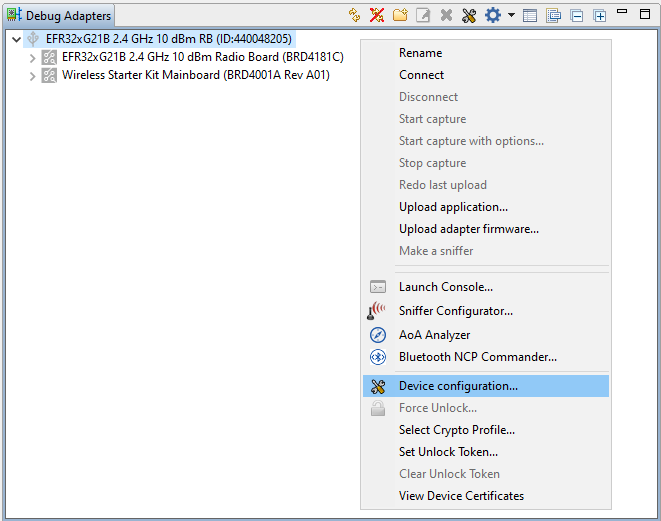
Click Device configuration... to open the Configuration of device: J-Link Silicon Labs (serial number) dialog box. Click the Security Settings tab to get the selected device configuration.

Using an External Tool#
The tamper disable example uses OpenSSL to sign the access certificate and challenge response. The Windows version of OpenSSL can be downloaded from Shining Light Productions. This application note uses OpenSSL Version 1.1.1h (Win64).
openssl versionOpenSSL 1.1.1h 22 Sep 2020The OpenSSL's Command Line Interface (CLI) is invoked by openssl.exe in the OpenSSL folder. The location in Windows (Win64) is C:\Program Files\OpenSSL-Win64\bin. For ease of use, it is highly recommended to add the path of openssl.exe to the system PATH in Windows.
Provision Public Command Key and Tamper Configuration#
The Public Command Key pair can be generated from the "unsafe" private key delivered with Simplicity Studio, by Simplicity Commander, or by a Hardware Security Module (HSM). Using an HSM is recommended for production systems.
Generated from "Unsafe" Key
External tools such as openssl can be used to generate a public key from the reference private key provided in Simplicity Studio. Note that this private key is well known and should not be used in production devices.
Run the openssl ec command to generate the Public Command Key from the Private Command Key.
openssl ec -in /c/SiliconLabs/SimplicityStudio/v5/developer/adapter_packs/secmgr/scripts/offline/cmd-unsafe-privkey.pem -pubout -out cmd-unsafe-pubkey.pem
Generated Using Simplicity Commander
Run the util genkey command to generate the Public Command Key pair (command_key.pem and command_pubkey.pem) and Public Command Key token file (command_pubkey.txt).
commander util genkey --type ecc-p256 --privkey command_key.pem --pubkey command_pubkey.pem --tokenfile command_pubkey.txtGenerating ECC P256 key pair...
Writing private key file in PEM format to command_key.pem
Writing public key file in PEM format to command_pubkey.pem
Writing EC tokens to command_pubkey.txt...
DONESE Manager - Tamper Platform Example#
Click the View Project Documentation link to open the readme file for instructions on creating the project and running the example.

Press
ENTERtwo times to program the secure boot and tamper configuration to the HSE OTP of an uninitialized device.SE Manager Tamper Example - Core running at 38000 kHz. . SE manager initialization... SL_STATUS_OK (cycles: 7 time: 0 us) . Read EMU RSTCAUSE register... SL_STATUS_OK (cycles: 3728 time: 98 us) + The EMU RSTCAUSE register (MSB..LSB): 00000043 . Read SE OTP configuration... SL_STATUS_NOT_INITIALIZED (cycles: 7487 time: 197 us) + Cannot read SE OTP configuration. + Press ENTER to initialize SE OTP for tamper configuration or press SPACE to abort. + Warning: The OTP configuration cannot be changed once written! + Press ENTER to confirm or press SPACE to abort if you are not sure. + Initialize SE OTP for tamper configuration... SL_STATUS_OK (cycles: 267256 time: 7033 us) + Issue a power-on or pin reset to activate the new tamper configuration. . SE manager deinitialization... SL_STATUS_OK (cycles: 9 time: 0 us)Note: This example does not enable the secure boot.
Press the RESET button on the WSTK to restart the program. It will display the current tamper configuration of the device.
SE Manager Tamper Example - Core running at 38000 kHz. . SE manager initialization... SL_STATUS_OK (cycles: 10 time: 0 us) . Read EMU RSTCAUSE register... SL_STATUS_OK (cycles: 3736 time: 98 us) + The EMU RSTCAUSE register (MSB..LSB): 00000043 . Read SE OTP configuration... SL_STATUS_OK (cycles: 7174 time: 188 us) + Secure boot: Disabled + Tamper source level Filter counter : 1 SE watchdog : 4 SE RAM CRC : 4 SE hard fault : 4 SE software assertion : 4 SE secure boot : 4 User secure boot : 0 Mailbox authorization : 1 DCI authorization : 0 OTP read : 4 Self test : 4 TRNG monitor : 1 PRS0 : 1 PRS1 : 1 PRS2 : 2 PRS3 : 2 PRS4 : 4 PRS5 : 4 PRS6 : 7 PRS7 : 7 Decouple BOD : 4 Temperature sensor : 2 Voltage glitch falling : 2 Voltage glitch rising : 2 Secure lock : 4 SE debug : 0 Digital glitch : 2 SE ICACHE : 4 + Reset period for the tamper filter counter: ~32 ms x 1024 + Activation threshold for the tamper filter: 4 + Digital glitch detector always on: Disabled + Tamper reset threshold: 5 . Current tamper test is NORMAL. + Press SPACE to select NORMAL or TAMPER DISABLE, press ENTER to run.
Simplicity Commander#
Run the security writekey command to provision the Public Command Key (e.g., command_pubkey.pem).
commander security writekey --command **command_pubkey.pem** --device EFR32MG21B010F1024 --serialno 440030580Device has serial number 000000000000000014b457fffe0f77ce ================================================================================ Please look through any warnings before proceeding. THIS IS A ONE-TIME command which permanently ties debug and tamper access to certificates signed by this key. Type 'continue' and hit enter to proceed or Ctrl-C to abort: ================================================================================ continue DONENote: The Public Command Key cannot be changed once written.
Run the security readkey command to read the Public Command Key from the HSE OTP for verification with the key in step 1.
commander security readkey --command --device EFR32MG21B010F1024 --serialno 440030580B1BC6F6FA56640ED522B2EE0F5B3CF7E5D48F60BE8148F0DC08440F0A4E1DCA4 7C04119ED6A1BE31B7707E5F9D001A659A051003E95E1B936F05C37EA793AD63 DONERun the security genconfig command to generate a default user_configuration.jsonfile for secure boot and tamper configuration.
commander security genconfig --nostore -o user_configuration.json --device EFR32MG21B010F1024 --serialno 440030580Configuration file written to user_configuration.json DONENote: Simplicity Commander Version 1.14.6 or above is required to support tamper configuration for all HSE-SVH devices.
Use a text editor to modify the default tamper responses in
user_configuration.jsonto the desired configuration as below.{ "OPN": "EFR32MG21B010F1024", "VERSION": "1.0.0", "mcu_flags": { "SECURE_BOOT_ANTI_ROLLBACK": false, "SECURE_BOOT_ENABLE": false, "SECURE_BOOT_PAGE_LOCK_FULL": false, "SECURE_BOOT_PAGE_LOCK_NARROW": false, "SECURE_BOOT_VERIFY_CERTIFICATE": false }, "tamper_filter": { "FILTER_PERIOD": 10, "FILTER_THRESHOLD": 6, "RESET_THRESHOLD": 5 }, "tamper_flags": { "DGLITCH_ALWAYS_ON": false }, "tamper_levels": { "DCI_AUTH": 0, "DECOUPLE_BOD": 4, "DGLITCH": 2, "FILTER_COUNTER": 1, "MAILBOX_AUTH": 1, "OTP_READ": 4, "PRS0": 1, "PRS1": 1, "PRS2": 2, "PRS3": 2, "PRS4": 4, "PRS5": 4, "PRS6": 7, "PRS7": 7, "SECURE_LOCK": 4, "SELF_TEST": 4, "SE_CODE_AUTH": 4, "SE_DEBUG": 0, "SE_HARDFAULT": 4, "SE_ICACHE": 4, "SE_RAM_CRC": 4, "SOFTWARE_ASSERTION": 4, "TEMP_SENSOR": 2, "TRNG_MONITOR": 1, "USER_CODE_AUTH": 0, "VGLITCH_FALLING": 2, "VGLITCH_RISING": 2, "WATCHDOG": 4 } }Note: This example does not enable the secure boot.
Run the
security writeconfigcommand to program the secure boot and tamper configuration to the HSE OTP. This command can be executed once per device.commander security writeconfig --configfile user_configuration.json --device EFR32MG21B010F1024 --serialno 440030580================================================================================ THIS IS A ONE-TIME configuration: Please inspect file before confirming: user_configuration.json Type 'continue' and hit enter to proceed or Ctrl-C to abort: ================================================================================ continue DONERun the
security readconfigcommand to check the secure boot and tamper configuration of the device.commander security readconfig --serialno 440030580MCU Flags Secure Boot : Disabled Secure Boot Verify Certificate : Disabled Secure Boot Anti Rollback : Disabled Secure Boot Page Lock Narrow : Disabled Secure Boot Page Lock Full : Disabled Tamper Levels FILTER_COUNTER : 1 WATCHDOG : 4 SE_RAM_CRC : 4 SE_HARDFAULT : 4 SOFTWARE_ASSERTION : 4 SE_CODE_AUTH : 4 USER_CODE_AUTH : 0 MAILBOX_AUTH : 1 DCI_AUTH : 0 OTP_READ : 4 SELF_TEST : 4 TRNG_MONITOR : 1 PRS0 : 1 PRS1 : 1 PRS2 : 2 PRS3 : 2 PRS4 : 4 PRS5 : 4 PRS6 : 7 PRS7 : 7 DECOUPLE_BOD : 4 TEMP_SENSOR : 2 VGLITCH_FALLING : 2 VGLITCH_RISING : 2 SECURE_LOCK : 4 SE_DEBUG : 0 DGLITCH : 2 SE_ICACHE : 4 Tamper Filter Filter Period : 10 Filter Threshold : 6 Reset Threshold : 5 Tamper Flags Digital Glitch Detector Always On: Disabled DONE
Simplicity Studio#
This example focuses on provisioning the Public Command Key and tamper configuration. It skips the procedures for provisioning of the Public Sign Key and Secure Boot Enabling.
Run the
util keytotokencommand to convert the Public Command Key file (PEM format) into a text file (command_pubkey.txt).commander util keytotoken command_pubkey.pem --outfile command_pubkey.txtWriting EC tokens to command_pubkey.txt... DONEOpen the Security Settings of the selected device as described in Using Simplicity Studio..
Click [Start Provisioning Wizard...] in the upper right corner to display the Secure Initialization dialog box.

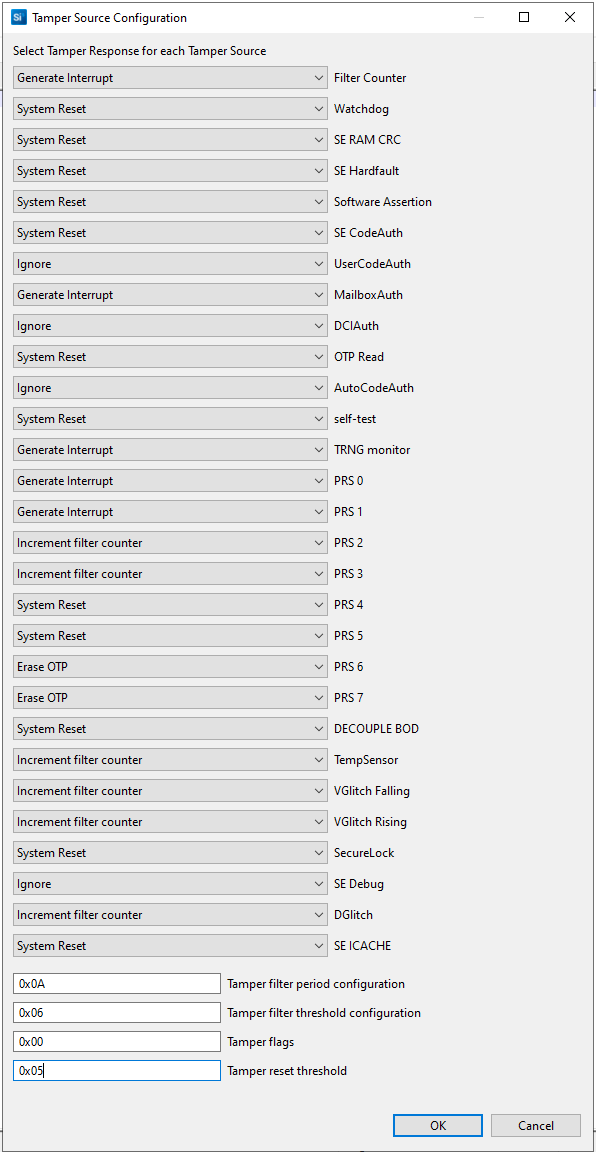
Click [Edit] to open the Tamper Source Configuration dialog box. Use the dropdown menus to modify the default tamper responses to the desired configuration. Click [OK] to exit.
Click [Next >]. The Security Keys dialog box is displayed.
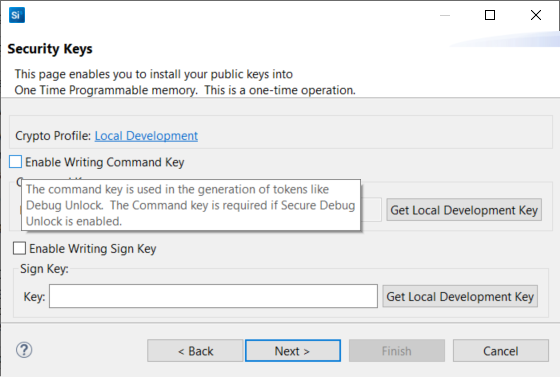
Using a text editor, open the
command_pubkey.txtfile generated in step 1.MFG_SIGNED_BOOTLOADER_KEY_X : B1BC6F6FA56640ED522B2EE0F5B3CF7E5D48F60BE8148F0DC08440F0A4E1DCA4 MFG_SIGNED_BOOTLOADER_KEY_Y : 7C04119ED6A1BE31B7707E5F9D001A659A051003E95E1B936F05C37EA793AD63Check Enable Writing Command Key. Copy the Public Command Key (X-point
B1BC...first, then Y-point7C04...) to the Key: box under Command Key:.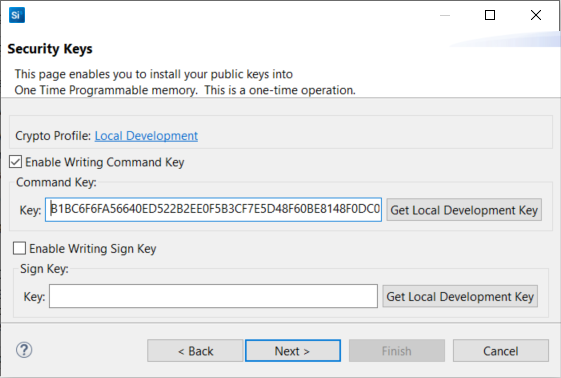
Note: This example does not enable the secure boot (not checking Enable Writing Sign Key option).
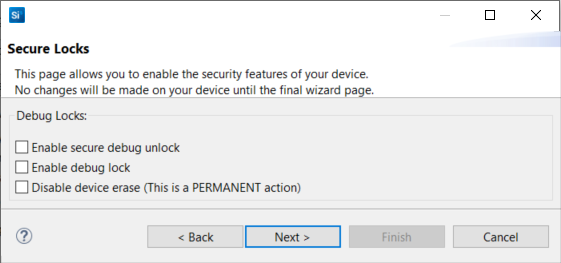
Click [Next >]. The Secure Locks dialog box is displayed. The Debug locks are set by default. Uncheck Enable secure debug unlock and Enable debug lock.
Click [Next >] to display the Summary dialog box. Verify the tamper configuration and Public Command Key in the Provisioning Summary are correct.

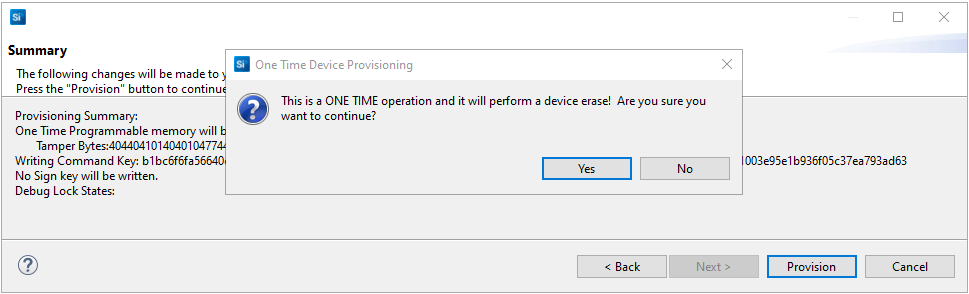
If the information displayed is correct, click [Provision]. Click [Yes] to confirm.
Note: The Public Command Key and tamper configuration cannot be changed once written.
The Provisioning Status is displayed in the Summary dialog box.
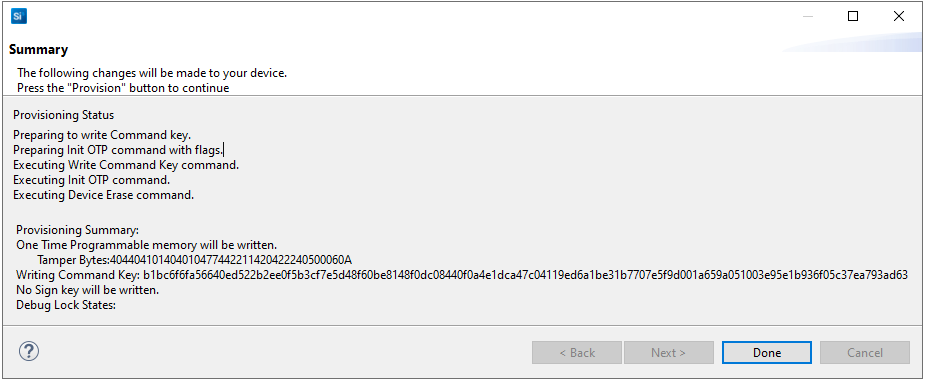
Click [Done] to exit the provisioning process. The device configuration is updated.
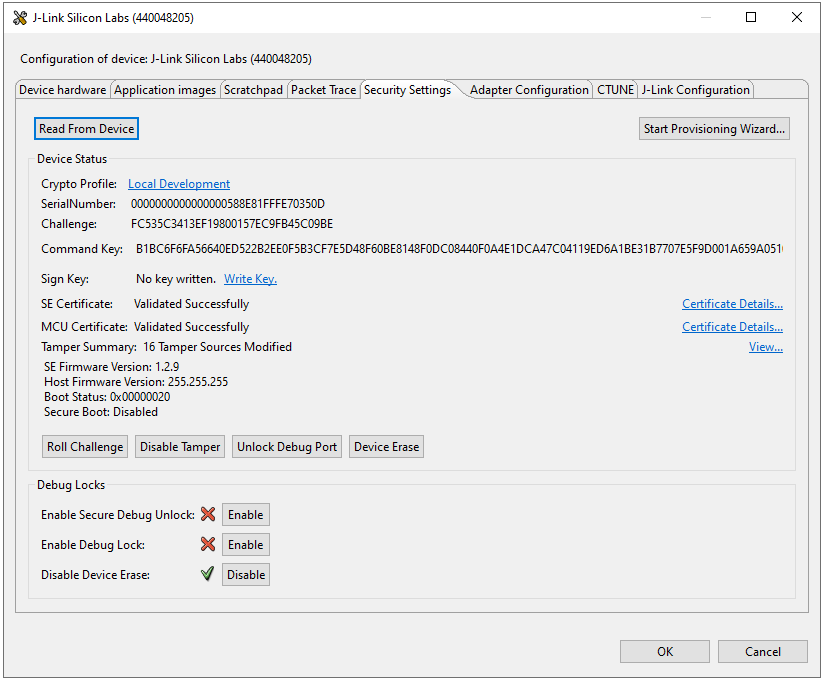
Click the View... link to check the tamper configuration or click [OK] to exit.
Tamper Disable and Roll Challenge#
PRS Tamper Sources#
The tamper configuration in the SE Manager Tamper platform example is used to demonstrate the tamper disable on HSE-SVH devices. The following tables list the PRS tamper source usage on EFR32xG21B and other HSE-SVH devices on this example. The push buttons PB0 and PB1 are on the Wireless Starter Kit (WSTK) Mainboard.
Table: PRS Tamper Source Usage on EFR32xG21B Devices
| Source (Bit) | Default Level (Response) | User Level (Response) | PRS Producer | Tamper Disable Mask (1) |
|---|---|---|---|---|
PRS0 (16) | 0 (Ignore) | 1 (Interrupt) | Push button PB0 | 0 |
PRS1 (17) | 0 (Ignore) | 1 (Interrupt) | - | 1 |
PRS2 (18) | 0 (Ignore) | 2 (Filter) | Push button PB0 | 0 |
PRS3 (19) | 0 (Ignore) | 2 (Filter) | - | 1 |
PRS4 (20) | 0 (Ignore) | 4 (Reset) | Push button PB1 | 1 |
PRS5 (21) | 0 (Ignore) | 4 (Reset) | Software (2) | 1 |
PRS6 (22) | 0 (Ignore) | 7 (Erase OTP) | - | 1 |
PRS7 (23) | 0 (Ignore) | 7 (Erase OTP) | - | 1 |
Notes:
The tamper disable mask is
0x00fa0000to restore the tamper sources PRS1, PRS3, PRS4, PRS5, PRS6, and PRS7 to default response (Ignore).The Software PRS triggers the tamper source PRS5 to reset the device if the filter counter reaches the trigger threshold (4) within the filter reset period (~32 ms x 1024).
Table: PRS Tamper Source Usage on Other HSE-SVH Devices
| Source (Bit) (1) | Default Level (Response) | User Level (Response) | PRS Producer | Tamper Disable Mask (2) |
|---|---|---|---|---|
PRS0 (25 or 26) | 0 (Ignore) | 1 (Interrupt) | - | 1 |
PRS1 (26 or 27) | 0 (Ignore) | 1 (Interrupt) | Push button PB0 | 0 |
PRS2 (27 or 28) | 0 (Ignore) | 2 (Filter) | Push button PB0 | 0 |
PRS3 (28 or 29) | 0 (Ignore) | 2 (Filter) | - | 1 |
PRS4 (29 or 30) | 0 (Ignore) | 4 (Reset) | Push button PB1 | 1 |
PRS5 (30 or 31) | 0 (Ignore) | 4 (Reset) | Software (3) | 1 |
PRS6 (31 or -) | 0 (Ignore) | 7 (Erase OTP) | - | 1 |
Notes:
The HSE-SVH devices with ETAMPDET peripheral only have PRS0 (bit 26) to PRS5 (bit 31).
The tamper disable mask depends on whether the HSE-SVH device has an ETAMPDET peripheral.
Without ETAMPDET peripheral, the tamper disable mask is
0xf2000000to restore the tamper sources PRS0, PRS3, PRS4, PRS5, and PRS6 to default response (Ignore).With ETAMPDET peripheral, the tamper disable mask is
0xe4000000to restore the tamper sources PRS0, PRS3, PRS4, and PRS5 to default response (Ignore).
The Software PRS triggers the tamper source PRS5 to reset the device if the filter counter reaches the trigger threshold (4) within the filter reset period (~32 ms x 1024).
SE Manager - Tamper Platform Example#
Click the View Project Documentation link to open the readme file for instructions on creating the project and running the example.
Follow the procedures in SE Manager - Tamper Platform Example if the HSE OTP is uninitialized. The following sections describe an initialized device that runs in Normal and Tamper Disable modes.
Normal#
Press
ENTERto run theNORMALtamper demo. Follow the instructions to go through the example.. Current tamper test is NORMAL. + Press SPACE to select NORMAL or TAMPER DISABLE, press ENTER to run. . Normal tamper test instructions: + Press PB0 to increase filter counter and tamper status is displayed. + PRS will issue a tamper reset if filter counter reaches 4 within ~32 ms x 1024. + Press PB1 to issue a tamper reset. + Device will enter diagnostic mode if tamper reset reaches 5.Press PB0 to trigger PRS0 (Interrupt) and PRS2 (Filter) to issue an interrupt. The active tamper sources (
0x00050000) of the EFR32xG21B device are PRS0 (bit 16) and PRS2 (bit 18).. Get tamper status... SL_STATUS_OK (cycles: 11937 time: 314 us) + Recorded tamper status (MSB..LSB): 00050001 + Currently active tamper sources (MSB..LSB): 00050000Press PB0 (Filter on PRS2) 4 times within ~32 ms x 1024 to trigger an interrupt when reaching the filer counter threshold. The program will use software PRS to issue a tamper reset through the PRS5 tamper source. The active tamper sources (
0x00050002) of the EFR32xG21B device are Filter (bit 2), PRS0 (bit 16), and PRS2 (bit 18).. Get tamper status... SL_STATUS_OK (cycles: 11725 time: 308 us) + Recorded tamper status (MSB..LSB): 00050002 + Currently active tamper sources (MSB..LSB): 00050002 + Tamper filter threshold is reached, issue a reset through PRSPress PB1 to trigger PRS4 (Reset) to issue a tamper reset.
After a tamper reset, the
SETAMPER(bit 13) inEMU->RSTCAUSEregister is set. Note that bit 1 indicates a pin reset and will also be set.. Read EMU RSTCAUSE register... SL_STATUS_OK (cycles: 4071 time: 107 us) + The EMU RSTCAUSE register (MSB..LSB): 00002002 + The tamper reset is observedAfter five consecutive tamper resets (reset threshold in this example), the device will enter diagnostic mode until a power-on or pin reset.
Tamper Disable#
This example uses the tamper disable mask (0x00fa0000) to restore the tamper sources PRS1, PRS3, PRS4, PRS5, PRS6, and PRS7 of EFR32xG21B device to default response (Ignore).
Press
SPACEto selectTAMPER DISABLE, pressENTERto run.. Current tamper test is NORMAL. + Press SPACE to select NORMAL or TAMPER DISABLE, press ENTER to run. + Current tamper test is TAMPER DISABLE.This example will prompt to program the default Public Command Key in flash to the HSE OTP if this key does not exist. Press
ENTERtwo times to confirm andENTERagain to restore the default tamper level. Follow the instructions shown in step 3 to go through the example (steps 4 to 6).. Verify the device public command key in SE OTP. + Exporting a public command key from a hard-coded private command key... SL_STATUS_OK (cycles: 210999 time: 5552 us) + Reading the public command key from SE OTP... SL_STATUS_NOT_INITIALIZED (cycles: 7763 time: 204 us) + Press ENTER to program public command key in SE OTP or press SPACE to abort. + Warning: The public command key in SE OTP cannot be changed once written! + Press ENTER to confirm or press SPACE to skip if you are not sure. + Programming a public command key to SE OTP... SL_STATUS_OK (cycles: 79656 time: 2096 us) + Press ENTER to disable tamper signals or press SPACE to exit.Press
ENTERto restore the default tamper level if the default Public Command Key in flash matches with the key in the HSE OTP. Follow the instructions to go through the example (steps 4 to 6).. Verify the device public command key in SE OTP. + Exporting a public command key from a hard-coded private command key... SL_STATUS_OK (cycles: 200804 time: 5284 us) + Reading the public command key from SE OTP... SL_STATUS_OK (cycles: 7134 time: 187 us) + Comparing exported public command key with SE OTP public command key... OK + Press ENTER to disable tamper signals or press SPACE to exit. . Start the tamper disable processes. + Creating a private certificate key in a buffer... SL_STATUS_OK (cycles: 214059 time: 5633 us) + Exporting a public certificate key from a private certificate key... SL_STATUS_OK (cycles: 206545 time: 5435 us) + Read the serial number of the SE and save it to access certificate... SL_STATUS_OK (cycles: 7930 time: 208 us) + Signing the access certificate with private command key... SL_STATUS_OK (cycles: 222650 time: 5859 us) + Request challenge from the SE and save it to challenge response... SL_STATUS_OK (cycles: 4208 time: 110 us) + Signing the challenge response with private certificate key... SL_STATUS_OK (cycles: 223559 time: 5883 us) + Creating a tamper disable token to disable tamper signals... SL_STATUS_OK (cycles: 946431 time: 24906 us) + Success to disable the tamper signals! . Tamper disable test instructions: + Press PB0 to increase filter counter and tamper status is displayed. + PRS will NOT issue a tamper reset even filter counter reaches 4 within ~32 ms x 1024. + Press PB1 will NOT issue a tamper reset. + Issue a power-on or pin reset to re-enable the tamper signals. + Press ENTER to roll the challenge to invalidate the current tamper disable token or press SPACE to exit.Press PB0 to verify tamper sources PRS0 (Interrupt) and PRS2 (Filter) of EFR32xG21B device can still issue an interrupt.
. Get tamper status... SL_STATUS_OK (cycles: 11259 time: 296 us) + Recorded tamper status (MSB..LSB): 00050001 + Currently active tamper sources (MSB..LSB): 00050000The PRS5 tamper source (configured as Reset) was restored to the default (Ignore), so it cannot issue a tamper reset even if users press PB0 (Filter on PRS2) 4 times within ~32 ms x 1024.
The PRS4 tamper source (configured as Reset) was restored to the default (Ignore), so it cannot issue a tamper reset even if users press PB1.
Issue a power-on or pin reset to exit the tamper disable state or press
ENTERto roll the challenge.. Check and roll the challenge. + Request current challenge from the SE... SL_STATUS_OK (cycles: 0 time: 0 us) + The current challenge (16 bytes): AA C1 79 FC FC C5 78 8E A0 3F 91 AB 5D A9 C5 04 + Rolling the challenge... SL_STATUS_OK (cycles: 0 time: 0 us) + Request rolled challenge from the SE... SL_STATUS_OK (cycles: 0 time: 0 us) + The rolled challenge (16 bytes): 0F 63 9C 44 46 E4 7C B2 C9 CA 66 13 34 34 92 8E + Issue a power-on or pin reset to activate the rolled challenge. . SE manager deinitialization... SL_STATUS_OK (cycles: 0 time: 0 us)
Simplicity Commander#
The tamper disable was designed with three organizations in mind:
The Direct Customer to whom Silicon Labs sells the chip. This chip has the Public Command Key installed in the SE OTP.
The Product Company is a customer of the Direct Customer. This is applicable if the Direct Customer is creating a white-labeled product for another company or a sub-component that goes into another company’s product.
The Debug
Party could be anyone, internal or external, that the Product Company decides is qualified to debug the device.
Because the Public Command Key is installed into the SE OTP of a large number of devices and cannot be changed, the corresponding Private Command Key must be guarded by a very stringent process. If this Private Command Key is ever leaked, all the devices programmed with the corresponding Public Command Key will be compromised.
A tamper disable use case is described in the following figure, and the signing process is performed by a Hardware Security Module (HSM).
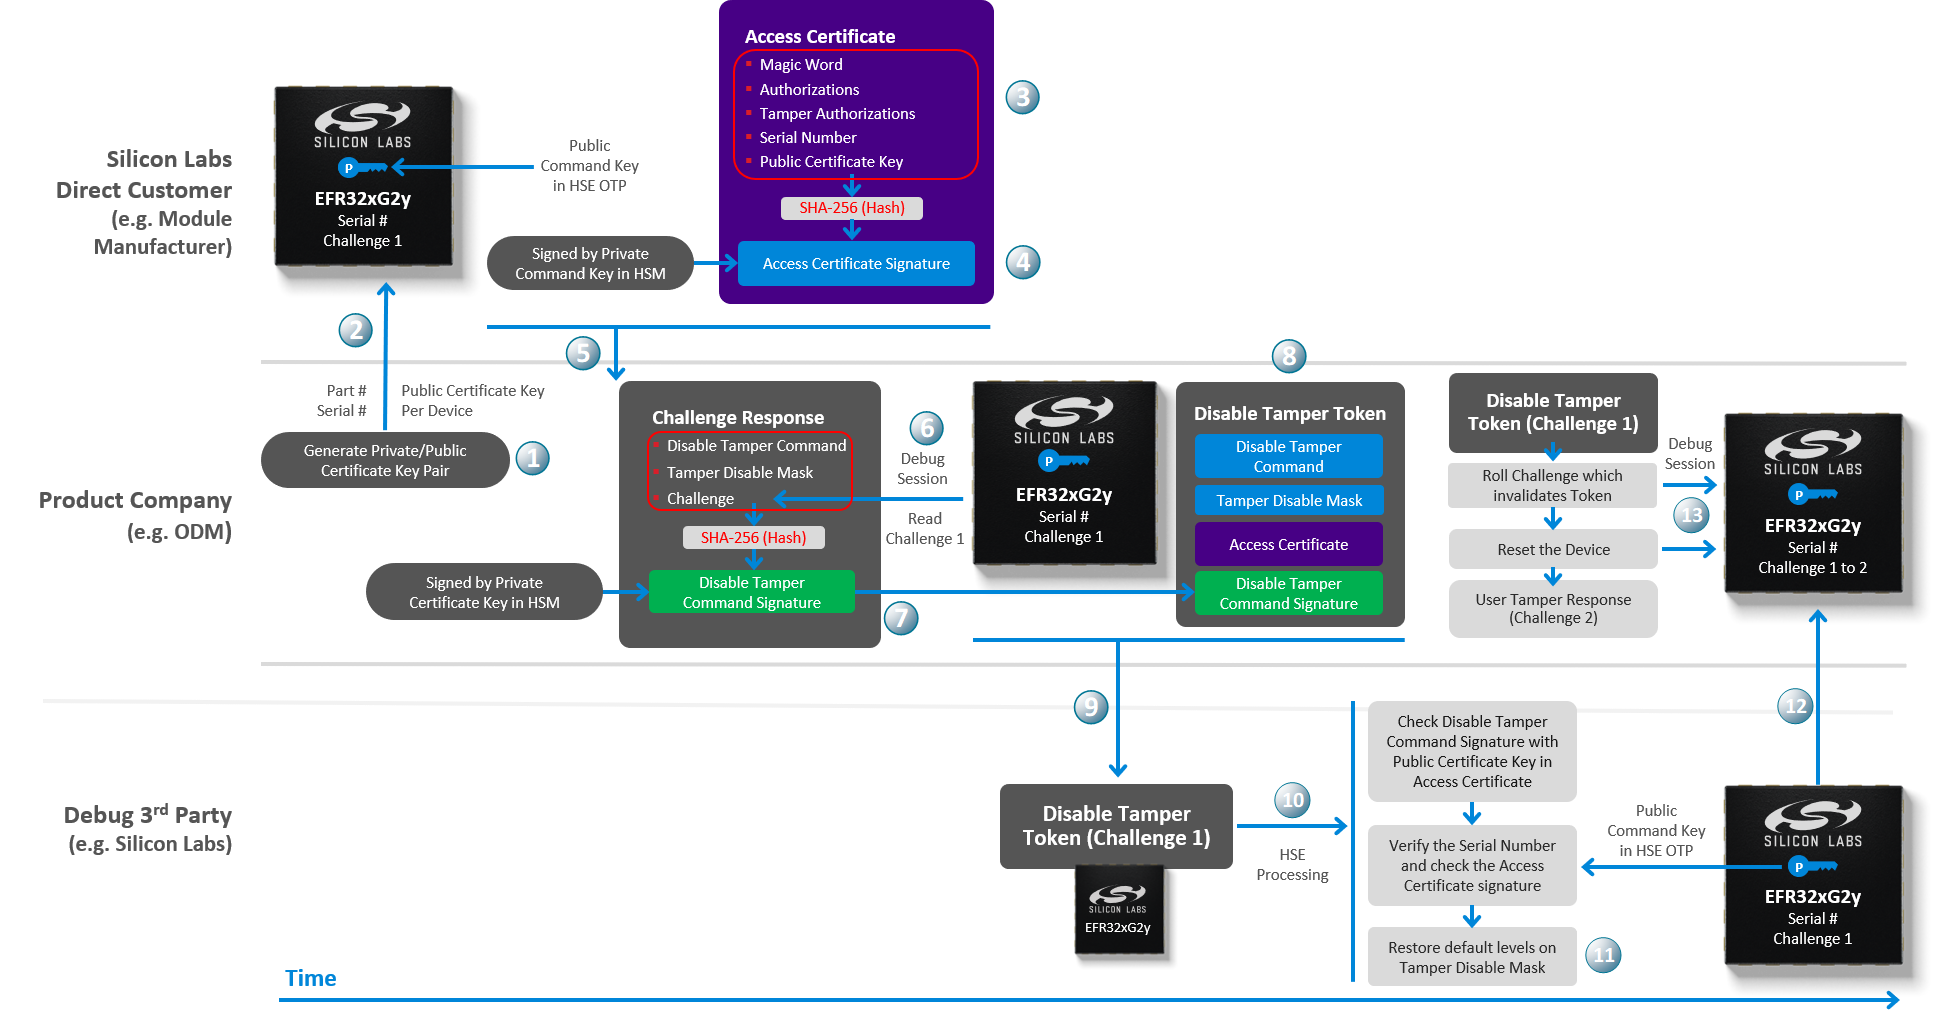
The tamper disable flow moving across the time axis from left to right is explained below:
The Product Company creates a Private/Public Certificate Key pair for each device. Because the key pair is assigned only to a single device, the company may not need to protect the Private Certificate Key as securely as the Private Command Key by the Direct Customer.
In this example, the Private/Public Certificate Key pair (
cert_key.pemandandcert_pubkey.pem) is generated by running theutil genkeycommand.commander util genkey --type ecc-p256 --privkey cert_key.pem --pubkey cert_pubkey.pemGenerating ECC P256 key pair... Writing private key file in PEM format to cert_key.pem Writing public key file in PEM format to cert_pubkey.pem DONEThe Public Certificate Key (
cert_pubkey.pem) for each device is passed to the Silicon Labs Direct Customer. The part number and serial number are also required if Direct Customer cannot access the device.Run the
security statuscommand to get the device serial number. The--serialnooption is for the J-Link serial number of the WSTK.commander security status --device EFR32MG21B010F1024 --serialno 440030580SE Firmware version : 1.2.9 Serial number : 000000000000000014b457fffe0f77ce Debug lock : Disabled Device erase : Enabled Secure debug unlock : Disabled Tamper status : OK Secure boot : Disabled Boot status : 0x20 - OK Command key installed : True Sign key installed : False DONEThe Direct Customer then places that Public Certificate Key in the access certificate. The access certificate is per device because it contains the unique device serial number. This certificate is generated once upon creation of the device, and thereafter, is generally only modified when the Private/Public Certificate Key pair is changed by the Product Company.
The following two steps are OPTIONAL for customization of Authorizations and Tamper Authorizations.
a. (Optional) Run the
security genauthcommand to generate the default certificate authorization file (certificate_authorization.json).commander security genauth -o certificate_authorizations.json --nostore --serialno 440030580DONEb. (Optional) Use a text editor to modify the default Authorizations and Tamper Authorizations in the
jsonfile.Run the
security gencertcommand with the following parameters from the Product Company to generate an unsigned access certificate (access_certificate.extsign) in Security Store:Device part number
Device serial number
Public Certificate Key
commander security gencert --device EFR32MG21B010F1024 --deviceserialno 000000000000000014b457fffe0f77ce --cert-pubkey cert_pubkey.pem --extsignAuthorization file written to Security Store: C:/Users/<username>/AppData/Local/SiliconLabs/commander/SecurityStore/device_000000000000000014b457fffe0f77ce/certificate_authorizations.json Cert key written to Security Store: C:/Users/<username>/AppData/Local/SiliconLabs/commander/SecurityStore/device_000000000000000014b457fffe0f77ce/cert_pubkey.pem Created an unsigned certificate in Security Store: C:/Users/<username>/AppData/Local/SiliconLabs/commander/SecurityStore/device_000000000000000014b457fffe0f77ce/access_certificate.extsign DONENotes:
The
--extsignoption to create an unsigned access certificate is only available in Simplicity Commander Version 1.11.2 or above.The unsigned access certificate is generated with the default certificate authorization file (
certificate_authorization.json) which uses0x0000003efor Authorizations and0xffffffb6(HSE-SVH device) for Tamper Authorizations (Table Elements of the Access Certificate on page).(Optional) Use
--authorizationoption if the customizedjsonfile generated in the above optional steps (a) and (b) is used.commander security gencert --device EFR32MG21B010F1024 --authorization certificate_authorizations.json --deviceserialno 000000000000000014b457fffe0f77ce --cert-pubkey cert_pubkey.pem --extsign
The signing of the access certificate can be done by passing an unsigned access certificate to a Hardware Security Module (HSM) containing the Private Command Key.
In this example, the OpenSSL is used to sign the access certificate (
access_certificate.extsign) in Security Store with the Private Command Key (command_key.pem). The access certificate signature is in thecert_signature.binfile.openssl dgst -sha256 -binary -sign command_key.pem -out cert_signature.binaccess_certificate.extsignRun the
util signcertcommand with the following parameters to verify the signature and generate the signed access certificate (access_certificate.bin):Unsigned access certificate
Access certificate signature
Public Command Key
commander util signcert access_certificate.extsign --cert-type access --signature cert_signature.bin --verify command_pubkey.pem --outfile access_certificate.binR = 76CDC5BA18E5248FDA5418002F250F149B449829A005D6F0726268016CC53ED4 S = E4B8ABA2CF742B0E6CC5BA2C1023D76BEEF3C4A11DA97CC4D23459F32237A206 Successfully verified signature Successfully signed certificate DONENotes:
Put the required files in the same folder to run the command.
The
util signcertcommand for access certificate is only available in Simplicity Commander Version 1.11.2 or above.The access certificate signature can be in a Raw or Distinguished Encoding Rules (DER) format.
The access certificate is passed to the Product Company. The purpose of the access certificate is to grant overall debug access capabilities to the Product Company and authorize them to allow third parties to debug the device. The Product Company can now use the access certificate to generate the Disable Tamper Token. The same access certificate can be used to generate as many Disable Tamper Tokens as necessary without having to ever go back to the Direct Customer.
To create the Disable Tamper Token, a debug session must be started with the device and the challenge value (which is a random number
Challenge 1in this example) should be read out to generate the challenge response.Run the
security gencommandcommandto generate the challenge response without disable tamper command signature and store it in a file (command_unsign.bin).commander security gencommand --action disable-tamper --disable-param 0x00fa0000 -o command_unsign.bin --nostore --device EFR32MG21B010F1024 --serialno 440030580Unsigned command file written to: command_unsign.bin DONEThe tamper disable mask (
0x00fa0000) is based on the Tamper platform example on EFR32xG21B devices (Table PRS Tamper Source Usage on EFR32xG21B Devices).If the
--disable-paramoption is not provided, it will restore all tamper sources (0xffffffb6) by default.
The challenge response is then cryptographically hashed (SHA-256) to create a digest. The digest is then signed by the Private Certificate Key to generate the disable tamper command signature.
The signing of the challenge response can be done by passing an unsigned challenge response to a Hardware Security Module (HSM) containing the Private Certificate Key.
In this example, the OpenSSL is used to sign the challenge response (
command_unsign.bin) with the Private Certificate Key (cert_key.pem). The disable tamper command signature is in thecommand_signature.binfile.openssl dgst -sha256 -binary -sign cert_key.pem -out command_signature.bincommand_unsign.binRun the
security disabletampercommand with the access certificate (access_certificate.bin) from Direct Customer and disable tamper command signature (command_signature.bin) in step 7 to generate the Disable Tamper Token.commander security disabletamper --disable-param 0x00fa0000 --cert access_certificate.bin --command-signature command_signature.bin EFR32MG21B010F1024 --serialno 440030580Certificate written to Security Store: C:/Users/<username>/AppData/Local/SiliconLabs/commander/SecurityStore/device_000000000000000014b457fffe0f77ce/access_certificate.bin R = A70834D97640A92510D151765F0EED6C6A05CB8BE81E06E905C230ED24E71659 S = 9B69C113C2B7DEE60BF0BC7D72719F7F9465840D68EADBBB4F9BCE7A1267B936 Command signature is valid Tamper successfully disabled. Command disable tamper payload was stored in Security Store DONENotes:
Put the required files in the same folder to run the command.
The disable tamper command signature can be in a Raw or Distinguished Encoding Rules (DER) format.
Simplicity Commander Version 1.11.2 or above is required to support signature in DER format.
(Alternative) Key protection is not required if the Private Certificate Key is ephemeral. Steps 6 to 8 can be implemented by running the
security disabletampercommand with the access certificate (access_certificate.bin) from the Direct Customer and Private Certificate Key (cert_key.pem) to generate the Disable Tamper Token.commander security disabletamper --disable-param 0x00fa0000 --cert access_certificate.bin --cert-privkey cert_key.pem --device EFR32MG21B010F1024 --serialno 440030580Certificate written to Security Store: C:/Users/<username>/AppData/Local/SiliconLabs/commander/SecurityStore/device_000000000000000014b457fffe0f77ce/access_certificate.bin Cert key written to Security Store: C:/Users/<username>/AppData/Local/SiliconLabs/commander/SecurityStore/device_000000000000000014b457fffe0f77ce/cert_pubkey.pem Created unsigned disable tamper command Signed disable tamper command using C:/Users/<username>/AppData/Local/SiliconLabs/commander/SecurityStore/device_000000000000000014b457fffe0f77ce/cert_key.pem Tamper successfully disabled. Command disable tamper payload was stored in Security Store DONEThe Disable Tamper Token (aka
Command disable tamper payload) file (tamper_payload_111110100000000000000000.bin, where111110100000000000000000is0x00fa0000for tamper disable mask) is stored in the Security Store. The location in Windows isC:\Users\<PC user name>\AppData\Local\SiliconLabs\commander\SecurityStore\device_<Serial number>\challenge_<Challenge value>.
Users can also use the
security getpathcommand to get the path of the Security Store or a specified device.commander security getpathC:/Users/<username>/AppData/Local/SiliconLabs/commander/SecurityStore DONEcommander security getpath --deviceserialno 0000000000000000588e81fffe70350dC:/Users/<username>/AppData/Local/SiliconLabs/commander/SecurityStore/device_0000000000000000588e81fffe70350d DONEThe Disable Tamper Token and the device are now delivered to the Debug
Party. Run the
security gencommandcommand to create the Security Store to place the Disable Tamper Token file.commander security gencommand --action disable-tamper --disable-param 0x00fa0000 --device EFR32MG21B010F1024 --serialno 440030580Unsigned command file written to Security Store: C:/Users/<username>/AppData/Local/SiliconLabs/commander/SecurityStore/device_000000000000000014b457fffe0f77ce/challenge_8e7f73e6322edda06b62997155334f29/disable_tamper_command_to_be_signed09_08_2021.bin DONECopy the Disable Tamper Token file (
tamper_payload_111110100000000000000000.bin) from Product Company to the Windows Security Storechallenge_<Challenge value>folder located inC:\Users\<PC username>\AppData\Local\SiliconLabs\commander\SecurityStore\device_<Serial number>\challenge_<Challenge value>.The device compares the Disable Tamper Token contents with its internal serial number, challenge value, and Public Command Key to determine the token’s authenticity. If authentic, it will execute the disable tamper command to restore the default levels on the tamper disable mask (
0xfa000000); otherwise, it will ignore the command.Run the
security disabletampercommand to disable the tamper.commander security disabletamper --disable-param 0x00fa0000 --device EFR32MG21B010F1024 --serialno 440030580Disabling tamper with tamper payload: C:/Users/<username>/AppData/Local/SiliconLabs/commander/SecurityStore/device_000000000000000014b457fffe0f77ce/challenge_8e7f73e6322edda06b62997155334f29/tamper_payload_111110100000000000000000.binTamper successfully disabled. DONENote: Users can verify the Disable Tamper Token by following steps 4 to 6 in Tamper Disable if the EFR32xG21B device is running in the Normal mode of the SE Manager Tamper platform example.
The Debug
Party can now use this same Disable Tamper Token to disable the tamper (step 12), over and over again after each power-on or pin reset, until they have finished debugging the device. Once the Debug
Party has finished debugging, they will send the device back to the Product Company. Once the Product Company receives the device, they will immediately start a debug session to roll the challenge (from
Challenge 1toChallenge 2in this example). Rolling the challenge will effectively invalidate any Disable Tamper Token that has been previously given to any third party.Run the
security rollchallengecommand and reset the device to invalidate the current Disable Tamper Token. The challenge cannot be rolled before it has been used at least once — that is, by running thesecurity disabletamperorsecurity unlockcommand.commander security rollchallenge --device EFR32MG21B010F1024 --serialno 440030580Challenge was rolled successfully. DONEThe unlock token is invalidated after rolling the challenge because any previously issued Disable Tamper Token now contains a different challenge value (
Challenge 1) than the challenge value currently in the device (Challenge 2).The validation process of any previously issued Disable Tamper Token will always fail until a new Disable Tamper Token is issued with a current matching challenge value (
Challenge 2).
Note: Direct Customer can directly use the Private Command Key on the connected chip to generate the Disable Tamper Token in Security Store. But it has a high risk (cannot use HSM) to leak the Private Command Key to a
party when using this approach.
commander security disabletamper --disable-param 0x00fa0000 --command-key command_key.pem
--device EFR32MG21B010F1024 --serialno 440030580Simplicity Studio#
Open Security Settings of the selected device as described in Using Simplicity Studio.
Click [Roll Challenge] to generate a new challenge value to invalidate the Disable Tamper Token for tamper disable. Click [OK] to exit.
