File System Programming Guide#
The following sections explain how to use different aspects of the file system, such as handling block devices, managing removable media, creating a cache, etc.
Setting Up and Opening a Block Device#
This section describes how to set up and open a block device instance. The procedure is the same no matter which underlying media type is used, so the provided examples can be used to set up a block device on a variety of media types, including SD card, SCSI logical unit, RAM disk or NOR/NAND flash memory. There are, however, advanced configurations and APIs that are media-specific. Refer to the NAND, NOR and SD-specific options in the subsection Storage Configuration for more details about media-specific advanced configurations. Refer also to Media-Specific Operations for more details about media-specific functions.
Initializing the Storage Sub-Module#
Listing - Initializing the Block Device Sub-Module in the Setting Up and Opening a Block Device page illustrates how to initialize the file system's storage sub-module. The function FSStorage_Init() allocates and initializes internal data structures, and should be called only once. The storage sub-module can be configured using the optional advanced configuration API covered in File System Run-time Configuration .
Listing - Initializing the Block Device Sub-Module#
RTOS_ERR err;
FSStorage_Init(&err);
if (err.Code != RTOS_ERR_NONE) {
/* An error occurred. Error handling should be added here. */
}Opening and Closing a Block Device#
Once the storage sub-module is initialized, the block device is ready to be opened. A block device can be opened using FSBlkDev_Open() and closed using FSBlkDev_Close(), as shown in Listing - Opening a Block Device in the Setting Up and Opening a Block Device page. Notice the call to FSMedia_Get() embedded in the FSBlkDev_Open() function call. Though it is not the only way of retrieving and providing a media handle to FSBlkDev_Open(), this is a compact and convenient way of doing so, based on the media name (see File System Basic Concepts for more details on media and media names).
Listing - Opening a Block Device#
FS_BLK_DEV_HANDLE blk_dev_handle;
RTOS_ERR err;
blk_dev_handle = FSBlkDev_Open(FSMedia_Get("sd0"), &err);
if (err.Code != RTOS_ERR_NONE) {
/* An error occurred. Error handling should be added here. */
}
/* The block device handle can be used here to perform block device operations. */
FSBlkDev_Close(blk_dev_handle, &err);
if (err.Code != RTOS_ERR_NONE) {
/* An error occurred. Error handling should be added here. */
}Low-Level Formatting Storage Media#
NOR and NAND flash memories need to be low-level formatted before a block device can be opened on top of them. This can be done using FSMedia_LowFmt() as shown in Listing - Low-Level Formatting a Media in the Setting Up and Opening a Block Device page. The first example (version 1) shows the situation where you want to low-level format the media explicitly, regardless of any existing on-disk formatting information. Version 2 shows a generic way to low-level format only if the media has an invalid format. For media other than NOR and NAND flash memories, FSMedia_LowFmt() does nothing.
Listing - Low-Level Formatting a Media#
FS_MEDIA_HANDLE media_handle;
FS_BLK_DEV_HANDLE blk_dev_handle;
RTOS_ERR err;
/* ---------------- VERSION 1 ---------------- */
media_handle = FSMedia_Get("nand0"); (1)
FSMedia_LowFmt(media_handle, &err); (2)
if (err.Code != RTOS_ERR_NONE) {
/* An error occurred. Error handling should be added here. */
}
blk_dev_handle = FSBlkDev_Open(media_handle, &err); (3)
if (err.Code != RTOS_ERR_NONE) {
/* An error occurred. Error handling should be added here. */
}
/* ---------------- VERSION 2 ---------------- */
media_handle = FSMedia_Get("nand0"); (4)
blk_dev_handle = FSBlkDev_Open(media_handle, &err); (5)
if (err.Code != RTOS_ERR_NONE) {
if (err.Code == RTOS_ERR_BLK_DEV_FMT_INVALID) { (6)
FSMedia_LowFmt(media_handle, &err);
if (err.Code != RTOS_ERR_NONE) {
/* An error occurred. Error handling should be added here. */
}
} else {
/* An error occurred. Error handling should be added here. */
}
blk_dev_handle = FSBlkDev_Open(media_handle, &err); (7)
if (err.Code != RTOS_ERR_NONE) {
/* An error occurred. Error handling should be added here. */
}
}(1) In Version 1, the media handle associated with the string ID nand0 is obtained.
(2) Low-level format is performed explicitly regardless of the media on-disk formatting information.
(3) A block device is open on the media. A block device handle is obtained and can be used to open a volume on the media.
(4) In Version 2, once again the media handle associated to the string ID nand0 is retrieved.
(5) This time an attempt to open a block device on the media is done. If the open operation succeeds, it means that the media has a valid format and you can continue by opening a volume for instance.
(6) If the block device open operation fails, the error type is checked. If it matches RTOS_ERR_BLK_DEV_FMT_INVALID meaning invalid format, a low-level format is performed by calling FSMedia_LowFmt().The low-level format is required only for NAND and NOR devices. Other media types such as SD or RAM disk do not need a low-level format. If FSMedia_LowFmt() is called for SD or RAM disk, the function does nothing and returns successfully.
(7) Upon success of FSMedia_LowFmt(), a new attempt to open the block device on the media is done. This block device opening should be successful.
Performing Raw Block Device Operations#
This section describes how to perform raw block device operations. If you are interested only in dealing with the file and directory abstraction, you can ignore this section and jump directly to Creating and Accessing Files and Directories . Please note that although operations performed at the block device level are lower-level that file operations, these operations do not necessarily target physical blocks, pages or sectors of the underlying media. They target logical blocks as opposed to physical blocks/pages/sectors. This distinction is very important in the case of flash memories.
Reading From and Writing to a Block Device#
Assuming that a block device handle has been acquired by calling FSBlkDev_Open(), you can read from and write to the block device using FSBlkDev_Rd() and FSBlkDev_Wr() respectively. Listing - Reading from and Writing to a Block Device in the Performing Raw Block Device Operations page shows how this is done.
Listing - Reading from and Writing to a Block Device#
CPU_INT08U RdWrBuf[MY_BLK_DEV_LB_SIZE];
RTOS_ERR err;
/* Initialize write buffer with known pattern. */
for (CPU_INT32U k = 0u; k < MY_BLK_DEV_LB_SIZE; k++) {
RdWrBuf[k] = (CPU_INT08U)k;
}
/* Write block 0 (first block). */
FSBlkDev_Wr(blk_dev_handle, /* Block device handle identifying media to write to. */
&RdWrBuf[0],
0u, /* Block number from where starting writing to. */
1u, /* Number of blocks to write. */
&err);
if (err.Code != RTOS_ERR_NONE) {
/* An error occurred. Error handling should be added here. */
}
/* Clear read buffer. */
Mem_Clr((void *)&RdWrBuf[0], sizeof(RdWrBuf));
/* Read block 0 back. */
FSBlkDev_Rd(blk_dev_handle, /* Block device handle identifying media to read from.*/
&RdWrBuf[0],
0u, /* Block number from where starting reading from. */
1u, /* Number of blocks to read. */
&err);
if (err.Code != RTOS_ERR_NONE) {
/* An error occurred. Error handling should be added here. */
}
/* Check that read and write data match. */
for (CPU_INT32U k = 0u; k < MY_BLK_DEV_LB_SIZE; k++) {
if (RdWrBuf[k] != (CPU_INT08U)k) {
printf("Mismatch at index %u.\r\n", k);
while (1);
}
}Querying the Block Size and Block Count#
In Listing - Reading from and Writing to a Block Device in the Performing Raw Block Device Operations page the logical block size is already known, so that the read/write buffer is allocated statically. In other contexts, such as when dealing with removable media, it might not be possible to know the block size beforehand, and so a run-time mechanism must be used to retrieve block device information dynamically. The FSBlkDev_LbSizeGet() and FSBlkDev_LbCntGet() functions return the logical block size and the logical block count, respectively. Their usage is illustrated in Listing - Querying Block Device Block Size and Block Count in the Performing Raw Block Device Operations page.
Listing - Querying Block Device Block Size and Block Count#
FS_LB_SIZE lb_size;
FS_LB_QTY lb_cnt;
RTOS_ERR err;
lb_size = FSBlkDev_LbSizeGet(blk_dev_handle, &err);
if (err.Code != RTOS_ERR_NONE) {
/* An error occurred. Error handling should be added here. */
}
lb_cnt = FSBlkDev_LbCntGet(blk_dev_handle, &err);
if (err.Code != RTOS_ERR_NONE) {
/* An error occurred. Error handling should be added here. */
}
printf("The block device has %u blocks of %u octets.", lb_cnt, lb_size);Syncing a Block Device#
Although the write buffer provided to the FSBlkDev_Wr() function may be reused as soon as the function returns, there is no guarantee that the written data has yet reached its final destination on the physical media. This is because the data may be buffered/cached either by the media driver or by the media itself. To force the data on the physical media explicitly, your application can use the function FSBlkDev_Sync() as demonstrated in Listing - Syncing a Block Device in the Performing Raw Block Device Operations page.
When using the file write API , you can use FSBlkDev_Sync() to force the data to be synced to the physical media. However, you are not obliged to perform an explicit sync after each file write. When opening a volume with FSVol_Open(), you can specify an option that controls the auto-sync on the volume. By default, auto sync is disabled to maximize write performance. When auto-sync is enabled, a media sync is done at the end of each write access (for instance file write, file rename, file truncate, etc.) to the media. When auto-sync is off, the sync points are performed less frequently; for example, only when the cache buffers containing the data to be written on the physical media are full. In this case, you might have performed multiple write accesses between two sync points. |
|---|
Listing - Syncing a Block Device#
CPU_INT08U RdWrBuf[MY_BLK_DEV_LB_SIZE] = {0};
RTOS_ERR err;
/* Zero out block 0 (first block). */
FSBlkDev_Wr(blk_dev_handle,
&RdWrBuf[0],
0u, /* Block number from where starting writing to. */
1u, /* Number of blocks to write. */
&err);
if (err.Code != RTOS_ERR_NONE) {
/* An error occurred. Error handling should be added here. */
}
/* At this point the data may NOT have reached the physical media yet. */
/* If a power failure occurs here, the data may be lost. */
/* Force media syncing. */
FSBlkDev_Sync(blk_dev_handle, &err);
if (err.Code != RTOS_ERR_NONE) {
/* An error occurred. Error handling should be added here. */
}
/* From this point on, data is guaranteed to have reached the physical media. */Creating and Assigning a Cache#
Before a block device can be accessed through the file system core interfaces, a cache must be assigned.
In its most basic form, the cache is a single buffer tied to a given block device. In more advanced usage schemes, the cache may contain many blocks shared across several block devices. In both scenarios, the cache is used for reading and writing file system metadata as well as performing read/modify/write accesses on user data. Moreover, cache blocks can be used as intermediate buffers to accommodate alignment mismatches between user-provided buffers and low-level drivers requirements.
Assigning a Cache on a Per-Device Basis#
The simplest way of assigning a cache to a block device is by using FSCache_DfltAssign(), as shown in Listing - Assigning a Cache on a Per-Device Basis in the Creating and Assigning a Cache page. This will assign a cache with the specified number of blocks (4 blocks in the listing) to the given block device. The function FSCache_DfltAssign() handles the calls to the FSCache_Create() and FSCache_Assign() functions described in Listing - Assigning a Cache Instance to Multiple Block Devices in the Creating and Assigning a Cache page. Apart from the number of blocks that you must specify, FSCache_DfltAssign() uses default values for the cache configuration that will be associated to the block device. The cache configuration is composed of:
The memory segment from where the cache buffers will be allocated.
The requested cache buffer alignment in case the storage media driver uses a DMA engine for the media transfers.
The maximum logical block size to consider.
The minimum logical block size to consider.
The number of cache blocks allowed for the cache instance.
The default values determined by FSCache_DfltAssign() will be:
Memory segment: most of the time, this will be the default File System Core layer memory segment. That is the heap segment, unless you have changed the memory segment using FSCore_ConfigureMemSeg().
Buffer alignment: default alignment associated to the given block device.
Maximum logical block size: logical block size of the given block device. In the example, the SD logical block size is almost always 512 bytes.
Minimum logical block size: logical block size of the given block device. Note that the minimum and maximum block size are the same.
Number of cache blocks: the value you have specified as an argument to FSCache_DfltAssign(). In the example, 4 blocks.
Note that FSCache_DfltAssign() returns a pointer to the created cache instance. This pointer can be used with the following functions:
FSCache_Assign(): you may assign the same cache instance to another block device. The File System allows sharing of the same cache instance across different block devices as explained in Sharing a Cache across Multiple Block Devices . Be aware that the block devices must have the same logical block size if you use FSCache_DfltAssign() to share a cache instance.
FSCache_MinBlkSizeGet(): you can verify the minimum logical block size that the function FSCache_DfltAssign() has determined.
FSCache_MaxBlkSizeGet(): you can verify the maximum logical block size that the function FSCache_DfltAssign() has determined.
Listing - Assigning a Cache on a Per-Device Basis#
FS_BLK_DEV_HANDLE blk_dev_handle;
blk_dev_handle = FSBlkDev_Open(FSMedia_Get("sd0"), &err);
if (err.Code != RTOS_ERR_NONE) {
/* An error occurred. Error handling should be added here. */
}
(void)FSCache_DfltAssign(blk_dev_handle, 4u, &err);
if (err.Code != RTOS_ERR_NONE) {
/* An error occurred. Error handling should be added here. */
}
/* From now on, file system core API's can be used on this block device. */Sharing a Cache Across Multiple Block Devices
A cache instance can be shared across multiple block devices. This sharing capability allows you to achieve the best possible trade-off between RAM usage and performance. In fact, sharing a cache instance reduces the relative overhead of the cache data structures (used for internal bookkeeping) and possibly the memory footprint associated with the cache blocks themselves (a single cache block can be shared across as many devices as you want). However, sharing also means a higher probability of block trashing, that is blocks being constantly evicted and read back, which could reduce the overall performance.
Listing - Assigning a Cache Instance to Multiple Block Devices in the Creating and Assigning a Cache page shows how to create a cache instance that can be shared between two block devices with different logical block sizes and different alignment requirements. The approach demonstrated here is completely generic in the sense that block device parameters are determined programmatically. However, for applications that do not require this level of generality (for example, where all block sizes are known beforehand and the code will always run on the same platform), block device parameters could simply be hard coded.
Note that cache_cfg.BlkCnt determines the number of blocks of size cache_cfg.MaxBlkSize. In general, the cache will contain cache_cfg.BlkCnt * (cache_cfg.MaxBlkSize / lb_size) blocks of size lb_size.
Also note the use of DEF_MAX() to determine the alignment requirement common to both block devices: this assumes that one of the alignment requirement is a divisor of the other. Otherwise, the least common multiple should be computed.
Listing - Assigning a Cache Instance to Multiple Block Devices#
FS_BLK_DEV_HANDLE nor_blk_dev_handle;
FS_BLK_DEV_HANDLE sd_blk_dev_handle;
FS_CACHE_CFG cache_cfg;
/* Open an SD block device. */
sd_blk_dev_handle = FSBlkDev_Open(FSMedia_Get("sd0"), &err);
if (err.Code != RTOS_ERR_NONE) {
/* An error occurred. Error handling should be added here. */
}
/* Open a NOR block device. */
nor_blk_dev_handle = FSBlkDev_Open(FSMedia_Get("nor0"), &err);
if (err.Code != RTOS_ERR_NONE) {
/* An error occurred. Error handling should be added here. */
}
/* Get SD block device needed alignment. */
sd_align_req = FSMedia_AlignReqGet(FSMedia_Get("sd0"), &err);
if (err.Code != RTOS_ERR_NONE) {
/* An error occurred. Error handling should be added here. */
}
/* Get NOR block device needed alignment. */
nor_align_req = FSMedia_AlignReqGet(FSMedia_Get("nor0"), &err);
if (err.Code != RTOS_ERR_NONE) {
/* An error occurred. Error handling should be added here. */
}
/* Get SD logical block size. */
sd_lb_size = FSBlkDev_LbSizeGet(sd_blk_dev_handle, &err);
if (err.Code != RTOS_ERR_NONE) {
/* An error occurred. Error handling should be added here. */
}
/* Get NOR logical block size. */
nor_lb_size = FSBlkDev_LbSizeGet(nor_blk_dev_handle, &err);
if (err.Code != RTOS_ERR_NONE) {
/* An error occurred. Error handling should be added here. */
}
/* Set cache configuration according to SD & NOR. */
cache_cfg.MinBlkSize = DEF_MIN(sd_lb_size, nor_lb_size);
cache_cfg.MaxBlkSize = DEF_MAX(sd_lb_size, nor_lb_size);
cache_cfg.BlkCnt = 1u;
cache_cfg.BlkMemSegPtr = DEF_NULL;
cache_cfg.Align = DEF_MAX(sd_align_req, nor_align_req);
/* Create 1 cache instance shared by SD & NOR. */
p_cache = FSCache_Create(&cache_cfg, &err); /* A pointer to cache instance is returned. */
if (err.Code != RTOS_ERR_NONE) {
/* An error occurred. Error handling should be added here. */
}
/* Assign cache to SD passing the pointer to cache. */
FSCache_Assign(sd_blk_dev_handle, p_cache, &err);
if (err.Code != RTOS_ERR_NONE) {
/* An error occurred. Error handling should be added here. */
}
/* Assign cache to NOR passing the pointer to cache. */
FSCache_Assign(nor_blk_dev_handle, p_cache, &err);
if (err.Code != RTOS_ERR_NONE) {
/* An error occurred. Error handling should be added here. */
}
/* From now on, file system core API's can be used on SD & NOR block devices. */Cache Flush Points#
Cache flush points correspond to the moment where the cache module flushes its buffers' content to the physical media. Inside the File System Core layer, there are two types of flush points:
Implicit flush point
Explicit flush point
Implicit flush points occur when the cache module has no more buffers available. It flushes one buffer from among all of the full buffers. The flushed buffer is reused to cache either new file system metadata or file data. Implicit flush points can happen at any moment when performing any file or directory operation. The non-exhaustive list below indicates which functions can trigger an implicit flush:
FSPartition_Init()
FSPartition_Add()
FS_FAT_Fmt()
FSVol_Open()
FSVol_LabelSet()
FSVol_LabelGet()
FSFile_Open()
FSFile_Rd()
FSFile_Wr()
FSFile_Truncate()
FSFile_Copy()
FSDir_Open()
FSDir_Rd()
FSEntry_Create()
FSEntry_Rename()
FSEntry_AttribSet()
FSEntry_TimeSet() (this function is deprecated and will be replaced by sl_fs_entry_time_set() in a next release)
Your application can slightly influence the frequency of implicit flush points in three situations:
By creating a cache instance with several buffers available. This is accomplished when your application calls FSCache_Create() and configures a large number of buffers (field FS_CACHE_CFG.MinBlkCnt). If more buffers are available to the cache module, it needs to flush a buffer less often. However, this influence is limited. If your application accesses different logical blocks of the device, the chances are that all these logical blocks are cached and thus occupy all of the available cache buffers. In that case, implicit flush points occur anyway at a certain frequency.
By frequently accessing the same logical blocks of your media. If your application is often reading or writing the same sectors of a file, and the number of available cache buffers is large enough, all these accessed sectors have been cached at least once. And the cache module will not necessarily need to flush a buffer, since the sectors' data are already cached.
By accessing the logical blocks in very small chunks. For example, if you write a few 512-byte sectors by chunks of 20 bytes, and you have four cache buffers available, the implicit flush points may become less frequent due to the numerous file writes that end up in the cache before exhausting the cache buffer pool.
Even if you can influence the frequency of implicit flush points a little bit, they remain an asynchronous operation because they happen when the cache module needs to free one of its buffers.
Explicit flush points occur in two cases:
During pre-determined locations inside some file operations
When your application syncs the volume
In these cases, an explicit flush point flushes all the buffers containing cached data, and they happen in addition to the implicit flush points. In contrast to implicit flush points, explicit flush points are synchronous operations because you control when they happen. Explicit flush points allow your application to create its own flush points to ensure that your data is synced regularly on the physical media.
The pre-determined locations for explicit flush points are activated if the volume's auto-sync option is enabled. You can enable this option via the parameter opt of the function FSVol_Open(). When the volume's auto-sync is on, an explicit flush point occurs at the end of the following functions:
FSFile_Wr()
FSFile_Truncate()
FSFile_Copy()
FSFile_Close()
FSEntry_Create()
FSEntry_Del()
FSEntry_Rename()
FSEntry_AttribSet()
FSEntry_TimeSet() (this function is deprecated and will be replaced by sl_fs_entry_time_set() in a next release)
The volume sync is done by calling the function FSVol_Sync().
Creating and Formatting Partitions#
Micrium OS File System is able to read and create DOS-like partitions. By default, support for partition handling is enabled, but it can be disabled at compile-time via FS_CORE_CFG_PARTITION_EN if it is not needed. If support for partitions is disabled, only the first partition can be read (even though more partitions may exist on the block device). The partition table is part of the Master Boot Record (MBR) sector. The block device can be used without a partition table (that is no MBR is created) In that case, all its blocks are part of an implicit large partition spanning the whole device.
Note that although Micrium OS File System is able to read extended partitions, it does not support creating extended partitions. This means that Micrium OS File System cannot create more than four partitions on a given block device. |
|---|
Creating a Partition Table#
Creating a partition table involves deleting any partition table that may already exist in the MBR, effectively obliterating all the data that the block device may contain. Make sure that the block device on which you want to create the new partition table does not contain any valuable data before proceeding. |
|---|
A partition table, part of the MBR sector, can be created using FSPartition_Init() as shown in Listing - Creating a Partition Table in the Creating and Formatting Partitions page(assuming that the block device has been previously opened, and a cache assigned, as shown in Setting Up and Opening a Block Device and Creating and Assigning a Cache ).
In addition to creating a new partition table, FSPartition_Init() also creates the first partition on the device, hence the second parameter, which specifies the size of the first partition in logical blocks. Here, a partition containing 1 000 000 logical blocks is created. Assuming 512-byte logical blocks, this is a 512MB partition.
Listing - Creating a Partition Table#
FS_BLK_DEV_HANDLE blk_dev_handle;
RTOS_ERR err;
/* Open a block device here using FSBlkDev_Open(). */
FSPartition_Init(blk_dev_handle,
1000000u, /* Partition size in number of logical blocks. */
&err);
if (err.Code != RTOS_ERR_NONE) {
/* An error occurred. Error handling should be added here. */
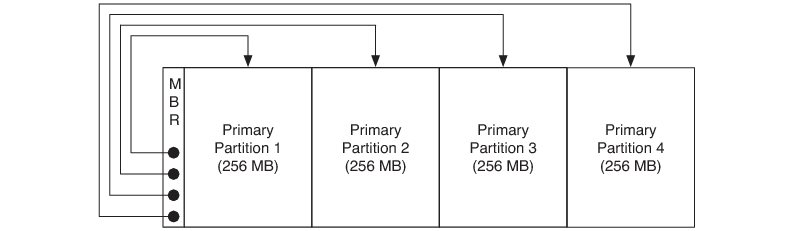
}After this call, the block device will be divided as shown in Figure - Block Device after Partition Initialization in the Creating and Formatting Partitions page. This new partition is called a primary partition because its entry is in the MBR. The four circles in the MBR represent the four partition entries; the one that is now used ‘points to’ Primary Partition 1.
Figure - Block Device after Partition Initialization#

Adding a New Partition#
Once a partition table has been created (along with the first partition), more partitions can be added using FSPartition_Add() as illustrated in Listing - Adding Partitions in the Creating and Formatting Partitions page. If no partition table has been created explicitly, it is created first.
Listing - Adding Partitions#
FS_BLK_DEV_HANDLE blk_dev_handle;
RTOS_ERR err;
/* Open a block device here using FSBlkDev_Open(). */
FSPartition_Add(blk_dev_handle, (1)
100000u, /* Partition size in number of logical blocks. */
&err);
if (err.Code != RTOS_ERR_NONE) {
/* An error occurred. Error handling should be added here. */
}(1) This call adds one partition besides the initial partition created if FSPartition_Init() has been previously called or create the first partition along with the MBR sector if FSPartition_Init() has not been previously called. FSPartition_Add() must be called for each partition you want to create. For example, if you need to create three more partitions, call FSPartition_Add() three times. In this example,
the device is divided as shown in Figure - Block Device after Four Partitions Have Been Created in the Creating and Formatting Partitions page.
Figure - Block Device after Four Partitions Have Been Created#
Formatting an Existing Partition#
Before a partition can be used to store actual contents, it must be populated with file system metadata. The process of writing appropriate file system metadata on disk is called formatting, and it is specific to a given file system driver. FAT is the only file system driver currently supported by Micrium OS File System, and so formatting is performed using FS_FAT_Fmt() as shown in Listing - Formatting a Partition in the Creating and Formatting Partitions page (assuming that at least one partition has been created, or that no partition table is used at all). The second parameter (here 1u) specifies the number of the partition that will be formatted. The first partition has number 1, the second partition has number 2, and so on. The third parameter (here DEF_NULL) may optionally be used to specify FAT volume parameters and is covered in details in FS_FAT_Fmt().
Listing - Formatting a Partition#
FS_BLK_DEV_HANDLE blk_dev_handle;
RTOS_ERR err;
/* Open a block device here using FSBlkDev_Open(). */
FS_FAT_Fmt(blk_dev_handle,
1u, /* Partition #1 to format. */
DEF_NULL, /* Default FAT configurations. */
&err);
if (err.Code != RTOS_ERR_NONE) {
/* An error occurred. Error handling should be added here. */
}Extended Partitions#
When first instituted, DOS partitioning was a simple scheme allowing up to four partitions, each with an entry in the MBR. It was later extended for larger devices requiring more with extended partitions, partitions that contains other partitions. The primary extended partition is the extended partition with its entry in the MBR; it should be the last occupied entry.
An extended partition begins with a partition table that has up to two entries (typically). The first defines a secondary partition which may contain a file system. The second may define another extended partition; in this case, a secondary extended partition, which can contain yet another secondary partition and secondary extended partition. Basically, the primary extended partition heads a linked list of partitions.
Figure - Block Device with Five Partitions#
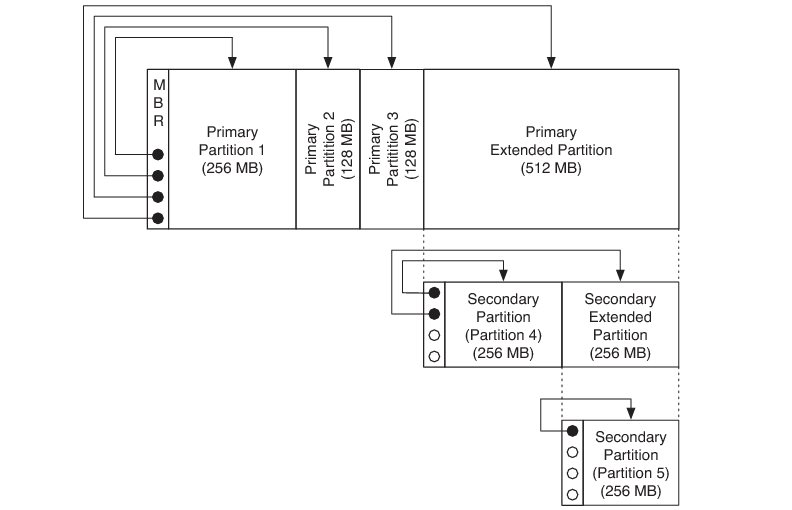
Reading secondary partitions in existing pre-formatted devices is supported by Micrium OS File System. For the moment, the creation of extended and secondary partitions is not supported in Micrium OS File System.
Volume Operations#
This section describes the high-level file system API that you can use to manage a volume.
There are four general operations that can be performed on a volume:
A volume can be opened (mounted). During the opening of a volume, file system control structures are read from the underlying block device, parsed and verified.
Files can be accessed on a volume. A file is a linear data sequence (the file's content) that is associated with some logical, typically human-readable identifier (a file name). Additional properties, such as size, update date/time, and access mode (for example read-only, write-only, read-write) may be associated with a file. File accesses consist of reading data from files, writing data to files, creating new files, renaming files, copying files, and so on. A file access is accomplished via the file module-level functions, which are covered in Creating and Accessing Files and Directories .
Directories can be accessed on a volume. A directory is a container for files and other directories. Operations include iterating through the contents of the directory, creating new directories, renaming directories, etc. A directory access is accomplished via the directory module-level functions, which are covered in Creating and Accessing Files and Directories .
A volume can be closed (unmounted). During volume closing, any cached data is written to the underlying device and associated structures are freed.
Opening and Closing a Volume#
A volume can be opened using FSVol_Open() and closed using FSVol_Close(), as shown in Listing - Opening a Volume in the Volume Operations page.
Listing - Opening a Volume#
FS_VOL_HANDLE vol_handle;
RTOS_ERR err;
/* Assume that a block device has previously been opened with FSBlkDev_Open(). */
/* You may have to format the partition with FS_FAT_Fmt() before opening a volume. */
(1)
/* Open a volume named "vol0". */
vol_handle = FSVol_Open(blk_dev_handle, /* Handle to block device where volume is opened. */
1u, /* Partition #1. */ (2)
"vol0", /* Unique volume name across all open volumes. */
FS_VOL_OPT_DFLT, /* Default options: write allowed, auto sync disabled. */ (3)
&err);
if (err.Code != RTOS_ERR_NONE) {
/* An error occurred. Error handling should be added here. */
}
/* You can now perform any file and directory operations in the opened volume. */
/* Close the volume. */
FSVol_Close(vol_handle, &err);
if (err.Code != RTOS_ERR_NONE) {
/* An error occurred. Error handling should be added here. */
}(1) Prior to opening the volume, you may need to high-level format the partition on which you want to open a volume. This is accomplished with the function FS_FAT_Fmt(), which is a file system-specific function. Refer to the section Formatting an Existing Partition for more details.
(2) The partition number uses a one-based index. Thus, the partition number #0 cannot be specified.
(3) The fourth argument allows you to indicate the volume's options. If the option FS_VOL_OPT_DFLT is used, the volume is opened with the following default options:
Write allowed
Auto-sync disabled
The other possible options are:
FS_VOL_OPT_ACCESS_MODE_RD_ONLY: volume in read-only. No write access is allowed.
FS_VOL_OPT_AUTO_SYNC: auto-sync is enabled. If this option is enabled, certain high-level operations will finish by explicitly flushing the cache instance. Refer to the section Cache Flush Points for more details about explicit cache flush points.
Syncing a Volume#
All high-level operations that imply a write access to the volume go through the cache module of the File System core. The volume's data (both file data and metadata) may be cached but not yet synced on the physical media. Two methods can be used to sync the data onto the physical media using explicit cache flush points (refer to the section Cache Flush Points for more details about explicit cache flush points):
Volume auto-sync option
Explicit volume sync
The volume auto-sync is enabled via the option FS_VOL_OPT_AUTO_SYNC passed to the function FSVol_Open(). Refer to the section Opening and Closing a Volume for more details.
The explicit volume sync is done when you call the function FSVol_Sync() as illustrated in Listing - Explicit Volume Sync in the Volume Operations page.
Listing - Explicit Volume Sync#
FS_VOL_HANDLE vol_handle;
/\* A volume must have been previously been opened with FSVol_Open(). \*/
/\* Sync volume by flushing the cache buffers. \*/
FSVol_Sync(vol_handle, &err);
if (err.Code != RTOS_ERR_NONE) {
/\* An error occurred. Error handling should be added here. \*/
}Obtaining Information Associated to a Volume#
The File System volume API offers some utility functions used to retrieve information associated to a given volume that may be useful for your application. There are five functions:
FSVol_Query(): this function provides pieces of information about certain volume characteristics.
FSVol_PartitionNbrGet(): this function provides the partition number on which the volume has been opened.
FSVol_BlkDevGet(): this function provides the block device handle associated to a given volume handle.
FSVol_NameGet(): this function returns the volume name associated to a given volume handle.
FSVol_Get(): this function does the opposite of FSVol_NameGet() by returning the volume handle associated to a given volume name.
Listing - Volume Utility Functions in the Volume Operations page presents an example of usage of these functions.
Listing - Volume Utility Functions#
FS_VOL_HANDLE vol_handle;
CPU_CHAR path_buf[50u];
FS_VOL_INFO vol_info;
FS_FAT_VOL_CFG fat_vol_info;
FS_PARTITION_NBR partition_nbr;
FS_BLK_DEV_HANDLE blk_dev_handle;
FS_LB_SIZE dev_lb_size;
RTOS_ERR err;
/* Assume that a volume named "test_vol" has previously been opened. */
/* -------------- UTILITY 1 -------------- */
/* Get information about the volume. */
FSVol_Query(vol_handle,
&vol_info, /* Structure receiving info about volume. */ (1)
&fat_vol_info, /* Optional info about volume file system. */ (2)
&err)
if (err.Code != RTOS_ERR_NONE) {
/* An error occurred. Error handling should be added here. */
}
printf("Volume info:\r\n");
printf("- Number of sectors used: %u\r\n", vol_info.UsedSecCnt);
printf("- Number of sectors free: %u\r\n", vol_info.FreeSecCnt);
printf("- Total number of sectors: %u\r\n", vol_info.TotSecCnt);
/* -------------- UTILITY 2 -------------- */
partition_nbr = FSVol_PartitionNbrGet(vol_handle, &err);
if (err.Code != RTOS_ERR_NONE) {
/* An error occurred. Error handling should be added here. */
}
/* -------------- UTILITY 3 -------------- */
FSVol_NameGet(vol_handle,
path_buf, /* Buffer receiving volume name */
50u, /* Buffer size in bytes. */
&err);
if (err.Code != RTOS_ERR_NONE) {
/* An error occurred. Error handling should be added here. */
}
/* Display retrieved information. */
printf("Volume '%s' is associated to partition #%u.\r\n", path_buf, partition_nbr);
/* -------------- UTILITY 4 -------------- */
(3)
blk_dev_handle = FSVol_BlkDevGet(vol_handle); /* Get block device handle. */
if (FS_BLK_DEV_HANDLE_IS_NULL(blk_dev_handle)) { (4)
/* An error occurred. Error handling should be added here. */
}
dev_lb_size = FSBlkDev_LbSizeGet(blk_dev_handle, &err); /* Get block device logical block size. */
if (err.Code != RTOS_ERR_NONE) {
/* An error occurred. Error handling should be added here. */
}
printf("Volume '%s' is associated to a block device whose block size is %u.\r\n", path_buf, dev_lb_size);(1) You must declare a volume information structure of type FS_VOL_INFO to retrieve the volume characteristics. All the fields of FS_VOL_INFO are described in FSVol_Query().
(2) You can optionally retrieve pieces of information about the file system formatted on the volume. In this example, information about FAT is obtained. Specify DEF_NULL if you don't need it.
(3) FSVol_BlkDevGet() returns the block handle associated to a given volume handle. With the block device handle, you can obtain block device characteristics such as the logical block size with function FSBlkDev_LbSizeGet(), the number of blocks using function FSBlkDev_LbCntGet() and the block device alignment requirement with function FSBlkDev_AlignReqGet().
(4) An utility macro called FS_BLK_DEV_HANDLE_IS_NULL() allows you to verify if the block device handle is valid, that is a non-null handle.
Creating and Accessing Files and Directories#
This page describes the high-level file system API that is used to manage files and directories.
Opening and Closing a Volume#
Before files can be created and accessed, a volume needs to be opened (or equivalently, a partition needs to be mounted). A volume can be opened using FSVol_Open()and closed using FSVol_Close()as shown in Listing - Opening a Volume in the Creating and Accessing Files and Directories page.
The volume name provided to the function FSVol_Open() must be unique. The volume name string can be anything you want, and there is no restricted format to follow. For instance, the volume name could be:
"vol0", "vol1", etc.: generic volume name with an incrementing number appended to the name
"nand:0", "nand:1", etc.: here the volume name is composed of the media name on which the volume is opened, 'nand', and an incrementing number appended and separated by a single colon ':'
FS_BLK_DEV_HANDLE blk_dev_handle;
FS_VOL_HANDLE vol_handle;
RTOS_ERR err;
/* Assumes that 'blk_dev_handle' points to a previously opened block device. */
/* Open a volume and name it "test_vol". */
vol_handle = FSVol_Open(blk_dev_handle,
1u, /* Open volume on formatted partition #1. */
"test_vol", /* Unique volume name across all open volumes. */
FS_VOL_OPT_DFLT, /* Default options: write allowed, auto sync disabled. */
&err);
if (err.Code != RTOS_ERR_NONE) {
/* An error occurred. Error handling should be added here. */
}
/* Perform operations on the volume here. */
/* Close the volume. */
FSVol_Close(vol_handle, &err);
if (err.Code != RTOS_ERR_NONE) {
/* An error occurred. Error handling should be added here. */
}Creating a File or a Directory#
There are two approaches for creating files and directories. The first one, using FSEntry_Create(), is shown in Listing - Creating a File or Directory using FSEntry Create() in the Creating and Accessing Files and Directories page. The second one, using FSFile_Open() nand FSDir_Open(), is covered in the sections Opening and Closing a File and Opening and Closing a Directory . There are only two entry types: directory or file.
Listing - Creating a File or Directory using FSEntry Create()#
RTOS_ERR err;
/* Assumes that a volume named "test_vol" has previously been opened. */
/* Create directory 'test_dir' in 'test_vol' root directory. */
FSEntry_Create(FS_WRK_DIR_NULL, /* NULL working directory means absolute path used. */
"test_vol/test_dir", /* Absolute path to directory to create. */
FS_ENTRY_TYPE_DIR, /* Entry type is directory. */
DEF_NO, /* Directory entry created even if it exists. */
&err);
if (err.Code != RTOS_ERR_NONE) {
/* An error occurred. Error handling should be added here. */
}
/* Create file 'test_file.bin' in 'test_dir' directory. */
FSEntry_Create(FS_WRK_DIR_NULL, /* NULL working directory means absolute path used. */
"test_vol/test_dir/test_file.bin", /* Absolute path to file to create. */
FS_ENTRY_TYPE_FILE, /* Entry type is file. */
DEF_NO, /* File entry created even if it exists. */
&err);
if (err.Code != RTOS_ERR_NONE) {
/* An error occurred. Error handling should be added here. */
}Opening and Closing a File#
A file can be opened using FSFile_Open() and closed using FSFile_Close(), as shown in Listing - Opening a File in the Creating and Accessing Files and Directories page. The FSFile_Open() function accepts a certain number of flags, all prefixed with FS_FILE_ACCESS_MODE_XXXX, and which alter the function's behavior. These flags are explained in Table - File Access Mode Flags in the Creating and Accessing Files and Directories page. The function FSFile_Open() uses a working directory handle as a first argument. You can refer to section Using Working Directories for more details about working directory.
Listing - Opening a File#
FS_FILE_HANDLE file_handle;
RTOS_ERR err;
/* Assumes that a volume named "test_vol" has previously been opened. */
/* Open 'test_vol/test_file.bin' file for reading (create it if needed). */
file_handle = FSFile_Open(FS_WRK_DIR_NULL, /* NULL working directory means absolute path used. */
"test_vol/test_file.bin", /* Absolute path to file to create. */
FS_FILE_ACCESS_MODE_CREATE | /* File created if it does not exist. */
FS_FILE_ACCESS_MODE_WR, /* File can be read or written. */
&err);
if (err.Code != RTOS_ERR_NONE) {
/* An error occurred. Error handling should be added here. */
}
/* The file handle can now be used for reading or writing data. */
/* Close the file. */
FSFile_Close(file_handle, &err);
if (err.Code != RTOS_ERR_NONE) {
/* An error occurred. Error handling should be added here. */
}Table - File Access Mode Flags#
Flags | Description |
|---|---|
FS_FILE_ACCESS_MODE_CREATE | If present, this flag indicates that the file should be created before being opened, if it does not already exist. If the file already exists, the function's behavior is determined by the presence or absence of the FS_FILE_ACCESS_MODE_EXCL flag. |
FS_FILE_ACCESS_MODE_EXCL | If present, this flag indicates that the file should not be opened if it already exists. If FS_FILE_ACCESS_MODE_CREATE is present, the file is created, otherwise the error is set to RTOS_ERR_NOT_FOUND. |
FS_FILE_ACCESS_MODE_WR | If present, this flag indicates that the file should be opened for writing. That is, write operations on this file will be allowed or disallowed based on the presence or absence of this flag. If the flag is absent and a write operation is attempted on the opened file an RTOS_ERR_FILE_ACCESS_MODE_INVALID error is returned. FS_FILE_ACCESS_MODE_WR implies FS_FILE_ACCESS_MODE_RD. |
FS_FILE_ACCESS_MODE_TRUNCATE | If present, this flag indicates that the file contents should be destroyed (i.e., file size zeroed) before the file is opened. |
FS_FILE_ACCESS_MODE_APPEND | If present, this flag indicates that all written data should be appended to the end of the file. In other words, the current file position should automatically be set to the end of the file before any write operation takes place. |
FS_FILE_ACCESS_MODE_RD | If present, this flag indicates that the file should be opened for reading (though it can also be opened for writing if FS_FILE_ACCESS_MODE_WR is also specified). |
Opening and Closing a Directory#
A directory can be opened using FSDir_Open()and closed using FSDir_Close() as shown in Listing - Opening a Directory in the Creating and Accessing Files and Directories page. Similarly to FSFile_Open(), FSDir_Open() accepts a certain number of flags to control the function's behavior: FS_DIR_ACCESS_MODE_CREATE and FS_DIR_ACCESS_MODE_EXCL. The meaning of these flags is analogous to the FSFile_Open() flags, and are explained in Table - Directory Access Mode Flags in the Creating and Accessing Files and Directories page. The function FSDir_Open() uses a working directory handle as a first argument. You can refer to section Using Working Directories for more details about working directory.
Listing - Opening a Directory#
FS_DIR_HANDLE dir_handle;
RTOS_ERR err;
/* Assumes that a volume named "test_vol" has previously been opened. */
/* Open 'test_vol/test_dir' directory for reading (create it if needed). */
dir_handle = FSDir_Open(FS_WRK_DIR_NULL, /* NULL working directory means absolute path used. */
"test_vol/test_dir", /* Absolute path to directory to create. */
FS_DIR_ACCESS_MODE_CREATE, /* Directory created if it does not exist. */
&err);
if (err.Code != RTOS_ERR_NONE) {
/* An error occurred. Error handling should be added here. */
}
/* The directory handle can now be used for reading the directory's content. */
/* Close directory. */
FSDir_Close(dir_handle, &err);
if (err.Code != RTOS_ERR_NONE) {
/* An error occurred. Error handling should be added here. */
}Table - Directory Access Mode Flags#
Flags | Description |
|---|---|
FS_DIR_ACCESS_MODE_NONE | If present, this flag indicates that the directory is not created at all and is opened only if the directory already exists. The main usage of FS_DIR_ACCESS_MODE_NONE is to get a directory handle of an existing directory. If the directory does not exist, the error RTOS_ERR_NOT_FOUND is returned. If FS_DIR_ACCESS_MODE_NONE is used with the other flags, it has no effect and only the other flags are considered. |
FS_DIR_ACCESS_MODE_CREATE | If present, this flag indicates that the directory should be created before being opened, if it does not already exist. If the directory already exists, the function's behavior is determined by the presence or absence of the FS_DIR_ACCESS_MODE_EXCL flag. |
FS_DIR_ACCESS_MODE_EXCL | If present, this flag indicates that the directory should not be opened if it already exists. If FS_DIR_ACCESS_MODE_CREATE is present, the directory is created; otherwise the error is set to RTOS_ERR_NOT_FOUND. |
Reading and Writing Files#
A file can be read from and written to using FSFile_Rd()and FSFile_Wr()respectively. This is shown in Listing - Reading and Writing Files in the Creating and Accessing Files and Directories page.
Note how the call to FSFile_PosSet()is used to bring the current file position back to the beginning of the file. This is necessary because the current file position is automatically incremented after each call to FSFile_Rd() and FSFile_Wr() by an amount equal to the number of bytes read or written. In other words, without the call to FSFile_PosSet(), the current file position would have been equal to sizeof(msg) - 1 and the following call to FSFile_Rd() would have immediately encountered the end of the file.
Also note that FSFile_Wr() returns the number of bytes written. Unless an error occurs, this value is always equal to the number of bytes to be written (the third parameter). This value is simply ignored here, as it is not needed. Similarly, FSFile_Rd() returns the number of bytes read from the file. However, unlike the value returned by FSFile_Wr(), this value may be different from the number of bytes given as a parameter, even if no error occurs. If the end of the file is reached before the specified number of bytes is read, the function returns the number of bytes read so far. This condition can be tested to determined whether the end of file has been reached, as shown below.
Listing - Reading and Writing Files#
FS_FILE_HANDLE file_handle;
CPU_CHAR buf[50];
CPU_SIZE_T rd_size;
CPU_CHAR msg[] = "This is a test!";
RTOS_ERR err;
/* Assumes that a volume named "test_vol" has previously been opened. */
/* Open a file (create or truncate if needed). */
file_handle = FSFile_Open(FS_WRK_DIR_NULL, /* NULL working dir. means absolute path used. */
"test_vol/test_file.bin", /* Absolute path to file to create. */
FS_FILE_ACCESS_MODE_CREATE | /* File created if it does not exist. */
FS_FILE_ACCESS_MODE_TRUNCATE | /* If file exists, size truncated to 0 bytes. */
FS_FILE_ACCESS_MODE_WR, /* File can be read or written. */
&err);
if (err.Code != RTOS_ERR_NONE) {
/* An error occurred. Error handling should be added here. */
}
/* Write 'This is a test!' to 'test_vol/test_file.bin'. */
(void)FSFile_Wr(file_handle, /* File handle associated to open file. */
(void *)msg, /* Buffer containing data to write. */
sizeof(msg), /* Size of buffer in bytes. */
&err);
if (err.Code != RTOS_ERR_NONE) {
/* An error occurred. Error handling should be added here. */
}
/* Set the current file position at the beginning of the file. */
FSFile_PosSet(file_handle, /* File handle associated to open file. */
0u, /* Offset added to reference position. */
FS_FILE_ORIGIN_START, /* Ref. position for offset: start of file. */
&err);
if (err.Code != RTOS_ERR_NONE) {
/* An error occurred. Error handling should be added here. */
}
/* Read the previously written message. */
rd_size = FSFile_Rd(file_handle, /* File handle associated to open file. */
(void *)&buf, /* Buffer receiving data from file. */
sizeof(buf), /* Size of buffer in bytes. */
&err);
if (err.Code != RTOS_ERR_NONE) {
/* An error occurred. Error handling should be added here. */
}
/* Verify whether the end of the file has been reached (this should be the case here). */
if (rd_size < sizeof(buf)){
printf("The end of file has been reached.\r\n");
}
/* Compare the read message with the previously written message. */
if (Str_Cmp(buf, msg) != 0u) {
printf("Something went wrong!\r\n");
while(1);
}
/* Close file. */
FSFile_Close(file_handle, &err);
if (err.Code != RTOS_ERR_NONE) {
/* An error occurred. Error handling should be added here. */
}File and Directory Names and Paths#
Files and directories are identified by a path string. For example, a file can be opened with:
file_handle = FSFile_Open(FS_WRK_DIR_NULL,
"test_vol/file001.txt",
FS_FILE_ACCESS_MODE_WR,
&err);In this case, test_vol/file001.txt is the path string.
An application specifies the path of a file or directory using either an absolute or a relative path.
In the path string test_vol/file001.txt , the path separator is a slash '/'. The path separator can also be a backslash '\'. In that case, the example of path string becomes: test_vol\file001.txt . Note that there are two backslashes in the path. This is due to the fact that backslash is used as an escape character by compilers when generating special characters. In order to get the proper character value corresponding to the single backslash '', the path string must double the backslash. This precaution does not apply to the forward slash '/'. |
|---|
Absolute Path#
An absolute path is a character string which specifies a unique file, and follows the pattern:
<vol_name><... Path ...><File>
where
<vol_name> | is the name of the volume, identical to the string specified in FSVol_Open(). |
|---|---|
<... Path ...> | is the file path, which must always begin and end with a slash '/' or a backslash ''. |
<File> | is the file (or leaf directory) name, including any extension. |
Listing - Example of Absolute File and Directory Paths in the Creating and Accessing Files and Directories page shows some examples of absolute paths (error handling omitted for clarity):
Listing - Example of Absolute File and Directory Paths#
/* Assume that a volume called "sd:vol0" has been previously open. */
dir_handle = FSDir_Open(FS_WRK_DIR_NULL, (1)
"sd:vol0",
FS_DIR_ACCESS_MODE_CREATE,
&err);
dir_handle = FSDir_Open(FS_WRK_DIR_NULL, (2)
"sd:vol0/dir01",
FS_DIR_ACCESS_MODE_CREATE,
&err);
file_handle = FSFile_Open(FS_WRK_DIR_NULL, (3)
"sd:vol0/file.txt",
FS_FILE_ACCESS_MODE_WR,
&err);
file_handle = FSFile_Open(FS_WRK_DIR_NULL, (4)
"sd:vol0/dir01/file01.txt",
FS_FILE_ACCESS_MODE_WR,
&err);Listing - Example of Absolute File and Directory Paths
(1) Opening the root directory of a specified volume.
(2) Opening a non-root directory.
(3) Opening a file in the root directory of a specified volume.
(4) Opening a file in a non-root directory.
In the code snippet above, all absolute paths containing the slash '/' separator could be replaced by a backslash '|' separator. Thus the different paths would become:
"sd:vol0\dir01"
"sd:vol0\file.txt"
"sd:vol0\dir01\file01.txt"
The code snippet would create the following tree structure:
sd:vol0 \dir01 \file01.txt \file.txt
Relative Path#
Relative paths can be used if the working directory API (that is FSWrkDir_Xxxx()) is employed (cf. section Using Working Directories for more details about working directory). A relative path begins with neither a volume name nor a slash '/' or a backslash \ :
<... Relative Path ...><File>
where
<... Relative Path ...> | is the file path, which must not begin with a slash '/' or a backslash '' but must end with a '' or '/'. |
|---|---|
<File> | is the file (or leaf directory) name, including any extension. |
Two special path components can be used:
Dot dot '..' moves the path to the parent directory.
Dot '.' keeps the path in the current directory (basically, it does nothing).
A relative path is appended to the current working directory of the calling task to form the absolute path of the file or directory.
Listing - Example of Relative File and Directory Paths in the Creating and Accessing Files and Directories page shows some examples of relative paths (error handling omitted for clarity):
Listing - Example of Relative File and Directory Paths#
FS_WRK_DIR_HANDLE wrk_dir_handle;
/* Assume that a volume called "sd:vol0" has been previously open. */
/* Open a working directory mapped to an existing directory 'sd:vol0/test_dir'. */
wrk_dir_handle = FSWrkDir_Open(FS_WRK_DIR_NULL,
"sd:vol0/test_dir",
&err);
dir_handle = FSDir_Open(wrk_dir_handle, (1)
"../",
FS_DIR_ACCESS_MODE_CREATE,
&err);
dir_handle = FSDir_Open(wrk_dir_handle, (2)
"./dir01",
FS_DIR_ACCESS_MODE_CREATE,
&err);
dir_handle = FSDir_Open(wrk_dir_handle, (3)
DEF_NULL,
FS_DIR_ACCESS_MODE_CREATE,
&err);
dir_handle = FSDir_Open(wrk_dir_handle, (3a)
".",
FS_DIR_ACCESS_MODE_NONE,
&err);
dir_handle = FSDir_Open(wrk_dir_handle, (3b)
"./",
FS_DIR_ACCESS_MODE_NONE,
&err);
file_handle = FSFile_Open(wrk_dir_handle, (4)
"../file.txt",
FS_FILE_ACCESS_MODE_WR,
&err);
file_handle = FSFile_Open(wrk_dir_handle, (5)
"./dir01/file01.txt",
FS_FILE_ACCESS_MODE_WR,
&err);
file_handle = FSFile_Open(wrk_dir_handle, (6)
"dir01/file02.txt",
FS_FILE_ACCESS_MODE_WR,
&err);(1) Opening the root directory relative to the directory "sd:vol0/test_dir" because two dots ".." points upwards in the hierarchy.
(2) Opening a non-root directory ("dir01") inside the directory "sd:vol0/test_dir" because one dot "." represents the current directory.
(3) Opening the current non-root directory ("test_dir"). The directory "sd:vol0/test_dir" associated to the working directory handle is considered the current directory to open because of the second argument set to DEF_NULL.
(3a) Opening the current non- root directory ("test_dir"). Specifying "." for the second argument is equivalent to DEF_NULL presented in (3). Here one dot "." represents the current directory.
(3b) Opening the current non- root directory ("test_dir"). Specifying "./" for the second argument is equivalent to "." presented in (3a) and DEF_NULL presented in (3).
(4) Opening a file (file.txt) in the root directory relative to the directory "sd:vol0/test_dir" because two dots ".." points upwards in the hierarchy.
(5) Opening a file (file01.txt) in a non-root directory ("dir01") located itself inside the directory "sd:vol0/test_dir" because one dot "." represents the current directory.
(6) Opening a file (file02.txt) in a non-root directory ("dir01") located itself inside the directory "sd:vol0/test_dir". Note in this example that the dot "." is not necessary.
In the code snippet above, all relative paths containing the slash '/' separator could be replaced by a backslash '|' separator. Thus the different paths would become:"..\"
".\dir01"
"..\file.txt"
".\dir01\file01.txt"
"dir01\file02.txt"
The code snippet would create the following tree structure:
sd:vol0 \test_dir working directory \dir01 \file01.txt \file02.txt \file.txt
Managing Removable Media#
This section explains the possible methods to handle removable media and optionally fixed media.
Handling Synchronous Connection and Disconnection#
The synchronous approach to media connection and disconnection handling is simple: presume that the media exists, is connected, and relies on returned errors (most likely an IO error) to detect disconnections. This approach is more naturally fitted for fixed media but can be used for removable media as well. Consider an application where a USB key is guaranteed to remain physically connected, for instance. In this context, it would make sense to use the synchronous approach even though the USB device is fundamentally a removable media.
Handling Asynchronous Connection and Disconnection#
The storage sub-module provides an asynchronous notification mechanism that alleviates the burden of managing removable media connections and disconnections. See File System Basic Concepts for a detailed discussion on what constitutes removable media. The notification mechanism relies on the internal Media Poll task. This task will poll all media periodically to detect a connection or disconnection. A set of pre-init and post-init functions allows you to configure the Media Poll task: FSStorage_ConfigureMediaPollTaskStk(), FSStorage_PollTaskPeriodSet() and FSStorage_PollTaskPrioSet().The asynchronous notification is available when FS_STORAGE_CFG_MEDIA_POLL_TASK_EN is set to DEF_ENABLED in fs_storage_cfg.h. In order to receive the notifications, all you need to do is register two callbacks, one for connection and one for disconnection, using the FSStorage_ConfigureMediaConnCallback() API. Upon media connection or disconnection, the Media Poll task will call the corresponding application callback and pass the media handle as an argument. Listing - Media Connection / Disconnection Modification Mechanism Usage in the Managing Removable Media page shows a minimal example of the notification mechanism where the user-provided callbacks merely print a message on the standard output each time a connection or disconnection event occurs. In a real-world context, the callback would typically post another task responsible for the actual event handling.
Even though the asynchronous approach to media connection handling has been designed with removable media in mind, this approach could be used for fixed media as well. In this case, the connection callback would be called immediately after the module initialization and the disconnection callback would never be called. This can be convenient if you wish to write generic code that can handle all possible media, disregarding their removable or non-removable nature. Refer to section Media for more details about the media characterization.
Listing - Media Connection / Disconnection Motification Mechanism Usage#
#define APP_FS_CFG_MAX_MEDIA_NAME_LEN 20u
void MyConnCb (FS_MEDIA_HANDLE media_handle)
{
RTOS_ERR err;
CPU_CHAR name[APP_FS_CFG_MAX_MEDIA_NAME_LEN + 1u]; /* +1 for null character terminating string. */
FSMedia_NameGet(media_handle, name, sizeof(name), &err);
if (err.Code == RTOS_ERR_NONE) {
printf("Media '%s' connected!\r\n", name);
}
}
void MyDisconnCb (FS_MEDIA_HANDLE media_handle) (1)
{
RTOS_ERR err;
CPU_CHAR name[APP_FS_CFG_MAX_MEDIA_NAME_LEN + 1u]; /* +1 for null character terminating string. */
FSMedia_NameGet(media_handle, name, sizeof(name), &err);
if (err.Code == RTOS_ERR_NONE) {
printf("Media '%s' disconnected!\r\n", name);
}
}
/* ... */
RTOS_ERR err;
FSStorage_ConfigureMediaConnCallback(MyConnCb, MyDisconnCb);
FSStorage_Init(&err)
if (err.Code != RTOS_ERR_NONE) {
/* An error occurred. Error handling should be added here. */
}
/* From this point on, if a removable media is inserted or removed,
a corresponding message will be printed on the standard output. */(1) In the disconnection callback, you could signal a task of your application that a removable media has been disconnected. If this task closes an opened volume with FSVol_Close(), you could get an error returned indicating an I/O error (RTOS_ERR_IO). In that case, the error should be considered as a normal situation. Indeed if the FAT journaling module is enabled via the configuration FS_FAT_CFG_JOURNAL_EN, when you close the volume, the File System stack deletes the journal file. Since the removable media (SCSI or SD) has been disconnected, the delete access on the physical media fails and an I/O error is returned.
Figure - Media Poll Task in the Managing Removable Media page summarizes the usage of the Media Poll task for the asynchronous media detection.
Figure - Media Poll Task#
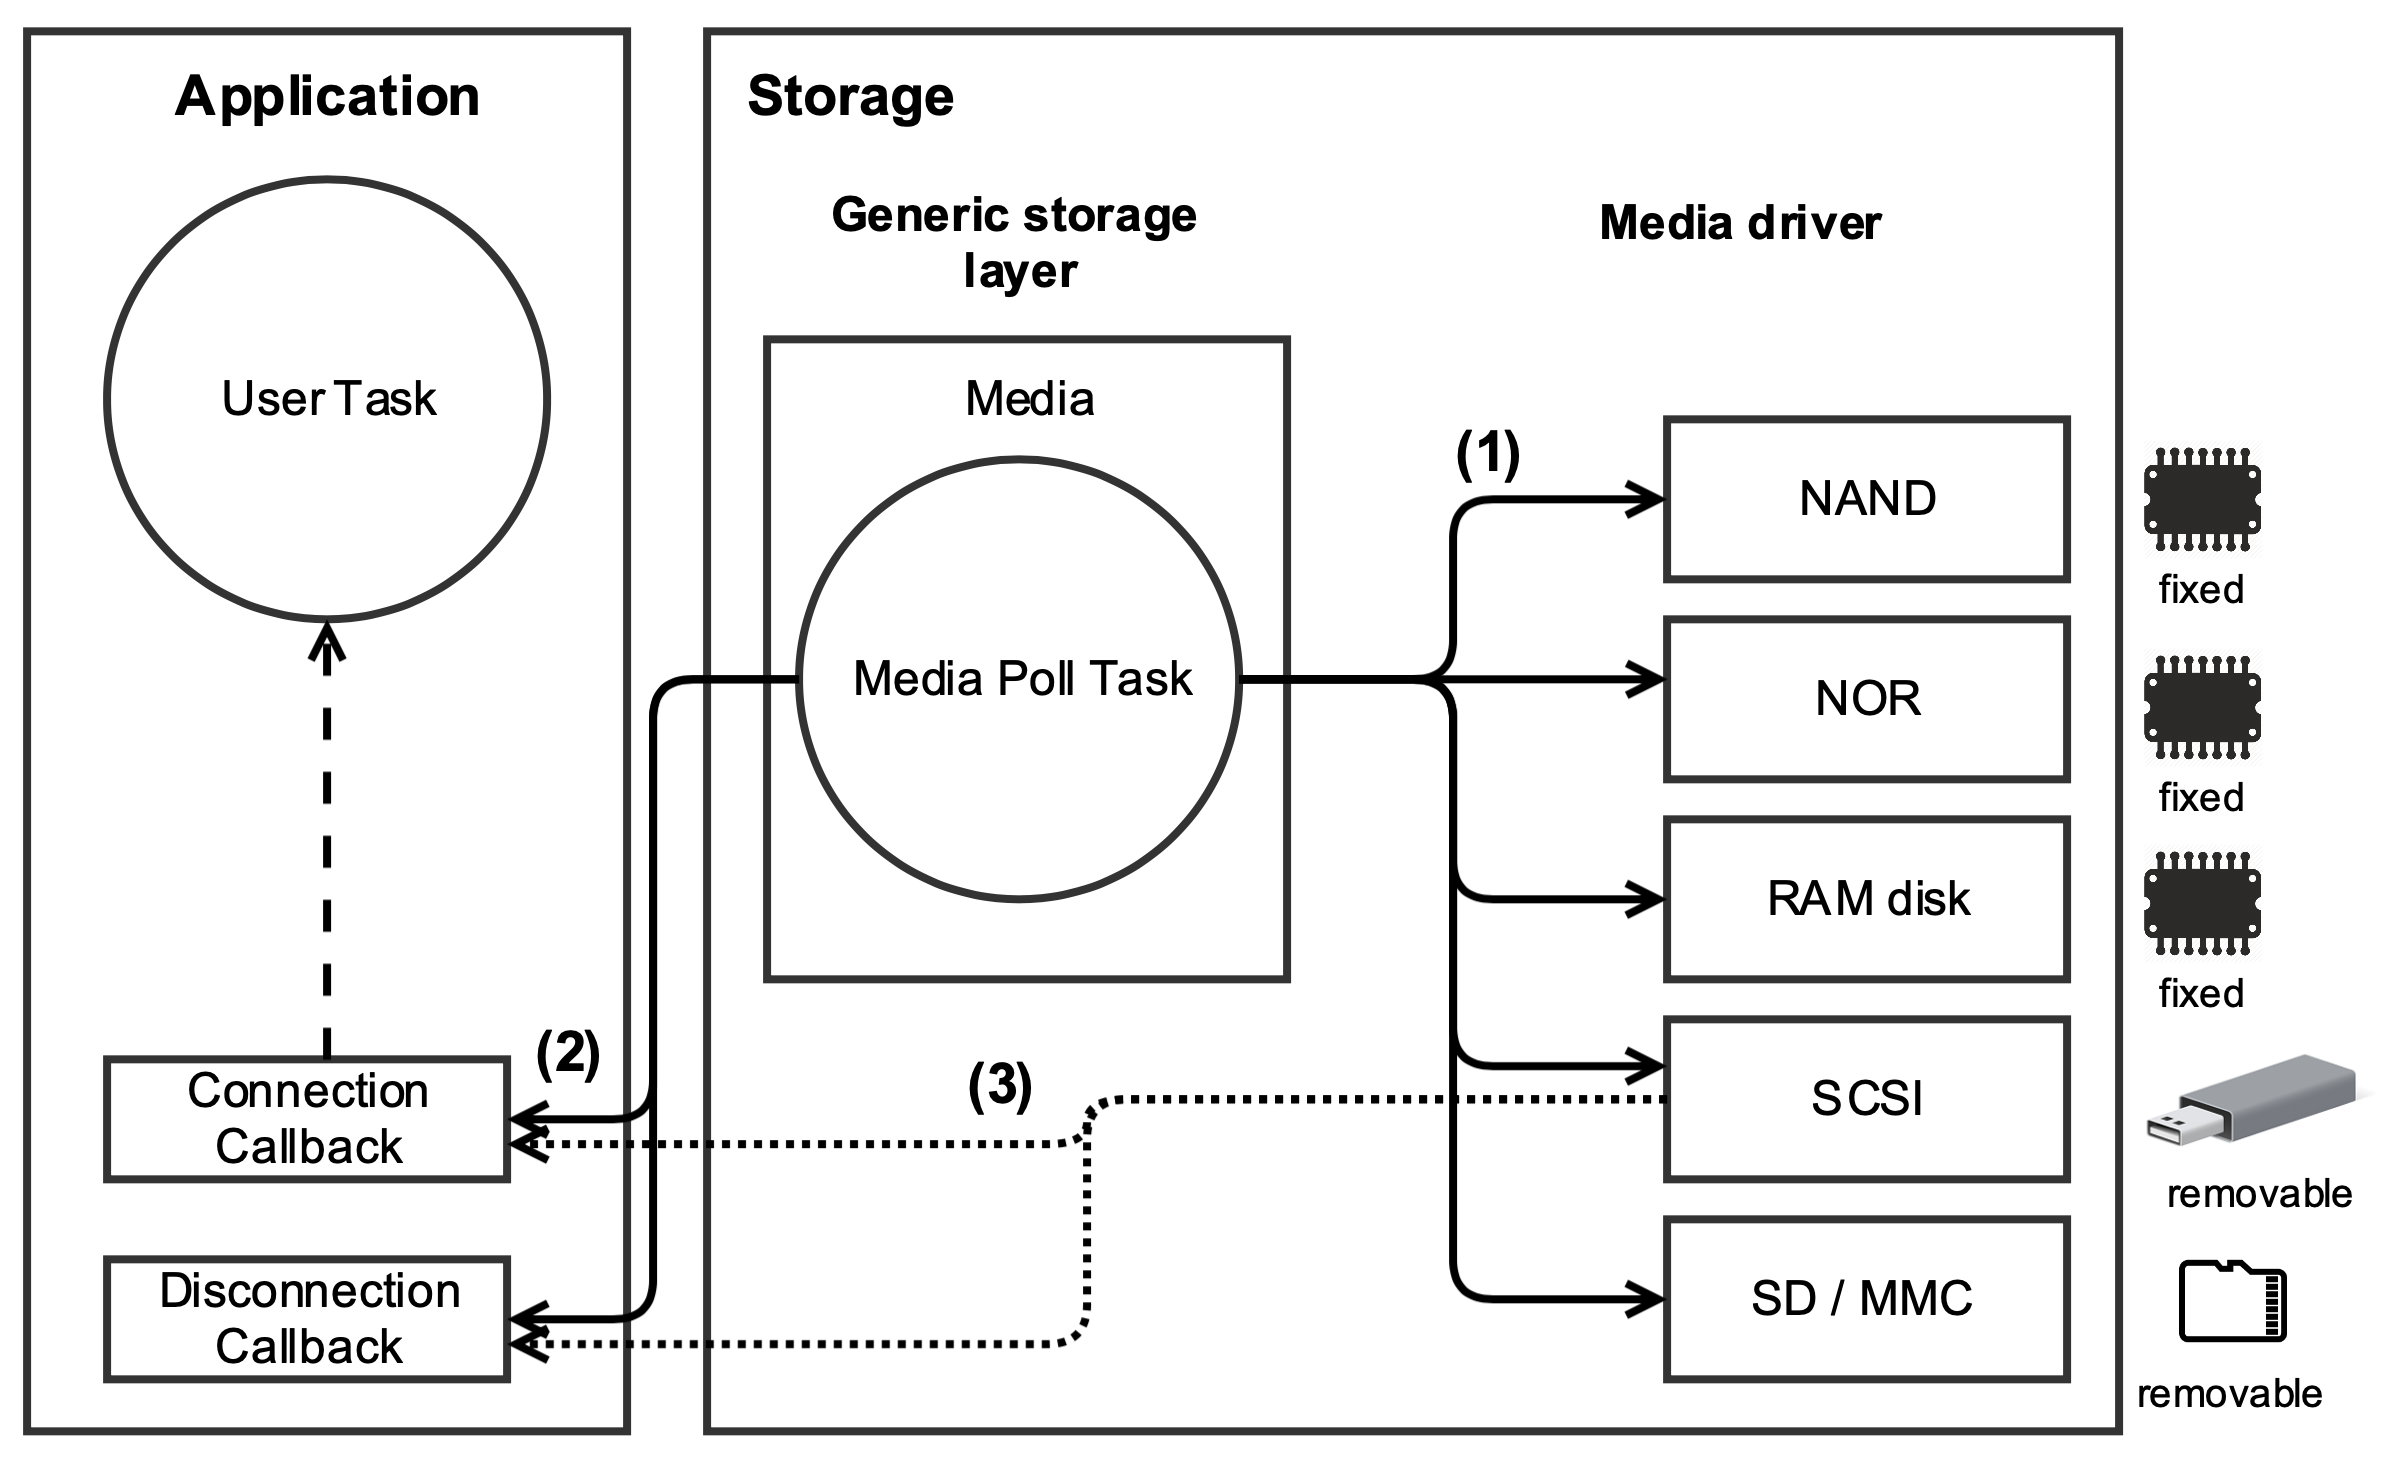
(1) The Media Poll task interrogates periodically each opened block device to know if a connection or disconnection has occurred.
(2) If a connection or disconnection has been detected, the Media Poll task will call the appropriate application callback. In general, the connection callback will notify a user task about the media connection. For fixed media, the user application is notified only once about the connection. The fixed media disconnection cannot happen of course.
(3) The SCSI media driver has the ability to notify the application about a device presence without using the Media Poll task's help. Refer to the section Detection Regardless of Media Poll Task Presence for more details.
SCSI Removable Media#
Detection Regardless of Media Poll Task Presence#
As explained in the section Media , which describes the media's physical nature, SD card and SCSI media types are considered to be removable media. Yet there is a difference between an SD card and a SCSI device: their persistence. From the File System perspective, an SD card is said to be persistent, as opposed to a SCSI device, which is non-persistent. This difference makes it possible for the SCSI storage driver to be independent from the Media Poll task presence. That is, regardless of the Media Poll task configuration (#define FS_STORAGE_CFG_MEDIA_POLL_TASK_EN in fs_storage_cfg.h), the user callbacks will always be called upon SCSI device connection or disconnection. If you want to perform file accesses on a SCSI device, you must rely on the application connection callbacks called by File System. On the other hand, if the Media Poll task is disabled, an SD card will not be detected asynchronously. You can still detect an SD card synchronously if the SD card is always inserted in the SD slot.
Automatic Media Naming#
As described in the section Media , a media name is assigned by you to NAND, NOR, RAM disk and SD so that they are registered in the Platform Manager and known from Micrium OS File System for properly configuring them. SCSI devices are a bit different because the media name is internally assigned by the SCSI media driver upon the device's connection. While you have full control on the media name for NAND, NOR, RAM disk and SD, the SCSI media name follows this format:
"scsiXXYY" where XX is a unique ID assigned to the connected SCSI device and YY is the logical unit number (a SCSI device is composed of one to N logical units).
When your application connection callback is called upon the SCSI device connection's detection, you have access to the SCSI media handle as shown in Listing - Media Connection / Disconnection Modification Mechanism Usage in the Managing Removable Media page. If this media handle is passed to the function FSMedia_NameGet(), you will get for example the SCSI device with the name "scsi0001".
Micrium OS USB Host's Hub Task#
The SCSI media driver works with Micrium OS USB Host to transport the SCSI commands over USB to memory sticks and memory card readers. Micrium OS USB Host has an internal task called the hub task responsible for all the hub-related events such as device connection, disconnection, etc. When a SCSI device connects to an embedded USB host, the USB Host hub task calls a connection callback provided by the SCSI media driver. Then this SCSI media driver's callback calls your application connection callback. This situation occurs only if the Media Poll task is disabled (#define FS_STORAGE_CFG_MEDIA_POLL_TASK_EN set to DEF_DISABLED in fs_storage_cfg.h). Within your application callback, you could call any functions that perform a file operation such as FSFile_Open(), FSFile_Rd(), etc. When calling these type of functions, several media read/write accesses can be done by the SCSI media driver passing through the different layers of Micrium OS USB Host stack. At this point, all the functions call stack is done within the USB Host hub task's context. For that specific case, the hub task must have a stack size large enough to accommodate worst case scenario of call stack. The default hub task's stack size is 768 elements as indicated in Table - Micrium OS Internal tasks in the Appendix A - Internal Tasks page. This stack size value should be sufficient for most typical cases. In general, your application connection callback would typically post another task responsible for the actual connection event handling. This other task would perform any file operations and would avoid any hub task's overflow issue.
Using File Buffers#
Since Micrium OS File System is essentially I/O-bound (that is, it spends most of the time waiting for I/Os to complete), a rapid series of multiple small accesses can cause performance to degrade drastically. Micrium OS File System's internal cache helps to mitigate these performance penalties by combining multiple small accesses to a given logical block into a single access. However, the cache cannot combine accesses beyond the size of a logical block, which may create a bottleneck on media such as SD cards. Indeed, SD cards tend to have high access latency, which can be mitigated using dedicated multi-block read and write operations.
This is essentially what file buffers are designed for. In the case of write operations, chunks of data smaller than the file buffer are accumulated until the buffer is full, at which point the accumulated data is written all at once. For read operations, the whole file buffer is pre-loaded with file contents following the chunk of data that is being read, such that subsequent chunk of data are read directly from the internal buffer.
Assigning a File Buffer#
File buffers are assigned on a per-file descriptor basis (see File System Basic Concepts for details regarding file and directory descriptors) using FSFile_BufAssign(). The process of assigning a file buffer is illustrated by Listing - Assigning a File Buffer in the Using File Buffers page. Notice the presence of the FS_FILE_BUF_MODE_RD_WR flag that indicates that the file buffer should be used both for accumulating written data and pre-loading read data. The FS_FILE_BUF_MODE_RD and FS_FILE_BUF_MODE_WR flags may be used to indicate that the file buffer should be used only for read or only for write operations respectively.
Listing - Assigning a File Buffer#
FS_FILE_HANDLE file_handle;
CPU_INT08U file_buf[4096];
RTOS_ERR err;
/* Assumes that 'file_handle' points to a file previously opened with FSFile_Open(). */
/* Assign the file buffer for read and write operations. */
FSFile_BufAssign(file_handle,
(void *)file_buf,
FS_FILE_BUF_MODE_RD_WR, /* Buffer access mode: data buffered for reads & writes.*/
4096u, /* Buffer size in bytes. */
&err);
if (err.Code != RTOS_ERR_NONE) {
/* An error occurred. Error handling should be added here. */
}Unassigning a File Buffer#
A file buffer is tied to a given file descriptor for as long as the file descriptor remains opened. In other words, the only way of unassigning a file buffer is to close the corresponding file descriptor using FSFile_Close(). Once the corresponding file descriptor is closed, the buffer can be safely reused with another file descriptor. Sharing a buffer between multiple simultaneously opened descriptors may lead to severe corruption.
Flushing a File Buffer#
Flushing a file buffer involves writing accumulated data to the media and/or discarding pre-loaded data. A file buffer is implicitly flushed whenever:
The buffer is full
The associated file descriptor is closed
You can also flush a file buffer explicitly using FSFile_BufFlush().
Using Working Directories#
This section explains the high-level file system API that you can use to manage working directories on a specific volume.
Micrium OS File System supports the notion of working directories, which allows you to use relative paths as opposed to absolute paths. If you open a file or a directory, you can pass only a file or directory name instead of providing an absolute file or directory path. The relative path is consequently shorter than an absolute path, and can be as short as a simple file or directory name. Moreover, the File System also offers a working directory bound to a specific task. This functionality allows a given task to work in the same directory with the high-level file system API without having to constantly use absolute paths, which may require the task to know which volume it operates on. The task simply can use single file names. Refer to section File and Directory Names and Paths for more details about usage of paths in Micrium OS File System.
Opening and Closing a Working Directory#
A working directory can be opened using FSWrkDir_Open() and closed using FSWrkDir_Close(), as shown in Listing - Opening a Working Directory in the Using Working Directories page.
Listing - Opening a Working Directory#
FS_WRK_DIR_HANDLE wrk_dir_handle;
RTOS_ERR err;
/* Assume that a volume named "test_vol" has previously been opened. */
/* Open a working directory mapped to the directory 'test_vol/test_dir'. */
(1)
wrk_dir_handle = FSWrkDir_Open(FS_WRK_DIR_NULL, /* NULL working dir means absolute path used. */
"test_vol/test_dir", /* Absolute path to directory to map. */
&err);
if (err.Code != RTOS_ERR_NONE) {
/* An error occurred. Error handling should be added here. */
}
/* The working directory handle can now be used for opening */
/* a file or directory in the directory 'test_vol/test_dir'. */
/* Close working directory. */
FSWrkDir_Close(wrk_dir_handle, &err);
if (err.Code != RTOS_ERR_NONE) {
/* An error occurred. Error handling should be added here. */
}(1) The first argument of FSWrkDir_Open() is a handle to the current working directory. The principle is that a new working directory can be created relative to the current working directory. This argument can have two possible values:
Null handle
Non-null handle
If a null working directory handle is passed, then the path to the directory to map must be absolute. On the other hand, a non-null working directory handle implies a relative path to the directory to map. If you pass a null handle, we recommend that you use the macro FS_WRK_DIR_NULL.
This approach to using working directories offers many possibilities. For instance, creation of the working directory can be "cascaded." That is, a working directory handle can help create a new working directory relative to an existing working directory. Let's consider the following simple tree structure:
test_vol
\—test_dir ← working directory
\—subdir
\—subsubdir
\—subsubsubdir ← working directoryListing - Cascaded Working Directory in the Using Working Directories page shows different ways of creating working directories with one of them illustrating cascaded working directories. The code snippet below exhibits the creation of working directories mapped to the directories "test_dir" and "subsubsubdir". Note: error handling in this listing has been omitted for clarity.
Listing - Cascaded Working Directory#
FS_WRK_DIR_HANDLE wrk_dir_handle1;
FS_WRK_DIR_HANDLE wrk_dir_handle2;
RTOS_ERR err;
/\* Assume that a volume named "test_vol" has previously been opened. \*/
(1)
wrk_dir_handle1 = FSWrkDir_Open(FS_WRK_DIR_NULL, /\* NULL working directory means absolute path used. \*/
"test_vol/test_dir", /\* Absolute path to directory to map. \*/
&err);
/\* ------------------- VERSION 1 --------------------\*/
(2)
wrk_dir_handle2 = FSWrkDir_Open(FS_WRK_DIR_NULL, /\* NULL working directory means absolute path used. \*/
/\* Absolute path to directory to map. \*/
"test_vol/test_dir/subdir/subsubdir/subsubsubdir",
&err);
/\* The working directory handles can now be used for opening \*/
/\* file or directory in the directory 'test_dir' and 'subsubsubdir'. \*/
FSWrkDir_Close(wrk_dir_handle2, &err);
/\* ------------------ VERSION 2 ----------------- \*/
(3)
wrk_dir_handle2 = FSWrkDir_Open(wrk_dir_handle1, /\* Non-NULL working dir means relative path used. \*/
"subdir/subsubdir/subsubsubdir", /\* Relative path to directory to map. \*/
&err);
/\* The working directory handles can now be used for opening \*/
/\* file or directory in the directory 'test_dir' and 'subsubsubdir'. \*/
/\* Close working directory. \*/
FSWrkDir_Close(wrk_dir_handle2, &err);
FSWrkDir_Close(wrk_dir_handle1, &err);(1) Open a working directory mapped to the directory 'test_dir'. The macro FS_WRK_DIR_NULL is used to pass a null working directory. In that case, the second argument of FSWrkDir_Open() must be an absolute path.
(2) Open a working directory mapped to the directory 'subsubsubdir'. Here again the macro FS_WRK_DIR_NULL is used. Consequently, the absolute path to 'subsubsubdir' must be provided. In that case, the working directory creation to 'subsubsubdir' is independent from 'test_dir' working directory handle.
(3) Open a working directory mapped to the directory 'subsubsubdir'. In this version, the 'test_dir' working directory handle is used instead of FS_WRK_DIR_NULL. The second argument must be relative to the working directory specified as first argument. In that case, the working directory creation to 'subsubsubdir' has been cascaded with the 'test_dir' working directory. It would be possible to create another working directory cascaded to the 'subsubsubdir' working directory. And so on.
Functions Operating with a Working Directory#
The functions listed in Table - Functions Operating with a Working Directory in the Using Working Directories page all require one or two working handles as arguments. As soon as a working directory handle argument is present, the following argument will be a path to a file, a directory or an entry. As explained in the details of Listing - Opening a Working Directory in the Using Working Directories page , the working directory handle can be null or not. If null, the file/directory/entry path argument must be absolute. If non-null, the path is relative to the directory mapped to the working directory handle.
Table - Functions Operating with a Working Directory#
Category | Functions | Number of Working Directory Handles as Argument | Example of Function Call | |
|---|---|---|---|---|
File | FSFile_Open() | 1 | ||
File | FSFile_Copy() | 2 | - | |
Directory | FSDir_Open() | 1 | ||
Entry | FSEntry_Create() | 1 | - | |
Entry | FSEntry_AttribSet() | 1 | - | |
Entry | FSEntry_Del() | 1 | - | |
Entry | FSEntry_Query() | 1 | - | |
Entry | FSEntry_Rename() | 2 | - | |
Entry | FSEntry_TimeSet() | 1 | - |
This function FSEntry_TimeSet() is deprecated and will be replaced by sl_fs_entry_time_set() in a next release. |
|---|
Obtaining Information Associated to a Working Directory#
The File System working directory API offers some utility functions that may be handy for your application to retrieve information associated to a given working directory handle. There are two functions of that type:
FSWrkDir_PathGet() : this function provides the absolute path associated to the given working directory handle
FSWrkDir_VolGet(): this function provides the volume handle associated to the given working directory handle
Listing - Working Directory Utility Functions in the Using Working Directories page presents an example of usage of these functions.
Listing - Working Directory Utility Functions#
FS_VOL_HANDLE vol_handle;
FS_WRK_DIR_HANDLE wrk_dir_handle;
CPU_CHAR path_buf[50u];
CPU_SIZE_T wrk_dir_path_len;
FS_VOL_INFO vol_info;
RTOS_ERR err;
/* Assume that a volume named "test_vol" has previously been opened. */
/* Open a working directory mapped to the directory 'test_dir'. */
wrk_dir_handle = FSWrkDir_Open(FS_WRK_DIR_NULL, /* NULL working dir means absolute path used. */
"test_vol/test_dir/subdir", /* Absolute path to directory to map. */
&err);
if (err.Code != RTOS_ERR_NONE) {
/* An error occurred. Error handling should be added here. */
}
/* ---------------- UTILITY 1 ---------------- */
wrk_dir_path_len = FSWrkDir_PathGet(wrk_dir_handle, (1)
path_buf, /* Buffer receiving absolute path associated to handle. */
50u, /* Buffer size in bytes. */
&err);
if (err.Code != RTOS_ERR_NONE) {
/* An error occurred. Error handling should be added here. */
}
/* Path displayed: "test_vol/test_dir/subdir". */
printf("Path associated to working directory handle: %s\r\n", path_buf);
/* ---------------- UTILITY 2 ---------------- */
vol_handle = FSWrkDir_VolGet(wrk_dir_handle); (2)
if (FS_VOL_HANDLE_IS_NULL(vol_handle)) { (3)
/* An error occurred. Error handling should be added here. */
}
/* Get information about the volume. */
FSVol_Query(vol_handle,
&vol_info, /* Structure receiving information about volume. */
DEF_NULL, /* Optional information about volume file system.*/
&err)
if (err.Code != RTOS_ERR_NONE) {
/* An error occurred. Error handling should be added here. */
}
printf("Volume info:\r\n");
printf("- Number of sectors used: %u\r\n", vol_info.UsedSecCnt);
printf("- Number of sectors free: %u\r\n", vol_info.FreeSecCnt);
printf("- Total number of sectors: %u\r\n", vol_info.TotSecCnt);
/* Close working directory. */
FSWrkDir_Close(wrk_dir_handle, &err);
if (err.Code != RTOS_ERR_NONE) {
/* An error occurred. Error handling should be added here. */
}(1) Besides providing the path associated to a given working directory handle, the function FSWrkDir_PathGet() returns the number of characters composing the absolute path. If you need to allocate dynamically the buffer receiving the path, you can use FSWrkDir_PathGet() to obtain only the number of characters in the path in the following way:
wrk_dir_path_len = FSWrkDir_PathGet(wrk_dir_handle,
DEF_NULL,
0u,
&err);You just need to provide a null buffer pointer and specify 0 bytes for the buffer size.
(2) FSWrkDir_VolGet() returns the volume handle associated to a given working directory handle. With the volume handle, you can for instance obtain some volume's information with the function FSVol_Query().
(3) An utility macro called FS_VOL_HANDLE_IS_NULL() allows you to verify if the volume handle is valid, that is not a null handle.
Task Working Directory#
When the configuration FS_CORE_CFG_TASK_WORKING_DIR_EN is enabled, an extended working directory API is available. This extended API is composed of three functions:
FSWrkDir_Get(): obtain the current working directory handle associated to the current task.
FSWrkDir_TaskBind(): bind a given directory to the current task. The directory becomes the current working directory.
FSWrkDir_TaskUnbind(): unbind the current task from the current working directory.
The task's working directory allows the task to perform file operations inside a specific working directory. From this working directory, the task can create a new tree structure composed of files and directories without using absolute paths. For instance, absolute paths require the volume name, and the task does not always know the exact volume name in which it works. For example, you may have an application which creates a task as soon as a user logins to your file system product. Upon login, the user has a working space to perform file operations in a default directory. You can use FSWrkDir_TaskBind() to bind the user task to a default directory representing the current working directory. From this moment on, the user can do anything in this working directory using a working directory handle and relative paths to files and directories.
The current working directory binding with the current task is done by saving the working directory handle in the Micrium OS Kernel task registers (see the section Task Registers in the Task Management Kernel Services section). |
|---|
Listing - Task Working Directory in the Using Working Directories page illustrates the usage of the task working directory. Let's assume that a user task has been created with the default directory being "test_vol/test_dir/subdir".
Listing - Task Working Directory#
/* Assume that a volume named "test_vol" has previously been opened. */
static void App_TaskUser (void *p_arg)
{
CPU_CHAR *p_default_dir_path;
FS_WRK_DIR_HANDLE cur_wrk_dir_handle;
CPU_CHAR path_buf[100u];
RTOS_ERR err;
(1)
cur_wrk_dir_handle = FSWrkDir_Get(); /* Obtain current working directory handle. */
(void)FSWrkDir_PathGet(cur_wrk_dir_handle, (2)
path_buf, /* Buffer receiving absolute path associated to handle. */
100u, /* Buffer size in bytes. */
&err);
if (err.Code != RTOS_ERR_NONE) {
/* An error occurred. Error handling should be added here. */
}
/* Display path: "test_vol" i.e. root directory. */
printf("Task's current working directory: %s\r\n", path_buf);
p_default_dir_path = (CPU_CHAR *)p_arg; /* Default directory path: "test_vol/test_dir/subdir". */
FSWrkDir_TaskBind(FS_WRK_DIR_NULL, /* NULL working directory means absolute path used. */
p_default_dir_path, /* Absolute path to directory to bind to task. */
&err);
if (err.Code != RTOS_ERR_NONE) {
/* An error occurred. Error handling should be added here. */
}
while (1) {
/* Task performs any file operations in the working directory 'subdir'. */
}
}(1) If the task calls FSWrkDir_Get() for the first time, the working directory handle will be a null handle. A null handle refers to the volume root directory.
(2) For your convenience, the macro FS_WRK_DIR_CUR can be used as the first argument of FSWrkDir_PathGet() in the example. FS_WRK_DIR_CUR represents a direct call to FSWrkDir_Get(). Thus the code at the beginning of the task becomes:
(void)FSWrkDir_PathGet(FS_WRK_DIR_CUR,
path_buf,
100u,
&err);The functions FSWrkDir_Get(), FSWrkDir_TaskBind() and FSWrkDir_TaskUnbind() apply to the task calling those functions. A given task cannot bind a working directory to another task. |
|---|
Posix#
The best-known API for accessing and managing files and directories is specified within the POSIX standard (IEEE Std 1003.1). The basis of some of this functionality – in particular buffered input/output – lies in the ISO C standard (ISO/IEC 9899), though many extensions provide new features and clarify existing behaviors. Functions and macros that are prototyped in four header files are of particular importance:
stdio.h: standard buffered input/output (fopen(), fread(), etc), operating on FILE objects.
dirent.h: directory accesses (opendir(), readdir(), etc), operating on DIR objects.
unistd.h: miscellaneous functions, including working directory management (chdir(), getcwd()), ftruncate() and rmdir().
sys/stat.h: file statistics functions and mkdir().
The Micrium OS File System provides a POSIX-like API based on a subset of the functions in these four header files. To avoid conflicts with the user compilation environment, files, functions and objects are renamed:
All functions begin with ‘fs_’. For example, fopen() is renamed fs_fopen(), opendir() is renamed fs_opendir(), getcwd() is renamed fs_getcwd(), etc.
All objects begin with ‘FS_’. So fs_fopen() returns a pointer to an FS_FILE and fs_opendir() returns a pointer to a FS_DIR.
Some argument types are renamed. For example, the second and third parameters of fs_fread() are typed fs_size_t to avoid conflicting with other size_t definitions.
For your convenience, you may still use the POSIX native file system functions name thanks to preprocessor directives that map the Micrium OS File System POSIX-like functions name to the POSIX ones. For instance, the function fopen() can be used in your application. When compiling your code, the preprocessor will resolve the occurrence of fopen, which is a macro, by fs_open. The File System POSIX maps also some data types defined in the four standard header files previously listed to some File System data types. For instance, the data type FILE is resolved to FS_FILE. The File System POSIX-like API is available to your application by including the file fs_core_posix.h.
In your application file, the header file fs_core_posix.h can be included in addition to the standard header file stdio.h. For example, you may want to display some messages with the function printf() in addition to file operations. In order to avoid some compilation errors/warnings with certain toolchains, the proper inclusion of stdio.h is managed within fs_core_posix.h. In that case, you shall follow these two requirements:
Include only fs_core_posix.h in your source file. stdio.h must be omitted
Place fs_core_posix.h as the first file in your header files inclusion block to ensure that other header files do not accidentally include stdio.h which could cancel the stdio.h handling centralized in fs_core_posix.h. |
Supported Functions#
The supported POSIX functions are listed in Table - POSIX API functions in the Supported Functions page. These are divided into five groups:
The functions that operate on file objects (FS_FILE) are grouped under file access (or simply file) functions. An application stores information in a file system by creating a file or appending new information to an existing file. At a later time, this information may be retrieved by reading the file. Other functions support these capabilities; for example, the application can move to a specified location in the file or query the file system to get information about the file. Refer to the section Managing Files for more details about this group.
The entries within a directory can be traversed using the directory access (or simply directory) functions, which operate on directory objects (FS_DIR). The name and properties of the entries are returned within a struct fs_dirent structure. Refer to the section Managing Directories for more details about this group.
A separate set of file operations (or entry) functions manages the files and directories available on the system. Using these functions, the application can create, delete and rename files and directories. Refer to the section Managing Entries for more details about this group.
A group of functions is the working directory functions. They allow to attach a working directory to a task and use relative paths. Refer to the subsection Working Directory for more details about this group.
The final group is the time functions. They allow to manipulate the time that can be associated to files and directories.
Table - POSIX API functions#
Function | POSIX Equivalent | File System / Sleeptimer Equivalent |
|---|---|---|
File Access | ||
fs_fopen() | fopen() | FSFile_Open() |
fs_fclose() | fclose() | FSFile_Close() |
fs_fread() | fread() | FSFile_Rd() |
fs_fwrite() | fwrite() | FSFile_Wr() |
fs_ftruncate() | ftruncate() | FSFile_Truncate() |
fs_feof() | feof() | FSFile_IsEOF() |
fs_ferror() | ferror() | FSFile_IsErr() |
fs_clearerr() | clearerr() | FSFile_ErrClr() |
fs_fgetpos() | fgetpos() | FSFile_PosGet() |
fs_fsetpos() | fsetpos() | FSFile_PosSet() |
fs_fseek() | fseek() | FSFile_PosSet() |
fs_ftell() | ftell() | FSFile_PosGet() |
fs_rewind() | rewind() | FSFile_PosSet() |
fs_fileno() | fileno() | - |
fs_fstat() | fstat() | FSFile_Query() |
fs_flockfile() | flockfile() | FSFile_Lock() |
fs_ftrylockfile() | ftrylockfile() | FSFile_TryLock() |
fs_funlockfile() | funlockfile() | FSFile_Unlock() |
fs_setbuf() | setbuf() | FSFile_BufAssign() |
fs_setvbuf() | setvbuf() | FSFile_BufAssign() |
fs_fflush() | fflush() | FSFile_BufFlush() |
Directory Access | ||
fs_opendir() | opendir() | FSDir_Open() |
fs_closedir() | closedir() | FSDir_Close() |
fs_readdir_r() | readdir_r() | FSDir_Rd() |
Entry | ||
fs_mkdir() | mkdir() | FSEntry_Create() |
fs_remove() | remove() | FSEntry_Del() |
fs_rename() | rename() | FSEntry_Rename() |
fs_rmdir() | rmdir() | FSEntry_Del() |
fs_stat() | stat() | FSEntry_Query() |
Working Directory | ||
fs_chdir() | chdir() | FSWrkDir_TaskBind() |
fs_getcwd() | getcwd() | FSWrkDir_PathGet() |
Time | ||
fs_asctime_r() | asctime_r() | sl_sleeptimer_convert_date_to_str()* |
fs_ctime_r() | ctime_r() | sl_sleeptimer_convert_time_to_date()* |
fs_ctime_r() | ctime_r() | sl_sleeptimer_convert_date_to_str()* |
fs_localtime_r() | localtime_r() | sl_sleeptimer_convert_time_to_date()* |
fs_mktime() | mktime() | sl_sleeptimer_convert_date_to_time()* |
*See Silicon Labs Documentation for more details.
Managing Files#
File State#
The file access functions provide an API for performing operations on any file stored in a volume’s file system.
When a file is opened, a file object pointer called FS_FILE is returned. This object pointer can be passed as an argument for all file access functions, and the file object preserves information about the actual file and the state of the file access (see Figure - File State Transitions in the Managing Files page). The file access state includes:
The file position (the next place data will be read/written)
Error conditions
The state of any file buffer, if file buffering is enabled
As data is read from or written to a file, the file position is incremented by the number of bytes transferred from/to the volume. The file position may also be manipulated directly by the application using the position set function (fs_fsetpos()). And the current absolute file position may be obtained with the position get function (fs_fgetpos()), which can be later used with the position set function.
Figure - File State Transitions#
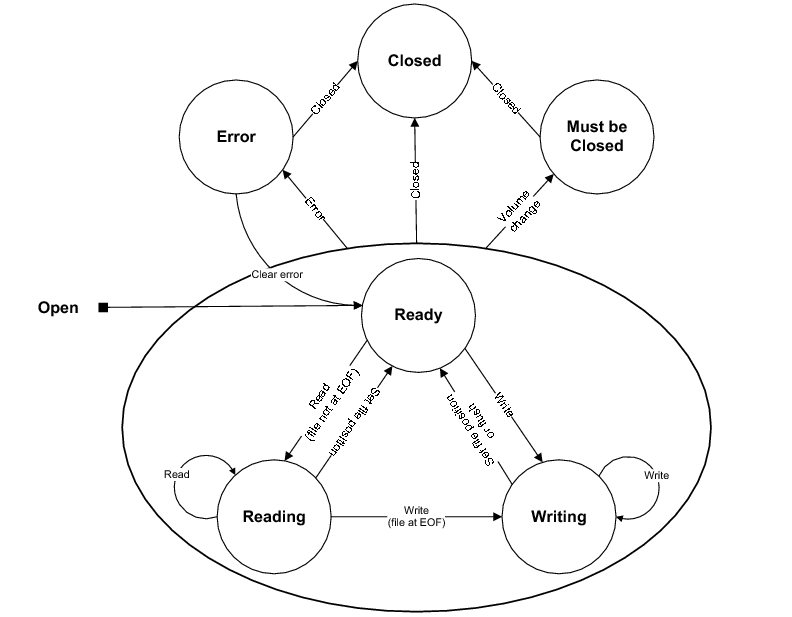
A file maintains flags that signal any errors encountered in the immediately-previous file access. Subsequent accesses will fail (under certain conditions outlined here) unless these flags are explicitly cleared (using fs_clearerr()).
There are actually two flags. One indicates whether the file encountered the end-of-file (EOF) during the previous access; if this flag is set, file reads (but not file writes) will fail. The other flag indicates device errors, and no subsequent file access will succeed (except file close) until this flag is cleared. The functions fs_ferror() and fs_feof() can be used to get the state of device error and EOF conditions, respectively.
If file buffering is enabled (FS_CORE_CFG_FILE_BUF_EN is DEF_ENABLED), then input/output buffering can be used to increase the efficiency of file reads and writes. A buffer can be assigned to a file using fs_setbuf() or fs_setvbuf(). The buffer's content can be flushed to the storage device using fs_fflush().
If a file is shared between several tasks in an application, a file lock can be employed to guarantee that a series of file operations are executed atomically. fs_flockfile() (or its non-blocking equivalent fs_ftrylockfile()) acquires the lock for a task (if it does not already own it). Accesses from other tasks will be blocked until fs_funlockfile() is called. This functionality is available if FS_CORE_CFG_FILE_LOCK_EN is DEF_ENABLED.
Opening, Reading and Writing Files#
When an application needs to access a file, it must first open it using fs_fopen() as shown in Listing - Posix File Open in the Managing Files page.
Listing - Posix File Open#
FS_FILE *p_file;
p_file = fs_fopen("vol0/file.txt", /* Absolute path to file. */
"w+"); /* File access mode: read/write/truncate/create. */
if (p_file == (FS_FILE *)0) {
/* An error occurred. Error handling should be added here. */
}The return value of this function should always be verified as non-NULL before the application proceeds to access the file. The first argument of this function is the path of the file. If working directories are disabled ( FS_CORE_CFG_TASK_WORKING_DIR_EN set to DEF_DISABLED ), this must be the absolute file path starting with a volume name (refer to section File and Directory Names and Paths for more details about absolute paths). The second argument of this function is a string indicating the file access mode. It must be one of the strings shown in Table - fs_fopen() File Access Mode Strings Interpretations in the Managing Files page. Note that in all instances, the ‘b’ (binary) option has no affect on the behavior of file accesses.
Table - fs_fopen() File Access Mode Strings Interpretations#
fs_fopen() File Access Mode String | Read | Write | Truncate | Create | Append |
|---|---|---|---|---|---|
“r” or “rb” | Yes | No | No | No | No |
“w” or “wb” | No | Yes | Yes | Yes | No |
“a” or “ab” | No | Yes | No | Yes | Yes |
“r+” or “rb+” or “r+b” | Yes | Yes | No | No | No |
“w+” or “wb+” or “w+b” | Yes | Yes | Yes | Yes | No |
“a+” or “ab+” or “a+b” | Yes | Yes | No | Yes | Yes |
After a file is opened, any of the file access functions that are valid for that mode can be called. The most commonly used functions are fs_fread() and fs_fwrite(), which reads or writes a certain number of ‘items’ from a file:
Listing - Posix File Read#
int cnt;
CPU_INT08U *p_buf;
FS_FILE *p_file;
cnt = fs_fread(p_buf, /* Pointer to buffer receiving data from file. */
1, /* Size, in bytes, of each item to be read. */
100, /* Number of items, each one with size of 1 byte. */
p_file); /* Pointer to file descriptor. */
if (cnt == 0) {
/* An error occurred. Error handling should be added here. */
}
cnt = fs_fwrite(p_buf, /* Pointer to buffer containing data to file. */
1, /* Size, in bytes, of each item to be write. */
100, /* Number of items, each one with size of 1 byte. */
p_file); /* Pointer to file descriptor. */
if (cnt == 0) {
/* An error occurred. Error handling should be added here. */
}The return value, the number of items read (or written), should be less than or equal to the third argument. If the operation is a read, this value may be less than the third argument for one of two reasons. First, the file could have encountered the end-of-file (EOF), which means that there is no more data in the file. Second, the device could have been removed, or some other error could have prevented the operation. To diagnose the cause, the fs_feof() function should be used. This function returns a non-zero value if the file has encountered the EOF.
Once the file access is complete, the file must be closed. If your application fails to close files, then the File System could run out of resources, such as file objects.
An example of reading a file is shown below:
Listing - Posix File Read Example#
void App_Fnct (void)
{
FS_FILE *p_file;
fs_size_t cnt;
unsigned char buf[50];
int eof;
int err;
p_file = fs_fopen("vol0/file.txt", "r"); /* Open file in read only. */
if (p_file != (FS_FILE *)0) { /* If file is opened, read from file. */
do {
cnt = fs_fread(&buf[0], /* Pointer to buffer receiving data from file. */
1, /* Size, in bytes, of each item to be read. */
sizeof(buf), /* Number of items, each one with size of 1 byte. */
p_file);
if (cnt > 0) {
printf("Read %d bytes.\r\n", cnt);
}
} while (cnt >= sizeof(buf));
eof = fs_feof(p_file); /* Check for EOF. */
if (eof != 0) { (1)
printf("Reached EOF.\r\n");
} else {
err = fs_ferror(p_file); /* Check for error. */
if (err != 0) { (2)
/* An error occurred. Error handling should be added here. */
}
}
fs_fclose(p_file); /* Close file. */
} else {
/* An error occurred. Error handling should be added here. */
}
...
}(1) To determine whether a file read terminates because of reaching the EOF or a device error/removal, the EOF condition should be checked using fs_feof().
(2) In most situations, either the EOF or the error indicator will be set on the file if the return value of fs_fread() is smaller than the buffer size. Consequently, this check is unnecessary.
Getting or Setting the File Position#
Another common operation is getting or setting the file position. The functions fs_fgetpos() and fs_fsetpos() allow the application to ‘store’ a file location, continue reading or writing the file, and then go back to that position at a later time. An example of using file position get and set is given in Listing - File Position Set and Get Example in the Managing Files page
Listing - File Position Set and Get Example#
void App_Fnct (void)
{
FS_FILE *p_file;
fs_fpos_t pos;
int err;
p_file = fs_fopen("vol0/file.txt", "r"); /* Open file in read only. */
if (p_file == (FS_FILE *)0) {
/* An error occurred. Error handling should be added here. */
}
/* Read some data from file. Each read will advance file position. */
err = fs_fgetpos(p_file, &pos); /* Save current file position. */
if (err != 0) {
/* An error occurred. Error handling should be added here. */
}
/* Read some data from file. Each read will advance file position. */
err = fs_fsetpos(p_file, &pos); /* Set file to previously saved position. */
if (err != 0) {
/* An error occurred. Error handling should be added here. */
}
/* Read data from saved file position. Each read will advance file position. */
fs_fclose(p_file); /* When finished, close file. */
}Configuring a File Buffer#
In order to increase the efficiency of file reads and writes, input/output buffering capabilities are provided. Without an assigned buffer, reads and writes will be performed immediately within fs_fread() and fs_fwrite(). When a buffer is assigned, data will always be read from or written to the buffer; device access will only occur once the file position moves beyond the window represented by the buffer.
fs_setbuf() or fs_setvbuf() assigns a buffer to a file. The buffer content can be flushed to the storage device with fs_fflush(). If a buffer is assigned to a file that was opened in update (read/write) mode, then a write may be followed by a read only if the buffer has been flushed (by calling fs_fflush() or a file positioning function). A read may be followed by a write only if the buffer has been flushed, except when the read encountered the end-of-file, in which case a write may happen immediately. The buffer is flushed automatically when the file is closed.
File buffering is particularly important when data is written in small chunks to a medium with slow write time or limited endurance. An example is NOR flash, or even NAND flash, where write times are much slower than read times, and the lifetime of device is constrained by limits on the number of times each block can be erased and programmed. |
|---|
Listing - File Buffer Usage Example#
static CPU_INT08U App_FileBuf[512u]; /* Define file buffer. */
void App_Fnct (void)
{
FS_FILE *p_file;
int err;
p_file = fs_fopen("vol0/file.txt", "w"); /* Open file in read/write. */
if (p_file == (FS_FILE *)0) {
/* An error occurred. Error handling should be added here. */
}
(1)
err = fs_setvbuf(p_file,
(void *)App_FileBuf, /* File buffer to assign to open file. */
FS__IOFBF, /* Data buffered for reads & writes. */
sizeof(App_FileBuf)); /* Size of buffer in bytes. */
if (err != 0) {
/* An error occurred. Error handling should be added here. */
}
/* Write some data to file. Each write will add data to the file buffer. */
(2)
fs_fflush(p_file); /* Make sure data is written to file. */
if (err != 0) {
/* An error occurred. Error handling should be added here. */
}
(3)
fs_fclose(p_file); /* When finished, close file. */
}(1) The buffer must be assigned immediately after opening the file. An attempt to set the buffer after read or writing the file will fail.
(2) While it is not necessary to flush the buffer before closing the file, some applications may want to make sure at certain points that all previously written data is actually stored on the device before writing more.
(3) When closing the file, the file buffer will be emptied by writing its content to the disk.
Diagnosing a File Error#
As explained in the section File State , the file maintains flags that indicate errors encountered in the immediately-previous file access. You may use the functions fs_ferror() and fs_feof() to identify a file error. Listing - File Error Diagnose Example in the Managing Files page illustrates a usage of those functions (Note: This code snippet is illustrative. No write should be done after opening a file in read-only, of course).
Listing - File Error Diagnose Example#
void App_Fnct (void)
{
unsigned char data1[50];
int cnt;
int file_is_err;
FS_FILE *p_file;
p_file = fs_fopen("vol0/file.txt", "r"); /* Open file in read only. */
if (p_file == (FS_FILE *)0) {
/* An error occurred. Error handling should be added here. */
}
(1)/* This write will fail */
/* because read-only file. */
cnt = fs_fwrite((void *)data1,
sizeof(unsigned char),
sizeof(data1),
p_file);
(2)/* Error indicator should be set */
/* because of failed write. */
file_is_err = fs_ferror(p_file);
APP_RTOS_ASSERT_CRITICAL((file_is_err != 0), DEF_FAIL);
fs_clearerr(p_file); (3) /* Clr err indicator. */
file_is_err = fs_ferror(p_file); (4)
APP_RTOS_ASSERT_CRITICAL((file_is_err == 0), DEF_FAIL);
(5)/* This read should pass. */
cnt = fs_fread((void *)data1,
sizeof(unsigned char),
sizeof(data1),
p_file);
if (cnt == 0) {
/* An error occurred. Error handling should be added here. */
}
fs_fclose(p_file); /* Close file. */
...
}(1) The file write will fail because the file was opened in read-only mode.
(2) Calling fs_ferror() should indicate that the error indicator flag has been set because of the previous failed file write.
(3) The error indicator flag is reset by a call to the function fs_clearerr().
(4) The error indicator flag is checked again. The assertion should confirm that the flag has been reset.
(5) A file read is attempted and is expected to succeed, since the error indicator flag is reset. Note that if a file read had been tried before the call to fs_clearerr(), the read would have failed because the flag would have still been set.
Atomic File Operations Using File Lock#
If a file is shared between several tasks in an application, a file lock can be employed to guarantee that a series of file operations are executed atomically. The function fs_flockfile() (or its non-blocking equivalent fs_ftrylockfile()) acquires the lock for a task (if it does not already own it). Accesses from other tasks will be blocked until fs_funlockfile() is called.
Each file has a lock count associated with it. This allows nested calls by a task to acquire a file lock; each of those calls must be matched with a call to fs_funlockfile(). Listing - File Lock Usage Example in the Managing Files page shows how the file lock functions can be used.
Listing - File Lock Usage Example#
void App_Fnct (void)
{
unsigned char data1[50];
unsigned char data2[10];
int cnt;
FS_FILE *p_file;
/* A file has been open with fs_fopen(). */
(1)
fs_flockfile(p_file); /* Lock file. */
/* Write data atomically. */
cnt = fs_fwrite(data1,
1,
sizeof(data1),
p_file);
if (cnt == 0) {
/* An error occurred. Error handling should be added here. */
}
cnt = fs_fwrite(data2,
1,
sizeof(data2),
p_file);
if (cnt == 0) {
/* An error occurred. Error handling should be added here. */
}
fs_funlockfile(p_file); /* Unlock file. */
...
}(1) fs_flockfile() will block the calling task until the file is available. If the task must perform other operations without waiting for the file to be available, the non-blocking function fs_ftrylockfile() can be used.
Managing Directories#
The directory access functions provide an API for reading the entries within a directory. The function fs_opendir() initiates this procedure, and each subsequent call to fs_readdir_r() returns information about a particular entry in a structure fs_dirent, until all entries have been examined. The fs_closedir() function releases any file system structures and locks.
Listing - Directory Content Listing Example in the Managing Directories page shows an example using the directory access functions to list the files and sub-directories in a directory.
Listing - Directory Content Listing Example#
void App_Fnct (void)
{
FS_DIR *p_dir;
struct fs_dirent dirent;
struct fs_dirent *p_dirent;
int err;
p_dir = fs_opendir("vol0/dir_test"); /* Open the directory. */
if (p_dir == (FS_DIR *)0) {
/* An error occurred. Error handling should be added here. */
}
/* Read first directory entry. Usually 'dot' entry. */
err = fs_readdir_r(p_dir, /* Directory handle. */
&dirent, /* Structure that will contain mainly entry name. */
&p_dirent); /* Pointer to structure containing entry info. */
if (err != 0) {
/* An error occurred. Error handling should be added here. */
}
if (p_dirent != (struct fs_dirent *)0) { /* If NULL, directory is empty. */
while (p_dirent != (struct fs_dirent *)0) { /* While last entry not reached. */
/* Display entry (file or directory) name. */
printf("entry found: %s\r\n", p_dirent->d_name);
/* Read next entry int the directory table. */
err = fs_readdir_r(p_dir,
&dirent, (1)
&p_dirent);
if (err != 0) {
/* An error occurred. Error handling should be added here. */
}
(2)
}
}
fs_closedir(p_dir); /* Close the directory. */
...
}(1) The second argument fs_readdir_r(), is a pointer to a struct fs_dirent, which has two members. The field d_name[] is the most useful and holds the name of the entry. For more information about the structure fs_dirent, refer to the notes section of fs_readdir_r().
(2) If you need more information about an entry such as file or directory, read and/or write attributes, time attributes, etc, you may call fs_stat().
Working Directory#
All file and directory paths often use an absolute path by specifying an explicit volume as illustrated below:
Listing - Absolute paths#
p_file = fs_fopen("sdcard:vol0\\file.txt", "r"); /* File on explicitly-specified volume. */
p_dir = fs_opendir("sdcard:vol0\\dir10"); /* Directory on explicitly-specified volume. */All absolute path variations described in the subsection File and Directory Names and Paths for the File System native API can be used also for the POSIX API. |
|---|
The file and directory path can also be relative. Paths are then specified relative to the working directory of the current task. In order to use relative paths, you must enable the configuration FS_CORE_CFG_TASK_WORKING_DIR_EN in fs_core_cfg.h. In that case, you will be able to open a file or directory relatively to the working directory, as shown below:
Listing - Special paths#
p_file1 = fs_fopen("file.txt", "r"); /* File in working directory. */
p_file2 = fs_fopen("..\\file.txt", "r"); /* File in parent of working directory. */
p_dir1 = fs_opendir("dir11"); /* Directory in working directory. */
p_dir2 = fs_opendir("..\\dir20"); /* Directory in parent of working directory. */The two standard special path components are supported:
The path component ".." moves to the parent directory of the current working directory.
The path component "." makes no change; essentially it means the current working directory.
Prior to using a relative path in fs_fopen() or fs_opendir(), you must first use the function fs_chdir() to set the working directory. You can retrieve the current working directory attached to a task by calling the function fs_getcwd().
All relative path variations described in the subsection File and Directory Names and Paths for the File System native API can be used also for the POSIX API. |
|---|
Managing Entries#
The entry access functions provide an API for performing single operations on file system entries (files and directories), such as renaming or deleting a file. Each of these operations is atomic. Consequently, in the absence of device access errors, either the operation will have completed or no change to the storage device will have been made upon function return.
Create a new directory: fs_mkdir()
Delete an existing file or directory: fs_remove()
Rename an existing file or directory: fs_rename()
Optional FAT Journaling#
The File System's FAT journaling module is an optional feature that provides protection against unexpected power failures during file system operations.
In the FAT file system, cluster allocation information is stored separately from file data and metadata. This means that file operations that make even simple changes to the content of a file are non-atomic. Atomic operations either complete immediately or (in the event of an error) do not happen at all; they never have a state halfway in between. The repercussions of this can be innocuous (for example, wasted disk space) or very serious (corrupted directories, corrupted files, and data loss). In order to prevent this kind of data corruption, you can use the File System FAT journaling module.
What Journaling Guarantees#
In short, journaling guarantees that the file system remains consistent on disk. Journaling prevents the directory hierarchy, file names, file metadata and cluster allocation information from becoming corrupted in case of an untimely interruption (such as a power failure or application crash). However, while journaling protects the integrity of the file system, it does not necessarily protect your data integrity (that is the content of your files). For example, if the application crashes while a write operation is being performed, the data could end up only partially written to the media (see Journaling API Level Atomicity ).
How Journaling Works#
In order to understand how the journaling module works, you should first understand how API-level operations relate to the underlying FAT layer operations. As seen in Figure - Relation Between API and FAT Layer Operations in the Optional FAT Journaling page, an API-level operation is made of one or more top-level FAT operations, which, in turn, are made of one or more low-level FAT operations.
Figure - Relation Between API and FAT Layer Operations#
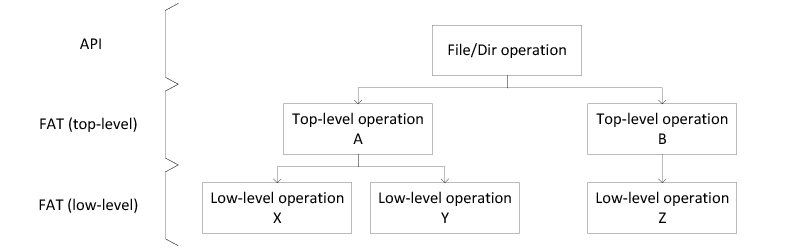
Let's take as an example a file rename operation. The API-level rename operation involves one top-level FAT rename operation and the following low-level FAT sub-operations:
Create a directory entry that uses the new file name.
Update the newly created directory entry so that it is identical to the original one.
Remove the original directory entry.
Without journaling, a failure occurring during the rename operation could leave the file system in any of the following corrupted states:
The original directory entry is intact, but orphaned LFN entries remain due to a partially-created directory entry.
The new directory entry now exists (creation has been completed), but orphaned LFN entries remain because the original directory entry was only partially deleted.
Two directory entries now exist, both pointing to the same data: one containing the original name and another one containing the new name.
Using the journaling module, any of the previous corrupted states would be either rolled back or completed when the volume is remounted. This is possible because, prior to performing any low-level FAT operation, the journaling system logs recovery information in a special file called the journal file. By reverting or completing successive underlying low-level FAT operations, the journaling module also allows top-level FAT operations to be reverted or completed, thus making them atomic. In our previous example, the journaled rename operation could have only one of the two following outcomes:
The original directory entry is intact and everything appears as if nothing had happened.
The new directory entry has been created and the original one has been completely deleted, so that the file has been cleanly renamed.
How To Use Journaling#
The FAT journaling module is active when the configuration constant FS_FAT_CFG_JOURNAL_EN is set to DEF_ENABLED.
The journaling system can be started on a per-volume basis. There are no specific functions required to start and stop the journal operations. Starting journaling is done automatically when the volume is opened with FSVol_Open(). It ensures that the FAT journal is ready when the first file operations are performed. In the same manner, stopping journaling is done when the volume is closed with FSVol_Close().
When the volume is mounted, a special hidden file called "ucfs.jnl" is created in the root directory. Each time a top-level FAT operation is journaled, this file will be written. When the volume closes, the file "ucfs.jnl" is deleted. If a power failure occurs, the "ucfs.jnl" file will still exist when the volume is re-opened with FSVol_Open(), and the file will be consulted to replay some journaled operations to maintain the file system's integrity on disk.
Journal operations (that is logging top-level FAT operations in the file "ucfs.jnl") take place automatically when calling certain high-level file system functions. The list below shows the high-level functions that involves journal operations:
FSVol_Open()
FSVol_Close()
FSDir_Open()
FSFile_Open()
FSFile_Close()
FSFile_Rd()
FSFile_Wr()
FSFile_PosSet()
FSFile_Copy()
FSFile_Truncate()
FSFile_BufFlush()
FSEntry_Create()
FSEntry_Rename()
FSEntry_Del()
FSEntry_AttribSet()
FSEntry_TimeSet() (this function is deprecated and will be replaced by sl_fs_entry_time_set() in a next release)
The file system operations that are logged by the journaling module are only those that perform write operations in the FAT table or in a directory table. Read operations will never be logged, as they do not modify the FAT table or a directory table. You may notice that the list above includes the functions FSFile_Rd () and FSFile_PosSet () . The journaled operations involved in these functions relate to file buffer management, which may require flushing the file buffer, and thus possibly updating the FAT table or a directory table. They do not relate to read operations.
Usage Advice#
There are a few aspects that you should be aware of to benefit from FAT journaling protection.
In addition to enabling FS_FAT_CFG_JOURNAL_EN , we highly recommend that you also enable FS_CORE_CFG_ORDERED_WR_EN. This constant enables ordered write operations within the File System cache module. This is particularly important, as it ensures that the cache blocks containing journaled data are flushed to disk before the non-journaled data. Otherwise in the event of a power failure or application crash, the journal module may not properly replay the journaled data when the volume is re-mounted, leaving the file system possibly corrupted. Refer to section Core Configuration for more details about FS_CORE_CFG_ORDERED_WR_EN.
You may want to enable the volume auto-sync functionality to ensure that the journal file content is always kept up-to-date, in case of a power failure. The journaled data are cached within the File System cache module during write operations. The cache buffers are flushed to the physical media when a flush point is encountered. Enabling the volume auto-sync functionality activates automatic flush points at the end of certain file operations (for instance, file write and file truncate). This is an additional precaution to ensure that the journaled data are synced regularly by the File System cache module. It relieves your application from having to flush the cache manually using FSVol_Sync() after certain write operations. If volume auto-sync is not used, the journal may not be able to replay all journaled entries because some of them had still been cached when a power failure occurred. The volume auto-sync feature is enabled as an option flag of FSVol_Open(). Refer to the section Syncing a Volume for more details about the auto-sync.
The number of blocks associated with a cache instance can affect the reliability of journal operations. As mentioned, the journaled data are cached, and the cache module is flushed when encountering a flush point. There are explicit flush points enabled by the volume auto-sync, and there are also implicit flush points. Implicit flush points are where the File System cache module run out of cache blocks and needs to evict a block. As the number of cache blocks increases, the implicit flush points come at longer intervals, and consequently so do the synchronizations of the journal data to the physical media. Thus you may want to reduce the number of cache blocks for a cache instance so that the journal file on-disk is updated frequently. Refer to the page Creating and Assigning a Cache for more details about how to set the number of cache blocks with FSCache_DfltAssign() or FSCache_Create().
Point #1 above has no impact on write performance. For points #2 and #3, activating the volume auto-sync feature and/or reducing the number of cache blocks may have an negative impact on write performance, since the flush points can occur more frequently. Applying points #2 and #3 may result in a tradeoff between performance and metadata integrity. In general, activating the FAT journal module still remains an useful option to ensure the file system metadata integrity while maintaining acceptable performance. |
|---|
Limitations of Journaling#
When properly used, the journaling system provides reliable protection for your file system metadata. But to ensure proper operation, you should be aware of certain limitations, and follow the corresponding recommendations. Failure to observe these recommendations could reduce the benefits of using the journaling system, and potentially lead to file system corruption.
Journaling and FAT16/32 Removable Media#
The journaling module recovery process is based on the assumption that the file system has not been modified or altered since the failure occurred. Therefore, mounting a journaled volume on a host such as Windows, Linux or Mac OS should be avoided as much as possible. If it must be done, you must first make sure that the volume has been cleanly unmounted from your embedded application by using FSVol_Close() so that the journal file has been deleted.
Journaling and API-Level Atomicity#
While the journaling system provides atomicity for top-level FAT-layer operations, it does not provide atomicity for all API-level operations. Most of the time, an API-level file system operation will result in a single top-level FAT operation being performed (see How Journaling Works ). In that case, the API-level operation is guaranteed to be atomic. For example, a call to FSEntry_Rename() will result in a single FAT rename operation being performed (assuming that renaming is not cross-volume), which is guaranteed to be atomic.
By comparison, a call to FSFile_Truncate() will likely result in many successive top-level FAT operations being performed. Therefore, the API-level truncate operation is not guaranteed to be atomic. The following API-level functions are atomic:
FSDir_Open()
FSFile_Open()
FSFile_Close()
FSFile_Rd()
FSFile_PosSet()
FSFile_BufFlush()
FSEntry_Create()
FSEntry_Rename() (atomic if the source and the destination are on the same volume)
FSEntry_Del()
FSEntry_AttribSet()
FSEntry_TimeSet() (this function is deprecated and will be replaced by sl_fs_entry_time_set() in a next release)
Non-atomic API level operations are listed below and Table - Non-Atomic API Level Operations in the Optional FAT Journaling page describes the possible interruption side effects for each non-atomic function.
FSEntry_Rename()
FSFile_Copy()
FSFile_Wr()
FSFile_Truncate()
Table - Non-Atomic API Level Operations#
API-Level Operation | API-Level Function | Possible Interruption Side Effects |
|---|---|---|
Entry rename | FSEntry_Rename() with the destination being on a different volume than the source. | The destination file size could end up being less than the source file size. |
Entry copy | FSFile_Copy() regardless of source and destination volumes location. | If the destination file exists and the flag to overwrite the existing file is set, the existing file could be deleted, but the copy not completed. The destination file size could end up being smaller than the source file size. |
File write (data appending) | FSFile_Wr() with file buffers enabled. | The file size could be changed to any value between the original file size and the new file size. |
File write (data overwriting) | FSFile_Wr() with or without file buffers. | If existing data contained in a file is overwritten with new data, data at overwritten locations could end up corrupted. |
File truncate | FSFile_Truncate() with file buffers enabled. | The file size could be changed to any value between the original file size and the new file size. |
Journaling and Device Drivers#
Data can be lost in case of unexpected reset or power-failure in either the File System Core layer or in the Storage layer. Your entire system is fail-safe only if both layers are fail-safe. The FAT journaling add-on makes the File System Core layer fail-safe. Some of the File System storage drivers are guaranteed to provide fail-safe sector operations; this is the case with the NOR and NAND flash drivers. For other drivers (SD and SCSI), the fail-safety of the sector operations depends on the underlying hardware.
Media-Specific Operations#
This section describes the media-specific functions which can be used to get additional controls and information about a media.
Opening and Closing Media#
When using some media-specific functions, you must first open media with the function FS<MEDIA>_Open() (where MEDIA can be NAND, NOR, SCSI or SD). You then get a media-specific handle that you can pass to other media-specific functions. When you have finished with the media operations, you can close it by calling the function FS<MEDIA>_Close(). Listing - Media-Specific Open/Execute/Close Generic Sequence in the Media-Specific Operations page illustrates, in a generic way, the media-specific open/execute/close sequence.
Listing - Media-Specific Open/Execute/Close Generic Sequence#
FS_MEDIA_HANDLE media_handle;
FS_<MEDIA-NAME>_HANDLE <media-name>_handle;
RTOS_ERR err;
/* Assume 'media_handle' has been obtained from FSMedia_Get(). */
(1)
/* Open a media device. */
<media-name>_handle = FS_<MEDIA>_Open(media_handle, &err); (2)
if (err.Code != RTOS_ERR_NONE) {
/* An error occurred. Error handling should be added here. */
}
/* Perform any media-specific operations. */
/* Open the media device. */
FS_<MEDIA>_Close(<media-name>_handle, &err);
if (err.Code != RTOS_ERR_NONE) {
/* An error occurred. Error handling should be added here. */
}(1) FSMedia_Get() allows you to retrieve a media handle associated with a given media name.
(2) A media device (NAND, NOR, SCSI or SD) is opened. You get a specific media handle allowing you to execute an operation on the opened media.RAM Disk does not define open and close functions.
NAND#
The NAND media driver can be tailored by the following specific configurations defined in fs_storage_cfg.h (refer to the section NAND-Specific Options for a detailed description of each configuration):
FS_NAND_CFG_AUTO_SYNC_EN
FS_NAND_CFG_UB_META_CACHE_EN
FS_NAND_CFG_DIRTY_MAP_CACHE_EN
FS_NAND_CFG_UB_TBL_SUBSET_SIZE
FS_NAND_CFG_RSVD_AVAIL_BLK_CNT
FS_NAND_CFG_MAX_RD_RETRIES
FS_NAND_CFG_MAX_SUB_PCT
FS_NAND_CFG_DUMP_SUPPORT_EN
The NAND media driver offers the specific functions listed in Table - NAND-Specific Functions in the Media-Specific Operations page.
Table - NAND-Specific Functions#
Function | Handle Type to Provide | Description | Notes |
|---|---|---|---|
FS_NAND_Open() | FS_MEDIA_HANDLE | Opens NAND media | |
FS_NAND_Close() | FS_NAND_HANDLE | Closes NAND media | |
FS_NAND_BlkErase() | FS_NAND_HANDLE | Erases a physical block | A NAND flash block is composed of a number of pages. A page is equivalent to a sector, and so a page is the smallest programmable unit within a NAND. Thus, erasing a block is equivalent to erasing several sectors. |
FS_NAND_ChipErase() | FS_NAND_HANDLE | Erases an entire NAND chip | Erase counts for each block will also be erased, affecting wear-leveling mechanism. |
FS_NAND_Dump() | FS_NAND_HANDLE | Dumps raw NAND contents in multiple data chunks through a user-supplied callback function | Used mainly for debugging purposes. |
FS_NAND_FTL_ConfigureLowParams() | FS_MEDIA_HANDLE | Configures NAND Flash Transaction Layer (FTL) parameters |
NOR#
The NOR media driver provides one specific configuration defined in fs_storage_cfg.h (refer to the section NOR-Specific Options for a detailed description of this configuration):
FS_NOR_CFG_WR_CHK_EN
The NOR media driver offers the specific functions listed in Table - NOR-Specific Functions in the Media-Specific Operations page.
Table - NOR-Specific Functions#
Function | Handle Type to Provide | Description | Notes |
|---|---|---|---|
FS_NOR_Open() | FS_MEDIA_HANDLE | Opens NOR media | |
FS_NOR_Close() | FS_NOR_HANDLE | Closes NOR media | |
FS_NOR_Rd() | FS_NOR_HANDLE | Reads data from NOR media | |
FS_NOR_Wr() | FS_NOR_HANDLE | Writes data to NOR media | |
FS_NOR_BlkErase() | FS_NOR_HANDLE | Erases a physical block | A NOR flash block is composed of a number of sectors. Thus erasing a block is equivalent to erasing several sectors. |
FS_NOR_ChipErase() | FS_NOR_HANDLE | Erases an entire NOR chip | |
FS_NOR_XIP_Cfg() | FS_NOR_HANDLE | Configures NOR flash and (Quad) SPI controller in XIP (eXecute-In-Place) mode | More details about XIP can be found on the page NOR eXecute In Place . |
FS_NOR_Get() | FS_NOR_HANDLE | Gets a NOR handle from a given media handle | |
FS_NOR_BlkCntGet() | FS_NOR_HANDLE | Gets the number of blocks on a NOR | |
FS_NOR_BlkSizeLog2Get() | FS_NOR_HANDLE | Gets the base-2 logarithm of a NOR block size | |
FS_NOR_FTL_ConfigureLowParams() | FS_MEDIA_HANDLE | Configures NOR Flash Transaction Layer (FTL) parameters | |
FS_NOR_FTL_LowCompact() | FS_BLK_DEV_HANDLE | Low-level compact a NOR device | A NOR block device must be opened with FSBlkDev_Open() prior to using this function. |
FS_NOR_FTL_LowDefrag() | FS_BLK_DEV_HANDLE | Low-level defragment a NOR device | A NOR block device must be opened with FSBlkDev_Open() prior to using this function. |
RAM Disk#
In contrast to NAND, NOR, SCSI and SD, the RAM Disk media driver does not offer open/close functions or many other specific functions. The only function is FS_RAM_Disk_Add() which creates a RAM disk region and adds it to the Platform Manager . Listing - Example of RAM Disk Creation in the Media-Specific Operations page shows an example of usage of this function.
Listing - Example of RAM Disk Creation#
/* RAM Disk zone definition. */
#define EX_FS_RAM_RESERVED_SEC_NBR 37u /* RAM Disk number of sectors reserved to file system. */
#define EX_FS_RAM_SEC_SIZE 512u /* RAM Disk sector size. */
/* RAM Disk total number of sectors. */ (1)
#define EX_FS_RAM_SEC_NBR (EX_FS_RAM_RESERVED_SEC_NBR + 64u)
static CPU_INT08U Ex_FS_RAM_Disk[EX_FS_RAM_SEC_SIZE * EX_FS_RAM_SEC_NBR];
FS_RAM_DISK_CFG disk_info;
RTOS_ERR err;
/* Initialize a RAM disk information structure. */
disk_info.DiskPtr = (void *)Ex_FS_RAM_Disk; /* Pointer to table simulating a RAM disk zone. */ (2)
disk_info.LbCnt = EX_FS_RAM_SEC_NBR; /* Number of sectors. */
disk_info.LbSize = EX_FS_RAM_SEC_SIZE; /* Sector size in bytes. */
/* Add RAM Disk instance to file system. */
FS_RAM_Disk_Add("ram0", /* String identifying this RAM Disk instance. */
&Ex_FS_RAM_Disk_Cfg, /* Configuration describing RAM area. */
&err);
if (err.Code != RTOS_ERR_NONE) {
/* An error occurred. Error handling should be added here. */
}
(3)
/* After the RAM disk creation, you must high-level format it with FS_FAT_Fmt(). */(1) The RAM disk zone will contain sectors reserved to the file system metadata. These reserved sectors are additional to the file data sectors. Thus be aware that the total RAM disk size, that is (FS_RAM_DISK_CFG.LbCnt * FS_RAM_DISK_CFG.LbSize), is not exclusively dedicated to your file data. Refer to the question "When writing a few files of a few KB in size in a RAM_disk, I get the error RTOS_ERR_VOL_FULL " in the File System Troubleshooting page for more details.
(2) DEF_NULL can be passed to the field FS_RAM_DISK_CFG.DiskPtr. In this case, the RAM disk zone is created from the LIB module's heap region. Set the configuration LIB_MEM_CFG_HEAP_SIZE accordingly to accommodate your disk size specified by (FS_RAM_DISK_CFG .LbCnt * FS_RAM_DISK_CFG.LbSize ).
(3) A RAM disk zone is a non-volatile memory that must be formatted. You shall use the function FS_FAT_Fmt() to format it as a FAT partition. Refer to the section Formatting an Existing Partition for more details about the high-level format.
SD#
The SD media driver provides one specific configuration defined in fs_storage_cfg.h (refer to the section SD-Specific Options for a detailed description of this configuration):
FS_SD_SPI_CFG_CRC_EN
The SD media driver offers the specific functions listed in Table - SD-Specific Functions in the Media-Specific Operations page.
Table - SD-Specific Functions#
Function | Handle Type to Provide | Description |
|---|---|---|
FS_SD_Open() | FS_MEDIA_HANDLE | Opens an SD Card or SPI media |
FS_SD_Close() | FS_SD_HANDLE | Closes an SD Card or SPI media |
FS_SD_CID_Rd() | FS_SD_HANDLE | Read SD CID (Card IDentification number) register |
FS_SD_CSD_Rd() | FS_SD_HANDLE | Read SD CSD (Card Specific Data) register |
FS_SD_InfoGet() | FS_SD_HANDLE | Get SD information |
Listing - Example of SD Information in the Media-Specific Operations page shows an example of SD-specific information retrieved with the function FS_SD_InfoGet(). If you are using the Media Poll task (refer to the section Handling Asynchronous Connection and Disconnection for additional information) to detect the insertion of an SD card, you may want to use FS_SD_InfoGet() as shown in this code listing to display information about the connected SD card.
Listing - Example of SD Information#
FS_MEDIA_HANDLE media_handle
FS_SD_HANDLE sd_handle;
FS_SD_INFO sd_info;
RTOS_ERR err;
/* Open an SD device. */
sd_handle = FS_SD_Open(media_handle, &err);
if (err.Code != RTOS_ERR_NONE) {
/* An error occurred. Error handling should be added here. */
}
/* Get information about the SD device. */
FS_SD_InfoGet(sd_handle,
&sd_info, /* Structure to receive device information. */
&err);
if (err.Code != RTOS_ERR_NONE) {
/* An error occurred. Error handling should be added here. */
}
/* Display specific information about SD device. */
printf("SD info: \r\n");
printf("- Sector size : %d bytes\r\n", sd_info.BlkSize);
printf("- Nbr of sectors : %d\r\n", sd_info.NbrBlks);
printf("- Max clk freq : %d Hz\r\n", sd_info.ClkFreq);
printf("- Comm timeout : %d cycles\r\n", sd_info.Timeout);
printf("- Card Type : %d\r\n", sd_info.CardType);
printf("- High Capacity : %d\r\n", sd_info.HighCapacity);
printf("- ManufID : 0x%X\r\n", sd_info.ManufID);
printf("- OEM_ID : 0x%X\r\n", sd_info.OEM_ID);
printf("- Product serial nbr: %d\r\n", sd_info.ProdSN);
printf("- Product name : %s\r\n", sd_info.ProdName);
/* Close an SD device. */
FS_SD_Close(sd_handle, &err);
if (err.Code != RTOS_ERR_NONE) {
/* An error occurred. Error handling should be added here. */
}SCSI#
The SCSI media driver offers the specific functions listed in Table - SCSI-Specific Functions in the Media-Specific Operations page.
Table - SCSI-Specific Functions#
Function | Handle Type to Provide | Description |
|---|---|---|
FS_SCSI_Open() | FS_MEDIA_HANDLE | Opens a SCSI media |
FS_SCSI_Close() | FS_SCSI_HANDLE | Closes a SCSI media |
FS_SCSI_LU_InfoGet() | FS_SCSI_HANDLE | Get SCSI logical unit information |
Listing - Example of SCSI Information in the Media-Specific Operations page shows an example of SCSI-specific information retrieved with the function FS_SCSI_LU_InfoGet(). If you are using the Media Poll task (refer to the section Handling Asynchronous Connection and Disconnection for additional information) to detect the insertion of a SCSI device, you may want to use FS_SCSI_LU_InfoGet() as shown in this code listing to display information about the connected SCSI.
Listing - Example of SCSI Information#
FS_MEDIA_HANDLE media_handle
FS_SCSI_HANDLE scsi_handle;
FS_SCSI_LU_INFO lu_info;
RTOS_ERR err;
/* Open a SCSI device. */
scsi_handle = FS_SCSI_Open(media_handle, &err);
if (err.Code != RTOS_ERR_NONE) {
/* An error occurred. Error handling should be added here. */
}
/* Get information about the SCSI device. */
FS_SCSI_LU_InfoGet(scsi_handle,
&lu_info, /* Structure to receive device information. */
&err);
if (err.Code != RTOS_ERR_NONE) {
/* An error occurred. Error handling should be added here. */
}
/* Display specific information about SCSI device. */
printf("LU info: \r\n");
printf("- Sector size : %d bytes\r\n", lu_info.SecDfltSize);
printf("- Nbr of sectors: %d\r\n", lu_info.SecCnt);
printf("- Vendor : %s\r\n", lu_info.VendorID_StrTbl);
printf("- Product : %s\r\n", lu_info.ProductID_StrTbl);
/* Close a SCSI device. */
FS_SCSI_Close(scsi_handle, &err);
if (err.Code != RTOS_ERR_NONE) {
/* An error occurred. Error handling should be added here. */
}NOR eXecute In Place#
This page describes how to use the NOR media driver to execute code directly from serial NOR flash memories. The method is called XIP – for eXecute In Place. You may want to read the page NOR Flash XIP to get familiar with the different notions associated with XIP.
The NOR media driver provides a low-level API that allows you to manage an external NOR flash. This API is presented in Table - NOR-Specific Functions in the Media-Specific Operations page. You must use the following functions to perform XIP:
FS_NOR_Rd()
FS_NOR_Wr()
FS_NOR_BlkErase()
FS_NOR_ChipErase()
FS_NOR_XIP_Cfg()
The above functions should be used in a specific sequence, as described below. In this example, a Quad SPI controller is considered.
Write the binary image using the indirect mode of the Quad SPI controller: FS_NOR_ChipErase(), FS_NOR_BlkErase() and FS_NOR_Wr().
Read back the binary image using the indirect mode of the Quad SPI controller to verify image integrity: FS_NOR_Rd().
Enter XIP mode by configuring the Quad SPI controller in memory-mapped mode, and optionally by configuring the NOR flash device and Quad SPI controller in XIP mode: FS_NOR_XIP_Cfg().
Make the processor jump to the QSPI memory location where the image begins. Here, there are two options:
Configure the processor's Program Counter to jump to the QSPI memory start address.
Direct the processor to restart and to boot directly from the QSPI external flash device if the system supports this feature.
At this point, the processor fetches its instructions from the NOR flash memory and executes in place the stored image.
If the XIP program subsequently returns processor execution to a program stored in the microcontroller's internal flash, the internal program may exit the XIP mode by calling FS_NOR_XIP_Cfg() again.
Listing - NOR Media Driver API - XIP Enable/Disable in the NOR eXecute In Place page shows how to enable the XIP mode, jump to the flash memory for execution, and disable the XIP mode.
Listing - NOR Media Driver API - XIP Enable/Disable#
#define NOR_XIP_FLASH_MEM_MAP_START_ADDR 0x04000000
CPU_ADDR flash_src;
CPU_INT08U blk_size_log2;
CPU_INT32U blk_ix_start = 0u; /* Image starts at block index #0. */
RTOS_ERR err;
/* A nor handle has been obtained with FS_NOR_Open(). */
/* A binary image has been previously written to the NOR memory. */
blk_size_log2 = FS_NOR_BlkSizeLog2Get(nor_handle, &err);
if (err.Code != RTOS_ERR_NONE) {
/* An error occurred. Error handling should be added here. */
}
/* ------------------ ENTER XIP MODE ------------------ */
FS_NOR_XIP_Cfg(nor_handle,
DEF_YES, (1)
&err);
if (err.Code != RTOS_ERR_NONE) {
/* An error occurred. Error handling should be added here. */
}
/* ------------------ EXECUTE IMAGE ------------------- */
flash_src = NOR_XIP_FLASH_MEM_MAP_START_ADDR + (blk_ix_start << blk_size_log2);
App_NOR_XIP_ImageExec(flash_src); (2)
[...]
/* ------------------ EXIT XIP MODE ------------------- */
FS_NOR_XIP_Cfg(nor_handle,
DEF_NO, (3)
&err);
if (err.Code != RTOS_ERR_NONE) {
/* An error occurred. Error handling should be added here. */
}(1) When entering XIP mode with FS_NOR_XIP_Cfg(), two situations can occur depending on whether XIP is supported by the NOR flash memory. If the NOR chip supports XIP, FS_NOR_XIP_Cfg() will activate XIP mode in the NOR chip and in the Quad SPI controller. Also, the Quad SPI controller will use direct mode (that is, memory-mapped mode) so that the flash device is seen internally by the processor. This configuration corresponds to the XIP hardware. If the NOR chip does not support XIP, FS_NOR_XIP_Cfg() will configure only the Quad SPI controller in direct mode. It is the XIP software configuration.
(2) Make the processor jump to a specified flash address where the image starts. The flash address must be in the address range dedicated to the external flash which is memory-mapped in the CPU address space. In this example, there are two directions for the processor jump depending again on whether the NOR flash supports XIP.
If the NOR does support XIP: the internal flash application may execute a branch instruction with the specified flash address so that the processor continues directly its execution flow from the external NOR flash device. Or the internal flash application code can provoke a processor reset, and during its boot sequence, the processor executes the newly written image from the NOR flash memory.
Some processors are able to execute an image from the external NOR memory during their power-up and boot sequence. In that case, there are two conditions that must be met:
The processor must be able to boot from an external NOR flash device using a Quad SPI controller.
The NOR flash device must support XIP mode during the memory power-up.
If the NOR does not support XIP, there is only one option. The internal flash application executes a branch instruction with the specified flash address so that the processor continues directly its execution flow from the external NOR memory.
The function App_NOR_XIP_ImageExec() is a dummy function created for this code snippet to illustrate a common action that you perform do to process the image. Micrium OS File System does not provide this function.
(3) If the XIP program subsequently returns control to the application code stored in the MCU internal flash, you may want to disable the XIP mode. In that case, FS_NOR_XIP_Cfg() is called again with a flag set to DEF_NO for instance. The function will perform the opposite actions described in note (6).
Prior to enabling the XIP mode, a binary image must be written to the flash device. Listing - NOR Media Driver API - XIP Image Write/Verify in the NOR eXecute In Place page shows an example of functions that allow you to write a binary image into the flash memory and verify it.
Listing - NOR Media Driver API - XIP Image Write/Verify#
#define NOR_PHY_SUBSEC_SIZE (4u * 1024u)
CPU_INT08U *p_buf;
CPU_INT08U *p_image_start;
CPU_INT08U *p_image_src;
CPU_INT08U blk_size_log2;
CPU_INT32U blk_ix_start;
CPU_INT32U blk_ix_stop;
CPU_INT32U blk_ix;
CPU_INT32U start_pos;
CPU_INT32U rem_size;
CPU_INT32U image_blk_cnt;
CPU_INT32U wr_size;
CPU_INT32U rd_size;
CPU_INT32U image_size;
CPU_BOOLEAN ok = DEF_OK;
RTOS_ERR err;
/* A nor handle has been obtained with FS_NOR_Open(). */
blk_size_log2 = FS_NOR_BlkSizeLog2Get(nor_handle, &err);
if (err.Code != RTOS_ERR_NONE) {
/* An error occurred. Error handling should be added here. */
}
/* Alloc test resources. */
p_buf = (CPU_INT08U *)Mem_SegAlloc(DEF_NULL,
p_seg,
NOR_PHY_SUBSEC_SIZE,
&err);
if (err.Code != RTOS_ERR_NONE) {
/* An error occurred. Error handling should be added here. */
}
/* --------- WRITE IMAGE WITH INDIRECT WRITE ---------- */
p_image_start = App_NOR_XIP_ImageGet(&image_size); (1)
if (p_image_start == DEF_NULL) {
/* An error occurred. Error handling should be added here. */
}
/* Compute how many blocks needed to hold entire image. */
image_blk_cnt = (image_size + ((1 << blk_size_log) - 1u) / (1 << blk_size_log));
blk_ix_start = 0u; /* Start at the first block of NOR flash. */
blk_ix_stop = blk_ix_start + image_blk_cnt;
/* Erase block(s) for proper image writing. */
for (blk_ix = blk_ix_start; blk_ix < blk_ix_stop; blk_ix++) {
FS_NOR_BlkErase(nor_handle, blk_ix, &err); (2)
if (err.Code != RTOS_ERR_NONE) {
/* An error occurred. Error handling should be added here. */
}
}
rem_size = image_size;
start_pos = blk_ix_start << blk_size_log2; /* Get physical start addr relative to flash addr range.*/
p_image_src = p_image_start;
while (rem_size > 0u) { /* Write entire image. */
wr_size = DEF_MIN(NOR_PHY_SUBSEC_SIZE, rem_size);
/* Write N bytes to flash device. */
FS_NOR_Wr(nor_handle, (3)
p_image_src,
start_pos,
wr_size,
&err);
if (err.Code != RTOS_ERR_NONE) {
/* An error occurred. Error handling should be added here. */
}
rem_size -= wr_size;
start_pos += wr_size;
p_image_src += wr_size;
}
/* ---- VERIFY IMAGE INTEGRITY WITH INDIRECT READ ----- */
rem_size = image_size;
start_pos = blk_ix_start << blk_size_log2; /* Get physical start addr relative to flash addr range.*/
p_image_src = p_image_start;
while (rem_size > 0u) { /* Read entire image. */
rd_size = DEF_MIN(NOR_PHY_SUBSEC_SIZE, rem_size);
Mem_Clr(p_buf, rd_size);
/* Read N bytes from flash device. */
FS_NOR_Rd(nor_handle, (4)
p_buf,
start_pos,
rd_size,
&err);
if (err.Code != RTOS_ERR_NONE) {
/* An error occurred. Error handling should be added here. */
}
/* Verify image integrity. */
ok = App_NOR_XIP_ImageVerify(p_buf,
p_image_src,
rd_size);
if (err.Code != RTOS_ERR_NONE) {
/* An error occurred. Error handling should be added here. */
}
rem_size -= rd_size;
start_pos += rd_size;
p_image_src += rd_size;
}(1) For the illustrative purpose of the NOR media driver API example, a pointer to a buffer holding the entire binary image is retrieved. The source binary image can, of course, be written by chunks in the external NOR memory. You could have for instance:
// While entire image not processed
// Get image chunk
// Write image chunk with FS_NOR_Wr()
// Read back this chunk with FS_NOR_Rd() to ensure image chunk is correctThe following functions AppNOR_XIP_ImageGet(), App NOR_XIP_ImageVerify() are dummy functions created for this code snippet to illustrate some common actions that you may do to process the image. Micrium OS File System does not provide these functions.
(2) To ensure the binary image is written properly, erase the required blocks with FS_NOR_BlkErase(). Indeed, in a NOR memory, a write cannot program the bits from 0 to 1. Thus a block erase should be done prior to writing. The erase operation will program the bits from 0 to 1. Moreover, instead of erasing selectively some blocks, you can erase the entire chip by using FS_NOR_ChipErase().
(3) Writing an image chunk with FS_NOR_Wr() will use the indirect mode of the Quad SPI controller. The indirect mode can be seen as a FIFO mode in which the software controls the transfers using several registers. It allows high-throughput data transfer with as little system overhead as possible.
(4) Reading back the image chunk will also use the indirect mode of the Quad SPI controller.
Shell Commands#
The command line interface is a traditional method for accessing the file system on a remote system, or in a device with a serial port (for instance, RS-232 or USB). A group of shell commands, derived from standard UNIX equivalents, are available for Micrium OS File System. These may be used to simply evaluate the File System suite, or to gather debugging information, or even to become part of the primary method of access in your final product.
Figure - File System Shell Command Usage#
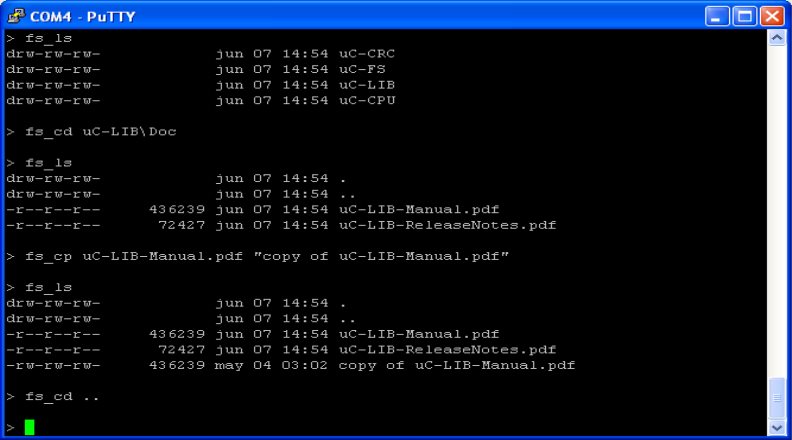
Using the Shell Commands#
In order to use the File System shell commands, you must first initialize:
The Shell module by calling Shell_Init()
The File System shell sub-module by calling FSCore_Init()
Usually, the next step would be to add a table containing all the File System shell commands to the Shell module by using the function Shell_CmdTblAdd(). This step is done automatically when you call FSCore_Init(). All the File System shell commands presented in Table - File System Shell Commands in the Shell Commands page are available in the Shell module. In order to execute a specific command received from the host via a USB or serial link, your application must call the function Shell_Exec(). When you provide a string describing the command and its arguments (for instance "fs_ls"), the Shell module will parse the command's string and call an associated callback which will decode the command's arguments, if any, and perform the command's action. If the command is required to output information back to the host, an output callback, which was passed as an argument of Shell_Exec(), is called by the Shell module. This output callback, provided by you, will forward the response of the command's execution to the host via the serial or USB link. Refer to Shell Module Programming Guide for more details about each Shell module steps.
The File System shell sub-module can manage only a single shell terminal of the host at a time. For instance, if you open two independent shell terminals on the host, and each of the terminals works in the same volume but in a different working directory, a file command such as fs_cat done in the first terminal may refer to the working directory of the second terminal and not the current terminal. You should always run any file commands from the same terminal. |
|---|
Commands#
The supported commands, listed in Table - File System Shell Commands in the Shell Commands page, are equivalent to the standard UNIX commands of the same names, although the functionality is usually simpler, with fewer or no special options. The only exception is fs_lsblk, which is specific to Micrium OS File System. The File System shell commands can be divided in five groups:
Block device: the sole command in this group allows you to obtain information about the block devices opened on the target with FSBlkDev_Open().
Volume: the commands in this group allow you to perform operations on a volume such mount, format, unmount, etc.
File: the commands in this group allow you to perform file operations such as display file content, obtain file statistics, copy a file, etc.
Directory: the commands in this group allow you to manage directory operations such as display a directory's content, change the working directory, etc.
Entry: the sole command in this group allows you to delete a file or directory.
All the commands in the groups File, Directory and Entry must be executed on a formatted volume. That is, you must always execute the command fs_mount prior to any commands in those groups. You may have to format the mounted volume with fs_mskfs if the volume has not been yet formatted. Note that the command fs_mskfs formats the volume as a FAT file system. |
|---|
Table - File System Shell Commands#
Command | Argument Needed | Description |
|---|---|---|
Block Device | ||
fs_lsblk |
| List all open block devices and display information about each partition composing the block device |
Volume | ||
fs_df |
| Report disk free space |
fs_mount |
| Mount volume |
fs_mkfs |
| Format a volume |
fs_umount |
| Unmount volume |
File | ||
fs_cat |
| Print a file to the terminal output |
fs_cp |
| Copy a file |
fs_date |
| Write the date and time to terminal output, or set the system date and time |
fs_mv |
| Move files |
fs_od |
| Dump file contents to terminal output |
fs_touch |
| Change file modification time |
fs_wc |
| Determine the number of newlines, words and bytes in a file |
Directory | ||
fs_cd |
| Change the working directory |
fs_ls |
| List directory contents |
fs_mkdir |
| Make a directory |
fs_pwd |
| Write the pathname of current working directory to the terminal output |
fs_rmdir |
| Remove a directory |
Entry | ||
fs_rm |
| Remove a directory entry, that is a file or a directory |


Information about each command can be obtained using the help (-h) option:
Figure - Help Option Output#
