Debug Unlock#
Overview#
The debug access port connected to the device's Cortex-M33 processor can be opened by issuing commands to the SE, either from a debugger over DCI or through the mailbox interface.
When secure debug unlock functionality is enabled, it is possible to request a challenge from the device and, by answering the challenge, debug lock can be disabled until the next power-on or reset.
The status of the debug lock can be inspected using the Read Lock Status command.
Standard Debug Unlock#
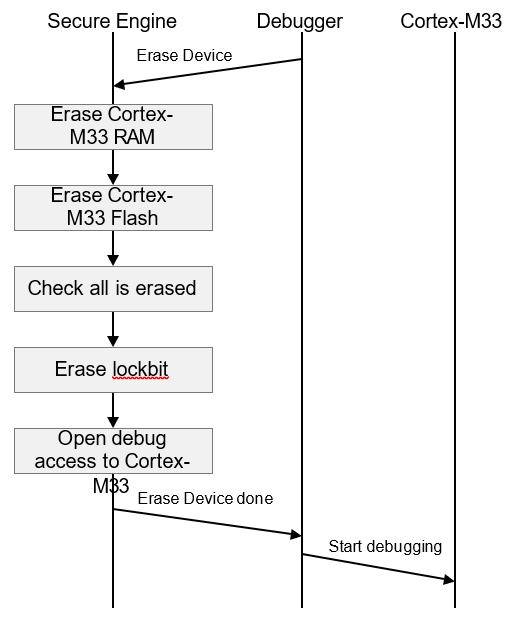
With the properties of the standard debug lock with Device Erase enabled, the device can be returned to the standard debug unlock state using the Erase Device command. This command will wipe the main flash and RAM and verify they are empty before opening the debug lock. It will not wipe user data (USERDATA section of Flash) and provisioned SE settings.
Secure Debug Unlock#
In a secure debug unlock setup, the customer owns a private key and installs a matching public key into the device. This public key checks a certificate that shows what actions the customer allows either for themselves or someone they trust. For example, they might allow only the debug port on a Cortex-M33 to be unlocked, or only certain tamper signals to be restored on HSE-SVH devices.
This method is very helpful during failure analysis because it lets the device be unlocked without erasing the data in flash or RAM.
Note: Enabling secure debug lock, without writing command public key into the device key, will cause the device to be permanently locked and cannot be debugged and even cannot be reprogrammed.
Secure Debug Lock/Unlock Flow#
The secure debug was designed with three organizations in mind:
Direct Customer to whom Silicon Labs sells the chip. This chip has the Public Command Key installed in the SE OTP.
That Direct Customer may be creating a white-labeled product for another company or a sub-component that goes into another company’s product. The Product Company is the customer of the direct customer.
The Debug 3rd Party could be anyone, internal or external, that the Product Company decides is qualified to debug the device.
Because the Public Command Key is installed into the SE OTP of a large number of devices and cannot be changed, the correspond- ing Private Command Key should be stored securely in HSM. If this Private Command Key is ever leaked, all the devices programmed with the corresponding Public Command Key will be compromised.
A secure debug unlock use case is described in the following figure. The secure debug unlock flow moves across the time axis from left to right.
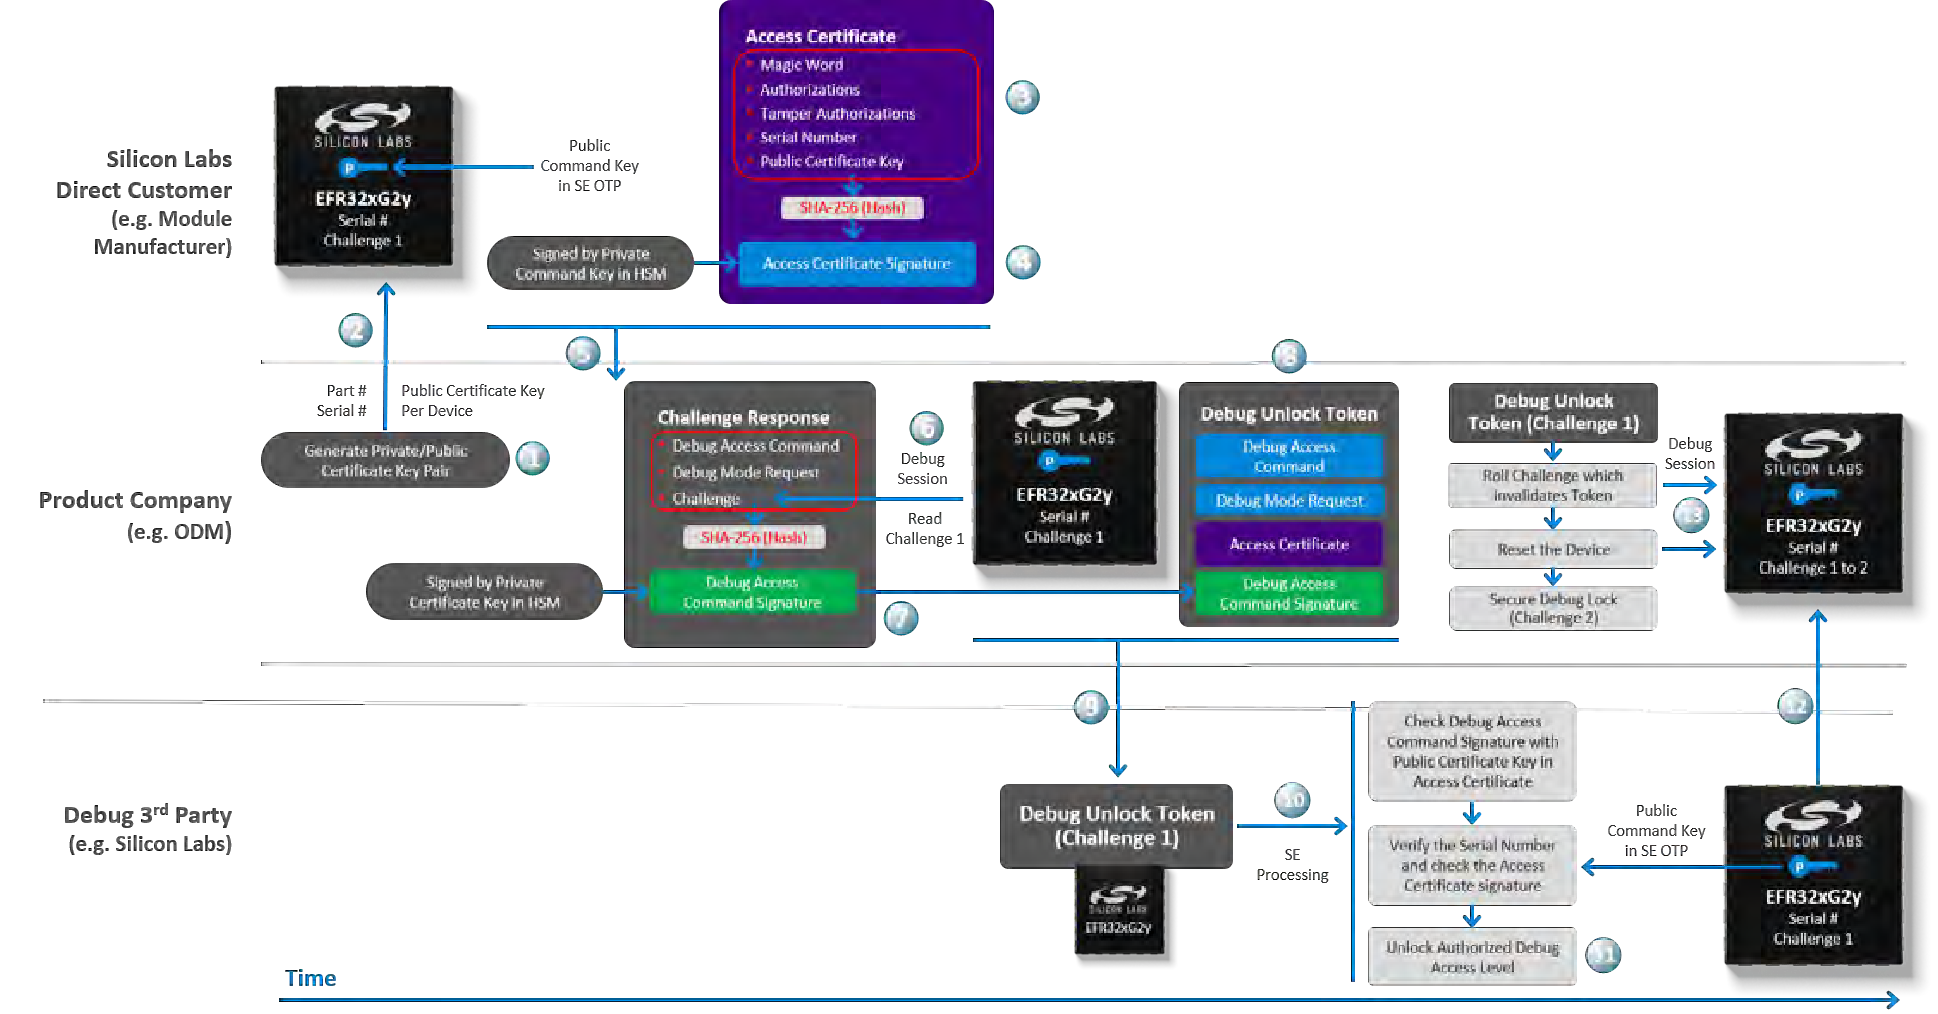
The Product Company creates a Private/Public Certificate Key pair for each device. Because the key pair is assigned only to a single device the company may not need to protect the Private Certificate key as securely as the Private Command key by the direct customer.
The Public Certificate Key (cert_pubkey.pem) for each device is passed to the Silicon Labs Direct Customer. The part number and serial number are also required if Direct Customer cannot access the device.
The Direct Customer then places that Public Certificate Key in the access certificate. The access certificate is per-device because it contains the unique device serial number. This certificate is generated once upon creation of the device, and thereafter, is generally only modified when the Private/Public Certificate Key pair is changed by the Product Company.
The Access certificate should be signed by Private Command key.
The access certificate is passed to the Product Company. The purpose of the access certificate is to grant overall debug access capabilities to the Product Company and authorize them to allow third parties to debug the device. The Product Company can now use the access certificate to generate the Debug Unlock Token. The same access certificate can be used to generate as many Debug Unlock Tokens as necessary without having to ever go back to the Direct Customer.
To create the Debug Unlock Token, a debug session must be started with the device and the challenge value (which is a random number) should be read out to generate the challenge response.
The challenge response is then cryptographically hashed (SHA-256) to create a digest. The digest is then signed by the Private Certificate Key to generate the debug access command signature.
Generate Debug Unlock Token, using access certificate and debug access command signature generated in above steps.
(Alternative) The key protection is not required if the Private Certificate Key is ephemeral. In such case steps 6 to 8 can be skipped and Debug Unlock Token can be directly generated with the access certificate from direct customer's Private Certificate key.
The Debug Unlock Token and the device are now delivered to the Debug 3rd Party.
The device compares the Debug Unlock Token contents with its internal serial number, challenge value, and Public Command Key to determine the token’s authenticity. If authentic, it will execute the debug access command to unlock the device; otherwise, it will ignore the command.
The Debug 3rd Party can now use this same Debug Unlock Token to unlock the device (step 11), over and over again after each power on or reset, until they have finished debugging the device.
Once the Debug 3rd Party has finished debugging, they will send the device back to the Product Company. After receiving the device product company has to invalidate the debug key, so that it should not be misused. To do so product company has to start debug session and should roll the challenge and put the device back into secure debug lock state. Rolling the challenge will effectively invalidate any Debug Unlock Token that has been previously given to any third party.
Note: Direct customer can use the Private Command Key on the connected chip to generate the Debug Unlock Token within the Security Store. However, this method carries a significant risk, as it bypasses the use of an HSM(Hardware Security Module), potentially exposing the Private Command Key to third parties.
Debug Unlock Token#
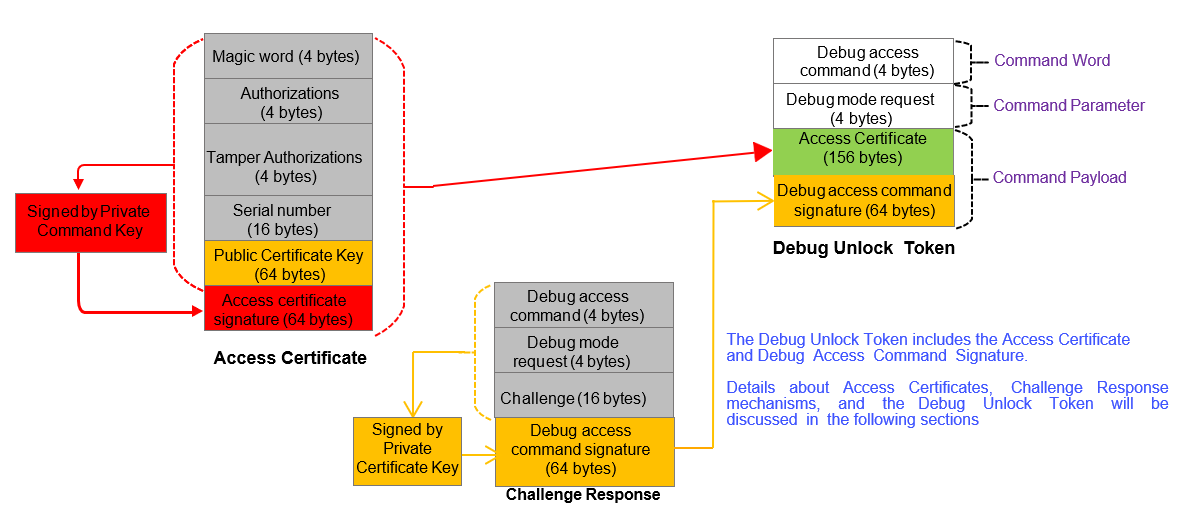
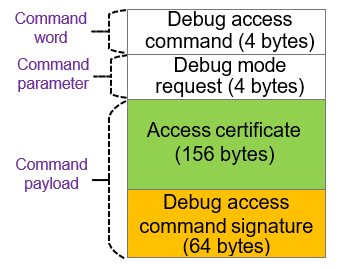
The elements of the Debug Unlock Token are described in the following figure and tables.
Element | Value | Description |
|---|---|---|
Debug access command | 0xfd010001 | The command word of the Debug Unlock Token. |
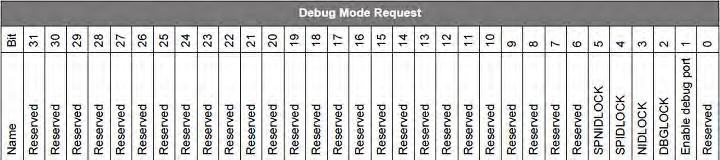
Debug mode request | Device dependent | The command parameter of the debug access command. |
Access certificate (1) | Device dependent | See section Access Certificate. |
Debug access command signature (1) | Device dependent | See section Challenge Response. |
Note:
The debug access command payload consists of an access certificate and a debug access command signature.
Notes:
Enable debug port - Debug port enabled if set.
DBGLOCK (Non-secure, Invasive debug lock): The Invasive debug features for the Non-secure state are unlocked if set.
NIDLOCK (Non-secure, Non-invasive debug lock): The Non-invasive debug features for the Non-secure state are unlocked if set.
SPIDLOCK (Secure, Invasive debug lock): The Invasive debug features for the Secure state are unlocked if set.
SPNIDLOCK (Secure, Non-Invasive debug lock): The Non-invasive debug features for the Secure state are unlocked if set.
All reserved bits should be 0, and bit 1 must be 1 to access the debug port.
For the TrustZone-unaware debugging, bits 2 to 5 are irrelevant, so bits 1 to 5 are usually set (
0x0000003e) to match with the Authorizations in the access certificate.For the TrustZone-aware debugging, bits 2 to 5 are relevant. Refer to TrustZone Debug Authentication for details about these debug options.
Access Certificate#
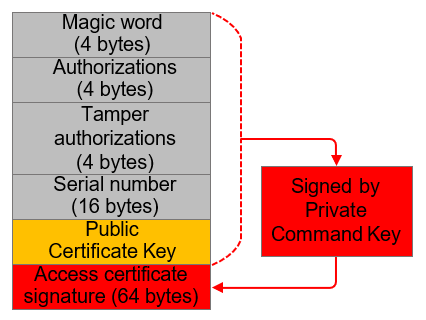
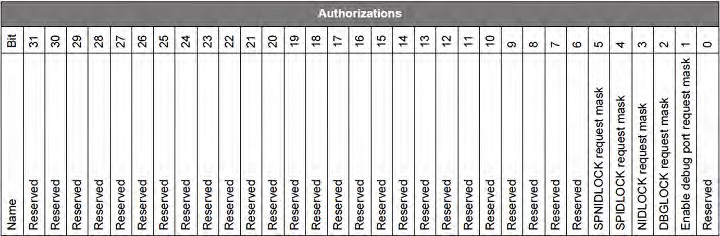
The elements of the access certificate are described in the following figures and table.
Element | Value | Description |
|---|---|---|
Magic word | 0xe5ecce01 | A constant value used to identify the access certificate. |
Authorizations | 0x0000003e (1) | A value used to authorize which bit in the debug mode request can be enabled for secure debug. |
Tamper Authorizations | 0x00000000 or 0xffffffb6 (2) | A value used to authorize which bit in the tamper disable mask can be set to disable the tamper response. |
Serial number | Device dependent | A number used to compare against the on-chip serial number for secure debug or tamper disable. |
Public Certificate Key (3) | Device dependent | The public key corresponding to the Private Certificate Key (3) used to generate the signature (ECDSA-P256-SHA256) in a challenge response. |
Access certificate signature | Device dependent | All the content above is signed (ECDSA-P256-SHA256) by the Private Command Key corresponding to the Public Command Key in the SE OTP. |
Notes:
This value allows all debug options to be reset for secure debug.
Value that sets available bits in the tamper disable mask for tamper disable (HSE-SVH device only).
The Private/Public Certificate Key is a randomly generated key pair. It can be ephemeral or retainable.
The Private Certificate Key can be used repeatedly to generate the signature in a challenge response on one device until the Private/ Public Certificate Key pair is discarded. This can reduce the frequency of access to the Private Command Key, allowing more restrictive access control on that key.
For more information about tamper disable, see Anti-Tamper Protection Configuration and Use.
Notes:
Set the bit to enable the corresponding bit in the debug mode request.
The Debug Unlock Token will reset the corresponding debug option if the same bit is set in Debug mode request and Authorizations.
Challenge Response#
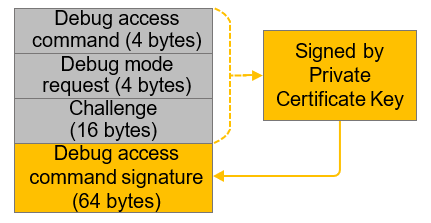
The elements of the challenge response are described in the following figure and table.
Element | Value | Description |
|---|---|---|
Debug access command | 0xfd010001 | The command word of the Debug Unlock Token. |
Debug mode request | Device dependent | The command parameter of the debug access command. |
Challenge | Device dependent (1) | A random value generated by the SE. |
Debug access command signature | Device dependent (2) | All the content above is signed (ECDSA-P256-SHA256) by the Private Certificate Key corresponding to the Public Certificate Key in the access certificate. |
Notes:
The challenge remains unchanged until it is updated to a new random value by rolling the challenge. The Private Certificate Key can be reused for signing when the device challenge is refreshed.
This signature is the final argument of the Debug Unlock Token.
Debug Access Flow#
The debug access flow is described in the following figure.
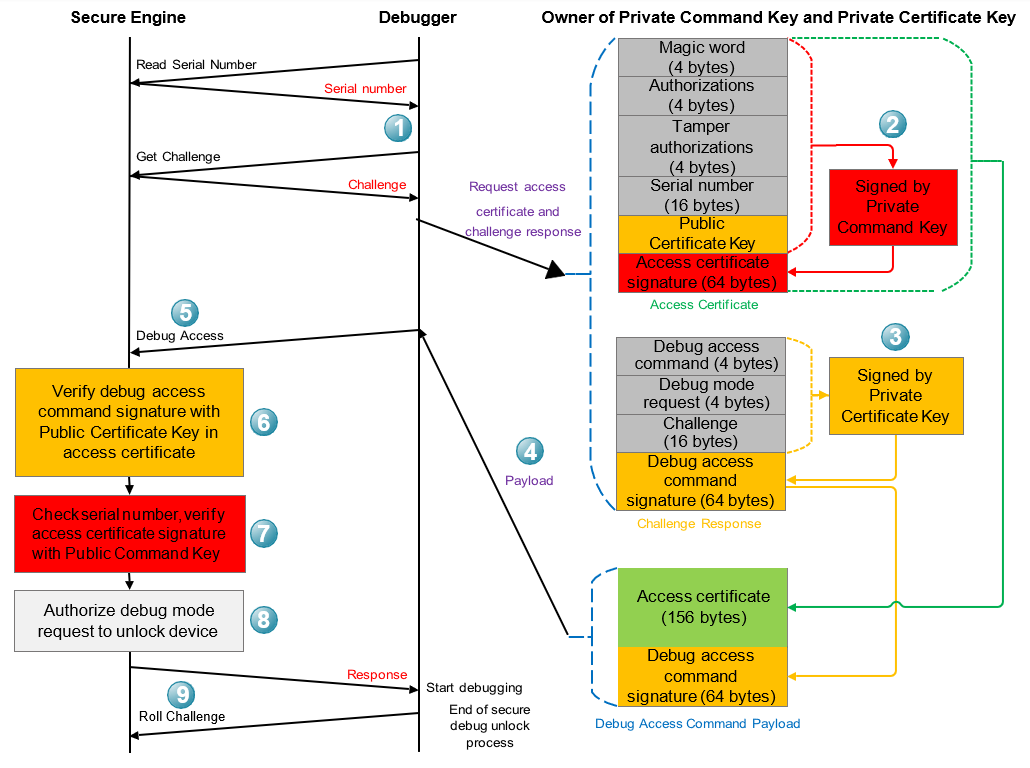
Get the serial number and challenge from the SE.
Generate the access certificate with the device serial number.
Generate the challenge response with device challenge.
Generate the debug access command payload with access certificate and debug access command signature.
Send the Debug Unlock Token to the SE.
Verify the debug access command signature using the Public Certificate Key in the access certificate.
Verify the serial number and the access certificate signature using the on-chip serial number and Public Command Key in the SE OTP.
Authorize the debug mode request to reset the debug options until the next power-on or pin reset.
Roll the challenge to invalidate the current Debug Unlock Token.
TrustZone Debug Authentication#
The debug and trace support in the Cortex-M33 devices are based on the CoreSight architecture, which can be classified into Invasive and Non-invasive debugging features as described in the following table.
Classification | Debug and Trace Features | Description |
|---|---|---|
Invasive | Core debug (e.g., single stepping), Breakpoints, Data watchpoints, Halt mode debugging | These features halt the Cortex-M33 core and change the program execution flow. |
Non-invasive | Embedded Trace Macrocell (ETM), Micro Trace Buffer (MTB), Data trace, Instrumentation Trace Macrocell (ITM), Profiling | These features have a minor or no impact on the program execution flow. |
The separation of Invasive and Non-invasive debug and trace operations in CoreSight architecture can apply to TrustZone debug authentication, which defines the permission levels of the debug and trace features on Secure and Non-secure worlds.
The table below describes four debug options in SE to support TrustZone debug authentication. It is possible to restrict the TrustZone access permissions of the debug interface by setting one or more of the following options.
Debug Option | Description |
|---|---|
DBGLOCK | Non-secure, Invasive debug lock. If this bit is set, the Invasive debug features for the Non-secure state are locked. |
NIDLOCK | Non-secure, Non-invasive debug lock. If this bit is set, the Non-invasive debug features for the Non-secure state are locked. |
SPIDLOCK | Secure, Invasive debug lock. If this bit is set, the Invasive debug features for the Secure state are locked. |
SPNIDLOCK | Secure, Non-invasive debug lock. If this bit is set, the Non-invasive debug features for the Secure state are locked. |
Notes:
Use Simplicity Commander or the SE Manager API to set the debug options.
The state of the debug options is stored permanently in SE and can only be reset to the default value (0000) through the Erase Device command (if enabled).
A secure debug lock device Device Erase was disabled can only use the Debug Unlock Token to temporarily unlock (reset) the debug options to debug the Secure and Non-secure applications.
The following conditions are recommended (1, 2, and 3) or mandatory (4) when setting up the debug options for secure debug unlock.
If SPIDLOCK is unlocked, then DBGLOCK should also be unlocked.
If SPNIDLOCK is unlocked, then NIDLOCK should also be unlocked.
If DBGLOCK is unlocked, the NIDLOCK should also be unlocked.
If SPIDLOCK is unlocked, then SPNIDLOCK is automatically unlocked. The following table lists the recommended combinations of debug options.
SPNIDLOCK | SPIDLOCK | NIDLOCK | DBGLOCK | Description |
|---|---|---|---|---|
0 | 0 | 0 | 0 | Allows all debug and trace features for both the Secure and the Non-secure world (default setting). |
0 | 1 | 0 | 0 | Only allows a Non-invasive debug in the Secure world. Allows both Invasive and Non-invasive debugs in the Non-secure world. |
0 | 1 | 0 | 1 | Only allows a Non-invasive debug in the Secure and the Non-secure world. |
1 | 1 | 0 | 0 | Only allows debug and trace features in the Non-secure world. |
1 | 1 | 0 | 1 | Only allows a Non-invasive debug in the Non-secure world. |
1 | 1 | 1 | 1 | All debug and trace features are disabled. |
Notes:
Trace Point Interface Unit (TPIU) registers' access fault will occur and lock the processor in a security assertion if both NIDLOCK and DBGLOCK in debug option are set (xx11). The device will be unrecoverable if it is in the permanent debug lock state.
The workaround is to avoid using the xx11 debug option or avoid accessing the TPIU registers and upgrade to SE firmware ≥ v1.2.14 (xG21 and xG22) or ≥ v2.2.1 (other Series 2 and all Series 3 devices) so that the debug options cannot be modified after the device is locked.
The highly recommended setting of debug options is to allow debugging in the Non-secure world while, at the same time, disabling debugging for the Secure world (1100).
Secure memories (flash and RAM) are not accessible by the debugger.
All debug access is blocked from accessing Secure addresses.
The debugger will ignore the vector-catch events generated by the Secure exceptions.
Trace sources (e.g., ETM) will stop generating instruction/data trace packets when the Cortex-M33 is in a Secure state.
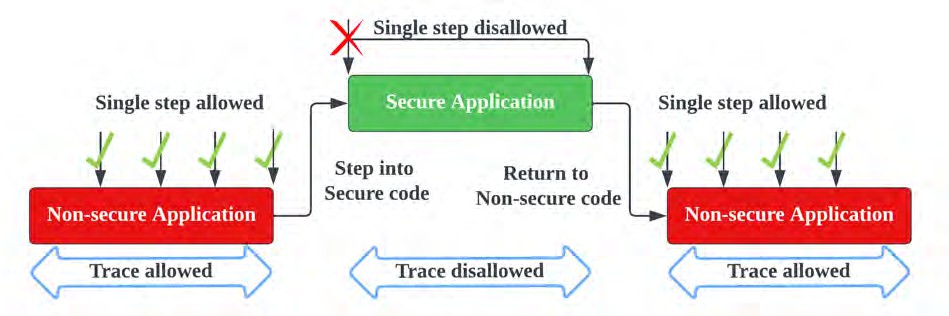
The debugger can neither halt a Secure application (e.g., breakpoint) nor single step into it.
The Cortex-M33 will not stop when stepping into the Secure application until it returns to the Non-secure state.
The figure below describes the debug scenario of debug options with 1100 configuration.
The following examples describe the relationship between debug options and debug mode request when performing a secure debug unlock on Series 2 devices.
Example 1: All debug and trace features for both the Secure and the Non-secure world are allowed (0000)
Debug Options | Authorizations | Debug Mode Request | Debug options after Secure Debug Unlock | Description |
|---|---|---|---|---|
0000 | 00|1111|10 | 00|xxxx|10 | 0000 | No action |
Example 2: Only debug and trace features in the Non-secure world are allowed (1100)
Debug Options | Authorizations | Debug Mode Request | Debug options after Secure Debug Unlock | Description |
|---|---|---|---|---|
1100 | 00|1111|10 | 00|00xx|10 | 1100 | No action |
1100 | 00|1111|10 | 00|10xx|10 | 0100 | Unlock SPNIDLOCK |
1100 | 00|1111|10 | 00|01xx|10 or 00|11xx|10 | 0000 (reset SPIDLOCK will automatically unlock SPNIDLOCK) | Unlock SPNIDLOCK and SPIDLOCK |
Notes:
The bit order of debug options are SPNIDLOCK (MSB), SPIDLOCK, NIDLOCK, and DBGLOCK (LSB).
Debug options : 0 = Unlocked, 1 = Locked
Authorizations in the access certificate: 0 = Disable, 1 = Enable
The authorizations in the access certificate are usually set to 00|1111|10 (0x3e), so the corresponding debug options (bits 2 to 5) can be reset (unlocked) by debug mode request during secure debug unlock.
Debug mode request (bits 2 to 5) in the Debug Unlock Token:
0 = No action on the corresponding debug option if it was locked (i.e., 1)
1 = Reset (unlock) the corresponding debug option from 1 to 0 if it was locked (i.e., 1)
x = No action (either 0 or 1) on the corresponding debug option if it was unlocked (i.e., 0)
Debug options return to the original state after power-on or pin reset.
Debug Unlock Command Reference#
The commands for debug unlock are described in the following table.
DCI Command (1) | Mailbox (SE Manager) API (2) | Description | Availability |
|---|---|---|---|
Erase Device | sl_se_erase_device | Performs a device mass erase and resets the debug configuration to its initial unlocked state. | While Device Erase is enabled. |
Read Serial Number | sl_se_get_serialnumber | Reads out the serial number (16 bytes) of the Series 2 device. | Always. |
Get Challenge | sl_se_get_challenge | Reads out the current challenge value (16 bytes) for Secure debug unlock. | While Public Command key is uploaded. |
Debug Access | sl_se_open_debug | Opens the secure debug access of the Cortex-M33. | Only when Secure Debug is enabled. |
Notes:
Performing these commands over DCI is implemented in Simplicity Studio and Simplicity Commander.
These APIs are only available on HSE devices. The SE Manager API document can be found at https://docs.silabs.com/gecko-platform/latest/platform-security-api/sl-se-manager.