Welcome and Device Tabs#
This page describes the functionality available on the Welcome page and the tabbed interface that is displayed once you connect or selected a devices. Tabs include:
Welcome#
Simplicity Studio® 5 (SSv5) opens to a Welcome page.
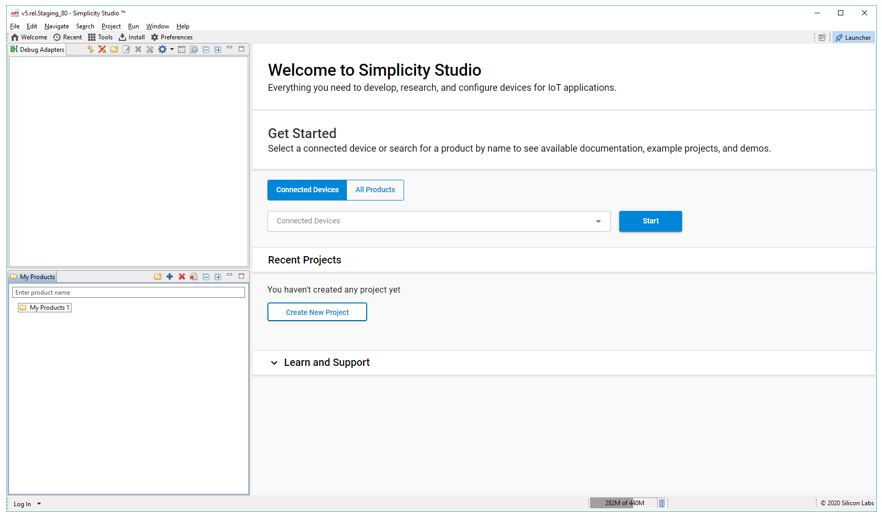
To return to the Welcome page at any time, click Welcome on the tool bar.
![]()
![]()
On the Welcome Page you can:
Select a Target Device#
SSv5’s purpose is to provide a development environment directed toward a specific target device. Therefore, one of the first things to do is to define that target device. Once a target device is selected, a tabbed interface to features specific to that device is available, starting on the Overview tab. The device can be a physical piece of hardware, or a virtual part.
Physical If you have one or more devices physically connected, either on a development kit or on customer hardware with a supported debug adapter, they are displayed in the Debug Adapters view, where you can get started simply by clicking a device to selected it.
They are also displayed in the Get Started area’s Connected Devices drop down. Clicking a device to select it, then click Start.
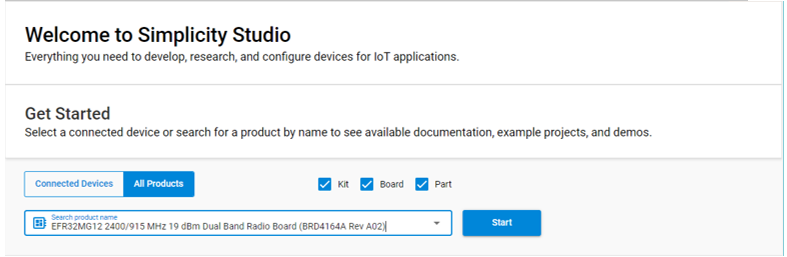
Virtual If you do not have a physical device, but would like to explore some of SSv5’s functions, or get started with developing for a part you will receive later, select a virtual device either in the My Products view or in the Get Started area.
In the My Products view, start typing a product name and select the product of interest.
Under Get Started, click All Products. Use the checkboxes to limit the search list to kits, boards, or parts. Click in the search products field and start typing. When you see the target, select it and click Start. The next time you return to the Welcome page, that device will be shown in the My Products view.
Start a New Project#
You can start a new project from the Welcome page, but you must immediately select a target device. See Start a Project for more information.

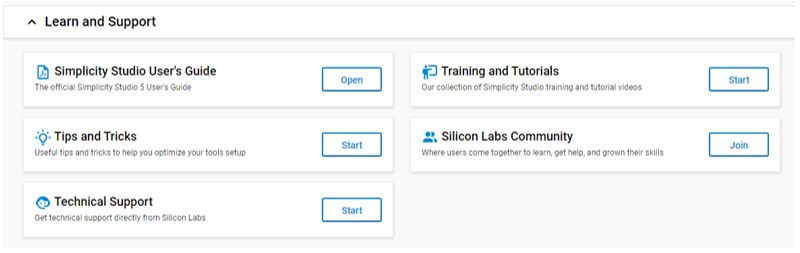
Learn and Support#
Expand the Learn and Support section for access to a variety of resources related to developing for a Silicon Labs target.
Device-Specific Tabs#
Device-Specific tabs include:
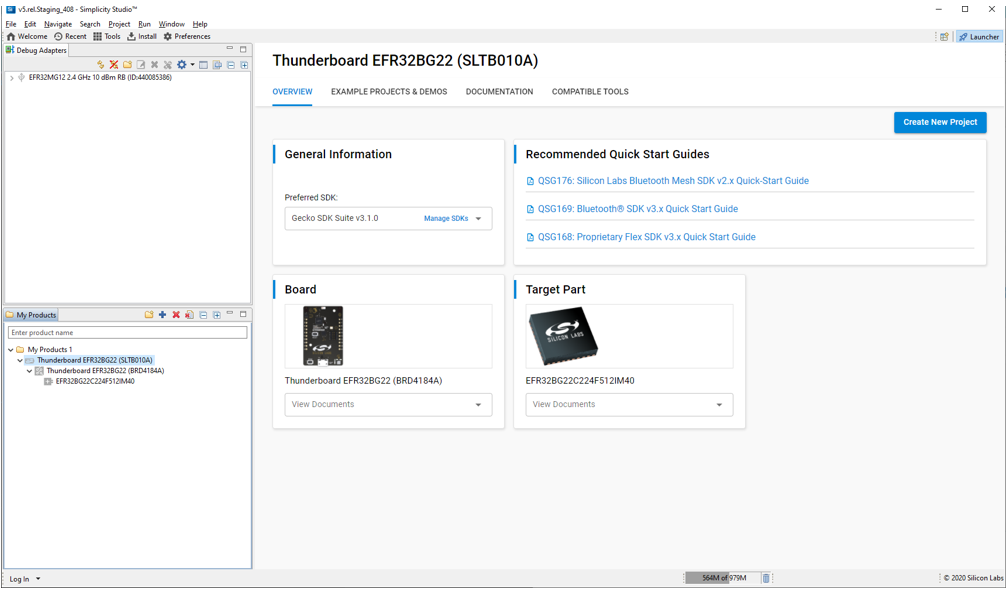
Overview Tab#
Once you have selected a target device, the Launcher perspective editor area changes to the OVERVIEW tab specific to that part. For a physically-connected device you have general device information, as well as details about the hardware components. Each hardware component is pictured in a card and has a View Documents drop down where you can see related hardware documentation. Finally, links to recommended quick start guides from compatible protocol SDKs are provided.
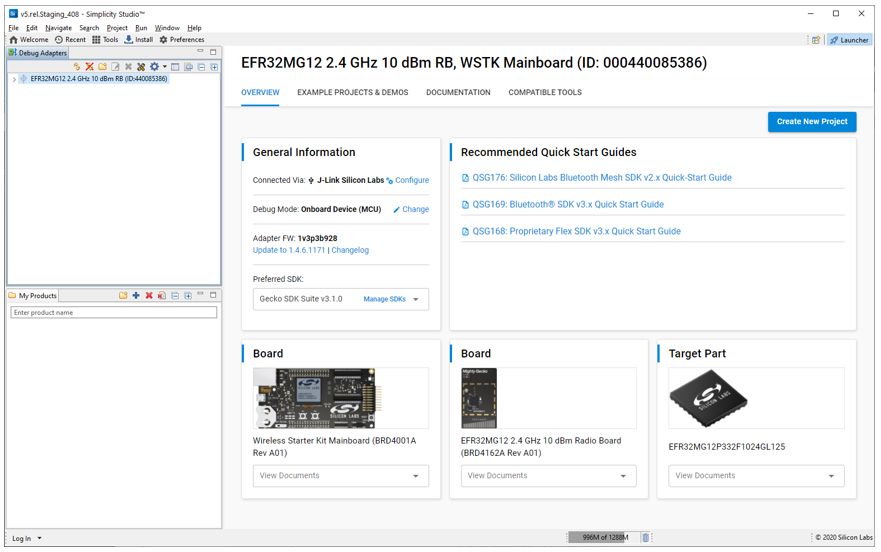
SSv5 displays similar information for virtual devices (selected in the My Products view) and devices connected to a supported debug adapter (for example, SEGGER J-Link or a Wireless Starter Kit mainboard in debug OUT mode). The settings in the General Information card vary depending on the target device.
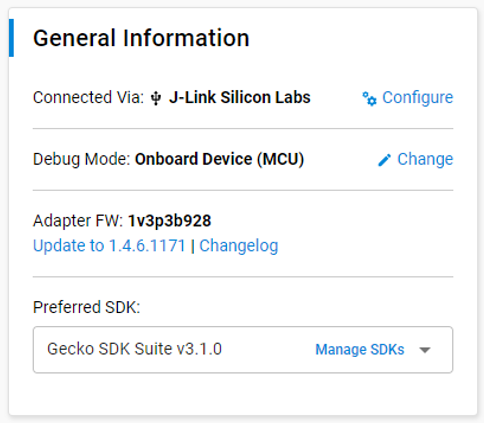
General Device Information#
Configure Connection
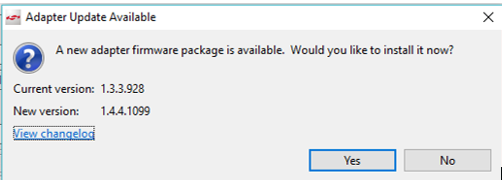
Device Connection shows how the device is connected to SSv5. Click Configure to explore or modify connection parameters. If your device firmware is not up to date, you will be invited to update it.
If you are targeting an EFR32-based Silicon Labs kit, you will almost certainly also see the following question:
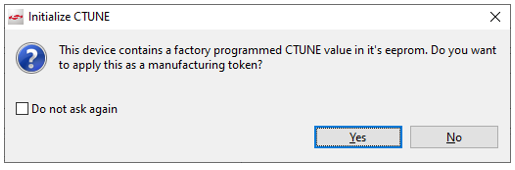
The CTUNE value is used to tune the external crystal capacitors to hit the exact frequency they are intended to hit. Because this varies from board to board, in production Silicon Labs measures it during board tests and programs a unique CTUNE value for each board into the EEPROM. Each SDK also has a default CTUNE value programmed in a manufacturing token. This message asks if you want to overwrite the default CTUNE value with the one found in the EEPROM. Because the EEPROM value is more accurate, Silicon Labs recommends you click Yes. The default CTUNE value will also work, but could under some circumstances, such as temperature extremes, bring the radio frequency out of spec.
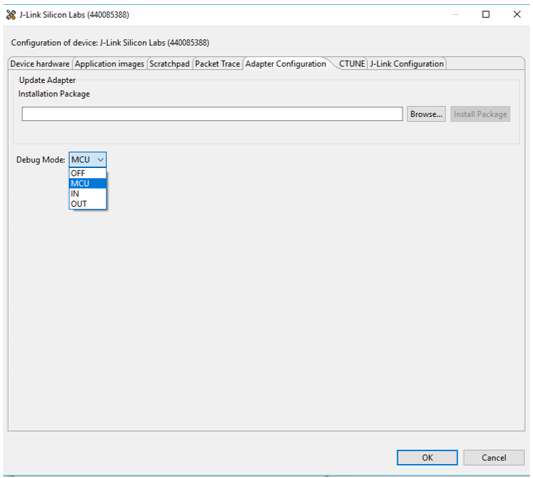
Debug Mode
The Debug Mode controls the interface to the wireless starter kit mainboard onboard debugger. Changing Debug Mode opens the Adapter Configuration tab of the J-Link Configuration tool. The debug modes are:
Onboard Device (MCU) (default): The debugger built into the development board is connected to the on-board target device.
External Device (OUT): The on-board debugger is configured for connection to an external device such as your custom hardware.
External Debugger (IN): An external debugger is connected to the device on the development board.
See your kit's User’s Guide for more information on the debug modes available.
Adapter Firmware
This shows the firmware version running on the debug controller of your Silicon Labs development kit and whether or not an update is available. Silicon Labs strongly recommends that you update adapter firmware to the current version. The Changelog shows the firmware release notes.
When you update adapter firmware SSv5 will ask you to confirm before proceeding. When firmware is up to date the interface says Latest.

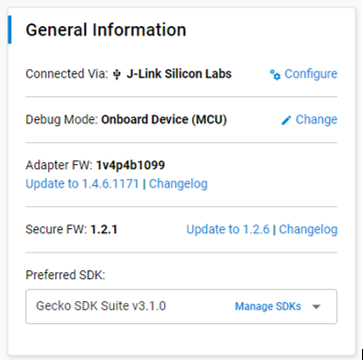
Secure Firmware
Series 2 devices contain a Secure Element, a tamper-resistant component used to securely store sensitive data and keys, and to execute cryptographic functions and secure services. The Secure Element firmware can also be updated. When you have a Series 2 device connected, the General Information card includes a Secure FW line. This shows the firmware version running on the Secure Element and whether or not an update is available. Silicon Labs strongly recommends that you update firmware to the current version. The Changelog shows the firmware release notes.
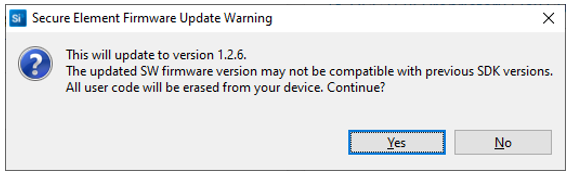
When you update, you are warned that user software, including any factory-installed applications such as RangeTest, will be deleted.
After upgrade, the installed and available versions are the same.

Preferred SDK
Some developers may have more than one GSDK version installed. The preferred SDK shows the currently selected SDK. Click Manage SDKs to see other options.
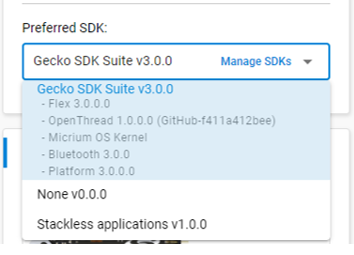
The options shown are those selected in Preferences > Simplicity Studio > SDKs. To add an installed SDK to the list, click Add SDK and browse to the installed location. SSv5 autodetects SDKs in the location folder. Select the SDK to add, and click OK. Make sure the new SDK is selected in the list, and click Apply and Close. You should now be able to select it in the Preferred SDK list.
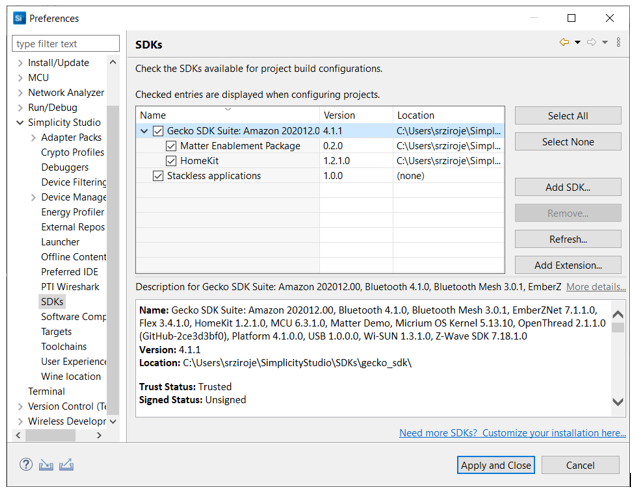
The same dialog is used to install SDK extensions.
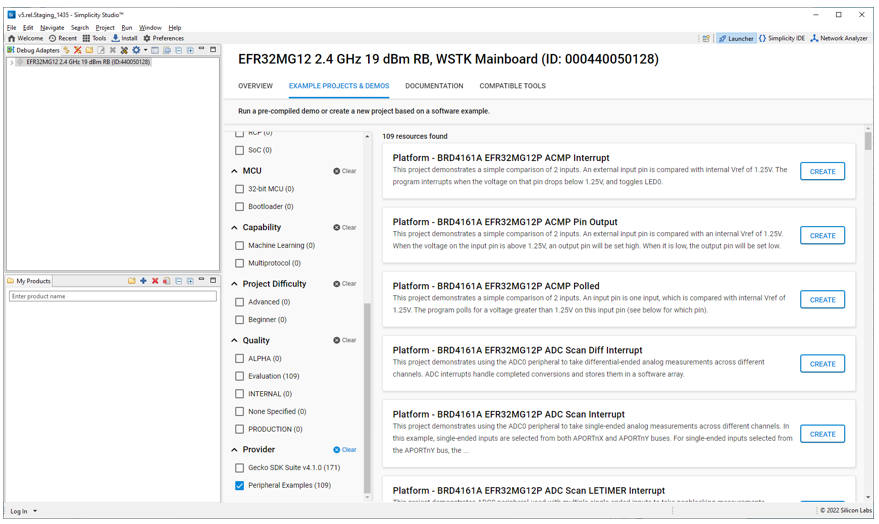
Example Projects & Demos Tab#
The EXAMPLE PROJECTS & DEMOS tab shows a list of example projects and demos compatible with the selected device. A demo is a prebuilt software example that can be loaded into a compatible device and used to show and test application functionality. Every demo comes with an associated example project. See the Quick Start Guide for your SDK for more information about the examples and demos provided.
Click RUN on any demo to install it on a target device. Click CREATE on any project to create it. This is equivalent to creating a project from the OVERVIEW tab, except that the project is already selected. By default, the tab enables showing both demos and examples. Demos have a blue tag in the upper left of the card. To see only one type of file, disable the other type.
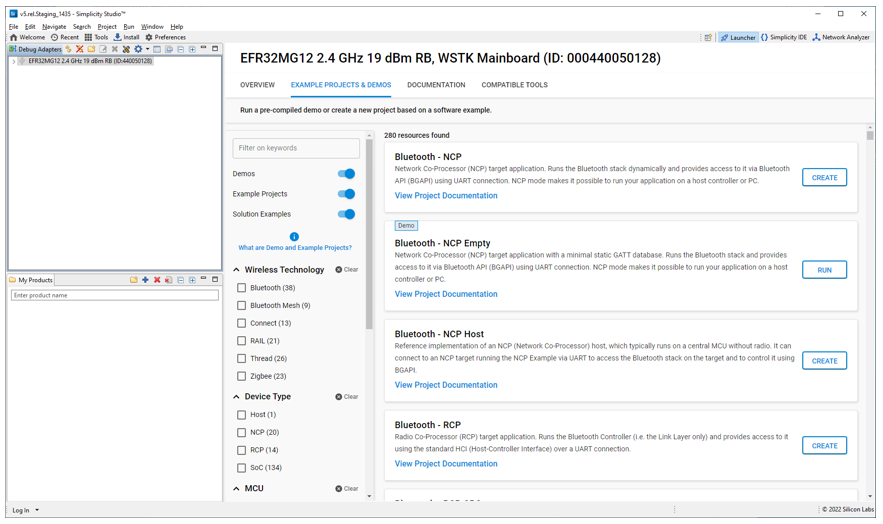
Use the switches, checkboxes and search box to filter the list. Note: Solutions are combinations of projects on which certain operations can be performed at the same time. This is a new feature and support is still being added for it. No example solutions are provided in this release, but you can create your own. See Solutions for more information.
The checkboxes displayed depend on your selected device. Checkbox categories include:
Wireless Technology
Device Type
MCU
Capability
Project Difficulty
Quality
Provider
Provider includes the checkbox Peripheral Examples. These examples are provided from the Silicon Labs GitHub repository peripheral-examples, are specific to your connected or selected board, and allow you to exercise various peripheral functions.
SSv5 allows you to add other GitHub repositories containing examples. To add a GitHub repository, go to Preferences > Simplicity Studio > External Repos. Here you can add, edit, and delete repos, and select from repos that are already added. Adding a repo is done in two steps: cloning and then selecting the branch, tag, or commit to add. The default branch is Master. application_examples and peripheral_examples are official Silicon Labs repos and may not be edited or deleted.

You must be connected to the Internet to create a project from an example in a remote GitHub repository. Projects created from GitHub repositories are created in the location specified in the project creation dialog. The cloned project does not have any Git-related information in it. You cannot sync/checkout/pull code from Git.
If you specify a repository installed locally, SSv5 will not synchronize the repo and all Git-related interface items will not be presented.
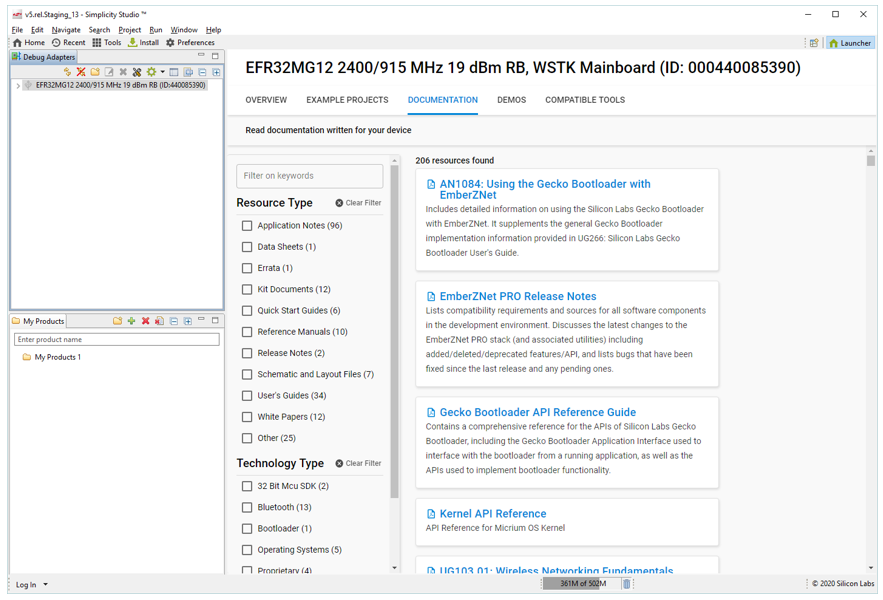
Documentation Tab#
The DOCUMENTATION tab shows all documentation compatible with the selected part. Use the checkboxes or text filter field to find a resource of interest. The technology filter corresponding to your development environment will show you most software documents relevant to that environment.
Compatible Tools Tab#
The COMPATIBLE TOOLS tab shows the tools compatible with the selected product. The Tools button on the toolbar shows all tools unfiltered.
