Tips and Tricks#
Many of these tips rely on changes in Preferences. This can be accessed through the Window > Preferences selection, or the Preferences button on the toolbar.
Useful Windows 10 paths#
Default Simplicity Studio Install Path: C:\SiliconLabs\SimplicityStudio
Downloaded location for kit resources: C:\SiliconLabs\SimplicityStudio\v5\offline\aem\www.silabs.com\documents\public\schematic-files
Command line or direct GUI access to Simplicity Commander: C:\SiliconLabs\SimplicityStudio\v5\developer\adapter_packs\commander
Protocol SDK locations for all GSDK SDKs:
GSDK 4.x: C:\Users\<NAME>\SimplicityStudio\SDKs\gecko_sdk\protocol\<protocol>
GSDK 3.x: C:\SiliconLabs\SimplicityStudio\v5\developer\sdks\gecko_sdk_suite\<GSDK version>\<protocol>
Beginning with GSDK 4.0, content such as documentation or demos that was previously installed with the SDK is now downloaded after being accessed through Simplicity Studio: C:\SiliconLabs\SimplicityStudio\v5\offline\com.silabs.sdk.stack.super_<version>
Useful Mac OS paths#
Default Simplicity Studio Install Path: /Applications/SimplicityStudio.app/Contents/Eclipse (recommend changing to one word SimplicityStudio.app)
Downloaded location for kit resources: /Applications/SimplicityStudio.app/Contents/Eclipse/offline/aem/www.silabs.com/documents/public/schematic-files
Command line or direct GUI access to Simplicity Commander: /Applications/SimplicityStudio.app/Contents/Eclipse/developer/adapter_packs/commander
Protocol SDK locations for all GSDK SDKs:
GSDK 4.x: /Users/<NAME>/SimplicityStudio/SDKs/gecko_sdk/protocol/<protocol>
GSDK 3.x: /Applications/SimplicityStudio.app/Contents/Eclipse/developer/sdks/gecko_sdk_suite/<GSDK version>/protocol
Beginning with GSDK 4.0, content such as documentation or demos that was previously installed with the SDK is now downloaded after being accessed through Simplicity Studio: /Applications/SimplicityStudio.app/Contents/Eclipse/offline/com.silabs.sdk.stack.super_<version>
Default Project Locations#
Default project locations in your Windows 10 workspace C:\Users<user>\SimplicityStudio Ex: C:\Users\daseymou\SimplicityStudio
Default project locations in your Mac workspace /Users/<user>/SimplicityStudio Ex: /Users/mahallam/SimplicityStudio
Get All Parts of an Update#
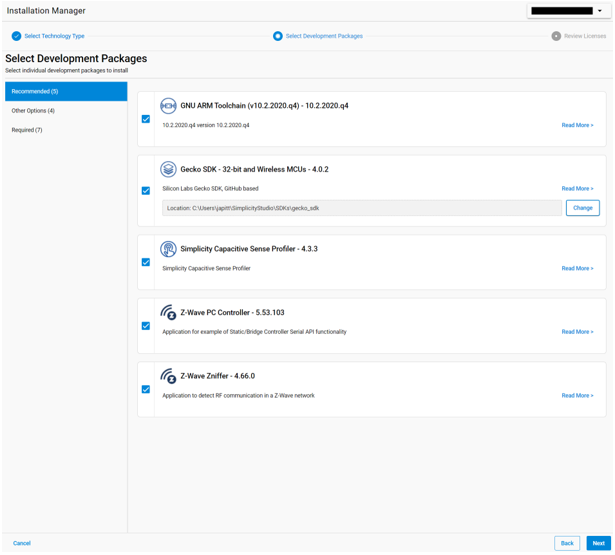
When you update Simplicity Studio, whether in response to an update notification or in the Installation Manager, Simplicity Studio installs all Product Updates. However, other updates may also be available, for example for the GSDK or compiler support. The best practice after Simplicity Studio installs an update is to open the Installation Manager and select Install by Technology Type. Check the boxes for each technology type being used and click Next. Click Advanced and then Next. The next dialog shows you if there are any required or recommended packages to be installed. If yes, install them, otherwise click Cancel to leave the Installation Manager. For example, in an update from Simplicity Studio version 5.1 to 5.3.2, the following recommended updates, including GCC toolchain and the GSDK, were available.
How to Update the Internal Simplicity Studio Copy of Simplicity Commander#
Simplicity Commander, included with Simplicity Studio, is regularly updated with other Simplicity Studio updates. In general, to get the latest Simplicity Commander update, update Simplicity Studio. However, sometimes the release of a new Simplicity Commander to the Silicon Labs website (https://www.silabs.com/mcu/programming-options) lags behind the release of a new Simplicity Studio™ version. If the new version of Simplicity Commander includes a feature that is required for development then it is possible to replace the Simplicity Studio version with the following procedure.
First exit all running instances of Simplicity Studio and then download the appropriate version of Simplicity Commander from the above website.
The procedure for updating Simplicity Commander on the MacOS is slightly different and is described after the Windows and Linux instructions.
Windows and Linux (verified on Windows 10 and Ubuntu 18.04 LTS)#
Two Simplicity Commander files in the current installation must be backed up as they have to be added back after the update. The default paths for the Simplicity Studio version of Simplicity Commander are:
Windows: C:\SiliconLabs\SimplicityStudio\v4\developer\adapter_packs\commander
Linux: ~/SimplicityStudio_v4/developer/adapter_packs/commander
Back up the following two files:
commander40x40.png
When the downloaded version of Simplicity Commander is expanded on Windows it is placed in a [Simplicity Commander] folder and on Linux in a [SimplicityCommander-Linux] folder. The Linux version will contain an additional tarball that needs to be expanded into a [commander] folder. The contents of that folder ([Simplicity Commander] on Windows or [commander] on Linux) should be used to replace the internal Simplicity Studio™ commander located at the above paths. Then copy in the two files that were backed up (apack.info and commander40x40.png) replacing the apack.info file.
MacOS Instructions (verified on MacOS Catalina version 10.15.4)#
After the SimplicityCommander-Mac.zip is expanded it will be placed in a folder with a release note text file, a README.txt and the Commander .dmg file. When the .dmg file is opened it mounts the Commander application as a volume. The Commander.app can then be executed from that volume, dragged into the Applications folder or, in this case, used to replace the internal Simplicity Studio installation. Drag Commander.app into the folder containing the existing Commander.app:
/Applications/Simplicity\ Studio.app/Contents/Eclipse/developer/adapter_packs/commander
A popup will be displayed saying an item named "Commander.app" already exists with various options:
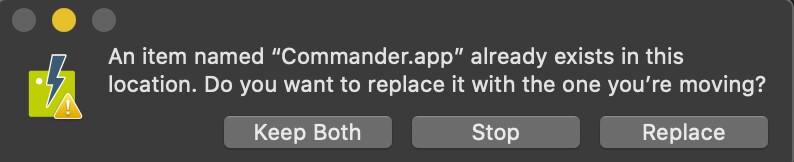
Click Replace. Note: If Commander.app is dragged from the Applications folder it will move it out of Applications and not create a copy.
Conclusion#
To verify the new version is being used, start Simplicity Studio and launch Simplicity Commander (from the Launcher perspective Tools icon (green wrench)) and select [Help] > [About Simplicity Commander] and the version will match the name of the .zip (Windows), .tgz (Linux) or .dmg (MacOS) file. Commander is also used behind the scenes for several operations including flashing images and various security commands.
Note there has been at least one report on a Mac that it had to be rebooted for this to work correctly. That should not normally be necessary, but it might if Simplicity Commander or Simplicity Studio did not shut down cleanly for some reason so it is worth trying.
Optionally Disable Automatic Updates#
By default, SSv5 checks for updates when you first open it. You can manage update frequency through Preferences > Install/Update > Automatic Updates.
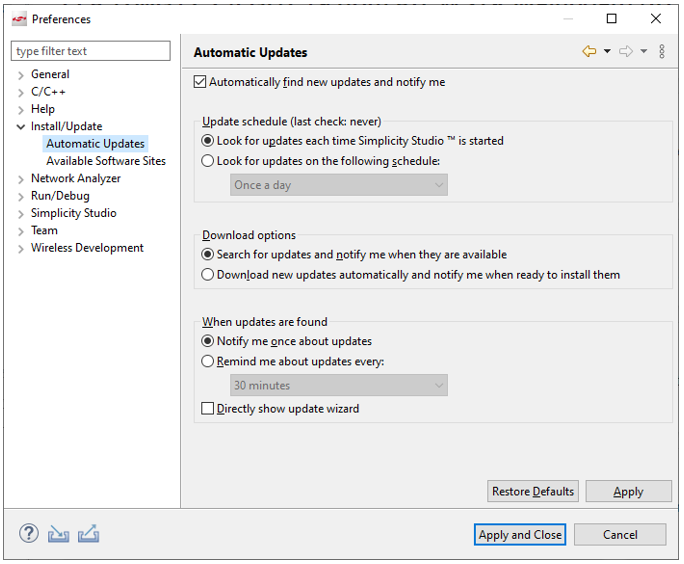
Either uncheck Automatically find new updates and notify me or change the Update Schedule selection to use a schedule such as once a week.
If you have turned automatic updates off, you can check for updates by clicking Install on the toolbar, then Manage Installed Packages, and then Check for Updates on the Product Updates tab.
See About Update Frequency for details on the selections available.
Performance Enhancements#
To improve SSv5 performance, try one or more of the following suggestions.
Disable SDKs not being used
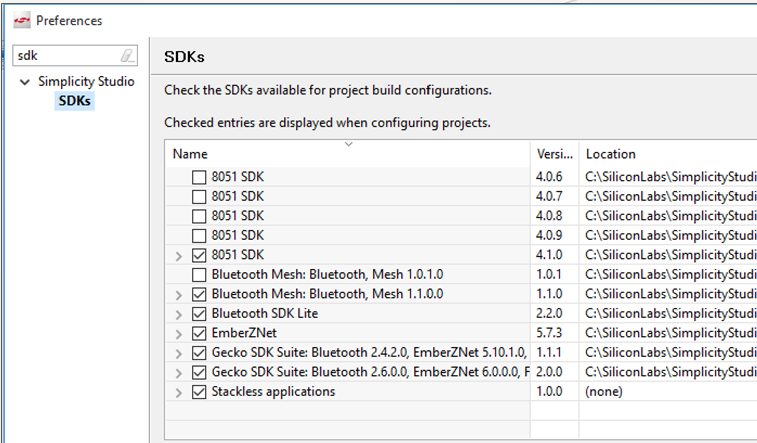
If you have installed many different versions of different SDKs and GSDKs over time, go to Preferences, type SDK in the filter field, and uncheck the ones not currently being used.
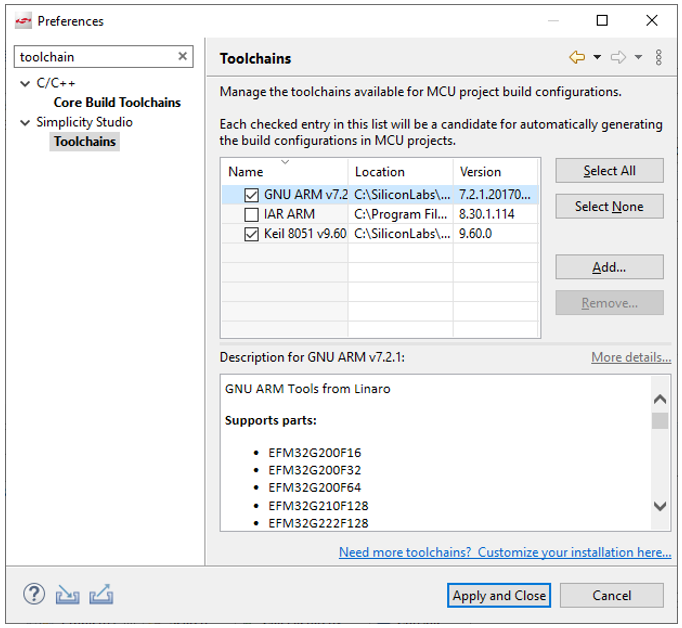
Disable unused targets or toolchains
If you have installed multiple toolchains but are not using all of them, or are not using all of the targets, disable the unused ones. Go to Preferences and type toolchain or target in the filter field, and uncheck any unused items.
Use different workspaces for different GSDK versions or compilers
Overloading a workspace with projects and different versions of SDKs can slow down SSv5 operations. Keep separate workspaces for specific project and/or SDK versions and/or toolchains. Note that this is necessary if you are using different versions of the IAR compiler to match different versions of the GSDK.
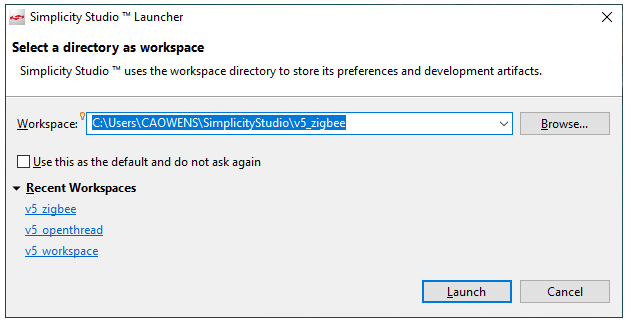
While you can use File > Switch Workspaces to change workspaces as described in Project Explorer View, if you will be working with different workspaces, you may wish to have SSv5 prompt you on startup about which workspace to use. Go to Preferences > General > Startup and Shutdown > Workspaces and check Prompt for workspace on startup.
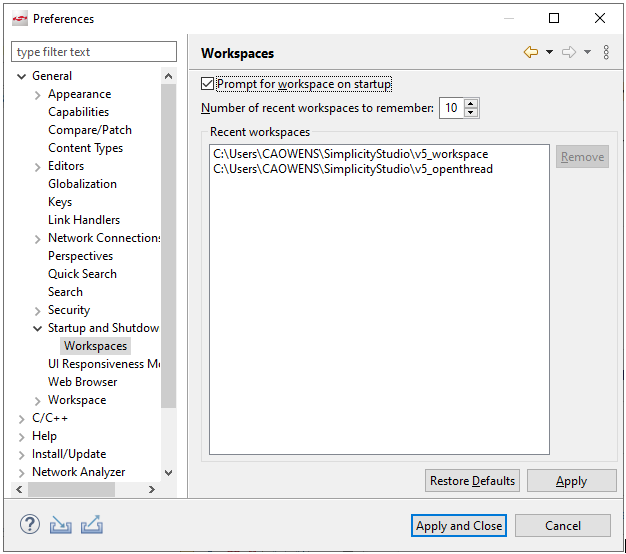
Then on startup you can select a workspace or create a new workspace by clicking Browse and adding a directory.
Increase heap size
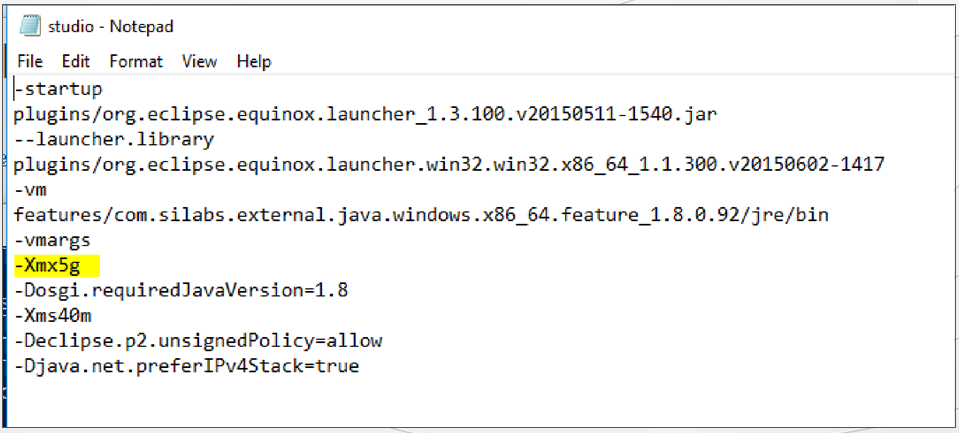
Close SSv5. Use a text editor to open following file within the Simplicity Studio root path, for example: C:\SiliconLabs\SimplicityStudio\v5\studio.ini
In the following figure, the line Xmx5g was added to increase the maximum Java heap SSv5 will use to 5 GBytes. Choose larger or smaller depending on your system resources. Without that line SSv5 defaults to a maximum of one quarter of the system RAM. On a system with 8 GBytes of RAM that would be 2 GBytes and SSv5 might run out of Java Heap space on memory-intensive operations.
SDK installation or updates are not working#
The cause might be your IT department using proxy servers, and potentially also man-in-the-middle security monitoring. See the following knowledge base articles for more information on how to work around these situations:
Configuring Simplicity Studio to Work with Proxy Servers
Installing SSL Security Certificates for Simplicity Studio Updates
Speed up debug session startup#
Go to Preferences > Run/Debug > Launching, and under General Options uncheck Build (if required) before launching.
This will interfere with your workflow if you are accustomed to making a change and clicking the Debug button to build the project before launching the project.
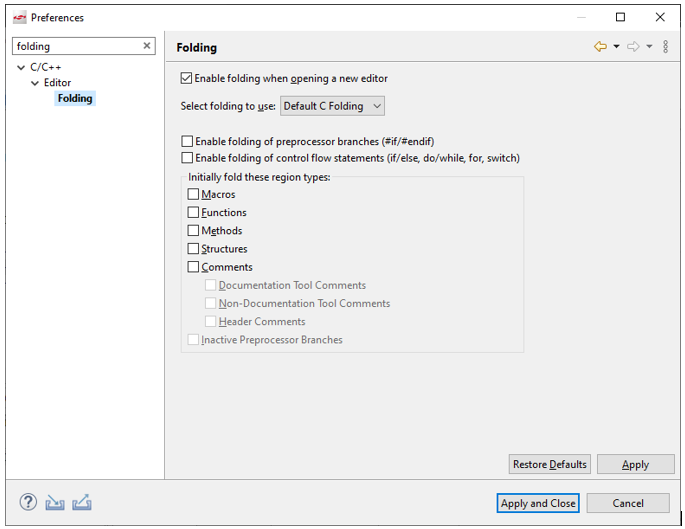
Speed up reading large source files#
Enable folding of #if/#ifdef's and if/else, do/while, for, and switch statements in source code. Go to Preferences and type folding in the filter field, and check the three "Enable folding … " options.
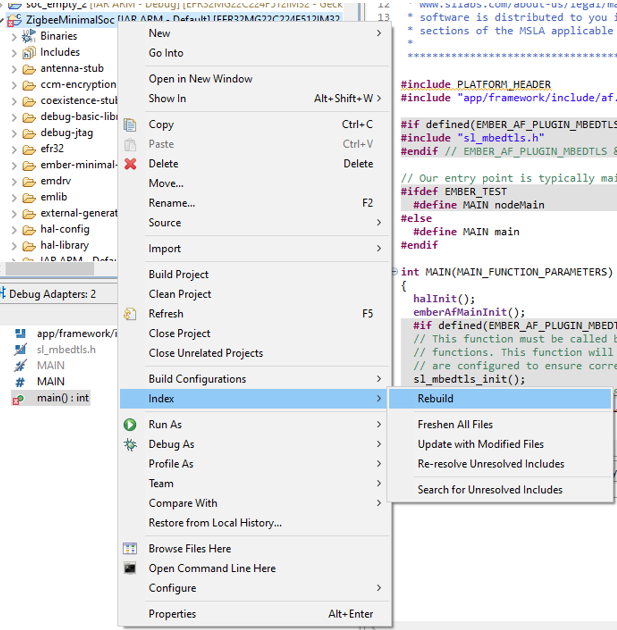
Speed up the indexer#
If the Indexer is taking a long time to run, close other projects. If still slow, in the Project Explorer view right-click the project directory and select Index > Rebuild.
Restore a perspective layout#
To reset a perspective to its original layout, right-click the perspective button in the toolbar and select Reset.
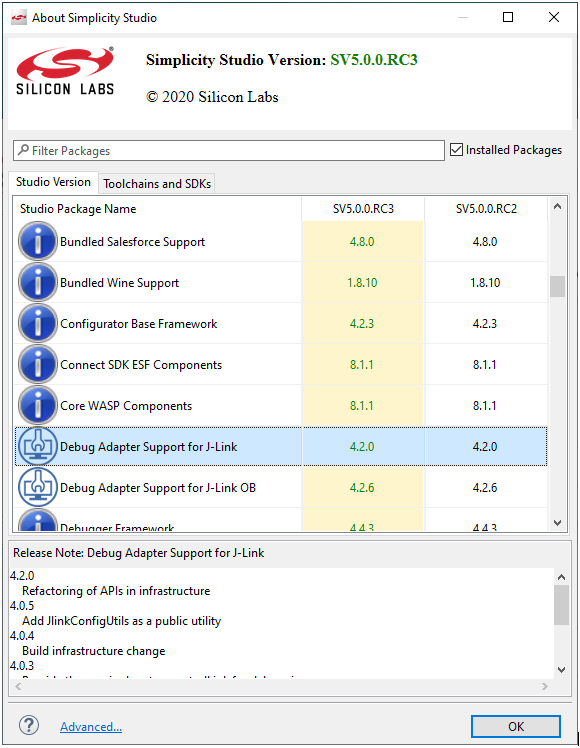
Find a Version#
Go to Help > About Simplicity Studio for version information. The overall SSv5 version is at the top of the dialog. The Studio Version tab lists version information for all the components that make up SSv5. The Toolchains and SDKs tab lists version information for the installed SDKs and toolchains.
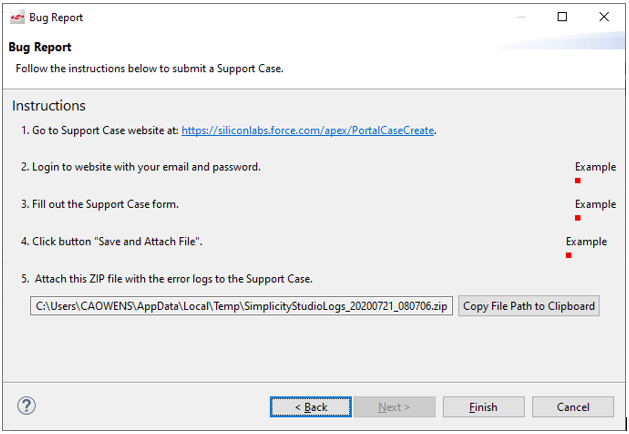
Report a Bug#
Go to Help > Report bug .... The default selection generates a log file to the location you specify. This is useful if you need to attach a log to a case that's already created.
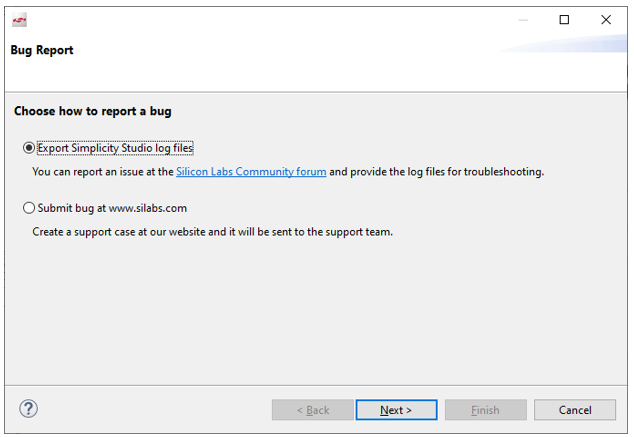
Select Submit bug at Silabs.com if you are creating a new ticket. This generates the log file and provides instructions on creating a ticket.
Capture a Simplicity Studio 5 Thread Dump#
If Simplicity Studio 5 happens to hang (become unresponsive for several minutes) during an operation, the best way to report this to Silicon Labs is to use a Java tool called jstack to capture a thread dump while the program is still in the hung state. This thread dump can be used by the Silicon Labs team to analyze the hang. If Simplicity Studio 5 is shut down and restarted, a thread dump at that point will not be useful. The jstack tool is included in the Simplicity Studio 5 installed Java Runtime Environment (JRE).
Once you have generated the thread dump file according to one of the following procedures, attach it to a Silicon Labs support case along with other details of what operation was being performed right before the hang as well as any screenshots taken of what was shown in the application. A support case can be created from the Silicon Labs Simplicity Studio Community home page or with this url: https://siliconlabs.force.com/s/contactsupport.
The procedure to use the jstack tool for Windows, MacOS and Linux is described in the following sections.
Windows#
Open Windows Task Manager and go to the Details tab to find the PID for Simplicity Studio (studio.exe).
Open a command prompt and issue the following command, adjusting it based on the Simplicity Studio installation path:
[SIMPLICITY_STUDIO_INSTALLATION]\features\com.silabs.external.java.windows.x86_64.feature_11.0.5\jre\bin\jstack.exe PID > [PATH]\SSv5ThreadDump.txt
For example, with the default installation path:
C:\SiliconLabs\SimplicityStudio\v5\features\com.silabs.external.java.windows.x86_64.feature_11.0.5\jre\bin\jstack.exe -l -e 41068 > C:\temp\SSv5ThreadDump.txt
MacOS#
Open a terminal window.
Use the following command to get the PID:
ps aux | grep studio
This is an example of the output with the pid 76698:
USERNAME@mac0010128 ~ % ps aux | grep studio
USERNAME 76698 5.6 9.7 12491892 1633396 ?? S Tue09AM 92:52.70 /Applications/SimplicityStudio5.app/Contents/MacOS/studio
USERNAME 19420 0.0 0.0 4268300 680 s000 R+ 3:26PM 0:00.00 grep studioUse the PID with the jstack command
[SIMPLICITY_STUDIO_INSTALLATION]/Contents/Eclipse/jre/Contents/Home/bin/jstack -l -e PID > [PATH]/SSv5ThreadDump.txt
For example
/Applications/Simplicity\ Studio.app/Contents/Eclipse/jre/Contents/Home/bin/jstack -l -e 76698 > ~/Documents/SSv5ThreadDump.txt
Linux#
Open a terminal window.
Use the following command to get the PID:
ps aux | grep studio
This is an example of the output with the pid 10233:
ThinkPad-W530:~$ ps aux | grep studio
USERNAME 10233 10.1 27.3 110505488 2115904 ? Sl 12:55 10:58 /home/USERNAME/SimplicityStudio_v5//jre/bin/java -Dosgi.requiredJavaVersion=11.0.5 -Xms40m -Declipse.p2.unsignedPolicy=allow -Djava.net.preferIPv4Stack=true -Djxbrowser.ipc.external=true -jar /home/USERNAME/SimplicityStudio_v5//plugins/org.eclipse.equinox.launcher_1.5.600.v20191014-2022.jar -os linux -ws gtk -arch x86_64 -showsplash -launcher /home/USERNAME/SimplicityStudio_v5/studio -name Studio --launcher.library /home/USERNAME/SimplicityStudio_v5//plugins/org.eclipse.equinox.launcher.gtk.linux.x86_64_1.1.1100.v20190907-0426/eclipse_1801.so -startup /home/USERNAME/SimplicityStudio_v5//plugins/org.eclipse.equinox.launcher_1.5.600.v20191014-2022.jar --launcher.overrideVmargs -exitdata a78007 -vm /home/USERNAME/SimplicityStudio_v5//jre/bin/java -vmargs -Dosgi.requiredJavaVersion=11.0.5 -Xms40m -Declipse.p2.unsignedPolicy=allow -Djava.net.preferIPv4Stack=true -Djxbrowser.ipc.external=true -jar /home/USERNAME/SimplicityStudio_v5//plugins/org.eclipse.equinox.launcher_1.5.600.v20191014-2022.jarUse the PID with the jstack command:
[SIMPLICITY_STUDIO_INSTALLATION]/jre/bin/jstack -l -e PID > [PATH]/SSv5ThreadDump.txt
For example:
~/SimplicityStudio_v5/jre/bin/jstack -l -e 10233 > ~/Documents/SSv5ThreadDump.txt
Convert an Existing Simplicity Studio 5 Project from GCC to IAR#
Create a new IAR build configuration:
Right-click the project folder and select Build Configurations > Manage.
In the resulting Manage Build Configurations dialog, click New.
Select the IAR ARM build configuration to use (IAR ARM Default recommended) and click OK.
Still in the Manage Build Configurations dialog, select the new build configuration and click Set Active.
Open the project's .slcp file and, on the OVERVIEW tab, click Edit on the Project Generators card.
Select IAR EMBEDDED WORKBENCH PROJECT and click Save.
For Bluetooth projects steps 5 through 7 are also necessary. For Platform and Flex projects proceed to step 8.
In the Project Explorer view:
Right-click the project folder and select Properties.
In the resulting Properties dialog, expand C/C++ Build and select Settings.
Under Tool Settings select IAR Linker for ARM > Library and select all of the libraries with GCC or gcc in the name or path and also the 'gcc', 'c', 'm' and 'nosys' libraries.
Click Delete in the dialog menu.
Click Apply and Close.
In the Project Explorer view:
Expand gecko_sdk_n.n.n > platform > Device > SiliconLabs > <target-part> > Source.
Right-click the GCC folder and select Resource Configurations > Exclude from Build...
In the resulting dialog, check the box for the IAR ARM ... build configuration.
Click OK
Check if the project contains gecko_sdk_n.n.n > service > udelay > src > sl_udelay_armv6m_gcc.s. If it does, exclude it from the build with the same command as in the previous step.
Build the project. It should be successful. If not, check if any other GCC-specific files exist that need to be excluded from the build configuration.
Use Custom Boards#
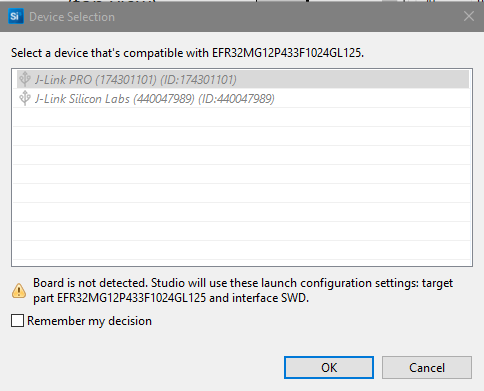
Connect the board either using an external Segger J-Link Debug Adapter or a Silicon Labs mainboard, with Debug Mode set to OUT. (In the Debug Adapters view, right-click the device, select Device Configuration, and change the Debug Mode on the Adapter Configuration tab). Create the project with the chip part number set in the Target, SDK, and Toolchain Selection dialog.
You cannot use Flash Programmer until the debug adapter's device configuration has been configured with the part. Use Simplicity Commander instead.
Projects based on custom boards can be built and flashed as part of a debug session. Simplicity Studio then displays and allows you to confirm the target settings to use for the debug session.
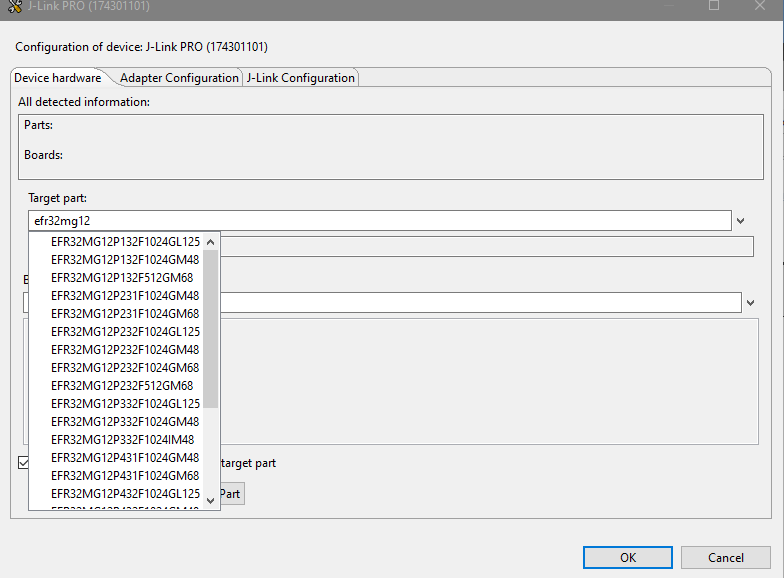
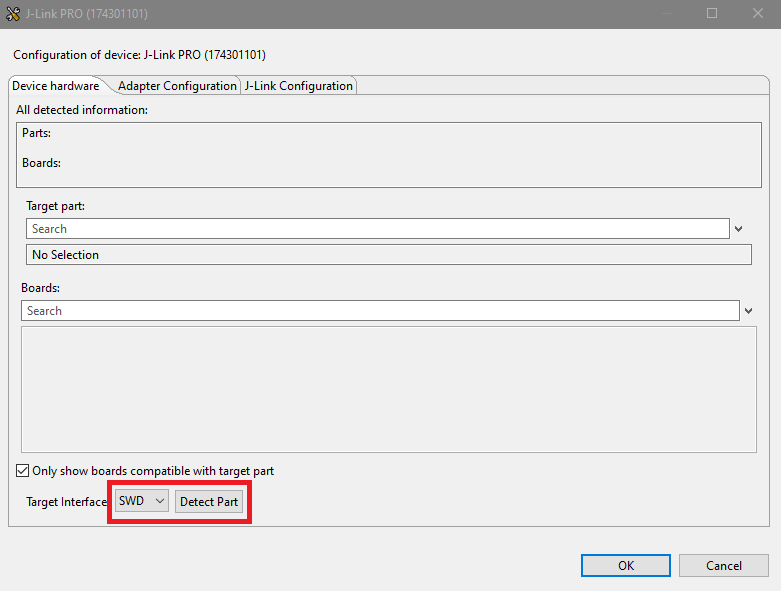
You can change the debug adapter's device configuration by right-clicking the device in the Debug Adapters view, selecting Device Configuration, and making either of these changes:
On the Device Hardware tab, enter the target part number.
On the Device Hardware tab, change the Target Interface to SWD. Click Detect Part.
Discover Network Devices#
Sometimes Simplicity Studio may fail to discover a device connected on a local network. For devices with EFR32/EM3xx/Si917 MCUs, this can be addressed through the Preferences > Simplicity Studio > Device Manager > TCP/IP Adapters settings. Enabling more network scanning, for example by selecting the Include all network interfaces. (Use when connected to VPN) checkbox on that dialog, can flood the network with undesired discovery requests. The preferred method is by discovering the specific device.
On the TCP/IP Adapters dialog, check Use TCP discovery for individual addresses.
In the Discovery Subnet Configuration text box, enter the individual IP address.
Place a Project Under Source Control#
Note that not all of these folders will be present in all projects. Which ones are present depends on if the project is a Project Configurator-based project (has a .slcp file) as well as what operations have been done with the project, especially in the Project Configurator.
Hidden Folders in SSv5 IDE Projects:
Files / Folder | Purpose | Under Source Control? |
|---|---|---|
.pdm | Tracks project changes compared to the original project template used during project creation, normally from a software example. | Yes - very important |
.cproject & .project files | Eclipse project files, contains project settings for the different build configurations such as Includes, Defines, and compiler options. | Yes |
.settings | Tracks project-level preferences for Eclipse and Simplicity Studio. | Probably - but some might only apply to the local developer |
.trash | Keeps a copy of Project Configurator files or folders for software components that were deleted from the project and had been changed from the default values. The files are kept in case the component is added back, in which case the last used settings for the component are restored. Can also contains user-copied/supplied source files, for example if the user adds their own source files to the project and then deletes them. | No |
.uceditor | Keeps a list of software components that were edited on this computer. | No |
.projectlinkstore | Contains quick links for commonly used files or resources. The listed links are updated based on how often a user opens a file or resource. | No |
General Source Control Information for Project Configurator Projects:#
File / Folder | Purpose | Under Source Control? |
|---|---|---|
.slcp, .slps and .pintool | The main Project Configurator files. | Yes |
config | Contains the configuration header files for all of the software components used in the project. Changes made in the header files are reflected in the Project Configurator and vice versa. Also contains subfolders with Advanced Configurator (AC) configuration files. For example, Bluetooth projects have a 'btconf' subfolder with the gatt_configuration.btconf file and possibly 'in_place_ota_dfu.xml' file. | Yes - Cannot be recreated |
autogen | Contains files created by the Project Configurator based on the installed software components and the files in the 'config' folder. The files are necessary to build the project, but they will be recreated on project generation. | Normally yes, but with some flexibility depending on the workflow of the team (that is, do they always do a generation after updating the project). |
gecko_sdk_x.y.z | Created by the Project Configurator based on the installed components. It will be recreated on project generation. | Same as for the 'autogen' folder |
Build output folders ('GNU ARM...', 'IAR ARM...' or 'Keil 8051...') | Created when the project is built. | Not normally |