Visual Studio Code Enablement#

With the Simplicity Studio 5 (SSv5) 5.6.0.0 release, Silicon Labs introduced support for using Visual Studio Code (VS Code) in combination with Simplicity Studio. To enable this support, a VS Code extension is required. It can be either downloaded directly from the VS Code marketplace or with this link to marketplace. The preferred method of installation is to download it from the marketplace within the VS Code application itself.

Simplicity Studio is still needed to create the initial project and to make project changes with the Project Configurator GUIs. However, when you are using the Visual Studio Code compatible project generator, all editing, building, and debugging of the project should be done in VS Code. In other words, do not try to build the project in both Simplicity Studio and in VS Code.

Enabling a Project for Use Within VS Code#

In order to operate on a Silicon Labs project from within VS Code, the correct project generator must be used. This can be set from within an existing project or at initial project creation.

For new projects, you can set the target generator in the new project wizard on step 1 as shown below.

Select VSCode NewPrj GeneratorSelect VSCode NewPrj Generator

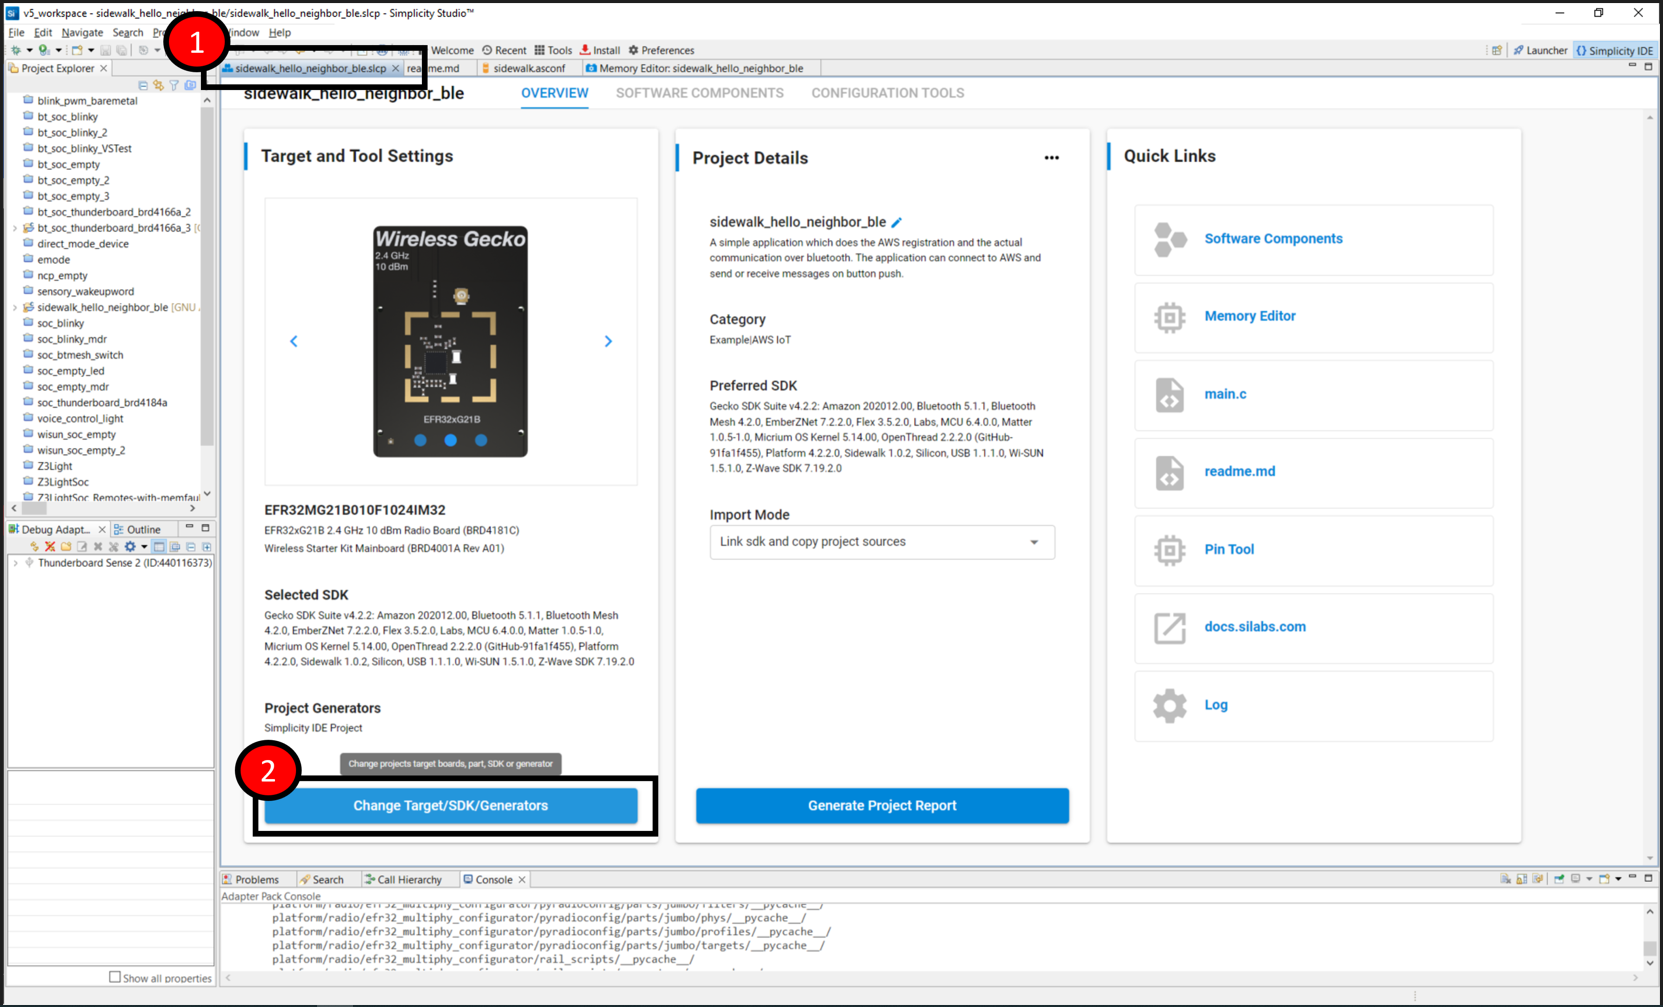
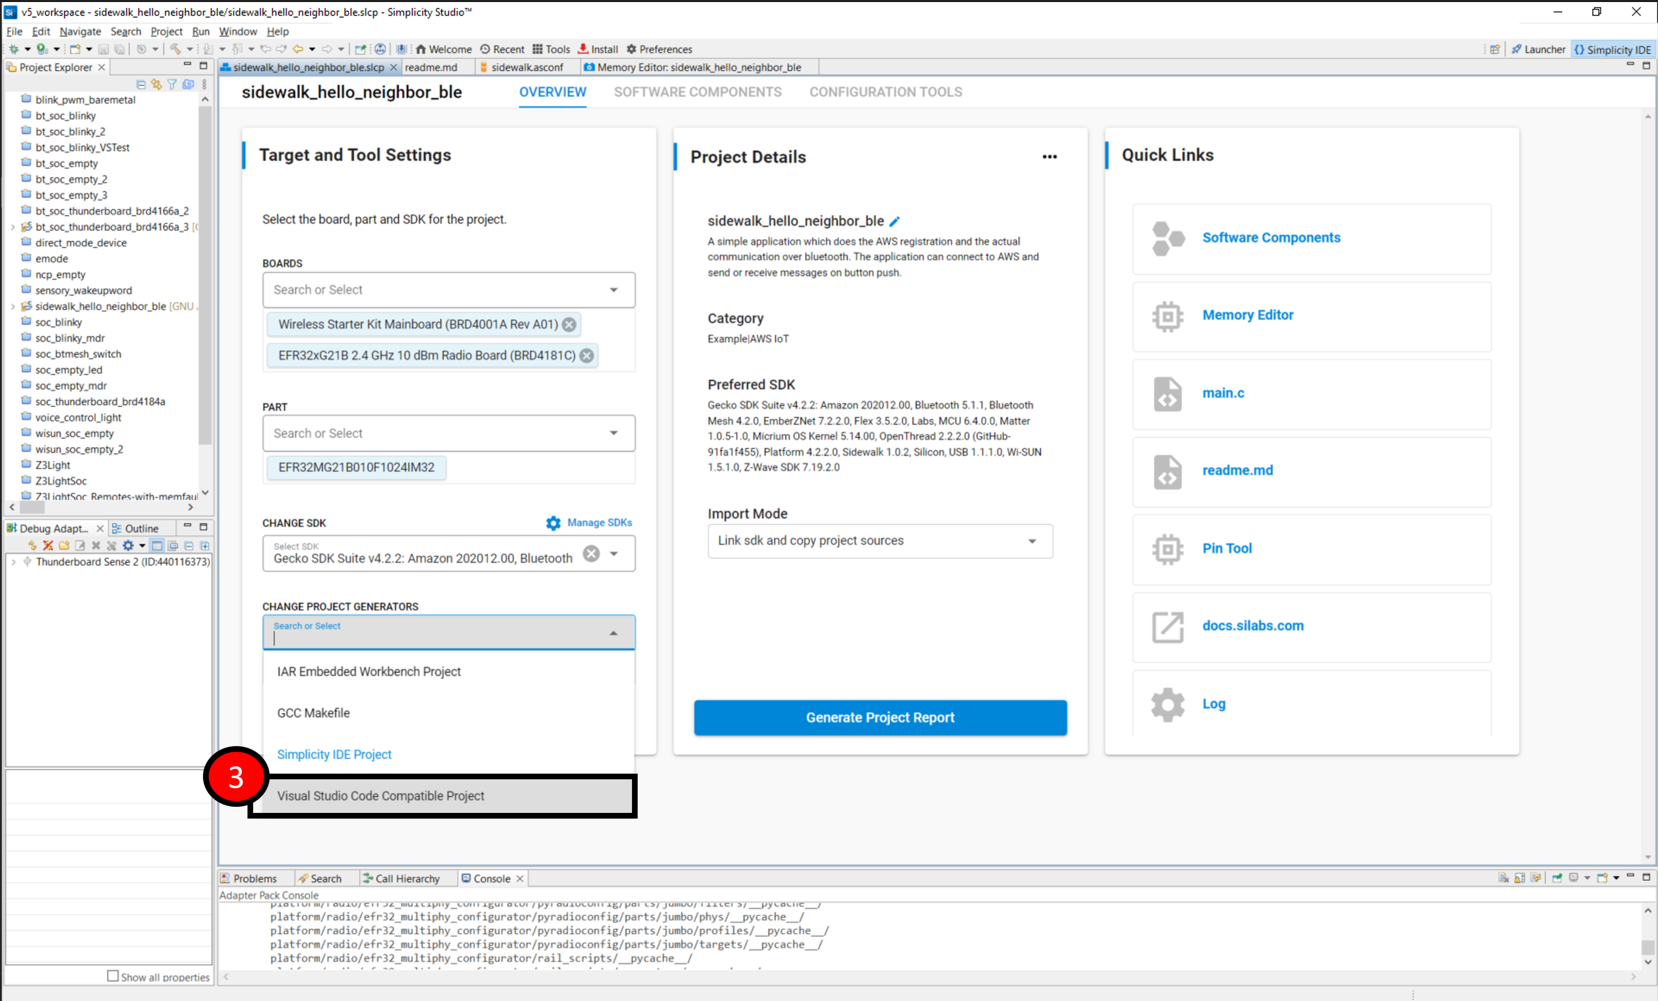
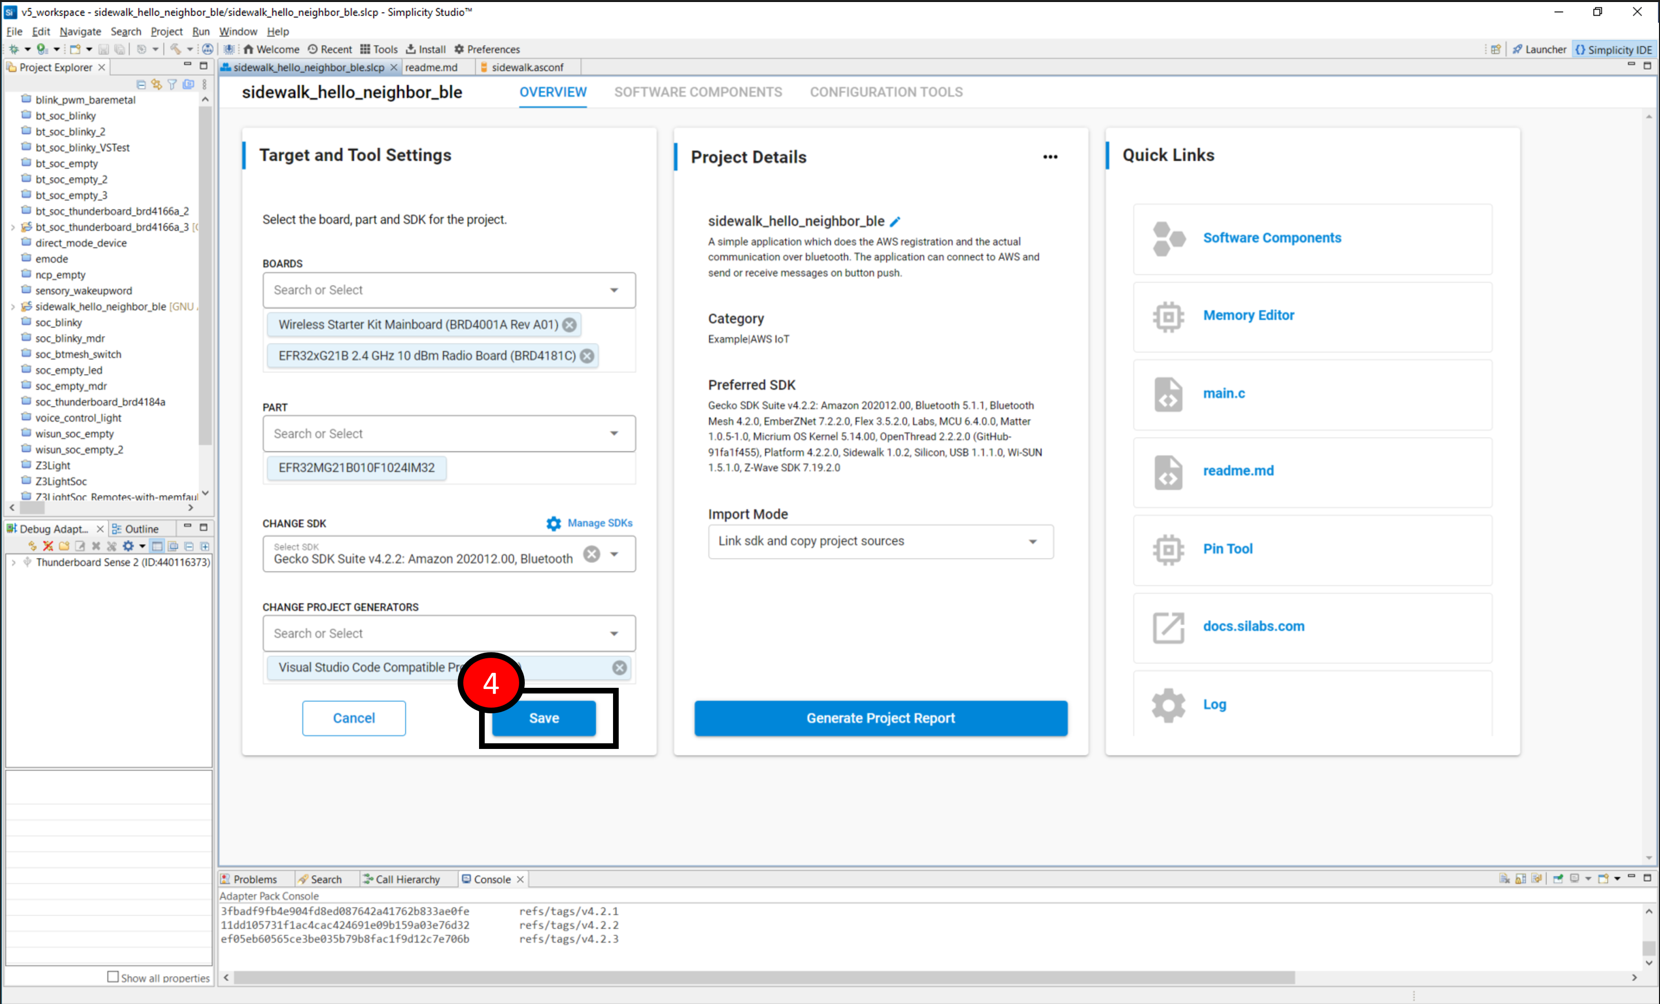
For existing projects, from the Project Configurator Overview tab, click Change Target/SDK/Generators and select the VS Code generator.

Select VSCode Generator 1Select VSCode Generator 1 Select VSCode Generator 2Select VSCode Generator 2 Select VSCode Generator 3Select VSCode Generator 3

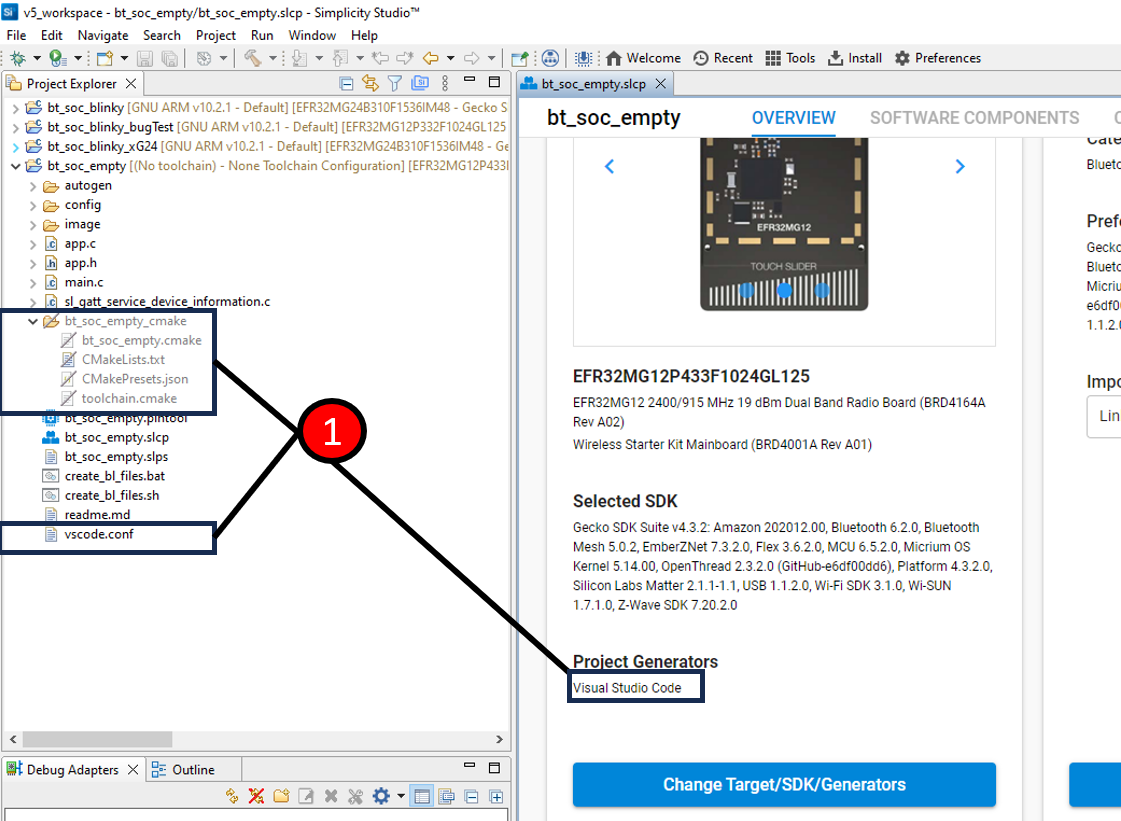
Once you have set your project to generate for VS Code, and generation is complete, you will notice new files in the Project Explorer view. This includes new files to support development in VS Code and enable CMake and Ninja. If a popup dialog appears asking what to do with some project configuration files, leave the setting at the default “Keep my file” and click OK.

The new VS Code support files are:

  • Folder: <projectname>_cmake

    • <projectname>.cmake

    • CMakeLists.txt

    • CMakePresets.json

    • toolchain.cmake

  • vscode.conf.

VSCode generation filesVSCode generation files

You can make any other project configurator changes, such as adding a component, to the project from within Simplicity Studio. From there, the project can be continued in VS Code. Once you begin using VS Code for development, it is not recommended to build the project in Simplicity Studio. However, before any changes have been made in VS Code, you can verify that it builds in Simplicity Studio before continuing development in VS Code.

The VS Code generator is Gecko SDK Suite (GSDK)-independent. This means it can be used with any 4.x.x GSDK.

Preparing VS Code for Silicon Labs Support#

To use VS Code for development with Silicon Labs projects, VS Code must first be downloaded and installed from the Visual Studio website (Download Visual Studio Code). Then the Silicon Labs extension must be installed either from within VS Code by clicking on the Extensions icon and then searching the Marketplace for “SiLabs” or by downloading the extension as a .vsix file from the marketplace and then adding it to VS Code by clicking the three dots next to EXTENSIONS and selecting 'Install from vsix…'.

VS Code install from vsixVS Code install from vsix

Installing the Simplicity Studio for VS Code extension will also install other extensions it depends on: C++ Extension Pack and Cortex-Debug.

VS Code is now ready to add the Silicon Labs project from the earlier step.

Adding a VS Code-Enabled Simplicity Studio Project to VS Code#

You can add a project to VS Code in three ways.

  1. Use File > Open Folder… and browse to the project folder in the Simplicity Studio workspace (default workspace is v5_workspace) or the source-controlled project folder.

  2. Use File > Add Folder to Workspace… and again browse to the project folder. This second method is recommended, especially if working with multiple projects. This will place the folder in an untitled workspace. Select File > Save Workspace As… and select a folder and name for the workspace. The VS Code workspace should be saved outside of the Simplicity Studio workspace folder in a folder dedicated to VS Code workspaces. Subsequent projects can be added to this open workspace using File > Add Folder to Workspace.

  3. Use Silabs Workspace > Connect to Simplicity Workspace.

After adding projects to a workspace, you should notice that the project appears in the explorer and the 'SILICON LABS SUPPORT' section is now populated with project related actions as shown below.

Silabs Quick Access#

This view provides quick access to main extension functionalities from the default VS Code Explorer view.

  1. Silabs quick access view.

  2. Shortcut to extension walkthrough on how to get started with the extension.

  3. Refresh view.

  4. Show more options.

    screenshotscreenshot

Show more actions:

  1. Welcome content, which is the same as the Walkthrough.

  2. Shortcut to extension's settings.

  3. Show external links to docs.silabs.com.

    screenshotscreenshot

After opening a compatible project folder. (Simplicity Studio generated project is considered compatible, if its generator list contains "Visual Studio Code").

  1. Opened project.

  2. Build.

    • If multiple build configurations are present for a given project, before building, you will be asked to select one build configuration. If a build is a success, and binary files were generated, the configuration will be displayed under the project.

  3. Shortcut to Build Configurator. For more information, check the corresponding section of this document.

    screenshotscreenshot

Successfully built configuration under the project.

  1. Expand the configuration.

  2. Flash.

    1. Before Flash is executed, you will be asked to choose a binary file to flash. This can be: .hex, .bin, or .rsp. For binaries that do not contain address information, for example .bin, you should add a starting memory address as well.

    2. In case multiple compatible devices [see settings: Board display] are connected, choose one.

  3. Debug.

    1. If multiple compatible devices [see settings: Board display] are connected, choose one.

    2. Successful start of the debug section will navigate you to the "Run and Debug" view.

    3. When Debug is launched, a "launch.json" file will be created/updated in the ".vscode" folder with information about the Silabs debug session. If you have your own launch.json file and want to keep it, the corresponding setting should be turned off [Overwrite launch file].

    screenshotscreenshot

Build Configurator#

  1. Add your folder name to the build.

    1. This folder will be available for any subsequent build configuration. See it as a global settings.

    2. This folder can contain subfolders, in which case subfolders do not need to be added, as they will be discovered automatically.

  2. Example of a user-created folder.

  3. Files in the project root folder and in folders that are included to the build are automatically discovered.

  4. Name of the current configuration.

  5. Save button, to save current configuration.

    screenshotscreenshot

Choose Available Build Configurations#

  1. Dropdown menu to choose from available build configurations. This configuration will be edited further down.

  2. Edit the name of the current configuration There cannot be two configurations with the same name.

  3. Add new, blank configuration.

  4. Copy current configuration settings under a new name.

  5. Save button to save current configuration.

    screenshotscreenshot

Edit a Current Configuration#

  1. Current configuration under editing.

  2. Added definition for the current configuration.

  3. New definition should be a key - value pair.

  4. Save button, to save current configuration.

    screenshotscreenshot

Compiler Flags#

  1. Current configuration.

  2. Compiler flags for different types of source files, .c, .cpp, and .asm.

  3. List of flags. Any flag/options should go in new line. So 1 line 1 flag/option.

  4. Save button to save current configuration.

    screenshotscreenshot

Status Bar#

Once a file from opened project is selected in VS Code explorer, shortcuts to build, flash and debug are displayed in the status bar. With the project name that contains the selected file.

  1. File selected in Explorer.

  2. Shortcuts to build, flash and debug.

    • These can be initiated by one or more additional input steps depending on the number of opened projects and the number of connected devices.

      screenshotscreenshot

Silabs Workspace#

The following describes the Silicon Labs Workspace within VS Code.

  1. Silicon Labs view.

  2. Shortcut to extension walkthrough on how to get started with the extension.

  3. Refresh workspace.

  4. Connect to Simplicity Studio Workspace.

  5. Shortcut to extension's settings.

    screenshotscreenshot

Connecting and selecting previous workspaces:

  1. Connect to Simplicity Studio Workspace.

  2. Previously connected workspaces.

    1. Selecting one will automatically load the folder content into the workspace view.

    2. List can be edited under settings [V5 workspaces].

    3. Important: Only projects and solution generated with "Visual Studio Code" generator will be displayed.

  3. Browse button to browse folders for a new workspace.

    • Selecting one will automatically load the folder content into the workspace view

      screenshotscreenshot

Workspace details:

  1. Badge in the left rail.

    1. Number shows how many "notifications" are waiting.

    2. These are listed in the tooltip when you hover over the Si icon.

  2. Tooltip displaying if the workspace had changes.

  3. Refresh to update the Workspace content.

screenshotscreenshot

For a displayed project, the following actions are available:

  1. Build.

    • If multiple build configurations are present for a given project, before building, you will be asked to select one build configuration.

  2. Flash.

    1. Before Flash is executed, you will be asked to choose a binary file to flash. This can be: .hex, .bin, or .rsp. For binaries that do not contain address information, for example .bin, you should add a starting memory address as well.

    2. In case multiple compatible devices [see settings: Board display] are connected, you should choose one.

  3. Debug.

    1. In case multiple compatible devices [see settings: Board display] are connected, you should choose one.

    2. Successful start of the debug section will navigate you to the Run and Debug view.

    3. When Debug is launched, a launch.json file is created/updated in the .vscode folder with information about the Silicon Labs debug session. If you have your own launch.json file and want to keep it, the corresponding setting should be turned off [Overwrite launch file].

    4. Shortcut to 04-Build-Configurator#build-configurator. For more information, check the corresponding section of this document.

      screenshotscreenshot

For a displayed solution the following actions are available:

  1. Build.

    • In this version only, one build configuration is available for solution.

  2. Flash.

    1. Before Flash is executed, you will be asked to choose a binary file to flash.

    2. In case multiple compatible devices [see settings: Board display] are connected, you should choose one.

  3. Debug.

    1. In case multiple compatible devices [see settings: Board display] are connected, you should choose one.

    2. Successful start of the debug section will navigate you to the Run and Debug view.

    3. When Debug is launched, a launch.json file is be created/updated in the .vscode folder with information about the Silicon Labs debug session. If you have your own launch.json file and want to keep it, the corresponding setting should be turned off [Overwrite launch file].

      screenshotscreenshot

Right click on folder brings up a context menu with the following actions:

  1. Add new file or folder to the selected folder.

    1. When you choose this, an additional input dialog is displayed.

    2. If text input contains a file extension, a file will be created; otherwise a folder will be added.

    3. Folder or file cannot be added to the top level folder of a solution

  2. Rename selected folder.

    1. Projects and solutions cannot be renamed only in Simplicity Studio.

    2. Sub-projects of a solutions can only be renamed in Simplicity Studio.

    3. Renaming a Simplicity Studio generated folder may cause the project to malfunction.

  3. Delete selected folder.

    1. Projects and solutions can only be deleted in Simplicity Studio.

    2. Sub-projects of a solutions can only be deleted in Simplicity Studio.

    3. Deleting a Simplicity Studio generated folder may cause the project to malfunction.

      screenshotscreenshot

Right click a file to open a context menu with the following actions:

  1. Rename selected file.

    • Renaming a Simplicity Studio generated file may cause the project to malfunction.

  2. Delete selected file.

    • Deleting a Simplicity Studio generated file may cause the project to malfunction.

  3. Some configuration files that have a configurator in Simplicity Studio have this optional action. Selecting this action will open the selected configuration file in its own configurator.

  4. Show the selected file in VSC Explorer by moving the focus to the selected file in the VSC Explorer view.

    screenshotscreenshot

Settings#

Silicon Labs extension related settings.

General#

Setting

Input

Used for

Experimental

Build before Flash

Boolean checkbox

If true, the project will build automatically before flashing the binary.

No

Build before Debug

Boolean checkbox

If true, the project will build automatically before debug starts.

No

Log Level

Dropdown menu with log levels

Set the log level for the extension. Logs are saved under (on Windows):

<user_home>\AppData\Local\Temp\silabs_extension\vscode.log

No

Show walkthrough

Boolean checkbox

If true walkthrough will be displayed every time the extension starts.

No

Erase chip memory

Boolean checkbox

If true, chip memory will be erased every time before flash.

No

Project paired to Studio

Map<String, String>

If multiple Simplicity Studio present in tools.json, with same version, this field maps project to Simplicity Studio which workspace contains the given project.

No

Overwrite launch file

Boolean checkbox

If true, the launch.json in the .vscode folder will be overwritten every time debug is executed.

No

Refresh CMake file before build

Boolean checkbox

If true, CMake project file will be updated before build is executed.

No

Setting

Input

Used for

Experimental

V5 workspaces

Text array

All previously added V5 workspace folders. Can be edited by the User.

No

Active V5 workspace

Text input

Path of V5 workspace that is currently in use.

No

Appearance#

Setting

Input

Used for

Experimental

Device label elements

Multiple boolean checkbox

Compose device label to display.

No

Board display

Boolean checkbox

If true, only boards with matching part are displayed for a given project.

No

Device Discovery#

Setting

Input

Used for

Experimental

Select device type

Dropdown menu with different device types

Set displayed device type.

- All: all device

- Local device: Device connected to machine

- Remote device: Device connected through network.

No

Discovery interval

Number input

Time interval between two device lookup, in millisecond.

No

Setting

Input

Used for

Experimental

Remote device timeout

Number input

Time that the extension looks for remote devices.

No

Custom board settings: Interface

Dropdown menu with options

Debug interface type that the extension use when collecting information about connected boards.

- SWD (default)

- JTAG

Custom board settings: Device Name

Text input

Device name for custom board that used as fallback option when connecting to board.

No

Custom board settings: Clock Speed

Number input

Debug adapter clock speed to help connect to custom boards.

No

Overwrite IPs adapter

Text input

Discover more remote devices based on the IPs subnet configuration.

- Individual IP address: 10.4.178.22

- Range of addresses: 10.4.178.20-29

- Subnet wildcard: 10.4.178.

- Address with subnet mask: 10.4.178.0/255.255.255.0

No

STS Configurations#

Available command

Input

Used for

Experimental

Tool Suite Workspace Fetch Interval

number input

Simplicity Tool Suite workspace will be checked by this interval

Yes

Available command

Input

Used for

Experimental

Tool Suite Installation Path

Text input

Simplicity Tool Suite install folder.

By filling this setting STS related options will be available, after user connect to STS. User will be asked if he/she wants to connect to STS or nut upon extension start.

Yes

Command Palette#

Silicon Labs extension commands that are available from the command palette. Some of the command will initiate one or more additional user input steps depends on the number of opened projects and the number of connected devices.

Command

Used for

Experimental

Silabs: Erase chip

Erase a selected device, if only one device is present it will be selected automatically and erased.

No

Silabs: Clean

Clean a selected project - build configuration.

No

Silabs: Unbrick Device

Recover a selected bricked device.

No

Silabs: Add Simplicity Studio V5 workspace

Browse a Simplicity Studio workspace folder and add it to the workspaces list.

No

Silabs: Select Simplicity Studio V5 workspace as active

Select a Simplicity Studio workspace from list and set it as active.

No

Silabs: Open 04-Build-Configurator#build-configurator

Open build configurator for selected project. If only one project present it will be selected automatically.

No

Silabs: Build

Build a selected project - build configuration.

No

Silabs: Flash

Flash a selected binary to a selected, compatible, device. (For device compatibility, check settings)

No

Silabs: Debug

Debug a selected project - build configuration on a selected device.

No

Silabs: Set Simplicity Studio path

Set Simplicity Tool Suite Path.

Yes