Power Manager Usage Scenarios#
This guide describes common scenarios for using the Power Manager to optimize performance and reduce power consumption. Each use case includes:
An overview of the feature and its benefits
A configuration sequence with step-by-step guidance
A complete implementation example
Key benefits and programming guidelines
Use Case 1: Switching Power State#
The Power Manager uses a requirement-based system to manage power states. Software modules add and remove requirements dynamically, which determines the current system power state.
This scenario demonstrates the sequence for managing power-state transitions through requirement-based control, balancing performance and energy efficiency.
Overview#
The system supports five power states: PS0, PS1, PS2, PS3, and PS4. It transitions automatically to the highest requested state among all active requirements. By default, the Power Manager starts in PS3.
Configuring Power State Management with Requirements#
Follow these steps to configure requirement-based power management:
System initialization: The Power Manager starts in PS3 by default when installed.
Add power state requirement: Applications add requirements to prevent the system from entering lower energy modes. The Power Manager maintains a requirement table.
static uint8_t requirement_ps_table[POWER_STATE_TABLE_SIZE] = { 0, // SL_SI91X_POWER_MANAGER_PS0 requirement counter 0, // SL_SI91X_POWER_MANAGER_PS1 requirement counter 0, // SL_SI91X_POWER_MANAGER_PS2 requirement counter 0, // SL_SI91X_POWER_MANAGER_PS3 requirement counter 0, // SL_SI91X_POWER_MANAGER_PS4 requirement counter };System transition: The system automatically enters the highest requested state.
Remove requirement: Release requirements when no longer needed. Add new requirements before removing old ones.
System transition: After removal, the system remains in the last transitioned state until another requirement is added.
Complete Implementation Example#
void power_state_management_example(void)
{
// Step 1: System Initialization - Power Manager starts in PS3 (default state)
// Note: Please refer to the Initialization and Configuration section for detailed information about the initialization process.
// Step 2: Add Power State Requirement - Request PS4 state
sl_status_t status = sl_si91x_power_manager_add_ps_requirement(SL_SI91X_POWER_MANAGER_PS4);
if (status != SL_STATUS_OK) {
// Handle error - requirement not added
return;
}
// Step 3: System Transition - Automatic transition to PS4 (highest requirement)
// Step 4: Perform high-performance work
// Step 5: Remove Power State Requirement - Release PS4 requirement
sl_si91x_power_manager_remove_ps_requirement(SL_SI91X_POWER_MANAGER_PS4);
// Step 6: System remains in PS4 state until a new requirement is added and current requirement is removed
// Optional: Verify current state
sl_si91x_power_state_t current_state;
status = sl_si91x_power_manager_get_current_state(¤t_state);
if (status == SL_STATUS_OK) {
printf("Current power state: PS%d\n", current_state);
}
}Key Benefits and Programming Guidelines#
Power-efficiency benefits:
Automatic optimization: The system selects the optimal power state from the requirement table.
Safe transitions: Requirement validation prevents invalid state changes.
Default behavior: When no requirements exist, the system returns to PS3.
Programming guidelines:
Follow the sequence strictly for reliable transitions.
Always add a new requirement before removing an old one.
Check return values and handle errors.
Optionally verify the current state after changes.
Remove unused requirements to conserve power.
Use Case 2: Entering Low-Power Sleep Mode Using Tickless Idle Mode#
Sleep mode conserves power by putting the Arm Cortex-M4 processor into a low-power state. The processor wakes on Ultra-Ultra-Low-Power (UULP) interrupt sources.
This scenario demonstrates how to use the Cortex Microcontroller Software Interface Standard – Real-Time Operating System (CMSIS-RTOS) semaphores with FreeRTOS tickless idle to trigger and manage sleep.
Overview#
When all tasks are idle, FreeRTOS disables the periodic tick interrupt. If idle time exceeds 100 ms, the system enters sleep mode automatically. Wake-up sources release semaphores to resume execution.
Configuring Sleep Mode with Semaphore Control#
Follow this sequence to configure sleep mode:
System initialization: Create a semaphore for sleep control. The Power Manager starts in PS3.
Configure wake-up sources: Use the Universal Configurator (UC) in Simplicity Studio to set GPIO, timers, or wireless events.
Add power state requirement: Add the requirement for the desired sleep state.
Remove requirement: Release it to enable automatic sleep entry during idle. FreeRTOS triggers sleep if idle > 100 ms.
Application task execution: Run normal application tasks.
Semaphore acquire: Block the task to trigger tickless idle.
System idle → Sleep entry: FreeRTOS transitions the processor to sleep.
Wakeup and semaphore release: Interrupt sources wake the processor and release the semaphore.
Complete Implementation Example#
void sleep_mode_management_example(void)
{
// Step 1: System Initialization - Create semaphore for sleep control
timer_semaphore = osSemaphoreNew(1U, 0U, NULL); // max=1, initial=0 (blocks immediately)
// Step 2: Configure Wakeup Sources through UC
// Configure wakeup sources using Universal Configurator (UC) in Simplicity Studio
// This includes GPIO interrupts, timers, wireless events, etc.
// Step 3: Add Power State Requirement - Add the power state requirement for desired sleep state
sl_si91x_power_manager_add_ps_requirement(SL_SI91X_POWER_MANAGER_PS2); // Example: PS2 state
// Step 4: Remove Power State Requirement - Remove to allow system to go to sleep when idle
sl_si91x_power_manager_remove_ps_requirement(SL_SI91X_POWER_MANAGER_PS2);
while (1) {
// Step 5: Application Task Execution - Perform application work
perform_application_work();
// Step 6: Semaphore Acquire - Block task to trigger tickless idle
// When all tasks are blocked, FreeRTOS tickless idle activates
// Step 7: System Idle → Sleep Entry - Automatic sleep if idle time > 100ms
osSemaphoreAcquire(timer_semaphore, osWaitForever);
// Step 8: Execution resumes here after wakeup and semaphore release
printf("System woke up from sleep mode\n");
}
}
// Wakeup Source Callback Handlers - Release semaphore to wake up the system
// (Dummy APIs - replace with appropriate wakeup source callback functions)
void wakeup_source_callback(void)
{
// System automatically exits sleep state
// Release semaphore to resume application task
osSemaphoreRelease(timer_semaphore);
}Key Benefits and Programming Guidelines#
Power-efficiency benefits:
Automatic sleep management through FreeRTOS tickless idle
Multiple configurable wake-up sources
Accurate tick adjustment maintains system time
Transparent integration with FreeRTOS applications
Programming guidelines:
Configure wake-up sources before entering sleep.
Use a counting semaphore (max=1, initial=0) to ensure blocking.
Always check return values for semaphore functions.
Follow the sequence to ensure reliable operation.
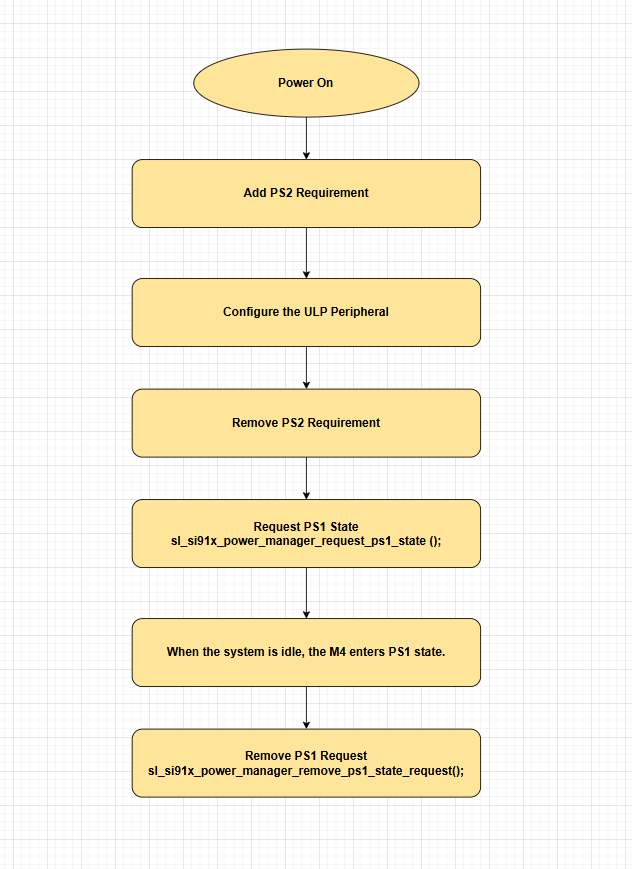
Use Case 3: Entering PS1 State Using Tickless Idle Mode#
Power State 1 (PS1) runs at 32 kHz while maintaining Ultra-Low-Power (ULP) peripherals. The SiWx917 system-on-chip (SoC) transitions through PS2 before entering PS1. In PS1, the Cortex-M4 core powers down while ULP peripherals remain active.
Overview#
The system automatically returns from PS1 to PS2 when ULP operations complete. ULP peripherals generate interrupts to wake the system.
Supported ULP peripherals:
ULP Peripheral | Wake-up Capability |
|---|---|
ULP GPIO | Pin state change or edge-triggered interrupts |
ULP Timer | Programmable timer expiration events |
ULP ADC | ADC conversion completion or threshold detection |
ULP Comparator | Voltage threshold crossing events |
ULP UART | Incoming data reception or communication events |
Configuring M4 PS1 State with ULP Peripherals#
Steps for configuration:
System initialization: Power Manager starts in PS3.
Add PS2 requirement: The system must transition through PS2.
Configure ULP peripheral: Enable wake-up interrupts (GPIO, Timer, ADC, Comparator, UART).
Remove PS2 requirement: Allows entry to PS1.
Request PS1 state: Call
sl_si91x_power_manager_request_ps1_state().Idle → PS1 entry: The Cortex-M4 enters PS1 when idle.
Interrupt handler: In the ULP ISR, call
osSemaphoreRelease().Remove PS1 request: Call
sl_si91x_power_manager_remove_ps1_state_request()when complete.
Complete Implementation Example#
void ps1_state_management_example(void)
{
// Step 1: System Initialization - Power Manager starts in PS3 (default state)
// Note: Please refer to the Initialization and Configuration section for detailed information about the initialization process.
// Step 2: Add PS2 Requirement - Keep system active for configuration
sl_si91x_power_manager_add_ps_requirement(SL_SI91X_POWER_MANAGER_PS2);
// Step 3: Configure the ULP Peripheral (Example with ULP Timer)
// Replace with appropriate ULP peripheral APIs based on your requirements
ulp_peripheral_init(); // e.g., sl_si91x_ulp_timer_init(&timer_config)
ulp_peripheral_config(); // e.g., sl_si91x_ulp_timer_set_timeout(5000000)
ulp_peripheral_start(); // e.g., sl_si91x_ulp_timer_start(ULP_TIMER_0)
// Step 4: Remove PS2 Requirement - Allow system to enter lower power states
sl_si91x_power_manager_remove_ps_requirement(SL_SI91X_POWER_MANAGER_PS2);
// Step 5: Request PS1 State - Enable PS1 state capability
sl_si91x_power_manager_request_ps1_state();
// Step 6: System Idle → M4 Enters PS1 State
// When FreeRTOS task blocks, tickless idle automatically enters PS1
osSemaphoreAcquire(idle_semaphore, osWaitForever); // Task blocks, triggers PS1 entry
// System wakes up here when ULP peripheral triggers interrupt
// Execution resumes after wakeup event
// Step 7: Remove PS1 Request - Cancel PS1 state when no longer needed
sl_si91x_power_manager_remove_ps1_state_request();
}
// ULP Peripheral Callback Handlers - Release semaphore to wake up the system
// (Dummy APIs - replace with appropriate ULP peripheral callback functions)
void ulp_peripheral_callback(void)
{
// System automatically exits PS1 state
// Release semaphore to resume application task
osSemaphoreRelease(idle_semaphore);
}Key Benefits and Programming Guidelines#
Power-efficiency benefits:
Ultra-low-power consumption with Cortex-M4 powered down
Only critical ULP peripherals remain active
Seamless FreeRTOS tickless integration
Interrupt-driven wakeup for responsiveness
Programming guidelines:
Follow the full sequence for correct operation.
Use only supported ULP peripherals.
Release semaphores in ULP ISRs.
Check API return values and implement error recovery.
Remove the PS1 request after completion.
Sequence to Configure M4 PS1 State in FreeRTOS Tickless Idle Mode#
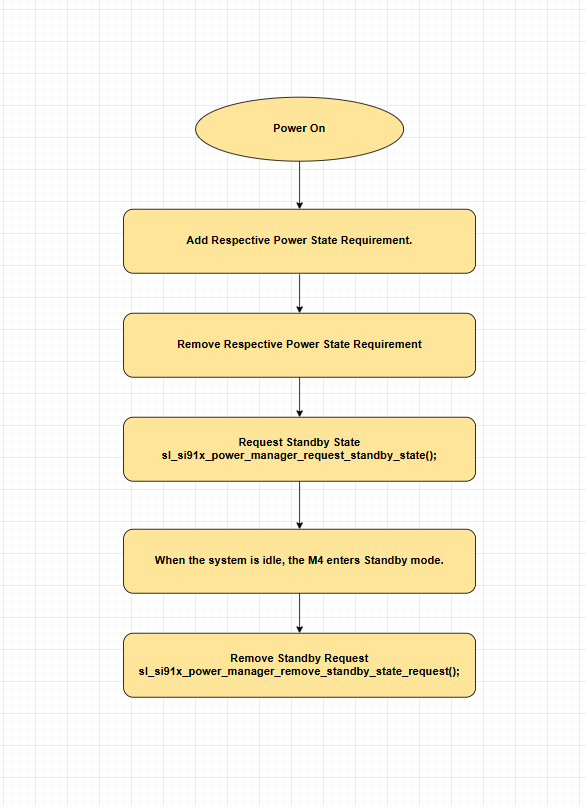
Use Case 4: Entering Standby State Using Tickless Idle Mode#
Standby mode minimizes power by clock-gating the Cortex-M4 CPU and most peripherals. The system can wake from High-Power (HP), ULP, or UULP interrupts.
Overview#
This mode is ideal for battery-powered devices that need maximum energy savings while still supporting fast wakeup through interrupts.
Configuring M4 Standby State with UULP Peripherals#
Steps for configuration:
System initialization: Power Manager starts in PS3.
Add power state requirement: Keep the system active during initial configuration (for example, PS2).
Configure wake-up sources: Set HP, ULP, or UULP peripheral interrupts for wakeup.
Remove requirement: Allow the system to enter Standby.
Request Standby: Call
sl_si91x_power_manager_request_standby_state().Idle → Standby entry: When idle, the Cortex-M4 enters Standby automatically.
Hardware interrupt wakeup: Any configured interrupt wakes the system.
Remove Standby request: Call
sl_si91x_power_manager_remove_standby_state_request()to restore normal behavior.
Complete Implementation Example#
void standby_state_management_example(void)
{
// Step 1: System Initialization - Power Manager starts in PS3 (default state)
// Note: Please refer to the Initialization and Configuration section for detailed information about the initialization process.
// Step 2: Add Power State Requirement - Keep system active during configuration
sl_si91x_power_manager_add_ps_requirement(SL_SI91X_POWER_MANAGER_PS2);
// Step 3: Configure Wakeup Sources - Set up peripheral interrupts for wakeup
uulp_peripheral_init(); // e.g., sl_si91x_uulp_gpio_init(), sl_si91x_uulp_rtc_init()
uulp_peripheral_config(); // e.g., sl_si91x_uulp_gpio_configure_wakeup()
// Step 4: Remove Power State Requirement - Allow system to enter Standby mode
sl_si91x_power_manager_remove_ps_requirement(SL_SI91X_POWER_MANAGER_PS2);
// Step 5: Request Standby State - Enable automatic Standby entry when idle
sl_si91x_power_manager_request_standby_state();
// Step 6: System Idle → M4 Enters Standby Mode
// When FreeRTOS task blocks, system automatically transitions to Standby with clock-gating
osSemaphoreAcquire(standby_semaphore, osWaitForever); // Task blocks, triggers Standby entry
// Step 7: Hardware Interrupt Wakeup - Any HP/ULP/UULP interrupt wakes the system
// Note: System restart occurs, execution may not resume from this point
// Step 8: Remove Standby Request - Cancel Standby state (after system restart)
sl_si91x_power_manager_remove_standby_state_request();
}
// UULP Peripheral Callback Handlers - Handle wakeup from Standby
// (Dummy APIs - replace with appropriate UULP peripheral callback functions)
void uulp_peripheral_callback(void)
{
// System automatically restarts from Standby state
// Handle post-wakeup initialization if needed
handle_standby_wakeup();
}Key Benefits and Programming Guidelines#
Power-efficiency benefits:
Automatic power management through FreeRTOS tickless idle
Long-term standby capability for battery-powered applications
Fast transitions for responsive behavior
Programming guidelines:
Configure peripherals first.
Follow the sequence in order.
Remove the Standby request when no longer needed.
Sequence to Configure M4 Standby State in FreeRTOS Tickless Idle Mode#
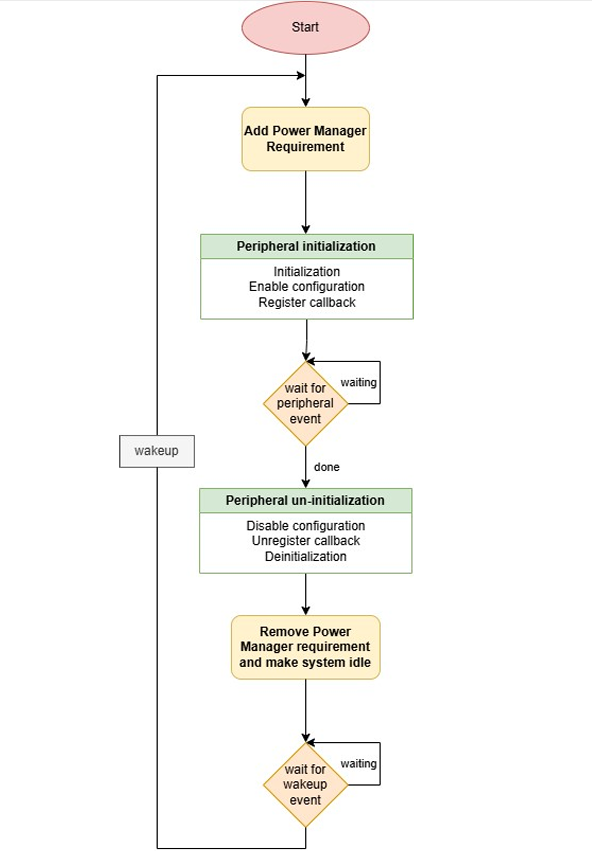
Use Case 5: Configuring Peripheral with Sleep Wakeup#
This scenario shows how to manage peripherals while ensuring proper power management. The system remains in active states only when peripherals operate, then returns to sleep when idle.
Overview#
By coordinating peripheral operation with Power Manager requirements, you balance performance with low-power operation.
Configuring Peripheral with Power Manager#
Follow this sequence:
System initialization: Power Manager starts in PS3.
Add power state requirement: Ensure sufficient resources (for example, PS2 or PS4).
Peripheral initialization: Configure interrupts and settings.
Peripheral operation: Perform tasks at the required power state.
Peripheral de-initialization: Shut down and release resources.
Remove power state requirement: Allow the system to optimize power.
Idle → Sleep entry: The system transitions automatically.
Wakeup and resume: Interrupts wake the system.
Complete Implementation Example#
void peripheral_power_management_example(void)
{
// Step 1: System Initialization - Power Manager starts in PS3 (default state)
// Note: Please refer to the Initialization and Configuration section for detailed information about the initialization process.
// Step 2: Add Power State Requirement - Ensure adequate resources for peripheral operation
sl_status_t status = sl_si91x_power_manager_add_ps_requirement(SL_SI91X_POWER_MANAGER_PS4);
if (status != SL_STATUS_OK) {
// Handle error - requirement not added
return;
}
// Step 3: Peripheral Initialization - Configure peripheral with interrupt handlers
peripheral_init(); // Replace with actual peripheral init (e.g., sl_si91x_uart_init())
peripheral_config(); // Configure peripheral settings and interrupts
// Step 4: Peripheral Operation - Execute tasks at required power state
peripheral_start(); // Begin peripheral operation (e.g., sl_si91x_uart_send_data())
while (!peripheral_operation_complete) {
// Wait for peripheral to complete operations
}
// Step 5: Peripheral De-initialization - Clean shutdown and resource release
peripheral_stop(); // Stop peripheral operation
peripheral_deinit(); // Release peripheral resources (e.g., sl_si91x_uart_deinit())
// Step 6: Remove Power State Requirement - Allow power optimization
sl_si91x_power_manager_remove_ps_requirement(SL_SI91X_POWER_MANAGER_PS4);
// Configure wakeup sources before sleep
sl_si91x_power_manager_set_wakeup_sources(SL_SI91X_POWER_MANAGER_GPIO_WAKEUP, true);
// Step 7: System Idle → Sleep Entry - Block task to trigger automatic sleep
osSemaphoreAcquire(sleep_semaphore, osWaitForever); // System enters sleep mode
// Step 8: Wakeup and Resume - Execution resumes here after wakeup interrupt
handle_system_wakeup(); // Process wakeup event and prepare for next cycle
}Key Benefits of This Approach#
Power efficiency:
System remains active only when peripheral operations are required
Automatic transition to low-power mode when idle
Configurable wake-up sources for system resume
Resource management:
Proper initialization and cleanup of peripheral resources
Power requirements prevent premature sleep during operations
Clean separation between active and idle phases
Flexibility:
Can be adapted for different peripherals such as universal asynchronous receiver–transmitter (UART), inter-integrated circuit (I2C), and serial peripheral interface (SPI)
Multiple wake-up sources can be configured
Easy integration with FreeRTOS tickless idle mode
Sequence to Configure Peripheral with Sleep Wakeup#
Use Case 6: Peripheral Initialization and De-initialization with Power State Transitions#
This scenario demonstrates how to initialize and de-initialize peripherals during the M4 active power state transitions (for example, PS4 to PS3 with an HP peripheral such as I²C or UART). For sleep and wakeup flows, see Use Case 5.
Overview#
Power state transitions change the supply voltage and clock frequency. If a peripheral remains active during these changes, it might operate incorrectly. To prevent this behavior, de-initialize the peripheral before the power state transition. After the system enters the new power state, re-initialize the peripheral to ensure valid timing and correct operation.
When the system enters PS2, de-initialize HP peripherals that are unavailable in that state. After returning to PS3 or PS4, initialize only the peripherals supported in the active state.
Configuring Peripheral with Power State Transitions#
Follow this sequence:
System initialization: After calling
sl_si91x_power_manager_init(), the system starts in PS3.Add power state requirement: Request the first active state (for example, PS4).
Peripheral initialization: Initialize and configure the peripheral for the current clock and supply.
Peripheral operation: Perform application work while the requirement holds the target state.
Peripheral de-initialization: Stop and de-initialize the peripheral before changing power state.
Add the next power state requirement: Request the new state (for example, PS3) before removing the current one (see Use Case 1).
Remove the previous power state requirement: Release the previous requirement to complete the transition.
Peripheral re-initialization: Initialize and configure the peripheral for the new power state.
End of use: Stop and de-initialize the peripheral, then remove power state requirements you no longer need.
Complete Implementation Example#
void peripheral_init_deinit_with_power_state_example(void)
{
sl_status_t status;
// Step 1: System Initialization - Power Manager starts in PS3 (default state)
// Note: Please refer to the Initialization and Configuration section for detailed information about the initialization process.
// Step 2: Add Power State Requirement - Request PS4
status = sl_si91x_power_manager_add_ps_requirement(SL_SI91X_POWER_MANAGER_PS4);
if (status != SL_STATUS_OK) {
return;
}
// Step 3-4: Peripheral Initialization and Operation at PS4
peripheral_init(); // Replace with actual peripheral init (e.g., sl_si91x_i2c_init())
peripheral_config();
peripheral_start();
while (!peripheral_work_phase_a_done()) {
}
// Step 5: Peripheral De-initialization - Stop before power state change
peripheral_stop();
peripheral_deinit();
// Step 6-7: Add PS3 before removing PS4 (Use Case 1)
status = sl_si91x_power_manager_add_ps_requirement(SL_SI91X_POWER_MANAGER_PS3);
if (status != SL_STATUS_OK) {
return;
}
sl_si91x_power_manager_remove_ps_requirement(SL_SI91X_POWER_MANAGER_PS4);
// Step 8: Peripheral Re-initialization at PS3
peripheral_init();
peripheral_config();
peripheral_start();
while (!peripheral_work_phase_b_done()) {
}
// Step 9: End of Use - Clean shutdown and remove requirement
peripheral_stop();
peripheral_deinit();
sl_si91x_power_manager_remove_ps_requirement(SL_SI91X_POWER_MANAGER_PS3);
}Programming Guidelines#
Always add the new power state requirement before removing the previous one. For details, see Use Case 1.
De-initialize HP peripherals before entering PS2, sleep, or standby if they are unsupported in the target mode; re-initialize only valid peripherals after returning to PS3 or PS4.
For sleep and wakeup handling, see Use Case 5.
Use Case 7: Configuring PowerSave and Performance Mode#
The Power Manager supports clock-scaling modes to balance energy and performance.
Overview#
Applications can dynamically adjust frequencies to meet workload demands.
Modes available:
PowerSave mode (
SL_SI91X_POWER_MANAGER_POWERSAVE) – Lower frequencies for efficiencyPerformance mode (
SL_SI91X_POWER_MANAGER_PERFORMANCE) – Higher frequencies for maximum throughput
Clock frequencies by state:
Power State | PowerSave Mode | Performance Mode |
|---|---|---|
PS4 | 100 MHz | 160 MHz |
PS3 | 40 MHz | 80 MHz |
PS2 | 20 MHz (Fixed) | 20 MHz (Fixed) |
Note: PS2 state operates at a fixed 20 MHz frequency and does not support clock scaling.
Configuring PowerSave Mode#
void configure_powersave_mode(void)
{
sl_status_t status;
// First, ensure system is in PS4 state
status = sl_si91x_power_manager_add_ps_requirement(SL_SI91X_POWER_MANAGER_PS4);
if (status != SL_STATUS_OK) {
printf("Failed to transition to PS4: 0x%lx\n", status);
return;
}
// Configure PS4 for PowerSave mode (100MHz)
status = sl_si91x_power_manager_set_clock_scaling(SL_SI91X_POWER_MANAGER_POWERSAVE);
if (status == SL_STATUS_OK) {
printf("PS4 PowerSave mode configured - Operating at 100MHz\n");
} else {
printf("Failed to configure PowerSave mode: 0x%lx\n", status);
}
}Configuring Performance Mode#
void configure_performance_mode(void)
{
sl_status_t status;
// First, ensure system is in PS4 state
status = sl_si91x_power_manager_add_ps_requirement(SL_SI91X_POWER_MANAGER_PS4);
if (status != SL_STATUS_OK) {
printf("Failed to transition to PS4: 0x%lx\n", status);
return;
}
// Configure PS4 for Performance mode (160MHz)
status = sl_si91x_power_manager_set_clock_scaling(SL_SI91X_POWER_MANAGER_PERFORMANCE);
if (status == SL_STATUS_OK) {
printf("PS4 Performance mode configured - Operating at 160MHz\n");
} else {
printf("Failed to configure Performance mode: 0x%lx\n", status);
}
}Key Considerations#
Use PowerSave mode when:
Running battery-powered devices
Performing moderate workloads
Managing heat and efficiency
Use Performance mode when:
Running high-performance workloads
Handling real-time tasks
Requiring maximum processing
Notes:
Clock scaling applies immediately
Supported in PS4 and PS3 only
PS2 runs at fixed 20 MHz
Use Case 8: Guidelines for App Designing Without FreeRTOS#
Applications that do not use FreeRTOS tickless idle require manual power optimization. This section provides strategies for minimizing consumption.
Overview#
Without tickless mode, the CPU wakes for every tick, reducing efficiency. Developers must design tasks and power strategies carefully.
Power Optimization Guidelines#
1. Optimize Tick Rate Configuration#
Set the RTOS tick rate (configTICK_RATE_HZ) to the minimum value that satisfies your application's real-time requirements. A lower tick rate reduces the frequency of CPU wakeups, conserving power.
#define configTICK_RATE_HZ 1002. Implement Low-Power Modes During Idle#
Ensure that the idle task of the RTOS enters a low-power mode whenever the system is idle. This can be achieved by implementing an idle hook function.
void vApplicationIdleHook(void)
{
// Enter low-power mode
sl_si91x_power_manager_sleep();
}3. Minimize Interrupt Activity#
Optimize peripherals and system interrupts to reduce their frequency and duration. Configure peripherals to use event-driven approaches instead of polling, which consumes more power.
Key strategies:
Use interrupt-driven peripheral operation instead of continuous polling.
Configure peripherals for event-based operation.
Minimize interrupt handler execution time.
Use efficient interrupt service routines.
4. Implement Task Batching#
Group non-urgent tasks to execute together during a single active period, reducing the number of wakeups.
Implementation approach:
Combine related operations into single execution cycles.
Schedule multiple tasks to run consecutively.
Reduce the frequency of individual task wakeups.
Optimize task scheduling for power efficiency.
5. Dynamic Frequency and Voltage Scaling (DVFS)#
Use dynamic frequency and voltage scaling to adjust the CPU's power and performance levels based on workload demands.
DVFS implementation:
Monitor system workload in real time.
Scale frequency based on processing requirements.
Use power manager APIs to adjust clock frequencies.
Balance performance needs with power consumption.
6. Optimize Peripheral Power Management#
Turn off or place unused peripherals in low-power modes when not in use. Use hardware features like clock gating to reduce power usage.
Peripheral management strategies:
Disable unused peripherals completely.
Use clock gating for temporarily inactive peripherals.
Configure active peripherals for low-power operation modes.
Implement peripheral wake-up sources where needed.
7. Design Efficient Tasks#
Design tasks to run only when necessary and complete execution as quickly as possible to return to idle mode. Avoid tight loops or delays in tasks, as these prevent the system from entering low-power states.
Task design principles:
Minimize active execution time.
Avoid blocking operations in tasks.
Use efficient algorithms and data structures.
Complete tasks quickly to enable sleep states.
8. Reduce Tick Interrupt Processing Overhead#
Minimize the work done in the tick interrupt handler to reduce power usage during each tick. Offload non-critical tasks to lower-priority threads instead of handling them in the tick interrupt.
Tick optimization techniques:
Keep tick interrupt handlers minimal.
Defer heavy processing to application tasks.
Use efficient tick counting mechanisms.
Minimize context switching overhead.
9. Use Sleep-On-Exit Feature#
If supported by the microcontroller unit (MCU), enable the sleep-on-exit feature to ensure the CPU enters low-power mode automatically after handling an interrupt.
Sleep-on-exit benefits:
Automatic sleep entry after interrupt handling
Reduced software overhead for sleep management
Improved power efficiency for interrupt-driven applications
Hardware-assisted power state management
10. Profile and Optimize Power Usage#
Use tools such as power analyzers or RTOS profiling tools to monitor power consumption and identify inefficiencies in your design.
Profiling and optimization:
Measure actual power consumption under various conditions.
Identify power consumption hotspots in your application.
Use development tools for power analysis.
Iteratively optimize based on measurement results.
Key Considerations#
Best practices:
Set tick rate to minimum value that meets real-time requirements.
Implement efficient idle power management.
Use event-driven peripheral configurations instead of polling.
Batch non-urgent operations to reduce wake-up frequency.
Design tasks for quick execution and return to idle.
Power optimization strategy:
Monitor and profile power consumption regularly.
Balance real-time performance with power efficiency.
Use hardware sleep features where available.
Implement comprehensive peripheral power management.
Important notes:
Idle power management is critical for achieving good power efficiency.
Peripheral configuration significantly impacts overall power consumption.
Task design should minimize active time and maximize sleep periods.
Use Case 9: Configuring Wake-up Sources Without UC#
This scenario demonstrates how to configure Ultra-Ultra-Low-Power (UULP) wake-up sources without using Universal Configurator (UC). The approach provides flexible runtime configuration of wake-up sources for different power-saving scenarios.
Overview#
Manual wake-up source configuration allows developers to dynamically select and configure wakeup mechanisms based on application requirements. This approach provides more control than static UC configuration and enables runtime switching between different wake-up sources.
Supported wake-up sources:
Wake-up Source | Description | Use Cases |
|---|---|---|
Calendar Wakeup | Second /Alarm trigger from calendar/RTC | Periodic wakeups, time-based operations |
Deep Sleep Timer Wakeup | Deep Sleep Timer wakeup | Sleep-initiated timing |
GPIO Wakeup | GPIO pin state change | External event-driven wake-ups |
Note: Wireless wakeup is enabled by default when the Power Manager component is installed.
Configuring UULP Wake-up Sources Programmatically#
Follow this sequence to configure wake-up sources without UC:
System initialization: Power Manager starts in PS3.
Add power state requirement: Specify the power state from which the system should enter sleep mode.
Select wake-up source: Choose the appropriate wake-up mechanism that matches your application requirements.
Initialize and configure the peripheral: Initialize and configure the peripheral using as wake-up source.
Set the wake-up source: Set the wake-up source using the provided API.
Register the callback: Register the callback of the wake-up source.
Remove power state requirement: Allow system to enter low-power states.
Enter sleep mode: System enters sleep and waits for configured wake-up event.
Wake-up handling: Process wake-up event and perform necessary actions.
Complete Implementation Example#
// Global semaphore for sleep/wakeup coordination
static osSemaphoreId_t wakeup_semaphore;
/*******************************************************************************
* Steps 4, 5 & 6: Initialize, configure and register callback for calendar wakeup source.
* This example demonstrates configuring calendar-based wakeup without UC.
******************************************************************************/
static void set_calendar_wakeup_source(void)
{
sl_status_t status;
// Step 4: Initialize and configure the peripheral - Calendar clock reset and initialization
sl_si91x_calendar_init();
// Step 5: Set the wakeup source using the provided API
status = sl_si91x_power_manager_set_wakeup_sources(SL_SI91X_POWER_MANAGER_SEC_WAKEUP, true);
if (status != SL_STATUS_OK) {
printf("sl_si91x_power_manager_set_wakeup_sources failed, Error Code: 0x%lX\n", status);
return;
}
// Step 6: Register the callback of the wakeup source
status = sl_si91x_calendar_register_sec_trigger_callback(on_sec_callback);
if (status != SL_STATUS_OK) {
printf("sl_si91x_calendar_register_sec_trigger_callback failed, Error Code: 0x%lX\n", status);
return;
}
printf("Calendar wakeup source configured successfully\n");
}
void calendar_wakeup_example(void)
{
sl_status_t status;
// Step 1: System Initialization - Create semaphore for wakeup coordination
wakeup_semaphore = osSemaphoreNew(1U, 0U, NULL); // max=1, initial=0
if (wakeup_semaphore == NULL) {
printf("Failed to create wakeup semaphore\n");
return;
}
// Step 2: Add Power State Requirement - Ensure sufficient power for configuration
status = sl_si91x_power_manager_add_ps_requirement(SL_SI91X_POWER_MANAGER_PS2);
if (status != SL_STATUS_OK) {
printf("Failed to add PS2 requirement, Error Code: 0x%lX\n", status);
return;
}
// Step 3: Select wakeup source - Calendar peripheral chosen
// Step 4, 5 & 6: Initialize, configure and register callback for Calendar wakeup source
set_calendar_wakeup_source();
// Step 7: Remove Power State Requirement - Allow system to enter low-power states
sl_si91x_power_manager_remove_ps_requirement(SL_SI91X_POWER_MANAGER_PS2);
printf("Calendar wakeup configuration completed. Entering sleep mode...\n");
while (1) {
// Step 8: Enter Sleep Mode - Block task to trigger automatic sleep
osSemaphoreAcquire(wakeup_semaphore, osWaitForever);
// Step 9: Wakeup Handling - Execution resumes here after calendar wakeup
printf("System woke up from calendar wakeup source\n");
// Perform post-wakeup tasks
printf("Processing calendar wakeup event\n");
}
}
// Calendar Wakeup Callback Handler
void on_sec_callback(void)
{
// Calendar wakeup occurred - release semaphore to resume application
printf("Calendar second trigger wakeup occurred\n");
osSemaphoreRelease(wakeup_semaphore);
}Key Benefits and Programming Guidelines#
Power efficiency benefits:
Manual configuration: Direct control over wake-up source configuration without UC dependency
Lightweight implementation: Simple, focused approach for wake-up scenarios
Power optimization: System sleeps until wakeup trigger occurs
Programming guidelines:
Proper initialization sequence: Configure calendar wakeup before entering sleep states.
Error handling: Always check return values for calendar and power manager APIs.
Callback registration: Register calendar callback function for wake-up handling.