Getting Started with WiSeConnect™ SDK v3.x in SoC Mode#
This guide describes how to get started with developing an application for SiWx91x™ using the WiSeConnect™ SDK v3.x in System-on-chip (SoC) mode, where both the application and the networking stack run on the SiWx917 chipset.
Check Pre-requisites#
Hardware#
SiWx917 SoC development kit
Windows/Linux/MacOS computer with a USB port
USB cable
USB-to-TTL converter
Jumper cables
Software#
Simplicity Studio
A Terminal application
Tera Term for Windows
Serial Debug Assistant
Install Simplicity Studio#
Download the latest version of Simplicity Studio and follow the installation instructions. During the installation, choose the technology type as 32-bit and Wireless MCUs.
In the Simplicity Studio home page, select Install > Manage installed packages > Early Access.
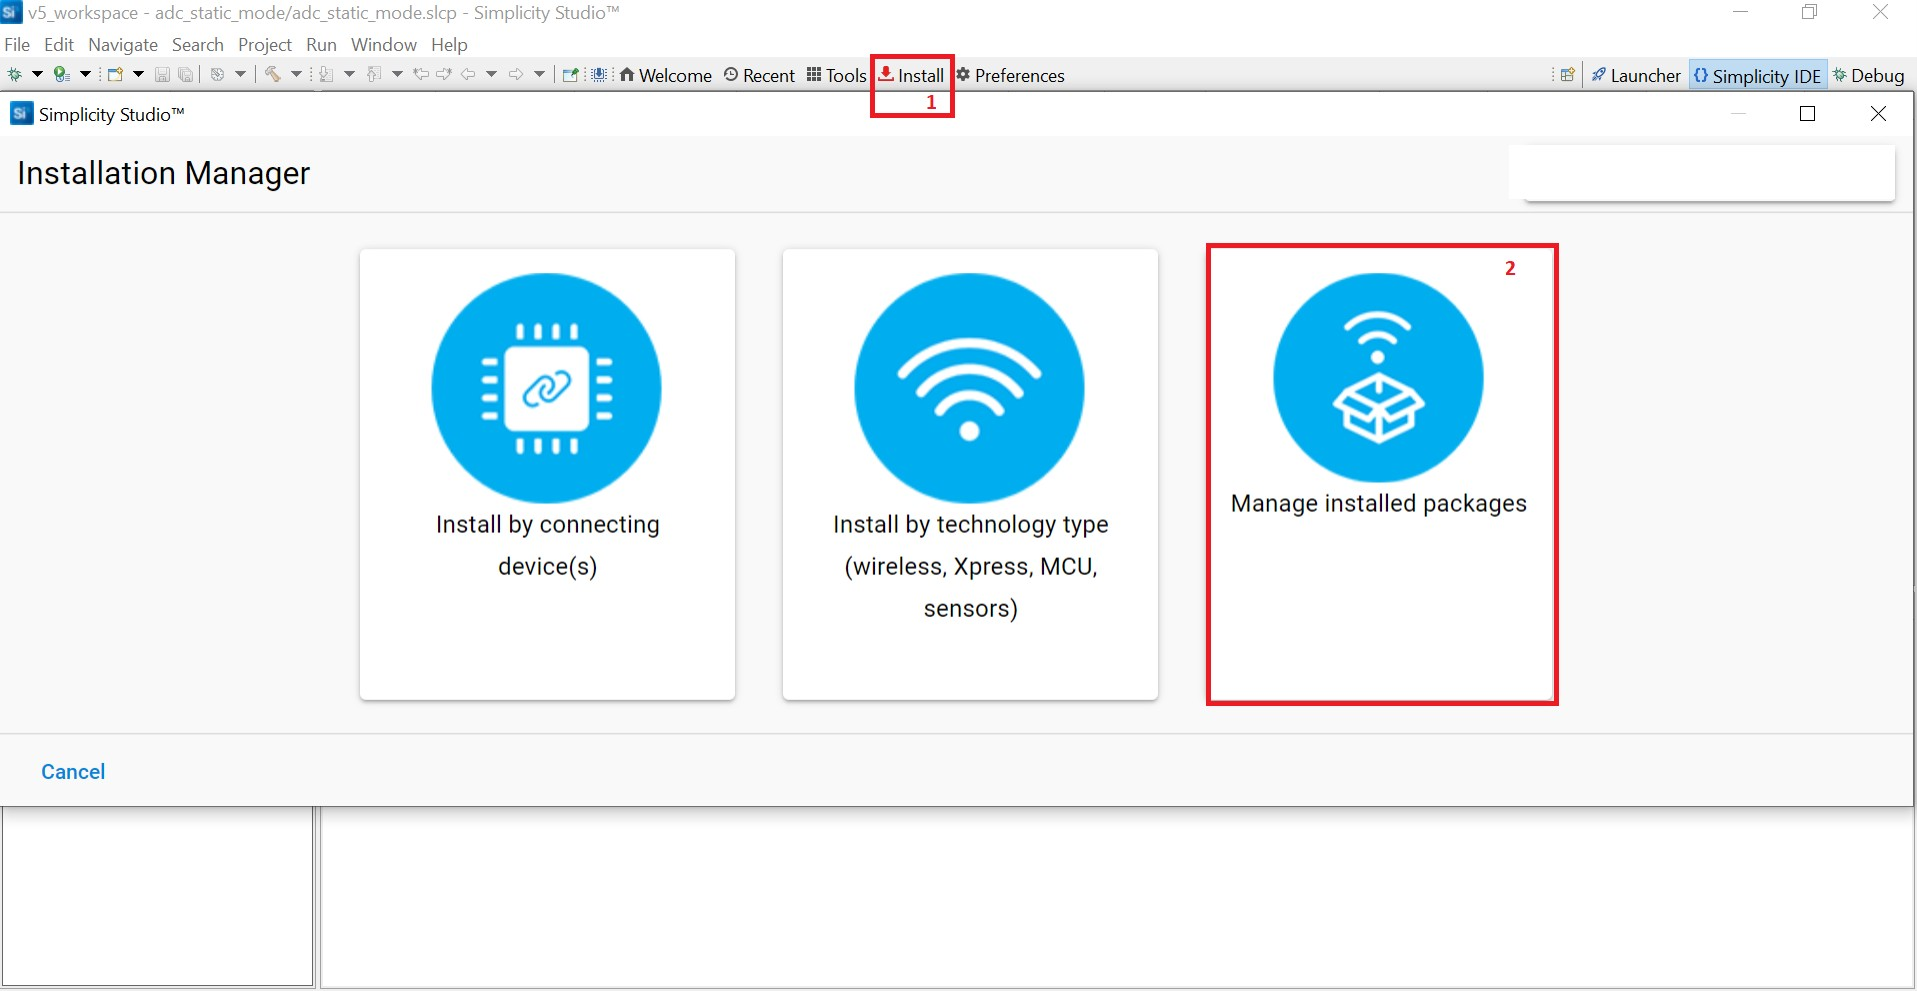

Note: You may not have permission to access the Early Access page for SiWx917. To request permission, contact the Silicon Labs Sales team by clicking here.
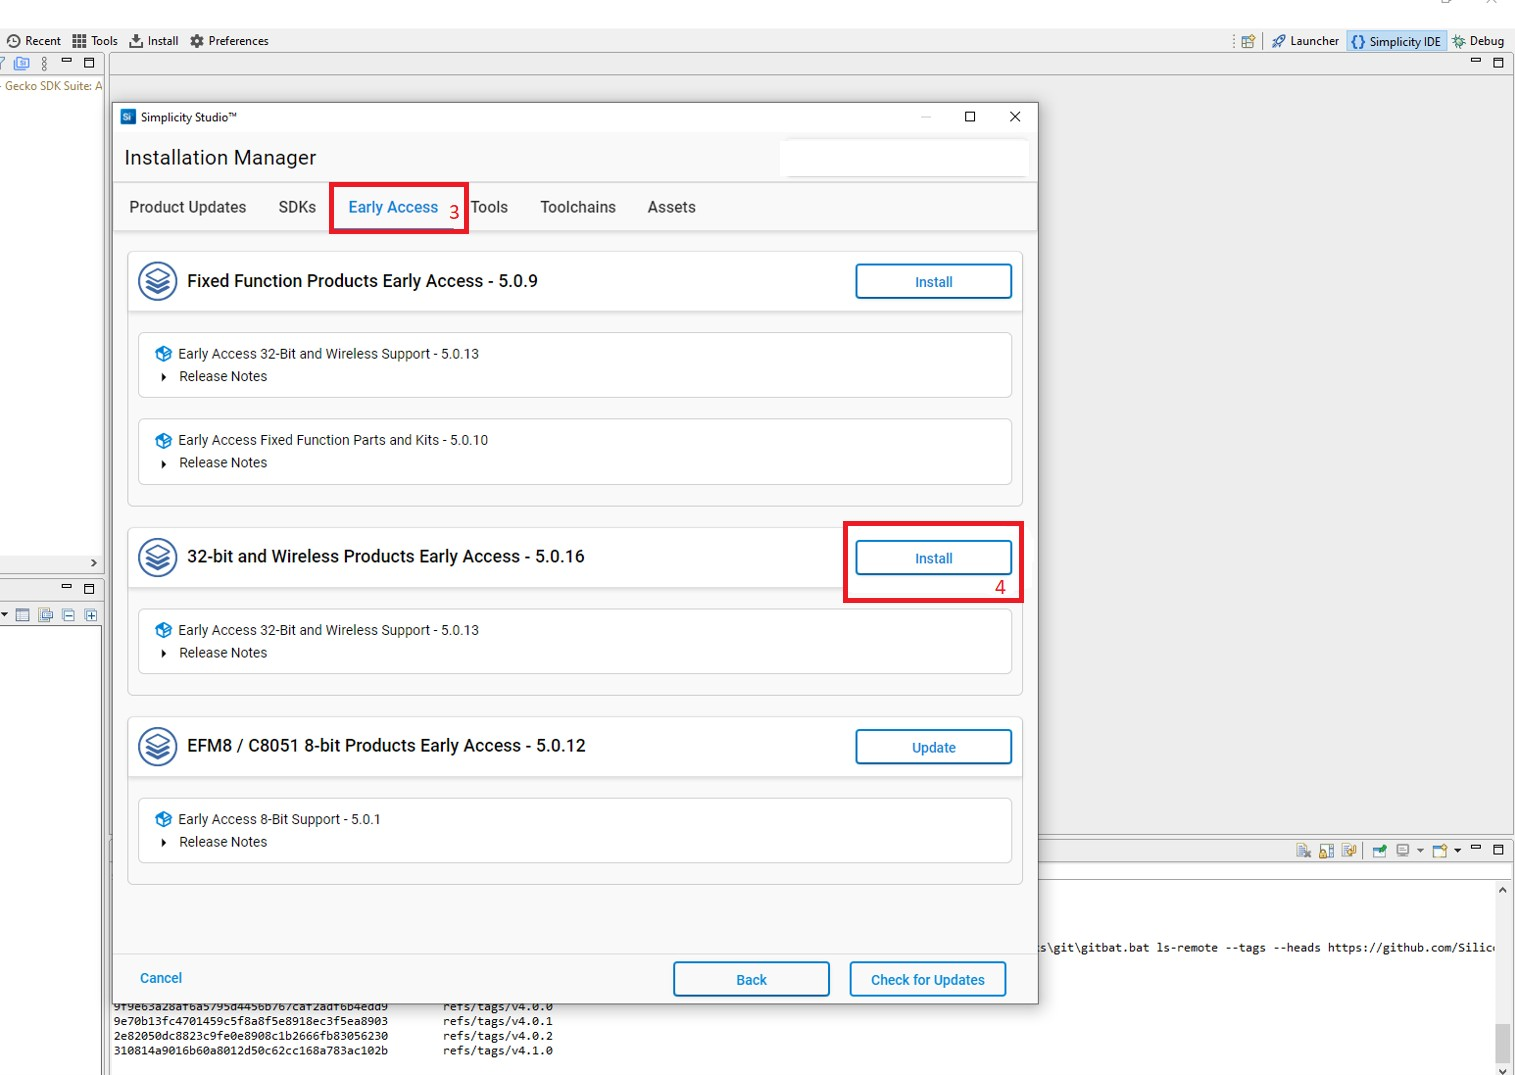
Select 32-bit and Wireless Product Early Access-x.x.xxx and click Install.

Connect SiWx91x to Computer#
Connect your SiWx91x Wireless Starter Kit (WSTK) board to your computer using a USB cable.


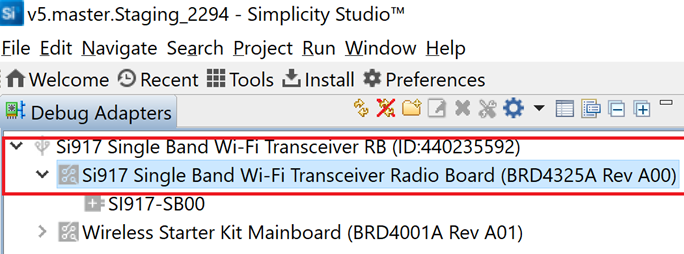
Simplicity Studio will detect and display your radio board.

Troubleshoot Board Detection Failure#
If Simplicity Studio does not detect your radio board, try the following:
In the Debug Adapters pane, Click the Refresh button (having an icon of two looping arrows).
Press the RESET button on the radio board.
Power-cycle your device by disconnecting and reconnecting the USB cable.
Install WiSeConnect 3 Extension#
Launch Simplicity Studio.
In the Debug Adapters pane, select your radio board.
In the General Information section, click Manage SDKs.
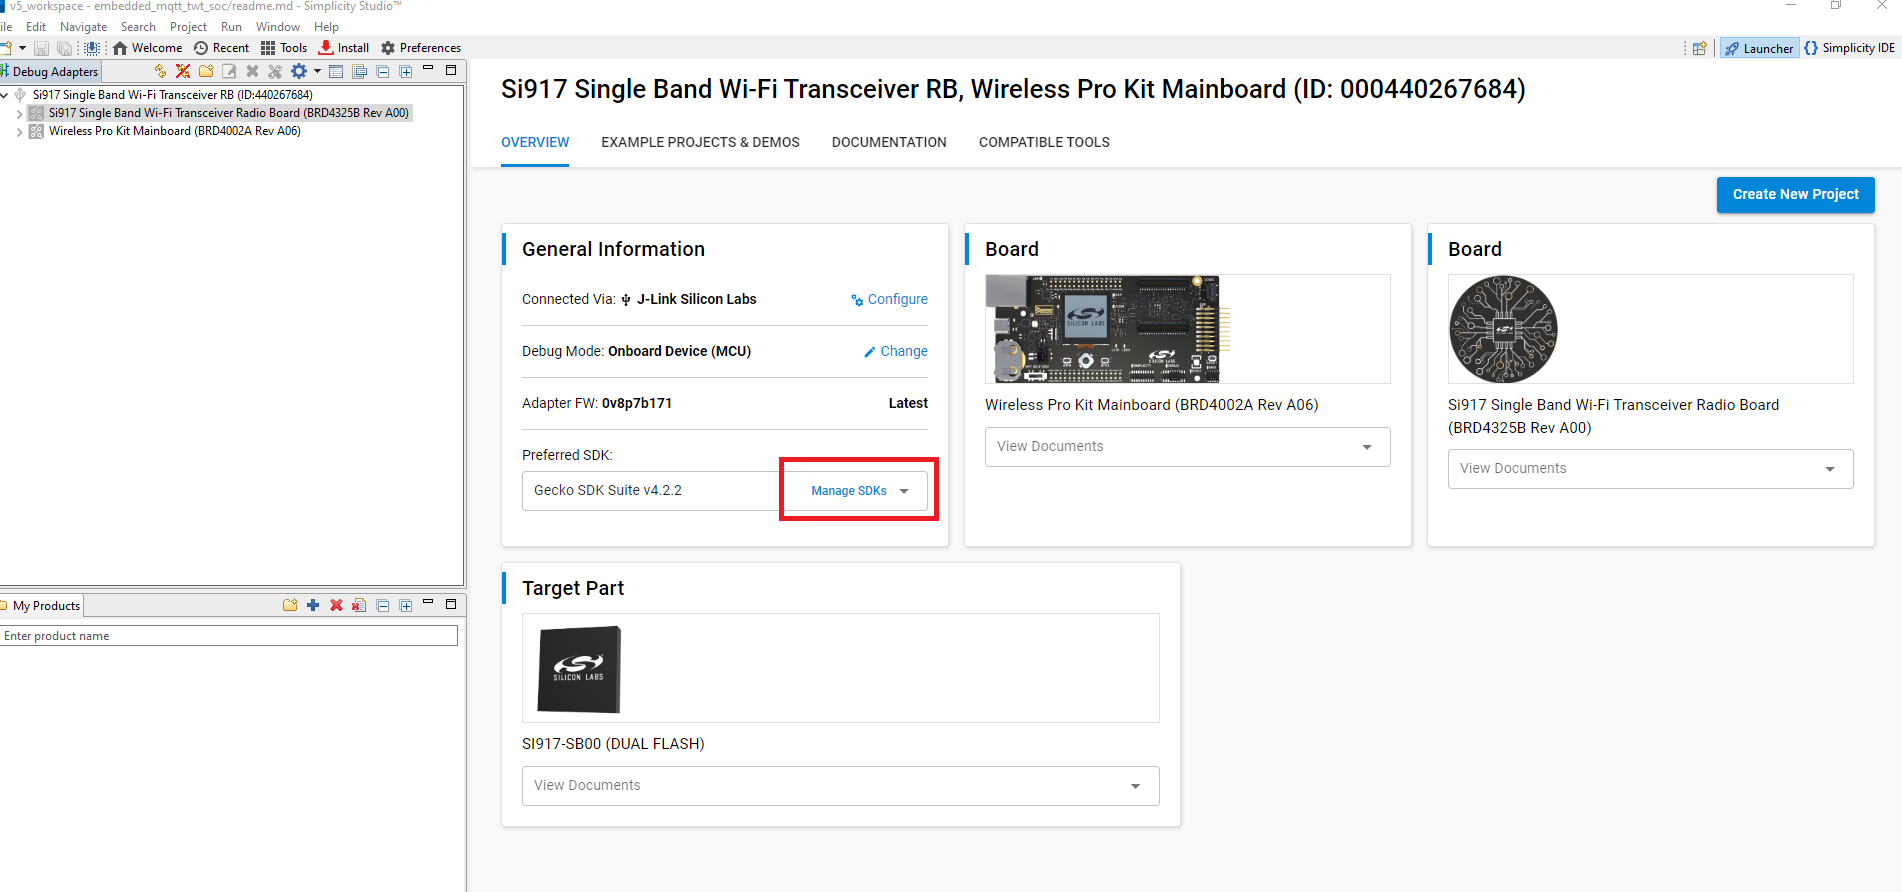

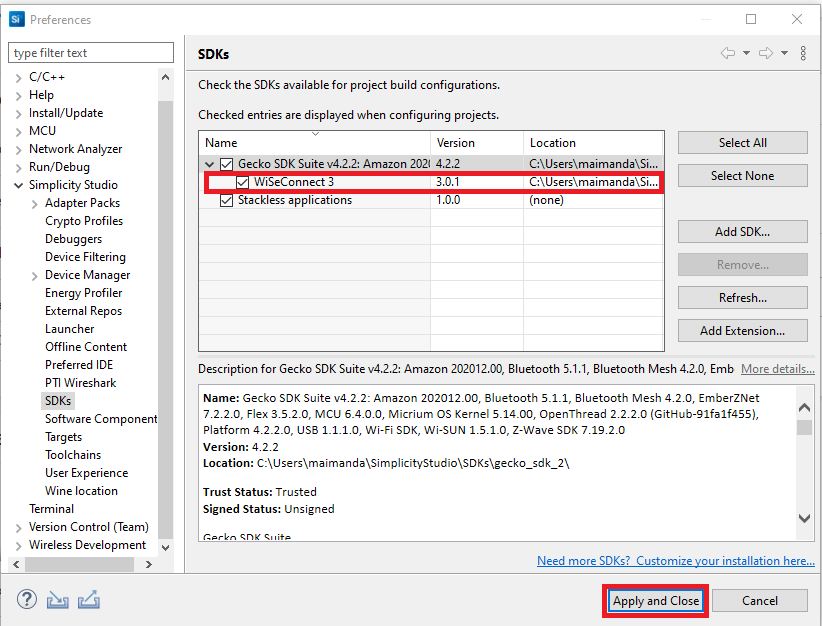
In the Preferences window, go to the SDKs section, select Gecko SDK Suite vx.x.x and click Add Extension.
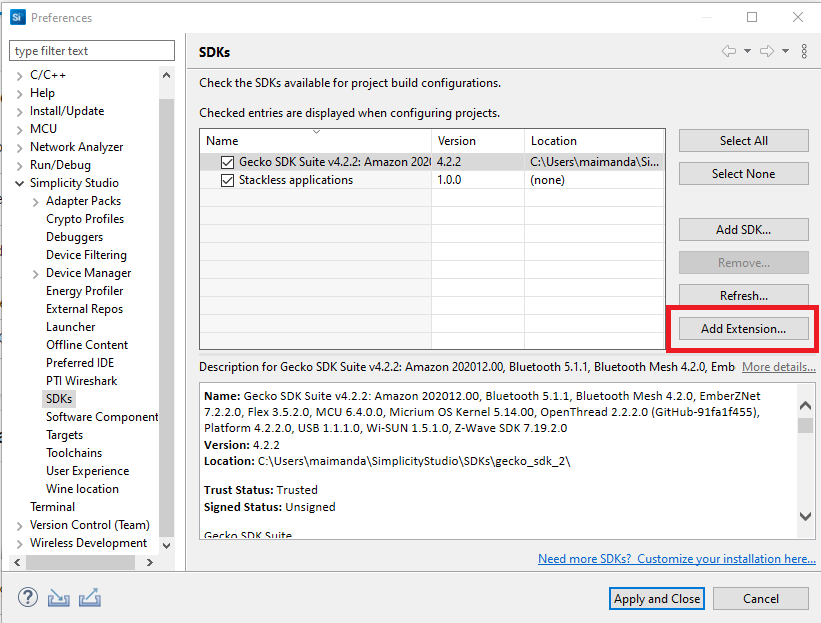

In the Add SDK Extensions window, click Browse
Find and select WiSeConnect 3.
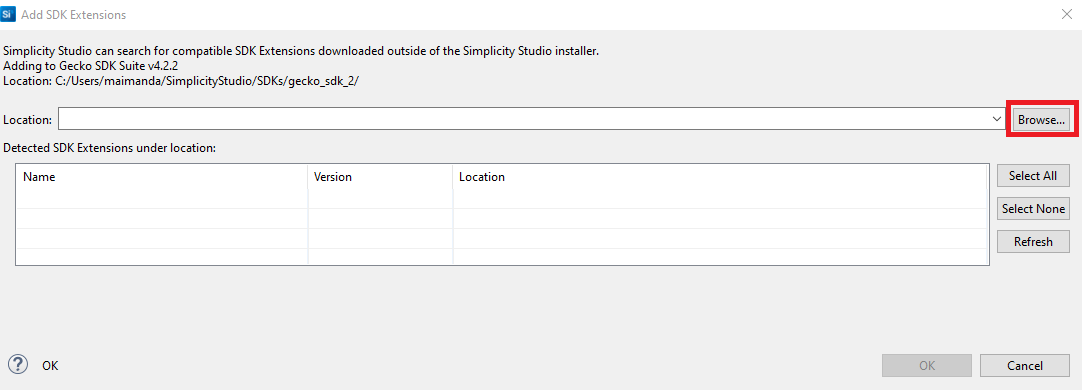

If a Verify SDK Extension popup is displayed, click Trust.
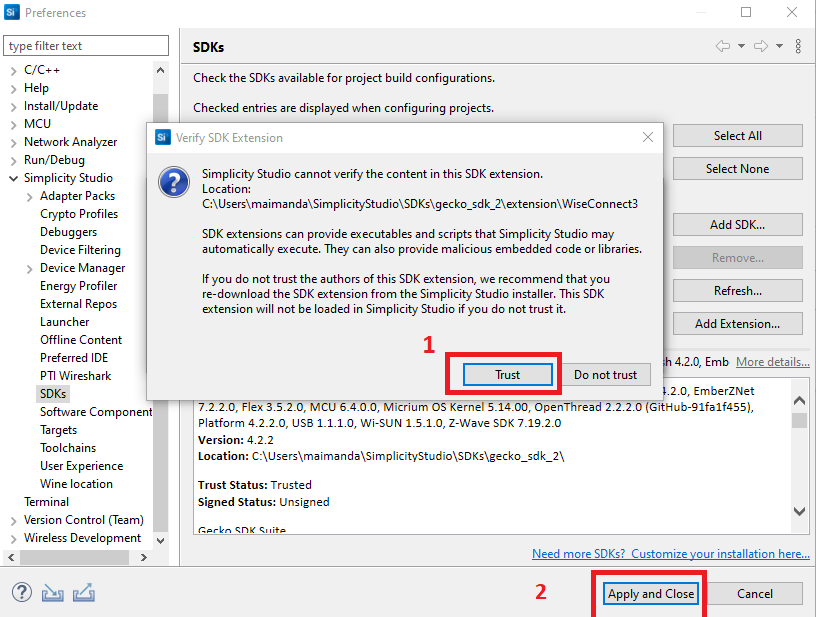

The selected WiSeConnect 3 extension will be displayed.
Click Apply and Close.

Open the command prompt.
Enter the following command where <wiseconnect-3-extension-path> is the path where you downloaded the WiSeConnect - 3 extension:
git apply --ignore-whitespace --ignore-space-change "<wiseconnect-3-extension-path>/utilities/gsdk_service_patch/gsdk_service.patch"
Note:
The GSDK path is displayed in the Location field in the Preferences > SDKs section mentioned in step 4 above.
The
git applycommand needs to be run to apply a GSDK patch not available with the current WiSeConnect 3 release. This patch will be automatically included in the next release.
Upgrade SiWx91x Connectivity Firmware#
Download the recommended version of firmware before you start with the update process.
Note: Simplicity Commander does not support upgrading the SiWx91x connectivity firmware on a Dual Flash radio board. To upgrade on Dual Flash, see the upgrading connectivity firmware with Kermit section.
Upgrade Connectivity Firmware using Simplicity Commander#
In the Simplicity Studio home page, click Tools.
In the Tools dialog, select Simplicity Commander and click OK.
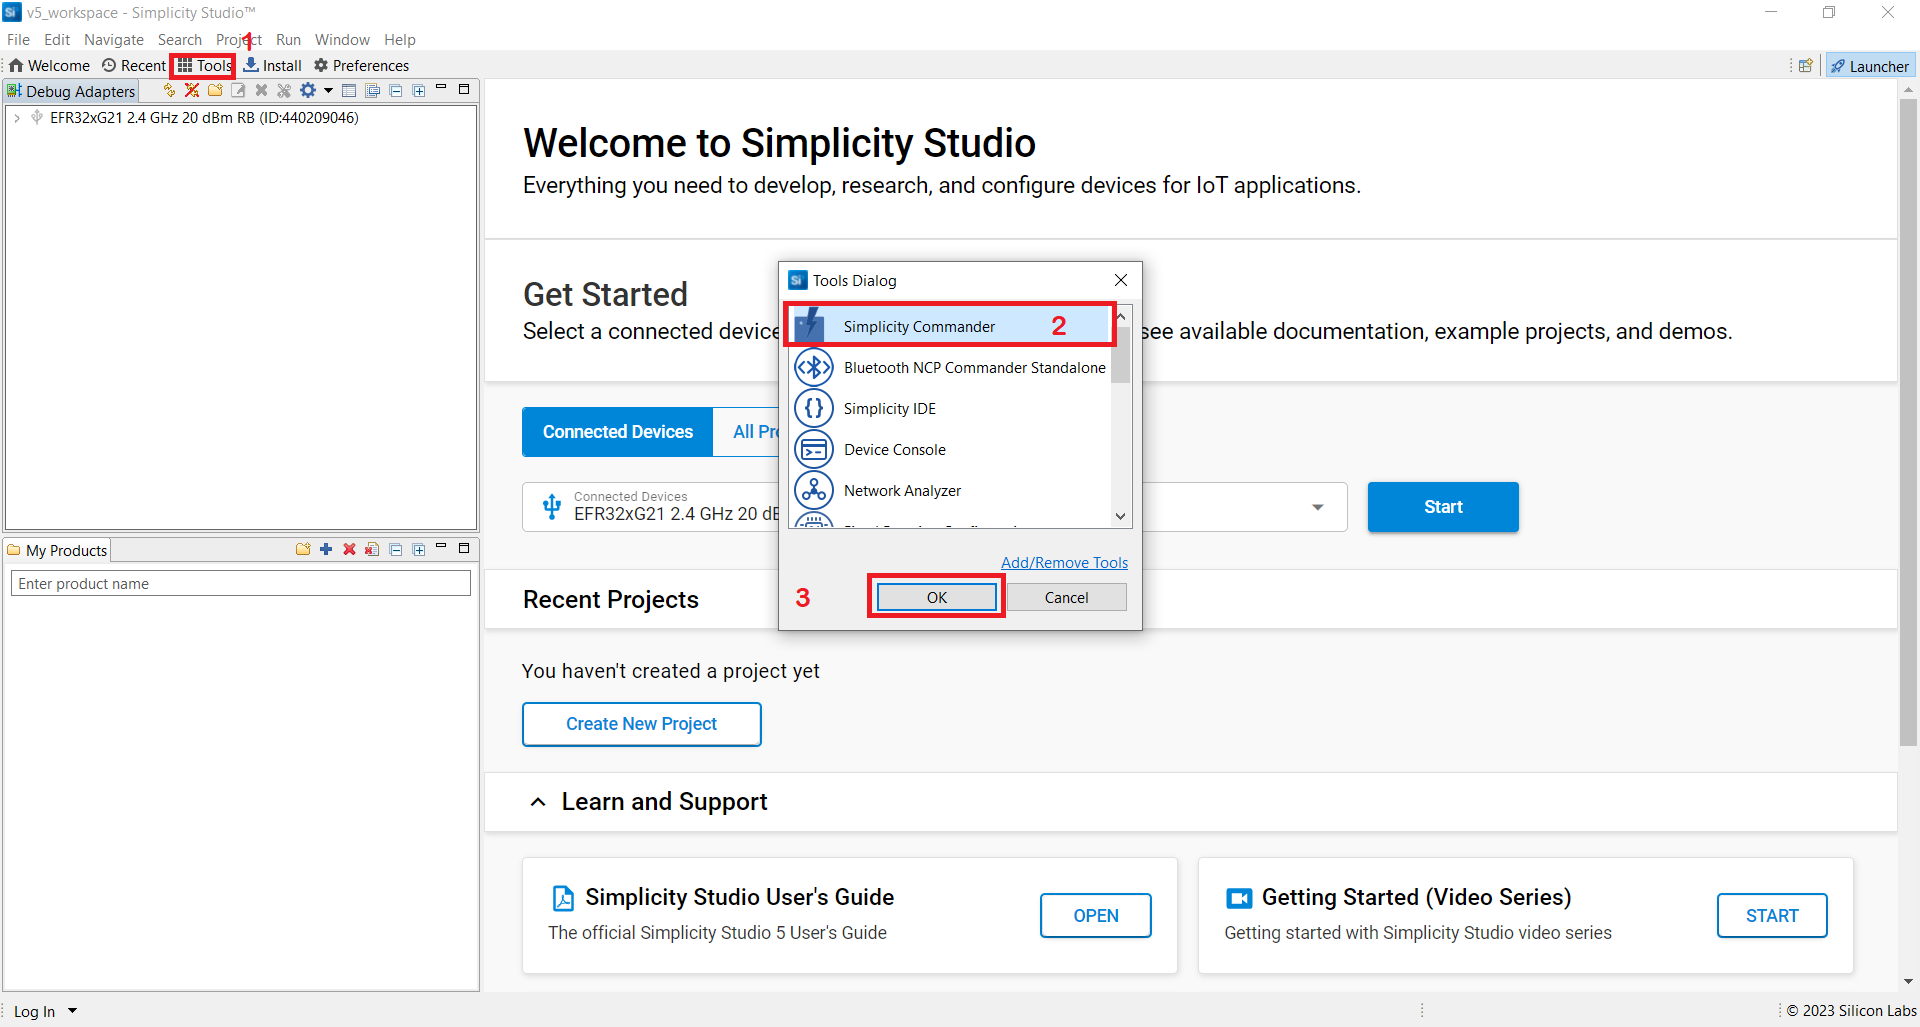

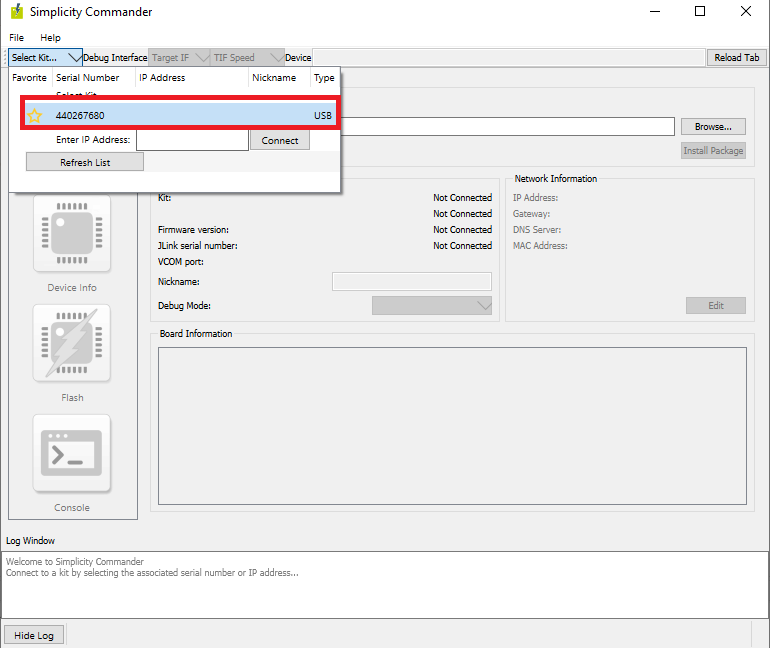
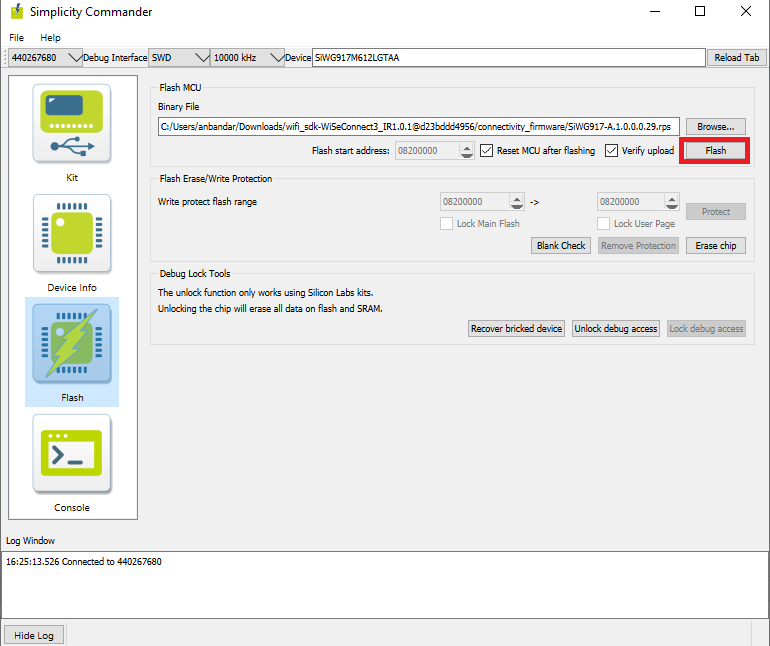
In the Simplicity Commander window, click Select Kit and choose your radio board.

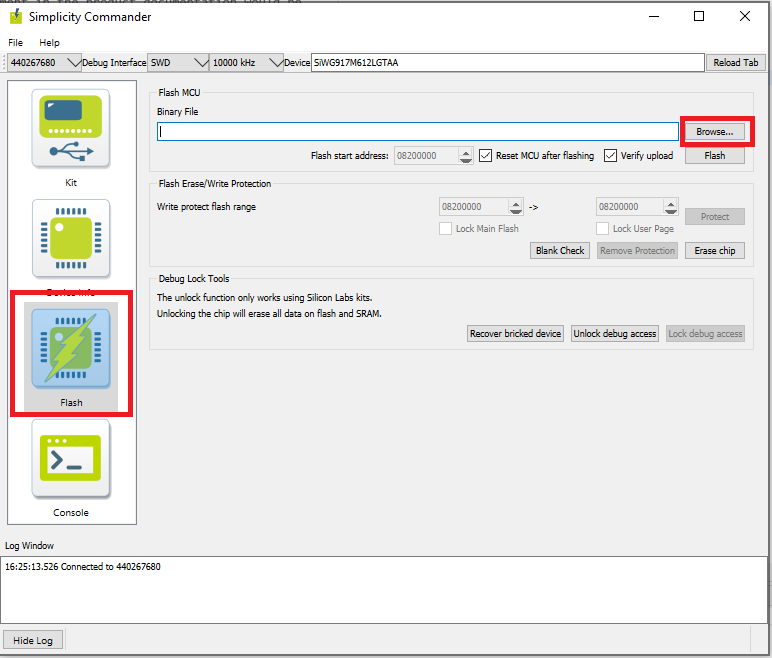
In the navigation pane, go to the Flash section.
In the Flash MCU page, next to the Binary File field, click Browse.
Locate and select the firmware file to be flashed on the radio board.
Click Flash.


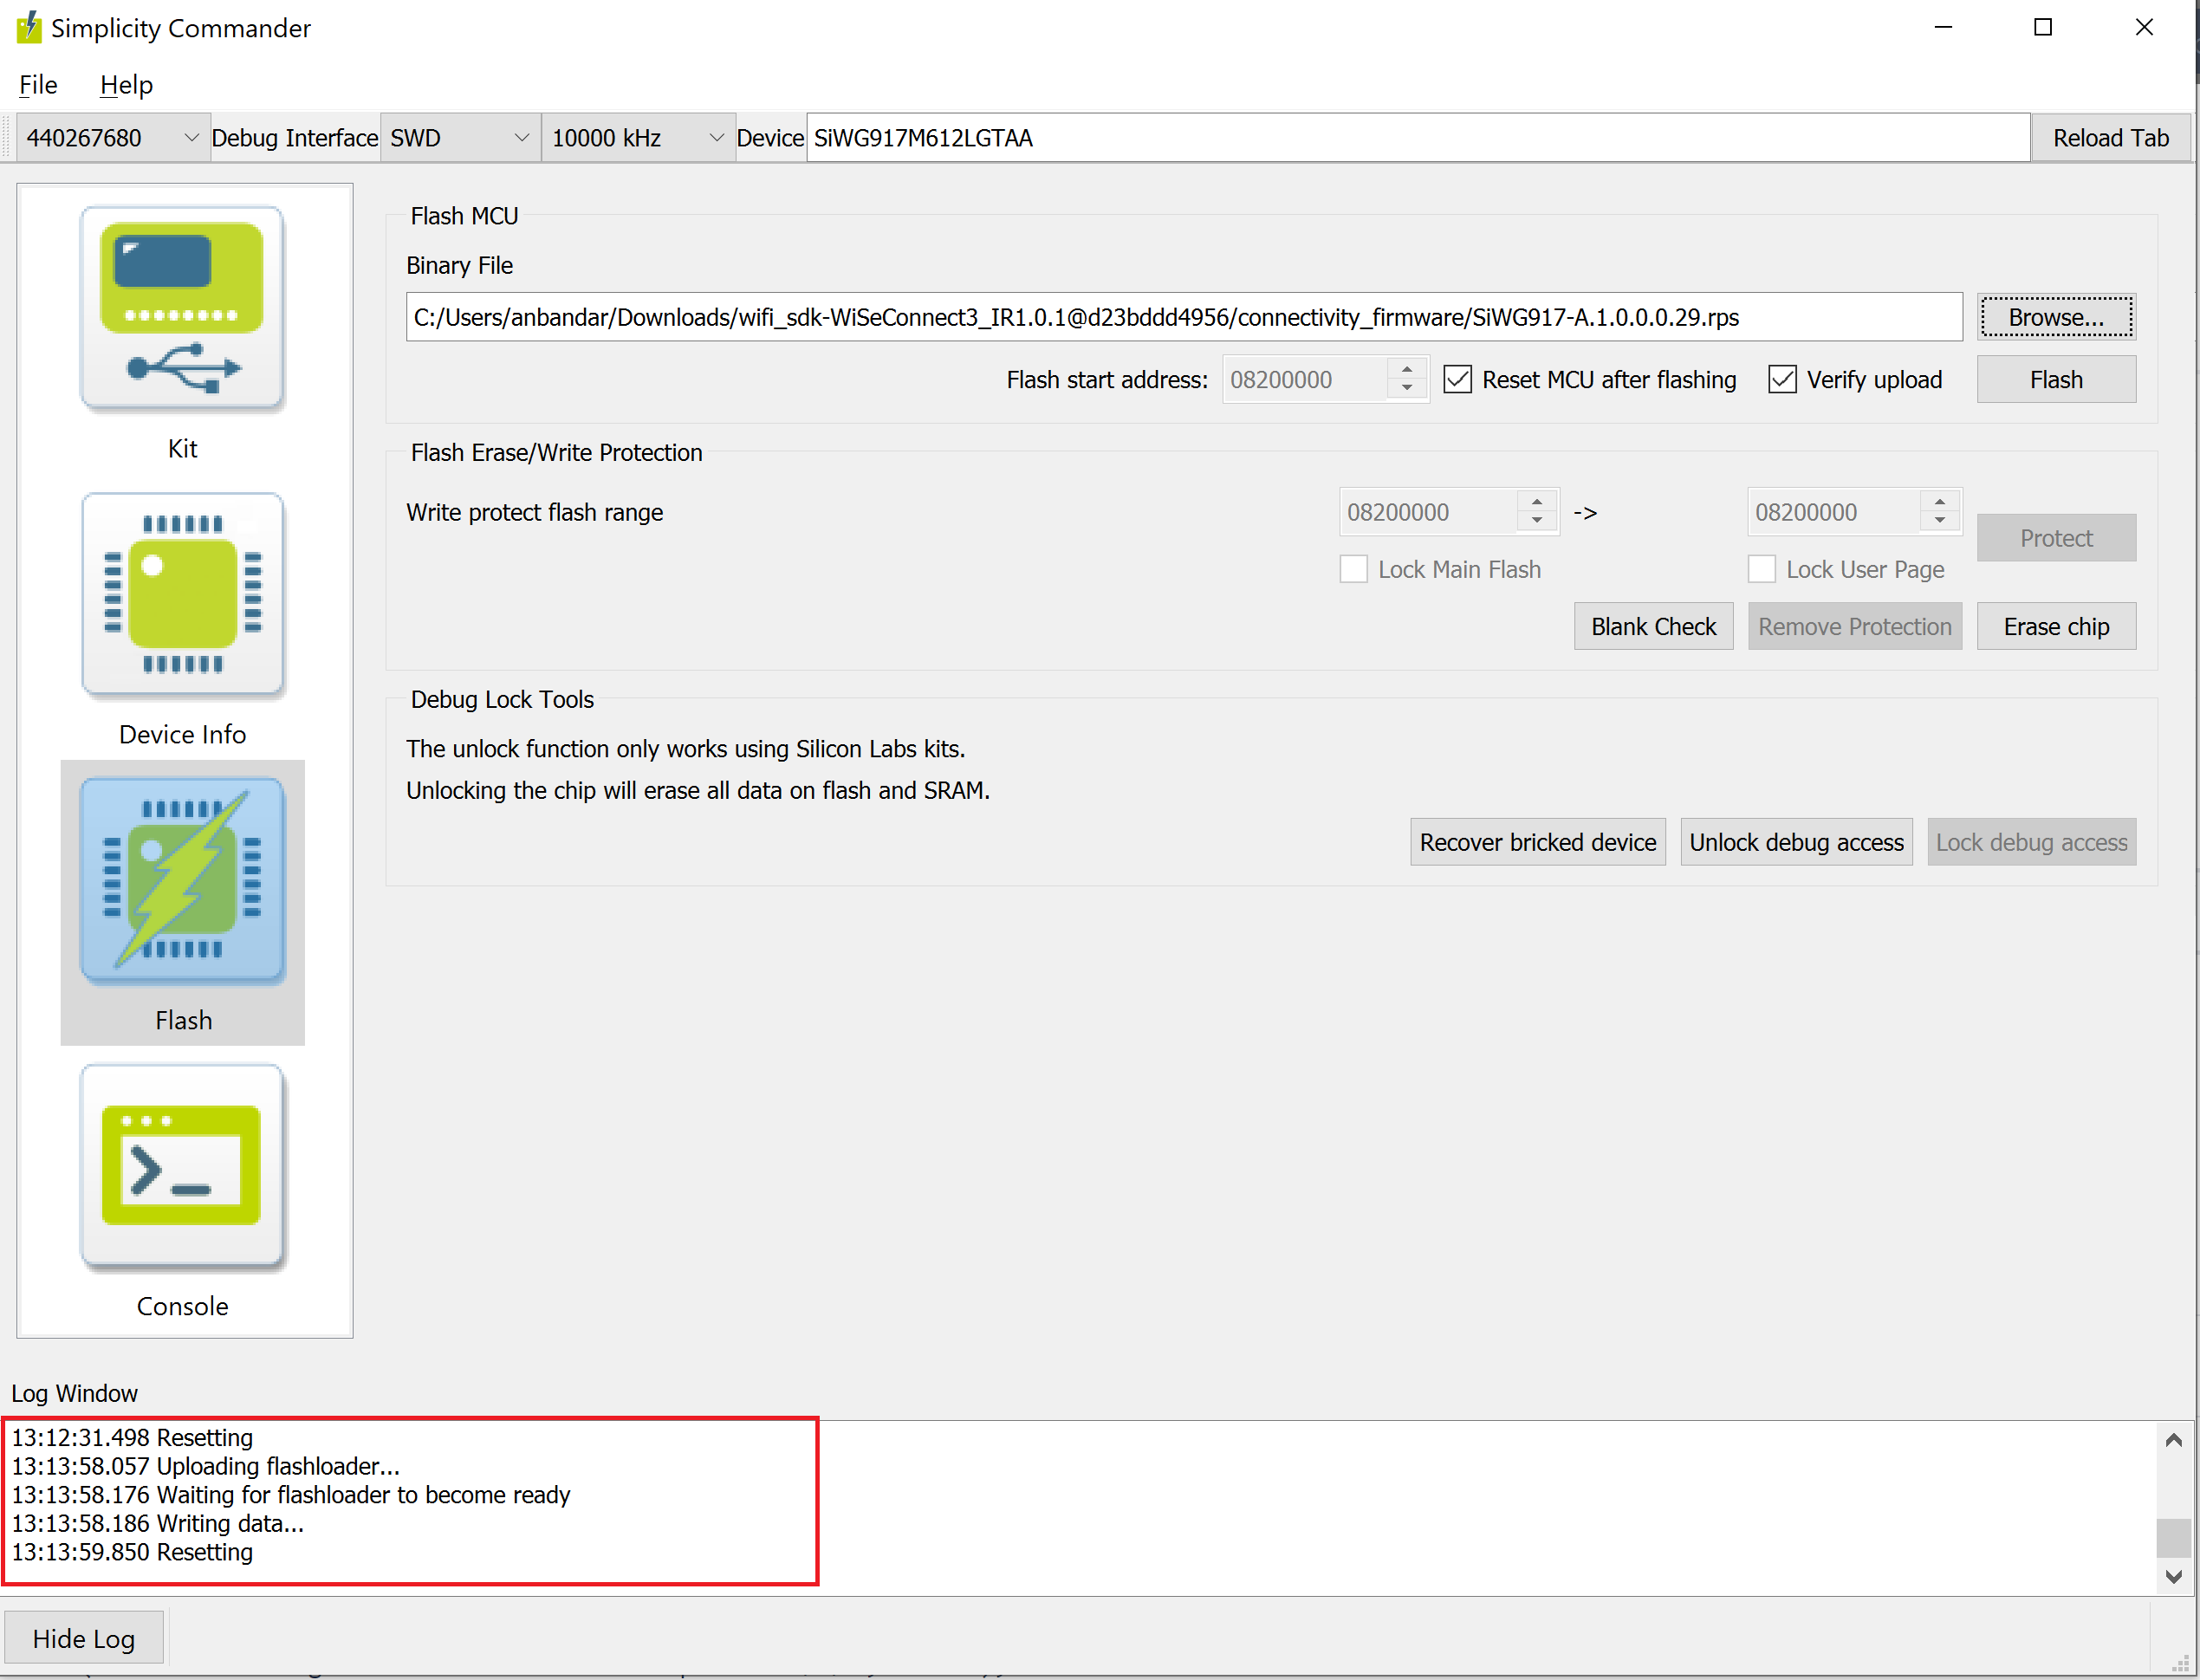
The firmware will be flashed and the Log Window will display a "Resetting" message.

Troubleshoot Firmware Update Failure#
If the firmware update fails, try the following:
Toggle the power switch towards AEM (Advanced Energy Monitoring) on the WSTK board.
Perform the following steps and try the firmware update again
Toggle the ISP switch towards ISP on the radio board.
Press the RESET button on the WSTK board.
Toggle the ISP switch away from ISP on the radio board.
In the Flash MCU page, click Erase chip.
The flash will be erased.
Retry the firmware upgrade with Simplicity Commander.
Upgrade Connectivity Firmware using Kermit#
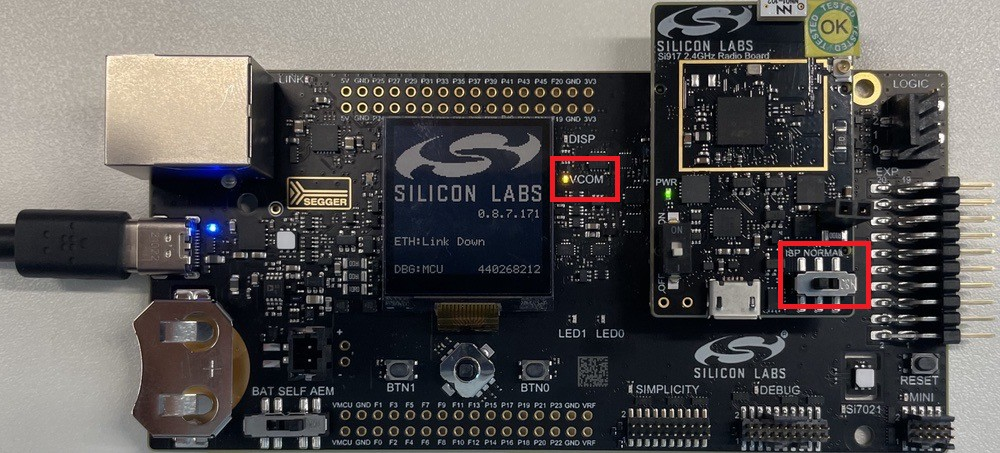
Toggle the ISP switch towards ISP on the radio board.
The VCOM light will glow on the WSTK board.

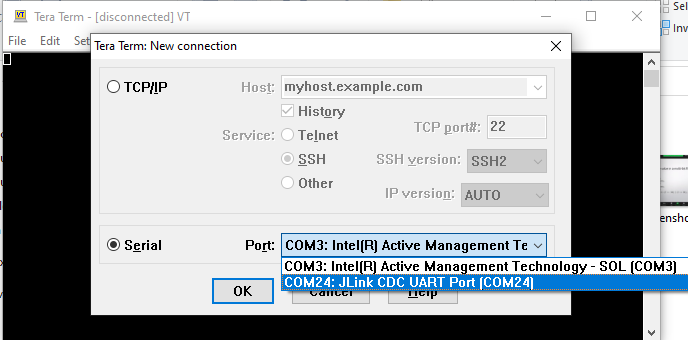
Open Tera Term for Windows and check for connected USB devices.
Select the JLink CDC UART port.

Modify the Baud Rate to 921600 to increase the connection speed.
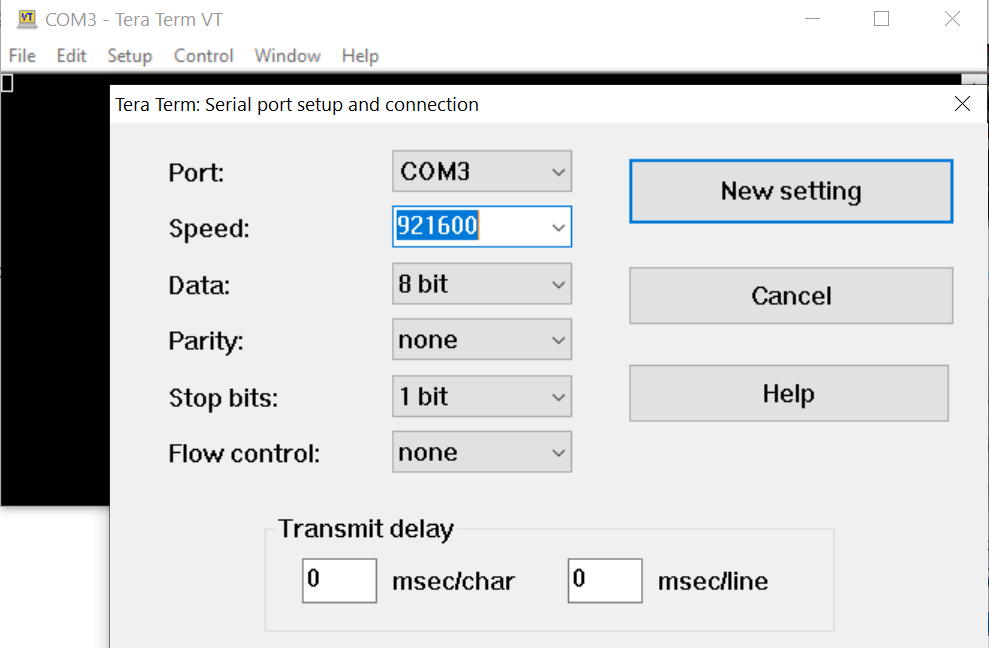

Open the terminal application.
Press CTRL+| to receive the boot message.
Press U to display the boot menu.
Enter B+0 to update the wireless firmware.
From the menu, select File > Transfer > Kermit > Send.
Browse for the firmware file and select it.
The firmware will be flashed and you will see an "Upgradation Successful" message.
An Enter Next Command prompt will appear.
Enter 1.
The device will start up the flashed image and you will see a "Loading..." message.
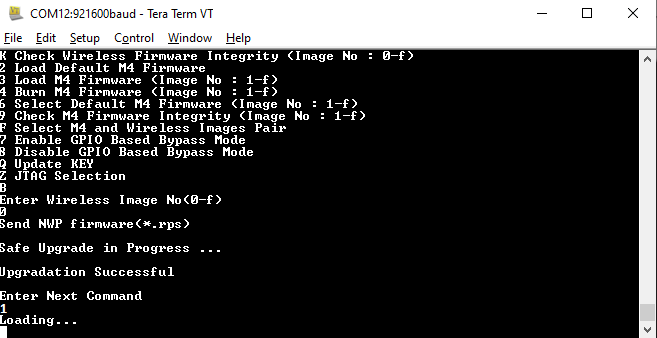

Toggle the ISP switch away from ISP to allow applications to be flashed afterwards.
Create Project#
Open Simplicity Studio and connect the SiWx91x to your computer.
Go to the Debug Adapters section.
Select your radio board from the displayed list.
If you are using a Dual Flash radio board, select your radio board from the My Products page.
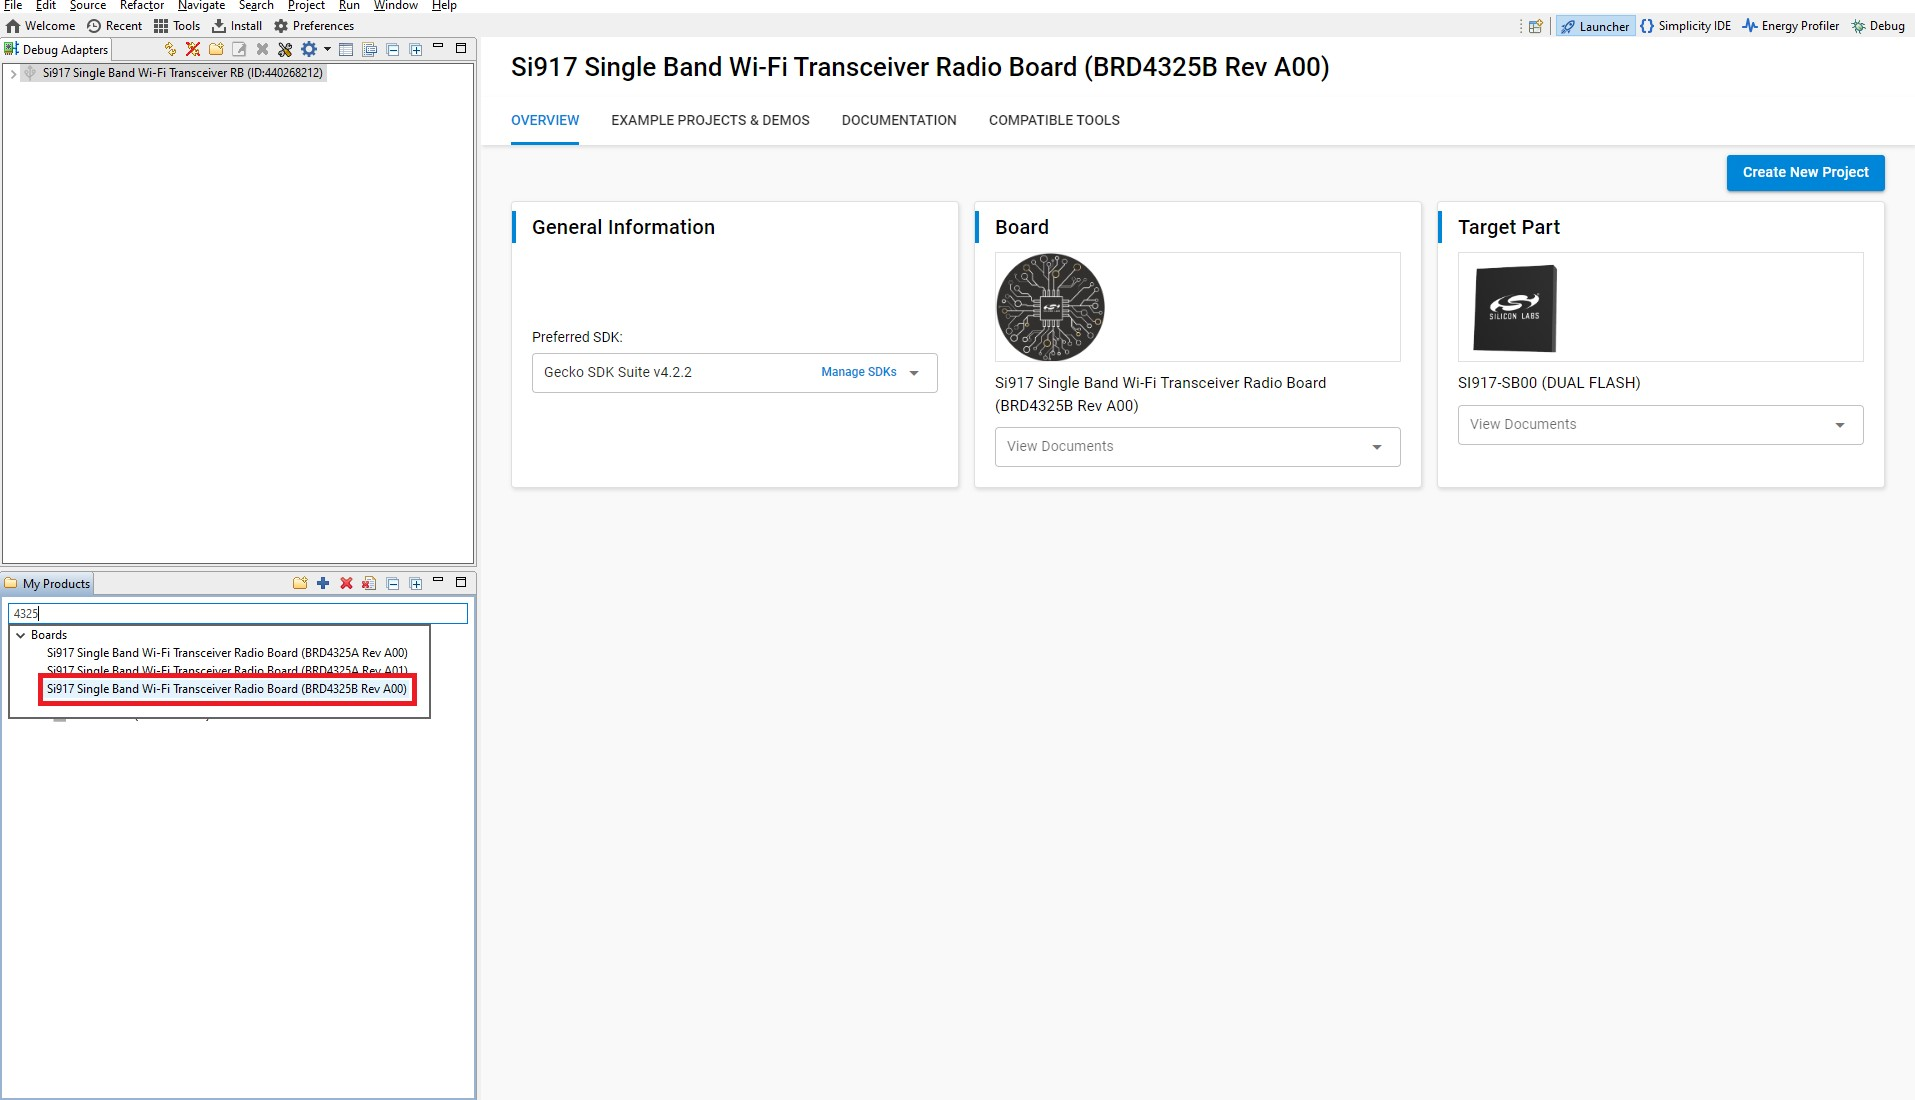

The Launcher page will display the selected radio board's details.
Click Overview.
Verify the following in the General Information section:
The Debug Mode is Onboard Device (MCU).
The Preferred SDK is the version you selected earlier.
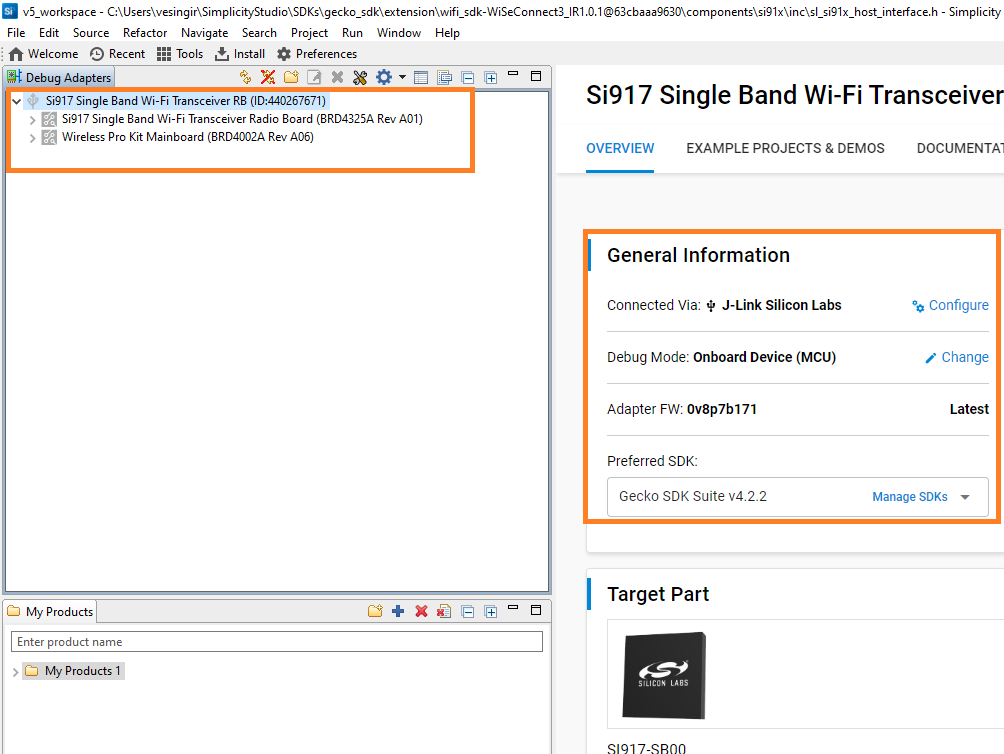

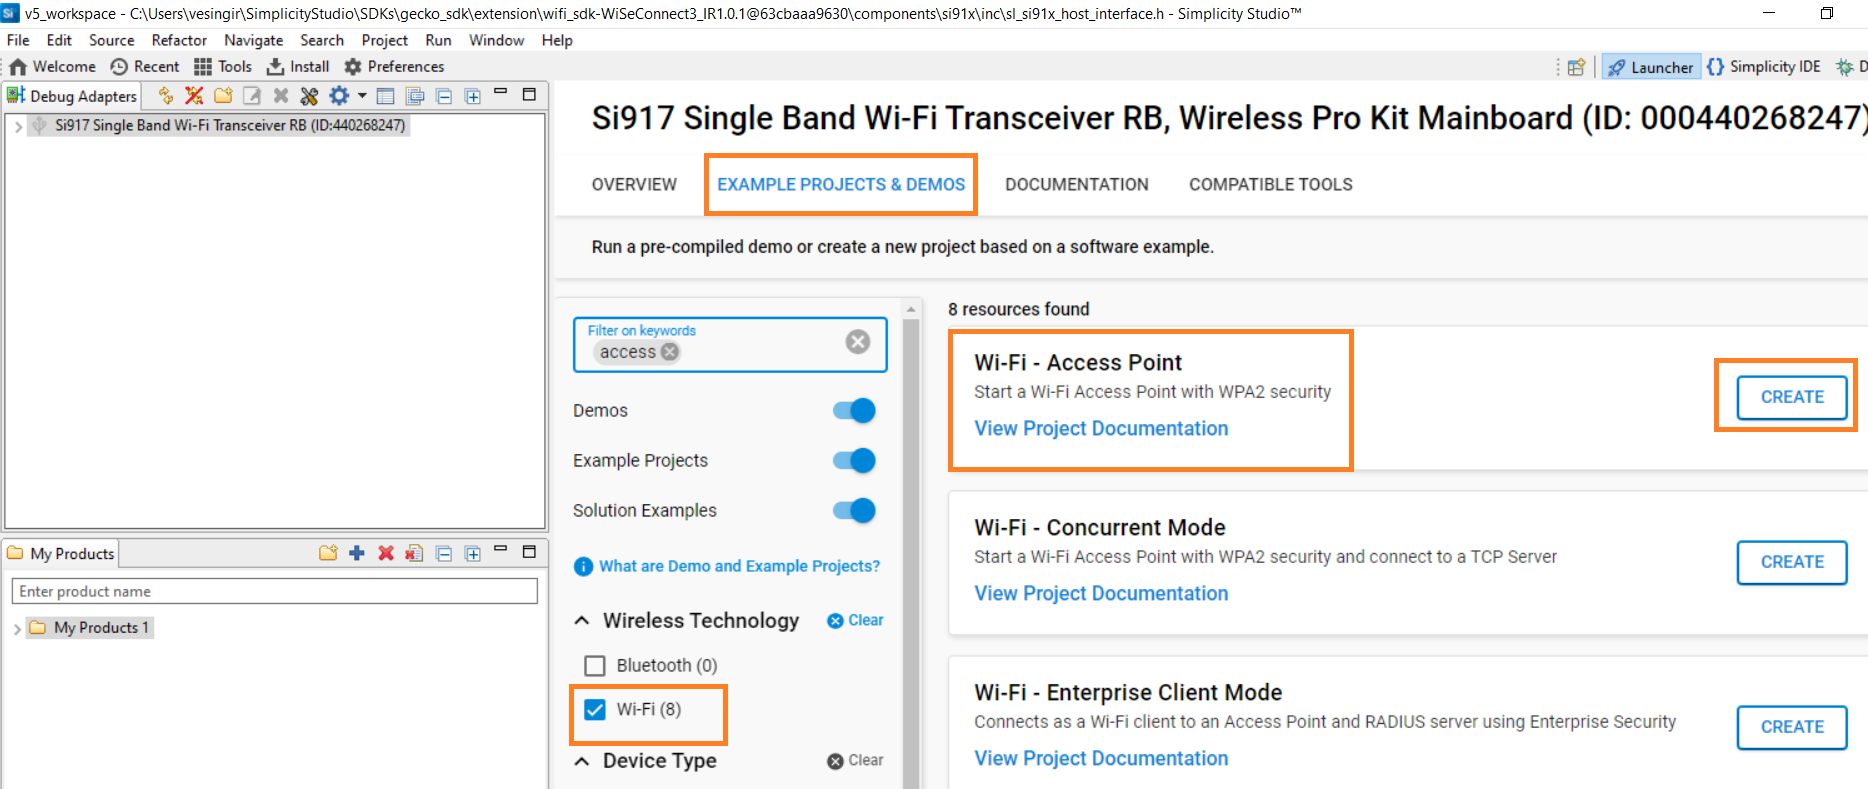
Go to the EXAMPLE PROJECTS AND DEMOS section.
Locate the example you want and click CREATE.

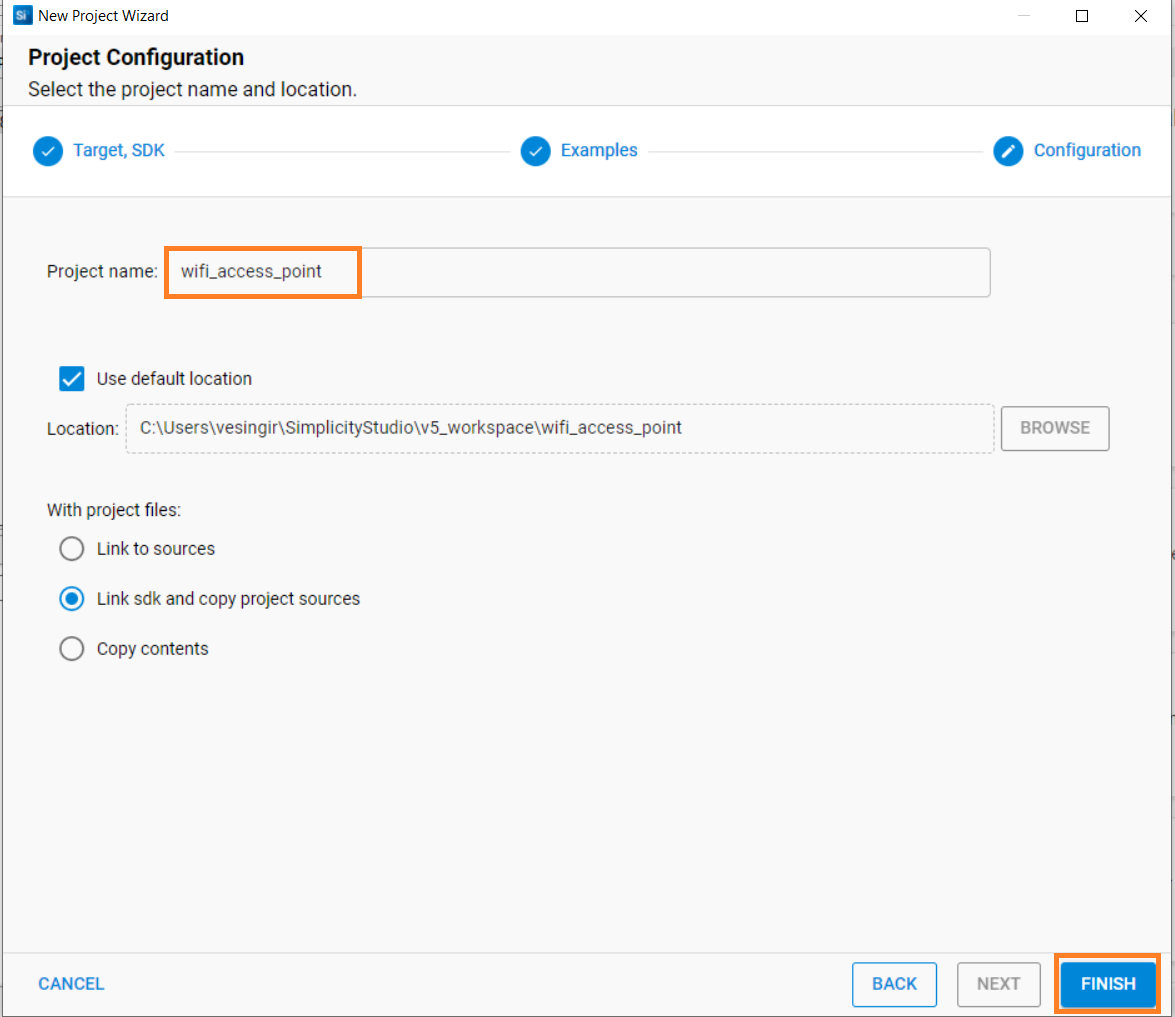
In the New Project Wizard window, click Finish.

Build Application#
Open Simplicity Studio.
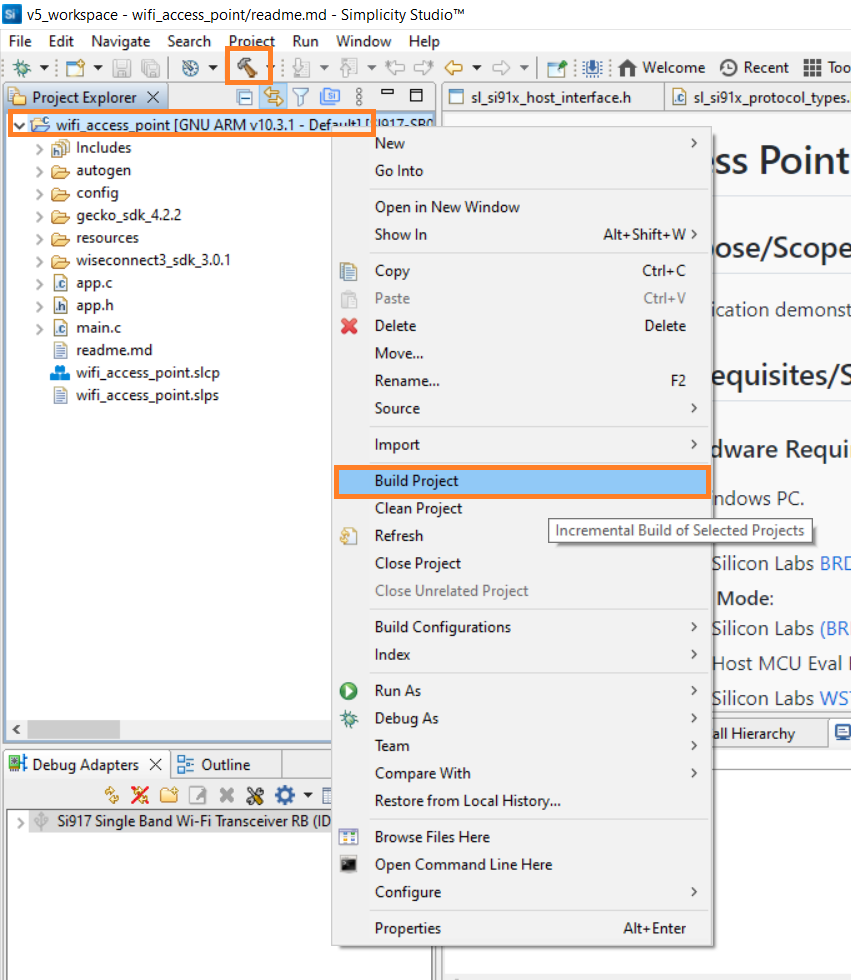
In the Project Explorer pane, right-click the project name and select Build Project.
You may also click the Build button with a hammer icon on the Simplicity IDE perspective toolbar.

Flash Application#
From the menu, select Run As > 1 Silicon Labs ARM Program.


The application binary will be flashed on the radio board and the application will start running.
Troubleshoot Application Flash Failure#
The application may fail to flash if Studio failed to detect your radio board. See the troubleshooting for board detection failure section.
Configure GDB Debugger#
Note: Application debugging currently does not work. This is a known issue and the following is the workaround for it.
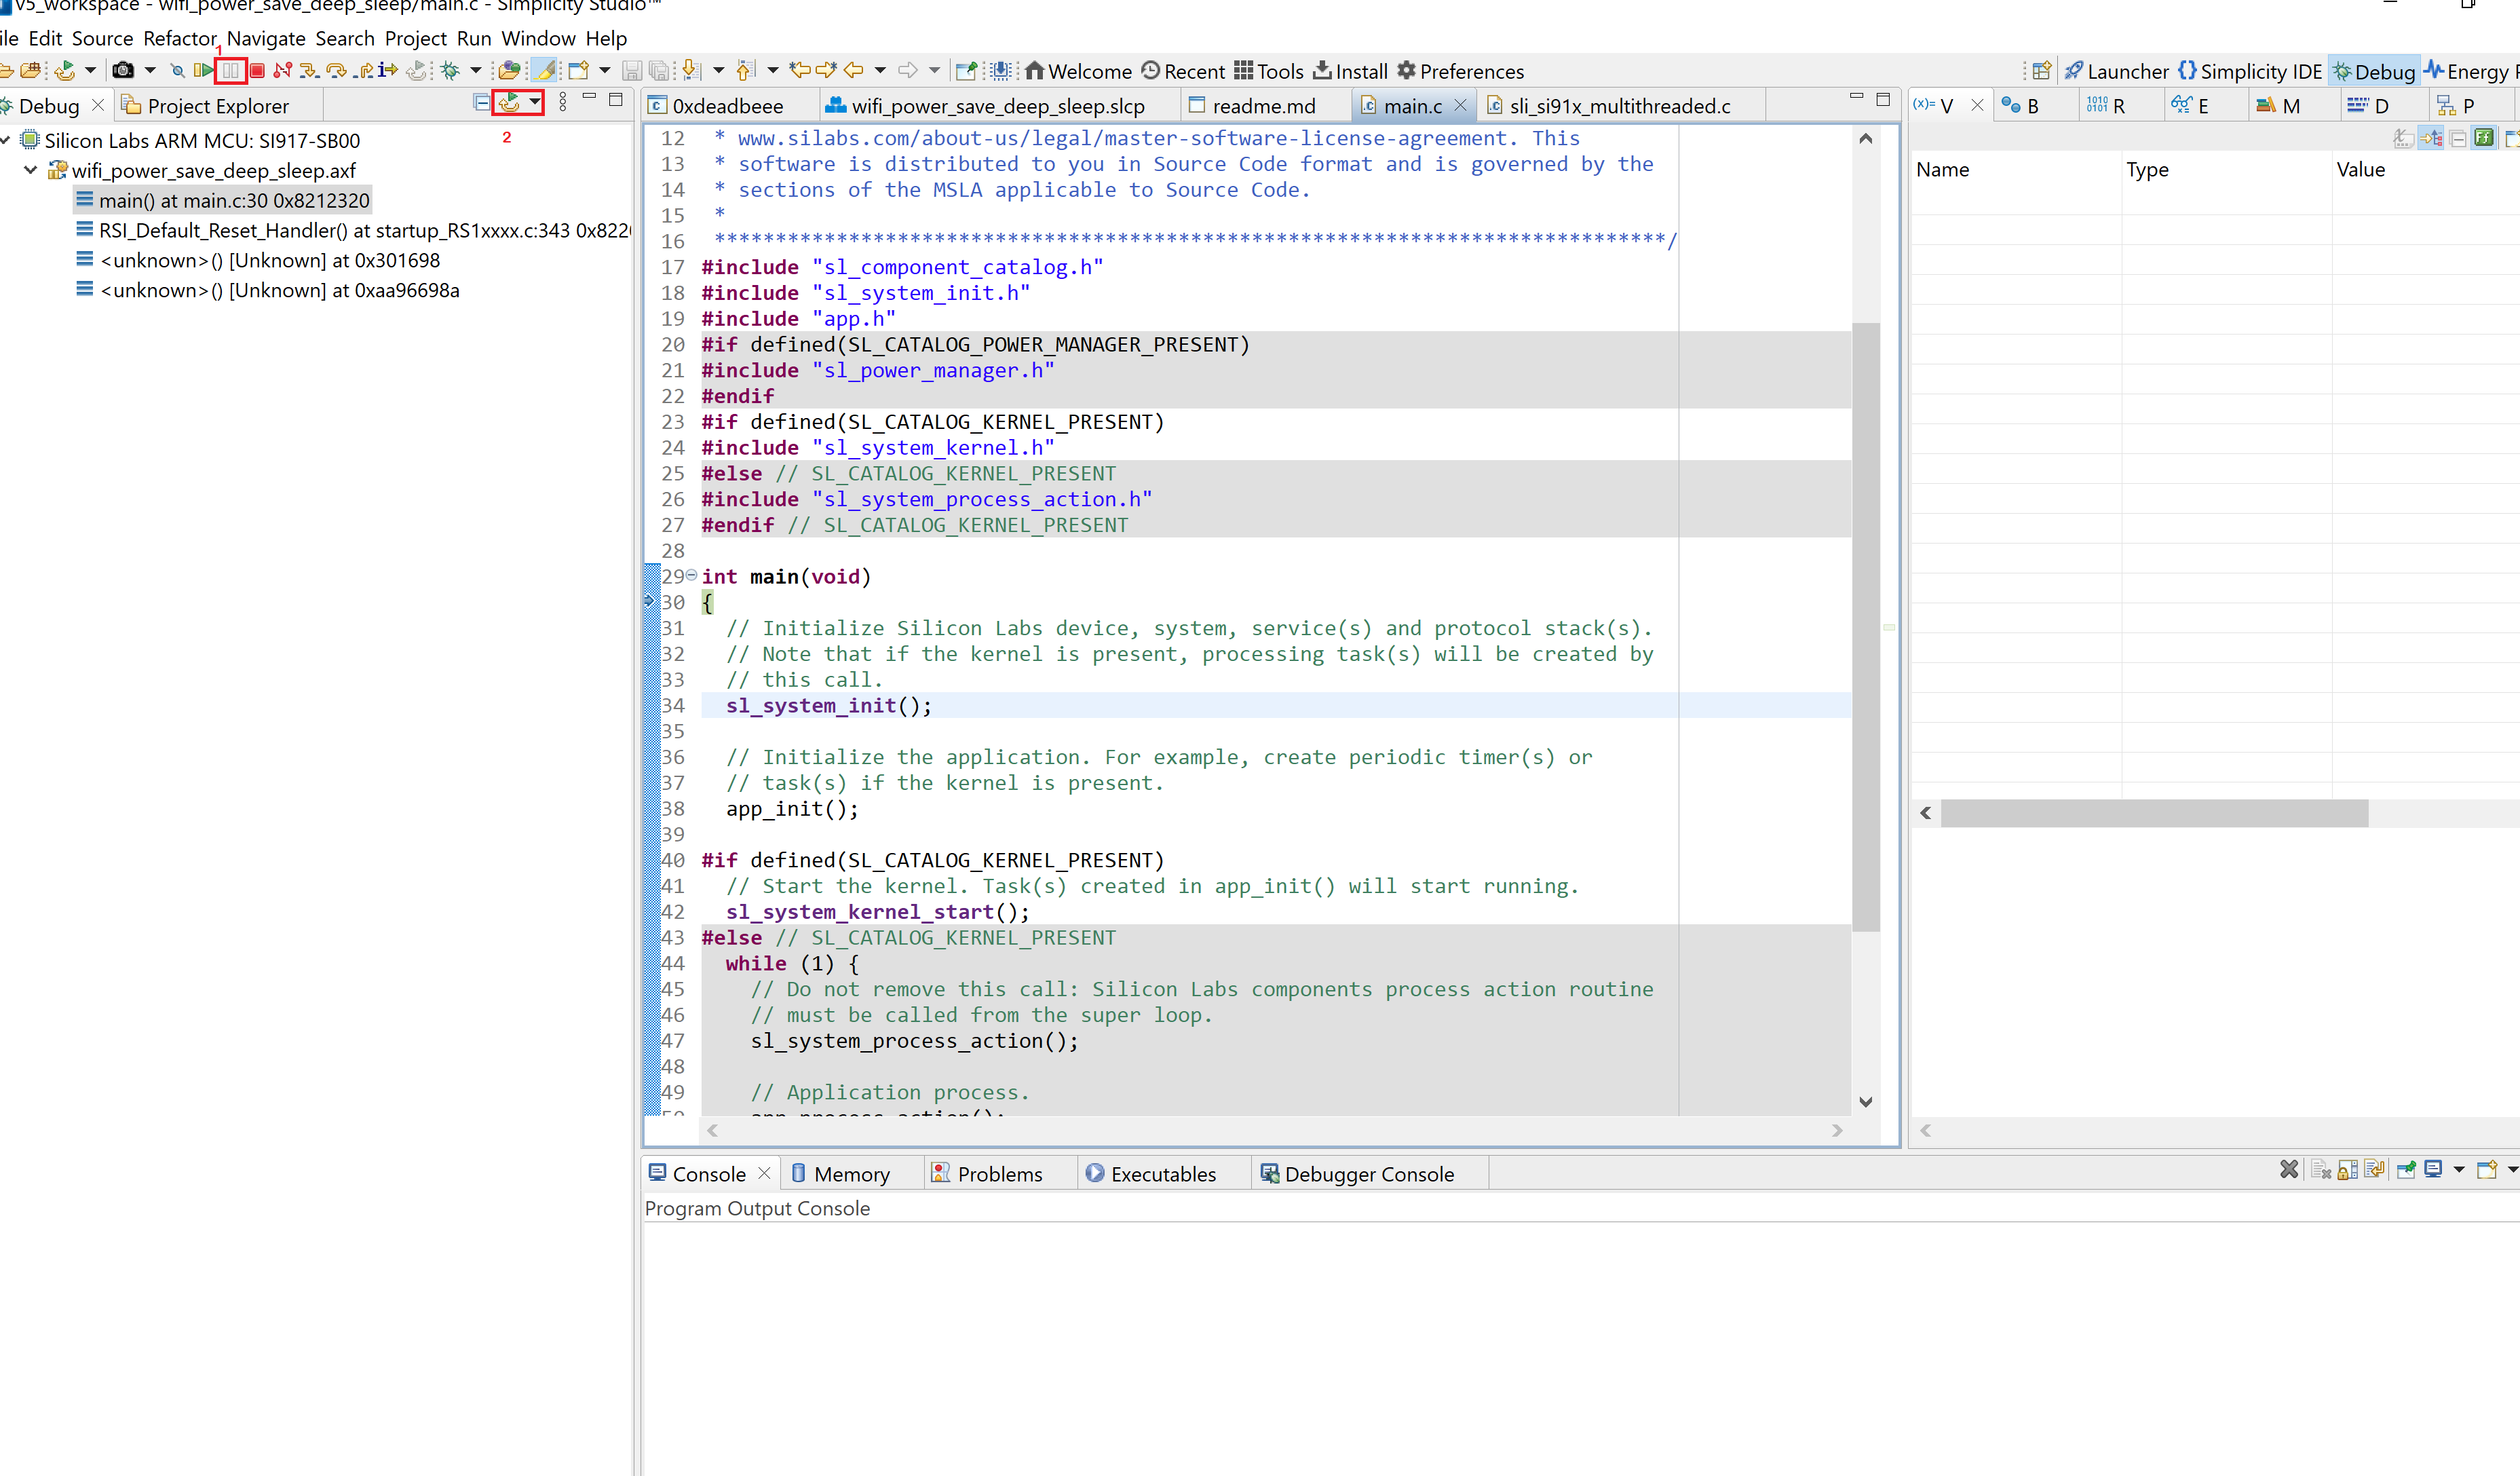
From the Simplicity Studio menu, select Run > Debug As > 1 Silicon Labs ARM Program.
Studio will switch to debug mode and fail to halt execution at
main()as described in the debugging section.Close the Debug pane.
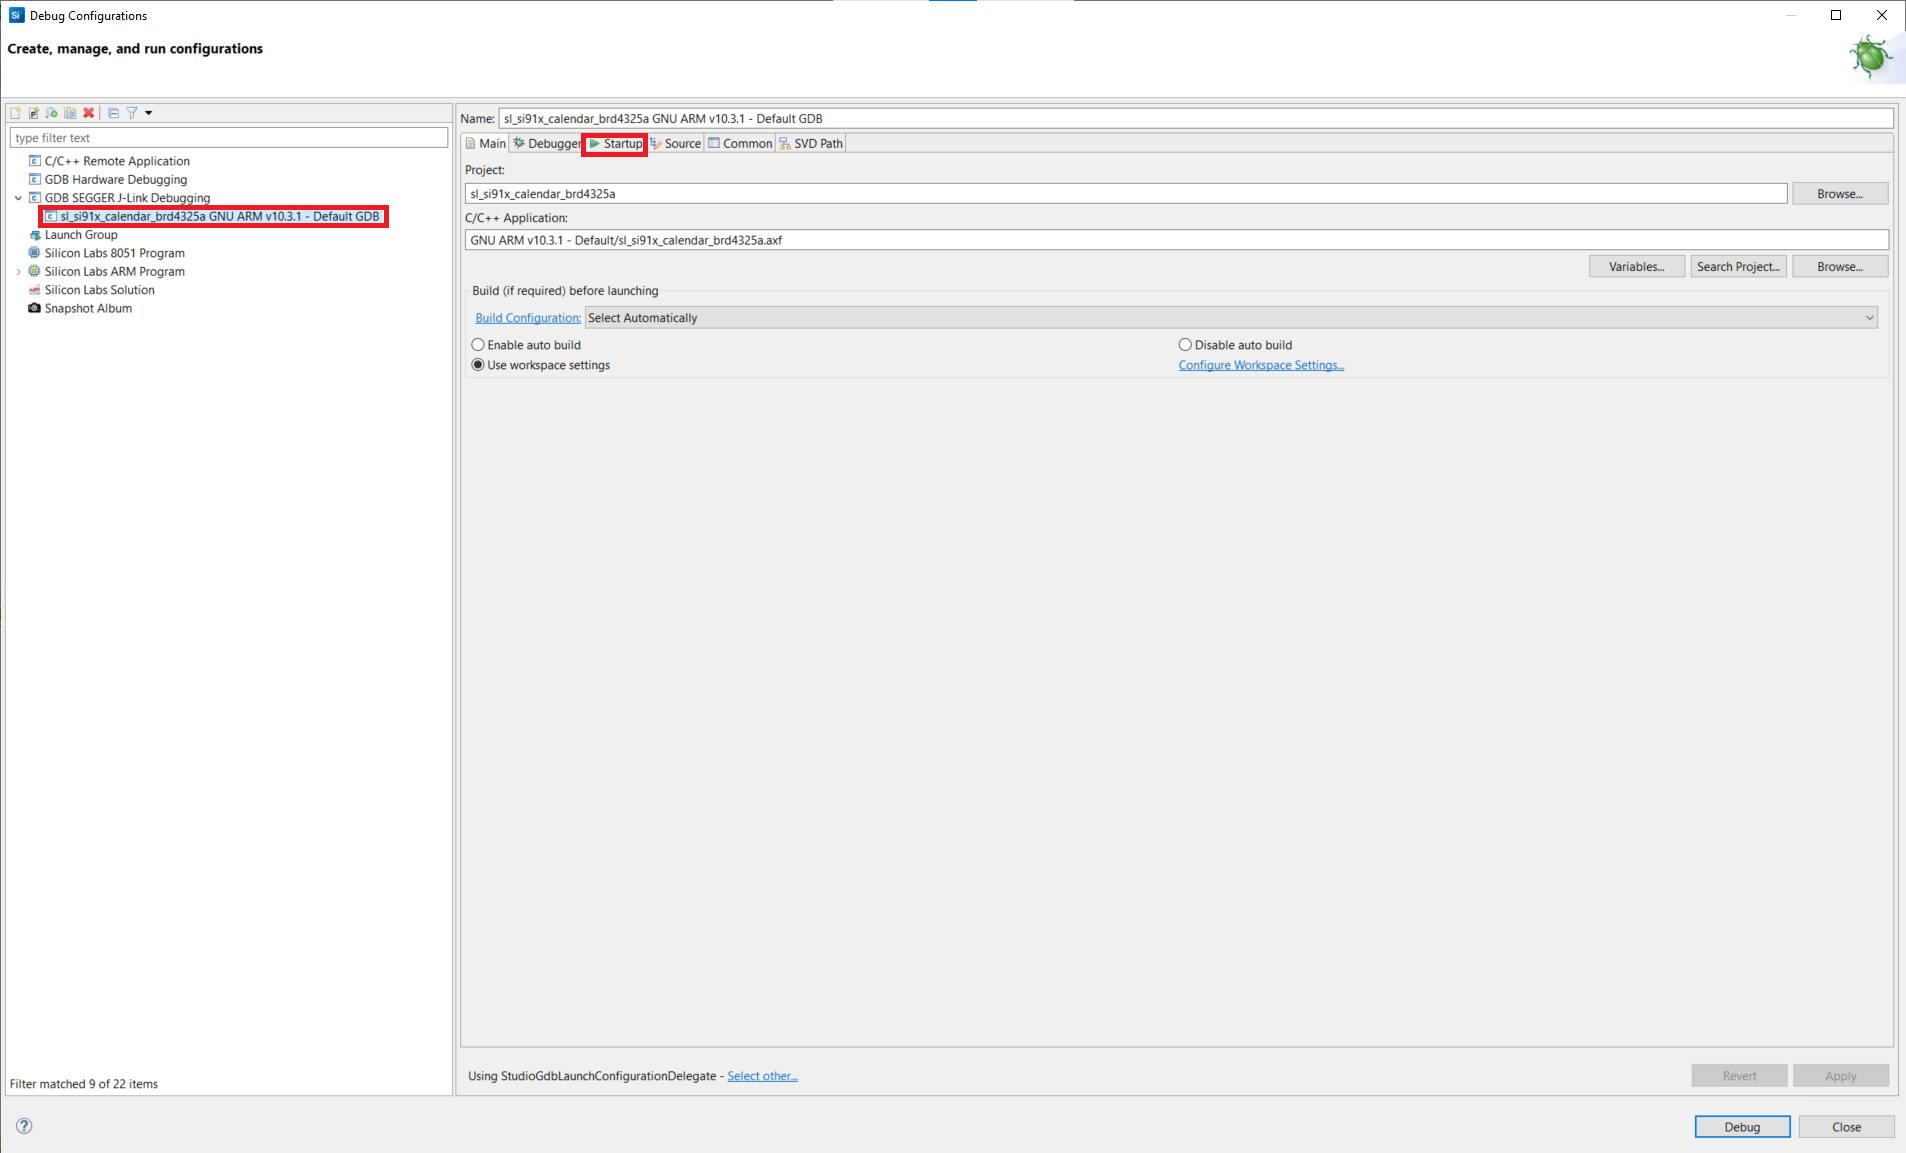
In the Project Explorer pane, right-click on your project name and select Debug As > Debug Configurations.
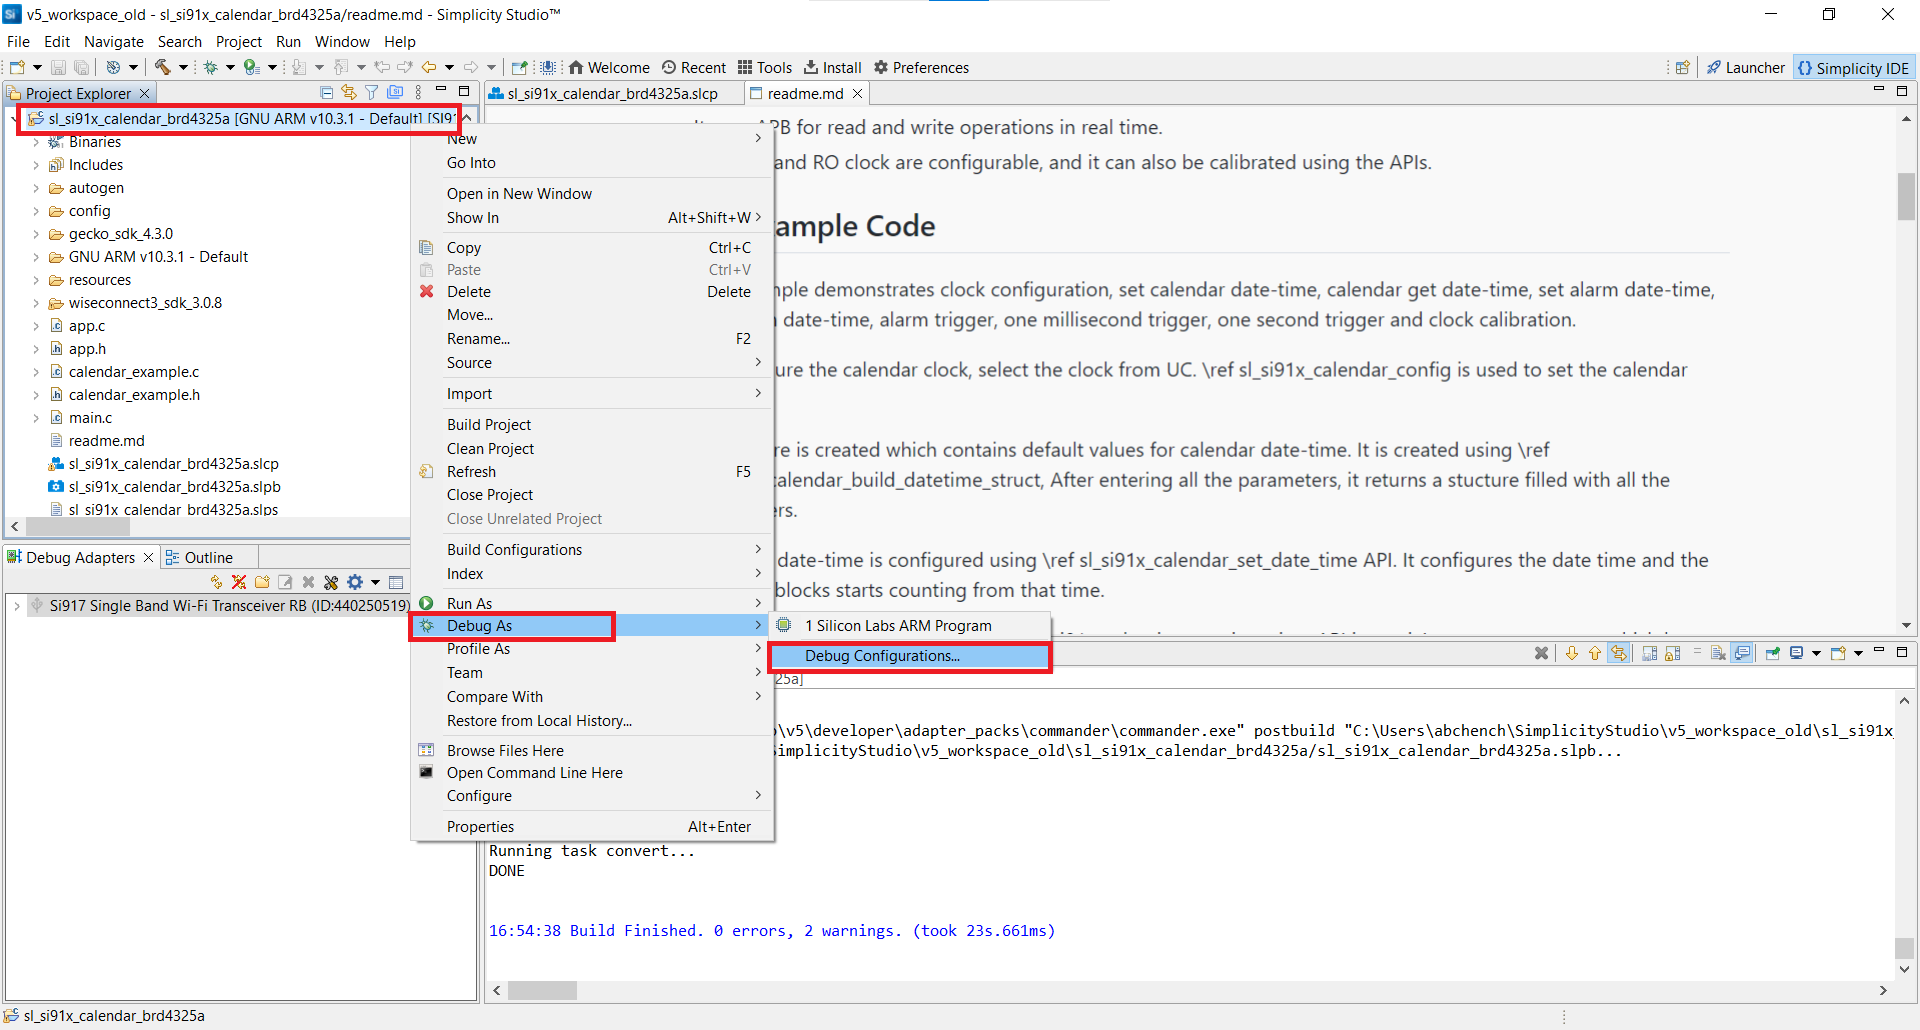

Select the Startup tab.

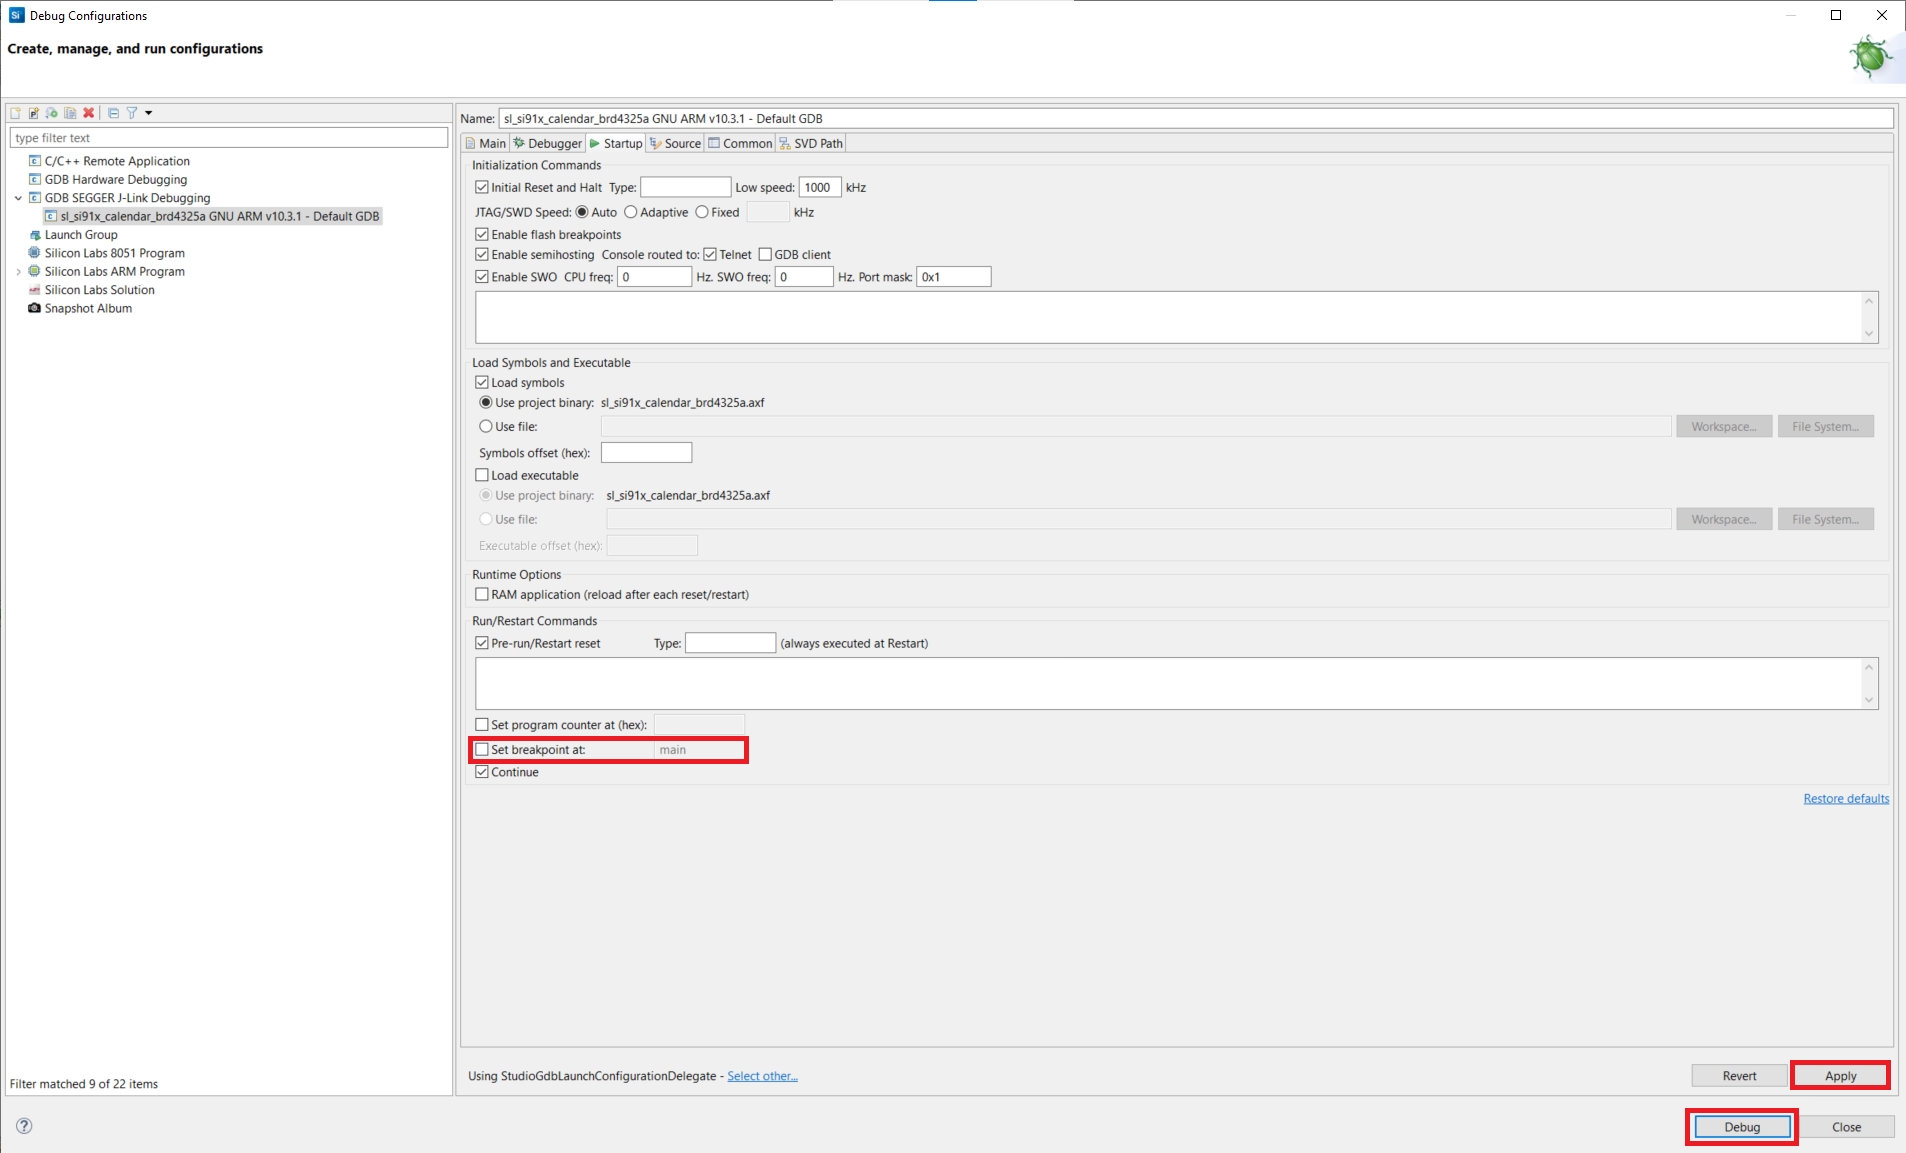
Unselect the Set breakpoint at field.
Click Apply and click Debug.

Debug Application#
From the Simplicity Studio menu, select Run > Debug As > 1 Silicon Labs ARM Program.
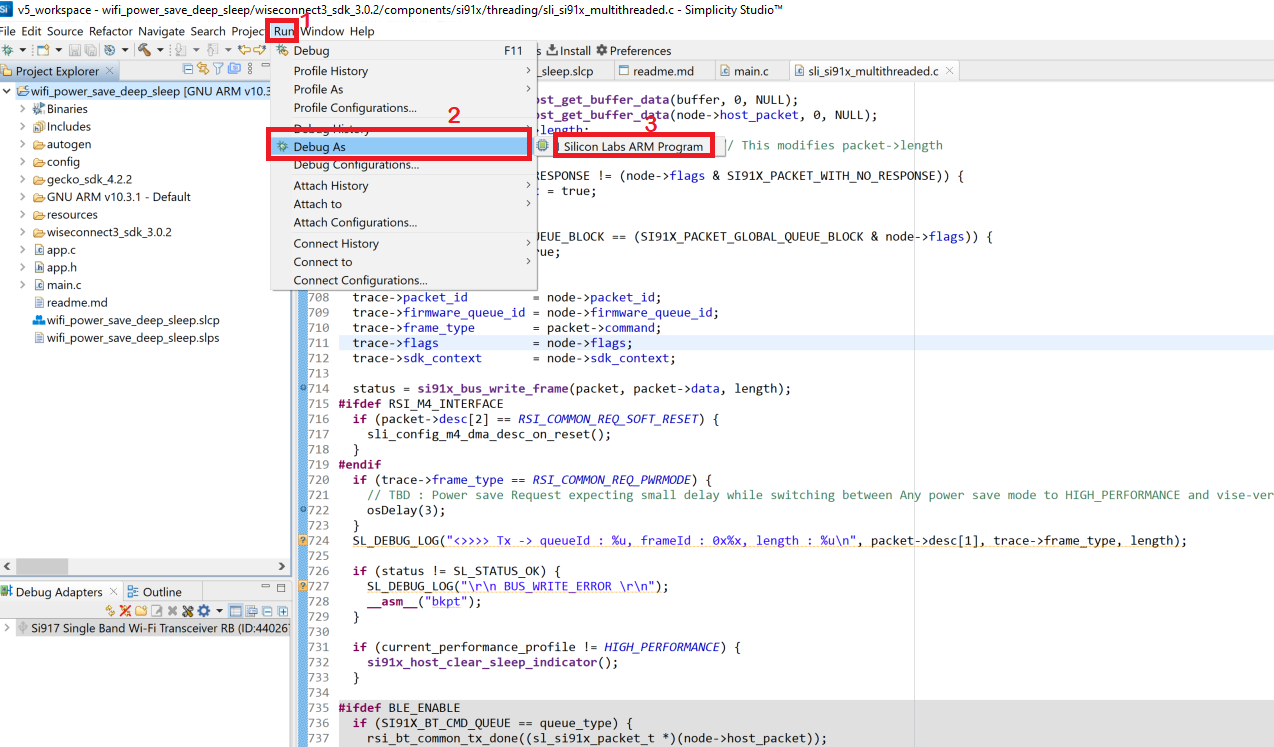

Studio will switch to debug mode and halt execution at the
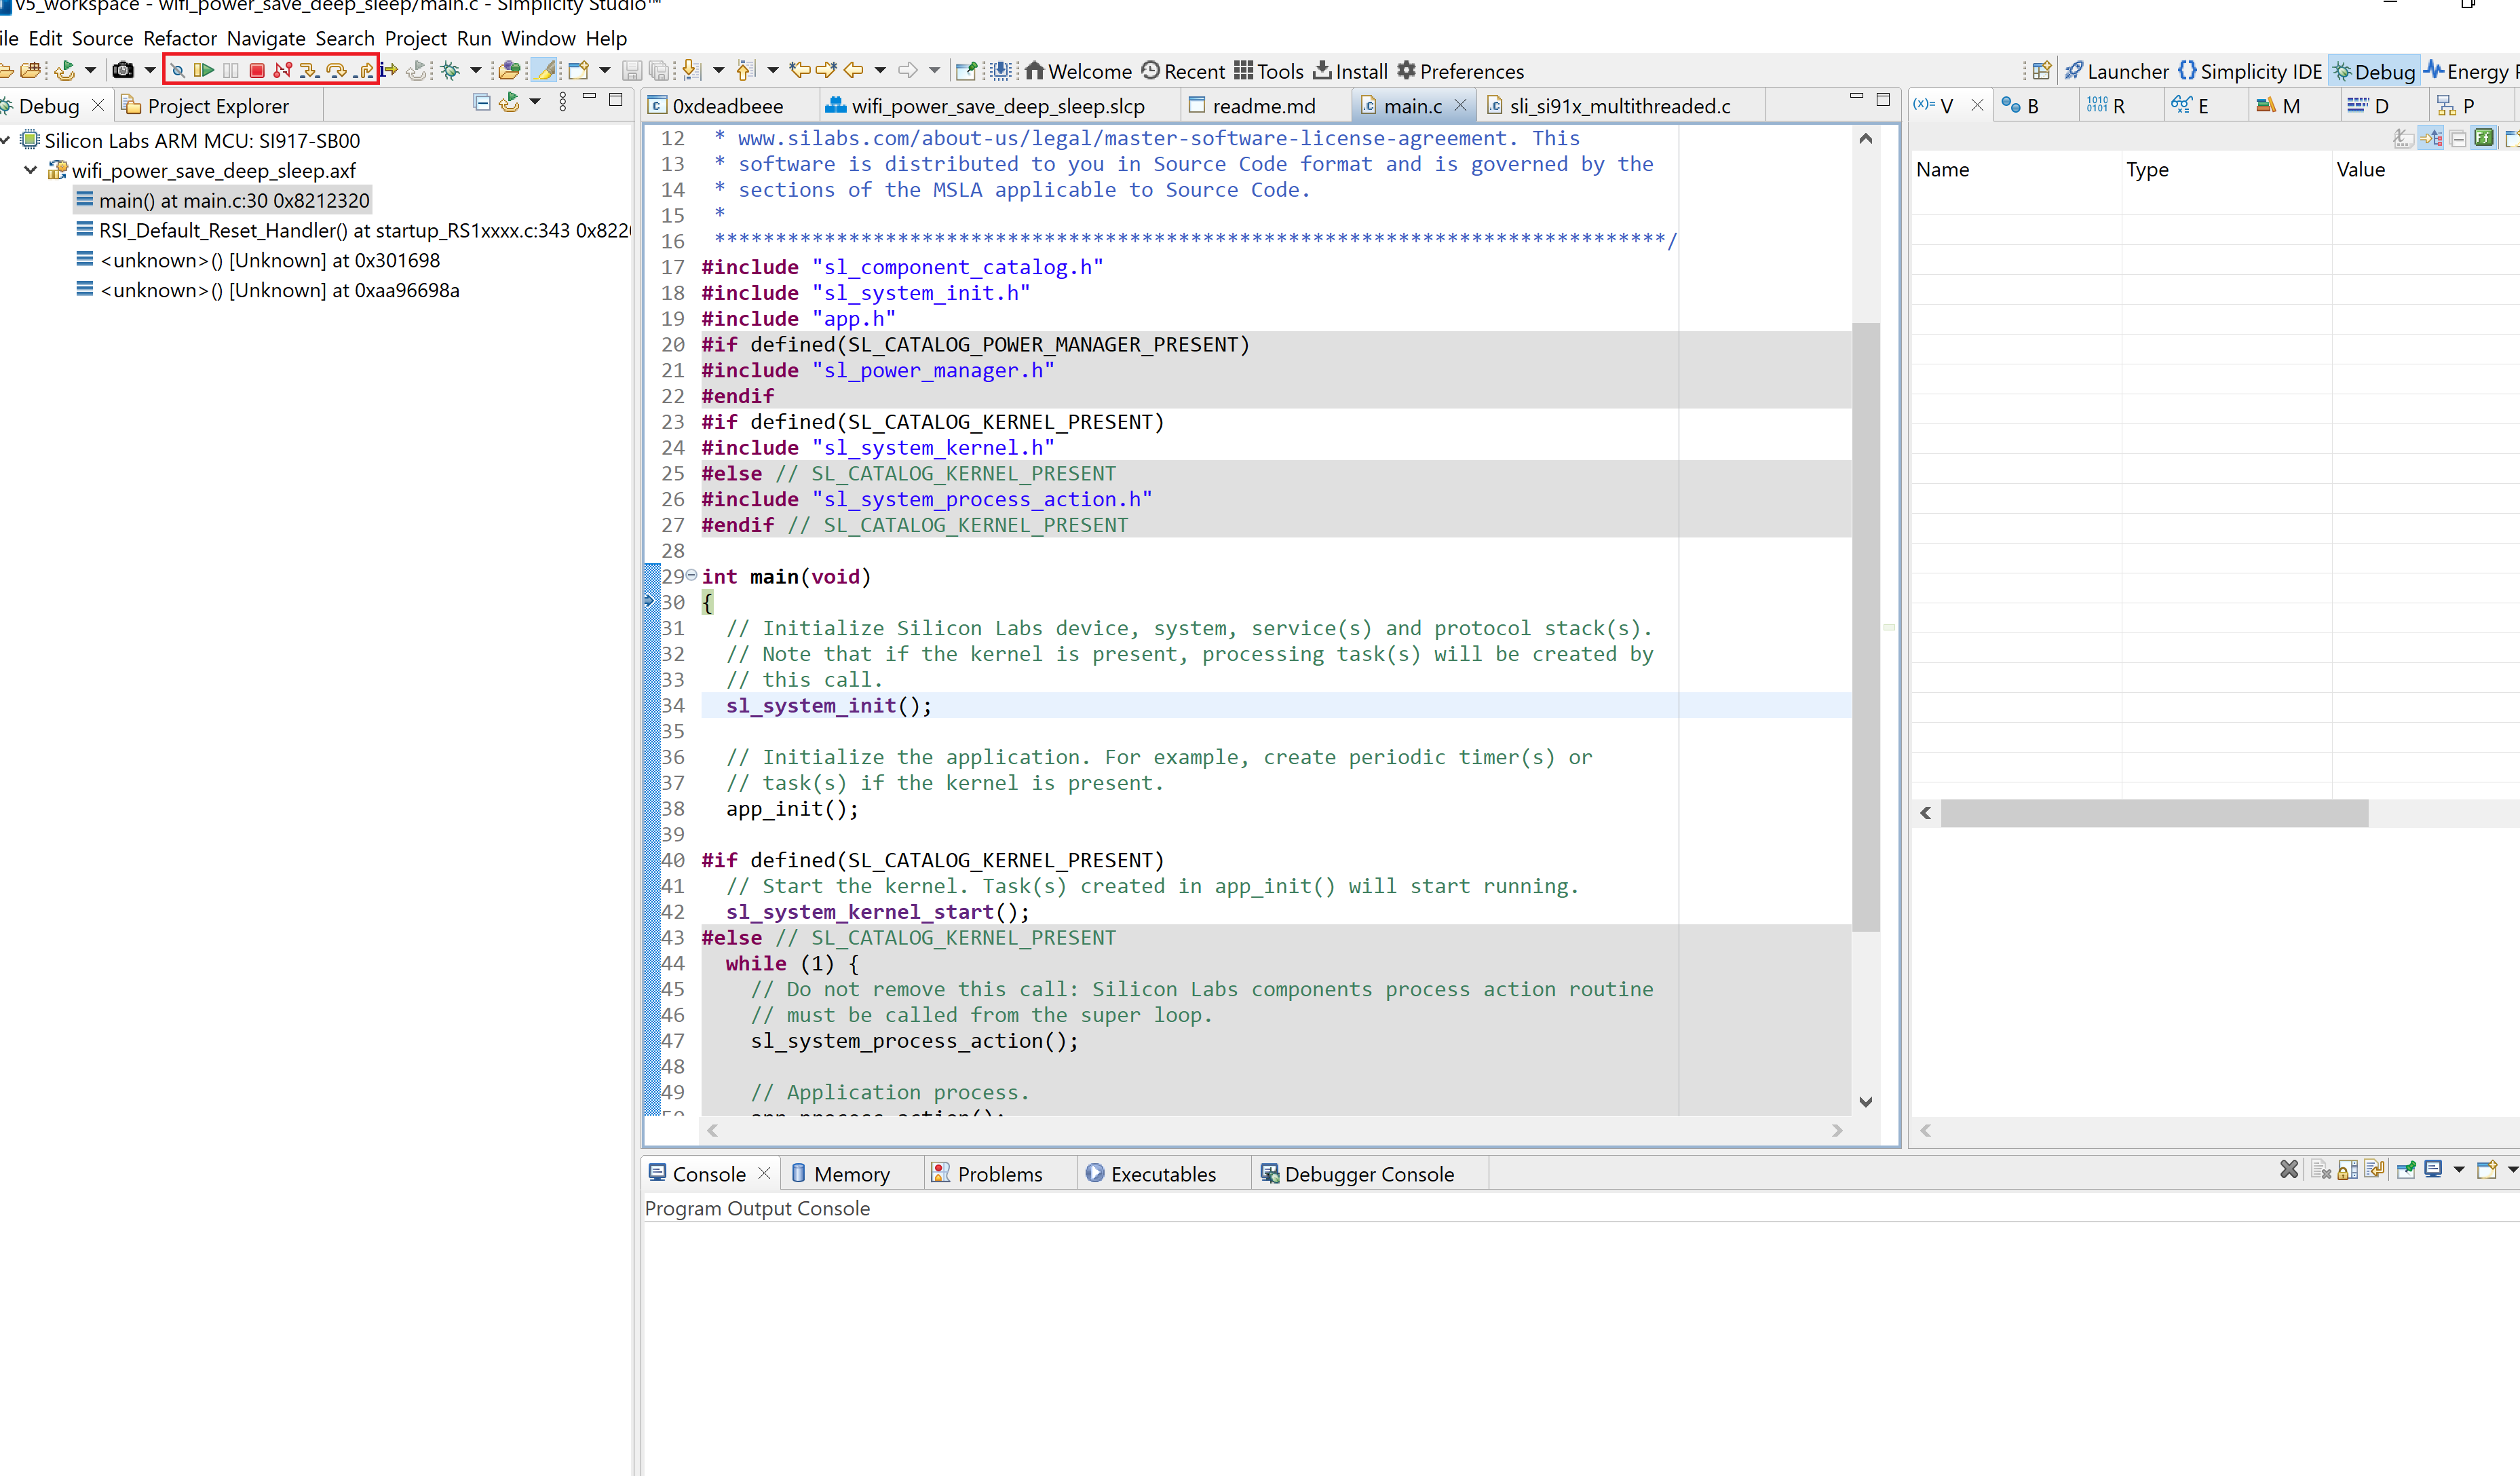
main()function in your application.Add a break point in the desired location of the code and click the Resume button (having an icon with a rectangular bar and play button).
Execution will halt at the break point.
Use the following debug functions to direct the execution of the code:
Step In button (having an icon with a arrow pointing between two dots).
Step Over button (having an icon with an arrow going over a dot).
Step Out button (having an icon with an arrow pointing out from between two dots).

View the standard output as needed. See the console input and output section.
Troubleshoot Application Debug Failure#
The application may fail to enter the debug mode due to one of the following reasons:
Unknown reason - try re-launching Simplicity Studio.
Studio failed to detect your radio board. See the troubleshooting for board detection failure section.
Studio failed to halt execution at the
main()function. Try the following steps:Click the Suspend button (having a pause button icon).
Click the Reset button (having an icon of a play button with an arrow underneath).

Console Input and Output#
Note: The SiWx91x radio boards do not currently support VCOM. This support is coming soon. In the meantime:
Console output (such as logs) from the device can be seen by performing a WSTK firmware upgrade.
Console input (such as commands) can be sent to the device using a USB-to-TTL Converter.
View Console Output#
Connect your WSTK board to your computer.
Open Simplicity Studio.
In the Debug Adapters pane, select your WSTK board.
The Adapter FW field shows your WSTK board's current firmware version, similar to 1v4pxxbyyyy, where xx is the major version number.
If the major version number is less than 10, click Update to 1.4.xx.yyyy.
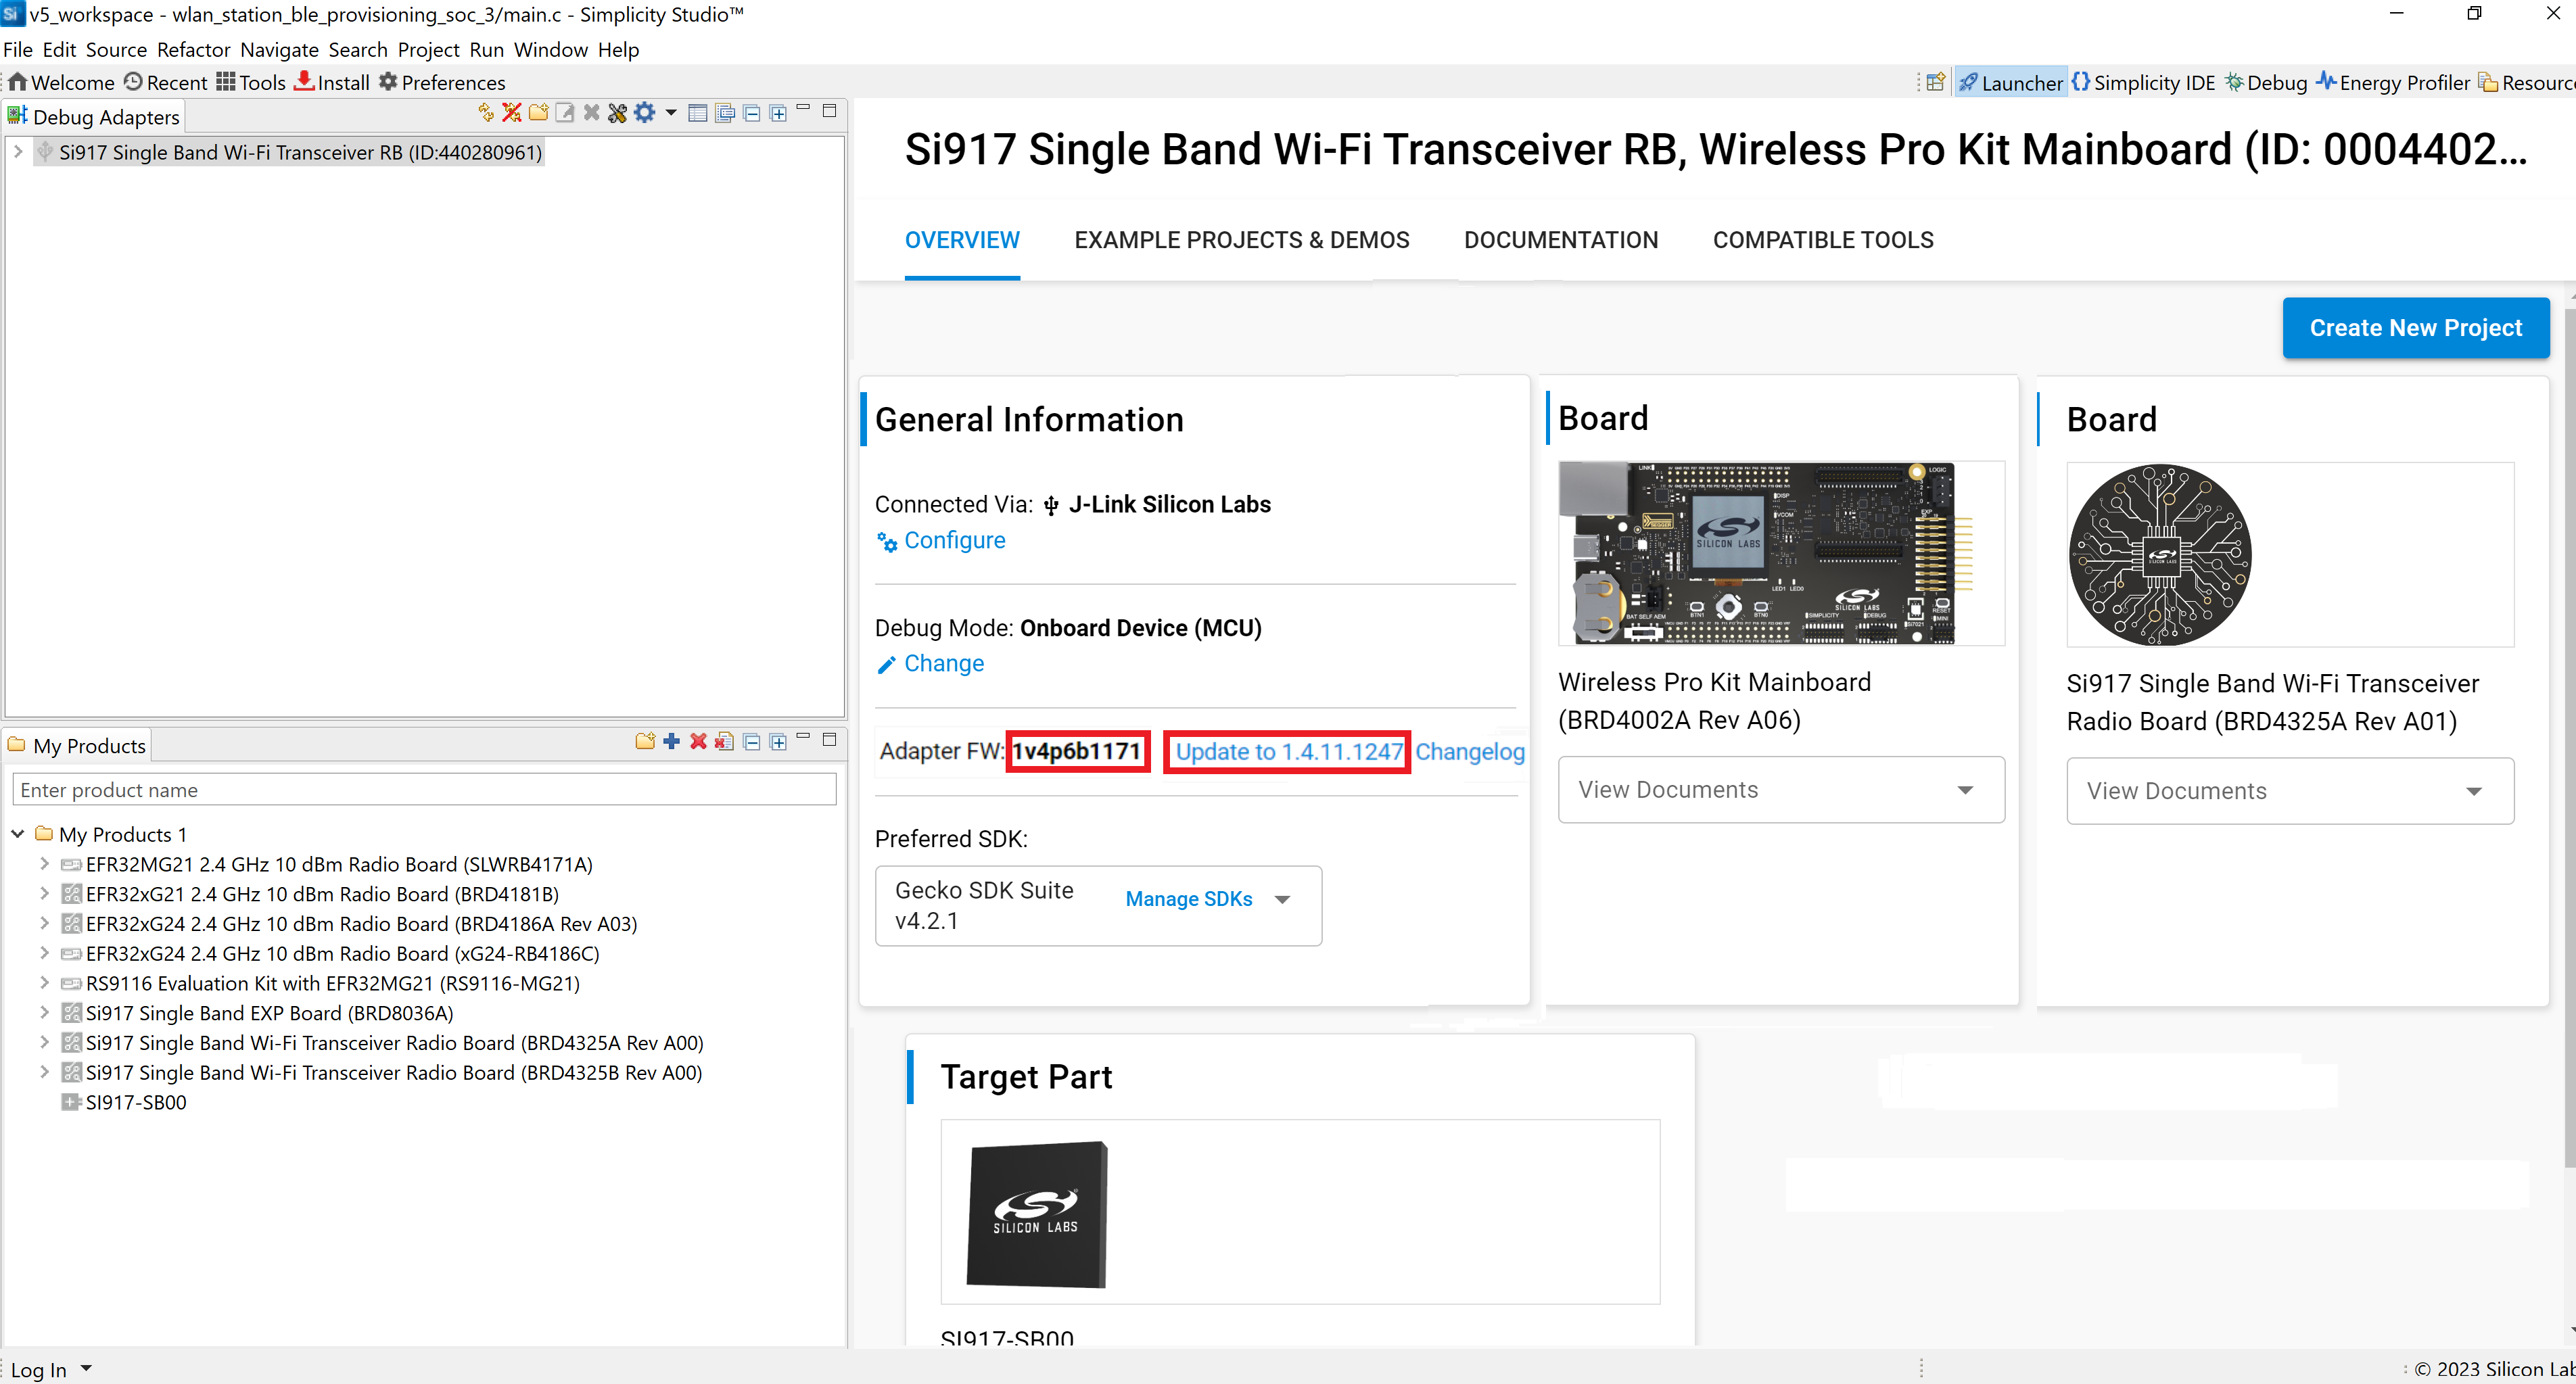

The firmware will be upgraded on your WSTK board.
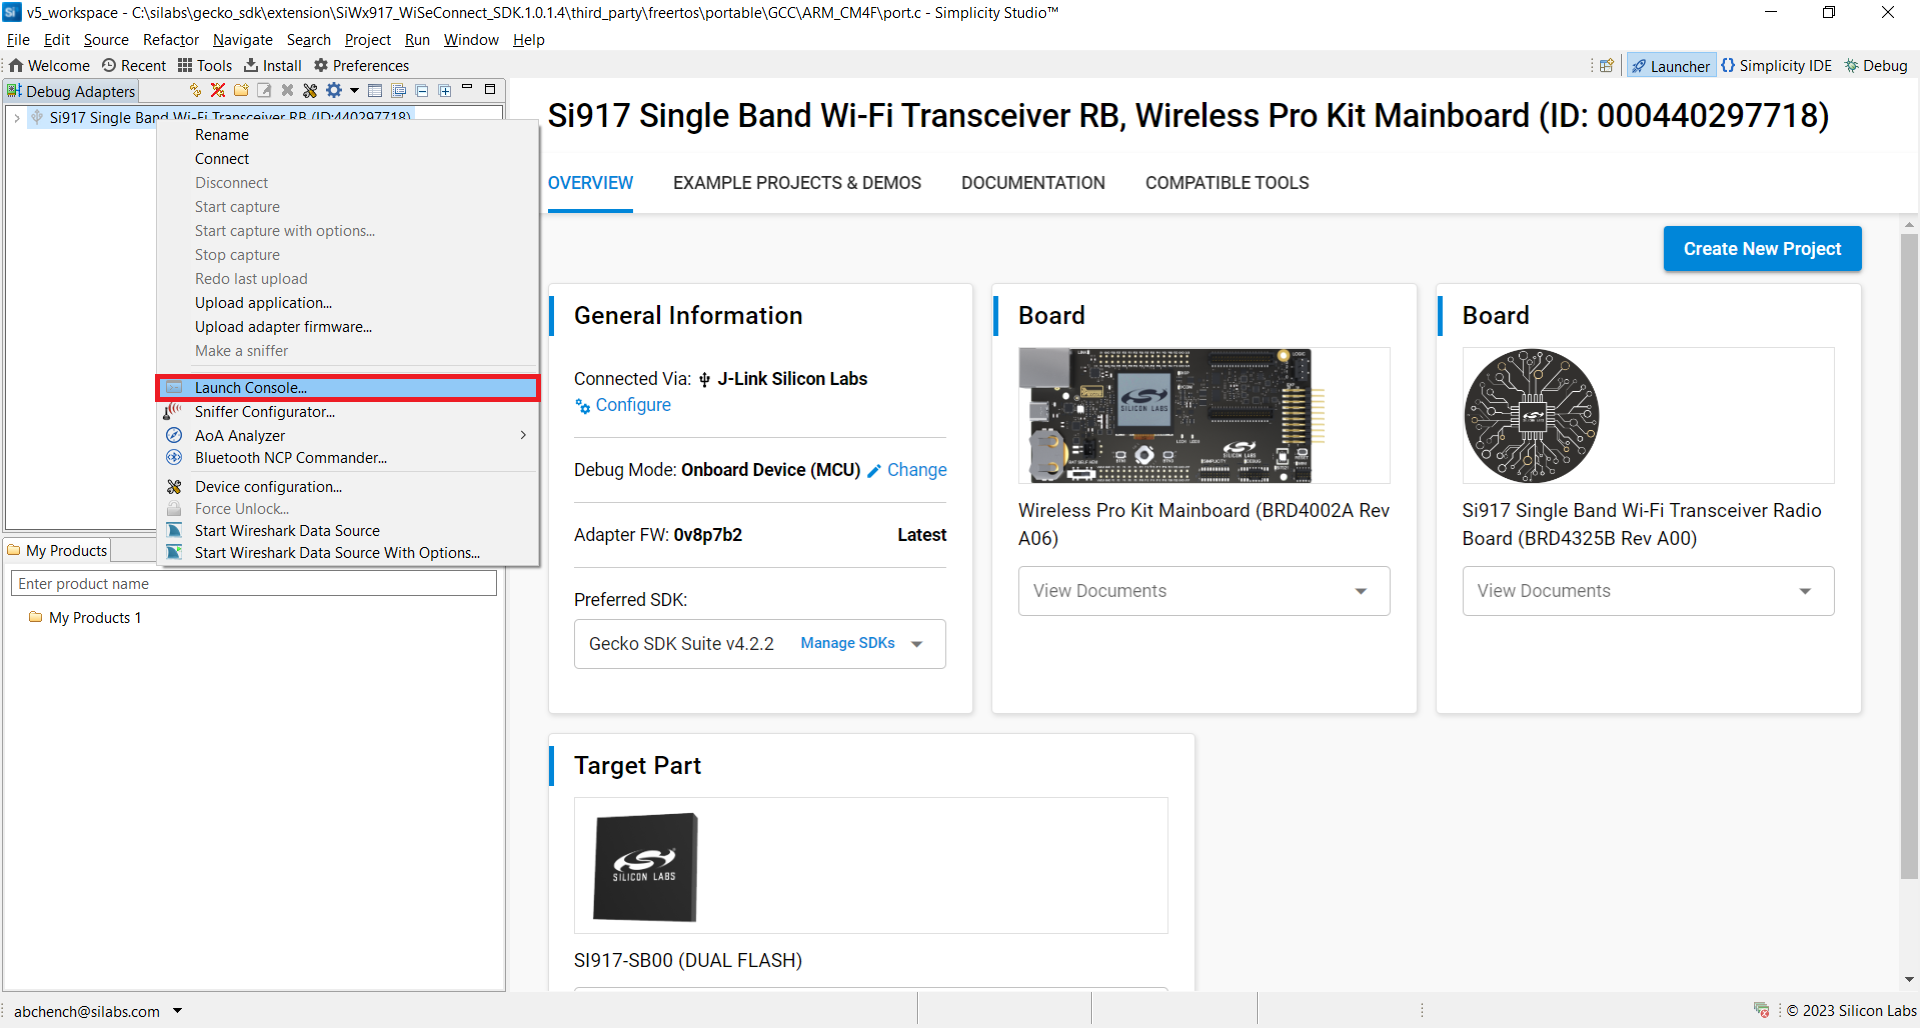
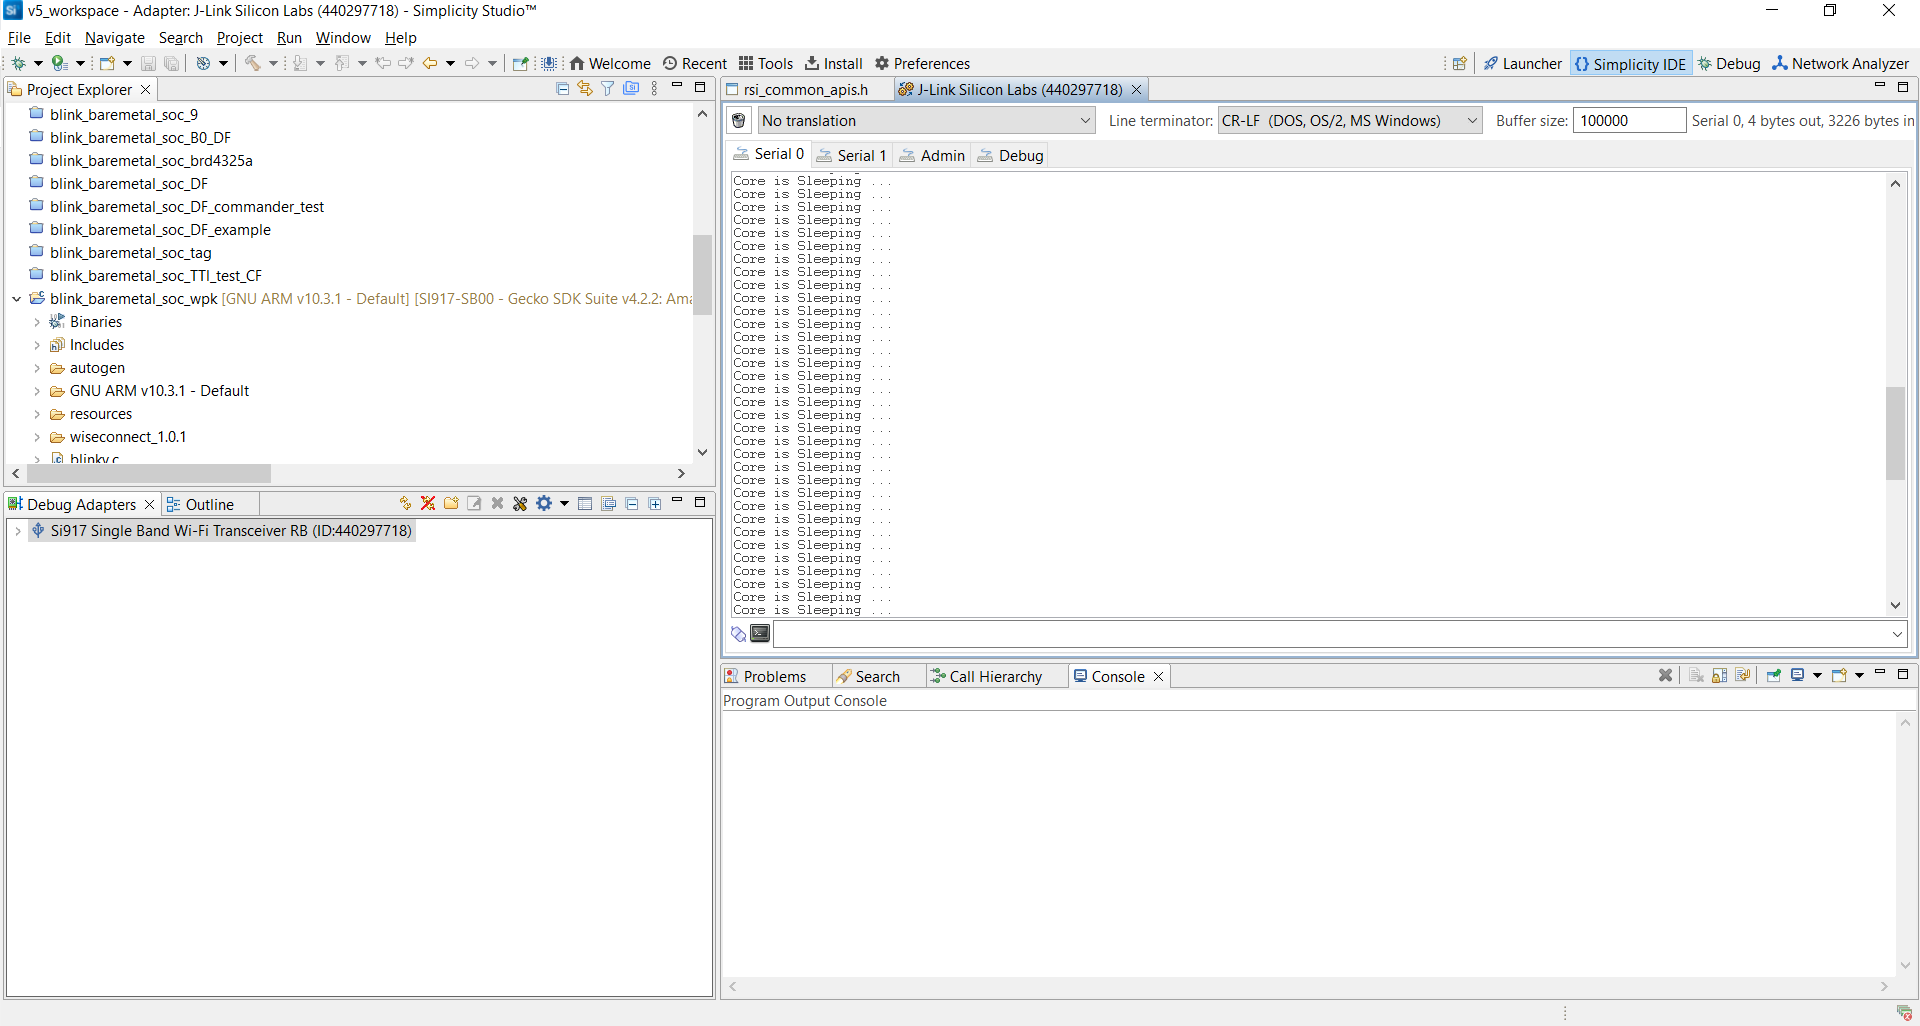
In the Debug Adapters pane, right-click on your radio board and click Launch Console.

Select the Admin tab and press Enter to see the
WPK>prompt.Enter the following command to set the Baud Rate:
pti config 0 vuart 115200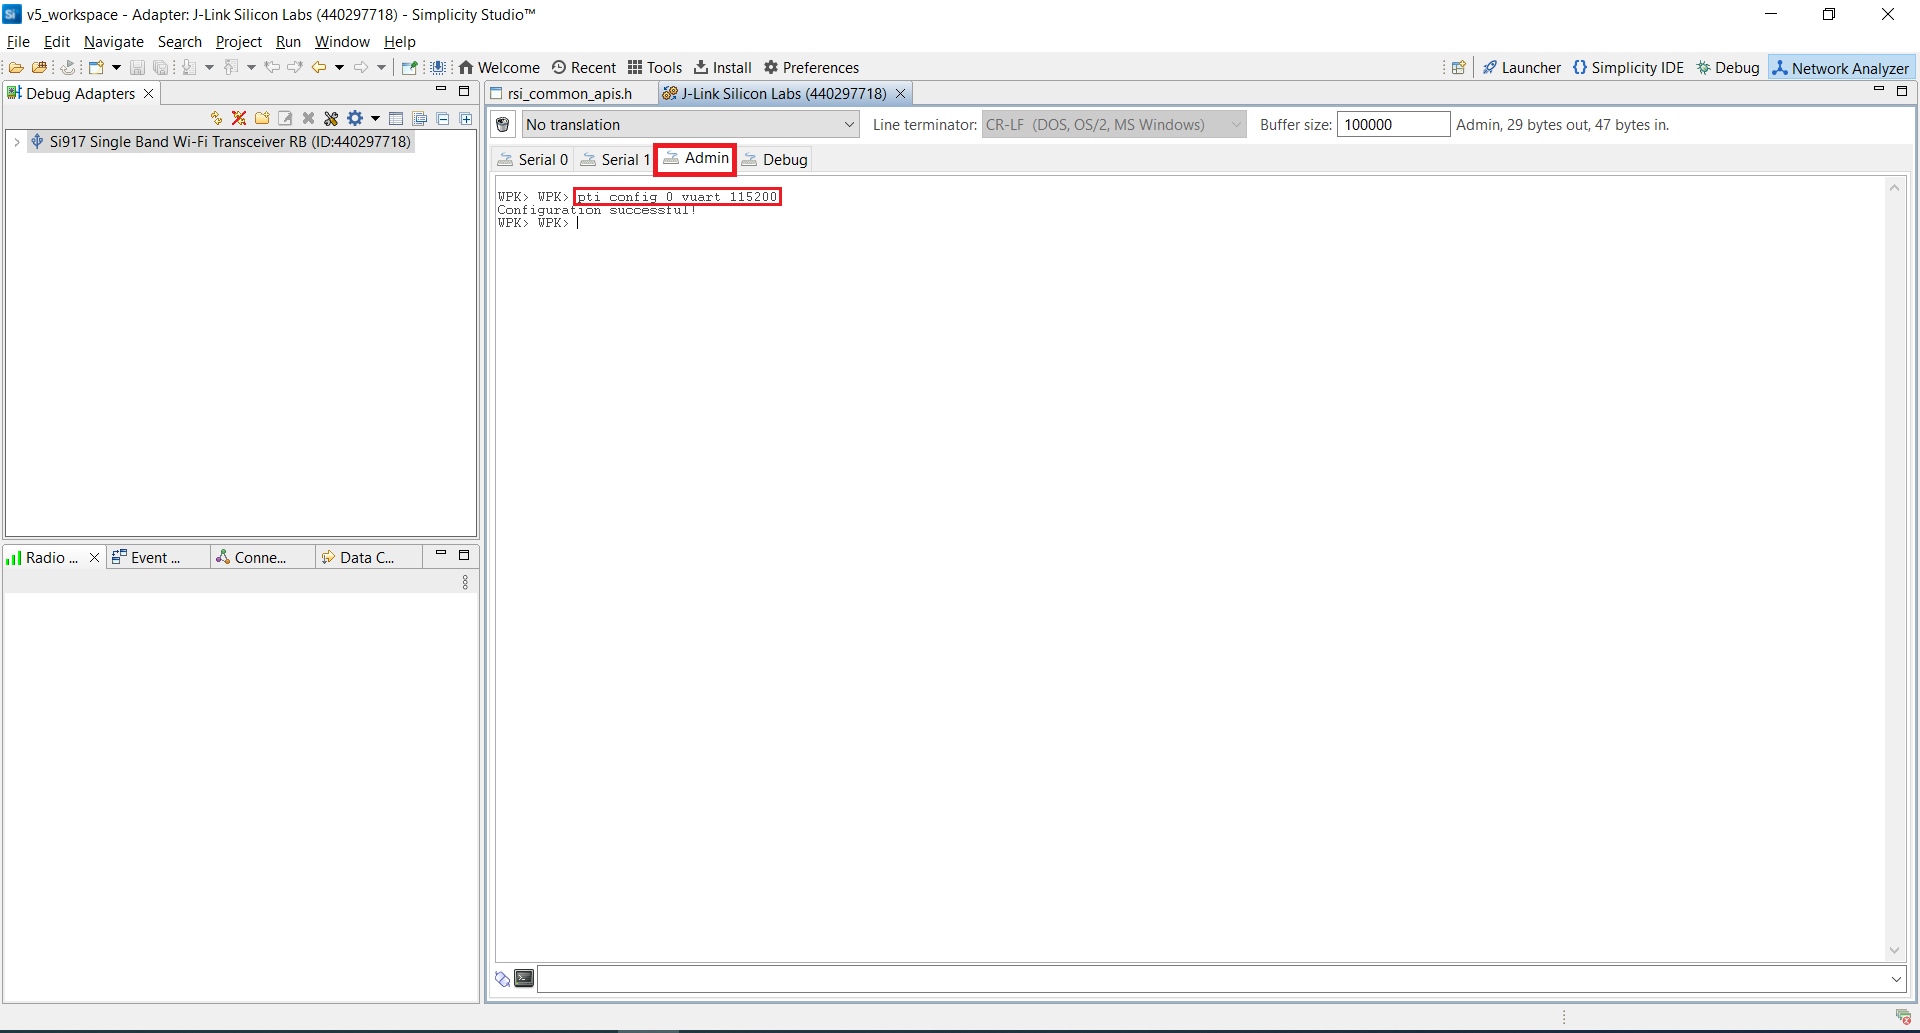

Select the Serial 0 tab to view the console output from the running application.

Enter Console Input#
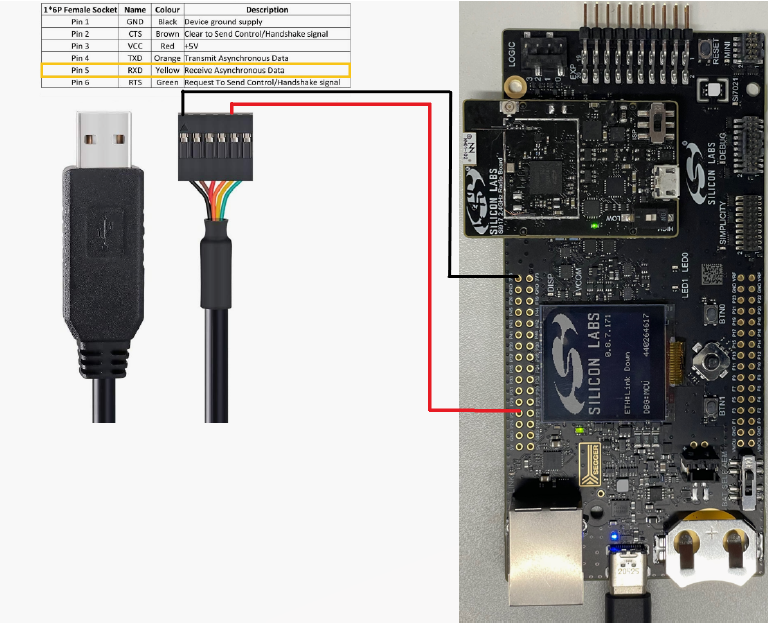
Connect the TXD pin (pin 4) of the USB-to-TTL Converter to pin 14 on the WSTK board.
Connect the GND pin (pin 1) of the USB-to-TTL Converter to pin 1 on the WSTK board.
Press the RESET button on the WSTK board.

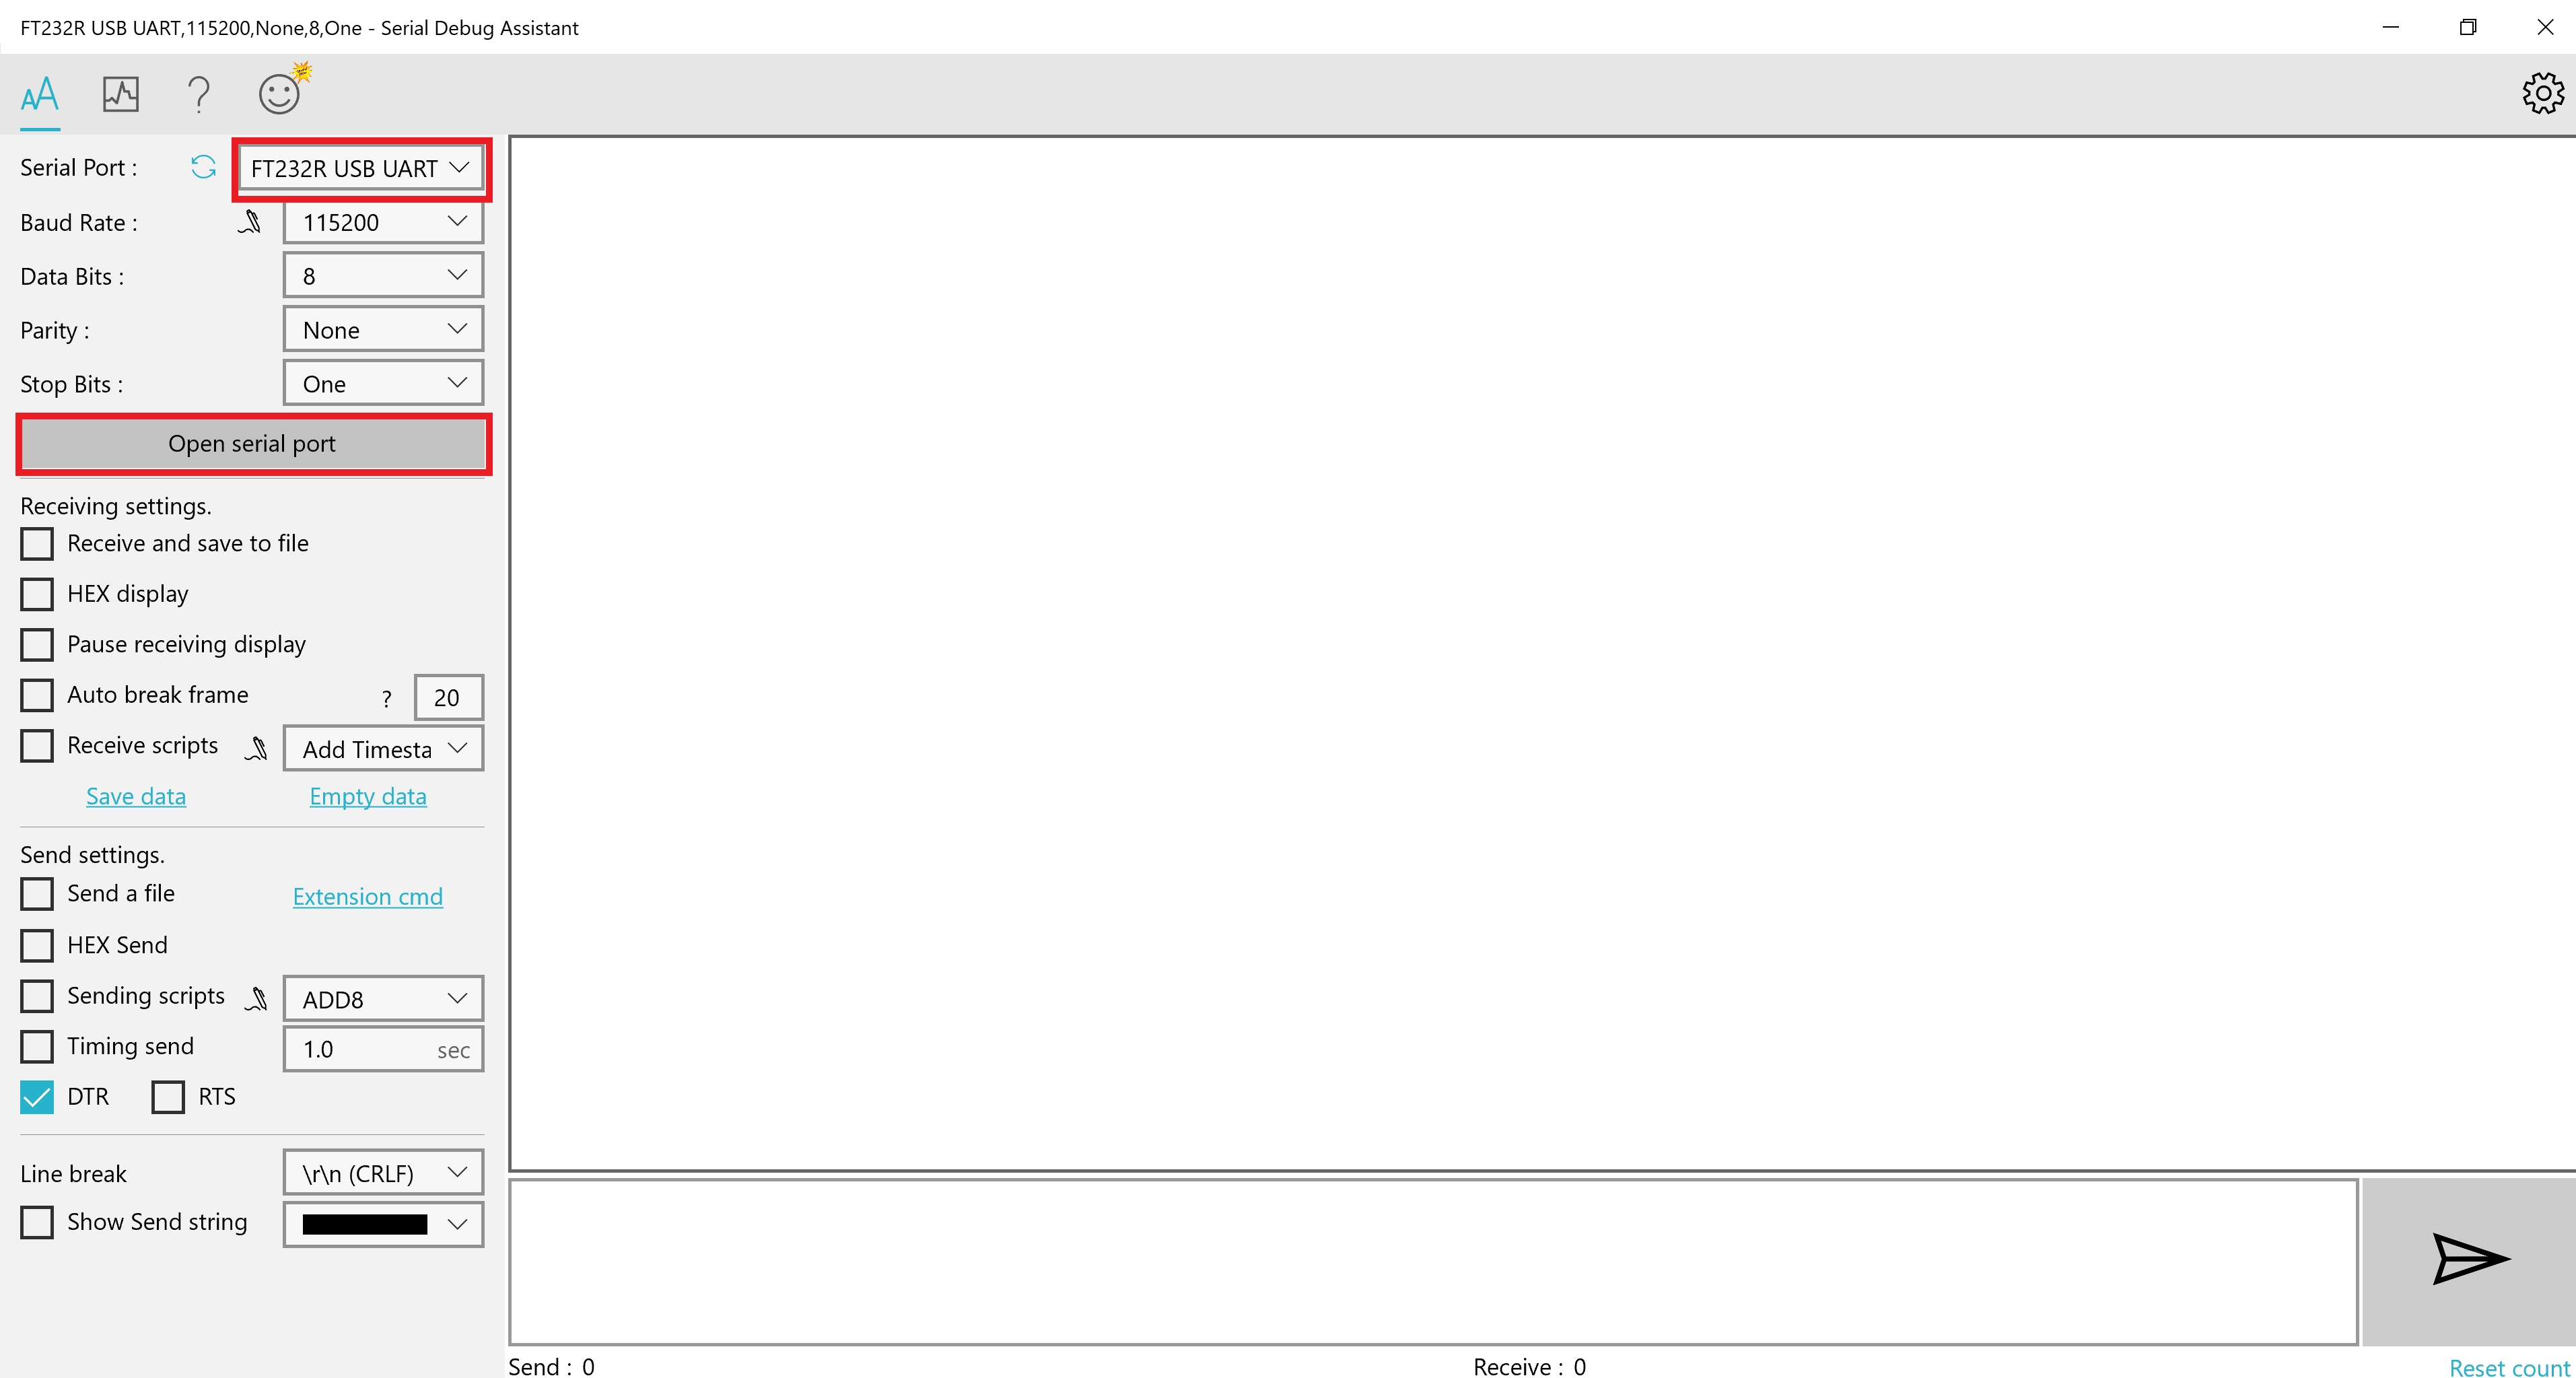
Open Serial Debug Assistant.
In the Serial Port dropdown, select the serial port to which the USB-to-TTL Converter is connected.
Click Open serial port.

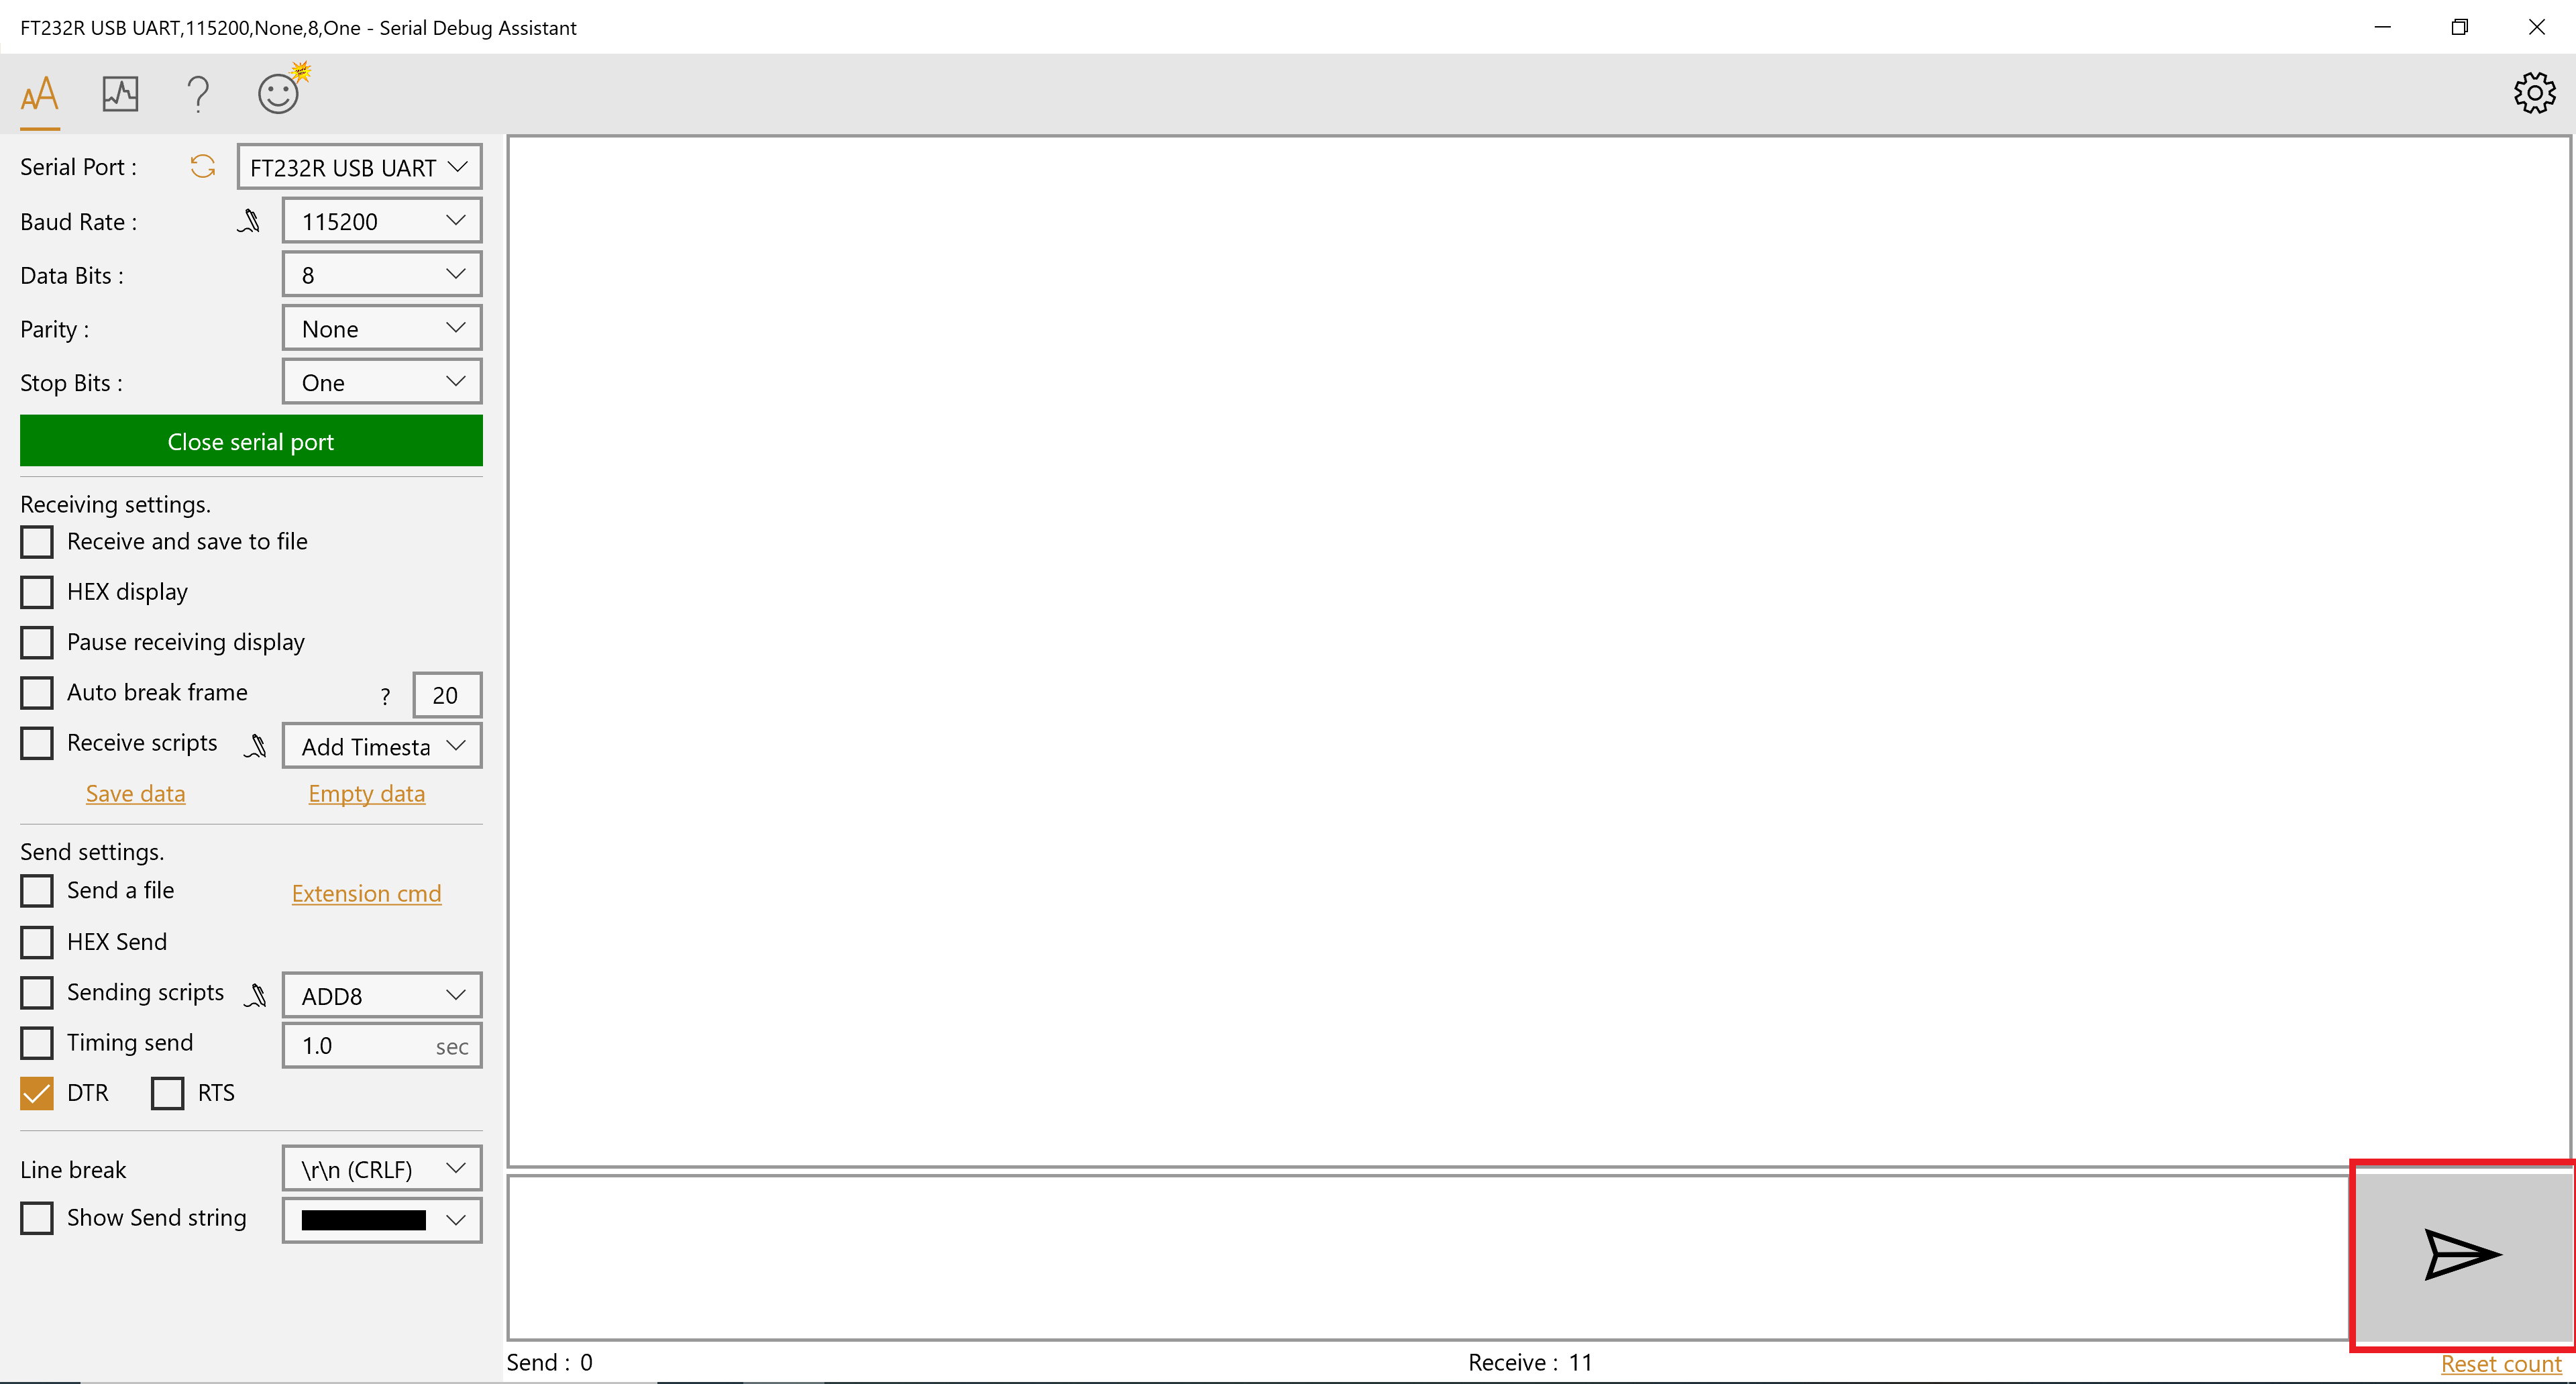
The serial port will be opened and the button will change to Close serial port.
In the input area, enter the characters you wish to send to the SiWx91x device.
Click the Send button (having an envelope icon).

Customize Application Components#
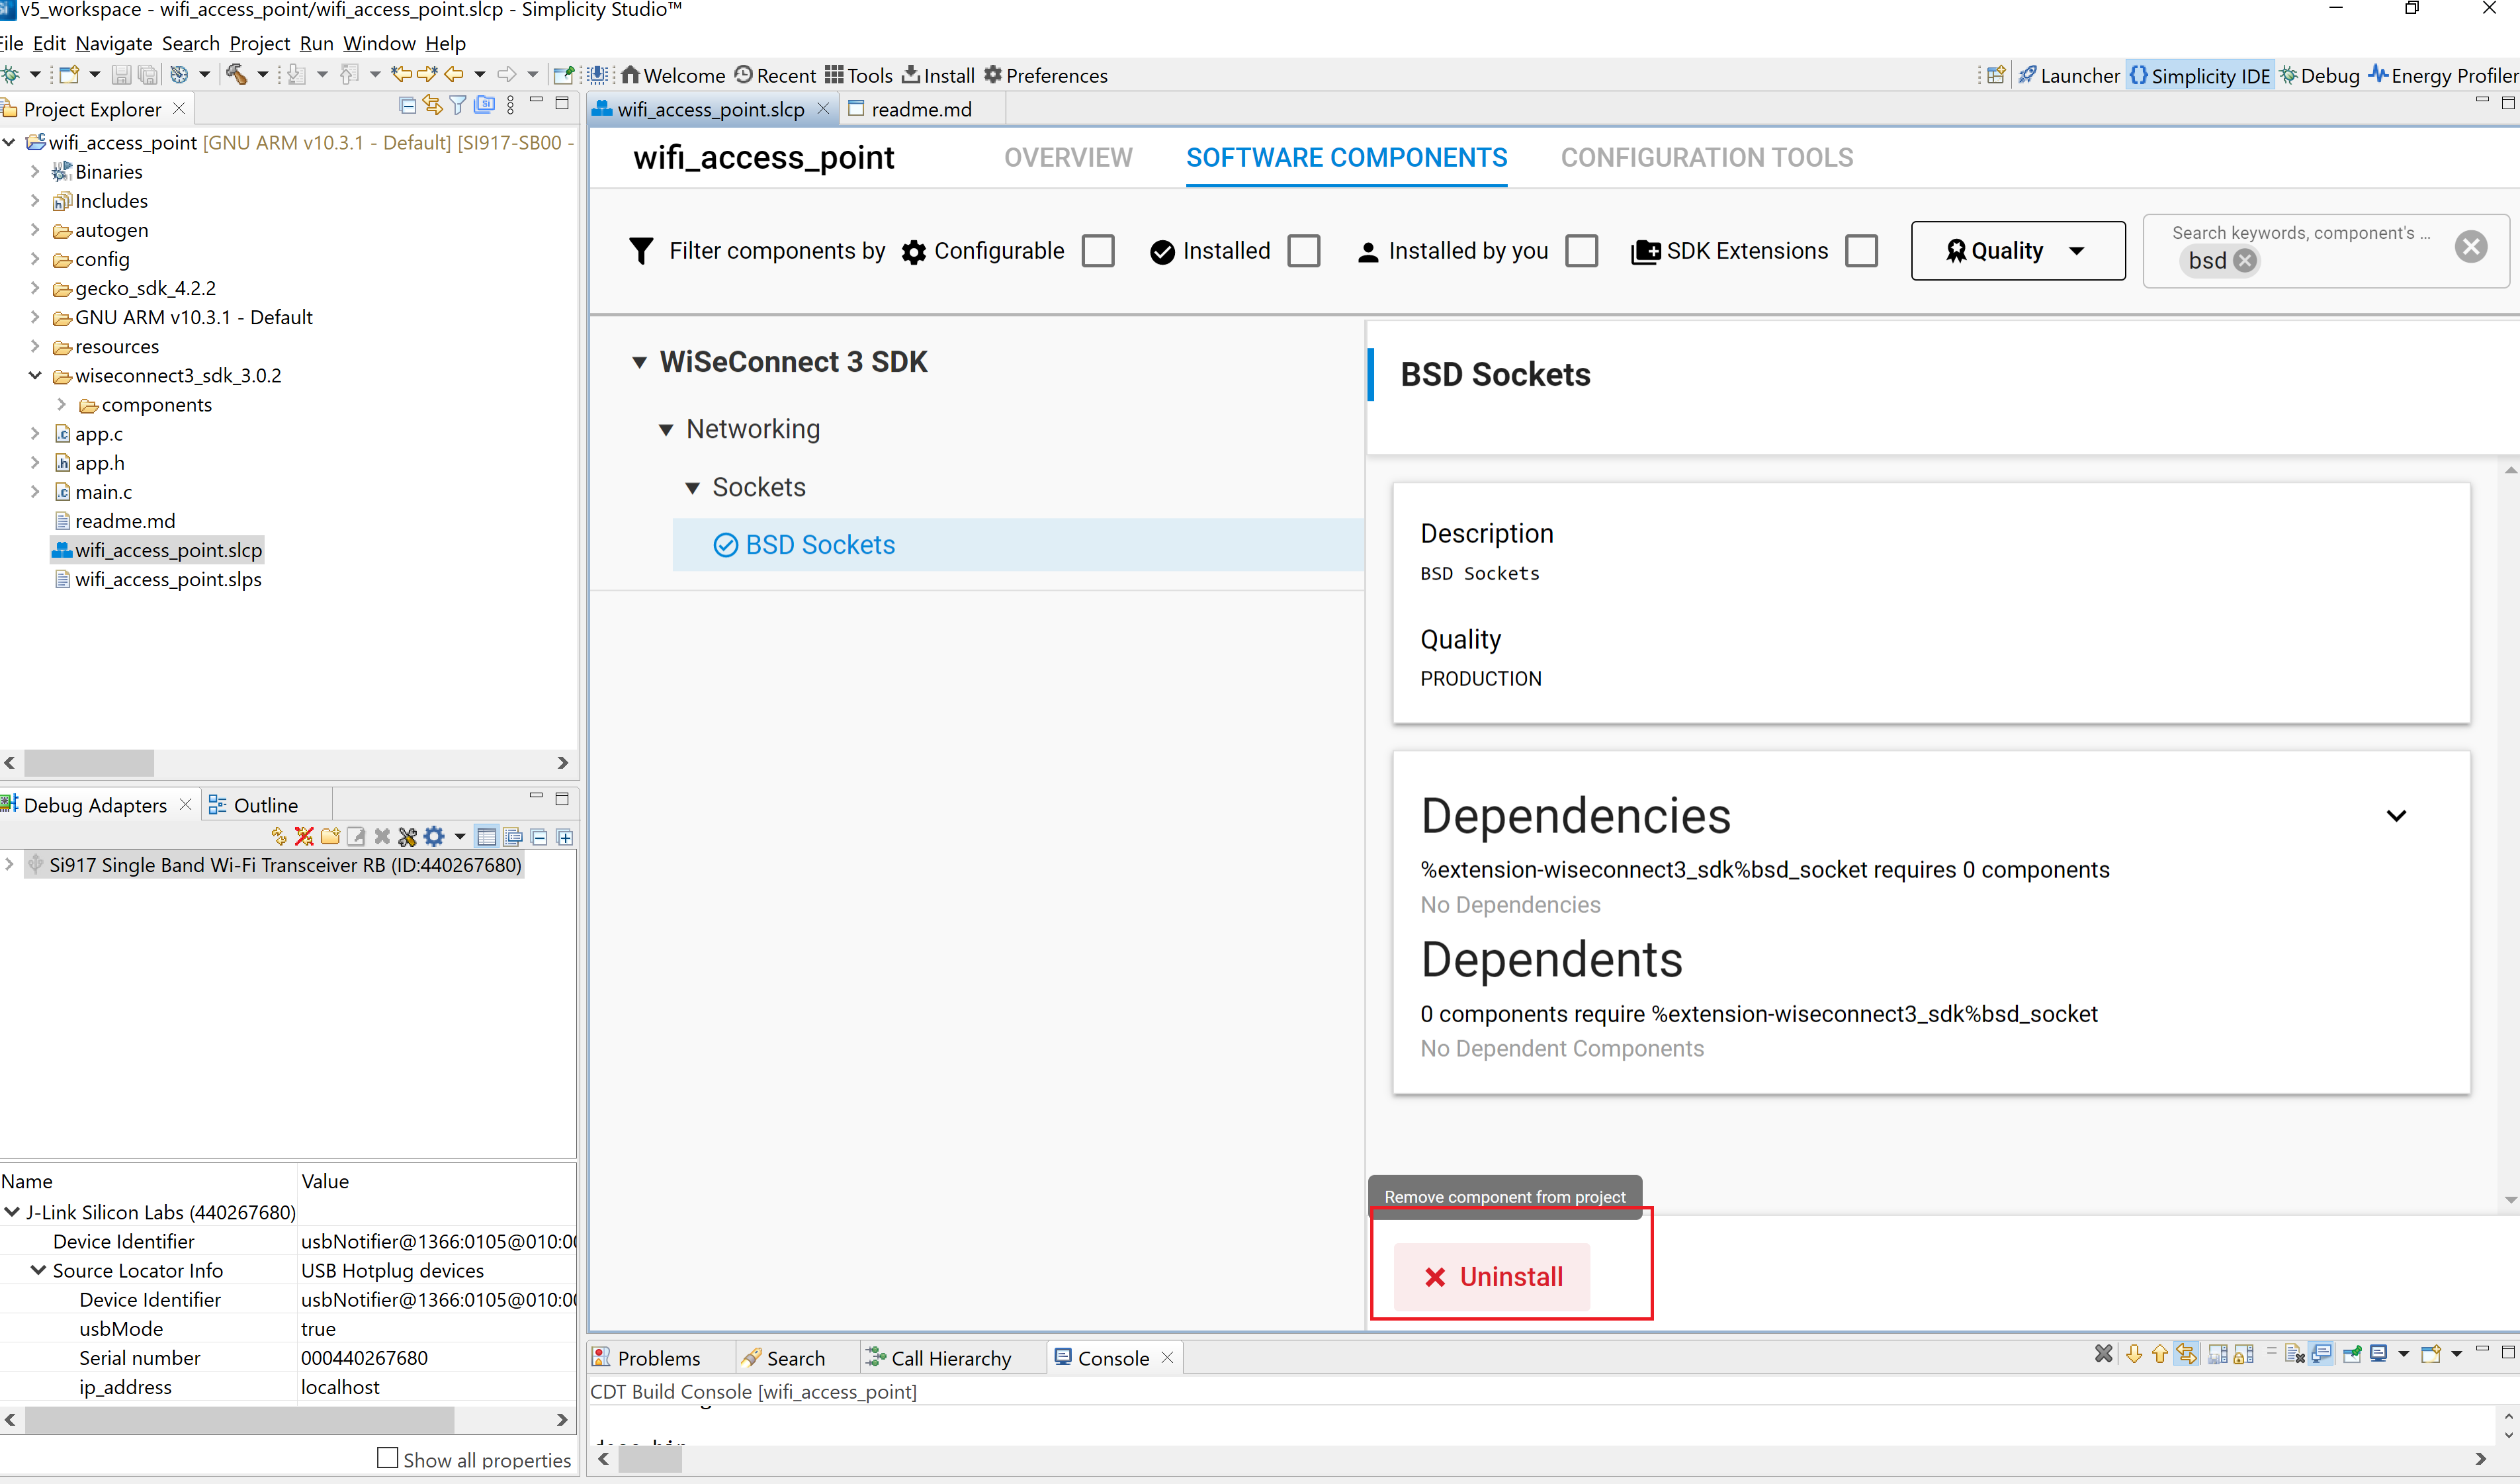
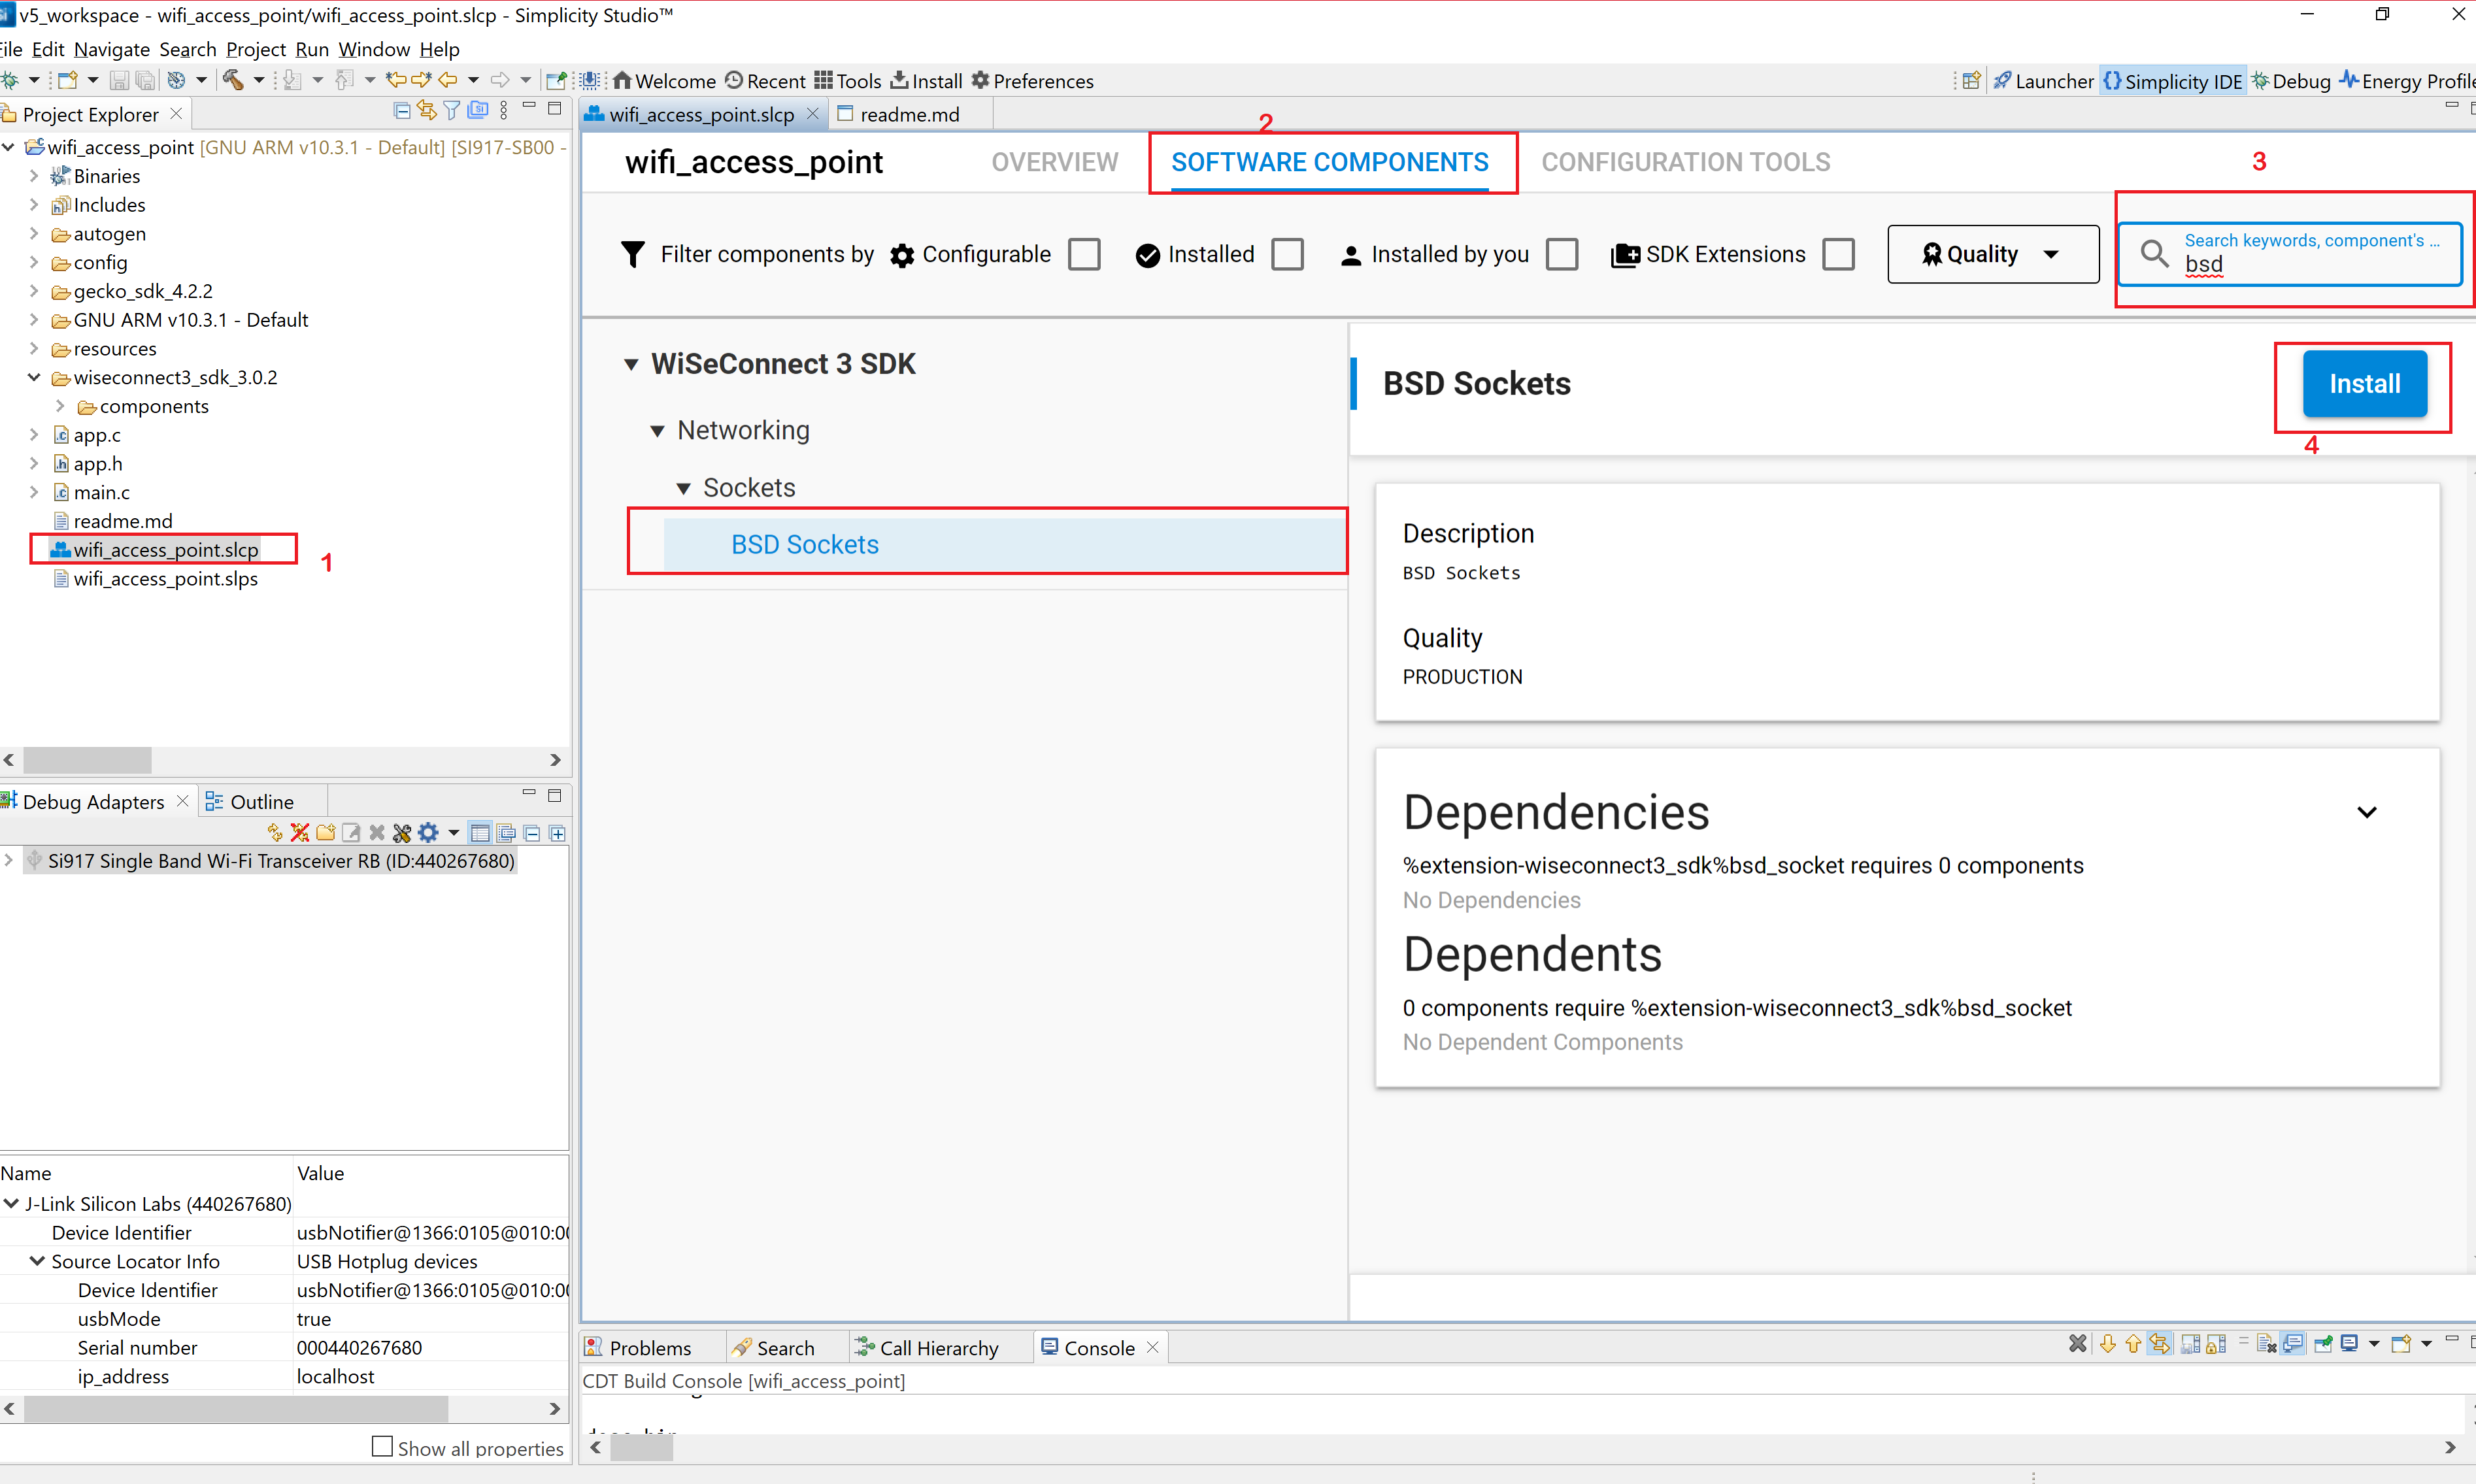
Simplicity Studio allows you to add or remove functional components in your application, such as BSD Sockets.
Add Component#
In the Project Explorer pane, select the project_name.slcp file.
Select the SOFTWARE COMPONENTS tab.
Search for and select the component that you want to install
Click Install.

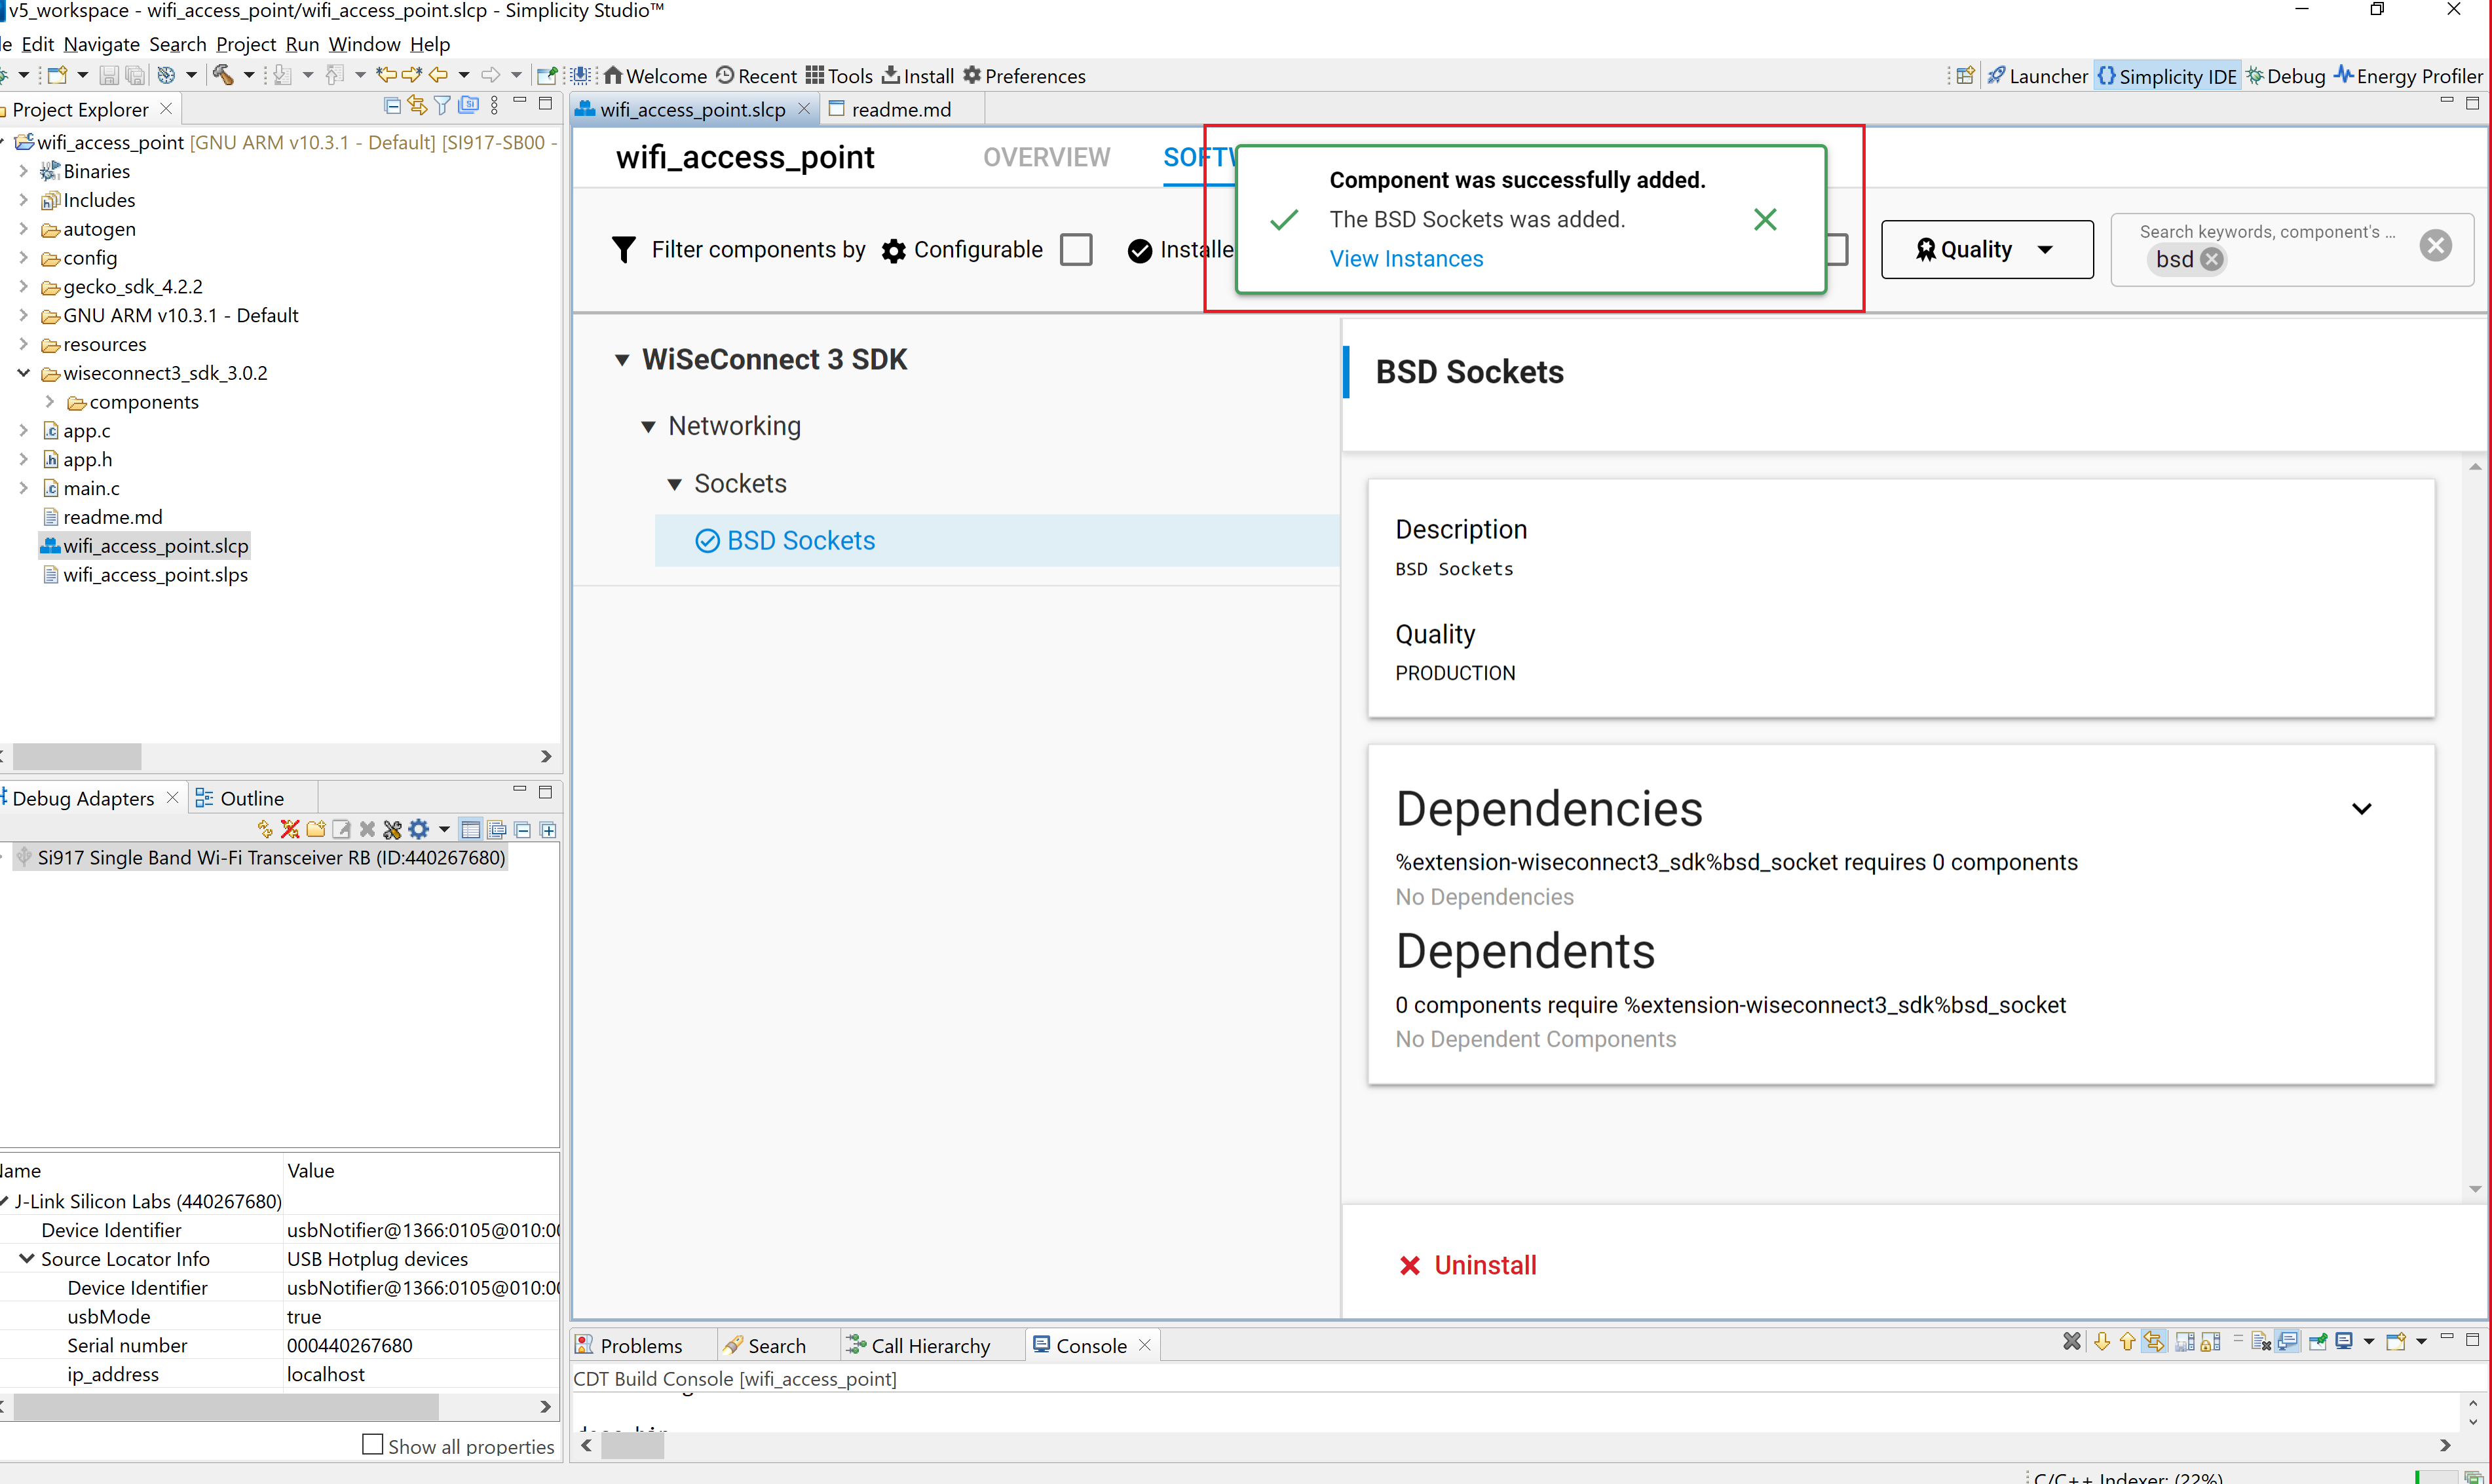
Studio will add the component and display a success message.

Remove Component#
Find the component you want to remove.
Select the component and click Uninstall.
