SiWG917 Firmware Update Mechanisms#
Firmware update mechanisms are categorized into two:
Firmware Update via OTA
Firmware Update via Bootloader
The following subsections provide descriptions for both.
Firmware Update via OTA#
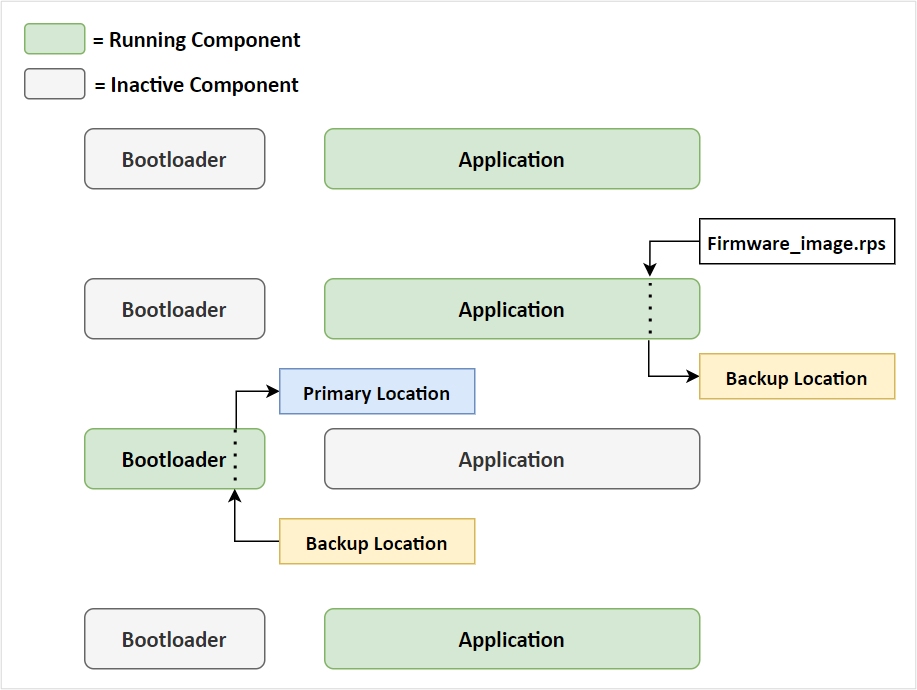
The following steps are executed during firmware update Over The Air:
The current M4 application receives and sends the new firmware image (RPS) in backup location.
The existing firmware does the integrity check of the new firmware based on the RPS header configuration.
If the integrity is verified and valid, then a soft reset is given in the current M4 application.
The device boots into the Bootloader.
The Bootloader finds that a new firmware is available in the backup location and again does an integrity check using CRC, MIC, or Signature-based check (If security is enabled), depending on the control flags of the RPS and the MBR configuration.
After the image is verified, the Bootloader transfers the image from download location to the execution/target location. If the image is encrypted, decryption is performed during the process of transferring and parsing the RPS file.
Fast Firmware Upgrade:
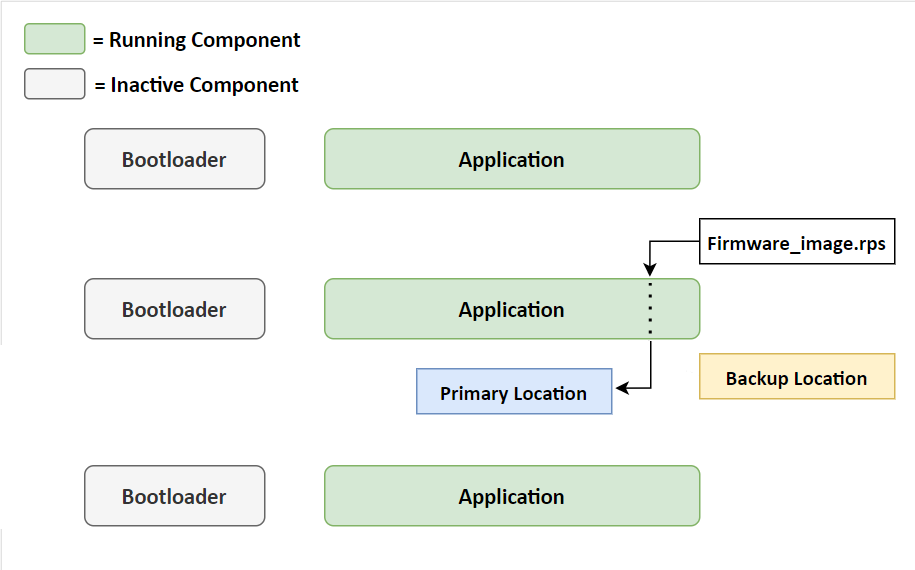
There are two mechanisms to update Firmware via OTA.
Firmware Update via HTTP/S
Firmware Update via M4 as Host
The following subsections explains the mechanisms in detail.
Firmware Update via HTTP/S#
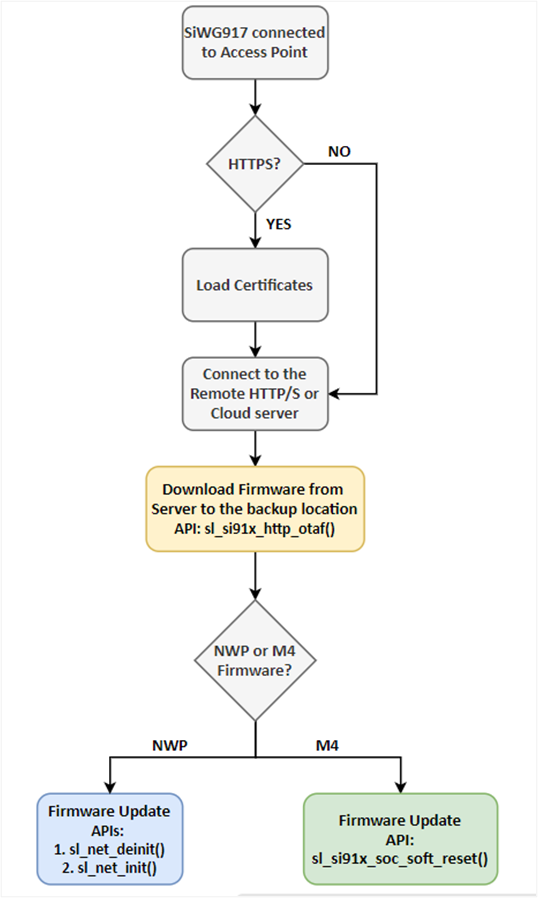
The SiWG917 connects to access point and configure as a HTTP/S client and establishes connection with an HTTP/S server or the cloud storage server. After a successful HTTP/S connection, the SiWG917 sends a firmware file request to the remote server and the server responds with the firmware file.
The server-transferred firmware file gets loaded/updated in the SiWx91x module flash memory when the respective APIs are called. The following figure shows the firmware update process in the form of an image and flow chart respectively.

Firmware Update APIs#
The following APIs are used for downloading and updating the NWP firmware and M4 application.
Download Firmware:
sl_si91x_http_otaf()- the API used for downloading is the same for NWP and M4
Update Firmware:
For NWP Firmware – First sl_net_deinit() and next, sl_net_init() should be called
For M4 Application – sl_si91x_soc_nvic_reset()
The following flowchart shows the steps involved in the firmware update process via HTTPS.
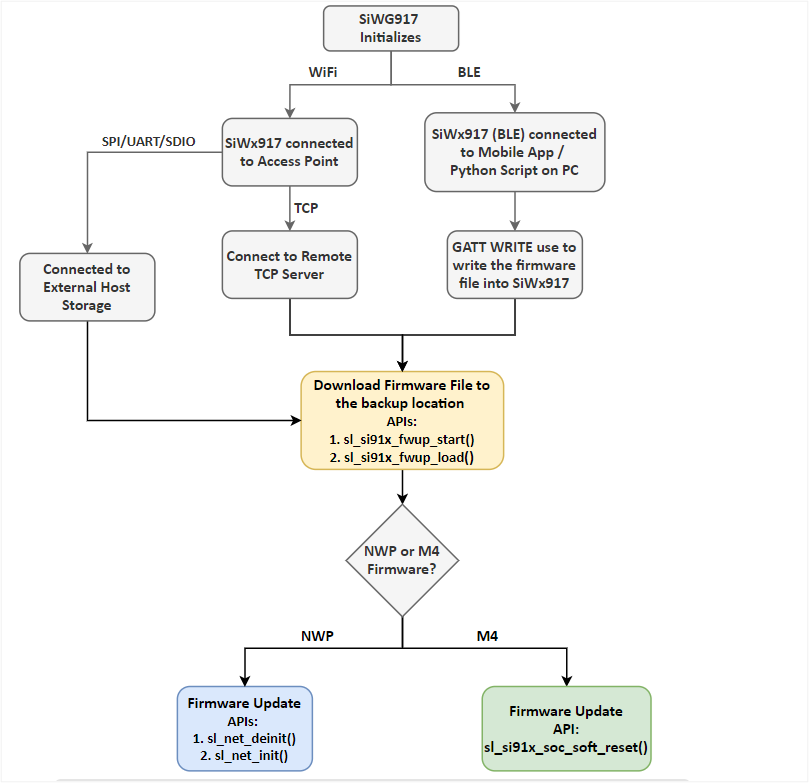
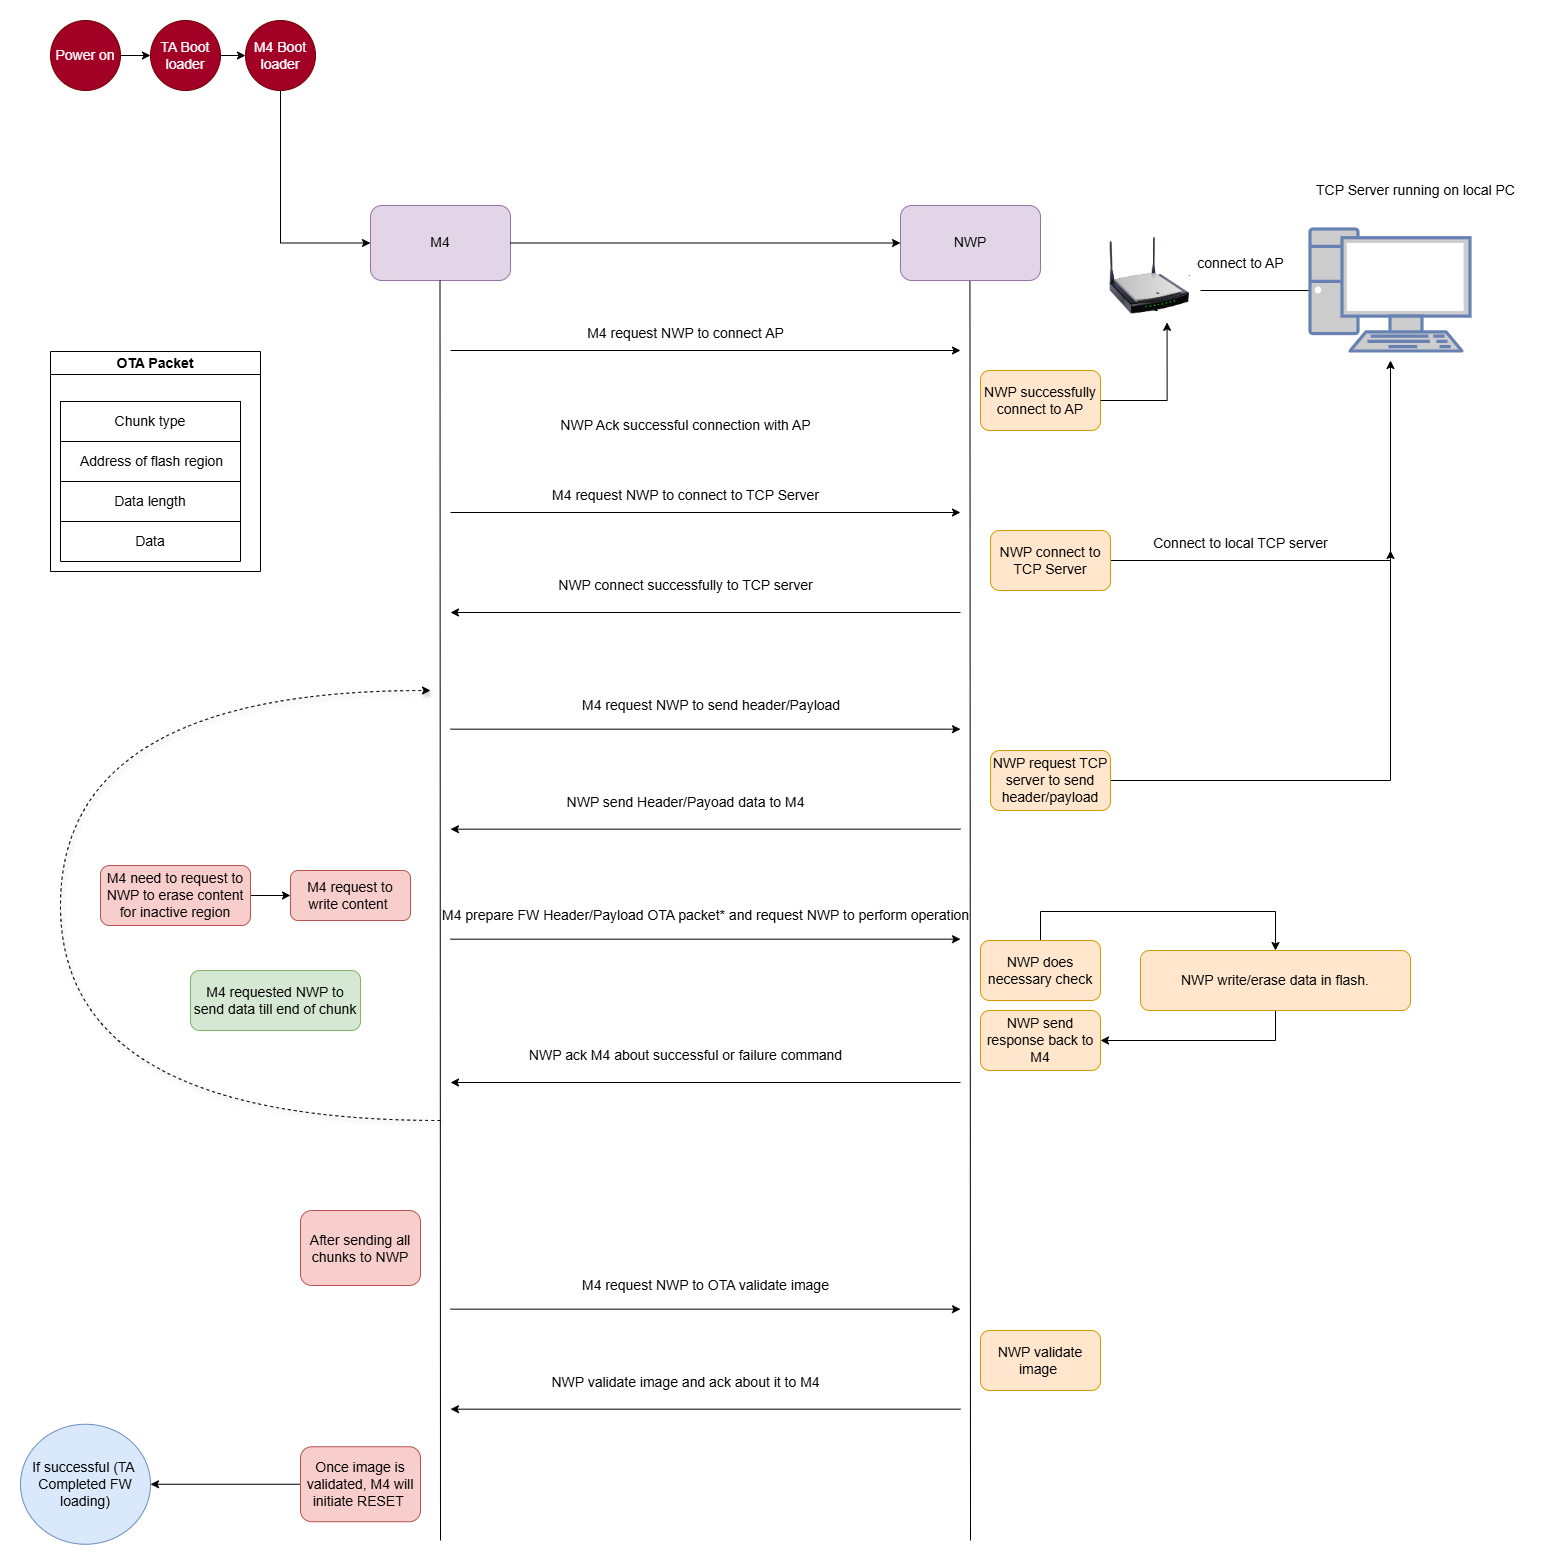
Firmware Update via M4 as Host#
The SiWG917 connects to a remote TCP server via Wi-Fi or to an external host storage via SPI/UART/SDIO, or BLE to get the firmware file to the M4. The user can update the firmware by calling the required APIs.
Refer to BLE OTA application for an understanding of the firmware update using BLE.
The following figure shows the firmware update process via M4 as host.

The following flowchart shows the steps involved in the firmware update process via M4 as host.
Application flow for OTA via TCP server (Detailed flow):
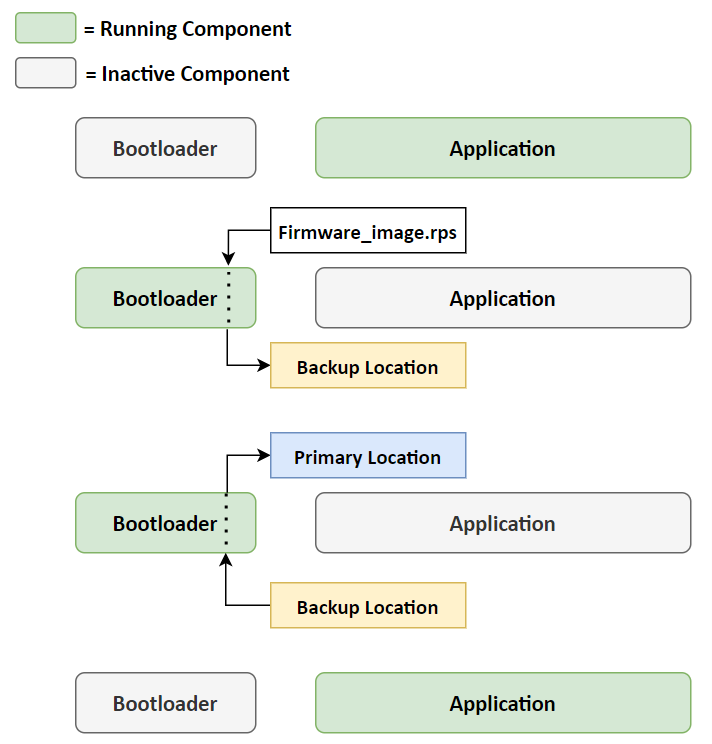
Firmware Update via Bootloader#
The firmware update via Bootloader is a two-stage process where the NWP Bootloader places the application image in a separate download location and then does the integrity check of the received image. The NWP Bootloader then replaces the current application image with the newly received authenticated image.
There are two mechanisms to update the Firmware via Bootloader:
Firmware Update via Kermit
Firmware Update via Simplicity Commander Tool or CLI
Firmware Update via External Host Interfaces – SPI/SDIO (ISP Mode) Simplicity Commander Tool or CLI
The following subsections explains the mechanisms in detail.
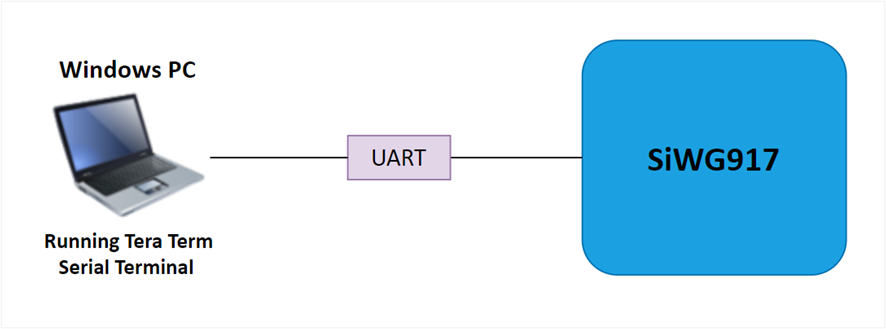
Firmware Update via Kermit#
In updating the firmware via Kermit, the SiWG917 device is connected to the PC using the USB cable. The device is detected as a UART COM Port. In this process, a serial terminal like Tera Term acts like a host to the SiWG917 and gives Bootloader commands to load the firmware.
Steps for NWP Firmware/M4 Application Update
Connect the RX pin of the TTL board (FTDI) to the GPIO_8 (F8 pin on the main board) and the TX pin of the TTL board (FTDI) to the GPIO_9 (F9 pin on the main board).
Entering ISP mode:
To enter ISP mode, the device samples the JTAG_TDO_SWO (GPIO_34) signal during reset. If this signal is low while reset is released, the device enters ISP mode.
While using Silabs Evaluation board, the JTAG_TDO_SWO (GPIO_34) signal is controlled by the ISP button.
To enter ISP mode:
Press and hold the ISP button.
While holding the ISP button, press and release the Reset button on the main board.
Release the ISP button after reset completes.
The device is now in ISP mode.
Function | Signal | GPIO/Pin Name | Package Pin | Notes |
|---|---|---|---|---|
UART RX (ISP) | ISP_UART_RX / UART1_RX | GPIO_8 | A20 | Connect to FTDI TX |
UART TX (ISP) | ISP_UART_TX / UART1_TX | GPIO_9 | A21 | Connect to FTDI RX |
Reset Button | RESET_N | RESET_N | A31 | Active-low reset |
ISP Enable (Boot) | JTAG_TDO_SWO | GPIO_34 | B15 | Pull LOW during reset to enter ISP mode |
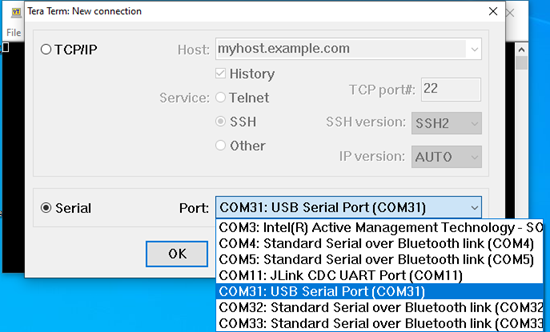
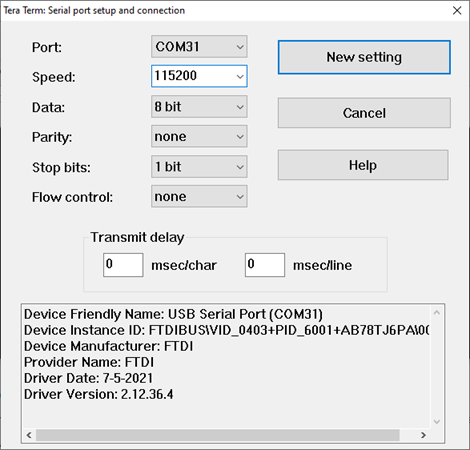
Open Tera Term and choose COM Serial Port as shown in the following figure.
Go to Setup → Serial port and select speed as 115200.
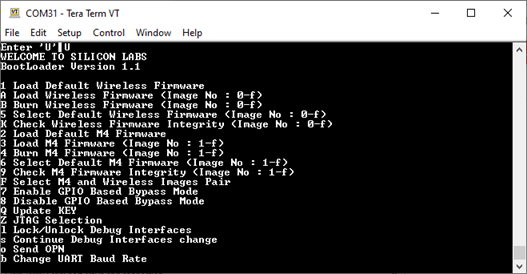
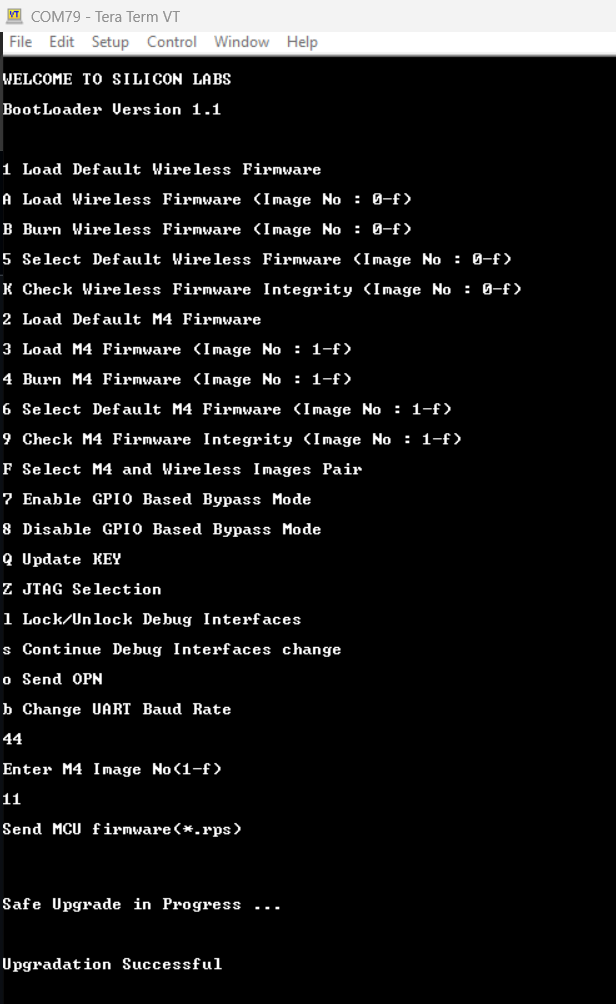
Press any key for boot message - U, then type U for boot menu → type B → 0 to burn wireless (NWP firmware) (or) 4, 1 to burn MCU (M4) application.
Note: You can load/store only one image in any of the locations for NWP image (0-f) and for M4 (1-f).
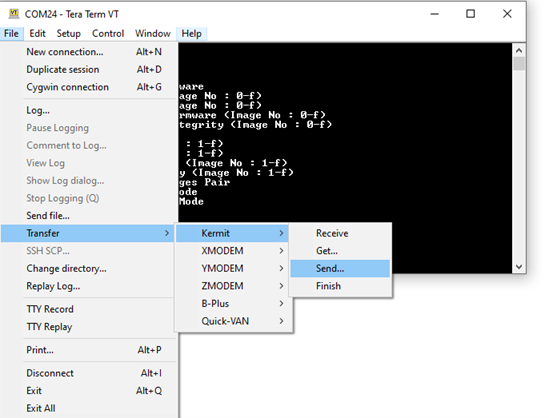
Go to File → Transfer → Kermit → Send.. and select .rps or .bin file, this starts to load the image into the SiWG917 device.
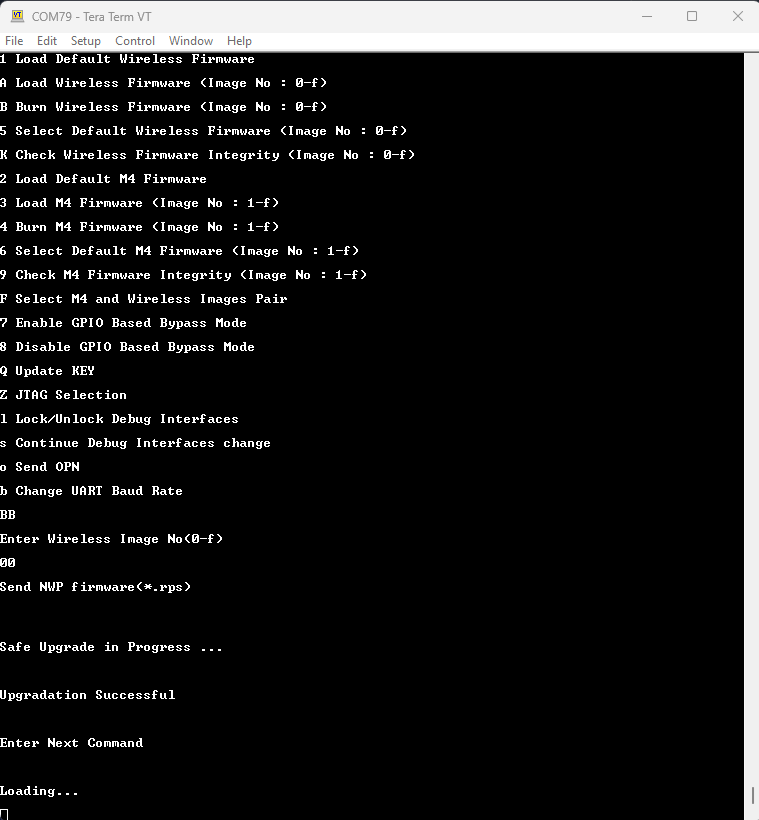
Once the upgrade is successful, give 1, the message output Loading... is displayed. It is now safe to exit from Tera Term.
NWP firmware upgrade logs:
M4 firmware upgrade logs:
Note:
The time taken to update the NWP and M4 firmware with the baud rate 921600 using the serial terminal (Tera Term) is as follows:
NWP firmware (1.6 MB): ~ 85 seconds
M4 firmware (104 KB): ~10 seconds
To boost the firmware update speed when performing firmware update via Kermit, you can modify as mentioned below
Search for TERATERM.INI File in the Tera Term application folder. Make the below mentioned change, KmtLongPacket = OFF --> KmtLongPacket = ON
Firmware Update via Simplicity Commander Tool or CLI#
Simplicity Commander is a single, all-purpose tool to be used in a production environment. The steps to update the firmware using the Simplicity Commander tool are mentioned in the Update SiWx91x Connectivity Firmware section in the Getting started with SoC mode. It can also be invoked using a simple Command Line Interface (CLI).
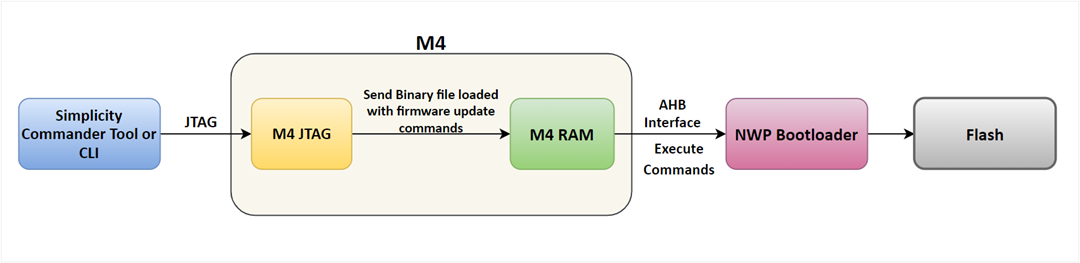
The following figure shows the steps involved in firmware update process using the Simplicity Commander.
The general command line structure looks like this: commander [command] [options] [arguments] where:
commander is the name of the tool
command is one of the commands supported by Simplicity Commander, such as, flash, write, convert, and so on.
argument is an item of information provided to Simplicity Commander when it is started. An argument is commonly used when the command takes one or more input files.
square brackets indicate optional parameters as in this example: commander write [filename(s)] [options]
angle brackets indicate required parameters as in this example: commander read --output <filename>
Firmware Update
Command: commander rps load <filename.rps> -d si917
Example: commander rps load ta_fw.rps -d si917
M4 Firmware Update
Command: commander rps load <filename.rps> -d si917
Example: commander rps load Secured_sl_si91x_calendar.rps -d si917
For more information about the Simplicity Commander Line Interface, refer to the UG574: SiWx917 SoC Manufacturing Utility User Guide.
Note: If the security is enabled in your device, you have to load the secured image; otherwise, the loading fails.
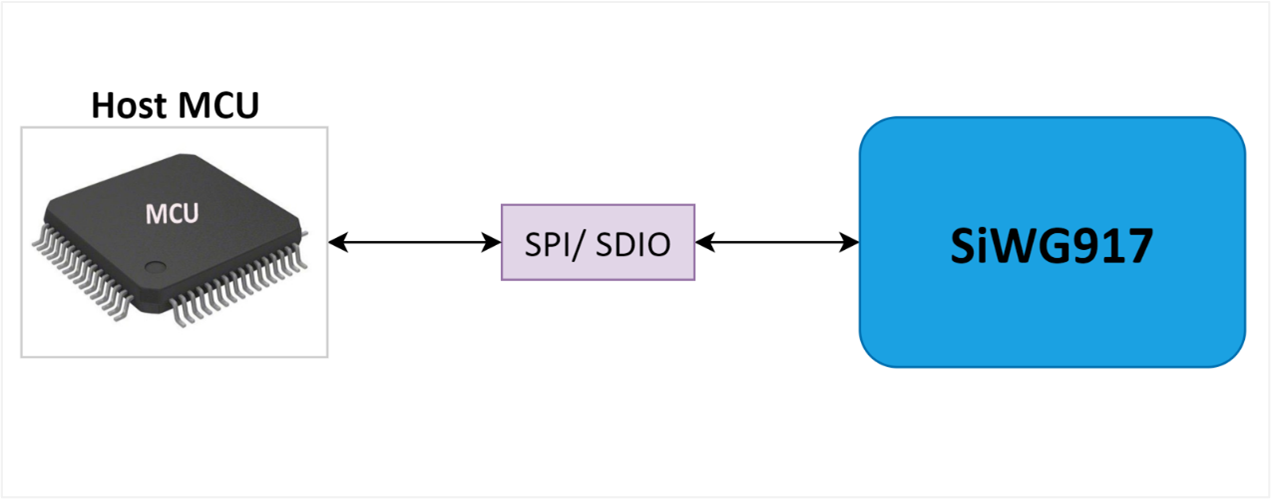
Firmware Update via External Host Interfaces - SPI/SDIO (ISP Mode)#
The SiWG917 should be kept in ISP mode for the firmware update vis external host interfaces (SPI/SDIO).
The host uses two registers at address locations - 0x41050034 (HOST_INTERACT_REG_IN) and 0x4105003C (HOST_INTERACT_REG_OUT). These registers are used by the host and the device for giving commands and acknowledgments.
SPI or SDIO Interface – Steps for Firmware Update#
The SiWG917 should be kept in ISP mode. To keep the device in ISP mode, press the ISP-button, and while holding down the ISP-button, press and release the Reset-button (on the main board) and release the ISP-button, this will enable ISP mode. You can exit the ISP mode by pressing the reset button on the main board.
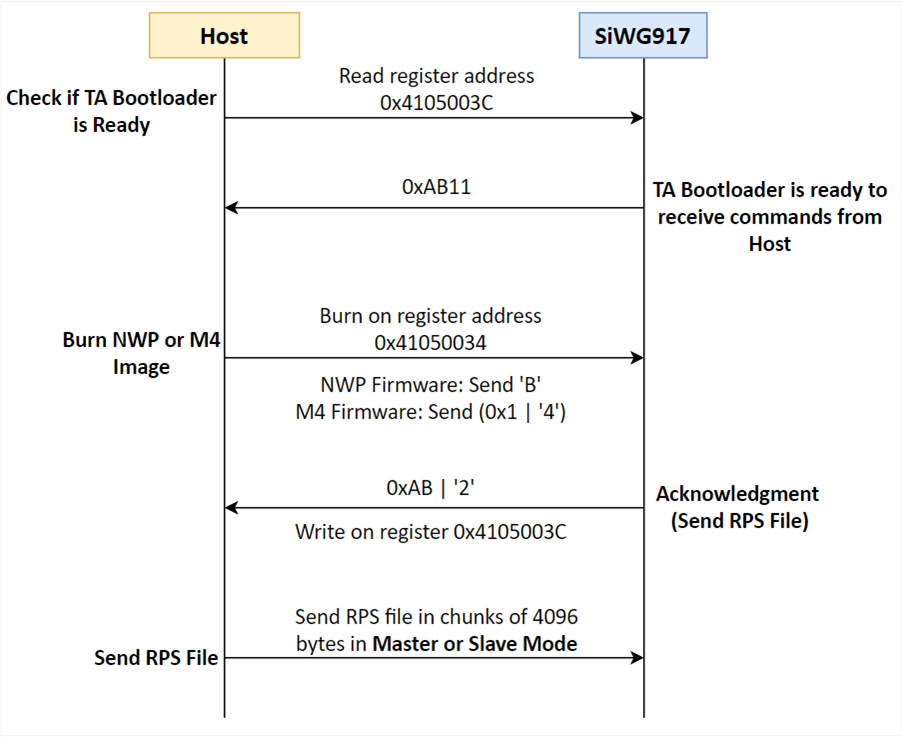
Using SPI interface on the host and read the register 0x4105003C, which should read out 0xAB11. This means the NWP bootloader is ready to receive the commands from host.
Send "Burn" command to device. For NWP firmware, the command is 'B' and for M4 firmware, the command is 0x1|'4' ('4' OR’ed with 0x1 to indicate the image number).
This command should be written on register address 0x41050034.
Once the NWP bootloader receives the above command, the device will respond with acknowledgement which will be (0xAB | '2') written on register 0x4105003C. This response means the SiWG917 is requesting the host to send RPS file
Upon receiving above response, the host will send the RPS file in chunks of 4096 bytes.
Note:
Refer to the firmware update from the host MCU using SDIO for reference application using EFM32 as host.
We used an external MCU to flash the NWP and M4 firmware images through SPI interface to the SiWG917. The time taken for firmware update are as follows:
NWP firmware (1.6 MB): ~ 40 seconds
M4 firmware (104 KB): ~ 5 seconds
For detailed information about the firmware upgrade, see SiWx917 Software Reference Manual.
Firmware Fallback:
Firmware fallback feature is a mechanism that allows the SiWG917 to fallback to a previous version of its firmware if an update fails or when the updated firmware does not work as expected. This feature involves storing two sets of NWP-M4 firmwares denoted as Slot-A and Slot-B for easier understanding. For more information about the firmware fallback mechanism, refer to the UG625: SiWG917 Firmware Fallback.