Wi-SUN Linux Border Router#
The Silicon Labs Wi-SUN Linux Border Router solution “wsbrd” provides a daemon that is responsible for running the Wi-SUN protocol high-level layers. It is paired with an RF device (RCP) handling the low-level layers and radio activities. The Silicon Labs RCP devices currently supported are listed under Wi-SUN Wireless SoCs.
Software Architecture#
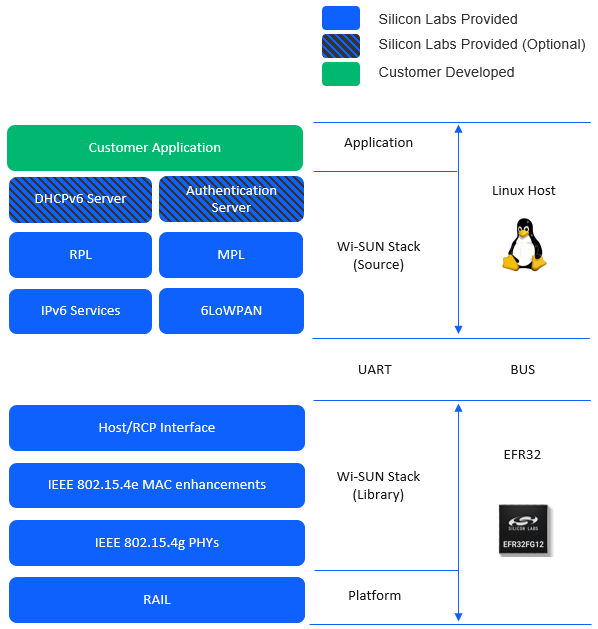
The Silicon Labs Linux border router solution has two distinct software components:
wsbrd: the solution running on a Linux host. It supports high-level Wi-SUN FAN protocols such as 6LoWPAN, RPL, and MPL. The solution is available in source code on GitHub: https://github.com/SiliconLabs/wisun-br-linux
Wi-SUN RCP: the solution running on an EFR32. It provides a low-level Wi-SUN implementation meant to be paired with a Linux host running wsbrd. Silicon Labs provides the Wi-SUN RCP application in the Gecko SDK and Simplicity Studio 5.
The two solutions exchange messages using a serial link between the Linux host and the EFR32. UART is the currently supported protocol. The solution relies on Linux services for the IPv6 communication with external IP devices. The complete architecture of the solution is provided in the following figure.
Getting Started with the Solution#
To use the Wi-SUN Border Router Linux install wsbrd on a Raspberry Pi (Silicon Labs recommends this platform but you can use another Linux host if desired) and use the solution as it would be in production. This method allows you to access the Wi-SUN devices from the Linux host (Wi-SUN border router and the devices connected to it). However, there is no automatic IPv6 configuration to allow another IP device (other than the Linux host) to access the Wi-SUN network. You must configure the Linux host and the IP routing to match his external IP network configuration.
Flashing the Wi-SUN RCP#
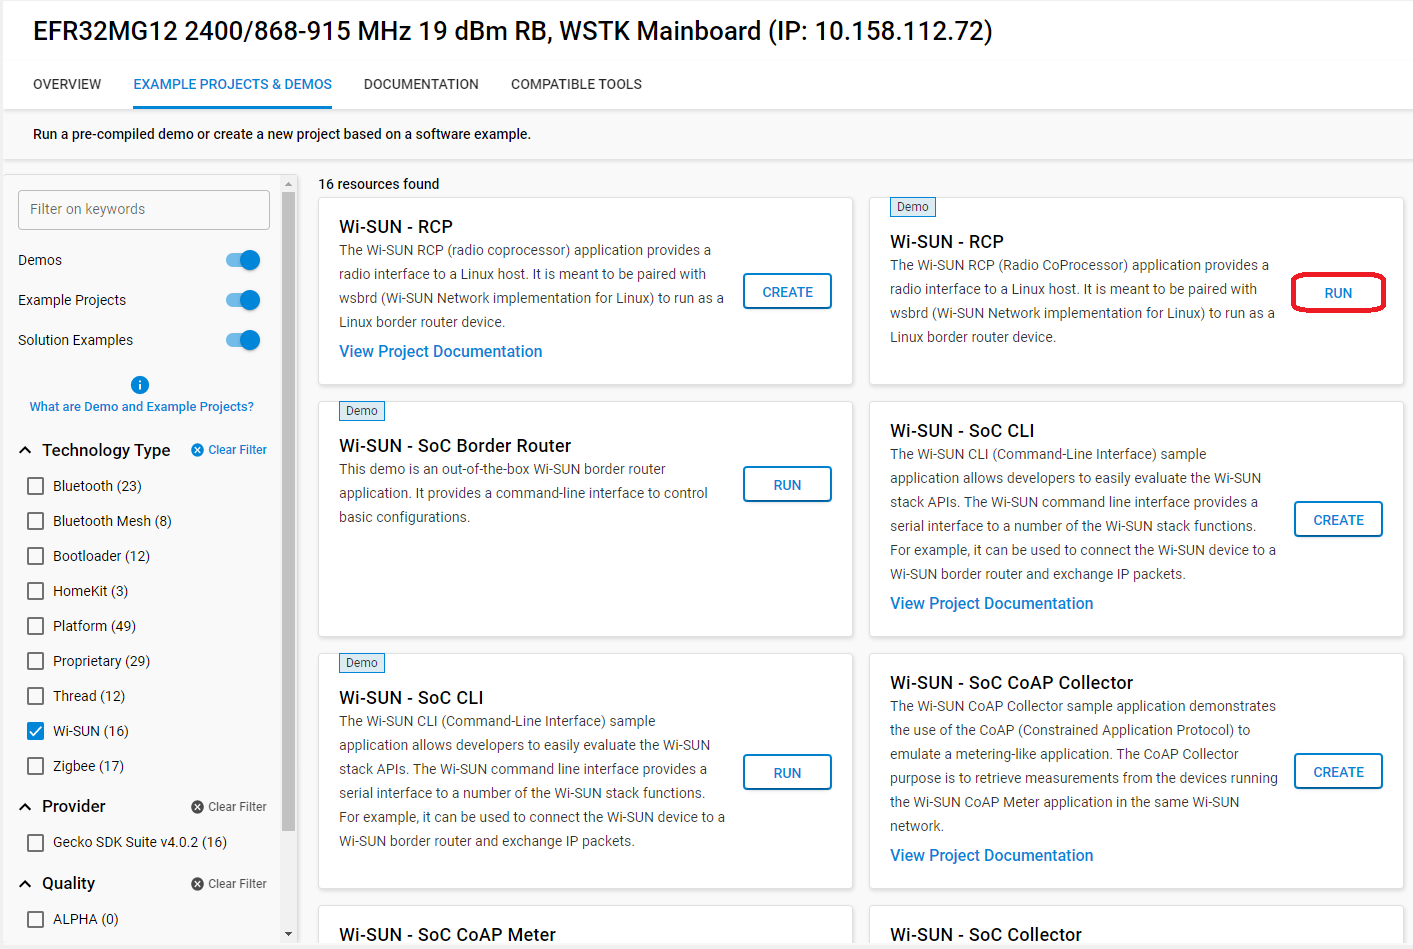
A mandatory step to evaluate the Silicon Labs Wi-SUN Linux border router solution is to flash the Wi-SUN RCP image on an EFR32. The first possibility is to use the image or project delivered through Simplicity Studio 5. Create the Wi-SUN – RCP project, compile, and flash it in your mainboard. To do so, complete the following steps:
In the Debug Adapters view, select the device to be used as the Wi-SUN RCP.
Navigate to the EXAMPLE PROJECTS & DEMOS tab and turn off the Example Projects filter.
Click RUN next to the Wi-SUN – RCP project.
wsbrd#
To install and run wsbrd on your hardware:
Connect the EFR32 flashed with the RCP image to the Raspberry Pi through USB.
Download the wsbrd software on your Linux device.
Follow the guidelines provided in the repository readme (Wi-SUN Linux Border Router repository ).
When starting wsbrd and if it is running as expected, you should see a similar trace on the terminal.
$ sudo wsbrd -F examples/wsbrd.conf -u /dev/ttyACM0
Silicon Labs Wi-SUN border router v1.0.0
Connected to RCP "0.12.0" (0.12.0), API 0.12.0
[DBG ][core]: Allocate Root Tasklet
[DBG ][6lo ]: P.Init
Successfully registered to system DBus
[DBG ][core]: NS Root task Init
[DBG ][sck ]: Socket Tasklet Generated
[INFO][wsbs]: WS tasklet initIn the traces, the wsbrd, RCP, and API versions are output. The wsbrd automatically checks the RCP and API versions to confirm they are valid and supported by the wsbrd version running.
If the default configuration is used, a new border router is advertising a network with the name “Wi-SUN Network”. On the Raspberry Pi, a new IP interface is created with the name “tun0”. Here is an example of the IP configuration once wsbrd is running.
tun0: flags=4305<UP,POINTOPOINT,RUNNING,NOARP,MULTICAST> mtu 1500
inet6 fd12:3456::7c3f:f8e7:55c5:e07f prefixlen 64 scopeid 0x0<global>
inet6 fe80::d0a6:c144:ad24:9b1d prefixlen 64 scopeid 0x20<link>
unspec 00-00-00-00-00-00-00-00-00-00-00-00-00-00-00-00 txqueuelen 500 (UNSPEC)
RX packets 10 bytes 752 (752.0 B)
RX errors 0 dropped 0 overruns 0 frame 0
TX packets 3 bytes 144 (144.0 B)
TX errors 0 dropped 0 overruns 0 carrier 0 collisions 0The “tun0” interface can be natively used to interact with the Wi-SUN devices connected to the Linux border router.
Interact with a Running wsbrd Instance#
wsbrd Command Line Interface#
wsbrd provides a command line interface to interact with the Linux border router when it is running. The interface can be used to retrieve configurations like the network name, Wi-SUN PHY configuration, PAN ID, GAK/GTK and LGAK/LGTK keys, and the MAC Addresses of the border router and the connected nodes. You can use the “wsbrd_cli status” command to view the list of configurations. For help, use the command “wsbrd_cli help”.
$ wsbrd_cli status
network_name: Wi-SUN Network
fan_version: FAN 1.1
domain: NA
phy_mode_id: 2
chan_plan_id: 1
panid: 0x3f48
size: SMALL
GAK[0]: 0f:a7:bc:8e:fa:1f:a3:22:6b:15:30:80:dd:06:6d:e7
GAK[1]: 95:03:54:82:78:c2:01:69:79:96:96:72:9a:f9:08:b9
GAK[2]: 95:03:54:82:78:c2:01:69:79:96:96:72:9a:f9:08:b9
GAK[3]: 95:03:54:82:78:c2:01:69:79:96:96:72:9a:f9:08:b9
GTK[0]: e9:a6:e0:19:00:8d:ae:12:4a:1d:73:93:ee:53:c6:6b
GTK[1]: 00:00:00:00:00:00:00:00:00:00:00:00:00:00:00:00
GTK[2]: 00:00:00:00:00:00:00:00:00:00:00:00:00:00:00:00
GTK[3]: 00:00:00:00:00:00:00:00:00:00:00:00:00:00:00:00
LGAK[0]: a5:01:bf:df:aa:fa:da:84:a5:9d:9c:41:53:31:03:9e
LGAK[1]: 95:03:54:82:78:c2:01:69:79:96:96:72:9a:f9:08:b9
LGAK[2]: 95:03:54:82:78:c2:01:69:79:96:96:72:9a:f9:08:b9
LGTK[0]: 61:ff:86:39:6c:ec:00:52:c9:fd:27:90:f1:db:f7:f5
LGTK[1]: 00:00:00:00:00:00:00:00:00:00:00:00:00:00:00:00
LGTK[2]: 00:00:00:00:00:00:00:00:00:00:00:00:00:00:00:00
38:39:8f:ff:fe:99:9b:e4DBus Interface#
The DBus interface can also interact with the Linux border router when it’s running and retrieve static configurations. It is also able to trigger actions like adding or revoking root certificates and revoking a Wi-SUN device access to the network. You can execute the command busctl introspect com.silabs.Wisun.BorderRouter /com/silabs/Wisun/BorderRouter to see the list of all the properties that can be retrieved with in the DBus interface and the methods that can be used. For example, to read a DBus property execute the following command:
$ busctl get-property com.silabs.Wisun.BorderRouter /com/silabs/Wisun/BorderRouter com.silabs.Wisun.BorderRouter WisunNetworkName
s "Wi-SUN Network"For additional information on the interface usage, refer to the D-Bus API documentation.
Raspberry Pi Adapter BRD8016A#
BRD8016A is an excellent solution to build a Wi-SUN Linux Border Router on top of a Raspberry Pi, together with a Wi-SUN Radio Board used as the Wi-SUN device. The Wi-SUN Linux Border Router is ultimately made of 3 boards stacked together:
• Raspberry Pi (Linux host)
• BDR8016A (Adapter Board)
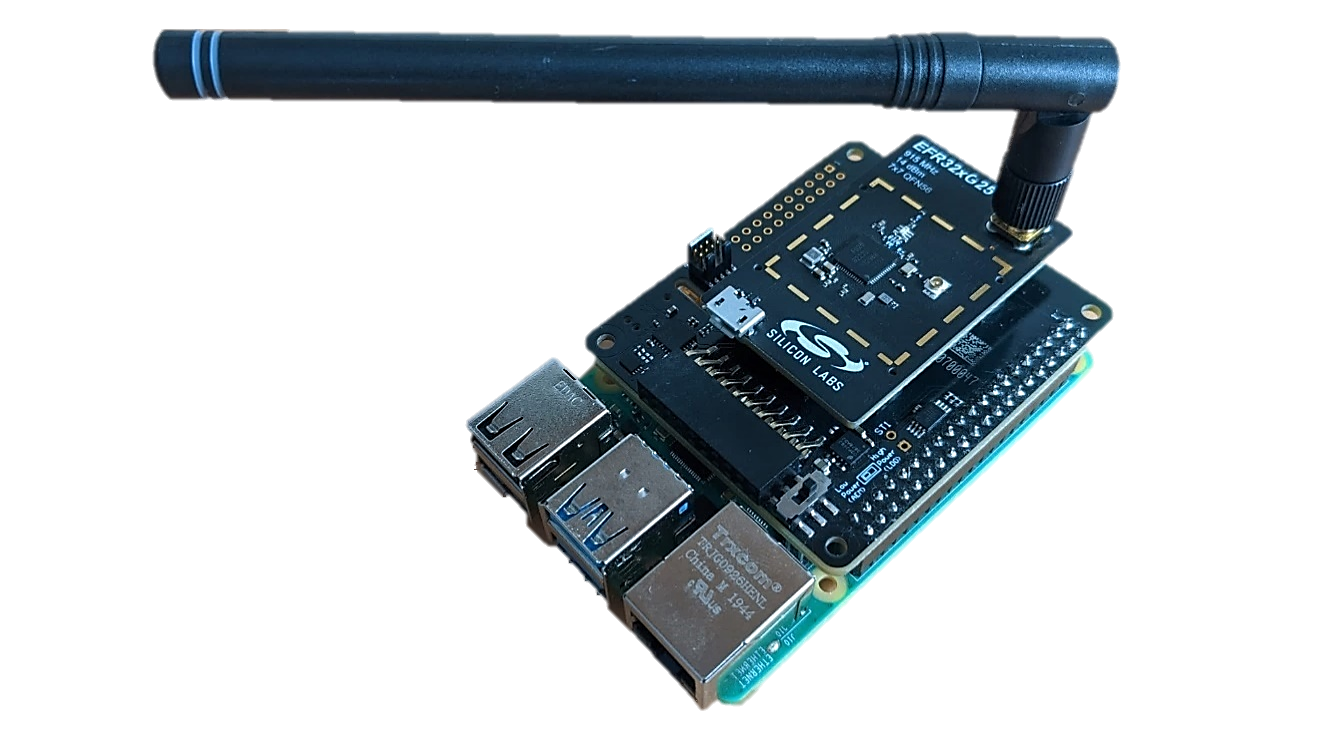
• Radio Board (RCP: Radio Co-Processor)
This setup is an alternative to connecting the Raspberry Pi to the Radio Board over USB via a WSTK/WPK mainboard, as initially described in the Wi-SUN Linux Border Router README.
wsbrd configuration#
This setup uses the Normal UART instead of UART over USB usually used with the WSTK/WPK. For the wsbrd to use the Normal UART, change the following option in the wsbrd.conf file:
uart_device = /dev/ttyAMA0Raspberry Pi Boot Configuration#
To use the Normal UART by the Raspberry Pi, change the configuration in /boot/config.txt. Because of the way Raspberry Pi 2/3/4 are wired, to get a good UART clock, it is required to disable Bluetooth and use GPIOs 14 and 15 for /dev/ttyAMA0. See the Raspberry Pi documentation for details. To achieve this, the following changes need to be added at the end of /boot/config.txt:
[all]
dtoverlay=disable-bt
enable_uart=1
gpio=23=op,dhIt is required to reboot the Raspberry Pi following such changes:
sudo rebootAfter rebooting your Raspberry Pi, follow these steps to enable shell messages on the serial connection and disable the login shell over serial:
Open Raspberry Pi configuration GUI:
sudo raspi-configSelect
3 Interface Options Configure connections to peripheralsSelect
I6 Serial Port Enable/disable shell messages on the serial connectionAnswer “No” to the question “Would you like a login shell to be accessible over serial?”
Answer “Yes” to the question “Would you like the serial port hardware to be enabled?”
Choose to reboot your Raspberry Pi
Now that the Raspberry Pi is configured, connect the RCP to the adapter and start wsbrd.
Note that the switch on the adapter (BRD8016A) must be on High Power (LDO) to use 5V from the Raspberry Pi to generate a regulated 3.3V supply.