


Z-Wave Plus v2 Applications#
Because starting application development from scratch is difficult, the Z-Wave and Z-Wave Long Range SDK comes with several Z-Wave certified applications covering the most frequent use cases.
The Switch On/Off application is a good starting point for new Z-Wave developers who wish to familiarize themselves with the protocol.
Z-Wave SDK 8.1.x includes Z-Wave Plus v2 end-device applications for Z-Wave Series 800 devices. The applications are implemented according to the applicable Z-Wave Plus v2 specifications [1], [2], [3], [4], [5], [6], [7] and [8]. All Z-Wave specifications are available on the Z-Wave Alliance website (Member login - select Specifications under the Home tab).
Overview of Z-Wave Certified Applications#
The SDK comes with the following Z-Wave certified applications:
Door Lock (project:
zwave_soc_door_lock_keypad). Shows an implementation of a door lock. It supports user codes and, thereby, eliminates the need for traditional keys. It is possible to both lock and unlock the door remotely through Z-Wave.LED Bulb (project:
zwave_soc_led_bulb). Shows an implementation of a remotely controlled color switch capable device, such as an LED bulb.Multilevel Sensor (project:
zwave_soc_multilevel_sensor). Shows a reporting sleeping sensor that advertises numerical sensor readings, such as temperature and humidity.Power Strip (project:
zwave_soc_power_strip). Shows an extension block implementation to turn on a number of devices that are connected to power. Examples include lights, appliances, etc.Sensor PIR (project:
zwave_soc_sensor_pir). Shows a presence/movement detector implementation for controlling other devices and for sending notifications.Switch On/Off (project:
zwave_soc_switch_on_off). Shows a switch implementation to turn on any device that is connected to power. Examples include lights, appliances, etc.Wall Controller (project:
zwave_soc_wall_controller). Shows a push-button switch panel implementation to control devices in the Z-Wave network from push buttons (physical or virtual) on a device that is meant to be mounted on a wall. Examples include scene and zone controller and wall-mounted AV controllers.
Detailed descriptions are available in each application's README in the created Simplicity Studio project or in the installed SDK under \zwave_sample_app\. The Silicon Labs Z-Wave API reference also publishes the application documentation.
All applications are built on the Z-Wave Plus v2 Framework [9].
Z-Wave certified applications can operate in a Z-Wave network with certified devices from other manufacturers. Mains-powered always-listening nodes act as repeaters in a Z-Wave mesh network, regardless of vendor, to improve network reliability.
Before flashing a different sample application, factory-reset or mass-erase the Series 800 SoC as appropriate for the workflow. Retained NVM data from a previous application can affect the new application.
Refer to the table below for an overview of the functionality covered by the Z-Wave Plus v2 applications.
Functionality | Door Lock | LED Bulb | Multilevel Sensor | Power Strip | Sensor PIR | Switch On/Off | Wall Controller |
|---|---|---|---|---|---|---|---|
Role Type | |||||||
Always On End Device | ✓ | ✓ | ✓ | ✓ | |||
Reporting Sleeping End Device | ✓ | ✓ | |||||
Listening Sleeping End Device | ✓ | ||||||
Multi-channel | |||||||
Endpoints | ✓ | ||||||
Security (see Note 1) | |||||||
S2 Access | ✓ | ||||||
S2 Authenticated | ✓ | ✓ | ✓ | ✓ | ✓ | ✓ | |
S2 Unauthenticated | ✓ | ✓ | ✓ | ✓ | ✓ | ✓ | |
S0 | ✓ | ✓ | ✓ | ✓ | ✓ | ✓ | |
Main functionality | |||||||
Binary Switch | ✓ | ✓ | |||||
Central Scene | ✓ | ||||||
Door Lock | ✓ | ||||||
Firmware Update | ✓ | ✓ | ✓ | ✓ | ✓ | ✓ | ✓ |
Multilevel Sensor | ✓ | ||||||
Multilevel Switch | ✓ | ✓ | |||||
Notification | ✓ | ✓ | |||||
User Code | ✓ | ||||||
Color Switch | ✓ |
Note 1: S2 Authenticated is the lowest key class allowed for Z-Wave Long Range based devices. A node requesting the S0 key during Z-Wave inclusion will not request that key during Z-Wave Long Range inclusion. In addition, if the node is included as a Z-Wave Long Range node, Command Class Security S0 will not be listed in the NIF.
General User Interface#
The following base controls apply when the supported applications run on the Series 800 development-board setup described in Software and Hardware, including the BRD4002A mainboard and BRD8029A buttons and LEDs expansion board. Product hardware and individual applications can map these functions differently.
Button/LED | Action | Description |
|---|---|---|
RST | Press | Resets the firmware of an application (like losing power). All volatile memory will be cleared. |
BTN1 | Press | Enter "learn mode" (sending node info frame) to add/remove the device. Removing the device from a network will reset it. |
Hold for at least 5 seconds and release | Perform a reset to factory default operation of the device, and a Device Reset Locally Notification Command is sent via Lifeline. | |
LED1 | n/a | Blinks with 1 Hz when learn mode is active. Used for Indicator Command Class. |
How to trigger indicator LED#
The indicator LED will flash when using indicator ID 0x50 (Identify).
SmartStart#
SmartStart-enabled products can be added into a Z-Wave network by scanning the Z-Wave QR Code present on the product with a controller providing SmartStart inclusion. No further action is required, and the SmartStart product will be added automatically within 10 minutes of being switched on in the network vicinity. The Z-Wave certified applications are not labeled with a QR Code. However, QR Codes are generated internally in the SoC and can be retrieved via Simplicity Studio. Right-click on your connected hardware in the Debug Adapters section in Simplicity Studio, then right-click and select Device Configuration from this menu, and select Z-Wave Device Settings.
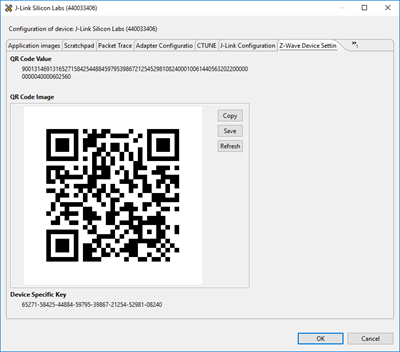
In this view, the entire QR Code Value and the corresponding QR Code Image is shown. In addition, the Device Specific Key (DSK) is shown.
This DSK can be compared against the Z-Ware UI, PC Controller dialog box, or other Controller UI. If needed, the first decimal group of the DSK can be typed in for S2 secure inclusion.