Finding and Binding#
Overview of Finding and Binding#
As we know, a switch always binds to a light in a Zigbee network. Is there any easy way to implement it? The answer is yes, finding and binding can be used here.
Finding and Binding is a cluster commissioning method to establish application connection automatically, which can be invoked by user interaction on two or more endpoints on two or more nodes. This method identifies and discovers endpoints using the Identify cluster. For each match between corresponding application clusters on the endpoints, binding is created at the initiator of the application transaction.
For example, both the switch and light have an On/Off cluster. The binding for the On/Off cluster will be created after the finding and binding operations are completed on both sides.
Which device needs perform Finding and Binding#
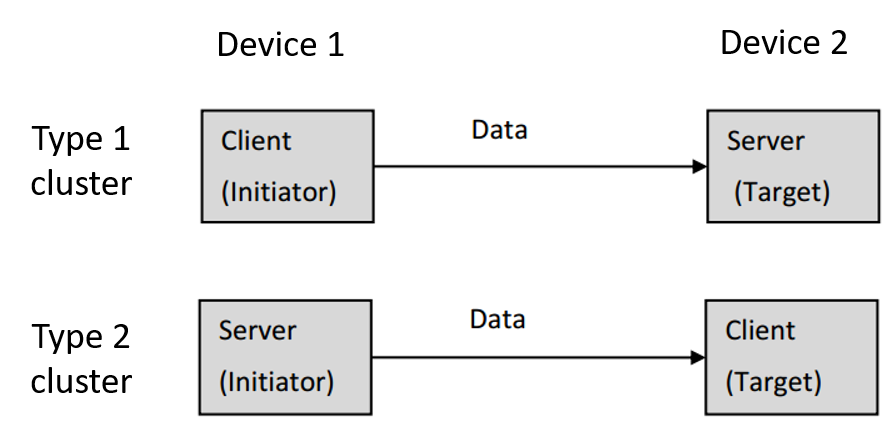
There are two kinds of clusters: Type 1 and Type 2. An application cluster is either a Type 1 or Type 2 cluster, depending on its primary functional transactions. A transaction has an initiator and a target.
A Type 1 cluster’s primary function is to initiate transactions from the client to the server. For example: An On/Off client sends commands (data) to the On/Off server.
A Type 2 cluster’s primary function is to initiate transactions from the server to the client. For example: A Temperature Measurement server reports to the Temperature Measurement client.
For a Type 1 client or a Type 2 server cluster, the application shall perform finding and binding as an initiator endpoint.
For a Type 1 server or a Type 2 client cluster, the application shall perform finding and binding as a target endpoint.
In summary:
The application SHALL perform finding and binding as an initiator endpoint
Type 1 client cluster
Type 2 server cluster
The application SHALL perform finding and binding as a target endpoint
Type 1 server cluster
Type 2 client cluster
Finding and Binding procedure#
For a target endpoint#
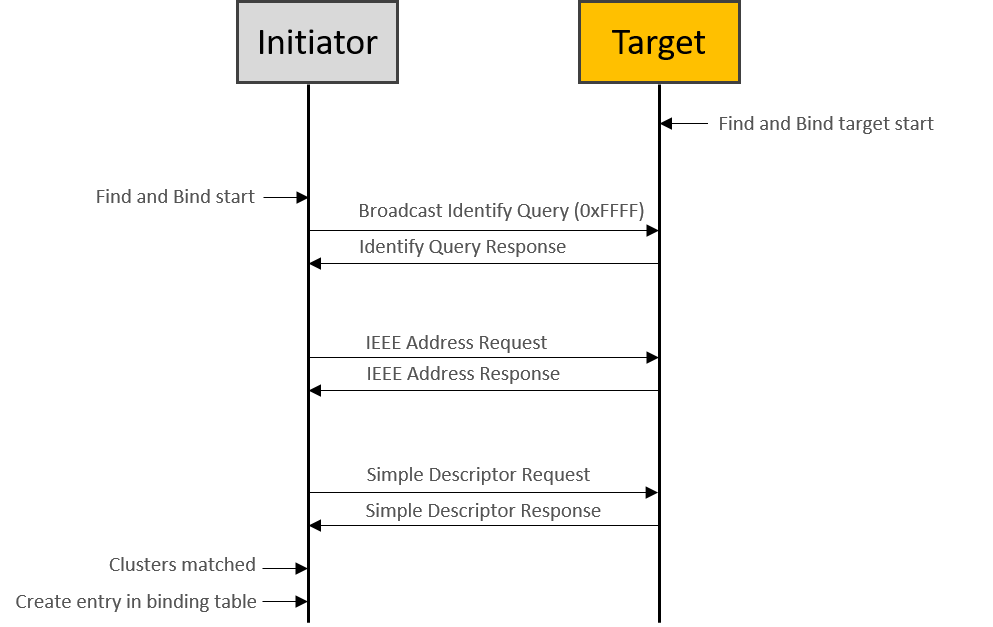
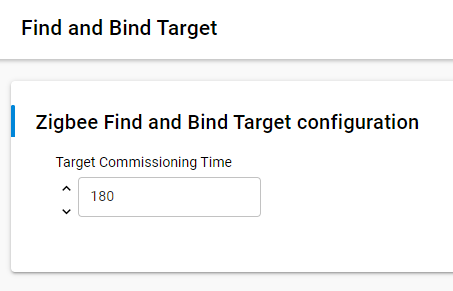
On the finding and binding target endpoint, once the finding and binding target start, it will write the Time attribute of the Identify cluster to make sure the target can be identified. In Software Components, the Time attribute can be configured in “Find and Bind Target” component and the default value is 180 seconds. During the identify time, the target should respond to the Identify Query from the initiator. Once the decrementing Identify's Time attribute reaches zero, the target shall terminate the finding and binding procedure.
It means that the finding and binding target should write the Time attribute of the Identify cluster to make sure it can be identified during the finding and binding procedure.
In Software Components, the Identify Time can be configured in “Find and Bind Target” component and the default value is 180 seconds.
For an initiator endpoint#
On the finding and binding initiator endpoint, it broadcasts Identify Query to all nodes which include sleepy end device (using the broadcast address 0xffff). If no Identify Query, Identify Query Response commands received, the initiator sets status to NO_IDENTIFY_QUERY_RESPONSE and terminates the finding and binding procedure.
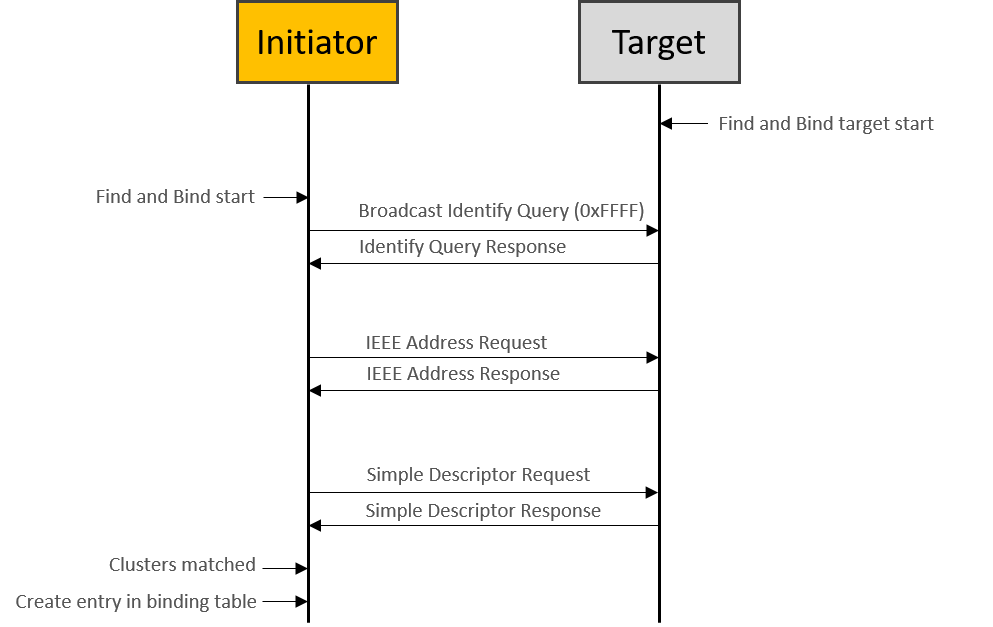
If at least one Identify Query Response is received, the initiator sends IEEE address request to get the EUI64 of the target, which will be used for binding table entry later. And then the initiator sends Simple Descriptor Request to get the clusters info on target. Once some clusters matched between initiator and target endpoints, then the binding is created for every matched clusters on initiator. If a group binding is requested, the initiator endpoint configures group membership of the target endpoint, which means that the initiator unicasts “Add Group” command to the target.
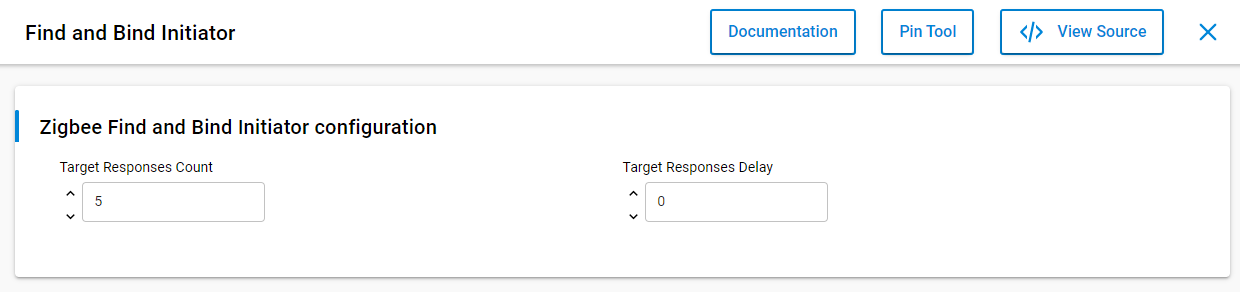
In Software Components, there are two options that can be configured in the “Find and Bind Initiator” component. The “Target Responses Count” means the number of the target responses that the initiator will accept. The “Target Responses Delay” means how long the initiator will listen for target responses. You can feel free to configure these options to fit your user case.
The APIs to start finding and binding operations#
The API to start target finding and binding operations is emberAfPluginFindAndBindTargetStart(), which can be found in find-and-bind-target.h. It is a call to this function will commence the target finding and binding operations. Specifically, the target will attempt to start identifying the endpoint that is passed as a parameter. The EmberAfStatus value describing the success of the commencement of the target operations.
As the similar, the API to start initiator finding and binding operations is emberAfPluginFindAndBindInitiatorStart(), which can be found in find-and-bind-initiator.h. It is a call to this function will commence the initiator finding and binding operations. Specifically, the initiator will attempt to start searching for potential bindings that can be made with identifying targets. The EmberStatus value describing the success of the commencement of the initiator operations.
Please note that the target should be started first during the finding and binding procedure.
Testing on Z3Light and Z3Switch sample#
It is easy to set up the testing for finding and binding with Z3Light and Z3Switch samples.
First you can build the two samples directly, download the firmware to the kits separately, and then join to the same Zigbee 3.0 network formed by a Z3Gateway.
On the Z3Light side, launch the console and type CLI command plugin find-and-bind target 1.
Z3Light>plugin find-and-bind target 1
Find and Bind Target: Start target: 0x00
T00000000:RX len 3, ep FF, clus 0x0003 (Identify) FC 01 seq 00 cmd 01 payload[]
T00000000:RX len 5, ep 01, clus 0x0003 (Identify) FC 00 seq 00 cmd 0B payload[00 00]
On the Z3Switch side, launch the console and type CLI command plugin find-and-bind initiator 1.
Z3Switch>plugin find-and-bind initiator 1
Processing message: len=3 profile=0104 cluster=0003
T00000000:RX len 3, ep FF, clus 0x0003 (Identify) FC 01 seq 00 cmd 01 payload[]
Processing message: len=5 profile=0104 cluster=0003
T00000000:RX len 5, ep 01, clus 0x0003 (Identify) FC 09 seq 00 cmd 00 payload[72 00 ]
T00000000:TX (resp) Ucast 0x00 TX buffer: [00 00 0B 00 00 ]
Processing message: len=12 profile=0000 cluster=8001
Processing message: len=25 profile=0000 cluster=8004
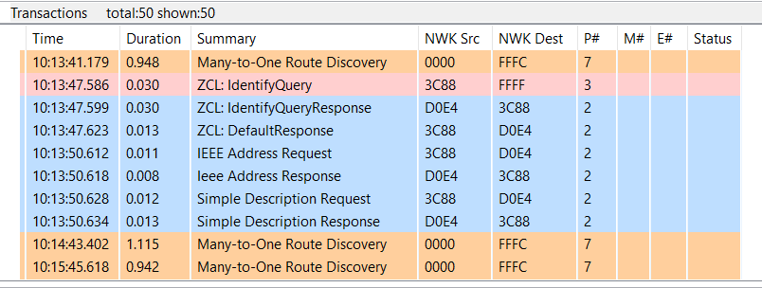
Find and bind initiator complete: 0x00You will see the log “Find and bind initiator complete: 0x00” printed on the console after the finding and binding procedure finishes. When you print the binding table on Z3Switch side (initiator), you will see the entries are created in the binding table. All the matched clusters between the initiator and target are bound. The finding and binding transactions can be found in packet trace, which proves the finding and binding working flow works as expected.
Z3Switch>option binding-table print
#  type   nwk  loc   rem   clus   node   eui
0: UNICA  0    0x01  0x01  0x0003 0xD0E4 (>)000B57FFFE648DA0
1: UNICA  0    0x01  0x01  0x0006 0xD0E4 (>)000B57FFFE648DA0
2: UNICA  0    0x01  0x01  0x0008 0xD0E4 (>)000B57FFFE648DA0
3 of 10 bindings used
Let’s summarize how the finding and binding procedure works.
On the target side, it will write the Identify Time attribute for EMBER_AF_PLUGIN_FIND_AND_BIND_TARGET_COMMISSIONING_TIME. During the duration, the initiator broadcasts Identify Query and the target responds Identify Query Response. Then the initiator sends IEEE Address Request to the target to get the EUI64 of target, which will be used in creating binding table. The Simple Descriptor Request will be sent to target to get the clusters info on target side. Once the clusters matched, the entries will be created in binding table of initiator.