Application Development#
Prototyping APIs#
To automate device creation for prototyping, scripts are provided that create the necessary objects in the cloud and the manufacturing page. The required scripts are available in the Amazon getting started Github repository. To set up a prototype device and register it to the network the following steps are necessary:
Deploy your application in AWS
Compile and flash an application for your embedded device
Create a device profile in AWS
Create a wireless device in AWS
Generate a manufacturing page
Flash the manufacturing page to your embedded device
You can deploy your AWS application automatically using dedicated tools like Amazon CloudFormation. You can compile and flash your application using Simplicity Studio 5. To create the device profile, wireless device, and manufacturing page you can use the prototyping tool proposed by Amazon.
Remember to install the requirements listed in the requirements.txt file at the root of the repository with pip3 install -r requirements.txt.
The script configuration is handled by a YAML file like the following:
Config:
AWS_PROFILE: default # Name of your AWS profile from .aws/credentials
DESTINATION_NAME: CFSDestination # Sidewalk destination used for uplink traffic routing
HARDWARE_PLATFORM: SILABS
USERNAME: null
PASSWORD: null
INTERACTIVE_MODE: True
Outputs:
DEVICE_PROFILE_ID: null
WEB_APP_URL: null
_Paths:
PROVISION_SCRIPT_DIR: tools/provision
SILABS_COMMANDER_TOOLS_DIR: null # Not needed if Silabs Commander is already in system Path. Only needed for SILABS.The first block is used to configure the cloud side:
AWS_PROFILE: Used to choose the AWS CLI profile linking to the correct credentials. If you do not use profiles, you can leave the default.DESTINATION_NAME: Should be the name of the destination used by your AWS cloud application.HARDWARE_PLATFORM: Should be SILABS for Silicon Labs products.
The second block controls the device details:
DEVICE_PROFILE_ID: If this is your first time running the script, it should be empty (null).
The third block defines the toolchain used to create the manufacturing page:
PROVISION_SCRIPT_DIR: Should link to the folder containing theprovision.pyscript.SILABS_COMMANDER_TOOLS_DIR: Should link to the folder containing the Simplicity Commander executable.
The parameters USERNAME, PASSWORD, INTERACTIVE_MODE and WEB_APP_URL are only needed for the Amazon Sensor app cloud application. Simplicity Studio 5 example applications can keep the default values.
On the first run, the script will create a prototyping device profile and will fill the DEVICE_PROFILE_ID with the resulting device ID. All subsequent wireless devices will be created using this device profile. Note that during prototyping, a device profile can be linked to a maximum of 1000 wireless devices.
To start the script, execute the following:
python3 EdgeDeviceProvisioning/provision_sidewalk_end_device.py --instances <number_of_instances>number_of_instances is the number of devices you want to create (default value is 1).
The script creates a directory structure as follows in the EdgeDeviceProvisioning folder:
DeviceProfile_7c51bc6b-0556-2083-6f0d-aeb750c94508
├── DeviceProfile.json
└── WirelessDevice_db57b1c9-22ad-c052-07ae-1e1cae9bb384
├── SiLabs_MFG.nvm3
├── Silabs_xG21.s37
├── Silabs_xG24.s37
└── WirelessDevice.jsonThe first directory is named with the device id of your device profile and contains DeviceProfile.json, which contains your device profile information. Then a directory is created for every wireless device you created. One wireless device contains manufacturing pages for all supported platforms and a WirelessDevice.json file containing your device information (including private keys).
Non-Volatile Memory Use#
Amazon Sidewalk example applications use non-volatile memory to store the application code, registration information, and manufacturing data. This section describes how this memory is used for each type of data stored.
In addition to the application code, three other NVM3 instances are used in an Amazon Sidewalk project:
Default
Manufacturing
Key-value storage
The default instance is mostly used by the Gecko SDK Suite (GSDK) for BLE stack status and cryptographic storage. This is where the wrapped private keys are stored when using Secure Vault. For more information see [the dedicated page](place holder link for platform resources).
The manufacturing instance is used to store the manufacturing page generated for every device. The manufacturing page contains various information such as device public keys, signatures, and Sidewalk Manufacturing Serial Number (SMSN). This instance is read-only from application code.
The Key-value storage contains information about the Amazon Sidewalk stack. The way the key-value pairs are stored on NVM3 is a bit different from the way the manufacturing information is stored. Objects are stored under groups, so there is actually one NVM3 object (so-called group) to store different information. The size of this instance depends on the needs of the stack (depending on the link layer). The values stored in the instance are not part of the public Amazon Sidewalk APIs. This instance is accessible in read-write from application code.
For more information on Silicon Labs NVM driver, see the dedicated documentation NVM3 - NVM Data Manager. For background on NVM3, see the Platform Resources section.
Memory Map for EFR32xG21 Series#
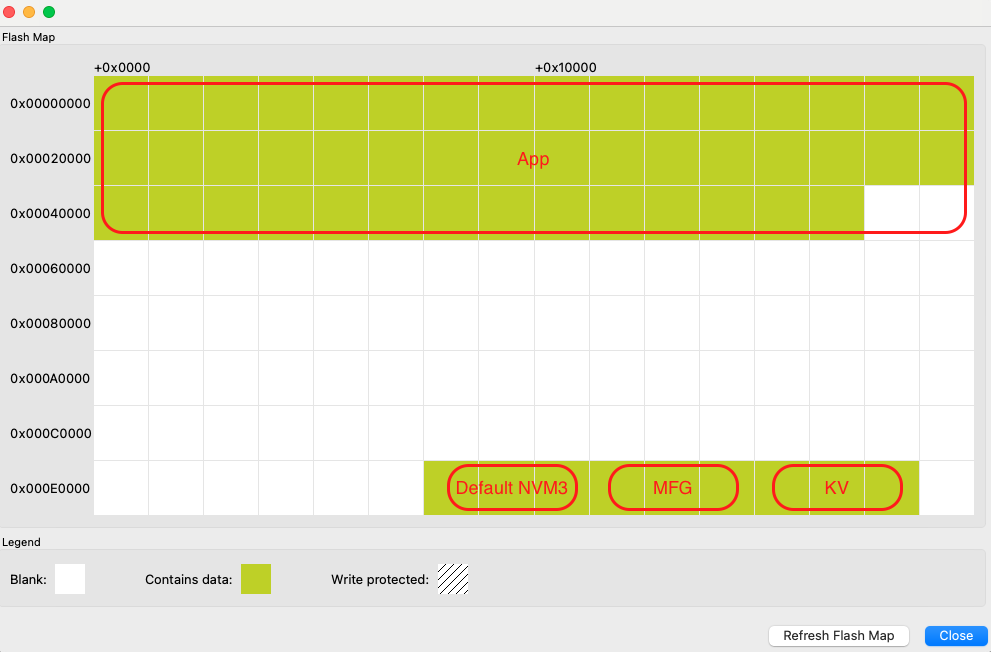
Region | Base Address | End Address | Size | Description |
|---|---|---|---|---|
Application | 0x00000000 | - | - | Application code - size depends on application |
Default NVM3 Instance | 0x000EC000 | 0x000F2000 | 0x6000 | Used for BLE stack. Wrapped keys are stored here when using Secure Vault. |
Manufacturing page NVM3 Instance | 0x000F2000 | 0x000F8000 | 0x6000 | Manufacturing data - Read-only from Sidewalk Application context |
Key-value Storage NVM3 Instance | 0x000F8000 | 0x000FE000 | 0x6000 | Sidewalk stack and registration status - Read/Write from Sidewalk Application context |
Those addresses are given as an example for an EFR32xG21 with a flash size of 1024 kB. Base addresses can change to adapt to smaller flash sizes. You can use Simplicity Commander to display the memory layout of your application:
With your kit selected, go to Device Info panel.
Select Flash Map in Main Flash panel.
Memory Map for EFR32xG24 Series#
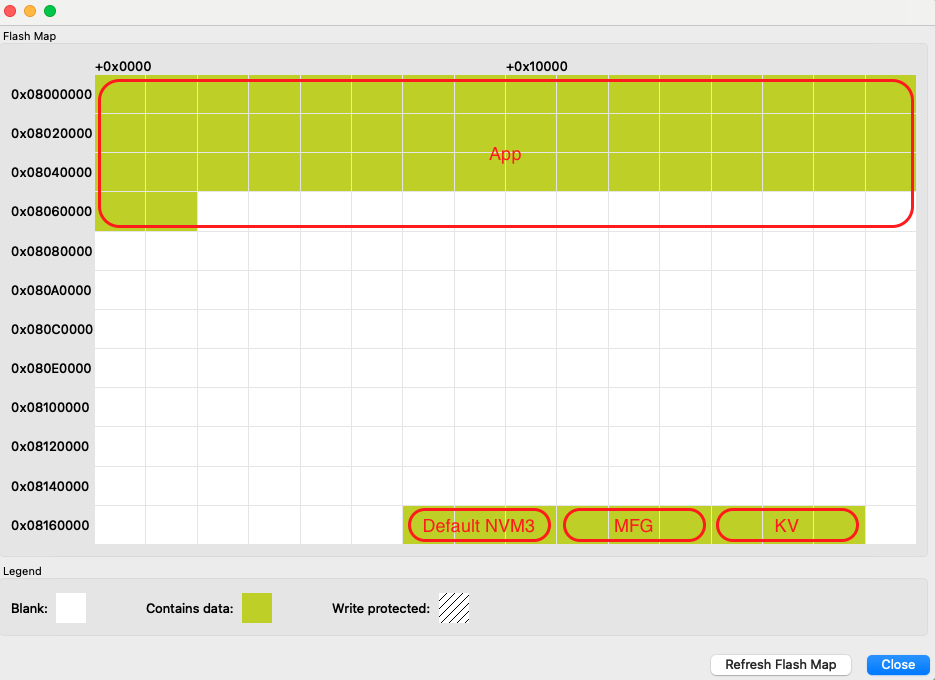
Region | Base Address | End Address | Size | Description |
|---|---|---|---|---|
Application | 0x08000000 | - | - | Application code - size depends on application |
Default NVM3 Instance | 0x0816C000 | 0x08172000 | 0x6000 | Used for BLE stack. Wrapped keys are stored here when using Secure Vault. |
Manufacturing page NVM3 Instance | 0x08172000 | 0x08178000 | 0x6000 | Manufacturing data - Read-only from Sidewalk Application context |
Key-value Storage NVM3 Instance | 0x08178000 | 0x0817E000 | 0x6000 | Sidewalk stack and registration status - Read/Write from Sidewalk Application context |
Those addresses are given as an example for an EFR32xG24 with a flash size of 1536 kB. The base addresses can change to adapt to smaller flash sizes. You can use Simplicity Commander to display the memory layout of your application:
With your kit selected, go to Device Info panel.
Select Flash Map in Main Flash panel.
Credentials Backup/Restore Feature#
The out-of-the-box (OOB) application provided with the Pro Kit has a feature that allows users to erase the flash memory without losing the device private keys and other device-specific information. The feature relies on the user data partition that is not affected by mass-erase but it can still be erased. This feature can be used alongside Secure Vault seamlessly.
The manufacturing page needs to persist in order for the application to work in the Amazon Sidewalk network. This data can be divided on two groups, one for device-specific information and the other for information common to all devices created under the same device profile. As the capacity of the user data partition is quite limited, the common information is stored in the application code and only the device-specific information is backed up on the user data partition.
To generate the header file that must be included in the application, use the nvm3_to_c_array_converter script.
The following flow diagram shows the backup/restore feature workflow.
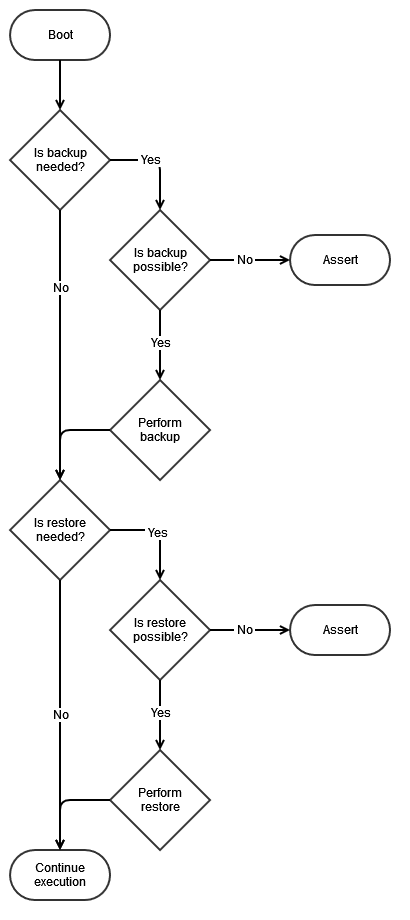
The Backup feature is used to copy device-specific information from the manufacturing page onto the user data partition. There is no need to copy common information as it is hard-coded in the application. Backup takes place when the application cannot detect any backed up data on the user data partition. This implies that, if the user data partition is erased but not the application, then the application will perform a backup process after each boot.
The Restore feature is used to copy device-specific information from the user data partition and common information from the OOB application code onto the manufacturing page. Restore takes place when the application cannot detect any valid manufacturing page. This implies that, if the device is mass-erased, then the application will perform a restore process after each boot and restore the whole manufacturing page.
Use Cases#
If you erase the main flash: The device should recover the credentials on first boot after flashing the application binary.
If you erase the user data partition: The device should recover by itself on first boot.
If you erase both the main flash and user data partition: Your device credentials are not recoverable.
This is especially important if you have one of Silicon Labs Pro Kits for Amazon Sidewalk. If you wish to use the radio boards with an application other than the demo, you can erase the main flash and use any application you like with your own manufacturing page. As long as you have not erased the user data partition, your device will recover the demo when you flash the out-of-the-box application binary back on your device. You should never erase the user data partition of your Pro Kit's radio boards.
Leveraging Secure Vault#
On Silicon Labs' EFR32 Series 2 platforms, you can leverage Secure Vault to store the device's sensitive data (private keys). A set of scripts, called Dynamic Data Provisioning (DDP), is provided to use the Secure Element in the Amazon Sidewalk context.
The goal of DDP scripts is to facilitate dynamic data provisioning by providing ready-to-use scripts and a way of communicating with the embedded device from a host computer. The DDP flow for development and manufacturing setups stays the same, which makes the transition from development to manufacturing transparent.
Scripts consist of two functions: initialization and provisioning.
The initialization script generates an image with the static data of a Sidewalk device (the common part of the Amazon Sidewalk certificate) and optionally a Sidewalk application. The generated image is identical for all the devices in question.
The provisioning script, on the other hand, flashes the initialization image generated in the previous step, flashes the dynamic data provisioner RAM application, and provisions device-specific information via this application. Each device is provisioned with a unique set of security credentials (device-specific part of the Sidewalk certificate).
Leveraging Secure Vault does not use the manufacturing page (MFG) generated by the prototyping or manufacturing scripts. Instead it uses the WirelessDevice.json and DeviceProfile.json files provided as output of the prototyping scripts described in Prototyping APIs section. The steps are as follows:
The initialization script creates an output file (.s37) containing a part of the manufacturing page that is identical for all the devices created using the same Device Profile.
The output of this initialization script can optionally include the Sidewalk application binary.
The device-specific information is provisioned to the device using the provisioning script. Here, the rest of the manufacturing page on the device will be completed with the device-specific information.
To summarize, the initialization script generates an output file that can be flashed to all devices. Then the provisioning script is used to provision the device credentials. The credentials are wrapped by keys contained in the Secure Vault and stored in the Default NVM3 Instance as described in the Non-Volatile Memory Use section.
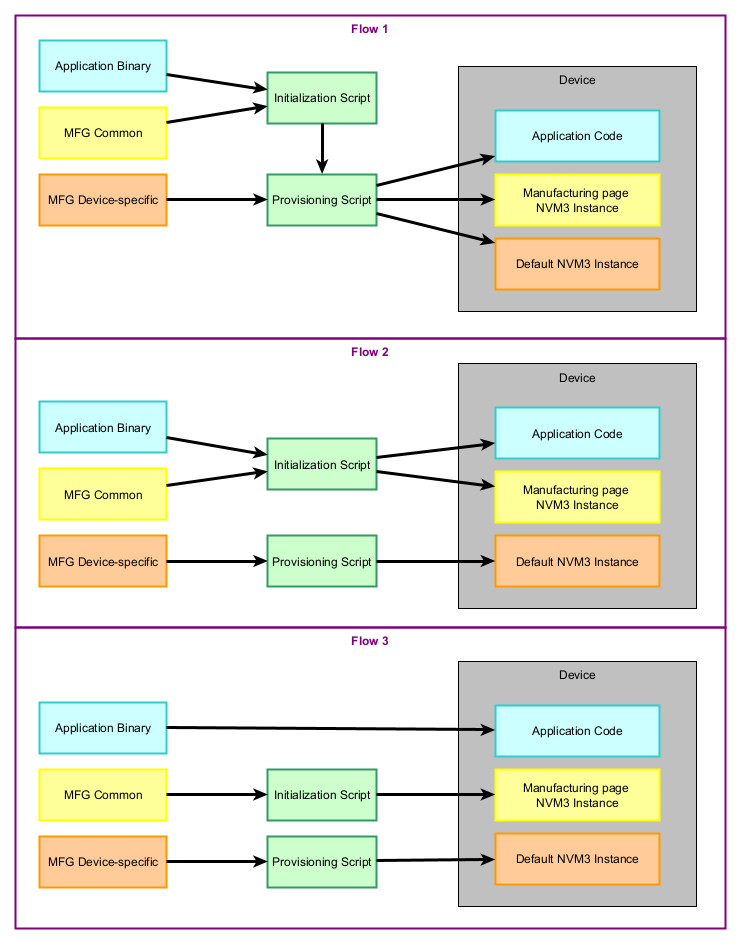
The scripts can be used in three different configurations:
You can include the application binary in the initialization script and use the output of the script in the provisioning script. This flashes both binaries containing the application, MFG common section, and MFG device-specific section.
You can call the initialization script with the application binary. Flash the resulting image, which contains the application and MFG common section, on your device. Then call the provisioning script without the initialization image (init-img) option to flash the remaining MFG device-specific information.
You can omit the application binary in the initialization script (sid-app option). You will have to flash the output of the initialization script (MFG common section) before calling the provisioning one. Then you can call the provisioning script (MFG device-specific section). The application binary can be flashed at any point or added as an argument of the provisioning script (using the init-img option).
In all the flows, the only hard requirement is to flash the output of initialize_silabs.py (sid.s37) before calling silabs_provision.py. The common information in the manufacturing page must be on the device before the device-specific one. See the diagram below for more details.
The DDP scripts are located in ddp/scripts folder of the extension. The folder contains two python scripts (initialization_silabs.py and provision_silabs.py) and a binary file for the secure vault control (ddp_xg2x.bin one for each supported platform). In the following instructions on each script, two commands are shown, one for prototyping and one for manufacturing. The prototyping one can be used with the output files of Amazon prototyping flow (DeviceProfile.json and WirelessDevice.json) while the manufacturing one can be used with Amazon manufacturing flow output files containing the private keys.
Running the Initialization Script#
The initialization script takes an Amazon Sidewalk device certificate, SoC family and Sidewalk application binary as input arguments and generates a binary file that contains the static (common) part of the Sidewalk certificate and the Sidewalk application provided as input arguments. The output binary file is common to all the product instances so it does not contain any device-specific information (device-specific information is provisioned in the next step). This script can be run once to generate the common binary in the production, following these steps:
Navigate to
ddp/scriptsdirectoryRun the commands below
pip3 install -r requirements.txt
# For manufacturing
python3 initialize_silabs.py --cert-file certificate.json --soc <bg21_or_mg21_or_mg24> --sid-app <sidewalk_application.s37> --out-file sid.s37 --prod
# For prototyping
python3 initialize_silabs.py --cert-file WirelessDevice.json --dev-profile DeviceProfile.json --soc <bg21_or_mg21_or_mg24> --sid-app <sidewalk_application.s37> --out-file sid.s37At the end of this step, an output file (in ddp/scripts/out) that contains the static (common) part of the Sidewalk certificate and the Sidewalk application is generated. It will be used as an input argument in the next step.
Running the Provisioning Script#
The provisioning script takes a Sidewalk device certificate, SoC family, initialization image (generated in the previous step) and provisioning image (ddp_mg24.bin) as input arguments and provisions the end device with device credentials extracted from the Sidewalk device certificate. This script must be run per device in production, using the following steps:
Connect a main board and a supported radio board (BRD4181C, BRD4187C, or BRD4332A)
Navigate to
ddp/scriptsdirectory (it must have been done previously in theory)Run the following commands
Ⓘ INFO Ⓘ: If you prefer to flash the initialization image before the provisioning, you can skip the
--init-imgargument.
# For manufacturing
python3 provision_silabs.py --cert-file certificate.json --soc <bg21_or_mg21_or_mg24> --init-img out/sid.s37 --prov-img <sidewalk_dynamic_data_provisioner.bin> --prod
# For prototyping
python3 provision_silabs.py --cert-file WirelessDevice.json --soc <bg21_or_mg21_or_mg24> --init-img out/sid.s37 --prov-img <sidewalk_dynamic_data_provisioner.bin>At the end of this step, the Sidewalk end device is provisioned with device-specific credentials.
Modify Application Code#
To enable Secure Vault in the application, you must modify your code as follow:
In file app_init.c, add function silabs_crypto_enable_sv extern definition.
/* Enable Secure Vault for secure key storage */
extern void silabs_crypto_enable_sv(void);
void app_init(void)
{In the same file, call function silabs_crypto_enable_sv during app_init before crypto module initialization.
app_assert(ret == SID_ERROR_NONE, "sidewalk key-value storage init failed");
silabs_crypto_enable_sv();
// Initialize PAL crypto module
ret = sid_pal_crypto_init();