Examples#
Overview#
The following table describes the examples for Series 2 and Series 3 Secure Boot.
Note: Series 3 devices require SE firmware Version 3.1.0 or later to support Secure Boot. However, version 3.3.4 or newer is recommended for full feature support and latest security enhancements.
Example | Device (Radio Board) | Minimum SE Firmware | Tool |
|---|---|---|---|
Provision Public Sign Key and Secure Boot Enabling | EFR32MG21A010F1024IM32 (BRD4181A) | Version 1.2.9 | Simplicity Commander |
" | EFR32MG21A010F1024IM32 (BRD4181A) | Version 1.2.9 | SE Manager |
" | EFR32MG21A010F1024IM32 (BRD4181A) | Version 1.2.9 | Simplicity Studio 5 |
Provision GBL Decryption Key | EFR32MG21A010F1024IM32 (BRD4181A) | Version 1.2.9 | Simplicity Commander |
" | EFR32MG21A010F1024IM32 (BRD4181A) | Version 1.2.9 | SE Manager |
Signing for ECDSA-P256-SHA256 Secure Boot | EFR32MG21A010F1024IM32 (BRD4181A) | Version 1.2.9 | Simplicity Commander |
Signing for Certificate-Based Secure Boot | EFR32MG21A010F1024IM32 (BRD4181A) | Version 1.2.9 | Simplicity Commander |
Generate a GBL Upgrade Image File | EFR32MG21A010F1024IM32 (BRD4181A) | Version 1.2.9 | Simplicity Commander |
Upgrade to Certificate-Based Secure Boot | EFR32MG21A010F1024IM32 (BRD4181A) | Version 1.2.9 | Simplicity Commander |
Certificate Revocation | EFR32MG21A010F1024IM32 (BRD4181A) | Version 1.2.9 | Simplicity Commander |
Upgrade to Secure Boot with RTSL | EFR32MG21A010F1024IM32 (BRD4181A) | Version 1.2.9 | SE Manager & Simplicity Commander |
Recover Devices when Secure Boot Fails | EFR32MG21A010F1024IM32 (BRD4181A) | Version 1.2.9 | Simplicity Commander |
Note: Unless specified in the example, these examples can be applied to other Series 2 and Series 3 devices.
Using Simplicity Commander#
This application note uses Simplicity Commander v1.19.2. The procedures and console output may be different for the other versions of Simplicity Commander. The latest version of Simplicity Commander can be downloaded from MCU Programming options.
Note: It is recommended to upgrade to the latest version of Simplicity Commander.
commander --versionSimplicity Commander 1v19p2b1907 JLink DLL version: 7.52d Qt 5.12.10 Copyright (C) 2017 The Qt Company Ltd. EMDLL Version: 0v17p19b0 mbed TLS version: 2.16.6 Emulator found with SN=440048205 USBAddr=0 DONEThe Simplicity Commander's Command Line Interface (CLI) is invoked by
commander.exein the Simplicity Commander folder. The location for Simplicity Studio 5 in Windows isC:\SiliconLabs\SimplicityStudio\v5\developer\adapter_packs\commander. For ease of use, it is highly recommended to add the path of commander.exe to the system PATH in Windows.If more than one WSTK is connected via USB, the target WSTK must be specified using the
--serialno <J-Link serial number>option.If the WSTK is in debug mode OUT, the target device must be specified using the
--device <device name>option. For more information about Simplicity Commander, see Simplicity Commander Reference Guide.
Using an External Tool#
The Secure Boot examples use the OpenSSL to sign the image files and certificates. The Windows version of OpenSSL can be downloaded from https://slproweb.com/products/Win32OpenSSL.html. This application note uses OpenSSL Version 3.5.0 (Win64).
openssl versionOpenSSL 3.5.0 8 Apr 2025 (Library: OpenSSL 3.5.0 8 Apr 2025)The OpenSSL's Command Line Interface (CLI) is invoked by openssl.exe in the OpenSSL folder. The location in Windows (Win64) is C:\Program Files\OpenSSL-Win64\bin. For ease of use, it is highly recommended to add the path of openssl.exe to the system PATH in Windows.
Using a Platform Example#
Simplicity Studio 5 includes the SE Manager platform example for key provisioning and Secure Boot enabling. This application note uses platform example of SiSDK v2025.6.1. The console output may be different on other versions.
Refer to the corresponding readme file for details about each SE Manager platform example. This file also includes the procedures to create the project and run the example.
Generate Key and Signing#
This section describes how to generate a key to sign an image file or certificate for Secure Boot using Simplicity Commander or using an HSM with Simplicity Commander (Openssl). For production environments, it is strongly recommended to generate keys with an HSM.
Using Simplicity Commander#
Run the
util genkeycommand to generate the ECDSA-P256 Sign Key pair (sign_key.pemandsign_pubkey.pem)and Public Sign Key token file (sign_pubkey.txt). The Simplicity Commander can program the Public Sign Key in token file (sign_pubkey.txt) to the top page of the main flash.commander util genkey --type ecc-p256 --privkey sign_key.pem --pubkey sign_pubkey.pem --tokenfile sign_pubkey.txtGenerating ECC P256 key pair... Writing private key file in PEM format to sign_key.pem Writing public key file in PEM format to sign_pubkey.pem Writing EC tokens to sign_pubkey.txt... DONENote: The same procedure can apply to generate the bootloader certificate and application certificate key pairs for Certificate-Based Secure Boot.
Use the convert command with the Private Key (like sign_key.pem) from step 1 to sign an image file or certificate. Refer to Signing for ECDSA-P256-SHA256 Secure Boot and Signing for Certificate-Based Secure Boot for more information about the Simplicity Commander signing process.
Using an HSM and Simplicity Commander#
You can use HSM to generate the ECDSA-P256 Sign Key pair. The Private Sign Key is securely held in HSM and the Public Sign Key can be exported in a specific format (like
sign_pubkey.pem).Note: The same procedure can apply to generate the bootloader certificate and application certificate key pairs for Certificate-Based Secure Boot.
Use the
util keytotokencommand to convert the Public Sign Key from step 1 to token format (sign_pubkey.txt). The Simplicity Commander can program the Public Sign Key in token file (sign_pubkey.txt) to the top page of the main flash.commander util keytotoken sign_pubkey.pem --outfile sign_pubkey.txtWriting EC tokens to sign_pubkey.txt... DONEUse the
convertcommand with--extsignoption to prepare an unsigned image or certificate for HSM.Use the Private Key from step 1 to generate a signature for the unsigned image or certificate from step 3.
Use the
convertcommand with the signature from step 4 to generate a signed image or certificate. Refer to Signing for ECDSA-P256-SHA256 Secure Boot and Signing for Certificate-Based Secure Boot for more information about the HSM and Simplicity Commander signing process.
Note: The Simplicity Commander v1.11.0 or above supports signature in DER format. The older version of Simplicity Commander can only handle signatures in Raw format.
Provision Public Sign Key and Secure Boot Enabling#
The Public Sign Key in SE OTP is used to verify the host image signature or certificate during Secure Boot. You should provision this key before setting the Secure Boot enabled flag in SE OTP. On HSE-SVH devices, when anti-tamper functionality is needed, you need to provision the anti-tamper protection configuration with Secure Boot settings.
If you set the SECURE_BOOT_ANTI_ROLLBACK option with Secure Boot, the SE will store the version counter (4 bytes) for anti-rollback of GBL (SSB) to SE flash and check the bootloader version during an upgrade and on every boot. The version counter will not roll to 0 if it reaches the maximum value (bootloader cannot be upgraded anymore). The anti-rollback does not prevent flashing an older signed GBL hex image to the device.
The following table describes the anti-rollback protection on signed GBL when SECURE_BOOT_ANTI_ROLLBACK is enabled or disabled.
The GBL handles the anti-rollback protection when upgrading the GBL through the GBL upgrade image file (
.gbl).The SE handles the anti-rollback protection (if
SECURE_BOOT_ANTI_ROLLBACKenabled) when booting the image.
Action | SECURE_BOOT_ANTI_ROLLBACK Disable | SECURE_BOOT_ANTI_ROLLBACK Enable |
|---|---|---|
Use a GBL upgrade image ( | Gecko Bootloader rejects upgrade if an equal or lower GBL version is detected. | Gecko Bootloader rejects upgrade if an equal or lower GBL version is detected. |
Flash and boot a firmware image ( | SE accepts the image to flash and boot regardless of the firmware image version. | The SE accepts and boots the firmware image if its version is equal to or higher than the stored version. A lower version will be blocked at boot. |
Note: [Series 2 devices only] The device needs to execute a mass erase (
commander device masseraseorcommander security erasedevicethen reset) before flashing a GBL hex image (.s37) to the device if SECURE_BOOT_PAGE_LOCK_NARROW or SECURE_BOOT_PAGE_LOCK_FULL option in SE OTP is enabled.
For simplicity, the Secure Boot examples in this application note do not enable the following options for Secure Boot.
SECURE_BOOT_PAGE_LOCK_NARROWSECURE_BOOT_PAGE_LOCK_FULL
Note:
SECURE_BOOT_PAGE_LOCK_NARROWandSECURE_BOOT_PAGE_LOCK_FULLare only available on Series 2 devices.
Simplicity Commander#
The following procedures assume the required files are in the same folder.
Follow the procedures in Generate Key and Signing to generate the ECDSA-P256 Sign Key pair (
sign_key.pemandsign_pubkey.pem) and Public Sign Key token file (sign_pubkey.txt).Run the
security writekeycommand to provision the Public Sign Key (sign_pubkey.pem) to the SE OTP slot. The Public Sign Key cannot be changed once written.commander security writekey --sign sign_pubkey.pem --device EFR32MG21A010F1024 --serialno 440048205Device has serial number 000000000000000014b457fffe045b21 ================================================================================ Please look through any warnings before proceeding. THIS IS A ONE-TIME command, all code to be run on the device must be signed by this key. Type 'continue' and hit enter to proceed or Ctrl-C to abort: ================================================================================ continue DONERun the
security readkeycommand to verify the Public Sign Key with the Public Sign Key in the token file (sign_pubkey.txt).commander security readkey --sign --device EFR32MG21A010F1024 --serialno 440048205C4AF4AC69AAB9512DB50F7A26AE5B4801183D85417E729A56DA974F4E08A562C DE6019DEA9411332DC1A743372D170B436238A34597C410EA177024DE20FC819 DONEFor Series 2 VSE devices (like EFR32MG22C224F512IM40), run the
flashcommand to program the Public Sign Key in the token file (sign_pubkey.txt) to the top page of the main flash for ECDSA-P256-SHA256 Secure Boot. It is optional on Series 2 HSE and Series 3 devices.commander flash --tokengroup znet --tokenfile sign_pubkey.txt --device EFR32MG22C224F512IM40 --serialno 440048205Writing 8192 bytes starting at address 0x0007e000 Comparing range 0x0007E000 - 0x0007FFFF (8 KiB) Programming range 0x0007E000 - 0x0007FFFF (8 KiB) DONENote: The MCU Series 2 devices (like EFM32PG22C200F512IM40) require Simplicity Commander Version 1.12.2 or above to support the
flash --tokengroup znetcommand.Run the
security genconfigcommand to generate theuser_configuration.jsonfile for secure boot.commander security genconfig --nostore --outfile user_configuration.json --device EFR32MG21A010F1024 --serialno 440048205 DONEName
Description
SECURE_BOOT_ENABLE
If set, verifies the host image on the Cortex-M33 before releasing the Cortex-M33 from reset.
SECURE_BOOT_VERIFY_CERTIFICATE
If set, requires certificate-based signing of the host image.
SECURE_BOOT_ANTI_ROLLBACK
If set, prevents secure upgrading to a host image with an equal or lower version than the image that is currently stored in flash.
SECURE_BOOT_PAGE_LOCK_NARROW
If set, locks flash pages that have been validated by the Secure Boot process to prevent re-flashing by other means than through the SE. Write/erase locks pages from 0 through the page where the Secure Boot host image signature is located, not including the last page if the signature is not on a page boundary.
SECURE_BOOT_PAGE_LOCK_FULL
If set, locks flash pages that have been validated by the Secure Boot process to prevent re-flashing by other means than through the SE. Write/erase locks pages from 0 through the page where the Secure Boot host image signature is located, including the last page if the signature is not on a page boundary.
Notes: The host image is the firmware in the device's flash starting address. It is usually the GBL.
SECURE_BOOT_PAGE_LOCK_NARROW and SECURE_BOOT_PAGE_LOCK_FULL are not available in Series 3 devices.
Use a text editor to modify the default secure boot settings to the desired configurations used in this application note.

Note: For devices prior to EFR32xG23, if
SECURE_BOOT_ENABLEis set to false, the SE ignores the other four options regardless of their values, whereas on EFR32xG23 and future Series 2 devices, this configuration cannot be programmed to the SE OTP.Follow the procedure in Signing for ECDSA-P256-SHA256 Secure Boot to flash a bootloader image for signature based secure boot.
OR
Follow the procedure in Signing for Certificate-Based Secure Boot to flash a bootloader image for certificate based secure boot.
Run the
security writeconfigcommand to program the secure boot configuration to the SE OTP. You can execute this command once per device.commander security writeconfig --configfile user_configuration.json --device EFR32MG21A010F1024 --serialno 440048205================================================================================ THIS IS A ONE-TIME configuration: Please inspect file before confirming: user_configuration.json Type 'continue' and hit enter to proceed or Ctrl-C to abort: ================================================================================ continue DONERun the
security readconfigcommand to check the secure boot configuration of the device.commander security readconfig --serialno 440048205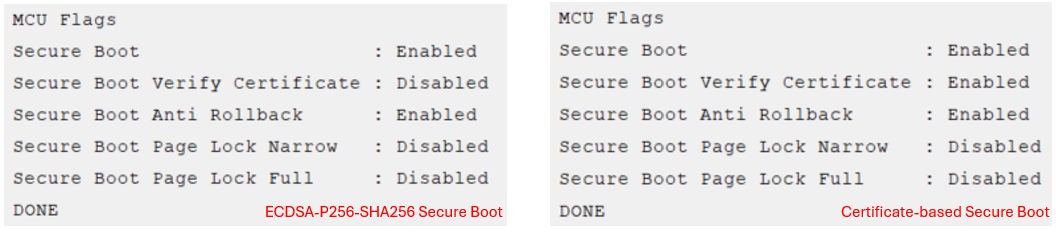
Note: Enabling Anti-rollback during development involves updating the firmware version every time you decide to flash a new image, this adds complexity. Therefore, it is recommended to enable Anti-rollback during production.
SE Manager Key Provisioning Platform Example#
Click the View Project Documentation link to open the readme file.

Modify the default Public Sign Key in
public_sign_key[PUB_KEY_SIZE]array inapp_process.cto the desired values./// Public sign key SL_ALIGN(4) static const uint8_t public_sign_key[PUB_KEY_SIZE] = { 0xc4, 0xaf, 0x4a, 0xc6, 0x9a, 0xab, 0x95, 0x12, 0xdb, 0x50, 0xf7, 0xa2, 0x6a, 0xe5, 0xb4, 0x80, 0x11, 0x83, 0xd8, 0x54, 0x17, 0xe7, 0x29, 0xa5, 0x6d, 0xa9, 0x74, 0xf4, 0xe0, 0x8a, 0x56, 0x2c, 0xde, 0x60, 0x19, 0xde, 0xa9, 0x41, 0x13, 0x32, 0xdc, 0x1a, 0x74, 0x33, 0x72, 0xd1, 0x70, 0xb4, 0x36, 0x23, 0x8a, 0x34, 0x59, 0x7c, 0x41, 0x0e, 0xa1, 0x77, 0x02, 0x4d, 0xe2, 0x0f, 0xc8, 0x19 };Modify the default secure boot settings in
init_se_otp_conf()function inapp_se_manager_key_provisioning.cto the desired configuration.// Overwrite secure boot options in SL_SE_OTP_INIT_DEFAULT if necessary. otp_init.enable_secure_boot = true; otp_init.verify_secure_boot_certificate = false; otp_init.enable_anti_rollback = true; otp_init.secure_boot_page_lock_narrow = false; otp_init.secure_boot_page_lock_full = false;Note: If
enable_secure_bootis false, the SE will ignore the other four options regardless of whether they are true or false. The EFR32xG23 and higher Series 2 devices do not allow this setting to program to the SE OTP.Follow the procedures in Generate an Unsigned Application Image to generate the unsigned application image if the GBL is present in the device.
Build the project and run the application. Follow the procedures in Signing for ECDSA-P256-SHA256 Secure Boot or Signing for Certificate-Based Secure Boot if a signed application image is required.
Then press SPACE to skip the programming of the AES-128 key (HSE devices only). Optional to press ENTER to program the hard-coded GBL Decryption Key to HSE OTP.
SE Manager Key Provisioning Example - Core running at 38000 kHz. . SE manager initialization... SL_STATUS_OK (cycles: 9 time: 0 us) . Get current SE firmware version... SL_STATUS_OK (cycles: 3578 time: 94 us) + Current SE firmware version (MSB..LSB): 00010209 . Read SE OTP configuration... SL_STATUS_COMMAND_IS_INVALID (cycles: 3908 time: 102 us) . Press ENTER to program 128-bit AES key in SE OTP or press SPACE to skip. . Encrypt 16 bytes plaintext with 128-bit AES OTP key... SL_STATUS_FAIL (cycles: 4627 time: 121 us) . Press ENTER to program public sign key in SE OTP or press SPACE to skip.Press ENTER to program the hard-coded Public Sign Key to SE OTP.
+ Warning: The public sign key in SE OTP cannot be changed once written! + Press ENTER to confirm or press SPACE to skip if you are not sure.Press ENTER to confirm the operation. The SE returns
SL_STATUS_INVALID_PARAMETERif the Public Sign Key is present in SE OTP.. Initialize public sign key... SL_STATUS_OK (cycles: 56052 time: 1475 us) . Get public sign key... SL_STATUS_OK (cycles: 8450 time: 222 us) + The public sign key (64 bytes): C4 AF 4A C6 9A AB 95 12 DB 50 F7 A2 6A E5 B4 80 11 83 D8 54 17 E7 29 A5 6D A9 74 F4 E0 8A 56 2C DE 60 19 DE A9 41 13 32 DC 1A 74 33 72 D1 70 B4 36 23 8A 34 59 7C 41 0E A1 77 02 4D E2 0F C8 19 . Press ENTER to program public command key in SE OTP or press SPACE to skip.. Initialize public sign key... SL_STATUS_INVALID_PARAMETER (cycles: 4375 time: 115 us) . Get public sign key... SL_STATUS_OK (cycles: 8435 time: 221 us) + The public sign key (64 bytes): C4 AF 4A C6 9A AB 95 12 DB 50 F7 A2 6A E5 B4 80 11 83 D8 54 17 E7 29 A5 6D A9 74 F4 E0 8A 56 2C DE 60 19 DE A9 41 13 32 DC 1A 74 33 72 D1 70 B4 36 23 8A 34 59 7C 41 0E A1 77 02 4D E2 0F C8 19 . Press ENTER to program public command key in SE OTP or press SPACE to skip.Press SPACE to skip the programming of the Public Command Key. Optional to press ENTER to program the hard-coded Public Command Key to SE OTP.
. Get public command key... SL_STATUS_FAIL (cycles: 4126 time: 108 us) . Press ENTER to initialize SE OTP for secure boot configuration or press SPACE to skip.Press ENTER to program the secure boot configuration.
+ Warning: The SE OTP configuration cannot be changed once written! + Press ENTER to confirm or press SPACE to skip if you are not sure.Press ENTER to confirm the operation. The SE returns
SL_STATUS_COMMAND_IS_INVALIDif an invalid setting from step 2 or the secure boot configuration has been programmed in SE OTP.. Initialize SE OTP... SL_STATUS_OK (cycles: 267256 time: 7033 us) + Read SE OTP configuration... SL_STATUS_OK (cycles: 6865 time: 180 us) + Secure boot : Enabled + Secure boot verify certificate : Disabled + Secure boot anti-rollback : Enabled + Secure boot page lock narrow : Disabled + Secure boot page lock full : Disabled . SE manager deinitialization... SL_STATUS_OK (cycles: 5 time: 0 us). Initialize SE OTP... SL_STATUS_COMMAND_IS_INVALID (cycles: 3989 time: 104 us) . SE manager deinitialization... SL_STATUS_OK (cycles: 5 time: 0 us)
Simplicity Studio#
The security operations are performed in the Security Settings of Simplicity Studio. This application note uses Simplicity Studio v5.2.3.1. The procedures and pictures may be different for the other versions of Simplicity Studio 5.
Right-click the selected debug adapter RB (ID:J-Link serial number) to display the context menu.
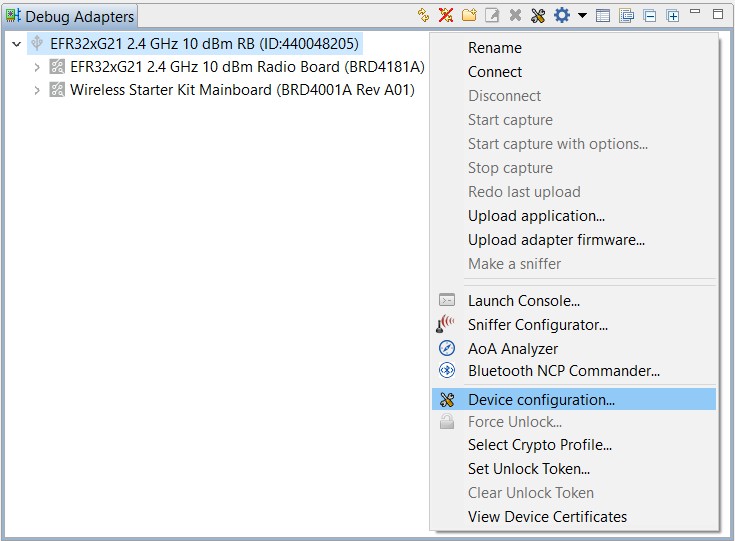
Click Device configuration... to open the Configuration of device: J-Link Silicon Labs (serial number) dialog box. Click the Security Settings tab to get the selected device configuration.
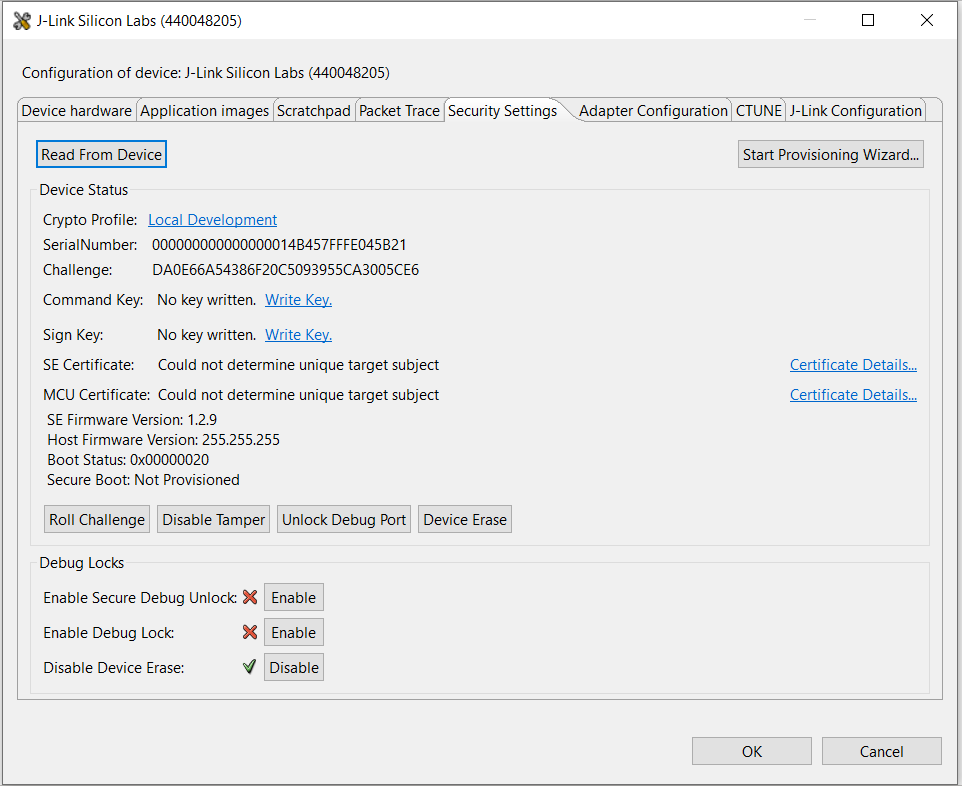
Click [Start Provisioning Wizard…] in the upper right corner to display the Secure Initialization dialog box. Checking the Enable Version Rollback Prevention of Host Image option is recommended. The Verify intermediate certificate before secure boot option is for Certificate-based Secure Boot.

Note: The SECURE_BOOT_PAGE_LOCK_NARROW and SECURE_BOOT_PAGE_LOCK_FULL options are not yet available in Simplicity Studio.
Click [Next >]. The Security Keys dialog box is displayed.
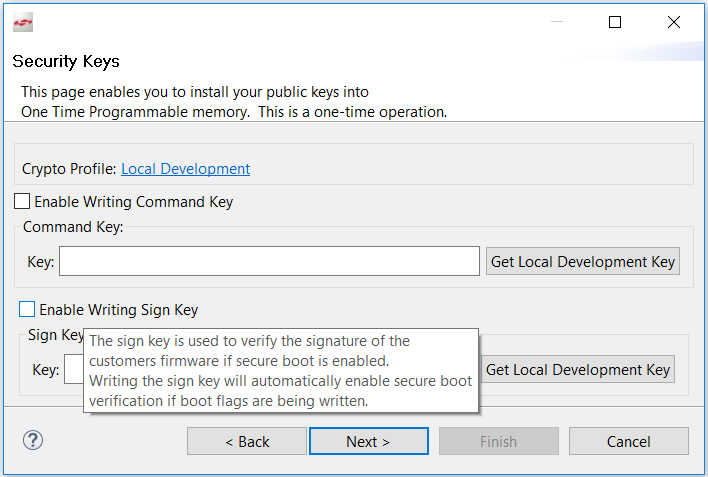
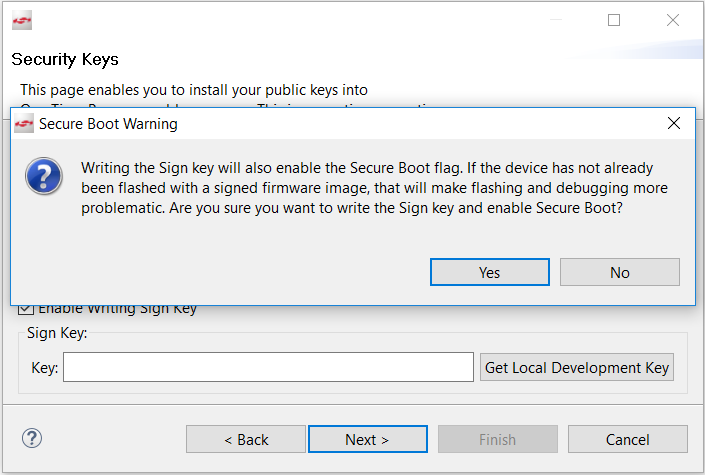
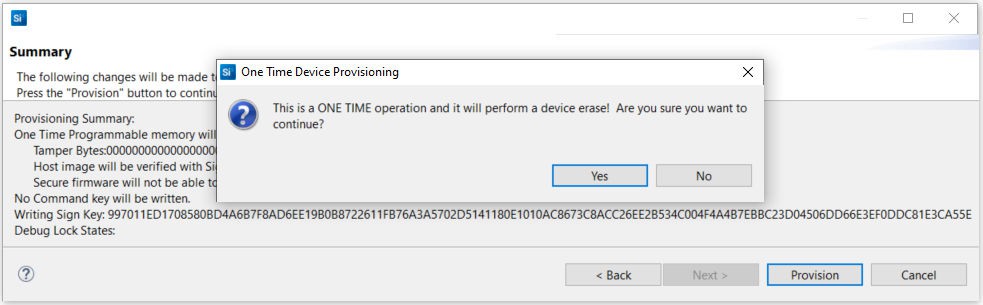
Checking the Enable Writing Sign Key checkbox will automatically enable Secure Boot. The following Secure Boot Warning is displayed. Click [Yes] to confirm.
Open the Public Sign Key token file (
sign_pubkey.txt).MFG_SIGNED_BOOTLOADER_KEY_X : 997011ED1708580BD4A6B7F8AD6EE19B0B8722611FB76A3A5702D5141180E101 MFG_SIGNED_BOOTLOADER_KEY_Y : 0AC8673C8ACC26EE2B534C004F4A4B7EBBC23D04506DD66E3EF0DDC81E3CA55ECopy Public Sign Key (X-point
9970...first, then Y-point0AC8...) to Key: box under Sign Key:.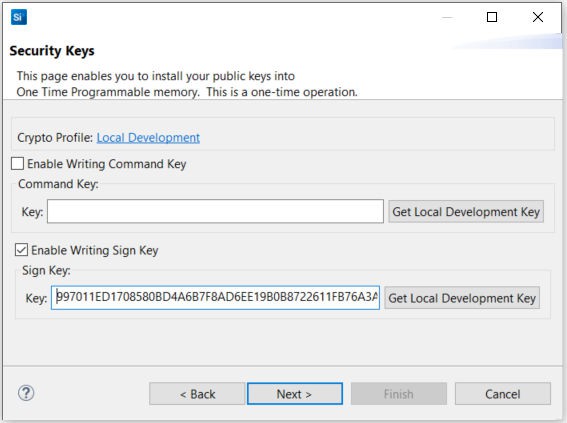
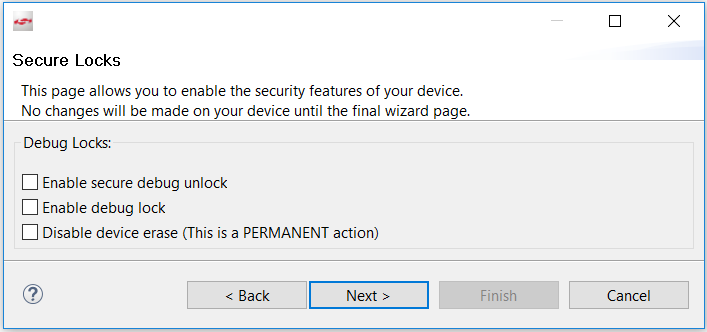
Click [Next >]. The Secure Locks dialog box is displayed. When Secure Boot is enabled, the Debug Locks are not set by default. Refer to Series 2 and Series 3 Secure Debug for more information about these locks.
Click [Next >] to display the Summary dialog box.
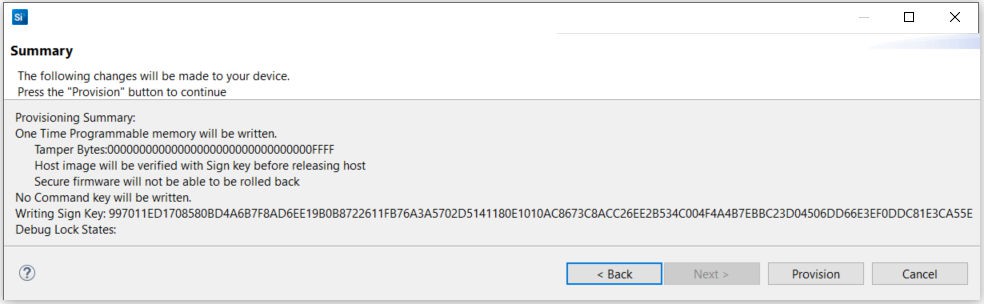
If the information displayed is correct, click [Provision]. Click [Yes] to confirm. The Public Sign Key and Secure Boot configuration cannot be changed once written.
The Summary dialog box displays the Provisioning Status.
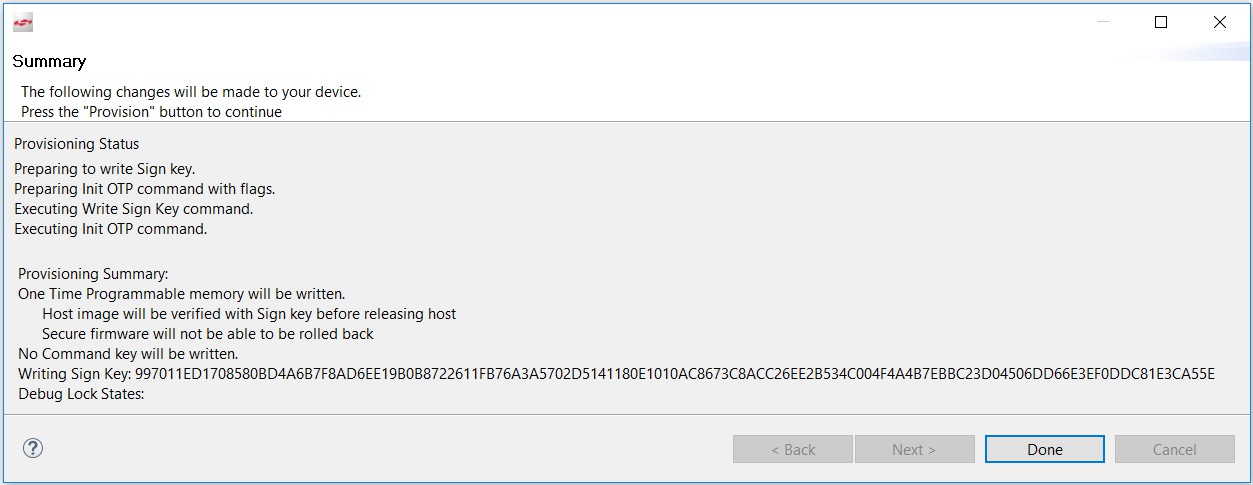
Click [Done] to exit the provisioning process. The device configuration is updated.
Provision GBL Decryption Key#
The GBL Decryption Key is used to decrypt the GBL upgrade image file payloads during firmware upgrade. You should provision this key before enabling the Require encrypted firmware upgrade files option in AppBuilder plugin and 3.4.1.2 Bootloader-core Software Component.
The following figures and table show the available options, two for VSE and three for HSE, for selecting the GBL Decryption Key used to decrypt the GBL upgrade image (bootloader, SE, or application).


Option for GBL Decryption Key Selection | GBL Decryption Key Storage |
|---|---|
1. Use symmetric key stored in Secure Element storage (HSE devices only and GSDK ≥ v3.0). | The 128-bit symmetric key stored in HSE OTP is used for GBL upgrade image file decryption. |
2. Use symmetric key stored in Application Properties Struct (GSDK ≥ v4.1). | The 128-bit symmetric key stored in the GBL Application Properties Struct is used for GBL upgrade image file decryption. The key is stored in the Secure flash if TrustZone is implemented. |
3. Default storage if none of the above options are selected. | The 128-bit symmetric key stored on the top page of the main flash is used for GBL upgrade image file decryption. The key is stored in the Non-secure flash if TrustZone is implemented. |
Note:
Option 2 requires
ApplicationProperties_tstruct v1.2 or higher (defined inapplication_properties.hin the Windows folderC:\Users\<PC USER NAME>\SimplicityStudio\SDKs\gecko_sdk\platform\bootloader\api) in GSDK v4.1 or higher to store the GBL Decryption Key.
/// Major version number of the ApplicationProperties_t struct #define APPLICATION_PROPERTIES_VERSION_MAJOR (1UL)
/// Minor version number of the ApplicationProperties_t struct #define APPLICATION_PROPERTIES_VERSION_MINOR (2UL)/// Application Properties struct typedef struct {
/// @brief Magic value indicating this is an ApplicationProperties_t struct.
/// Must equal @ref APPLICATION_PROPERTIES_MAGIC uint8_t magic[16];
/// Version number of this struct uint32_t structVersion;
/// Type of signature this application is signed with uint32_t signatureType;
/// Location of the signature. Typically points to the end of the application uint32_t signatureLocation;
/// Information about the application ApplicationData_t app;
/// Pointer to information about the certificate ApplicationCertificate_t *cert;
/// Pointer to Long Token Data Section uint8_t *longTokenSectionAddress;
/// Parser Decryption Key const uint8_t decryptKey[16];
} ApplicationProperties_t;Option 2 must be implemented before signing the GBL image for ECDSA-P256-SHA256 or certificate-based Secure Boot.
The options for the GBL Decryption Key are mutually exclusive. Either one of the two (VSE) or three (HSE) key storages will be selected for decryption.
From a security point of view, it is highly recommended to use or upgrade to option 1 for HSE devices and option 2 for VSE devices.
If the GBL Decryption Key in the selected option is compromised, the simple way is to upgrade the GBL to option 2 (if the existing option is 1 or 3) with the new GBL Decryption Key.
Simplicity Commander#
The following procedures describe how to program the GBL Decryption Key for the options below. All procedures assume the required files are in the same folder.
Use symmetric key stored in Secure Element storage (HSE devices only and GSDK ≥ v3.0)
Use symmetric key stored in Application Properties Struct (GSDK ≥ v4.1)
Default Storage on the Top Page of the Main Flash
Generate a 128-bit Symmetric Key.
Run the
util genkeycommand to generate the token file for the GBL Decryption Key.commander util genkey --type aes-ccm --outfile aes_key.txtUsing Windows' Cryptographic random number generator DONE(Use symmetric key stored in Secure Element storage) Run the
security writekeycommand to provision the GBL Decryption Key to the SE OTP slot. The GBL Decryption Key cannot be changed once written.commander security writekey --decrypt aes_key.txt --device EFR32MG21A010F1024 --serialno 440030580Device has serial number 0000000000000000000d6ffffead3d94 ================================================================================ Please look through any warnings before proceeding. THIS IS A ONE-TIME command, any encrypting of GBL files must be done with this key. Type 'continue' and hit enter to proceed or Ctrl-C to abort: ================================================================================ continue DONENote: It cannot read back the GBL Decryption Key from the HSE OTP.
(Use symmetric key stored in Application Properties Struct) Run the
convertcommand to program the GBL Decryption Key to theApplication Properties Structof the GBL.commander convert bootloader-uart-xmodem.s37 --aeskey aes_key.txt --outfile bootloader-uart-xmodem.s37Parsing file bootloader-uart-xmodem.s37... Writing to bootloader-uart-xmodem.s37... Overwriting file: bootloader-uart-xmodem.s37... DONENotes:
The
--aeskeyoption in theconvertcommand requires Simplicity Commander v1.12.3 or above.The GBL Decryption Key can only be added to the GBL with
Application Properties Structv1.2 or higher.
(Default Storage on the Top Page of the Main Flash) Run the
flashcommand to program the GBL Decryption Key in the token file to the top page of the main flash.commander flash --tokengroup znet --tokenfile aes_key.txt --device EFR32MG21A010F1024 --serialno 440030580Writing 8192 bytes starting at address 0x000fe000 Comparing range 0x000FE000 - 0x000FFFFF (8 KB) Programming range 0x000FE000 - 0x000FFFFF (8 KB) DONENote: The MCU Series 2 VSE devices (like EFM32PG22C200F512IM40) require Simplicity Commander Version 1.12.2 or above to support the flash --tokengroup znet command.
SE Manager Key Provisioning Platform Example#
This example only applies to option 1 for Series 2 and Series 3 HSE devices. Click the View Project Documentation link to open the readme file.
Modify the default GBL Decryption Key in the
aes_key[16]array inapp_process.cto the desired values./// 128-bit AES key SL_ALIGN(4) static const uint8_t aes_key[16] = { 0x81, 0xa5, 0xe2, 0x1f, 0xa1, 0x52, 0x86, 0xf1, 0xdf, 0x44, 0x5c, 0x2c, 0xc1, 0x20, 0xfa, 0x3f };Modify the
ciphertext[16]array inapp_process.cto the expected ciphertext for AES ECB on 16 bytes zero plaintext to verify the GBL Decryption Key in step 1./// Ciphertext to verify 128-bit AES key static const uint8_t ciphertext[16] = { 0x66, 0xd2, 0x0f, 0x99, 0x65, 0x3e, 0xa8, 0xd0, 0x83, 0x05, 0xa6, 0x39, 0xd4, 0x4e, 0x98, 0xa6 };Follow the procedures in Generate an Unsigned Application Image to generate the unsigned application image if the GBL is present in the device.
Build the project and run the application. Follow the procedures in Signing for ECDSA-P256-SHA256 Secure Boot or Signing for Certificate-Based Secure Boot if a signed application image is required.
Then press ENTER to program the hard-coded GBL Decryption Key to HSE OTP.
SE Manager Key Provisioning Example - Core running at 38000 kHz. . SE manager initialization... SL_STATUS_OK (cycles: 9 time: 0 us) . Get current SE firmware version... SL_STATUS_OK (cycles: 3578 time: 94 us) + Current SE firmware version (MSB..LSB): 00010209 . Read SE OTP configuration... SL_STATUS_COMMAND_IS_INVALID (cycles: 3908 time: 102 us) . Press ENTER to program 128-bit AES key in SE OTP or press SPACE to skip. + Warning: The 128-bit AES key in SE OTP cannot be changed once written! + Press ENTER to confirm or press SPACE to skip if you are not sure.Press ENTER to confirm the operation. The program either returns
SL_STATUS_OKorSL_STATUS_INVALID_PARAMETER(already present) and performs AES ECB encryption to verify the GBL Decryption Key in HSE OTP.. Initialize 128-bit AES key... SL_STATUS_OK (cycles: 39059 time: 1027 us) . Encrypt 16 bytes plaintext with 128-bit AES OTP key... SL_STATUS_OK (cycles: 11013 time: 289 us) + Compare encrypted message with expected ciphertext... OK . Press ENTER to program public sign key in SE OTP or press SPACE to skip.. Initialize 128-bit AES key... SL_STATUS_INVALID_PARAMETER (cycles: 4474 time: 117 us) . Encrypt 16 bytes plaintext with 128-bit AES OTP key... SL_STATUS_OK (cycles: 11001 time: 289 us) + Compare encrypted message with expected ciphertext... OK . Press ENTER to program public sign key in SE OTP or press SPACE to skip.Press SPACE to skip the programming of the Public Sign Key.
. Get public sign key... SL_STATUS_FAIL (cycles: 4126 time: 108 us) . Press ENTER to program public command key in SE OTP or press SPACE to skip.Press SPACE to skip the programming of the Public Command Key.
. Get public command key... SL_STATUS_FAIL (cycles: 4126 time: 108 us) . Press ENTER to initialize SE OTP for secure boot configuration or press SPACE to skip.Press SPACE to skip the programming of the secure boot configuration.
. SE manager deinitialization... SL_STATUS_OK (cycles: 10 time: 0 us)
Secure Boot#
You should usually not enable Secure Boot during the development phase to avoid a clash on debugging. The Secure Boot feature is enabled near firmware release and uses the following sections to validate the configuration and system functionality.
Generate an Unsigned GBL Image#
There are two ways to configure the application firmware through a GBL project.
Use AppBuilder (
.isc file) in GSDK v3.2 and lower.Use Bootloader-core software component (
.slcpfile) in GSDK v4.0 and higher, and SiSDK v2024.6.0 and higher.
The following notes apply to the AppBuilder and Bootloader-core software component.
Enabling the Allow use of public key from manufacturing token storage option is mandatory on VSE devices (cannot be disabled in AppBuilder and is discarded in Bootloader-core software component) for ECDSA-P256-SHA256 Secure Boot.
The HSE device ignores this default enabled option if the Public Sign Key has been provisioned in OTP.
When the Enable application rollback protection option (GSDK ≥ v3.0) is enabled, the GBL stores an application version counter at the end of the bootloader space in flash. The GBL checks this version during upgrades and at every boot, but it does not prevent flashing an older image onto the device.
The Minimum application version allowed option (GSDK ≥ v3.0) sets the lowest application version that can boot. This option maintains the version counter, which resets to 0 after upgrading the GBL.
The Enable application rollback protection option is not applicable if the SECURE_BOOT_PAGE_LOCK_FULL in SE OTP is enabled. See section "Secure Boot with Application Rollback Protection" in UG266 (for GSDK v3.2 and lower), Silicon Labs Gecko Bootloader User's Guide for GSDK 4.0 and Higher (series 1 and 2 devices), or Silicon Labs Gecko Bootloader User’s Guide for Series 3 and Higher for details about the application rollback protection.
The GBL size and starting address are device-dependent. For more information about the bootloader size and starting address on Series 2, see section "Memory Space For Bootloading" in UG103.6: Bootloader Fundamentals.
Refer to Generate a GBL Upgrade Image File to create GBL upgrade image file for the Require signed firmware upgrade files and Require encrypted firmware upgrade files options. For simplicity, the Secure Boot examples in this application note do not enable these options. Refer to UG266, Silicon Labs Gecko Bootloader User's Guide for GSDK 4.0 and Higher (series 1 and 2 devices), or Silicon Labs Gecko Bootloader User’s Guide for Series 3 and Higher for information about these options.
The following sections describe how to build the unsigned GBL image from the UART XMODEM Bootloader (GSDK < v4.1) or Bootloader - NCP UART XMODEM (GSDK ≥ v4.1).

AppBuilder#
This application note uses UART XMODEM Bootloader example v1.12.0 in GSDK v3.2.3. The procedures and pictures may be different for the other versions of this example.
Create a UART XMODEM Bootloader project.
The Plugins tab in AppBuilder (bootloader-uart-xmodem.isc) shows the default configurations for the UART XMODEM Bootloader example.
Use Bootloader Core, provides API: core in the Plugins tab to set up the application firmware configurations.
a. This application note uses the configuration below for ECDSA-P256-SHA256 Secure Boot.
b. This application note uses the configuration below for Certificate-based Secure Boot.
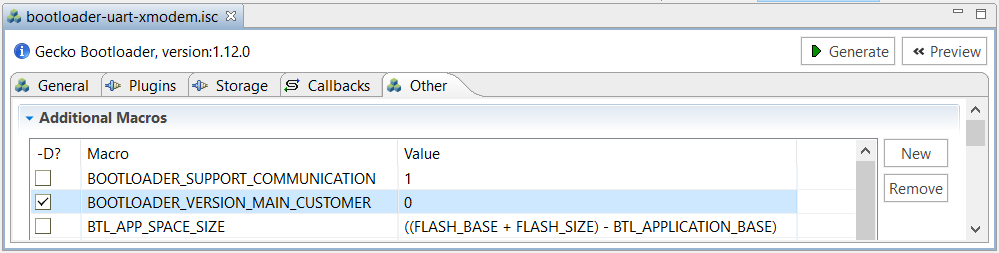
Enter a higher version number (default is 0) to the macro BOOTLOADER_VERSION_MAIN_CUSTOMER → Value in the Additional Macros field on the Other tab for anti-rollback protection of GBL.
The default setting of GBL will overwrite the existing application image when upgrading the GBL or SE. It forces to update the application image even without changes on the firmware. Use the AppBuilder settings below to keep the existing application image when upgrading the GBL or SE.
a. Enter the required application image size to the macro BTL_APP_SPACE_SIZE → Value in the Additional Macros field on the Other tab. Check the -D? checkbox to add this definition to the project.
This application note uses 507904 (496 kB) to replace the default value of ((FLASH_BASE + FLASH_SIZE) - BTL_APPLICATION_BASE). b. The Base address of bootloader upgrade image ≥ (BTL_APP_SPACE_SIZE + size of the GBL). The example in this application note uses EFR32MG21A010F1024:
Base address of bootloader upgrade image = 507904 (496 kB) + 16384 (16 kB for GBL) = 524288 (512 kB)  > **Note**: The default value of Base address of bootloader upgrade image is 32768 (32 kB).c. The (Base address of bootloader upgrade image + size of the GBL or SE + upgrade file overhead) ≤ the available size of the device main flash for application use (see project linker file for details).
The example in this application note uses EFR32MG21A010F1024: 512 kB (Base address of bootloader upgrade image) + 16 kB (GBL) or 48 kB (SE) + overhead bytes \< 1024 kB (size of main flash) For more information about the size of the GBL and SE, see section *Storage Space Size Configuration* in [UG266](https://www.silabs.com/documents/public/user-guides/ug266-gecko-bootloader-user-guide.pdf). > **Note**: It requires GBL v1.11.0 or above to support this feature.Click [Generate] in the right upper corner.
In the Generation Successful dialog, click [OK].
Build the project to generate the unsigned GBL image file (
bootloader-uart-xmodem.s37).(Optional) Run the
util appinfocommand to check all available information (application properties) in an unsigned GBL image. TheApp versionis the GBL version for the SECURE_BOOT_ANTI_ROLLBACK option.
commander util appinfo bootloader-uart-xmodem.s37Parsing file bootloader-uart-xmodem.s37...
Found application properties in image.
Application properties info:
Application properties location : 0x00002b1c
Signature location : 0x00002d08
Signature type : No signature
Long token section address : Not set (0x00000000)
Application data info:
For Series 2 devices: If rollback prevention is enabled in the OTP configuration, the device will not boot if the device has seen an application with a higher version number.
App type : Bootloader (APPLICATION_TYPE_BOOTLOADER)
App version : 0x010c0000
Product ID : Not set (0x00000000000000000000000000000000)
No certificate found in image.
For Series 2 devices: If the configuration flag SECURE_BOOT_VERIFY_CERTIFICATE is set or a device has previously seen certificate based signing, it will not accept direct signing.
DONEBootloader-core Software Component#
This application note uses UART XMODEM Bootloader example v2.0.0 in GSDK v4.0. The procedures and pictures may be different for the other versions of this example.
Create a UART XMODEM Bootloader project.
Checking the Installed Components under the SOFTWARE COMPONENTS tab shows the list of installed components (
bootloader-uart-xmodem.slcp) in the UART XMODEM Bootloader example.Click [Configure] in the Bootloader-core component to open the Bootloader Core Configuration.
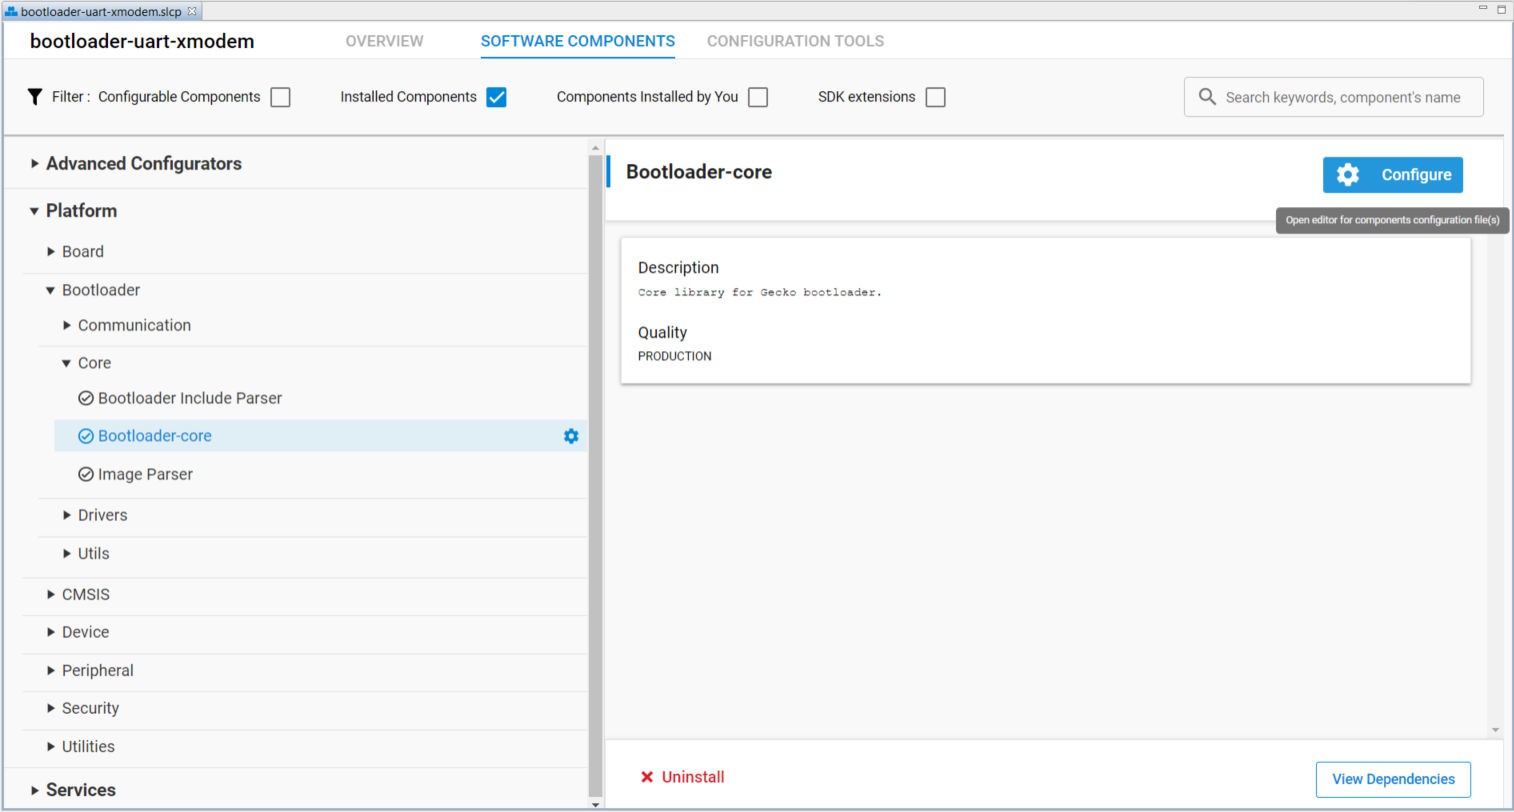
Note: Install "Bootloader Core (Series-3)" for series 3 devices.
Use Bootloader Core Configuration in Bootloader-core to set up the application firmware configurations.
This application note uses the configuration below for ECDSA-P256-SHA256 Secure Boot.
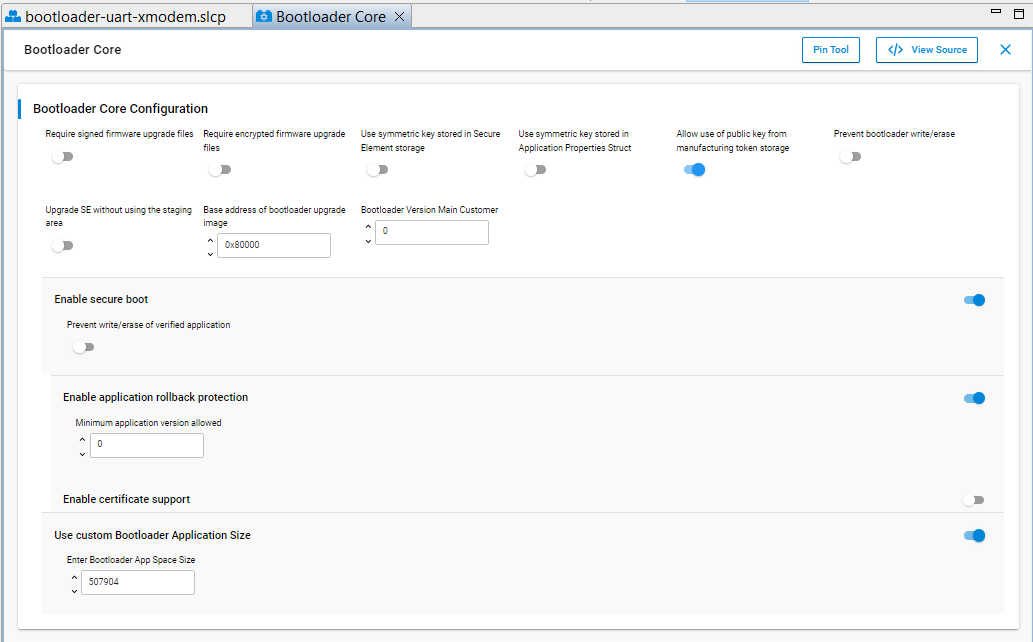
This application note uses the configuration below for Certificate-based Secure Boot.

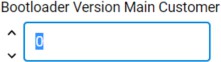
[For series 2 devices only] Enter a higher version number (default is 0) to BOOTLOADER VERSION MAIN CUSTOMER for anti-rollback protection of GBL.
[For series 2 devices only] The default setting of GBL will overwrite the existing application image when upgrading the GBL or SE. It forces to update the application image even without changes on the firmware. Use the Bootloader-core settings below to keep the existing application image when upgrading the GBL or SE.
a. Enter the required application image size to the Enter Bootloader App Space Size dialog box after enabling the Use custom Bootloader Application Size option.
This application note uses 507904 (496 kB) to replace the default value of 0. b. The Base address of bootloader upgrade image ≥ (Enter Bootloader App Space Size + size of the GBL). The example in this application note uses EFR32MG21A010F1024:
Base address of bootloader upgrade image = 507904 (496 kB) + 16384 (16 kB for GBL) = 524288 or 0x80000 (512 kB)  > **Note**: The default value of Base address of bootloader upgrade image is 32768 or 0x8000 (32 kB).c. The (Base address of bootloader upgrade image + size of the GBL or SE + upgrade file overhead) ≤ the available size of the device main flash for application use (see project linker file for details).
The example in this application note uses EFR32MG21A010F1024: 512 kB (Base address of bootloader upgrade image) + 16 kB (GBL) or 48 kB (SE) + overhead bytes \< 1024 kB (size of main flash) For more information about the size of the GBL and SE, see section *Storage Space Size Configuration* in [Silicon Labs Gecko Bootloader User's Guide for GSDK 4.0 and Higher (series 1 and 2 devices)](https://docs.silabs.com/mcu-bootloader/latest/bootloader-user-guide-gsdk-4/).Click [X] in the right upper corner to exit the Bootloader Core Configuration.
Build the project to generate the unsigned GBL image file (bootloader-uart-xmodem.s37).
(Optional) Run the
convertcommand to program the GBL Decryption Key to the Application Properties Struct if this GBL Decryption Key option in GBL (GSDK ≥ v4.1) is selected.
commander convert bootloader-uart-xmodem.s37 --aeskey aes_key.txt --outfile bootloader-uart-xmodem.s37Parsing file bootloader-uart-xmodem.s37...
Writing to bootloader-uart-xmodem.s37...
Overwriting file: bootloader-uart-xmodem.s37...
DONE(Optional) Run the
util appinfocommand to check all available information (application properties) in an unsigned GBL image. The App version is the GBL version for the SECURE_BOOT_ANTI_ROLLBACK option.
commander util appinfo bootloader-uart-xmodem.s37Parsing file bootloader-uart-xmodem.s37...
Found application properties in image.
Application properties info:
Application properties location : 0x00002b30
Signature location : 0x00002c44
Signature type : No signature
Long token section address : Not set (0x00000000)
Application data info:
For Series 2 devices: If rollback prevention is enabled in the OTP configuration, the device will not boot if the device has seen an application with a higher version number.
App type : Bootloader (APPLICATION_TYPE_BOOTLOADER)
App version : 0x02000000
Product ID : Not set (0x00000000000000000000000000000000)
No certificate found in image.
For Series 2 devices: If the configuration flag SECURE_BOOT_VERIFY_CERTIFICATE is set or a device has previously seen certificate based signing, it will not accept direct signing.
DONENote: For TrustZone-aware bootloaders, the unsigned GBL image is the combined image of Secure and Non-secure bootloaders. The Bootloader-core component is installed in the Secure bootloader.
Generate an Unsigned Application Image#
This section describes how to generate an unsigned application image for the GBL.
For Series 2 devices, the application image should be placed on the main flash page after the GBL. For more information about the application starting address, see section Memory Space For Bootloading in Bootloader Fundamentals.
For Series 3 devices, the application image should be placed in the code region 1 next to the bootloader which is in region 0, see section External Flash Architecture in Series 3 Devices in Platform Memory Model.
(Simplicity Studio 5) You can use the Bootloader Application Interface component to set up the start address of the application image. This application note uses Platform - Blink Bare-metal example in GSDK v3.2.3. The procedures and pictures may be different on other versions of the GSDK. The following steps can apply to other platform examples in GSDK and SiSDK.
a. Create a Platform - Blink Bare-metal project.
b. The Software Components tab shows the list of available components (
blink_baremetal.slcp) that you can install in the project.c. Select Platform > Bootloader > Bootloader Application Interface.
d. Click [Install].
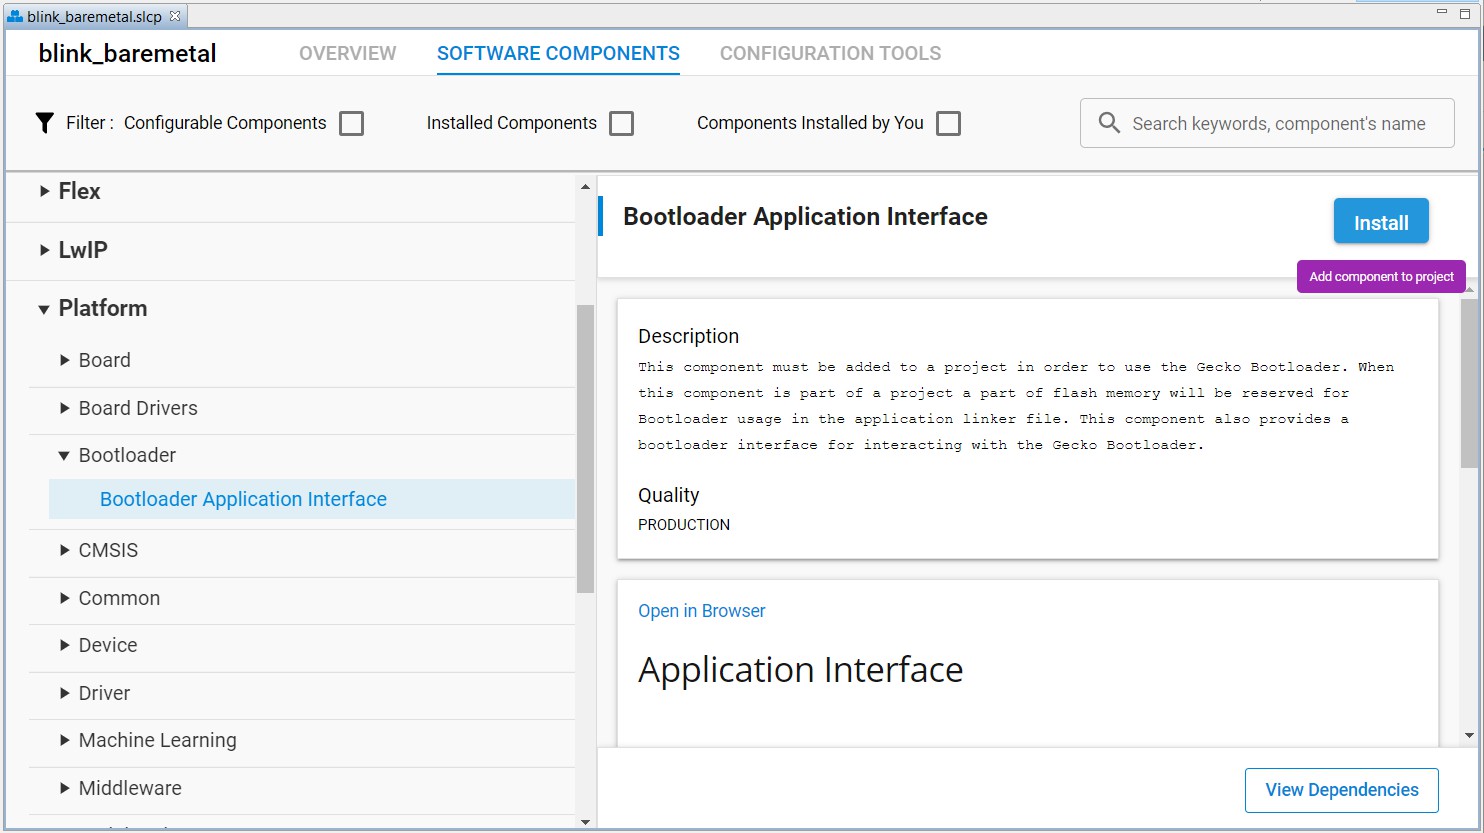
Note: For the wireless protocol stack example, the Bootloader Application Interface component is already present in the project.
The application image should contain an
ApplicationProperties_tstruct (defined inapplication_properties.hin the Windows folder below) declaring the application version, capabilities, and other metadata.For GSDK v3.2 and lower:
C:\SiliconLabs\SimplicityStudio\v5\developer\sdks\gecko_sdk_suite\<GSDK VERSION>\platform\bootloader\apiFor SiSDK v2024.6.0 and higher, or GSDK v4.0 and higher:
C:\Users\<PC USER NAME>\SimplicityStudio\SDKs\gecko_sdk\platform\bootloader\apiBelow is an example source file
app_properties.cwithApplicationProperties_tstruct for Secure Boot on GSDK v3.2 and lower.#include <stddef.h> #include "application_properties.h" const ApplicationProperties_t sl_app_properties = { .magic = APPLICATION_PROPERTIES_MAGIC, .structVersion = APPLICATION_PROPERTIES_VERSION, .signatureType = APPLICATION_SIGNATURE_NONE, .signatureLocation = 0, .app = { .type = APPLICATION_TYPE_MCU, .version = 1UL, .capabilities = 0UL, .productId = {0U}, }, };The
signatureTypeandsignatureLocationare filled by Simplicity Commander when signing the application image using theconvertcommand.The following table describes how to add the
app_properties.cfile in step 4 to Platform - Blink Bare-metal project. For the wireless protocol stack example, theapp_properties.cfile withApplicationProperties_tstruct is already present in the project.App properties for older Simplicity Studio and GSDK versions
Simplicity Studio 4 & Simplicity Studio 5 with GSDK v3.2 and lower
Simplicity Studio 5 with GSDK v4.0 and higher
Manually added
Automatically added after installing the Bootloader Application Interface component in step 3 to the project.
Note: Refer to the Knowledge Article in Silicon Labs Community to add
app_properties.cto the project in Simplicity Studio 4.(Simplicity Studio 4 & Simplicity Studio 5 with GSDK v3.2 and lower) Enter a higher version number to
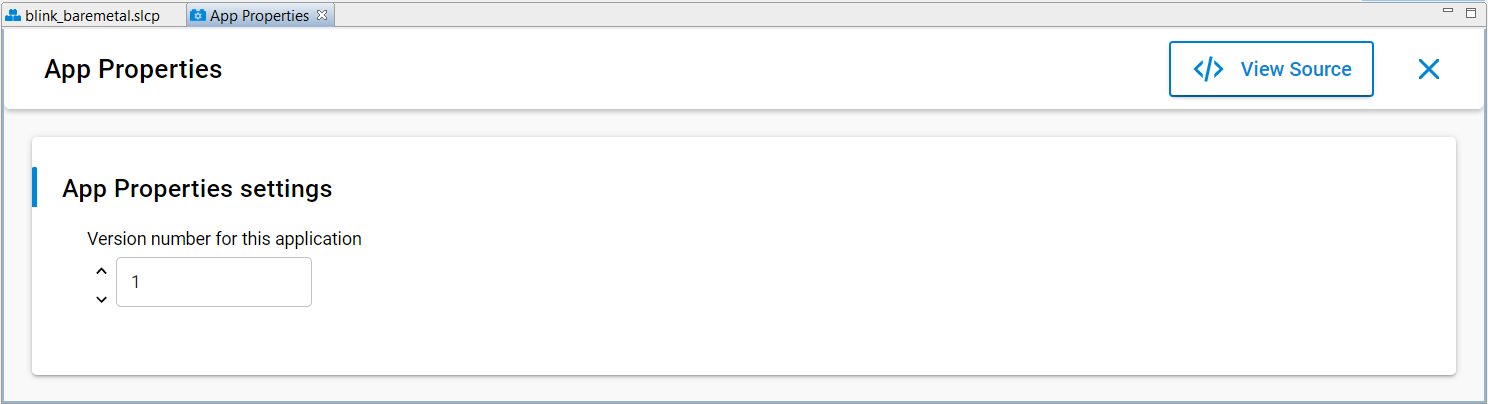
.versioninapp_properties.cfor anti-rollback protection (if enabled) of the application.(Simplicity Studio 5 with GSDK v4.0 and higher) Click [Configure] in the App Properties component under Platform > Bootloader to open the App Properties configuration. The example below uses GSDK v4.0. The procedures and pictures may be different on other versions of the GSDK.
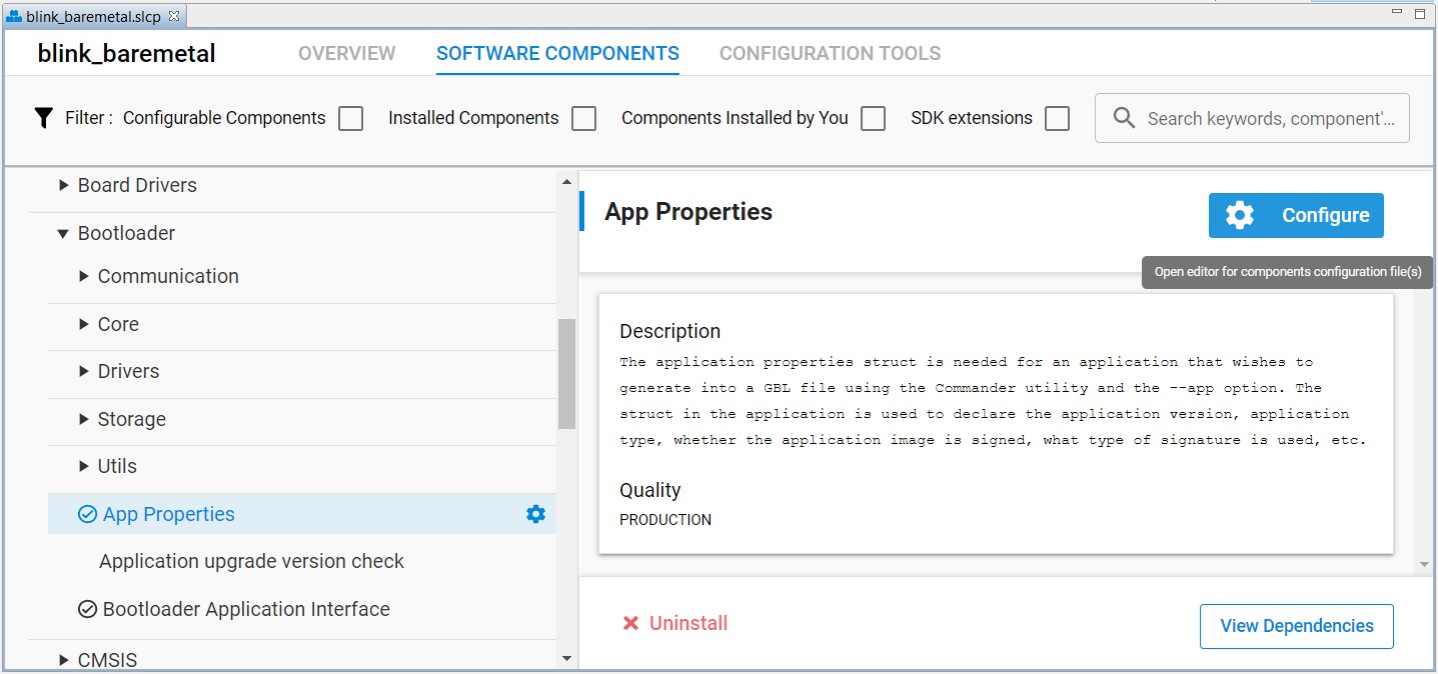
Enter a higher version number to Version number for this application dialog box in App Properties settings for anti-rollback protection (if enabled) of the application.
Note: The
app_properties.cis in the Windows folder below.C:\Users\<PC USER NAME>\SimplicityStudio\SDKs\gecko_sdk\platform\bootloader\app_propertiesBuild the project to generate the unsigned application image file (
blink_baremetal.s37).(Optional) Run the
util appinfocommand to check all available information aboutApplicationProperties_tstruct in an un-signed application image. The App version is for the Enable application rollback protection option in the [AppBuilder](#appbuilder or Bootloader-core software component.
commander util appinfo blink_baremetal.s37Parsing file blink_baremetal.s37...
Found application properties in image. Application properties info:
Application properties location : 0x00006198
Signature location : Not set (0x00000000)
Signature type : No signature
Long token section address : Not set (0x00000000)
Application data info:
For Series 2 devices: If rollback prevention is enabled in the OTP configuration, the device will not boot if the device has seen an application with a higher version number.
App type : MCU application (APPLICATION_TYPE_MCU)
App version : 0x00000001
Product ID : Not set (0x00000000000000000000000000000000)
No certificate found in image.
For Series 2 devices: If the configuration flag SECURE_BOOT_VERIFY_CERTIFICATE is set or a device has previously seen certificate based signing, it will not accept direct signing.
DONENote: For the TrustZone-aware applications, the unsigned application image is the combined image of Secure and Non-secure applications. The ApplicationProperties_t struct is located in the Secure application.
Signing for ECDSA-P256-SHA256 Secure Boot#
The following figure describes the signing and verification for ECDSA-P256-SHA256 Secure Boot.
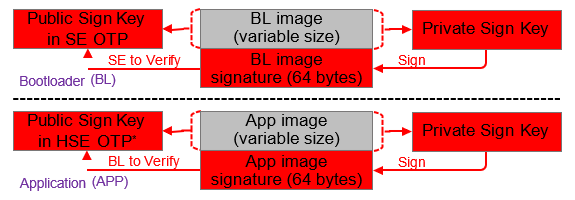
Note: The bootloader cannot access the Public Sign Key in VSE OTP to verify the application image. Therefore VSE devices need to store a Public Sign Key copy on the top page of the main flash (see section Key Storage in UG266/Silicon Labs Gecko Bootloader User's Guide for GSDK 4.0 and Higher (series 1 and 2 devices)).
Public Sign Key usage for VSE and HSE Devices
Device | FSB to Verify the Bootloader Image | SSB to Verify the Application Image |
|---|---|---|
HSE | Use the Public Sign Key in HSE OTP | Use the Public Sign Key in HSE OTP |
VSE | Use the Public Sign Key in VSE OTP | Use the Public Sign Key on the top page of the main flash |
The HSE device ignores the default enabled Allow use of public key from manufacturing token storage option once the Public Sign Key has been provisioned.
To have better protection on the Public Sign Key, the certificate-based Secure Boot is strongly recommended on VSE devices since the SSB does not require accessing the Public Sign Key to verify the application signature.
The following sections provide two methods to sign the bootloader image and application image files. All procedures assume the required files are in the same folder.
Using Simplicity Commander
Using an HSM and Simplicity Commander
Bootloader Image File#
If Secure Boot flag is not enabled in SE OTP, follow the procedures in Simplicity Commander to set up the ECDSA-P256-SHA256 Secure Boot configuration for the bootloader.
Follow the procedures in AppBuilder or Bootloader-core Software Component to set up the ECDSA-P256-SHA256 Secure Boot configuration for the user application to generate an unsigned bootloader image.
The following steps show two methods to generate a signed bootloader image—either directly with Simplicity Commander (3a) or using an HSM with Commander (3b).
a. (Using Simplicity Commander) Run the
convertcommand with Private Sign Key to overwrite the unsigned bootloader image file with the signed bootloader image file (bootloader-uart-xmodem.s37).```sh commander convert bootloader-uart-xmodem.s37 --secureboot --keyfile sign_key.pem --verify sign_pubkey.pem --outfile bootloader-uart-xmodem.s37 ``` ```sh Parsing file bootloader-uart-xmodem.s37... Found Application Properties at 0x00002b1c Writing Application Properties signature pointer to point to 0x00002d08 Setting signature type in Application Properties: 0x00000001 Image SHA256: c53bb8a3fd88a5071bfb71444324bb136b276160318488ff89011bbd269e114e R = AB62F3A52B13D137FBCC6A2176D4D1852E06B6E4E6B2673DC251FC491450CBDA S = 9C7C7AF2624165FD90FB3B114E3FA6FE4F4C5625B15C9F3D50DCB04DD06A7B19 Verifying signed image... Writing to bootloader-uart-xmodem.s37... Overwriting file: bootloader-uart-xmodem.s37... DONE ```b. (Using an HSM and Simplicity Commander) Run the
convertcommand with--extsignoption to generate an external signing bootloader image file (bootloader-uart-xmodem.extsign).```sh commander convert bootloader-uart-xmodem.s37 --secureboot --extsign --outfile bootloader-uart-xmodem ``` ```sh Parsing file bootloader-uart-xmodem.s37... Found Application Properties at 0x00002b1c Writing Application Properties signature pointer to point to 0x00002d08 Setting signature type in Application Properties: 0x00000001 Writing to bootloader-uart-xmodem.extsign... DONE ``` Use an HSM containing the Private Sign Key to generate the signature for the external signing bootloader image. This example uses the [OpenSSL](#using-an-external-tool) with the **Private Sign Key** to simulate this process. The signature is in the `bl_signature.der`. ```sh openssl dgst -sha256 -binary -sign sign_key.pem -out bl_signature.der bootloader-uart-xmodem.extsign ``` Run the `convert` command with the **bootloader image signature** to overwrite the unsigned bootloader image file with the signed bootloader image file (`bootloader-uart-xmodem.s37`). ```sh commander convert bootloader-uart-xmodem.s37 --secureboot --signature bl_signature.der --verify sign_pubkey.pem --outfile bootloader-uart-xmodem.s37 ``` ```sh Parsing file bootloader-uart-xmodem.s37... Parsing signature file bl_signature.der... R = 0E9FC64F41B55367894908D3ADAC40E8D145E33224C4BAA8151EC3EFD107A154 S = F56230AA6484E55270F22A4D164377CA918F66A367656AB6E10CB3F58641CE84 Found Application Properties at 0x00002b1c Writing Application Properties signature pointer to point to 0x00002d08 Setting signature type in Application Properties: 0x00000001 Verifying signed image... Writing to bootloader-uart-xmodem.s37... Overwriting file: bootloader-uart-xmodem.s37... DONE ```(Optional) Run the
util appinfocommand to check all available information aboutApplicationProperties_tstruct in a signed GBL image.commander util appinfo bootloader-uart-xmodem.s37Parsing file bootloader-uart-xmodem.s37... Found application properties in image. Application properties info: Application properties location : 0x00002b30 Signature location : 0x00002c44 Signature type : ECDSA-P256 Long token section address : Not set (0x00000000) Application data info: For Series 2 devices: If rollback prevention is enabled in the OTP configuration, the device will not boot if the device has seen an application with a higher version number. App type : Bootloader (APPLICATION_TYPE_BOOTLOADER) App version : 0x02000000 Product ID : Not set (0x00000000000000000000000000000000) No certificate found in image. For Series 2 devices: If the configuration flag SECURE_BOOT_VERIFY_CERTIFICATE is set or a device has previously seen certificate based signing, it will not accept direct signing. DONEThe signed bootloader image file (
.s37) can be used for production programming or for generating a GBL upgrade image file for bootloader upgrade.Run the
flashcommand to program the signed bootloader image (bootloader-uart-xmodem.s37) to the device if the device does not have a bootloader.commander flash bootloader-uart-xmodem.s37 --device EFR32MG21A010F1024 --serialno 440048205Parsing file bootloader-uart-xmodem.s37... Writing 16384 bytes starting at address 0x00000000 Comparing range 0x00000000 - 0x00003FFF (16 KiB) Programming range 0x00000000 - 0x00001FFF (8 KiB) Programming range 0x00002000 - 0x00003FFF (8 KiB) DONESimplicity Commander output for Series 3 devices will look as follows:
WARNING: Failed secure boot detected. Issuing a mass erase before flashing to recover the device... Parsing file bootloader-uart-xmodem.s37... Writing 14280 bytes starting at address 0x01000000 Erasing range 0x01000000 - 0x01007FFF (1 sector, 32 KB) Programming range 0x01000000 - 0x01000FFF (4 KB) Programming range 0x01001000 - 0x01001FFF (4 KB) Programming range 0x01002000 - 0x01002FFF (4 KB) Programming range 0x01003000 - 0x01003FFF (4 KB) Programming range 0x01004000 - 0x01004FFF (4 KB) Programming range 0x01005000 - 0x01005FFF (4 KB) Programming range 0x01006000 - 0x01006FFF (4 KB) Programming range 0x01007000 - 0x01007FFF (4 KB) JLinkError: Failed to halt CPU. Closing region 0 (this consumes one OTP bit, consider --noclose on development/testing devices) Flashing completed successfully! DONE
Application Image File#
Follow the procedures in Generate an Unsigned Application Image to generate an unsigned application image for the bootloader.
The following steps show two methods to generate a signed application image, either directly with Simplicity Commander (2a) or using an HSM with Commander and OpenSSL (2b).
a. (Using Simplicity Commander) Run the
convertcommand with Private Sign Key to overwrite the unsigned application image file with the signed application image file (blink_baremetal.s37).```sh commander convert blink_baremetal.s37 --secureboot --keyfile sign_key.pem --verify sign_pubkey.pem --outfile blink_baremetal.s37 ``` ```sh Parsing file blink_baremetal.s37... Found Application Properties at 0x000061bc Writing Application Properties signature pointer to point to 0x000064d8 Setting signature type in Application Properties: 0x00000001 Image SHA256: 8b58ec567126aa1f6baa88afc916581477745aca6f47697ec093512fc30dcc6f R = 056E3AA36BD882B5467D44A56DB7CC1AEE44D45BC9B98FAB05BE2C032573A1F7 S = BE1D27CE7877D0BC761C0F02690CC74251EBE3A458474C573C21B3A738A03577 Verifying signed image... Writing to blink_baremetal.s37... Overwriting file: blink_baremetal.s37... DONE ```b. (Using an HSM and Simplicity Commander) Run the
convertcommand with--extsignoption to generate an external signing application image file (blink_baremetal.extsign).```sh commander convert blink_baremetal.s37 --secureboot --extsign --outfile blink_baremetal ``` ```sh Parsing file blink_baremetal.s37... Found Application Properties at 0x00006198 Writing Application Properties signature pointer to point to 0x0000643c Setting signature type in Application Properties: 0x00000001 Writing to blink_baremetal.extsign... DONE ``` Use an HSM containing the Private Sign Key to generate the signature for the external signing application image. This example uses the [OpenSSL](#using-an-external-tool) with the **Private Sign Key** to simulate this process. The signature is in the `app_signature.der`. ```sh openssl dgst -sha256 -binary -sign sign_key.pem -out app_signature.der blink_baremetal.extsign ``` Run the `convert` command with the **application image signature** to overwrite the unsigned application image file with the signed application image file. (`blink_baremetal.s37`). ```sh commander convert blink_baremetal.s37 --secureboot --signature app_signature.der --verify sign_pubkey.pem --outfile blink_baremetal.s37 ``` ```sh Parsing file blink_baremetal.s37... Parsing signature file app_signature.der... R = BD5BDC866CE67DA104B1E7B686C45B7BF96F2643154D37ACC63DACDF69C27E89 S = 2DD3BFFAC857A5B0BD8C9B4DDB23D21944D062F8E431D36541B84EF411C1CC92 Found Application Properties at 0x000061bc Writing Application Properties signature pointer to point to 0x000064d8 Setting signature type in Application Properties: 0x00000001 Verifying signed image... Writing to blink_baremetal.s37... Overwriting file: blink_baremetal.s37... DONE ```(Optional) Run the
util appinfocommand to check all available information aboutApplicationProperties_tstruct in a signed application image.commander util appinfo blink_baremetal.s37Parsing file blink_baremetal.s37... Found application properties in image. Application properties info: Application properties location : 0x000061bc Signature location : 0x000064d8 Signature type : ECDSA-P256 Long token section address : Not set (0x00000000) Application data info: For Series 2 devices: If rollback prevention is enabled in the OTP configuration, the device will not boot if the device has seen an application with a higher version number. App type : MCU application (APPLICATION_TYPE_MCU) App version : 0x00000001 Product ID : Not set (0x00000000000000000000000000000000) No certificate found in image. For Series 2 devices: If the configuration flag SECURE_BOOT_VERIFY_CERTIFICATE is set or a device has previously seen certificate based signing, it will not accept direct signing. DONEThe signed application image file (
.s37) can be used for production programming or for generating a GBL upgrade image file for application upgrade.
Signing for Certificate-Based Secure Boot#
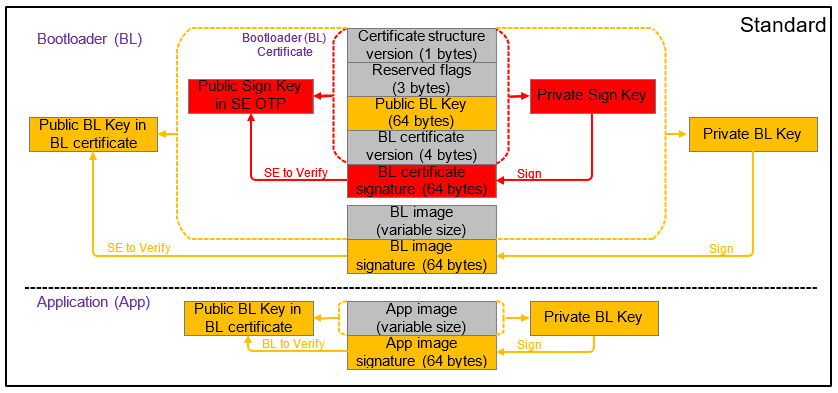
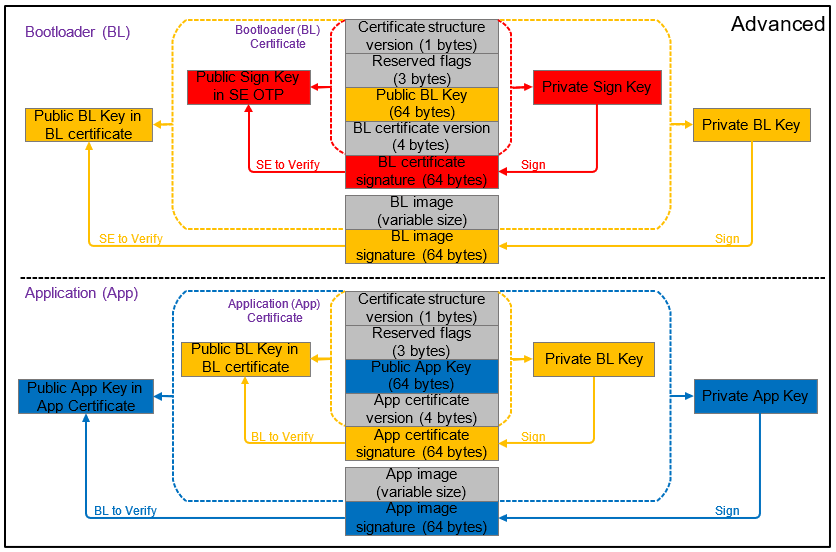
The following figure describes the signing and verification for certificate-based Secure Boot. You can freely switch between standard and advanced certificate-based Secure Boot by upgrading the application firmware without and with the application certificate.
Certificate#
The following table describes the elements of a certificate.
Element | Description |
|---|---|
Certificate structure version | The version of the certificate structure. |
Reserved flags | Reserved in the current certificate structure version. |
Certificate public key | ECDSA-P256 public key, X and Y coordinates concatenated, used to validate the image. |
Certificate version | The version of the running certificate. |
Certificate signature | ECDSA-P256 signature, used for the authentication of the public key and the certificate version. |
Notes:
The
application_properties.hfile in the Windows folder below defines the parameters of the certificate structure (ApplicationCertificate_t).For GSDK v3.2 and lower:
C:\SiliconLabs\SimplicityStudio\v5\developer\sdks\gecko_sdk_suite\<GSDK VERSION>\platform\bootloader\apiFor GSDK v4.0 and higher:
C:\Users\<PC USER NAME>\SimplicityStudio\SDKs\gecko_sdk\platform\bootloader\apiThe certificate is not in X.509 format.
Private/Public Key Pair#
The following table describes two Private/Public Key pairs used in certificates for certificate-based Secure Boot. You can use Simplicity Commander or HSM to generate these key pairs.
Certificate | Private Key | Public Key | Description |
|---|---|---|---|
Bootloader (bl_cert.bin) (1) | bl_cert_key.pem (Private Bootloader Key) | bl_cert_pubkey.pem (Public Bootloader Key) | The bootloader certificate is signed by the Private Sign Key corresponding to the Public Sign Key in SE OTP. |
Application (app_cert.bin) (2) | app_cert_key.pem (Private Application Key) | app_cert_pubkey.pem (Public Application Key) | The application certificate is signed by the Private Bootloader Key corresponding to the Public Bootloader Key in the bootloader certificate. |
Notes:
a. Certificate version in the bootloader certificate < certificate version in SE flash - the certificate is rejected.
b. Certificate version in the bootloader certificate = certificate version in SE flash - the certificate is accepted.
c. Certificate version in the bootloader certificate > certificate version in SE flash - the certificate is accepted. The certificate version in SE flash is updated to match (revocation mechanism).
The certificate version in the application certificate is compared with the certificate version in the bootloader certificate. The application certificate is accepted if its version is equal to or higher than the certificate version in the bootloader certificate.
The following sections provide two methods to sign the bootloader image and application image files. All procedures assume the required files are in the same folder.
Using Simplicity Commander
Using an HSM and Simplicity Commander
Bootloader Image File#
If Certificated based Secure Boot flag is not enabled in SE OTP, follow the procedures in Simplicity Commander to set up the certificate-based Secure Boot configuration for the bootloader.
Follow the procedures in AppBuilder or Bootloader-core Software Component to set up the certificate-based Secure Boot configuration for the user application to generate an unsigned bootloader image.
The following steps show two methods to generate a bootloader certificate, either directly with Simplicity Commander (3a) or using an HSM with Commander (3b).
a. (Using Simplicity Commander) Run the
util gencertcommand with Public Bootloader Key and Private Sign Key to generate the bootloader certificate (bl_cert.bin). Refer to the table abovefor details about the--cert-versionfor bootloader certificate.```sh commander util gencert --cert-type secureboot --cert-version 1 --cert-pubkey bl_cert_pubkey.pem --sign sign_key.pem --outfile bl_cert.bin ``` ```sh Successfully signed certificate DONE ``` Run the `convert` command with **Bootloader Certificate** and **Private Bootloader Key** to overwrite the unsigned bootloader image file with the signed bootloader image file (`bootloader-uart-xmodem.s37`). ```sh commander convert bootloader-uart-xmodem.s37 --secureboot --certificate bl_cert.bin --keyfile bl_cert_key.pem --outfile bootloader-uart-xmodem.s37 ``` ```sh Parsing file bootloader-uart-xmodem.s37... Writing certificate to location 0x00002cf0 Private key matches public key in certificate. Found Application Properties at 0x00002d78 Writing Application Properties signature pointer to point to 0x00002f64 Setting signature type in Application Properties: 0x00000001 Image SHA256: 3cf574b688853a801e8dc98687414db27f886c60c55dbf7fea2d47633df94e8d R = C866592B4CB7BAD9EFC35985F1B9D52C65C26453D4808597EEEFFB16DC4AA962 S = 94CAA21ED5D7772F96BBF4D24A0711A94DCCB6D4D38DFA45182876B9BE2A8DE3 Verifying signed image... Writing to bootloader-uart-xmodem.s37... Overwriting file: bootloader-uart-xmodem.s37... DONE ```b. (Using an HSM and Simplicity Commander) Run the
util gencertcommand with Public Bootloader Key and--extsignoption to generate an external signing bootloader certificate (bl_cert.extsign). Refer to the table above for details about the--cert-versionfor bootloader certificate.```sh commander util gencert --cert-type secureboot --cert-version 1 --cert-pubkey bl_cert_pubkey.pem --extsign --outfile bl_cert ``` ```sh DONE ``` Use an HSM containing the Private Sign Key to generate the signature for the external signing bootloader certificate. This example uses the [OpenSSL](#using-an-external-tool) with the **Private Sign Key** to simulate this process. The signature is in the `bl_cert_signature.der`. ```sh openssl dgst -sha256 -binary -sign sign_key.pem -out bl_cert_signature.der bl_cert.extsign ``` Run the `util signcert` command with the **bootloader certificate signature** to generate the bootloader certificate (`bl_cert.bin`). ```sh commander util signcert bl_cert.extsign --cert-type secureboot --signature bl_cert_signature.der --verify sign_pubkey.pem --outfile bl_cert.bin ``` ```sh R = 065A58EA6CE6BBA44F3C59C6D255A901DBBC55FA97F261658B2026ABC8CD9680 S = 8A0011AA6393BC284B13C8313EE6772030DE07E213E74CA0FEA740F3D33E6518 Successfully verified signature Successfully signed certificate DONE ``` Run the `convert` command with **Bootloader Certificate** and `--extsign` option to generate an external signing bootloader image file (`bootloader-uart-xmodem.extsign`). ```sh commander convert bootloader-uart-xmodem.s37 --secureboot --certificate bl_cert.bin --extsign --outfile bootloader-uart-xmodem ```(Optional) Run the
util verifysigncommand with Public Sign Key to verify that the Bootloader Certificate and image were correctly signed.commander util verifysign bootloader-uart-xmodem.s37 --verify sign_pubkey.pemParsing file bootloader-uart-xmodem.s37... Found application properties at 0x00002d78 Found certificate at 0x00002cf0 Successfully verified certificate signature with verification key. Using certificate key to verify application signature. Successfully verified application signature. DONE(Optional) Run the
util appinfocommand to check all available information aboutApplicationProperties_tstruct in a signed GBL image.commander util appinfo bootloader-uart-xmodem.s37Parsing file bootloader-uart-xmodem.s37... Found application properties in image. Application properties info: Application properties location : 0x00002d00 Signature location : 0x00002e14 Signature type : ECDSA-P256 Long token section address : Not set (0x00000000) Application data info: For Series 2 devices: If rollback prevention is enabled in the OTP configuration, the device will not boot if the device has seen an application with a higher version number. App type : Bootloader (APPLICATION_TYPE_BOOTLOADER) App version : 0x02000000 Product ID : Not set (0x00000000000000000000000000000000) Found certificate at 0x00002c78 Application certificate info: Certificate located at : 0x00002c78 Certificate version : 0x00000001 Certificate key : 0xb1bc6f6fa56640ed522b2ee0f5b3cf7e5d48f60be8148f0dc08440f0a4e1dca4 7c04119ed6a1be31b7707e5f9d001a659a051003e95e1b936f05c37ea793ad63 Certificate signature : 0xef3b53368d4cd7821eb30a96140bbde8840378cfea30687a8c10642e1c7728fd 309f976adf46e4eac62a2233f0c1f08f4e58344bdec61775b5282ceb351bb3d0 DONEThe signed bootloader image file (
.s37) can be used for production programming or for generating a GBL upgrade image file for bootloader upgrade.Run the
flashcommand to program the signed bootloader image (bootloader-uart-xmodem.s37) to the device if the device does not have a bootloader.
commander flash bootloader-uart-xmodem.s37 --device EFR32MG21A010F1024 --serialno 440048205Parsing file bootloader-uart-xmodem.s37...
Writing 16384 bytes starting at address 0x00000000
Comparing range 0x00000000 - 0x00003FFF (16 KiB)
Programming range 0x00000000 - 0x00001FFF (8 KiB)
Programming range 0x00002000 - 0x00003FFF (8 KiB)
DONESimplicity Commander output for Series 3 devices will look as follows:
WARNING: Failed secure boot detected. Issuing a mass erase before flashing to recover the device...
Parsing file bootloader-uart-xmodem.s37...
Writing 14280 bytes starting at address 0x01000000
Erasing range 0x01000000 - 0x01007FFF (1 sector, 32 KB)
Programming range 0x01000000 - 0x01000FFF (4 KB)
Programming range 0x01001000 - 0x01001FFF (4 KB)
Programming range 0x01002000 - 0x01002FFF (4 KB)
Programming range 0x01003000 - 0x01003FFF (4 KB)
Programming range 0x01004000 - 0x01004FFF (4 KB)
Programming range 0x01005000 - 0x01005FFF (4 KB)
Programming range 0x01006000 - 0x01006FFF (4 KB)
Programming range 0x01007000 - 0x01007FFF (4 KB)
JLinkError: Failed to halt CPU.
Closing region 0 (this consumes one OTP bit, consider --noclose on development/testing devices)
Flashing completed successfully!
DONEApplication Image File (Standard Certificate-Based)#
Follow the procedures in Generate an Unsigned Application Image to generate an unsigned application image for the bootloader.
a. (Using Simplicity Commander) Run the convert command with Private Bootloader Key to overwrite the unsigned application image file with the signed application image file (
blink_baremetal.s37).commander convert blink_baremetal.s37 --secureboot --keyfile bl_cert_key.pem --verify bl_cert_pubkey.pem --outfile blink_baremetal.s37Parsing file blink_baremetal.s37... Found Application Properties at 0x000061bc Writing Application Properties signature pointer to point to 0x000064d8 Setting signature type in Application Properties: 0x00000001 Image SHA256: 8b58ec567126aa1f6baa88afc916581477745aca6f47697ec093512fc30dcc6f R = 994739A26AB520A88A5550F1643AE263D88A952F185F96EE7021FA43DEA6138C S = 65B7112715E2F999A6B216C32D3331AB63B2D31A0A1311DF36EEE62269F8D6AA Verifying signed image... Writing to blink_baremetal.s37... Overwriting file: blink_baremetal.s37... DONEb. (Using an HSM and Simplicity Commander) Run the
convertcommand with--extsignoption to generate an external signing application image file (blink_baremetal.extsign).```sh commander convert blink_baremetal.s37 --secureboot --extsign --outfile blink_baremetal ``` ```sh Parsing file blink_baremetal.s37... Found Application Properties at 0x000061bc Writing Application Properties signature pointer to point to 0x000064d8 Setting signature type in Application Properties: 0x00000001 Writing to blink_baremetal.extsign... DONE ``` Use an HSM containing the Private Bootloader Key to generate the signature for the external signing application image. This example uses the [OpenSSL](#using-an-external-tool) with the **Private Bootloader Key** to simulate this process. The signature is in the `app_signature.der`. ```sh openssl dgst -sha256 -binary -sign bl_cert_key.pem -out app_signature.der blink_baremetal.extsign ``` Run the `convert` command with the **application image signature** to overwrite the unsigned application image file with the signed application image file. (`blink_baremetal.s37`). ```sh commander convert blink_baremetal.s37 --secureboot --signature app_signature.der --verify bl_cert_pubkey.pem --outfile blink_baremetal.s37 ``` ```sh Parsing file blink_baremetal.s37... Parsing signature file app_signature.der... R = 8DA79B020E954D24C23423D80627E046E44052736F6546902F016D64464E82DE S = 9D5A1CC424E97A5AD0352A4EEA6BBF565FED5FC61FF99E63AA73DFFEAD9EE399 Found Application Properties at 0x000061bc Writing Application Properties signature pointer to point to 0x000064d8 Setting signature type in Application Properties: 0x00000001 Verifying signed image... Writing to blink_baremetal.s37... Overwriting file: blink_baremetal.s37... DONE ```(Optional) Run the
util verifysigncommand with Public Bootloader Key to verify that the application image file was correctly signed.commander util verifysign blink_baremetal.s37 --verify bl_cert_pubkey.pemParsing file blink_baremetal.s37... Found application properties at 0x000061bc Did not find application certificate in file If the configuration flag SECURE_BOOT_VERIFY_CERTIFICATE is set or a device has previously seen certificate based signing, it will not accept direct signing. Successfully verified application signature. DONE(Optional) Run the
util appinfocommand to check all available information aboutApplicationProperties_tstruct in a signed application image.commander util appinfo blink_baremetal.s37Parsing file blink_baremetal.s37... Found application properties in image. Application properties info: Application properties location : 0x000061bc Signature location : 0x000064d8 Signature type : ECDSA-P256 Long token section address : Not set (0x00000000) Application data info: For Series 2 devices: If rollback prevention is enabled in the OTP configuration, the device will not boot if the device has seen an application with a higher version number. App type : MCU application (APPLICATION_TYPE_MCU) App version : 0x00000001 Product ID : Not set (0x00000000000000000000000000000000) No certificate found in image. For Series 2 devices: If the configuration flag SECURE_BOOT_VERIFY_CERTIFICATE is set or a device has previously seen certificate based signing, it will not accept direct signing. DONEThe signed application image file (
.s37) can be used for production programming or for generating a GBL upgrade image file for application upgrade.
Application Image File (Advanced Certificate-Based)#
Follow the procedures in Generate an Unsigned Application Image to generate an unsigned application image for the bootloader.
a. (Using Simplicity Commander) Run the
util gencertcommand with Public Application Key and Private Bootloader Key to generate the application certificate (app_cert.bin). Refer to Private/Public Key Pair for details about the--cert-versionfor application certificate.commander util gencert --cert-type secureboot --cert-version 1 --cert-pubkey app_cert_pubkey.pem --sign bl_cert_key.pem --outfile app_cert.binSuccessfully signed certificate DONERun the
convertcommand with Application Certificate and Private Application Key to overwrite the unsigned application image file with the signed application image file (blink_baremetal.s37). This command will inject the application certificate into the application image before signing.commander convert blink_baremetal.s37 --secureboot --certificate app_cert.bin --keyfile app_cert_key.pem --outfile blink_baremetal.s37Parsing file blink_baremetal.s37... Writing certificate to location 0x000064d8 Private key matches public key in certificate. Found Application Properties at 0x000061bc Writing Application Properties signature pointer to point to 0x00006560 Setting signature type in Application Properties: 0x00000001 Image SHA256: 38fd11214c36abf3bb4c4eeda8cfdd2ca2ac2ff1e07072d555a06c74700a23f5 R = 6B4E3BB454513CAA4569415AE8F79453973AAC7FD1FC4914284B65010F3790A6 S = 1657CAAABED579880187261038358C83B1780A67CC41475370D94ED4445A5557 Verifying signed image... Writing to blink_baremetal.s37... Overwriting file: blink_baremetal.s37... DONEb. (Using an HSM and Simplicity Commander) Run the
util gencertcommand with Public Application Key and--extsignoption to generate an external signing application certificate (app_cert.extsign). Refer to Private/Public Key Pair for details about the--cert-versionfor application certificate.```sh commander util gencert --cert-type secureboot --cert-version 1 --cert-pubkey app_cert_pubkey.pem --extsign --outfile app_cert DONE ``` Use an HSM containing the Private Bootloader Key to generate the signature for the external signing application certificate. This example uses the [OpenSSL](#using-an-external-tool) with the **Private Bootloader Key** to simulate this process. The signature is in the `app_cert_signature.der`. ```sh openssl dgst -sha256 -binary -sign bl_cert_key.pem -out app_cert_signature.der app_cert.extsign ``` Run the `util signcert` command with the **application certificate signature** to generate the application certificate (`app_cert.bin`). ```sh commander util signcert app_cert.extsign --cert-type secureboot --signature app_cert_signature.der --verify bl_cert_pubkey.pem --outfile app_cert.bin ``` ```sh R = 279D4FA1B801D108F82E30B0CF1164BF597549287290BD3883C5847B91095CCE S = 567F0E219D2089EF4D79C3D94E43D2FADFE1899B71492ED358E6A1B46AE8162F Successfully verified signature Successfully signed certificate DONE ``` Run the `convert` command with the **Application Certificate** and `--extsign` option to generate an external signing application image file (`blink_baremetal.extsign`). ```sh commander convert blink_baremetal.s37 --secureboot --certificate app_cert.bin --extsign --outfile blink_baremetal ``` ```sh Parsing file blink_baremetal.s37... Writing certificate to location 0x000064d8 ```(Optional) Run the
util verifysigncommand with Public Bootloader Key to verify that the Application Certificate and image were correctly signed.commander util verifysign blink_baremetal.s37 --verify bl_cert_pubkey.pemParsing file blink_baremetal.s37... Found application properties at 0x000061bc Found certificate at 0x000064d8 Successfully verified certificate signature with verification key. Using certificate key to verify application signature. Successfully verified application signature. DONE(Optional) Run the
util appinfocommand to check all available information aboutApplicationProperties_tstruct in a signed application image.commander util appinfo blink_baremetal.s37Parsing file blink_baremetal.s37... Found application properties in image. Application properties info: Application properties location : 0x000061bc Signature location : 0x00006560 Signature type : ECDSA-P256 Long token section address : Not set (0x00000000) Application data info: For Series 2 devices: If rollback prevention is enabled in the OTP configuration, the device will not boot if the device has seen an application with a higher version number. App type : MCU application (APPLICATION_TYPE_MCU) App version : 0x00000001 Product ID : Not set (0x00000000000000000000000000000000) Found certificate at 0x000064d8 Application certificate info: Certificate located at : 0x000064d8 Certificate version : 0x00000001 Certificate key : 0xe562003cd86e225decfd35712e431a19ecd5031a079b06c1d473620a6be9f57a 879820100fee074f28b5885fd6759f480b62aaa0717f96e245aab6635cfb1e11 Certificate signature : 0x039aaba62b5258e68d16e167c3a611c719c542bb3483f5d4b522472b06adf30f 8cfcc484bf8551a208256e3d2d8c9194a7d2ac551e2cac659a99822308a40aa6 DONEThe signed application image file (
.s37) can be used for production programming or for generating a GBL upgrade image file for application upgrade.
Generate a GBL Upgrade Image File#
This section provides steps to create GBL files used to upgrade bootloader, application and/or SE firmware on Series 2 and Series 3 devices.
Note: Series 3 devices support only GBLv4 files for firmware upgrade process.
Follow the procedures in AppBuilder or Bootloader-core Software Component to avoid overwriting the existing application image (if necessary) when upgrading the bootloader or SE.
For a standalone bootloader with communication interface, you can only generate three separate GBL upgrade image files containing bootloader, SE, and application images.
(Series 2 devices) For an application bootloader with storage, you can generate a single GBL upgrade image file (see example below) with a combination of bootloader, SE, and application images.
commander gbl create all.gbl --app app.s37 --bootloader bl.s37 --seupgrade se.seuA signed GBL upgrade image file is required if you enable the Require signed firmware upgrade files option in AppBuilder or Bootloader-core Software Component. The following table shows which private key(s) can be used to sign the GBL upgrade image file (bootloader, SE, or application) on VSE, HSE and Series 3 devices. The VSE devices store a Public Sign Key copy on the top page of the main flash to verify the GBL upgrade image file for ECDSA-P256-SHA256 Secure Boot.
Private Key(s) usage to sign GBL upgrade image file
Secure Boot | HSE and Series 3 | VSE |
|---|---|---|
ECDSA-P256-SHA256 | Private Sign Key | Private Sign Key (Public Sign Key in main flash) |
Certificate-Based | Private Sign Key or Private Bootloader Key | Private Bootloader Key |
An encrypted GBL upgrade image file is required if you enable the Require encrypted firmware upgrade files option in AppBuilder or Bootloader-core Software Component. Refer to Provision GBL Decryption Key on how to provision the GBL Decryption Key for this option.
[Only applicable for Series 2 devices] For an application bootloader with storage, you can enable the Upgrade SE without using the staging area option in GSDK v4.1.1 or higher to directly fetch the SE image from the GBL upgrade image file in storage instead of copying the image to the pre-configured upgrade location.
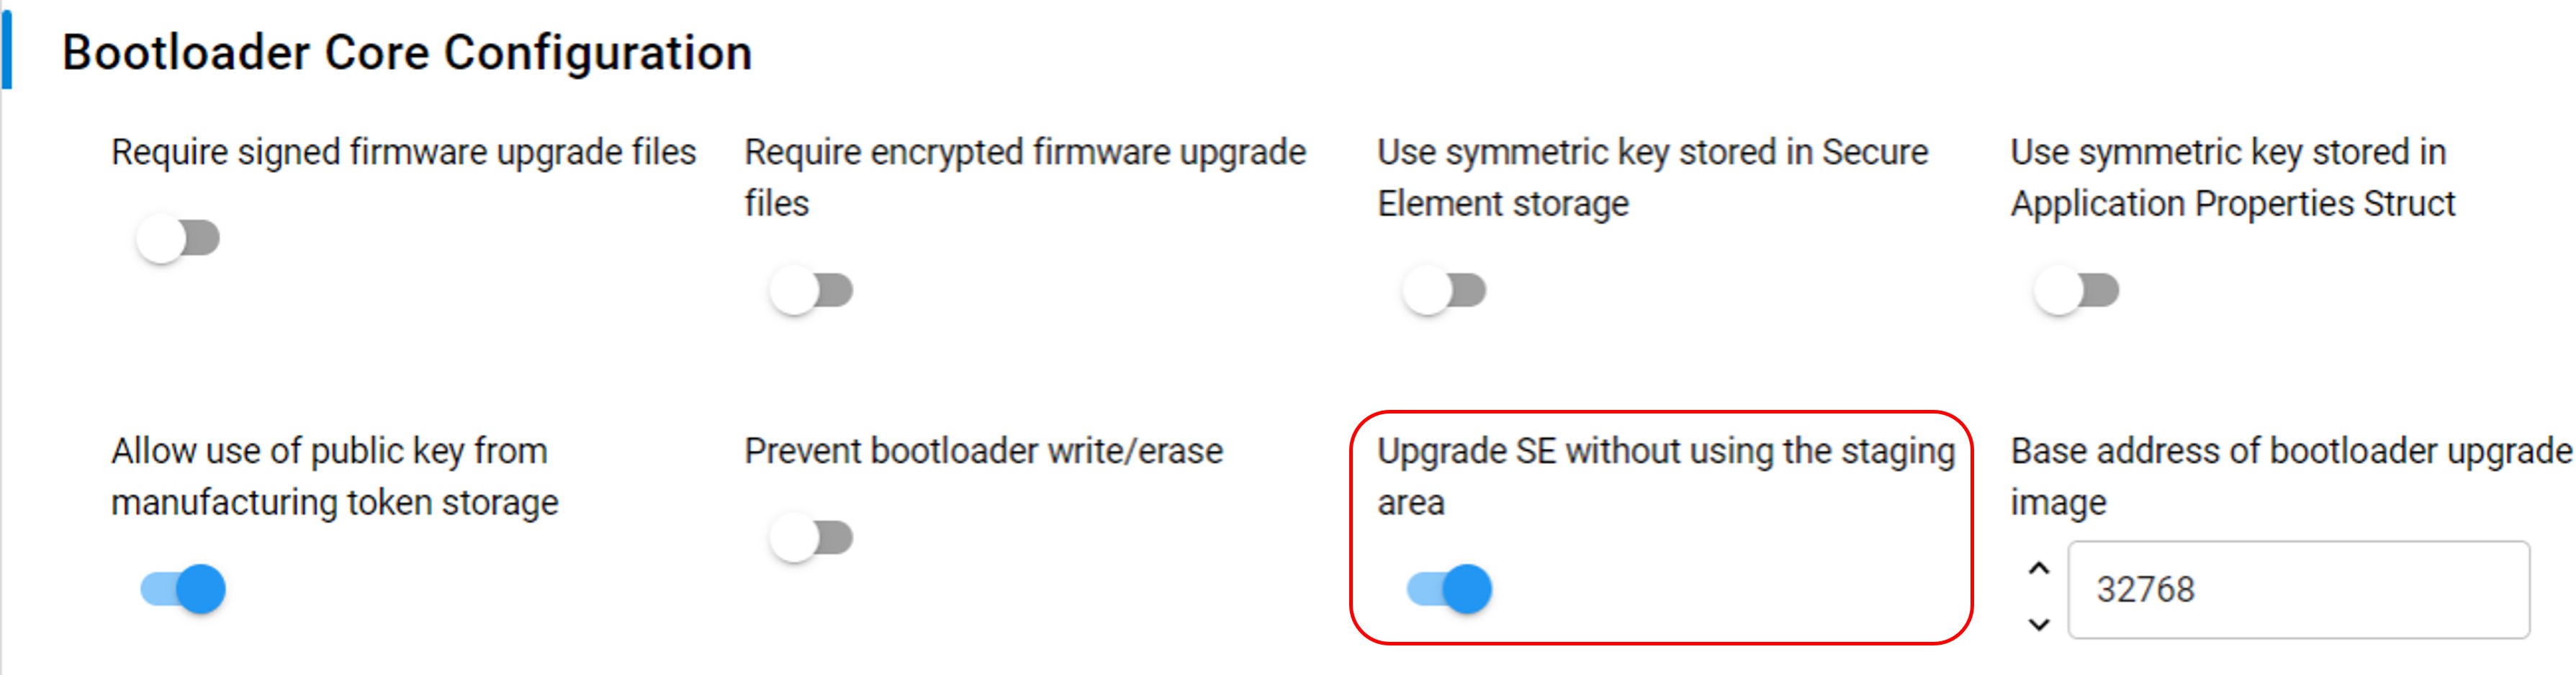
To use the above option, the SE image cannot be in the encrypted part of the GBL upgrade image file if the Require encrypted firmware upgrade files option is enabled. Use the --seunencrypted option in Simplicity Commander v1.13.0 or higher (see example below) to generate an encrypted GBL upgrade image file with a SE image outside the encrypted part of the file.
commander gbl create se-upgrade.gbl --seupgrade secure-element.seu --seunencrypted --app myapp.s37
--encrypt aes_key.txtIn Series 3 devices, the storage bootloader supports direct SE upgrades from the GBL file without the need for staging.
The following sections provide two methods to sign the bootloader, Secure Engine, and application upgrade image files if the Require signed firmware upgrade files option is enabled.
Using Simplicity Commander
Using an HSM and Simplicity Commander
The sections also include encryption examples with an AES-128 key (like aes_key.txt) for the Require encrypted firmware upgrade files option. All procedures assume the required files are in the same folder.
Series 3 devices require GBLv4. GBLv4 is a new format that supports more command line options than the upgrade file for series 2 devices which do not support GBLv4.
To compress an upgrade file, append
--compress <compression algorithm>to the command, supported algorithms arelz4andlzma.To add the product id, append
--productid <16-byte long identifier>to the command.To add the bundle version and minimum version, append
--bundleversion <version number> --minversion <version number>to the command.
Read more about GBLv4 files and the configurations supported in Gecko Bootloader File Format v4 section of Gecko Bootloader User's Guide for Series 3 and Higher.
All
gbl createandgbl4 createcommands support both encrypted and unencrypted images. To create an unencrypted image, omit the--encryptoption. To create an encrypted image, append--encrypt aes_key.txtto the command.
Bootloader Upgrade#
Create an unsigned GBL upgrade image:
a. Series 2 devices: Run the
gbl createcommand with--bootloaderoption to generate the bootloader GBL upgrade image file (bootloader-uart-xmodem.gbl) with the signed bootloader image file (bootloader-uart-xmodem.s37) from Signing for ECDSA-P256-SHA256 Secure Boot or Signing for Certificate-Based Secure Boot.```sh commander gbl create bootloader-uart-xmodem.gbl --bootloader bootloader-uart-xmodem.s37 ``` ```sh Initializing GBL file... Adding bootloader to GBL... Writing GBL file bootloader-uart-xmodem.gbl... DONE ```b. Series 3 devices: Run the
gbl4 createcommand with--dataoption to generate the bootloader GBL upgrade image file (bootloader.gbl) with the signed bootloader image file (bootloader-uart-xmodem.s37) from Signing for ECDSA-P256-SHA256 Secure Boot or Signing for Certificate-Based Secure Boot.```sh commander gbl4 create bootloader.gbl --data bootloader-uart-xmodem.s37 --device SIMG301LIL ``` ```sh Initializing GBLV4 file... Parsing file bootloader.s37... Writing GBL file bootloader.gbl... DONE ```Create a signed GBL upgrade image using Simplicity Commander:
a. Series 2 devices: Run the
gbl createcommand with--bootloaderoption to generate the signed bootloader GBL upgrade image file (bootloader-uart-xmodem.gbl) with Private Sign Key or Private Bootloader Key and the signed bootloader image file (bootloader-uart-xmodem.s37) from Signing for ECDSA-P256-SHA256 Secure Boot or Signing for Certificate-Based Secure Boot.```sh commander gbl create bootloader-uart-xmodem.gbl --bootloader bootloader-uart-xmodem.s37 --sign sign_key.pem ``` ```sh commander gbl create bootloader-uart-xmodem.gbl --bootloader bootloader-uart-xmodem.s37 --sign bl_cert_key.pem ``` ```sh Initializing GBL file... Adding bootloader to GBL... Signing GBL... Image SHA256: 3eb09993ffca5f9b34df3f38b65ab9d2f6619b828b014a186516016d4bbd80f7 R = C21E0C19254AC4F62374BBCA65DEBB42C7349384F5527330CD030A51DC2170F7 S = E1680C3670DE68D731086845E2726EF3BF07B96EB54AA2DB2F390F60BDB6DAB2 Writing GBL file bootloader-uart-xmodem.gbl... DONE ```b. Series 3 devices: Run the
gbl4 createcommand with--dataoption to generate the signed bootloader GBL upgrade image file (bootloader.gbl) with Private Sign Key or Private Bootloader Key and the signed bootloader image file (bootloader-u art-xmodem.s37) from Signing for ECDSA-P256-SHA256 Secure Boot or Signing for Certificate-Based Secure Boot.```sh commander gbl4 create bootloader.gbl --data bootloader-uart-xmodem.s37 --sign sign_key.pem --device SIMG301LIL ``` ```sh commander gbl4 create bootloader.gbl --data bootloader-uart-xmodem.s37 --sign bl_cert_key.pem --device SIMG301LIL ``` ```sh Initializing GBLV4 file... Parsing file bootloader.s37... Writing GBL file bootloader.gbl... Image SHA256: 5ba67b656103a3539f0f3802a4398f0babb3ff182fe9890962e678052571d42b R = 6845219257E660918B7BAE26FFF3DC7BBE8150DA3281CE8881B7088E9E9736EC S = B8C5B58987FA3C7E44444B7C43096A41F48D245ED148C4E0863F0F910133811E DONE ```Creating a signed GBL upgrade image using an HSM and Simplicity Commander:
a. Series 2 devices: Run the
gbl createcommand with--bootloaderand--extsignoptions to generate an external signing bootloader GBL upgrade image file (bootloader-uart-xmodem.extsign) with the signed bootloader image file (bootloader-uart-xmodem.s37) from Signing for ECDSA-P256-SHA256 Secure Boot or Signing for Certificate-Based Secure Boot.```sh commander gbl create bootloader-uart-xmodem --bootloader bootloader-uart-xmodem.s37 --extsign ``` ```sh Initializing GBL file... Adding bootloader to GBL... Preparing GBL for external signing... Writing GBL file bootloader-uart-xmodem.extsign... DONE ``` Use an HSM containing the Private Sign Key or Private Bootloader Key to generate the signature for the external signing bootloader GBL upgrade image file. This example uses the [OpenSSL](#using-an-external-tool) with the **Private Sign Key** or **Private Bootloader Key** to simulate this process. The signature is in the gbl_signature.der. ```sh openssl dgst -sha256 -binary -sign sign_key.pem -out gbl_signature.der bootloader-uart-xmodem.extsign ``` ```sh openssl dgst -sha256 -binary -sign bl_cert_key.pem -out gbl_signature.der bootloader-uart- xmodem.extsign ``` Run the `gbl sign` command with the **signature** above to generate a signed bootloader GBL upgrade image file (`bootloader-uart-xmodem.gbl`). ```sh commander gbl sign bootloader-uart-xmodem.extsign --signature gbl_signature.der --verify sign_pubkey.pem --outfile bootloader-uart-xmodem.gbl ``` ```sh commander gbl sign bootloader-uart-xmodem.extsign --signature gbl_signature.der --verify bl_cert_pubkey.pem --outfile bootloader-uart-xmodem.gbl ``` ```sh Reading GBL data from bootloader-uart-xmodem.extsign... Parsing signature file gbl_signature.der... R = 90F0A3C0D5D9ED2DC10EB3F55595FF21AB31307DC6283E3F3B7494A30FB741D4 S = 2765041F515A960F048CA250BFAB92031D4D1E569FB3F917C9329E7362C17B51 Writing signature to GBL... Verifying GBL... Successfully verified GBL signature Writing GBL file bootloader-uart-xmodem.gbl... DONE ```b. Series 3 devices: Run the
gbl4 createcommand with--dataand--extsignoptions to generate an unsigned and manifest files (bootloader.unsignedandbootloader.manifest) with the signed bootloader image file (bootloader-uart-xmodem.s37) from Signing for ECDSA-P256-SHA256 Secure Boot or Signing for Certificate-Based Secure Boot.```sh commander gbl4 create bootloader --data bootloader-uart-xmodem.s37 --extsign --device SIMG301LIL ``` ```sh Initializing GBLV4 file... Parsing file bootloader-uart-xmodem.s37... Writing manifest data (for external signing) to bootloader.manifest Writing unsigned GBL file (for later use in 'gbl4 sign') to bootloader.unsigned... After computing the signature of bootloader.manifest, assemble the GBL4 using: commander gbl4 sign bootloader.unsigned --outfile bootloader --signature <signature.der> DONE ``` Use an HSM containing the Private Sign Key or Private Bootloader Key to generate the signature for the manifest file. This example uses the [OpenSSL](#using-an-external-tool) with the **Private Sign Key** or **Private Bootloader Key** to simulate this process. The signature is in the `gbl_signature.der`. ```sh openssl dgst -sha256 -binary -sign sign_key.pem -out gbl_signature.der bootloader.manifest ``` ```sh openssl dgst -sha256 -binary -sign bl_cert_key.pem -out gbl_signature.der bootloader.manifest ```Follow the procedures in Upload a GBL Upgrade Image File to upgrade the bootloader with the bootloader GBL upgrade image file.
Secure Engine Upgrade#
Creating an unsigned GBL upgrade image:
a. Series 2 devices: Run the
gbl createcommand with--seupgradeoption to generate the SE GBL upgrade image file (s2c1_se_fw_upgrade_1v2p9.gbl) with the SE image file (s2c1_se_fw_upgrade_1v2p9.seu).```sh commander gbl create s2c1_se_fw_upgrade_1v2p9.gbl --seupgrade s2c1_se_fw_upgrade_1v2p9.seu ``` ```sh Initializing GBL file... Adding Secure Element upgrade image to GBL... Writing GBL file s2c1_se_fw_upgrade_1v2p9.gbl... DONE ```b. Series 3 devices: Run the
gbl4 createcommand with--seupgradeoption to generate the SE GBL upgrade image file (se-upgrade.gbl) with the SE image file (x301_se_fw_upgrade_3v3p2.seuv2).```sh commander gbl4 create se-upgrade.gbl --seupgrade x301_se_fw_upgrade_3v3p2.seuv2 --device SIMG301LIL ``` ```sh Initializing GBLV4 file... Reading SE upgrade file from x301_se_fw_upgrade_3v3p2.seuv2 Writing GBL file se-upgrade... DONE ```Creating a signed GBL upgrade image using Simplicity Commander:
a. Series 2 devices: Run the
gbl createcommand with--seupgradeoption to generate the signed SE GBL upgrade image file (s2c1_se_fw_upgrade_1v2p9.gbl) with Private Sign Key or Private Bootloader Key and the SE image file (s2c1_se_fw_upgrade_1v2p9.seu).```sh commander gbl create s2c1_se_fw_upgrade_1v2p9.gbl --seupgrade s2c1_se_fw_upgrade_1v2p9.seu --sign sign_key.pem ``` ```sh commander gbl create s2c1_se_fw_upgrade_1v2p9.gbl --seupgrade s2c1_se_fw_upgrade_1v2p9.seu --sign bl_cert_key.pem ``` ```sh Initializing GBL file... Adding Secure Element upgrade image to GBL... Signing GBL... Image SHA256: 599d7fc35996b4715441b642709ed262525d09d811d4726e423c0d605ec0f0bf R = EF8EC2DDEDDF44DF88FEAD4ED0A9FDC6351B4D745D5A05BFB87204791871A525 S = FCB26EF005D97E8C5341153A210AE9927E1CF646A3E473FFB90DA8C857E6421F Writing GBL file s2c1_se_fw_upgrade_1v2p9.gbl... DONE ```b. Series 3 devices: Run the
gbl4 createcommand with--seupgradeoption to generate the signed SE GBL upgrade image file (se-upgrade.gbl) with Private Sign Key or Private Bootloader Key and the SE image file (x301_se_fw_upgrade_3v3p2.seuv2).```sh commander gbl4 create se-upgrade.gbl --seupgrade x301_se_fw_upgrade_3v3p2.seuv2 --sign sign_key.pem --device SIMG301LIL ``` ```sh commander gbl4 create se-upgrade.gbl --seupgrade x301_se_fw_upgrade_3v3p2.seuv2 --sign bl_cert_key.pem --device SIMG301LIL ``` ```sh Initializing GBLV4 file... Reading SE upgrade file from x301_se_fw_upgrade_3v3p2.seuv2 Writing GBL file se-upgrade.gbl... Image SHA256: e6462d8810f9afee36974b82b3790af55c94f559c532ee0e264617d705a1fd6b R = 095A9D64BD490FCA444D49DADC53C666B717006D9E7C91C196B259F6E27E5C9C S = 0BFC9B86BA5B3C2A4C98AE5EC8264D905659AE8528433832FAD225D51E9899FD DONE ```Creating a signed GBL upgrade image using an HSM and Simplicity Commander:
a. Series 2 devices: Run the
gbl createcommand with--seupgradeand--extsignoptions to generate an external signing SE GBL upgrade image file (s2c1_se_fw_upgrade_1v2p9.extsign) with the SE image file (s2c1_se_fw_upgrade_1v2p9.seu).```sh commander gbl create s2c1_se_fw_upgrade_1v2p9 --seupgrade s2c1_se_fw_upgrade_1v2p9.seu --extsign ``` ```sh Initializing GBL file... Adding Secure Element upgrade image to GBL... Preparing GBL for external signing... Writing GBL file s2c1_se_fw_upgrade_1v2p9.extsign... DONE ``` Use an HSM containing the Private Sign Key or Private Bootloader Key to generate the signature for the external signing SE GBL upgrade image file. This example uses the [OpenSSL](#using-an-external-tool) with the **Private Sign Key** or **Private Bootloader Key** to simulate this process. The signature is in the `gbl_signature.der`. ```sh openssl dgst -sha256 -binary -sign sign_key.pem -out gbl_signature.der s2c1_se_fw_upgrade_1v2p9.extsign ``` ```sh openssl dgst -sha256 -binary -sign bl_cert_key.pem -out gbl_signature.der s2c1_se_fw_upgrade_1v2p9.extsign ``` Run the `gbl sign` command with the **signature** above to generate a signed SE GBL upgrade image file (`s2c1_se_fw_upgrade_1v2p9.gbl`). ```sh commander gbl sign s2c1_se_fw_upgrade_1v2p9.extsign --signature gbl_signature.der --verify sign_pubkey.pem --outfile s2c1_se_fw_upgrade_1v2p9.gbl ``` ```sh commander gbl sign s2c1_se_fw_upgrade_1v2p9.extsign --signature gbl_signature.der --verify bl_cert_pubkey.pem --outfile s2c1_se_fw_upgrade_1v2p9.gbl ``` ```sh Reading GBL data from s2c1_se_fw_upgrade_1v2p9.extsign... Parsing signature file gbl_signature.der... R = 2798B98194EE02717C738B5866ABD8D234D0F0E096E90495D371D2507D8E1C67 S = 19F2586E2C6177D6B4EEC708E006F67334C989D0398D4233C686C98ECB6992FB Writing signature to GBL... Verifying GBL... Successfully verified GBL signature Writing GBL file s2c1_se_fw_upgrade_1v2p9.gbl... DONE ```b. Series 3 devices: Run the
gbl4 createcommand with--seupgradeand--extsignoptions to generate unsigned and manifest files (se-upgrade.unsignedandse-upgrade.manifest) with the SE image file (x301_se_fw_upgrade_3v3p2.seuv2).```sh commander gbl4 create se-upgrade --seupgrade x301_se_fw_upgrade_3v3p2.seuv2 --extsign --device SIMG301LIL ``` ```sh Initializing GBLV4 file... Reading SE upgrade file from x301_se_fw_upgrade_3v3p2.seuv2 Writing manifest data (for external signing) to se-upgrade.manifest Writing unsigned GBL file (for later use in 'gbl4 sign') to se-upgrade.unsigned... After computing the signature of se-upgrade.manifest, assemble the GBL4 using: commander gbl4 sign se-upgrade.unsigned --outfile se-upgrade --signature <signature.der> DONE ``` Use an HSM containing the Private Sign Key or Private Bootloader Key to generate the signature for the manifest file. This example uses the [OpenSSL](#using-an-external-tool) with the **Private Sign Key** or **Private Bootloader Key** to simulate this process. The signature is in the `gbl_signature.der`. ```sh openssl dgst -sha256 -binary -sign sign_key.pem -out gbl_signature.der se-upgrade.manifest ``` ```sh openssl dgst -sha256 -binary -sign bl_cert_key.pem -out gbl_signature.der se-upgrade.manifest ``` Run the `gbl4 sign` command with the **signature** above to generate a signed SE GBL upgrade image file (`se-upgrade.gbl`).Follow the procedures in Upload a GBL Upgrade Image File to upgrade the SE with the SE GBL upgrade image file.
Notes:
The
sign_key.pem/sign_pubkey.pemkey pair is for Signing for ECDSA-P256-SHA256 Secure Boot, and thebl_cert_key.pem/bl_cert_pubkey.pemkey pair is for Signing for Certificate-Based Secure Boot.Trying to apply a lower version of the SE image file (
.seu) to the device will be ignored.
Application Upgrade#
Creating an unsigned GBL upgrade image:
a. Series 2 devices: Run the
gbl createcommand with--appoption to generate the application GBL upgrade image file (blink_baremetal.gbl) with the signed application image file (blink_baremetal.s37) from Signing for ECDSA-P256-SHA256 Secure Boot or Signing for Certificate-Based Secure Boot.```sh commander gbl create blink_baremetal.gbl --app blink_baremetal.s37 ``` ```sh Parsing file blink_baremetal.s37... Initializing GBL file... Adding application to GBL... Writing GBL file blink_baremetal.gbl... DONE ```b. Series 3 devices: Run the
gbl4 createcommand with--dataoption to generate the bootloader GBL upgrade image file (app-upgrade.gbl) with the signed bootloader image file (bt_soc_blinky_freertos.s37) from Signing for ECDSA-P256-SHA256 Secure Boot or Signing for Certificate-Based Secure Boot.```sh commander gbl4 create app-upgrade.gbl --data bt_soc_blinky_freertos.s37 --device SIMG301LIL ``` ```sh Initializing GBLV4 file... Parsing file bt_soc_blinky_freertos.s37... Writing GBL file app-upgrade.gbl... DONE ```Creating a signed GBL upgrade image using Simplicity Commander:
a. Series 2 devices: Run the
gbl createcommand with--appoption to generate the signed application GBL upgrade image file (blink_baremetal.gbl) with Private Sign Key or Private Bootloader Key and the signed application image file (blink_baremetal.s37) from Signing for ECDSA-P256-SHA256 Secure Boot or Signing for Certificate-Based Secure Boot.```sh commander gbl create blink_baremetal.gbl --app blink_baremetal.s37 --sign sign_key.pem ``` ```sh commander gbl create blink_baremetal.gbl --app blink_baremetal.s37 --sign bl_cert_key.pem ``` ```sh Parsing file blink_baremetal.s37... Initializing GBL file... Adding application to GBL... Signing GBL... Image SHA256: 116c1be47d799ab75afc7b3f4c9a8023e5cd031103b1d28c578eebfaf1ad73d2 R = CE4D85C058301A2437440E00385D97E496F1D8B5CAFFB8C184F8A88B5266E3E9 S = 90BBF754EBC0AB343CC32AA06ADED85F9D12D1A67CA6608F9085137142000A40 Writing GBL file blink_baremetal.gbl... DONE ```b. Series 3 devices: Run the
gbl4 createcommand with--dataoption to generate the signed bootloader GBL upgrade image file (app-upgrade-signed.gbl) with Private Sign Key or Private Bootloader Key and the signed bootloader image file (bt_soc_blinky_freertos.s37) from Signing for ECDSA-P256-SHA256 Secure Boot or Signing for Certificate-Based Secure Boot.```sh commander gbl4 create app-upgrade-signed.gbl --data bt_soc_blinky_freertos.s37 --sign sign_key.pem --device SIMG301LIL ``` ```sh commander gbl4 create app-upgrade-signed.gbl --data bt_soc_blinky_freertos.s37 --sign bl_cert_key.pem --device SIMG301LIL ``` ```sh Initializing GBLV4 file... Parsing file bt_soc_blinky_freertos.s37... Writing GBL file app-upgrade-signed.gbl... Image SHA256: 665ee8c703bc57ee59078d48183d39087e6a52e564ee3bd73971f33acbd0b009 R = 5C72EDFA23B947BAB1827A566C14BDF4542C24CE62F30DE928216AC10FE8AA5B S = 22A4912CA192274681FB000F882D0CE500FC3D29C54CB354430553EC4A61B11A DONE ```Creating a signed GBL upgrade image using an HSM and Simplicity Commander:
a. Series 2 devices: Run the
gbl createcommand with--appand--extsignoptions to generate an external signing application GBL upgrade image file (blink_baremetal.extsign) with the signed application image file (blink_baremetal.s37) from Signing for ECDSA-P256-SHA256 Secure Boot or Signing for Certificate-Based Secure Boot.```sh commander gbl create blink_baremetal --app blink_baremetal.s37 --extsign ``` ```sh Parsing file blink_baremetal.s37... Initializing GBL file... Adding application to GBL... Preparing GBL for external signing... Writing GBL file blink_baremetal.extsign... DONE ``` Use an HSM containing the Private Sign Key or Private Bootloader Key to generate the signature for the external signing application GBL upgrade image file. This example uses the [OpenSSL](#using-an-external-tool) with the **Private Sign Key** or **Private Bootloader Key** to simulate this process. The signature is in the `gbl_signature.der`. ```sh openssl dgst -sha256 -binary -sign sign_key.pem -out gbl_signature.der blink_baremetal.extsign ``` ```sh openssl dgst -sha256 -binary -sign bl_cert_key.pem -out gbl_signature.der blink_baremetal.extsign ``` Run the `gbl sign` command with the **signature** above to generate a signed application GBL upgrade image file (`blink_baremetal.gbl`). ```sh commander gbl sign blink_baremetal.extsign --signature gbl_signature.der --verify sign_pubkey.pem --outfile blink_baremetal.gbl ``` ```sh commander gbl sign blink_baremetal.extsign --signature gbl_signature.der --verify bl_cert_pubkey.pem --outfile blink_baremetal.gbl ``` ```sh Reading GBL data from blink_baremetal.extsign... Parsing signature file gbl_signature.der... R = 533499660E24F1620EF25D862FB607F46E9E4ECC41CBDECBE77C64EF1970D96A S = FA8901878218F5F1DB0FAF8B074CE98A27C63FFDE63730CD49EE47E847B9811D Writing signature to GBL... Verifying GBL... Successfully verified GBL signature Writing GBL file blink_baremetal.gbl... DONE ```b. Series 3 devices: Run the
gbl4 createcommand with--dataand--extsignoptions to generate an unsigned and manifest files (app-upgrade.unsignedandapp-upgrade.manifest) with the signed bootloader image file (bootloader-uart-xmodem.s37) from Signing for ECDSA-P256-SHA256 Secure Boot or Signing for Certificate-Based Secure Boot.```sh commander gbl4 create app-upgrade --data bt_soc_blinky_freertos.s37 --extsign --device SIMG301LIL ``` ```sh Initializing GBLV4 file... Parsing file bt_soc_blinky_freertos.s37... Writing manifest data (for external signing) to app-upgrade.manifest Writing unsigned GBL file (for later use in 'gbl4 sign') to app-upgrade.unsigned... After computing the signature of app-upgrade.manifest, assemble the GBL4 using: commander gbl4 sign app-upgrade.unsigned --outfile app-upgrade --signature <signature.der> DONE ``` Use an HSM containing the Private Sign Key or Private Bootloader Key to generate the signature for the manifest file. This example uses the [OpenSSL](#using-an-external-tool) with the **Private Sign Key** or **Private Bootloader Key** to simulate this process. The signature is in the `gbl_signature.der`. ```sh openssl dgst -sha256 -binary -sign sign_key.pem -out gbl_signature.der app-upgrade.manifest ``` ```sh openssl dgst -sha256 -binary -sign bl_cert_key.pem -out gbl_signature.der app-upgrade.manifest ``` Run the `gbl4 sign` command with the **signature** above to generate a signed bootloader GBL upgrade image file (`bootloader.gbl`).Follow the procedures in Upload a GBL Upgrade Image File to upgrade the application with the application GBL upgrade image file.
Notes:
[Series 2 devices] The Simplicity Commander v1.11.0 or above supports GBL upgrade image file in
util verifysigncommand.commander util verifysign blink_baremetal.gbl --verify sign_pubkey.pemSuccessfully verified GBL signature DONE[Series 2 devices] The Simplicity Commander v1.12.0 or above fixes a bug introduced in v1.11.0 when using the
--extsignoption on the GBL upgrade image file.
Upload a GBL Upgrade Image File#
This section describes how to use UART XMODEM Bootloader v2.0.0 in GSDK v4.0 and higher to upload a GBL upgrade image file (.gbl) to the device. The procedures and pictures may be different for the other versions of this example.
The GBL upgrade image file uses a proprietary format to store the upgrade image for a firmware upgrade. Use the gbl create command to generate the GBL upgrade image file for bootloader, application, and Secure Engine. Refer to UG266/Silicon Labs Gecko Bootloader User's Guide for GSDK 4.0 and Higher (series 1 and 2 devices) and Generate a GBL Upgrade Image File for more information about GBL upgrade image file creation.
You can use any terminal software that supports the XMODEM-CRC protocol for file transfer. This application note uses Tera Term as terminal software. The default serial port setting is 115200 bps 8-N-1.
Assume the UART XMODEM Bootloader and application firmware had already flashed to the radio board on WSTK.
Press the RESET and PB0 push buttons on the WSTK.
Release the RESET push button to run the UART XMODEM Bootloader.
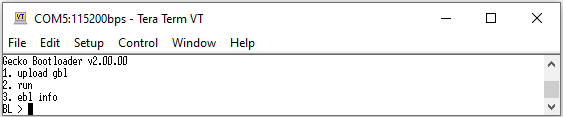
Release the PB0 push button. Press 1 (
upload gbl) in Tera Term to upload a GBL upgrade image file.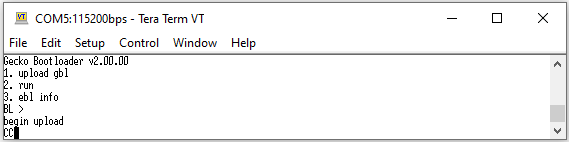
Transfer a file through XMODEM-CRC in Tera Term, navigate to File > Transfer > XMODEM > Send....
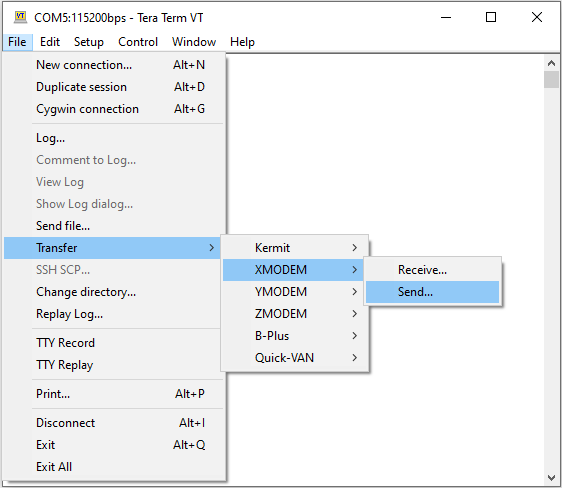
Select the target GBL upgrade image file. Click [Open] to upload.
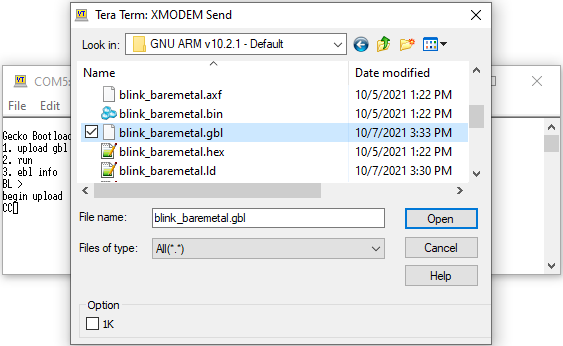
If no error occurs, press 2 (
run) to start a firmware upgrade.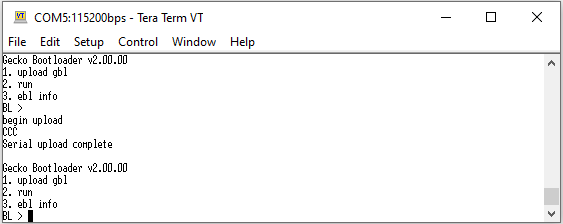
Upgrade to Certificate-Based Secure Boot#
You can upgrade the Series 2 and Series 3 devices deployed in the field from ECDSA-P256-SHA256 Secure Boot to certificate-based Secure Boot even if the SECURE_BOOT_VERIFY_CERTIFICATE option in SE OTP is disabled.
commander security readconfig --serialno 440048205MCU Flags
Secure Boot : Enabled
Secure Boot Verify Certificate : Disabled
Secure Boot Anti Rollback : Enabled
Secure Boot Page Lock Narrow : Disabled
Secure Boot Page Lock Full : DisabledThe following procedures for the upgrade to certificate-based Secure Boot is an IRREVERSIBLE process.
Follow the procedures in Generate Key and Signing to generate an ECDSA-P256 bootloader certificate key pair.
Follow the procedures in Signing for Certificate-Based Secure Boot to generate the signed GBL image file with the bootloader certificate key pair in step 1. The bootloader certificate version
(--cert-versionin theutil gencertcommand) in this signed GBL image file must be equal to or higher than one (≥ 1).Follow the procedures in Generate a GBL Upgrade Image File to upgrade the bootloader to certificate-based Secure Boot. Use the Private Sign Key for ECDSA-P256-SHA256 Secure Boot to sign the bootloader GBL upgrade image file if required.
SE will use the Public Bootloader Key to validate the bootloader image once SE identifies a bootloader certificate in the bootloader image. If the bootloader certificate version from step 2 is higher than zero (> 0) and gets verified once, SE will never again accept the ECDSA-P256-SHA256 Secure Boot signed bootloader image. Refer to the "Secure Boot Procedure" section in UG266/Silicon Labs Gecko Bootloader User's Guide for GSDK 4.0 and Higher (series 1 and 2 devices) for more information.
commander security status --device EFR32MG21A010F1024 --serialno 440048205SE Firmware version : 1.2.9 Serial number : 000000000000000014b457fffe045a2d Debug lock : Disabled Device erase : Enabled Secure debug unlock : Disabled Tamper status : Not OK Secure boot : Enabled Boot status : 0x18 - Failed: Secure Boot requires cert, but none found DONE(Standard Certificate-Based) Follow the procedures in Signing for Certificate-Based Secure Boot to generate the signed application image file with the Private Bootloader Key in step 1.
(Advanced Certificate-Based) Follow the procedures in Generate Key and Signing to generate an ECDSA-P256 application certificate key pair.
Follow the procedures in Signing for Certificate-Based Secure Boot to generate the signed application image file with the application certificate key pair in this step and the Private Bootloader Key in step 1. The application certificate version (
--cert-versionin theutil gencertcommand) in this signed application image file must be equal to or higher than the bootloader certificate version in step 2 (Private/Public Key Pair).Follow the procedures in Generate a GBL Upgrade Image File to upgrade application with the signed image from step 4 or 5 for certificate-based Secure Boot. Use the Private Sign Key or Private Bootloader key in step 1 for certificate-based Secure Boot to sign the application GBL upgrade image file if required.
Certificate Revocation#
The certificate revocation is the act of invalidating a certificate when its private key shows signs of being compromised. The following procedures describe how to revoke the Series 2 and Series 3 devices' bootloader certificates deployed in the field.
Follow the procedures in Generate Key and Signing to generate a new ECDSA-P256 bootloader certificate key pair.
Follow the procedures in Signing for Certificate-Based Secure Boot to generate the signed GBL image file with the bootloader certificate key pair in step 1. The bootloader certificate version (
--cert-versionin theutil gencertcommand) in this signed GBL image file must be higher than the certificate version in SE flash (see Private/Public Key Pair).Follow the procedures in Generate a GBL Upgrade Image File to upgrade the bootloader with the signed image from step 2. Use the Private Sign Key or existing Private Bootloader Key for certificate-based Secure Boot to sign the bootloader GBL upgrade image file if required.
(Standard Certificate-Based) Follow the procedures in Signing for Certificate-Based Secure Boot to generate the signed application image file with the Private Bootloader Key in step 1.
(Advanced Certificate-Based) Follow the procedures in Signing for Certificate-Based Secure Boot to generate the signed application image file with the Private Bootloader Key in step 1. The application certificate version (--cert-version in the util gencert command) in this signed application image file must be equal to or higher than the bootloader certificate version in step 2 (see Private/Public Key Pair).
You should generate a new ECDSA-P256 application certificate key pair if the Private Application Key for the application certificate is compromised.
Follow the procedures in Generate a GBL Upgrade Image File to upgrade the application with the signed image from step 4 or 5. Use the Private Sign Key or Private Bootloader key in step 1 for certificate-based Secure Boot to sign the application GBL upgrade image file if required.
Upgrade to Secure Boot with RTSL#
The following procedures describe upgrading Series 2 and Series 3 devices deployed in the field without Secure Boot to Secure Boot with RTSL.
(Recommended) Upgrade SE firmware to the latest version if available. See the Gecko Bootloader Operation - Secure Engine Upgrade section in UG266/Silicon Labs Gecko Bootloader User's Guide for GSDK 4.0 and Higher (series 1 and 2 devices).
Follow the procedures in AppBuilder or 3.4.1.2 Bootloader-core Software Component to prepare an unsigned GBL image with the required Secure Boot configuration for the application firmware.
Follow the procedures in Generate Key and Signing to generate the ECDSA-P256 Sign Key pair for Secure Boot. The key pairs for the bootloader certificate and application certificate (advanced) are required if using Certificate-Based Secure Boot.
Follow steps 1 to 2 in SE Manager Key Provisioning Platform Example if this HSE GBL Decryption Key option is selected. Use the Public Sign Key in step 3 and follow steps 1 to 3 in SE Manager Key Provisioning Platform Example to generate an unsigned image. Use this image to create an application GBL upgrade image file.
The original GBL (application Secure Boot is disabled) boots into the unsigned SE Manager Key Provisioning Platform Example after upgrading the application with the image file in step 4.
Follow steps 5 to 8 in SE Manager Key Provisioning Platform Example to install the Public Sign Key to SE OTP and GBL Decryption Key (optional) to HSE OTP. Press SPACE instead of ENTER in step 9 to BYPASS the programming of the Secure Boot configuration in SE OTP.
. Press ENTER to initialize SE OTP for secure boot configuration or press SPACE to skip. . SE manager deinitialization... SL_STATUS_OK (cycles: 5 time: 0 us)Notes:
Programming the Public Sign Key to the top page of the main flash (not included in this example) is required for the VSE device ECDSA-P256-SHA256 Secure Boot.
Programming the GBL Decryption Key to the top page of the main flash (not included in this example) is required if the default storage option for GBL Decryption Key is selected and the Require encrypted firmware upgrade files option is enabled in step 2.
Follow the signing procedures in Signing for ECDSA-P256-SHA256 Secure Boot or Signing for Certificate-Based Secure Boot (Bootloader Image File section, skip the Secure Boot configuration for the bootloader) with the required key(s) generated in step 3 to sign the unsigned GBL image generated from step 2. Use this signed image to create a bootloader GBL upgrade image file.
Follow the signing procedures in Signing for ECDSA-P256-SHA256 Secure Boot or Signing for Certificate-Based Secure Boot (Application Image File section) with the required key(s) generated in step 3 to sign the unsigned application image generated from step 4. Use this signed image to create an application GBL upgrade image file.
Note: For the application bootloader with storage, you can generate a single GBL upgrade image file for signed images from steps 7 and 8.
The Secure Boot in SE OTP is not yet enabled, so FSB does not verify the signature when upgrading to the signed GBL in step 7. The updated GBL (application Secure Boot enabled) verifies the signature when upgrading or booting to the signed SE Manager Key Provisioning Platform Example in step 8.
Follow steps 9 to 10 (use SPACE to skip previous steps for OTP key programming) in SE Manager Key Provisioning Platform Example to program the required Secure Boot configuration in SE OTP for signed GBL.
Update a signed custom application firmware to replace the signed SE Manager Key Provisioning Platform Example used for Secure Boot with RTSL upgrade.
Notes:
Refer to the "Enabling Secure Boot RTSL on Series 2 and Series 3 Devices" section (either Standalone Bootloaders or Application Bootloaders with Storage) in UG266/UG489 and Bootloader User Guide Series3 and higher for details.
The SE Manager Key Provisioning Platform Example used here is just for reference. You can modify or write a new application to automate the processes for the Secure Boot with RTSL upgrade.
If the Require signed firmware upgrade files option is enabled in step 2, the GBL upgrade image files from steps 8 and 11 must be signed.
If the Require encrypted firmware upgrade files option is enabled in step 2, the GBL upgrade image files from steps 8 and 11 must be encrypted. And the GBL Decryption Key for the corresponding option in GBL must be in place.
Recover Devices when Secure Boot Fails#
If a Secure Boot process fails (meaning firmware image at device starting address validation fails), the only way to recover is to flash a correctly signed image.
There are two scenarios to recover the device from a Secure Boot failure:
Debug Lock
BUSLOCK
DEBUG LOCK#
The following table describes the different debug lock scenarios on recovering the Secure Boot failure device.
Secure Debug | Device Erase | Debug Lock | State | Recover from Secure Boot Failure |
|---|---|---|---|---|
Disabled | Enabled | Disabled | Unlock | Flash a correctly signed image. |
Disabled | Enabled | Enabled | Standard debug lock | Flash a correctly signed image after standard debug unlocking the device. |
Disabled | Disabled | Enabled | Permanent debug lock | There is no way to recover the device. Make sure the programmed image is correctly signed before locking the device. |
Enabled | Disabled | Enabled | Secure debug lock | Flash a correctly signed image after secure debug unlocking the device. |
Note: The error code in the Boot status of examples below depends on boot failure caused by the host image (GBL).
The following procedures describe how to recover the Secure Boot failure device from the lock states below.
Unlocked
Standard debug locked
Secure debug locked
Follow the procedure in Signing for ECDSA-P256-SHA256 Secure Boot or Signing for Certificate-Based Secure Boot to generate a correctly signed GBL.
(Unlocked) Run the
security statuscommand to get the boot status.commander security status --device EFR32MG21A010F1024 --serialno 440048205SE Firmware version : 1.2.9 Serial number : 000000000000000014b457fffe045afd Debug lock : Disabled Device erase : Enabled Secure debug unlock : Disabled Tamper status : Not OK Secure boot : Enabled Boot status : 0x12 - Failed: Error while checking signature of host firmware DONERun the
flashcommand to flash the correctly signed image (likebootloader-uart-xmodem.s37). If a failed Secure Boot is detected, the device will be erased before flashing the new image.commander flash bootloader-uart-xmodem.s37 --device EFR32MG21A010F1024 --serialno 440048205WARNING: Failed secure boot detected. Issuing a mass erase before flashing to recover the device... Parsing file bootloader-uart-xmodem.s37... Writing 16384 bytes starting at address 0x00000000 Comparing range 0x00000000 - 0x00003FFF (16 KiB) Programming range 0x00000000 - 0x00001FFF (8 KiB) Programming range 0x00002000 - 0x00003FFF (8 KiB) DONE(Standard debug locked) Run the
security statuscommand to get the boot status.commander security status --device EFR32MG21A010F1024 --serialno 440048205SE Firmware version : 1.2.9 Serial number : 000000000000000014b457fffe045afd Debug lock : Enabled Device erase : Enabled Secure debug unlock : Disabled Tamper status : Not OK Secure boot : Enabled Boot status : 0x12 - Failed: Error while checking signature of host firmware DONERun the
security erasedevicecommand to unlock the device.commander security erasedevice --device EFR32MG21A010F1024 --serialno 440048205Successfully erased device DONENote: Issue a power-on or pin reset to complete the unlock process.
Run the
flashcommand to flash the correctly signed image (likebootloader-uart-xmodem.s37). If a failed Secure Boot is detected, the device will be erased before flashing the new image.commander flash bootloader-uart-xmodem.s37 --device EFR32MG21A010F1024 --serialno 440048205WARNING: Failed secure boot detected. Issuing a mass erase before flashing to recover the device... Parsing file bootloader-uart-xmodem.s37... Writing 16384 bytes starting at address 0x00000000 Comparing range 0x00000000 - 0x00003FFF (16 KiB) Programming range 0x00000000 - 0x00001FFF (8 KiB) Programming range 0x00002000 - 0x00003FFF (8 KiB) DONE(Secure debug locked) Run the
security statuscommand to get the boot status.commander security status --device EFR32MG21A010F1024 --serialno 440048205SE Firmware version : 1.2.9 Serial number : 0000000000000000000d6ffffe0a3a5f Debug lock : Enabled Device erase : Disabled Secure debug unlock : Enabled Tamper status : Not OK Secure boot : Enabled Boot status : 0x12 - Failed: Error while checking signature of host firmware DONERun the
security unlockcommand to unlock the device with the debug unlock token.commander security unlock --device EFR32MG21A010F1024 --serialno 440048205Unlocking with unlock payload: C:/Users/<username>/AppData/Local/SiliconLabs/commander/SecurityStore/device_0000000000000000000d6ffffe0a3a5f/challenge_020fc3cc9e492088d06d75d71b7aabfe/unlock_payload_0000000000111110.bin Secure debug successfully unlocked DONERun the
flashcommand with the--noresetoption to flash the correctly signed image (likebootloader-uart-xmodem.s37).commander flash --noreset bootloader-uart-xmodem.s37 --device EFR32MG21A010F1024 --serialno 440048205Parsing file bootloader-uart-xmodem.s37... Writing 16384 bytes starting at address 0x00000000 Comparing range 0x00000000 - 0x00003FFF (16 KiB) Erasing range 0x00000000 - 0x00003FFF (2 sectors, 16 KiB) Programming range 0x00000000 - 0x00001FFF (8 KiB) Programming range 0x00002000 - 0x00003FFF (8 KiB) DONENote: The
--noresetoption prevents the device from returning to the secure debug lock state before flashing.Run the
security statuscommand to check the boot status. The example below is an unlocked device.commander security status --device EFR32MG21A010F1024 --serialno 440048205SE Firmware version : 1.2.9 Serial number : 000000000000000014b457fffe045afd Debug lock : Disabled Device erase : Enabled Secure debug unlock : Disabled Tamper status : OK Secure boot : Enabled Boot status : 0x20 - OK DONE
BUSLOCK#
When secure boot is enabled, the SE enforces the secure boot process through a hardware mechanism called BUSLOCK. This BUS-LOCK will halt the host-side (M33) bus so that it will not start the executing code. The BUSLOCK is enabled out of reset when secure boot is enabled.
BUSLOCK status for secure boot success: BUSLOCK is enabled out of reset and is released only when the Secure boot process is successful and returns 0x20 - OK status code.
commander security status --device EFR32MG21A010F1024 --serialno 440048205SE Firmware version : 1.2.9
Serial number : 000000000000000014b457fffe045afd
Debug lock : Disabled
Device erase : Enabled
Secure debug unlock : Disabled
Tamper status : OK
Secure boot : Enabled
Boot status : 0x20 - OK
DONEBUSLOCK status for secure boot failure: BUSLOCK remains applied when the Secure Boot process fails and returns anything but 0x20 - OK status code. This keeps the BUSLOCK intact, and the host CPU is frozen, resulting in halting firmware execution on the M33 core. The device can be recovered from the BUSLOCK state by following these steps:
Issue a
security erasecommand to the SE:commander security erasedeviceSuccessfully erased device DONEAfter issuing the
security erasecommand to the SE, flash the correctly signed image to recover from a secure boot failure.