Examples#
Overview#
The examples for Series 2 debug lock and debug unlock are described in the following table.
| Example | Device (Radio Board) | SE Firmware | Tool |
|---|---|---|---|
Standard debug lock | EFR32MG21A010F1024IM32 (BRD4181A) | Version 1.2.14 | SE Manager |
Standard debug lock and unlock | EFR32MG21A010F1024IM32 (BRD4181A) | Version 1.2.14 | Simplicity Commander |
" | EFR32MG21A010F1024IM32 (BRD4181A) | Version 1.2.9 | Simplicity Studio 5 |
Provision Public Command Key | EFR32MG21A010F1024IM32 (BRD4181A) | Version 1.2.14 | SE Manager |
Secure debug lock | EFR32MG21A010F1024IM32 (BRD4181A) | Version 1.2.14 | SE Manager |
Provision Public Command Key and secure debug lock | EFR32MG21A010F1024IM32 (BRD4181A) | Version 1.2.14 | Simplicity Commander |
" | EFR32MG21A010F1024IM32 (BRD4181A) | Version 1.2.9 | Simplicity Studio 5 |
Secure debug unlock and roll challenge | EFR32MG21A010F1024IM32 (BRD4181A) | Version 1.2.14 | SE Manager |
" | EFR32MG21A010F1024IM32 (BRD4181A) | Version 1.2.14 | Simplicity Commander |
" | EFR32MG21A010F1024IM32 (BRD4181A) | Version 1.2.9 | Simplicity Studio 5 |
Secure debug unlock | EFR32MG21A010F1024IM32 (BRD4181A) | Version 1.2.9 | IAR v8.50.9 |
Permanent debug lock | EFR32MG21A010F1024IM32 (BRD4181A) | Version 1.2.14 | Simplicity Commander |
" | EFR32MG21A010F1024IM32 (BRD4181A) | Version 1.2.9 | Simplicity Studio 5 |
Note: Unless specified in the example, these examples can be applied to other Series 2 devices.
Using Simplicity Studio#
The security operations are performed in the Security Settings of Simplicity Studio. This application note uses Simplicity Studio v5.2.1.1. The procedures and pictures may be different for the other versions of Simplicity Studio 5.
Right-click the selected debug adapter RB (ID:J-Link serial number) to display the context menu.
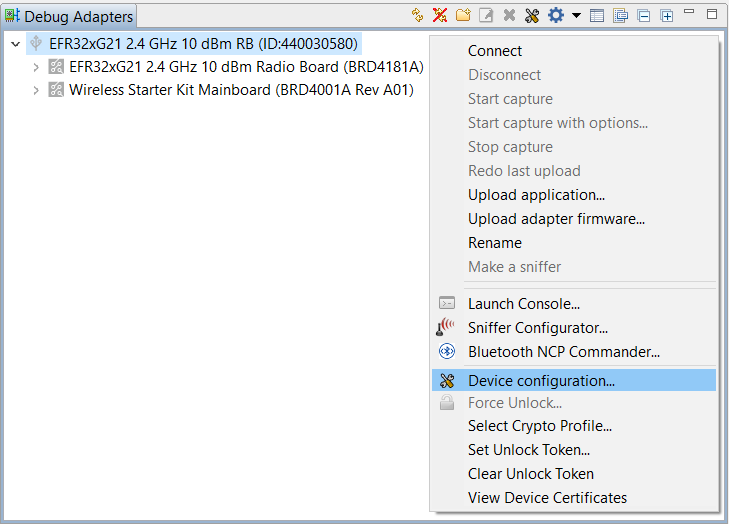
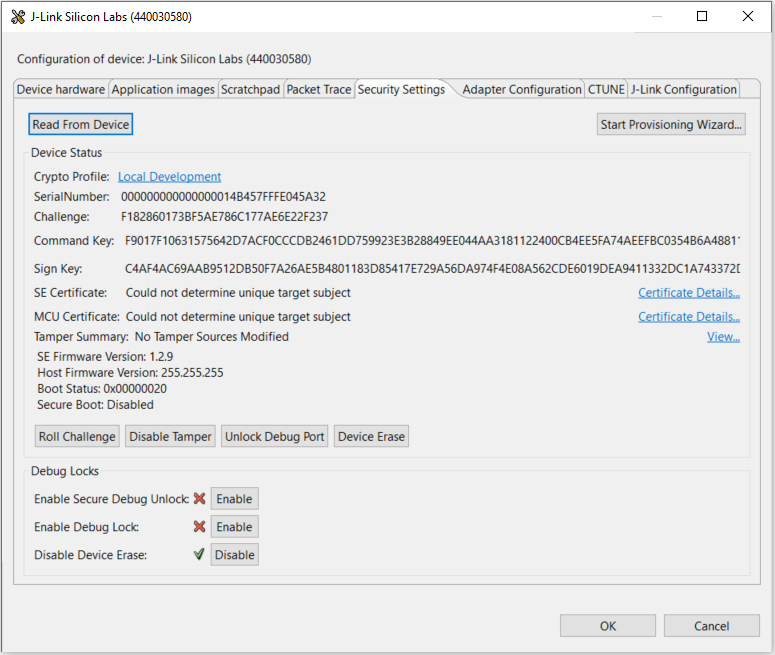
Click Device configuration... to open the Configuration of device: J-Link Silicon Labs (serial number) dialog box. Click the Security Settings tab to get the selected device configuration.
Using Simplicity Commander#
This application note uses Simplicity Commander v1.14.2. The procedures and console output may be different for the other versions of Simplicity Commander. The latest version of Simplicity Commander can be downloaded from https://www.silabs.com/developers/mcu-programming-options.
commander --versionSimplicity Commander 1v14p2b1232 JLink DLL version: 7.70d Qt 5.12.10 Copyright (C) 2017 The Qt Company Ltd. EMDLL Version: 0v18p7b669 mbed TLS version: 2.16.6 Emulator found with SN=440048205 USBAddr=0 DONEThe Simplicity Commander's Command Line Interface (CLI) is invoked by
commander.exein the Simplicity Commander folder. The location for Simplicity Studio 5 in Windows isC:\SiliconLabs\SimplicityStudio\v5\developer\adapter_packs\commander. For ease of use, it is highly recommended to add the path ofcommander.exeto the system PATH in Windows.If more than one Wireless Starter Kit (WSTK) is connected via USB, the target WSTK must be specified using the
--serialno \<J-Link serial number>option.If the WSTK is in debug mode OUT, the target device must be specified using the
--device \<device name>option.
For more information about Simplicity Commander, see UG162: Simplicity Commander Reference Guide.
Using External Tools#
The secure debug unlock example uses the OpenSSL to sign the access certificate and challenge response. The Windows version of OpenSSL can be downloaded from https://slproweb.com/products/Win32OpenSSL.html. This application note uses OpenSSL Version 1.1.1h (Win64).
openssl versionOpenSSL 1.1.1h 22 Sep 2020The OpenSSL's Command Line Interface (CLI) is invoked by
openssl.exein the OpenSSL folder. The location in Windows (Win64) isC:\Program Files\OpenSSL-Win64\bin. For ease of use, it is highly recommended to add the path ofopenssl.exeto the systemPATHin Windows.The secure debug unlock example uses the free Hex Editor Neo to edit the binary files generated by Simplicity Commander. The Windows version of Hex Editor Neo can be downloaded from https://www.hhdsoftware.com/free-hex-editor.
Using Platform Examples#
Simplicity Studio 5 includes the SE Manager platform examples for debug lock, key provisioning, and secure debug unlock. This application note uses platform examples of GSDK v4.2.1. The console output may be different on other versions of GSDK.
Refer to the corresponding readme file for details about each SE Manager platform example. This file also includes the procedures to create the project and run the example.
Standard Debug Lock and Unlock#
SE Manager - Debug Lock Platform Example#
Click the View Project Documentation link to open the readme file.

Press
SPACEthenENTERto select the debug lock operation.SE Manager Host Firmware Upgrade and Debug Lock Example - Core running at 38000 kHz. . SE manager initialization... SL_STATUS_OK (cycles: 10 time: 0 us) . Current selection is HOST FIRMWARE UPGRADE. + Press SPACE to select HOST FIRMWARE UPGRADE or DEBUG LOCK, press ENTER to run. + Current selection is DEBUG LOCK. . Get debug lock status... SL_STATUS_OK (cycles: 8788 time: 231 us) + Debug lock: Disabled + Press ENTER to apply debug lock or press SPACE to exit.Press
ENTERagain to lock the device.. Apply the debug lock... SL_STATUS_OK (cycles: 52585 time: 1383 us) + Get debug lock status... SL_STATUS_OK (cycles: 8769 time: 230 us) + Debug lock: Enabled . Current selection is DEBUG LOCK. + Press SPACE to select HOST FIRMWARE UPGRADE or DEBUG LOCK, press ENTER to run.
Simplicity Commander#
Run the
security statuscommand to get the selected device configuration.commander security status --device EFR32MG21A010F1024 --serialno 440048205SE Firmware version : 1.2.14 Serial number : 000000000000000014b457fffe045a93 Debug lock : Disabled Device erase : Enabled Secure debug unlock : Disabled Tamper status : OK Secure boot : Disabled Boot status : 0x20 - OK DONERun the
security lockcommand to lock the selected device.commander security lock --device EFR32MG21A010F1024 --serialno 440048205WARNING: Secure debug unlock is disabled. Only way to regain debug access is to run a device erase. Device is now locked. DONERun the
security statuscommand again to check the device configuration.commander security status --device EFR32MG21A010F1024 --serialno 440048205SE Firmware version : 1.2.14 Serial number : 000000000000000014b457fffe045a93 Debug lock : Enabled Device erase : Enabled Secure debug unlock : Disabled Tamper status : OK Secure boot : Disabled Boot status : 0x20 - OK DONERun the
security erasedevicecommand to unlock the selected device.commander security erasedevice --device EFR32MG21A010F1024 --serialno 440048205Successfully erased device DONENote: Issue a power-on or pin reset to complete the unlock process.
Run the
security statuscommand again to check the device configuration.commander security status --device EFR32MG21A010F1024 --serialno 440048205SE Firmware version : 1.2.14 Serial number : 000000000000000014b457fffe045a93 Debug lock : Disabled Device erase : Enabled Secure debug unlock : Disabled Tamper status : OK Secure boot : Disabled Boot status : 0x20 - OK DONE
Simplicity Studio#
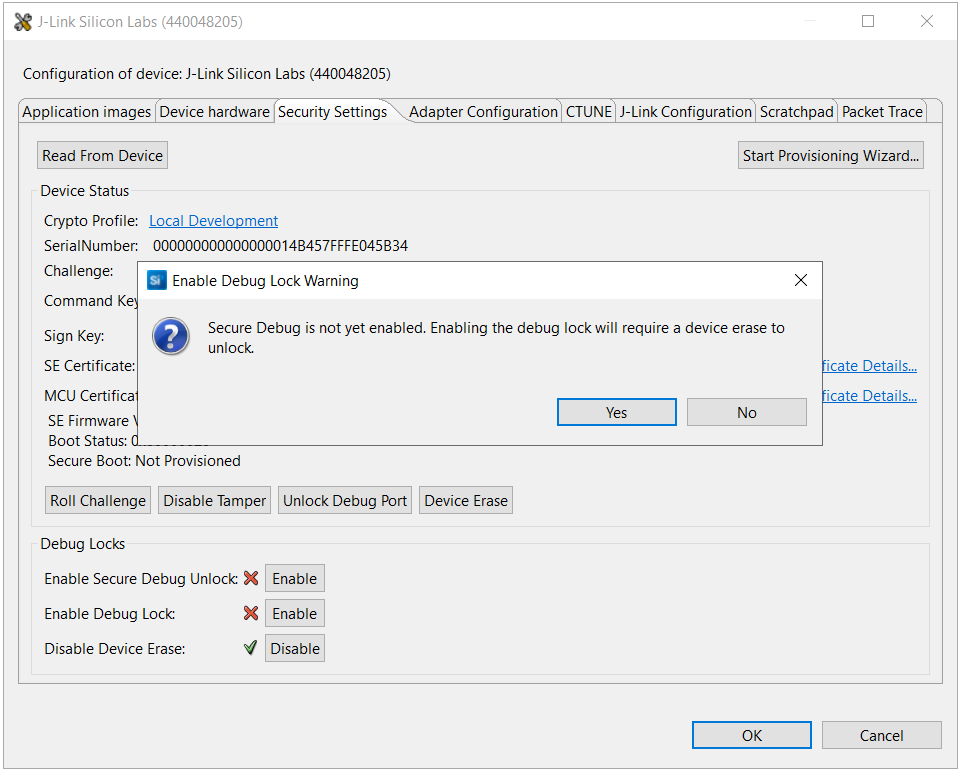
Open the Security Settings of the selected device as described in Using Simplicity Studio.
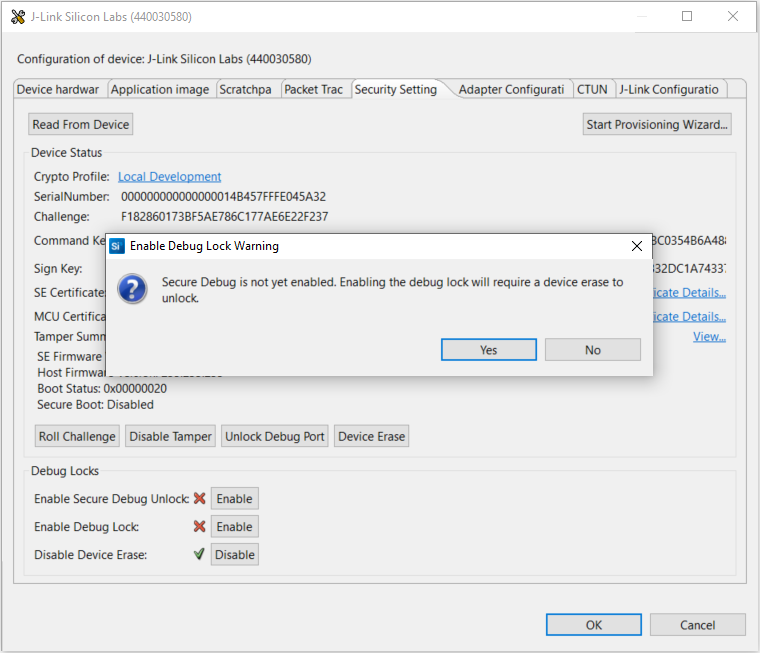
Click [Enable] next to Enable Debug Lock: to lock the device. The following Enable Debug Lock Warning is displayed. Click [Yes] to confirm. This configures standard debug lock.
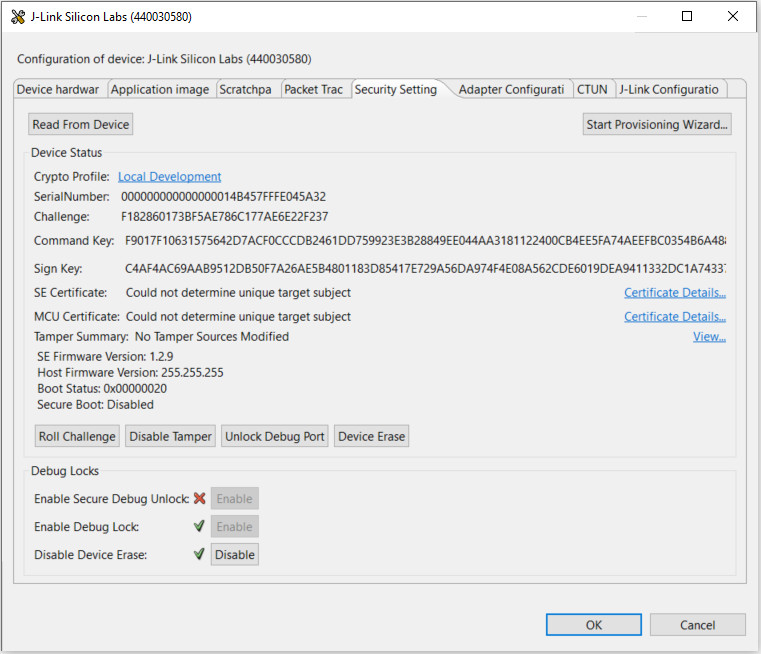
The [Enable] controls next to Enable Secure Debug Unlock: and Enable Debug Lock: are grayed out after standard debug lock is enabled.
Click [Device Erase] to unlock the device.

The device will return to the unlock state. Click [OK] to exit.

Provision Public Command Key and Secure Debug Lock#
SE Manager - Key Provisioning Platform Example#
Click the View Project Documentation link to open the readme file.

Press
SPACEto skip the programming of AES-128 key.SE Manager Key Provisioning Example - Core running at 38000 kHz. . SE manager initialization... SL_STATUS_OK (cycles: 9 time: 0 us) . Get current SE firmware version... SL_STATUS_OK (cycles: 3578 time: 94 us) + Current SE firmware version (MSB..LSB): 00010209 . Read SE OTP configuration... SL_STATUS_COMMAND_IS_INVALID (cycles: 3908 time: 102 us) . Press ENTER to program 128-bit AES key in SE OTP or press SPACE to skip. . Encrypt 16 bytes plaintext with 128-bit AES OTP key... SL_STATUS_FAIL (cycles: 4627 time: 121 us) . Press ENTER to program public sign key in SE OTP or press SPACE to skip.Press
SPACEto skip the programming of Public Sign Key.. Get public sign key... SL_STATUS_FAIL (cycles: 4144 time: 109 us) . Press ENTER to program public command key in SE OTP or press SPACE to skip.Press
ENTERto program the default Public Command Key in flash to the SE OTP.+ Warning: The public command key in SE OTP cannot be changed once written! + Press ENTER to confirm or press SPACE to skip if you are not sure.Press
ENTERto confirm the operation.. Initialize public command key... SL_STATUS_OK (cycles: 56052 time: 1475 us) . Get public command key... SL_STATUS_OK (cycles: 7135 time: 187 us) + The public command key (64 bytes): B1 BC 6F 6F A5 66 40 ED 52 2B 2E E0 F5 B3 CF 7E 5D 48 F6 0B E8 14 8F 0D C0 84 40 F0 A4 E1 DC A4 7C 04 11 9E D6 A1 BE 31 B7 70 7E 5F 9D 00 1A 65 9A 05 10 03 E9 5E 1B 93 6F 05 C3 7E A7 93 AD 63 . Press ENTER to initialize SE OTP for secure boot configuration or press SPACE to skip.Press
SPACEto skip the secure boot configuration.. SE manager deinitialization... SL_STATUS_OK (cycles: 7 time: 0 us)
SE Manager - Secure Debug Platform Example#
Click the View Project Documentation link to open the readme file.
Note: The secure debug platform example can only run on the HSE device.

Use a standard debug unlock device with matched Public Command Key.
SE Manager Secure Debug Example - Core running at 38000 kHz.
  . SE manager initialization... SL_STATUS_OK (cycles: 9 time: 0 us)
  . Get SE status... SL_STATUS_OK (cycles: 8496 time: 223 us)
  + The SE firmware version (MSB..LSB): 0001020E
  + Debug lock: Disabled
  + Device Erase: Enabled
  + Secure debug: Disabled
  + Secure boot: Disabled
  + Debug lock state: Unlocked
  + Non-secure, Invasive debug lock (DBGLOCK) configuration: Unlocked
  + Non-secure, Non-invasive debug lock (NIDLOCK) configuration: Unlocked
  + Secure, Invasive debug lock (SPIDLOCK) configuration: Unlocked
  + Secure, Non-invasive debug lock (SPNIDLOCK) configuration: Unlocked
  + Non-secure, Invasive debug lock (DBGLOCK) current state: Unlocked
  + Non-secure, Non-invasive debug lock (NIDLOCK) current state: Unlocked
  + Secure, Invasive debug lock (SPIDLOCK) current state: Unlocked
  + Secure, Non-invasive debug lock (SPNIDLOCK) current state: Unlocked. The device is in normal state and secure debug is disabled.
  + Exporting a public command key from a hard-coded private command key... SL_STATUS_OK (cycles: 202467 time: 5328 us)
  + Reading the public command key from SE OTP... SL_STATUS_OK (cycles: 7589 time: 199 us)
  + Comparing exported public command key with SE OTP public command key... OK
  + Press ENTER to enable secure debug or press SPACE to exit.
Press
ENTERto enable the secure debug.+ Enable the secure debug... SL_STATUS_OK (cycles: 48313 time: 1271 us) + Press ENTER to lock the device or press SPACE to disable the secure debug and exit.Press
ENTERto lock the device with debug options0x0c.+ Setting the debug options (0xc)... SL_STATUS_OK (cycles: 51091 time: 1344 us) + Locking the device... SL_STATUS_OK (cycles: 89683 time: 2360 us) + Device erase is enabled, press ENTER to disable device erase (optional if just for testing) or press SPACE to skip.Press
ENTERto disable device erase.+ Warning: This is a ONE-TIME command which PERMANETLY disables device erase! + Press ENTER to confirm or press SPACE to skip if you are not sure.Press
ENTERto confirm the operation.. Get SE status... SL_STATUS_OK (cycles: 8496 time: 223 us) + The SE firmware version (MSB..LSB): 0001020E + Debug lock: Enabled + Device Erase: Disabled + Secure debug: Enabled + Secure boot: Disabled + Debug lock state: Locked + Non-secure, Invasive debug lock (DBGLOCK) configuration: Unlocked + Non-secure, Non-invasive debug lock (NIDLOCK) configuration: Unlocked + Secure, Invasive debug lock (SPIDLOCK) configuration: Locked + Secure, Non-invasive debug lock (SPNIDLOCK) configuration: Locked + Non-secure, Invasive debug lock (DBGLOCK) current state: Unlocked + Non-secure, Non-invasive debug lock (NIDLOCK) current state: Unlocked + Secure, Invasive debug lock (SPIDLOCK) current state: Locked + Secure, Non-invasive debug lock (SPNIDLOCK) current state: Locked. The device is in secure debug lock state. + Press ENTER to issue a secure debug unlock or press SPACE to exit.Press
SPACEto exit.. SE manager deinitialization... SL_STATUS_OK (cycles: 9 time: 0 us)
Simplicity Commander#
Run the
security statuscommand to get the selected device configuration.commander security status --device EFR32MG21A010F1024 --serialno 440048205SE Firmware version : 1.2.14 Serial number : 000000000000000014b457fffe045a93 Debug lock : Disabled Device erase : Enabled Secure debug unlock : Disabled Tamper status : OK Secure boot : Disabled Boot status : 0x20 - OK DONERun the
security writekeycommand to provision the Public Command Key (e.g.,command_pubkey.pem).commander security writekey --command command_pubkey.pem --device EFR32MG21A010F1024 --serialno 440048205Device has serial number 000000000000000014b457fffe045a93 ================================================================================ Please look through any warnings before proceeding. THIS IS A ONE-TIME command which permanently ties debug and tamper access to certificates signed by this key. Type 'continue' and hit enter to proceed or Ctrl-C to abort: ================================================================================ continue DONENote: The Public Command Key cannot be changed once written.
Run the
security readkeycommand to read the Public Command Key from the SE OTP.commander security readkey --command --device EFR32MG21A010F1024 --serialno 440048205B1BC6F6FA56640ED522B2EE0F5B3CF7E5D48F60BE8148F0DC08440F0A4E1DCA4 7C04119ED6A1BE31B7707E5F9D001A659A051003E95E1B936F05C37EA793AD63 DONERun the
security lockconfigcommand to enable the secure debug.commander security lockconfig --secure-debug-unlock enable --device EFR32MG21A010F1024 --serialno 440048205Secure debug unlock was enabled DONEa. For the TrustZone-unaware application, run the
security lockcommandto lock the selected device.commander security lock --device EFR32MG21A010F1024 --serialno 440048205Device is now locked. DONEb. For the TrustZone-aware application, run the security lock --trustzone #### command to set the debug options (e.g.,
1100) and lock the selected device. The bit order of #### is SPNIDLOCK (MSB), SPIDLOCK, NIDLOCK, and DBGLOCK (LSB).commander security lock --trustzone 1100 --device EFR32MG21A010F1024 --serialno 440048205Writing debug restriction bits: DBGLOCK: 0 NIDLOCK: 0 SPIDLOCK: 1 SPNIDLOCK: 1 Device is now locked. DONENotes:
The
--trustzoneoption for thesecurity lockcommand requires Simplicity Commander ≥ v1.13.3.It is strongly recommended to upgrade to SE firmware ≥ v1.2.14 (xG21 and xG22) or ≥ v2.2.1 (other Series 2 devices) so that the debug options cannot be modified after the device is locked.
Use
commander security lockwithout the--trustzone#### option if the default setting of debug options (0000) is good enough for a TrustZone-aware application.
Run the
security disabledeviceerasecommand to disable device erase. This is an IRREVERSIBLE action, and should be the last step in production.commander security disabledeviceerase --device EFR32MG21A010F1024 --serialno 440048205================================================================================ THIS IS A ONE-TIME command which Permanently disables device erase. If secure debug lock has not been set, there is no way to regain debug access to this device. Type 'continue' and hit enter to proceed or Ctrl-C to abort: ================================================================================ continue Disabled device erase successfully DONENote: The debug options cannot be reset to the default value
0000(unlock) if the device erase option is disabled.a. For Simplicity Commander < v1.13.3, run the
security statuscommand to check the debug lock status of the device.commander security status --device EFR32MG21A010F1024 --serialno 440048205SE Firmware version : 1.2.14 Serial number : 000000000000000014b457fffe045a93 Debug lock : Enabled Device erase : Disabled Secure debug unlock : Enabled Tamper status : OK Secure boot : Disabled Boot status : 0x20 - OK DONEb. For Simplicity Commander ≥ v1.13.3, run the
security status --trustzonecommand to check the full debug lock status of the device.commander security status --trustzone --device EFR32MG21A010F1024 --serialno 440048205SE Firmware version : 1.2.14 Serial number : 000000000000000014b457fffe045a93 Debug lock : Enabled Device erase : Disabled Secure debug unlock : Enabled Debug lock state: Locked Non-secure, invasive debug lock (DBGLOCK) : Unlocked Non-secure, non-invasive debug lock (NIDLOCK) : Unlocked Secure, invasive debug lock (SPIDLOCK) : Locked Secure, non-invasive debug lock (SPNIDLOCK): Locked Non-secure, invasive debug lock state (DBGLOCK) : Unlocked Non-secure, non-invasive debug lock state (NIDLOCK) : Unlocked Secure, invasive debug lock state (SPIDLOCK) : Locked Secure, non-invasive debug lock state (SPNIDLOCK): Locked Tamper status : OK Secure boot : Disabled Boot status : 0x20 - OK DONE
Simplicity Studio#
Run
the util keytotokencommand to convert the Public Command Key file (PEM format) into a text file (command_pubkey.txt).commander `util keytotoken` command_pubkey.pem --outfile command_pubkey.txtWriting EC tokens to command_pubkey.txt... DONEOpen Security Settings of the selected device as described in Using Simplicity Studio.
Click the WriteKey link next to Command Key: to open a dialog box.
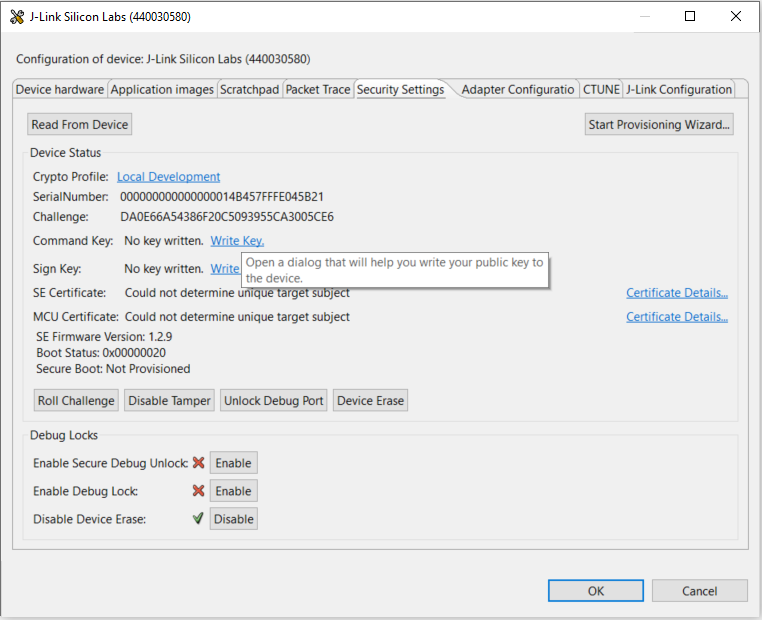
The Write Command Key dialog box is displayed.
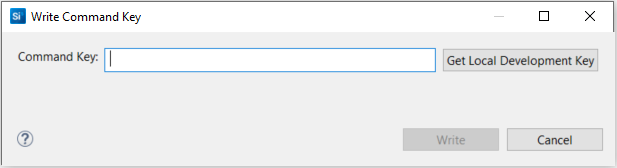
Open the
command_pubkey.txtfile generated in step 1.MFG_SIGNED_BOOTLOADER_KEY_X : B1BC6F6FA56640ED522B2EE0F5B3CF7E5D48F60BE8148F0DC08440F0A4E1DCA4 MFG_SIGNED_BOOTLOADER_KEY_Y : 7C04119ED6A1BE31B7707E5F9D001A659A051003E95E1B936F05C37EA793AD63Copy Public Command Key (X-point
B1BC...first, then Y-point7C04...) to Command Key: box.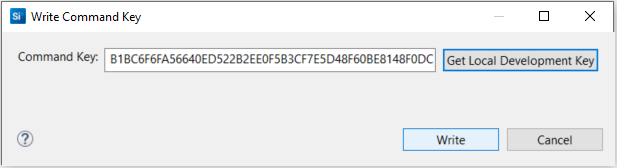
Click [Write] to provision the Public Command Key.
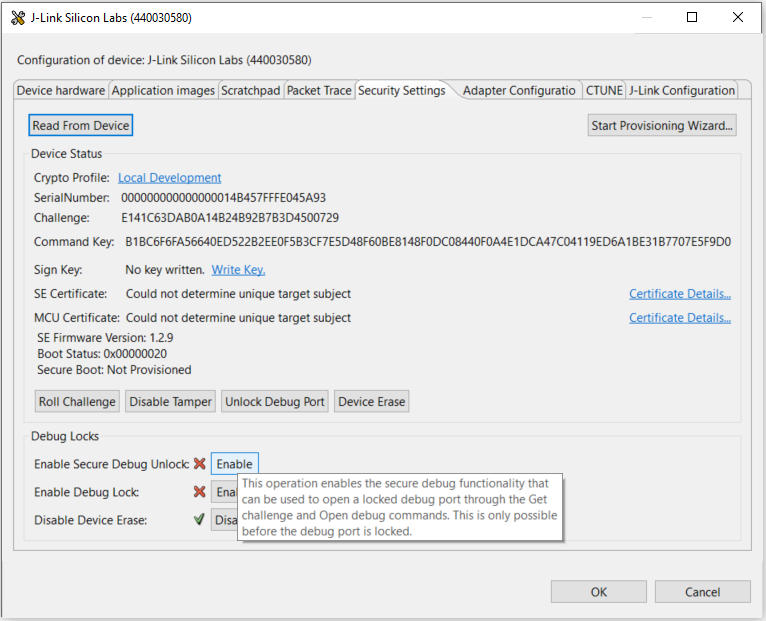
Click [Enable] next to Enable Secure Debug Unlock: to enable the secure debug functionality.
Click [Enable] next to Enable Debug Lock: to lock the device. This configures secure debug lock.

Click [Disable] next to Disable Device Erase: to disable the device erase. The following Disable Device Erase Warning is displayed. Click [Yes] to confirm.
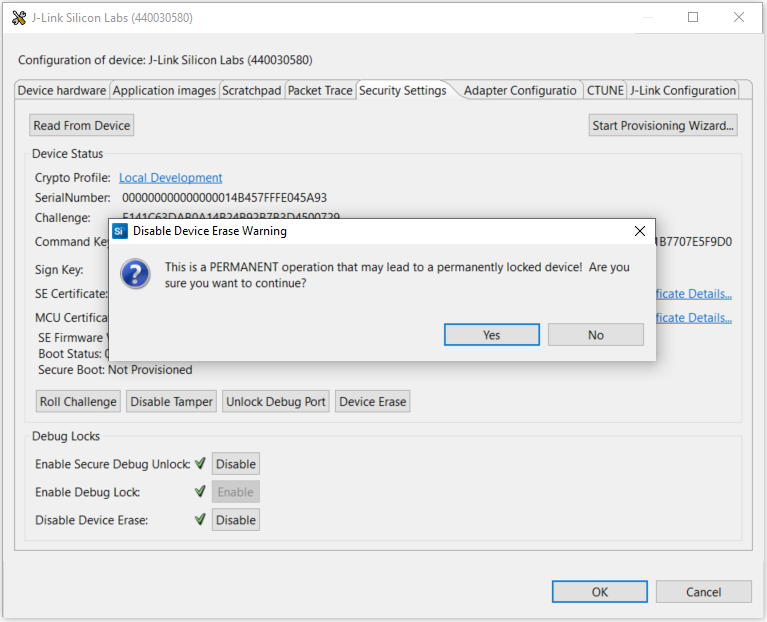
Note: This is an IRREVERSIBLE action, and should be the last step in production.
Secure Debug Unlock and Roll Challenge#
SE Manager - Secure Debug Platform Example#
Click the View Project Documentation link to open the readme file.
Note: The secure debug platform example can only run on the HSE device.
Use a secure debug lock device with matched Public Command Key.
  . Get SE status... SL_STATUS_OK (cycles: 8496 time: 223 us)
  + The SE firmware version (MSB..LSB): 0001020E
  + Debug lock: Enabled
  + Device Erase: Disabled
  + Secure debug: Enabled
  + Secure boot: Disabled
  + Debug lock state: Locked
  + Non-secure, Invasive debug lock (DBGLOCK) configuration: Unlocked
  + Non-secure, Non-invasive debug lock (NIDLOCK) configuration: Unlocked
  + Secure, Invasive debug lock (SPIDLOCK) configuration: Locked
  + Secure, Non-invasive debug lock (SPNIDLOCK) configuration: Locked
  + Non-secure, Invasive debug lock (DBGLOCK) current state: Unlocked
  + Non-secure, Non-invasive debug lock (NIDLOCK) current state: Unlocked
  + Secure, Invasive debug lock (SPIDLOCK) current state: Locked
  + Secure, Non-invasive debug lock (SPNIDLOCK) current state: Locked. The device is in secure debug lock state.
  + Press ENTER to issue a secure debug unlock or press SPACE to exit.
Press
ENTERto unlock the device with debug mode request0x3e.+ Creating a private certificate key in a buffer... SL_STATUS_OK (cycles: 202354 time: 5325 us) + Exporting a public certificate key from a private certificate key... SL_STATUS_OK (cycles: 199394 time: 5247 us) + Read the serial number of the SE and save it to access certificate... SL_STATUS_OK (cycles: 7084 time: 186 us) + Signing the access certificate with private command key... SL_STATUS_OK (cycles: 221849 time: 5838 us) + Request challenge from the SE and save it to challenge response... SL_STATUS_OK (cycles: 4418 time: 116 us) + Signing the challenge response with private certificate key... SL_STATUS_OK (cycles: 220833 time: 5811 us) + Creating an unlock token (DEBUG_MODE_REQUEST = 0x3e) to unlock the device... SL_STATUS_OK (cycles: 935778 time: 24625 us) + Get debug status to verify the device is unlocked... SL_STATUS_OK (cycles: 9017 time: 237 us) + Success to unlock the device! . Get SE status... SL_STATUS_OK (cycles: 8683 time: 228 us) + The SE firmware version (MSB..LSB): 0001020D + Debug lock: Enabled + Device Erase: Enabled + Secure debug: Enabled + Secure boot: Disabled + Debug lock state: Unlocked + Non-secure, Invasive debug lock (DBGLOCK) configuration: Unlocked + Non-secure, Non-invasive debug lock (NIDLOCK) configuration: Unlocked + Secure, Invasive debug lock (SPIDLOCK) configuration: Locked + Secure, Non-invasive debug lock (SPNIDLOCK) configuration: Locked + Non-secure, Invasive debug lock (DBGLOCK) current state: Unlocked + Non-secure, Non-invasive debug lock (NIDLOCK) current state: Unlocked + Secure, Invasive debug lock (SPIDLOCK) current state: Unlocked + Secure, Non-invasive debug lock (SPNIDLOCK) current state: Unlocked. The device is in secure debug unlock state. + Issue a power-on or pin reset to re-enable the secure debug lock. + Press ENTER to roll the challenge to invalidate the current unlock token or press SPACE to exit.Press
ENTERto roll the challenge.. Check and roll the challenge. + Request current challenge from the SE... SL_STATUS_OK (cycles: 4450 time: 117 us) + The current challenge (16 bytes): FA A7 AA 5E EF E6 18 23 E5 21 89 84 DB 7E 52 7D + Rolling the challenge... SL_STATUS_OK (cycles: 19757 time: 519 us) + Request rolled challenge from the SE... SL_STATUS_OK (cycles: 4628 time: 121 us) + The rolled challenge (16 bytes): 5A 7A 81 CC 6E 46 C1 EF B4 A4 CA 7A DD A9 85 EB + Issue a power-on or pin reset to activate the rolled challenge. . SE manager deinitialization... SL_STATUS_OK (cycles: 9 time: 0 us)
Simplicity Commander#
The secure debug was designed with three organizations in mind:
Direct Customer to whom Silicon Labs sells the chip. This chip has the Public Command Key installed in the SE OTP.
That Direct Customer may be creating a white-labeled product for another company or a sub-component that goes into another company’s product. The Product Company is the customer of the direct customer.
The Debug 3rd Party could be anyone, internal or external, that the Product Company decides is qualified to debug the device.
Because the Public Command Key is installed into the SE OTP of a large number of devices and cannot be changed, the corresponding Private Command Key must be guarded by a very stringent process. If this Private Command Key is ever leaked, all the devices programmed with the corresponding Public Command Key will be compromised.
A secure debug unlock user case is described in the following figure.

The secure debug unlock flow moving across the time axis from left to right is explained below:
The Product Company creates a Private/Public Certificate Key pair for each device. Because the key pair is assigned only to a single device, the company may not need to protect the Private Certificate Key as securely as the Private Command Key by the Direct Customer.
In this example, the Private/Public Certificate Key pair (
cert_key.pemandcert_pubkey.pem) is generated by running theutil genkeycommand.commander util genkey --type ecc-p256 --privkey cert_key.pem --pubkey cert_pubkey.pemGenerating ECC P256 key pair... Writing private key file in PEM format to cert_key.pem Writing public key file in PEM format to cert_pubkey.pem DONEThe Public Certificate Key (
cert_pubkey.pem) for each device is passed to the Silicon Labs Direct Customer. The part number and serial number are also required if Direct Customer cannot access the device.If necessary, run the
security statuscommand to get the device serial number.commander security status --device EFR32MG21A010F1024 --serialno 440048205SE Firmware version : 1.2.14 Serial number : 000000000000000014b457fffe045a32Debug lock : Enabled Device erase : Disabled Secure debug unlock : Enabled Tamper status : OK Secure boot : Disabled Boot status : 0x20 - OK DONEThe Direct Customer then places that Public Certificate Key in the access certificate. The access certificate is per device because it contains the unique device serial number. This certificate is generated once upon creation of the device, and thereafter, is generally only modified when the Private/Public Certificate Key pair is changed by the Product Company.
Run the
security gencertcommand with the following parameters from the Product Company to generate an unsigned access certificate (access_certificate.extsign) in Security Store:Device part number
Device serial number
Public Certificate Key
commander security gencert --device EFR32MG21A010F1024 --deviceserialno 000000000000000014b457fffe045a32
--cert-pubkey cert_pubkey.pem --extsign
Authorization file written to Security Store: C:/Users/<username>/AppData/Local/SiliconLabs/commander/SecurityStore/device_000000000000000014b457fffe045a32/certificate_authorizations.json Cert key written to Security Store: C:/Users/<username>/AppData/Local/SiliconLabs/commander/SecurityStore/device_000000000000000014b457fffe045a32/cert_pubkey.pem Created an unsigned certificate in Security Store: C:/Users/<username>/AppData/Local/SiliconLabs/commander/SecurityStore/device_000000000000000014b457fffe045a32/access_certificate.extsign DONENote:
The
--extsignoption to create an unsigned access certificate is only available in Simplicity Commander Version 1.11.2 or above.The unsigned access certificate is generated with the default certificate authorization file (
certificate_authorization.json) which uses0x0000003efor Authorizations and0x00000000(HSE-SVM device) for Tamper Authorizations (Table Elements of the Access Certificate on page 12).
The signing of the access certificate can be done by passing an unsigned access certificate to a Hardware Security Module (HSM) containing the Private Command Key.
In this example, the OpenSSL is used to sign the access certificate (
access_certificate.extsign) in Security Store with the Private Command Key (command_key.pem). The access certificate signature is in the cert_signature.binfile.openssl dgst -sha256 -binary -sign command_key.pem -out cert_signature.binaccess_certificate.extsignRun the
util signcertcommand with the following parameters to verify the signature and generate the signed access certificate (access_certificate.bin):Unsigned access certificate
Access certificate signature
Public Command Key
commander util signcert access_certificate.extsign --cert-type access --signature cert_signature.bin
--verify command_pubkey.pem --outfile access_certificate.bin
R = D97E43FEA278207080D6D0808B46810C1167F123AF1CA9FAF2DE0F4322B97ACE S = FEDFEA11A3C83AFFCD5293283B13A50580862B9F651AAE08012C2BFB6BA8E697 Successfully verified signature Successfully signed certificate DONENotes:
Put the required files in the same folder to run the command.
The
util signcertcommand for access certificate is only available in Simplicity Commander Version 1.11.2 or above.The access certificate signature can be in a Raw or Distinguished Encoding Rules (DER) format.
The access certificate is passed to the Product Company. The purpose of the access certificate is to grant overall debug access capabilities to the Product Company and authorize them to allow third parties to debug the device. The Product Company can now use the access certificate to generate the Debug Unlock Token. The same access certificate can be used to generate as many Debug Unlock Tokens as necessary without having to ever go back to the Direct Customer.
To create the Debug Unlock Token, a debug session must be started with the device and the challenge value (which is a random number
Challenge 1in this example) should be read out to generate the challenge response.Run the
security gencommandcommand to generate the challenge response without debug access command signature and store it in a file (command_unsign.bin).commander security gencommand --action debug-unlock--unlock-param 1111 -o command_unsign.bin --nostore --device EFR32MG21A010F1024 --serialno 440048205Unsigned command file written to: command_unsign.bin DONENotes:
The data in the
--unlock-paramoption are the bits 2 to 5 of debug mode request in the challenge response.The default value 1111(reset all debug options) is in place if the
security gencommandcommand does not include the--unlock-paramoption.
The challenge response is then cryptographically hashed (SHA-256) to create a digest. The digest is then signed by the Private Certificate Key to generate the debug access command signature.
The signing of the challenge response can be done by passing an unsigned challenge response to a Hardware Security Module (HSM) containing the Private Certificate Key.
In this example, the OpenSSL is used to sign the challenge response (
command_unsign.bin) with the Private Certificate Key (cert_key.pem). The debug access command signature is in the command_signature.binfile.openssl dgst -sha256 -binary -sign cert_key.pem -out command_signature.bincommand_unsign.binRun the
security unlockcommand with the access certificate (access_certificate.bin) from Direct Customer and debug access command signature (command_signature.bin) in step 7 to generate the Debug Unlock Token.commander security unlock --cert access_certificate.bin --command-signature command_signature.bin--unlock-param 1111 --device EFR32MG21A010F1024 --serialno 440048205Certificate written to Security Store: C:/Users/<username>/AppData/Local/SiliconLabs/commander/SecurityStore/device_000000000000000014b457fffe045a32/access_certificate.bin R = 67B51151F1E5F1BB9A49EC8D5885B221BD3D331D53741EEF54F81F0F3CB40455 S = 066C6AB5EDE3AE784DB1F75F44C5CA931736116D5A2104DBF44BC77ED8F49282 Command signature is valid Secure debug successfully unlocked Command unlock payload was stored in Security Store DONENotes:
Put the required files in the same folder to run the command.
The debug access command signature can be in a Raw or Distinguished Encoding Rules (DER) format.
It requires Simplicity Commander Version 1.11.2 or above to support signature in DER format.
The data in the
--unlock-paramoption are the bits 2 to 5 of debug mode request in the Debug Unlock Token. This value MUST be equal to the value of--unlock-paramoption in step 6.The default value
1111(reset all debug options) is in place if thesecurity unlockcommand does not include the--unlock-paramoption.
(Alternative) The key protection is not required if the Private Certificate Key is ephemeral. Steps 6 to 8 can be implemented by running the
security unlockcommand with the access certificate (access_certificate.bin)from the Direct Customer and Private Certificate Key (cert_key.pem) to generate the Debug Unlock Token.commander security unlock --cert access_certificate.bin --cert-privkey cert_key.pem--unlock-param 1111 --device EFR32MG21A010F1024 --serialno 440048205Certificate written to Security Store: C:/Users/<username>/AppData/Local/SiliconLabs/commander/SecurityStore/device_000000000000000014b457fffe045a32/access_certificate.bin Cert key written to Security Store: C:/Users/<username>/AppData/Local/SiliconLabs/commander/SecurityStore/device_000000000000000014b457fffe045a32/cert_pubkey.pem Created unsigned unlock command Signed unlock command using C:/Users/<username>/AppData/Local/SiliconLabs/commander/SecurityStore/device_000000000000000014b457fffe045a32/cert_key.pem Secure debug successfully unlocked Command unlock payload was stored in Security Store DONENotes:
The data in the
--unlock-paramoption are the bits 2 to 5 of debug mode request in the Debug Unlock Token.The default value
1111(reset all debug options) is in place if thesecurity unlockcommand does not include the--unlock-paramoption.
The Debug Unlock Token (aka
Command unlock payload) file (unlock_payload_0000000000111110.bin, where0000000000111110is the value of debug mode request) is stored in the Security Store. The location in Windows isC:\Users\<PC user name>\AppData\Local\SiliconLabs\commander\SecurityStore\device_\<Serial number>\challenge_\<Challenge value>.
Users can also use the security getpathcommand to get the path of the Security Store or a specified device.
commander security getpathC:/Users/<username>/AppData/Local/SiliconLabs/commander/SecurityStore DONEcommander security getpath --deviceserialno 000000000000000014b457fffe045a32C:/Users/<username>/AppData/Local/SiliconLabs/commander/SecurityStore/device_000000000000000014b457fffe045a32 DONEThe Debug Unlock Token and the device are now delivered to the Debug 3rd Party.
Run the
security gencommandcommand to create the Security Store to place the Debug Unlock Token file.commander security gencommand --action debug-unlock --device EFR32MG21A010F1024 --serialno 440048205Unsigned command file written to Security Store: C:/Users/<username>/AppData/Local/SiliconLabs/commander/SecurityStore/device_000000000000000014b457fffe045a32/challenge_8b925526a33b1ad3a95075055246e044/unlock_command_to_be_signed16_06_2021.bin DONECopy the Debug Unlock Token file (
unlock_payload_0000000000111110.bin) from Product Company to the Windows Security Storechallenge_\<Challenge value>folder located inC:\Users\<PC user name>\AppData\Local\SiliconLabs\commander\SecurityStore\device_\<Serial number>\challenge_\<Challenge value>.The device compares the Debug Unlock Token contents with its internal serial number, challenge value, and Public Command Key to determine the token’s authenticity. If authentic, it will execute the debug access command to unlock the device; otherwise, it will ignore the command.
Run the
security unlockcommand to unlock the device.commander security unlock --unlock-param 1111 --device EFR32MG21A010F1024 --serialno 440048205Unlocking with unlock payload: C:/Users/<username>/AppData/Local/SiliconLabs/commander/SecurityStore/device_000000000000000014b457fffe045a32/challenge_8b925526a33b1ad3a95075055246e044/unlock_payload_0000000000111110.binSecure debug successfully unlocked DONENotes:
If the security store has multiple tokens for the selected device, use --unlock-param option to specify which unlock token is chosen to unlock the device.
Simplicity Commander will only use the token with value 1111 (error if not available) from the security store to unlock the device if the security unlock command does not include the --unlock-param option.
For Simplicity Commander ≥ v1.13.3, run the
security status --trustzonecommand to check the full debug lock status of the device.commander security status --trustzone --device EFR32MG21A010F1024 --serialno 440048205SE Firmware version : 1.2.14 Serial number : 000000000000000014b457fffe045a32 Debug lock : Enabled Device erase : Disabled Secure debug unlock : Enabled Debug lock state: Unlocked Non-secure, invasive debug lock (DBGLOCK) : Unlocked Non-secure, non-invasive debug lock (NIDLOCK) : Unlocked Secure, invasive debug lock (SPIDLOCK) : Locked Secure, non-invasive debug lock (SPNIDLOCK): Locked Non-secure, invasive debug lock state (DBGLOCK) : Unlocked Non-secure, non-invasive debug lock state (NIDLOCK) : Unlocked Secure, invasive debug lock state (SPIDLOCK) : Unlocked Secure, non-invasive debug lock state (SPNIDLOCK): Unlocked Tamper status : OK Secure boot : Disabled Boot status : 0x20 - OK DONEThe Debug 3rd Party can now use this same Debug Unlock Token to unlock the device (step 12), over and over again after each power-on or pin reset, until they have finished debugging the device.
Once the Debug 3rd Party has finished debugging, they will send the device back to the Product Company.
Once the Product Company receives the device, they will immediately start a debug session, roll the challenge (from
Challenge 1toChallenge 2in this example), and put the device back into the secure debug lock state. Rolling the challenge will effectively invalidate any Debug Unlock Token that has been previously given to any third party.Run the
security rollchallengecommand and reset the device to invalidate the current Debug Unlock Token. The challenge cannot be rolled before it has been used at least once — that is, by running thesecurity unlockorsecurity disabletampercommand.commander security rollchallenge --device EFR32MG21A010F1024 --serialno 440048205Challenge was rolled successfully. DONEThe unlock token is invalidated after rolling the challenge because any previously issued Debug Unlock Token now contains a different challenge value (
Challenge 1) than the challenge value currently in the device (Challenge 2).The validation process of any previously issued Debug Unlock Token will always fail until a new Debug Unlock Token is issued with a current matching challenge value (
Challenge 2).Note: Direct Customer can directly use the Private Command Key on the connected chip to generate the Debug Unlock Token in Security Store. But it has a high risk (cannot use HSM) to leak the Private Command Key to a 3rd party when using this approach.
commander security unlock --command-key command_key.pem--unlock-param 1111 --device EFR32MG21A010F1024
--serialno 440048205
Authorization file written to Security Store: C:/Users/<username>/AppData/Local/SiliconLabs/commander/SecurityStore/device_000000000000000014b457fffe045a32/certificate_authorizations.json Generating ECC P256 key pair... Cert public key stored at: C:/Users/<username>/AppData/Local/SiliconLabs/commander/SecurityStore/device_000000000000000014b457fffe045a32/cert_pubkey.pem Cert private key stored at: C:/Users/<username>/AppData/Local/SiliconLabs/commander/SecurityStore/device_000000000000000014b457fffe045a32/cert_key.pem Command public key stored at: C:/Users/<username>/AppData/Local/SiliconLabs/commander/SecurityStore/device_000000000000000014b457fffe045a32/command_pubkey.pem Command private key stored at: C:/Users/<username>/AppData/Local/SiliconLabs/commander/SecurityStore/device_000000000000000014b457fffe045a32/command_key.pem Certificate was signed with key: C:/Users/<username>/AppData/Local/SiliconLabs/commander/SecurityStore/device_000000000000000014b457fffe045a32/command_key.pem Certificate written to Security Store: C:/Users/<username>/AppData/Local/SiliconLabs/commander/SecurityStore/device_000000000000000014b457fffe045a32/access_certificate.bin Created unsigned unlock command Signed unlock command using C:/Users/<username>/AppData/Local/SiliconLabs/commander/SecurityStore/device_000000000000000014b457fffe045a32/cert_key.pem Secure debug successfully unlocked Command unlock payload was stored in Security Store DONE
Simplicity Studio#
Use the Debug Unlock Token file (unlock_payload_0000000000111110.bin) generated in Using Simplicity Commander steps 8 or 9 to unlock the device with Simplicity Studio.
Open the
unlock_payload_0000000000111110.binfile with the Hex Editor Neo.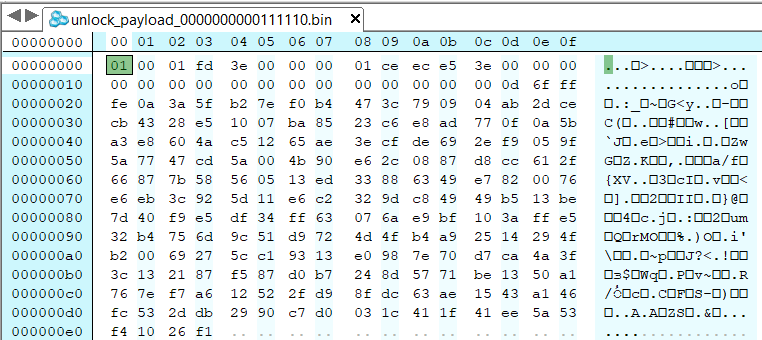
Click View to open the context menu, and then select Group By → Double words to convert the token into a little-endian format.

Select all (Ctrl+A) and copy (Ctrl+C) the Debug Unlock Token to a text editor.

Use the text editor to remove all the spaces from the token.
fd0100010000003ee5ecce010000003e000000000000000000000000ff6f0d00...Right-click the selected debug adapter RB (ID:J-Link serial number) to display the context menu.
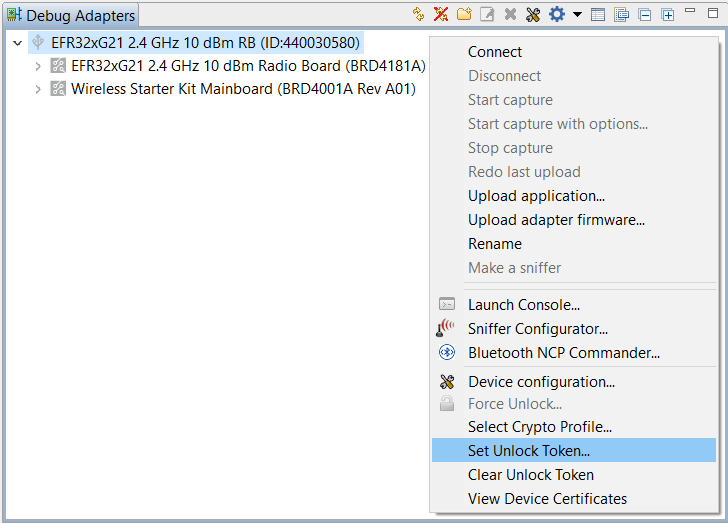
Click Set Unlock Token to open the Add Debug Unlock Token dialog box. Enter the name (e.g.,
AN1190 Token) for this Debug Unlock Token, and copy the content in step 4 to the Debug Unlock Token: box. Click [OK] to confirm and exit.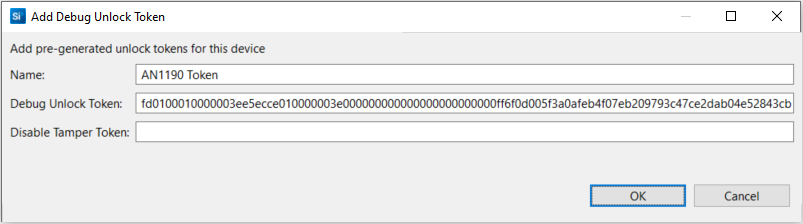
Note: The Simplicity Studio can only keep one Debug Unlock Token on each WSTK.
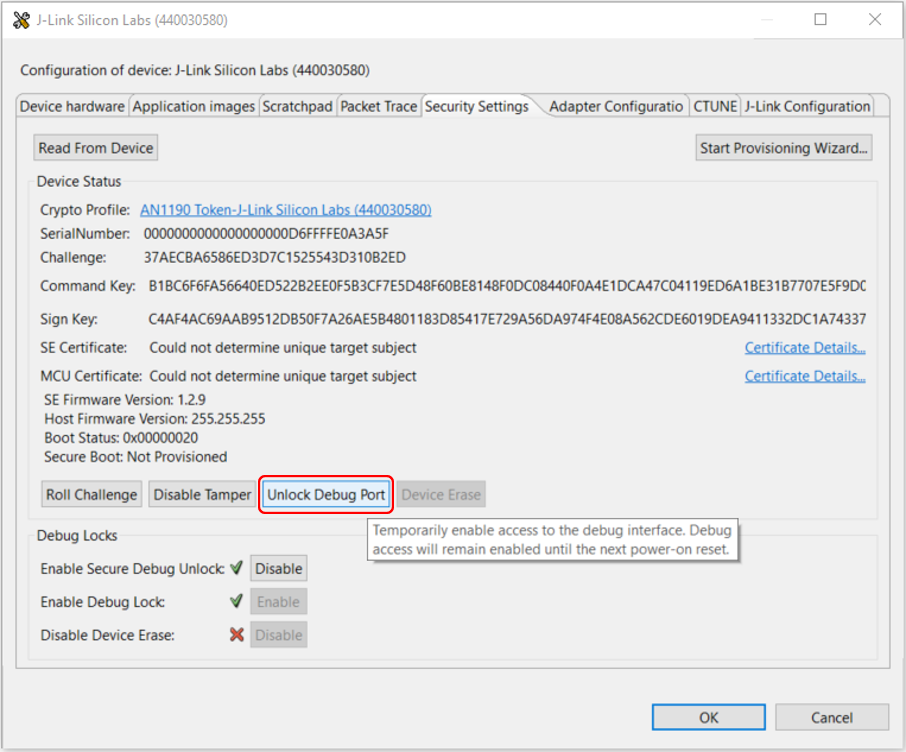
Open Security Settings of the selected device as described in Using Simplicity Studio.
The token added in step 6 should display on the Crypto Profile: field. If not, click the link next to Crypto Profile: to select the token from the Crypto Profile Manager drop-down list. The Simplicity Studio will automatically add the WSTK J-Link serial number (
-J-Link Silicon Labs (serial number)) to the token's name.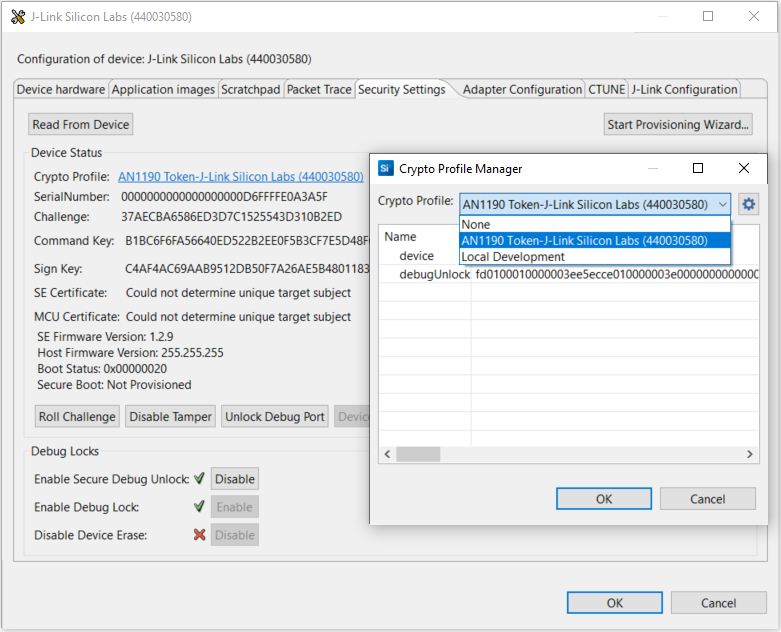
Click [Unlock Debug Port] to use the token in Crypto Profile: to unlock the device (invalid token will display an error message). The device stays in the unlock state until the next power-on or pin reset. Click [OK] to exit.
The Simplicity IDE will automatically use the selected Debug Unlock Token in Crypto Profile for debugging and flashing. For other IDE, the device should unlock again (step 9) after power-on or pin reset. After finished debugging, open the Security Settings of the selected device as described in Using Simplicity Studio.
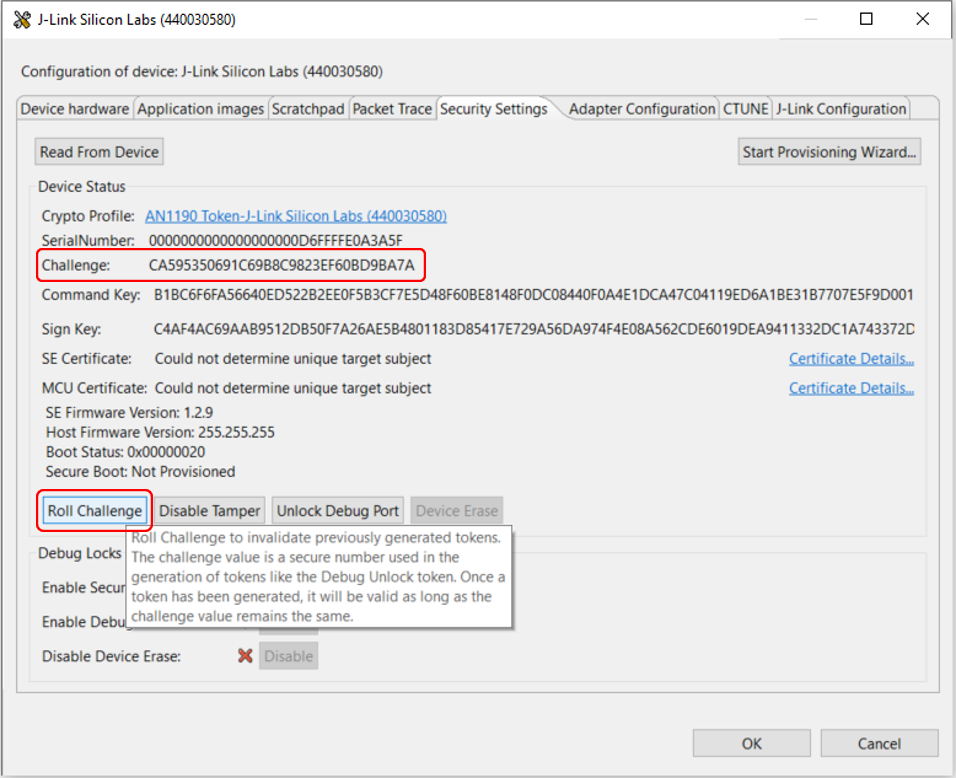
Click [Roll Challenge] to generate a new challenge value to invalidate the Debug Unlock Token added in step 6. Click [OK] to exit.
Right-click the selected debug adapter RB Board (ID:J-Link serial number) to display the context menu.

Click [Clear Unlock Token] to delete the WSTK Debug Unlock Token from Simplicity Studio.
IAR#
Use the Debug Unlock Token file (unlock_payload_0000000000111110.bin) in the Security Store (Simplicity Commander step 11) to unlock the device with IAR (Windows).
The Windows environment variable
PATHshould include the folder (C:\SiliconLabs\SimplicityStudio\v5\developer\adapter_packs\commander) that locates thecommander.exeof Simplicity Commander.Right-click the project in the workspace, and then click Options....
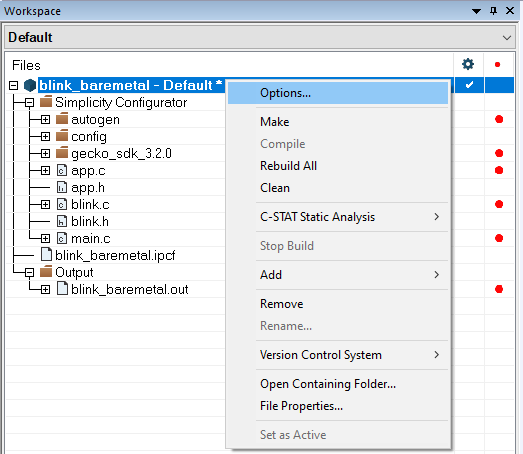
Click Build Actions to open the Build Actions Configuration dialog box. Enter the phrase below to the Post-build command line: box. Click [OK] to exit.
cmd /c "commander security unlock--unlock-param 1111 EFR32MG21A010F1024 --serialno 440048205 > $PROJ_DIR$\log.txt 2>&1"
After building the project, the
security unlockin the Post-build command unlocks the device using the Debug Unlock Token in Security Store. The device stays in the unlock state until the next power-on or pin reset.
Note: If the project is already up-to-date, it will not invoke the Post-build command to unlock the device. Use a dummy edit (add space or newline) on one of the source files in the project to trigger the build action.

The
> $PROJ_DIR$\log.txt 2>&1redirects thesecurity unlockcommand output to thelog.txtfile in the IAR project folder.
Permanent Debug Lock#
Simplicity Commander#
Run the
security statuscommand to get the selected device configuration.commander security status --device EFR32MG21A010F1024 --serialno 440048205SE Firmware version : 1.2.14 Serial number : 000000000000000014b457fffe045a32 Debug lock : Disabled Device erase : Enabled Secure debug unlock : Disabled Tamper status : OK Secure boot : Disabled Boot status : 0x20 - OK DONERun the
security lockcommand to lock the selected device.commander security lock --device EFR32MG21A010F1024 --serialno 440048205WARNING: Secure debug unlock is disabled. Only way to regain debug access is to run a device erase. Device is now locked. DONERun the
security disabledeviceerasecommand to disable device erase.commander security disabledeviceerase --device EFR32MG21A010F1024 --serialno 440048205================================================================================ THIS IS A ONE-TIME command which Permanently disables device erase. If secure debug lock has not been set, there is no way to regain debug access to this device. Type 'continue' and hit enter to proceed or Ctrl-C to abort: ================================================================================ continue Disabled device erase successfully DONENote: This is an IRREVERSIBLE action, and should be the last step in production.
Run the
security statuscommand again to check the device configuration.commander security status --device EFR32MG21A010F1024 --serialno 440048205SE Firmware version : 1.2.14 Serial number : 000000000000000014b457fffe045a32 Debug lock : Enabled Device erase : Disabled Secure debug unlock : Disabled Tamper status : OK Secure boot : Disabled Boot status : 0x20 - OK DONE
Simplicity Studio#
Open Security Settings of the selected device as described in Using Simplicity Studio.
Click [Enable] next to Enable Debug Lock: to lock the device. The following Enable Debug Lock Warning is displayed. Click [Yes] to confirm. This configures standard debug lock.
Click [Disable] next to Disable Device Erase: to disable the device erase. The following Disable Device Erase Warning is displayed. Click [Yes] to confirm. This configures a permanent debug lock.
Note: This is an IRREVERSIBLE action, and should be the last step in production.