Developing Silicon Labs OpenThread Applications#
OpenThread released by Google is:
An open-source implementation of the Thread® networking protocol. Google Nest has released OpenThread to make the technology used in Nest products more broadly available to developers to accelerate the development of products for the connected home.
OS and platform agnostic, with a narrow platform abstraction layer and a small memory footprint, making it highly portable. It supports both system-on-chip (SoC) and co-processor designs.
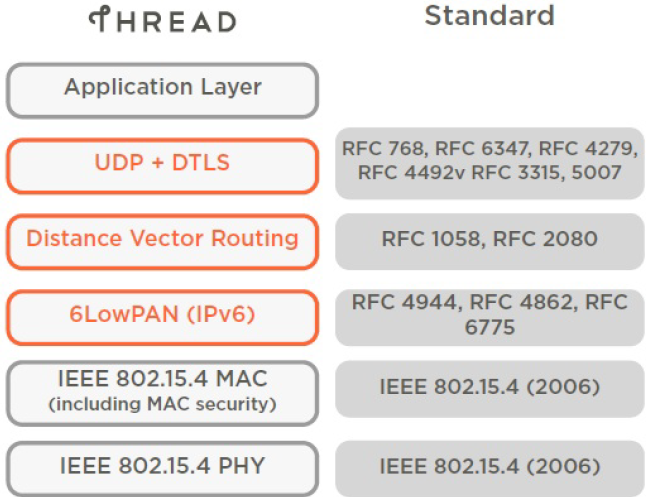
A Thread Certified Component, implementing all features defined in the Thread 1.4.0 specification, including all Thread networking layers (IPv6, 6LoWPAN, IEEE 802.15.4 with MAC security, Mesh Link Establishment, Mesh Routing) and device roles, as well as Border Router support.
Silicon Labs has implemented an OpenThread-based protocol tailored to work with Silicon Labs hardware. This protocol is available on GitHub and also as a software development kit (SDK) installed with Simplicity Studio. The SDK is a fully tested snapshot of the GitHub source. It supports a broader range of hardware than does the GitHub version and includes documentation and example applications not available on GitHub. The content on these pages is intended for those who want to experiment with, or are already developing, an OpenThread application using the Silicon Labs OpenThread SDK.
For details about this release: Links to release notes are available on the silabs.com Gecko SDK page.
For Silicon Labs' OpenThread product information: See the product pages on silabs.com.
For background about the OpenThread protocol and other wireless networking topics: The Fundamentals section is a good place to start. This section also contains information and resources for the open source OpenThread protocol.
To get started with development: See the Getting Started section to get started working with example applications.
If you are already in development: See the Developer's Guide for details or go directly to the API Reference.