Debug Utils RAM Dump#
1. Purpose / Scope#
This section provides examples to easily configure and execute debug applications of RS9116 module.
The RAM dump application is use to read the RAM content of RS9116W module for a given address.
2. Prerequisites / Setup Requirements#
Before running the application, the user will need the following things to setup.
2.1 Hardware Requirements#
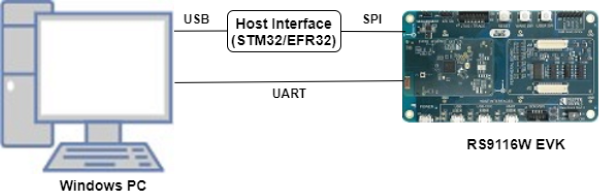
Windows PC with Host interface(UART/ SPI).
Silicon Labs RS9116 Wi-Fi Evaluation Kit
Host MCU Eval Kit. This example has been tested with:
Silicon Labs WSTK + EFR32MG21
2.2 Software Requirements#
Embedded Development Environment
For STM32, use licensed Keil IDE
For Silicon Labs EFx32, use the latest version of Simplicity Studio
3. Application Build Environment#
3.1 Platform#
The Application can be built and executed on below Host platforms
3.2 Host Interface#
By default, the application is configured to use the SPI bus for interfacing between Host platforms and the RS9116W EVK.
The SAPI driver provides APIs to enable other host interfaces if SPI is not suitable for your needs.
3.3 Project Configuration#
The Application is provided with the project folder containing Keil and Simplicity Studio project files.
Keil Project
The Keil project is used to evaluate the application on STM32.
Project path:
<SDK>/examples/snippets/debug_utils/ram_dump/projects/ram_dump-nucleo-f411re.uvprojx
Simplicity Studio
The Simplicity Studio project is used to evaluate the application on EFR32MG21.
Project path:
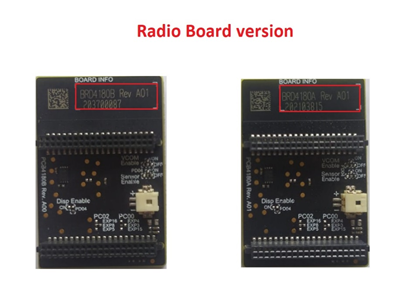
If the Radio Board is BRD4180A or BRD4181A, then access the path
<SDK>/examples/snippets/debug_utils/ram_dump/projects/ram_dump-brd4180a-mg21.slsprojIf the Radio Board is BRD4180B or BRD4181B, then access the path
<SDK>/examples/snippets/debug_utils/ram_dump/projects/ram_dump-brd4180b-mg21.slsprojUser can find the Radio Board version as given below
3.4 Bare Metal Support#
This application supports only bare metal environment. By default, the application project files (Keil and Simplicity Studio) are provided with bare metal configuration.
4. Application Configuration Parameters#
The application can be configured to suit your requirements and development environment. Read through the following sections and make any changes needed.
4.1 Open rsi_ram_dump.c file and update/modify following macros,
Path : /examples/snippets/debug_utils/ram_dump
This define should be ENABLE only in case of linux platform with USB interface, by default, it is DISABLE
#define LINUX_PLATFORM DISABLEAddress in Silicon Labs module
#define READ_ADDRESS 0x05. Testing the Application#
User has to follow the below steps for the successful execution of the application.
5.1 Loading the RS9116W Firmware#
Refer Getting started with PC to load the firmware into RS9116W EVK. The firmware binary is located in <SDK>/firmware/
5.2 Building the Application on the Host Platform#
5.2.1 Using STM32#
Refer STM32 Getting Started
Open the project
<SDK>/examples/snippets/debug_utils/ram_dump/projects/ram_dump-nucleo-f411re.uvprojxin Keil IDE.Build and Debug the project
Check for the RESET pin:
If RESET pin is connected from STM32 to RS9116W EVK, then user need not press the RESET button on RS9116W EVK before free run.
If RESET pin is not connected from STM32 to RS9116W EVK, then user need to press the RESET button on RS9116W EVK before free run.
Free run the project
Then continue the common steps from Section 5.3
5.2.2 Using EFX32#
Refer EFx32 Getting Started
Import the project from
<SDK>/examples/snippets/debug_utils/ram_dump/projectsSelect the appropriate .slsproj as per Radio Board type mentioned in Section 3.3
Compile and flash the project in to Host MCU
Debug the project
Check for the RESET pin:
If RESET pin is connected from EFX32 to RS9116W EVK, then user need not press the RESET button on RS9116W EVK before free run
If RESET pin is not connected from EFX32 to RS9116W EVK, then user need to press the RESET button on RS9116W EVK before free run
Free run the project
Then continue the common steps from Section 5.3
5.3 Common Steps#
Build and launch the application.
After the program gets executed RAM content is saved in ram_content buffer. In case of USB interface RAM content is saved in file dump.txt.
6. Compressed Debug Logging#
To enable the compressed debug logging feature please refer to Logging User Guide