Demos and Examples#
Silicon Labs provides both hardware and software solutions to make the evaluation of the Direction Finding solution quick and easy. Using a Direction Finding radio board along with a Wireless Starter Kit (WSTK) as a locator, and a Thunderboard BG22 as a tag, you can easily set up our demo environment, which shows you the capabilities of Bluetooth-based Direction Finding.
To get started with Bluetooth demo software, you should have downloaded Simplicity Studio 5 (SSv5) and the Bluetooth SDK v3.x or later as described in the Simplicity Studio 5 User's Guide, available online and through the SSv5 help menu. The Bluetooth SDK comes with some prebuilt demos that can be flashed to your EFR32 device and tested with the appropriate tool as described in this section. If you are new to Silicon Labs’ Direction Finding solution, it is worth starting with setting up this demo.
Demo#
The demo comprises three demo applications:
The Bluetooth AoA – SoC Asset Tag demo app is a prebuilt version of the sample app with the same name, and it is to be run on the tag that you want to follow.
The Bluetooth AoA – NCP Locator demo app is a prebuilt version of the sample app with the same name, and it is to be run on the antenna array board (Direction Finding board).
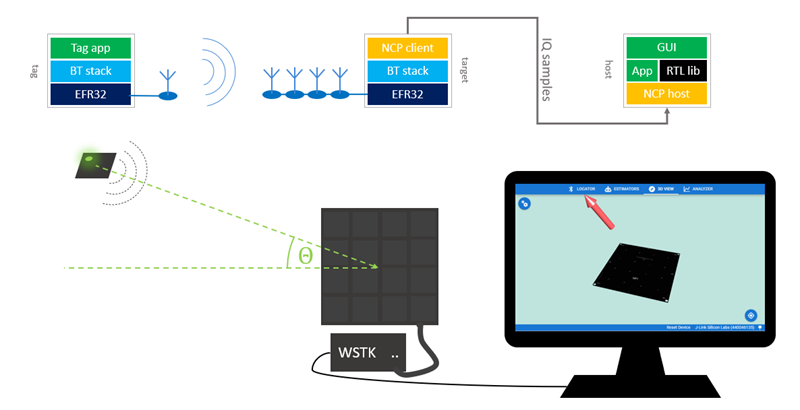
The AoA Analyzer tool is a Java based application, built into Simplicity Studio 5, that showcases the angle estimation skills of the RTL library in a graphical user interface. It is intended for demo and evaluation purposes and follows a simple architecture as shown in the following figure:
Running the demo requires the following devices:
An EFR32xG22 or an EFR32xG24 radio board, preferably a Thunderboard BG22
A BRD4191A antenna array board with a WSTK Mainboard and with a Debug Adapter board
A PC running Simplicity Studio 5 with Gecko SDK Suite v4.1.0 or later
Set Up the Antenna Array Board#
To set up the demo, first connect the antenna array board and install the proper firmware on it.
Attach the Antenna Array board to the Mainboard using the Debug Adapter board and a ribbon cable as shown in the following figure. The Antenna Array board uses the Mini Simplicity+ connector (MINI+) to communicate with the Mainboard.
Note: The MINI+ connector is located on the back of the Antenna Array board. Flip the board after attaching the cable so that the antennas face upward.
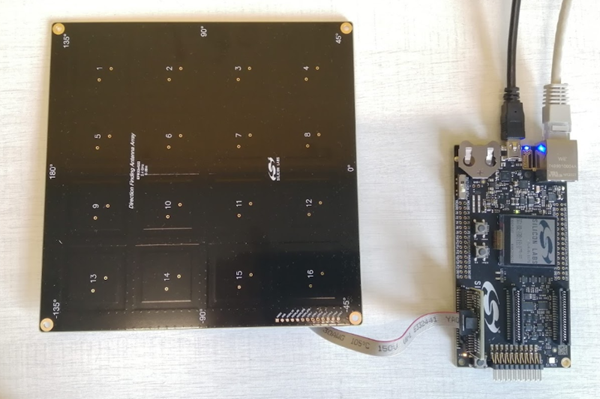
Connect the mainboard to a PC using an USB cable or via Ethernet.
Note: A USB connection is required, even if Ethernet is used for communication, to power the board. Do not use a coin cell battery for this use case.
Make sure that the switch on the mainboard is set to AEM.
Start Simplicity Studio 5.
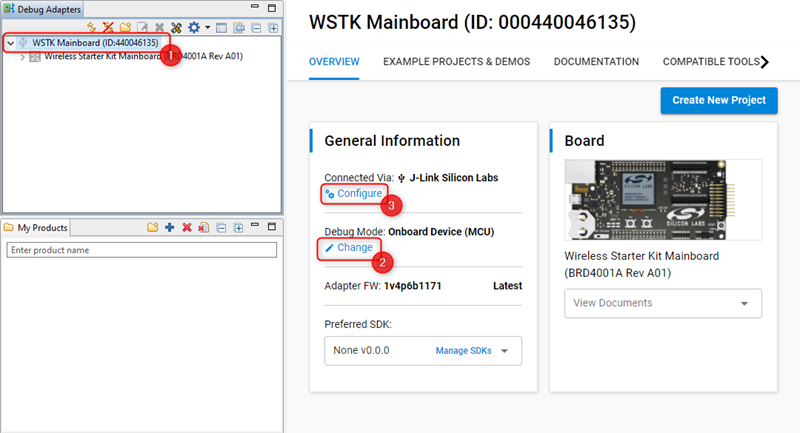
Since the Antenna Array board is attached via the external debug connector of the mainboard, the board is not automatically recognized. You must configure the mainboard into external debug mode.
In the Simplicity Studio 5 Launcher perspective’s Debug Adapters view, click the board to select it.
In the Launcher perspective’s Overview tab, on the General Information card, click Change next to Debug Mode. In the Device Configuration’s Adapter Configuration tab, change the Debug Mode setting from ‘MCU’ to ‘OUT’ and click OK.
On the General Information card, click Configure next to Connected via. In the Device Configuration’s Device Hardware tab, start typing “antenna array” into the Boards input field and select ‘BG22 Dual Polarized Antenna Array Radio Board (BRD4191A)’ from the list. Click OK.
Select the configured Antenna Array board in the Debug Adapters view and make sure that Gecko SDK Suite v4.1 (or later) is selected as Preferred SDK. Go to the Example Projects & Demos tab.
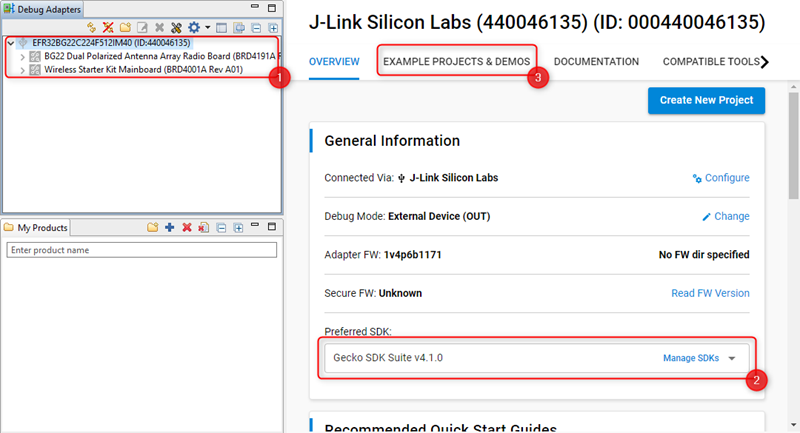
Filter for demos only and find the Bluetooth AoA – NCP Locator demo.
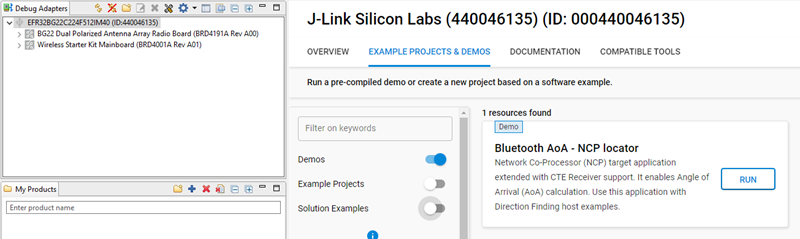
Click RUN to download and run the demo on your board. (Note: the demo also includes a bootloader. If you build the AoA locator application from source, a bootloader must also be flashed to the device.)
Set Up the Tag#
Next, install software on the board with an EFR32xG22 or EFR32xG24 part (the tag). Note: A precompiled demo is only available for the Thunderboard BG22. For other boards, build the example project with the same name, and flash it to the device along with a bootloader. These instructions are for the Thunderboard BG22.
Connect a Thunderboard BG22 to the PC.
Select the board in the Debug Adapters view, and make sure that Gecko SDK Suite v4.1 (or later) is selected as Preferred SDK.
Go to the Example Projects & Demos tab, filter for Bluetooth technology type and find the Bluetooth AoA – SoC Asset Tag demo.
If this is a new Thunderboard, push its reset button. On some boards the factory default firmware puts the device into EM4 sleep mode after 30 seconds, so the device must be restarted before the programmer can load the demo.
Click RUN to download and run the demo.
Start the AoA Analyzer Tool#
Finally, start the AoA Analyzer tool in Simplicity Studio 5.
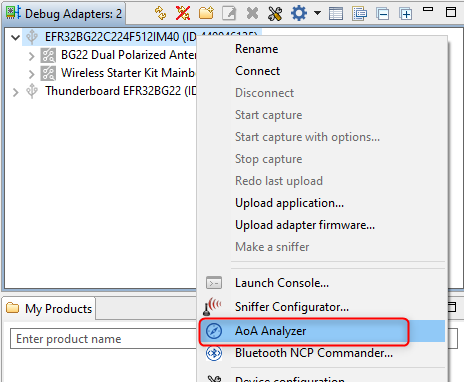
In the Launcher perspective’s Debug Adapters view, right-click the antenna array board (Direction Finding board).
Select AoA Analyzer in the context menu. The tool is also available through the Tools menu in the Simplicity Studio toolbar.
The analyzer opens, connects to the antenna array board, finds the asset tag near you, and displays its direction relative to the antenna array board.
Move around the scene with your mouse to get a better view on the board.
Move the tag around, and see the right arrow following your movement:
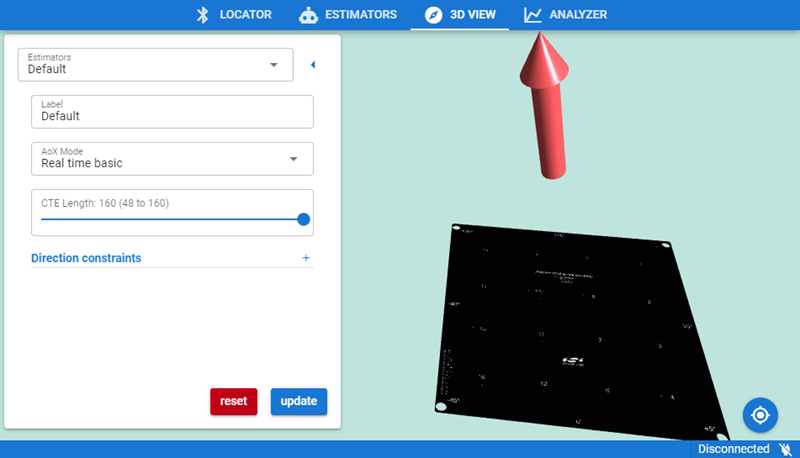
Expand the Assets window in the lower right to see more information about the assets.
In the Settings window you can experiment with the AoX Mode. Different AoX modes provide different latency and different accuracy of the angle estimation.
The application supports multiple tags, so if the Bluetooth AoA – SoC Asset Tag application is flashed to multiple devices, the AoA Analyzer will display each direction with multiple arrows.
If the AoA Analyzer gets stuck after starting, try resetting the board. If that does not solve the problem:
In Simplicity Studio’s Debug Adapters view, right-click the antenna array board.
Select Connect.
Right-click the device again and select Launch Console.
Select the admin tab.
Check the serial vcom settings with the command.
serial vcomChange the serial vcom settings to use CTS handshake mode.
serial vcom config handshake ctsNow re-try running AoA Analyzer. If it still does not work, upgrade the WSTK to the latest firmware version through the update functionality on the Launcher perspective’s Overview tab.
Application Examples#
As part of its reference RTLS implementations, Silicon Labs provides multiple sample apps that demonstrate the usage of the CTE Transmitter and CTE Receiver features and of the RTL library.
While the Demo is focusing on Angle of Arrival calculation only, the sample apps demonstrate both Angle of Arrival calculation and position estimation, using multiple locators.
The sample apps follow the software architecture shows in the Overview:
The Bluetooth AoA – SoC Asset Tag sample app running on the tag demonstrates the CTE Transmitter feature.
The Bluetooth AoA – NCP Locator sample app running on the antenna array board (target) is a modified version of the Bluetooth - NCP example supporting the CTE receiver feature.
The bt_aoa_host_locator host sample app running on the host demonstrates the CTE Receiver feature and the use of the angle estimation feature of the RTL library. It uses the same application logic as the AoA Analyzer used in the demo setup.
The bt_host_positioning host sample app running on the central device demonstrates the position estimation feature of the RTL library.
The bt_host_positioning_gui python script running on the central device visualizes the positions of the tags as calculated by the positioning app.
For detailed description of the sample apps, see Application Development with Silicon Labs’ RTL Library.
Tools#
Since setting up a full RTL system with multiple locators is not easy, Simplicity Studio also provides a set of tools that helps the developer. The tools can be used for:
Configuring the parameters of the individual locators and of the whole system,
Running 3D demos (Angle of Arrival and Positioning),
Analyzing the incoming and processed data.
To learn more about the tools, see Using the Bluetooth® Direction Finding Tool Suite.