Over-The-Air Device Firmware Upgrade#
To upgrade an application on a device, you need to:
Once only (on the Border Router platform):
Install libcoap2 & libcoap2-bin
Install a TFTP server
Start a CoAP notification server (optional, used to monitor the upgrade process)
Start a Linux Border Router
Add known IPv6 addresses to the Border Router
tun0interface
Once per device hardware:
Create an OTA-capable bootloader, with the compression algorithm(s) of your choice
Once per project:
Add the OTA DFU component
This will add the CoAP and TFTP components
Set the Wi-SUN network to auto-connect to the Border Router (Optional. If not, you will need to trigger connection on the device)
Once per device:
Flash the OTA-capable bootloader to the device, with the compression algorithm(s) of your choice
Flash an initial OTA-capable application to the device
Have the device connect to the Wi-SUN network
For every upgrade:
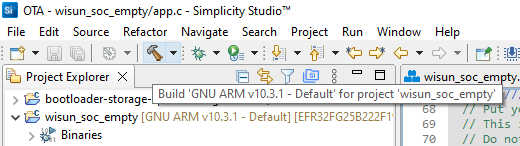
Build the project
Create a
.gblfile from the.s37file (optionally using compression)Copy the
.gblto the expected name in the TFTP server folderTrigger the OTA upgrade using a coap-client 'post' method
Check file download results
Trigger the reboot on the new firmware (the initial version of the OTA DFU component uses auto-reboot)
The following explains how to perform these steps based on the 'Wi-SUN SoC Empty' example application. OTA DFU can be applied using the same steps to all Wi-SUN example projects.
It is recommended to set an initial startup message in the application to show that the upgrade worked.
On more recent linux kernels, use libcoap3 and the commands with the
-notlssuffix to keep it simple (without TLS authentication), considering that your Wi-SUN network already supports encryption.
Prerequisites#
libcoap2 Installation#
libcoap2 is used for:
The (optional) CoAP notification server
The CoAP client used to trigger and monitor the firmware update
Both can be installed on separate machines, as long as they can be reached using IPv6. For the sake of simplicity, use the Linux platform supporting wsbrd for both functions. You will add a separate IPv6 address to the Border Router Wi-SUN interface to demonstrate this capability.
sudo apt-get install libcoap2sudo apt-get install libcoap2-binTFTP Server Installation on the Linux Border Router#
On the selected file server, install a TFTP server through the following steps. Here also you use the Linux platform used as the Border Router for this purpose, with a separate IPv6 address.
TFTP Daemon Installation#
sudo apt-get install tftpd-hpa tftp-hpaTFTP Service Configuration#
sudo nano /etc/default/tftpd-hpa
# /etc/default/tftpd-hpa
TFTP_USERNAME="tftp"
TFTP_DIRECTORY="/srv/tftp"
TFTP_ADDRESS=":69"
TFTP_OPTIONS="--secure"(optional) Set the TFTP_USERNAME and TFTP_DIRECTORY to match you setup, if it differs from the defaults.
Restart the TFTPD Service#
/etc/init.d/tftpd-hpa restartFrom this point, files stored under the TFTP_DIRECTORY are accessible using TFTP.
Start a Linux Border Router#
Start a Border Router set to allows connecting your devices. The devices should connect before adding OTA DFU to their application.
Add known IPv6 addresses to the Border Router (acting as CoAP server and Notification Server)#
What you need here is:
A TFTP server, such that your devices can send TFTP requests for the
.gblfiles.A (optional, highly recommended) CoAP Notification Server such that your devices can send progress notifications during OTA DFU download.
The TFTP and CoAP servers may not be on the Border Router platform, as long as they can be reached by your Wi-SUN devices via the Border Router. For the sake of simplicity in this first setup, use the same Linux platform as for wsbrd (i.e, your Wi-SUN Border Router) for both uses.
Using separate IPv6 addresses makes it clear that the three entities (Border Router, TFTP server, CoAP Notification Server) can be on different platforms. Since the Border Router application is 'wsbrd', you have control over the IPv6 prefix used by your Wi-SUN network (set in your wsbrd.conf file).
ipv6_prefix = fd00:6172:6d00::/64
You can then add a first IPv6 address to the tun0 interface using this IPv6 prefix for the 'OTA DFU HOST' role:
sudo ip -6 address add fd00:6172:6d00::1/64 dev tun0Add a second IPv6 address to the tun0 interface 'OTA DFU NOTIFY HOST' role:
sudo ip -6 address add fd00:6172:6d00::2/64 dev tun0Then check that you now have two IPv6 addresses for the 'tun0' interface:
ip address show tun0 | grep global' inet6 fd00:6172:6d00::1/64 scope global
inet6 fd00:6172:6d00::2/64 scope global
inet6 fd00:6172:6d00:0:92fd:9fff:fe00:333a/64 scope globalYou will later set the IPv6 OTA_DFU_HOST and OTA_DFU_NOTIFY_HOST addresses in the OTA component code to match these fixed (fd00:6172:6d00::1 and fd00:6172:6d00::2, respectively) addresses.
Start the CoAP Notification Server#
The CoAP Notification server is optional, but it's useful to follow the upgrade process. Silicon Labs highly recommends using it.
Checking coap-server Options#
Use coap-server --help to get the help. Below is an abstract with the version info and options used.
coap-server: invalid option -- '-'
coap-server v4.2.1 -- a small CoAP implementation
(c) 2010,2011,2015-2018 Olaf Bergmann <bergmann@tzi.org> and others
TLS Library: None
Usage: coap-server [-d max] [-g group] [-l loss] [-p port] [-v num]
[-A address] [-N]
[[-k key] [-h hint]]
[[-c certfile][-C cafile] [-n] [-R root_cafile]]
General Options
-d max Allow dynamic creation of up to a total of max
resources. If max is reached, a 4.06 code is returned
until one of the dynamic resources has been deleted
-g group Join the given multicast group
-p port Listen on specified port
-v num Verbosity level (default 3, maximum is 9). Above 7,
there is increased verbosity in GnuTLS logging
-A address Interface address to bind to
-N Make "observe" responses NON-confirmable. Even if set
every fifth response will still be sent as a confirmable
response (RFC 7641 requirement)Starting the COAP Notification Server#
Start the CoAP notification server with -d 10 to allow dynamic resource creation:
coap-server -A fd00:6172:6d00::2 -p 5685 -d 10Bootloader Application#
You need a Bootloader Application using SPI Flash for a single image of max 1024k bytes. This is to be manually flashed once to the part to allow OTA.
TIP:If you use the Erase option before Program when flashing the Wi-SUN application, you will need to re-flash the bootloader.
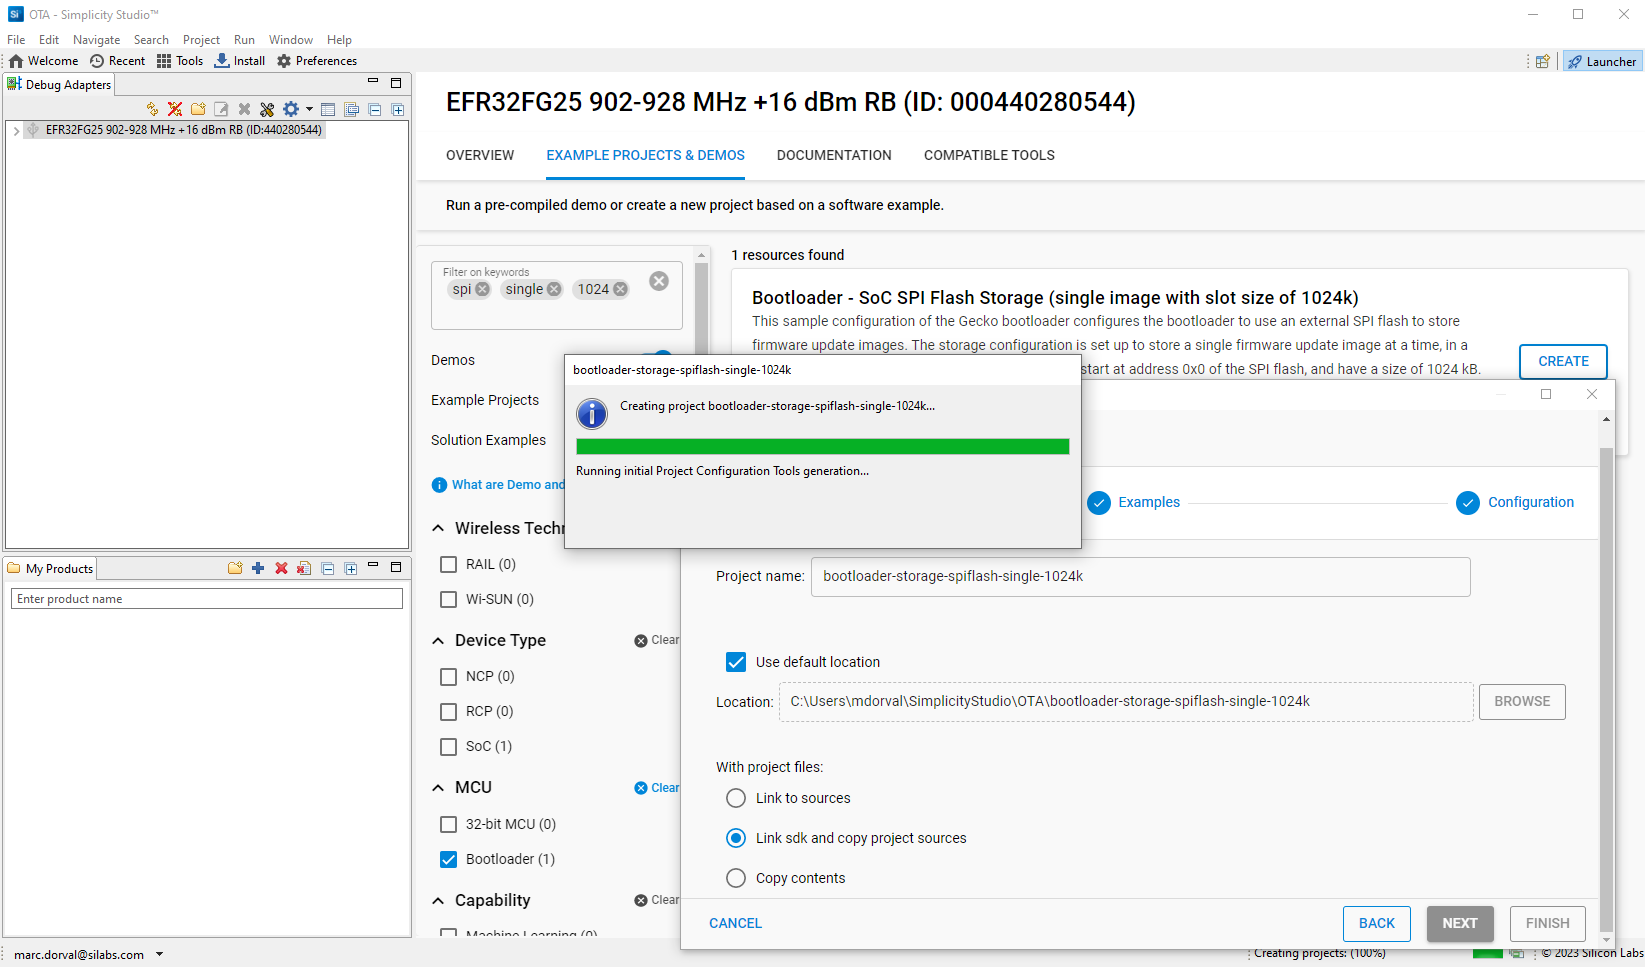
In Simplicity Studio:
Select the board you want to flash the bootloader to in the Debug Adapter window.
Open the Launcher perspective.
Select the EXAMPLE PROJECTS & DEMOS tab.
On the projects filtering section, under MCU, check Bootloader to reduce the list of available projects.
Further reduce by filtering on SPI, single and 1024. Enter these strings in the Filter on keywords box, pressing Enter after each string.
'Create' a Bootloader - SoC SPI Flash Storage (single image with slot size of 1024k) project.
Bootloader Configuration#
The Bootloader settings are defined in config/btl_storage_cfg.h. No need to change anything here, the default values are fine.
The Base Address is defined as
BTL_STORAGE_BASE_ADDRESS.The memory slots to store the images are defined as well.
Only
SLOT0is enabled, with aSLOT0_SIZEof1048576=1024 * 1024= 1024 kBytes, starting atSLOT0_START 0.
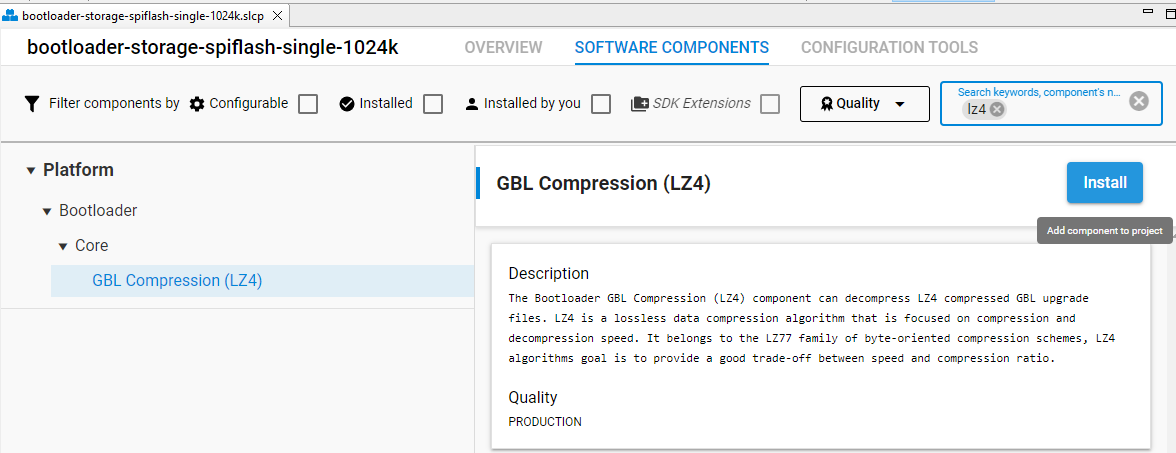
Add LZ4 Compression to Bootloader#
By default, the bootloader projects don't include the LZ4 compression algorithm, so install it if you want to use it.
TIP: Use lzma instead of lz4, lzma has better compression performance.
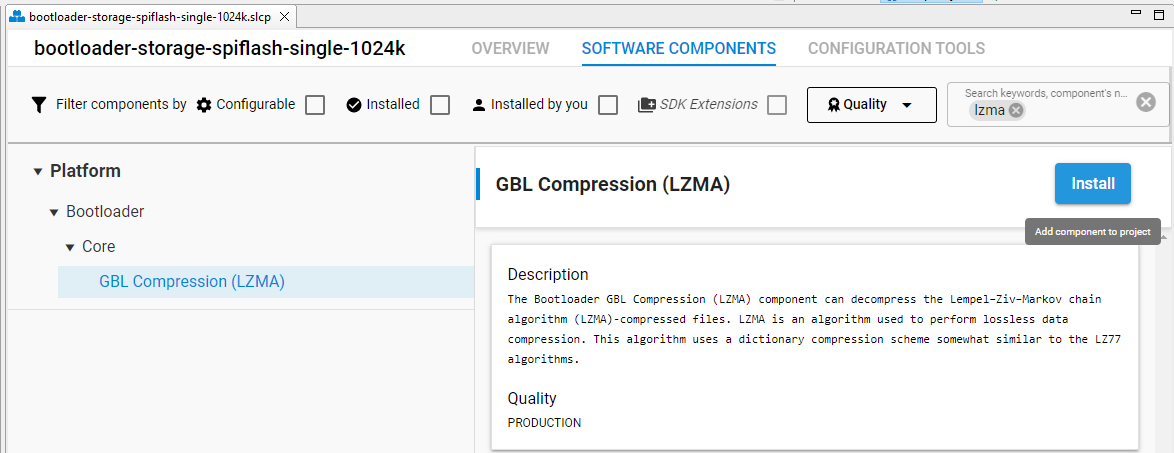
Add LZMA Compression to Bootloader#
By default, the bootloader projects don't include the most efficient LZMA compression algorithm, so install it if you want to use it.
TIP: Using lzma to compress
.gblfiles to save transmission time and therefore power when transmitting data.
Build the Bootloader Project#
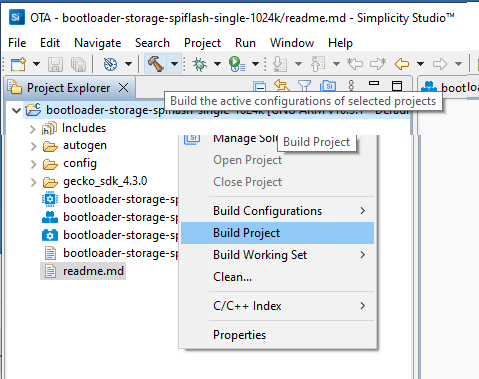
or
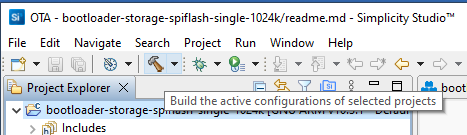
See Simplicity Studio 5 Users Guide for details.
Flash the Bootloader Binary to the Debug Adapter#
A new Binaries folder appeared in the project. This corresponds to the binaries present under GNU ARM v10.3.1 - Default.
On Series 1 (xG12, for example), select the
<projectname>-combined.s37binary (see Silicon Labs Gecko Bootloader User’s Guide for SiSDK 4.0 and Higher (series 1 and 2 devices) for details) or Silicon Labs Gecko Bootloader User’s Guide for Series 3 and Higher.On Series 2 (xG25 or xG28, for example), select the
<projectname>.s37binary.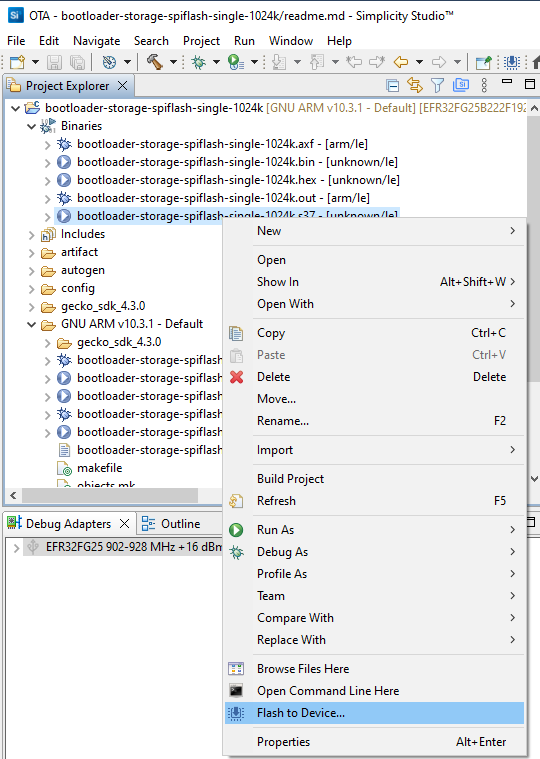
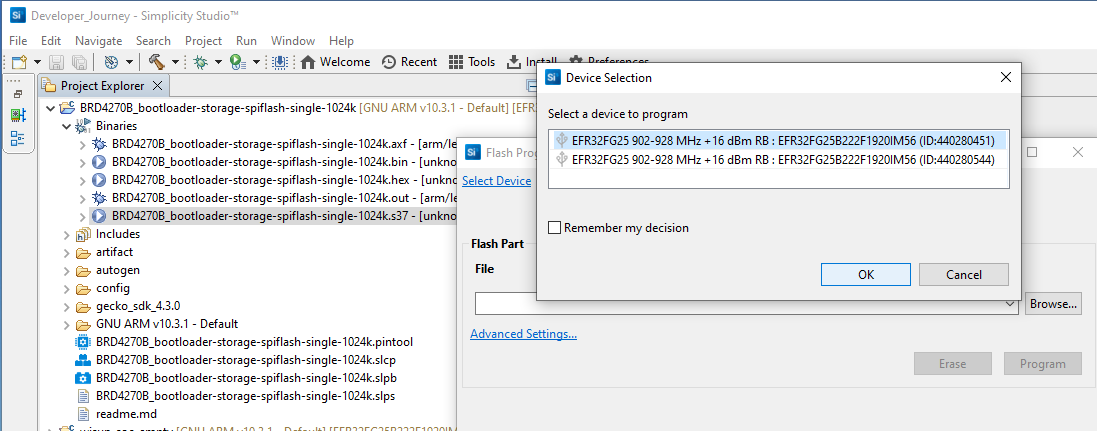
If you have several devices in your Debug Adapters window, you will be asked to select the device.
TIP: It's always better to erase the part before flashing a bootloader. As opposed to this, do not erase before flashing the Wi-SUN application; otherwise, you will need to re-flash the bootloader.
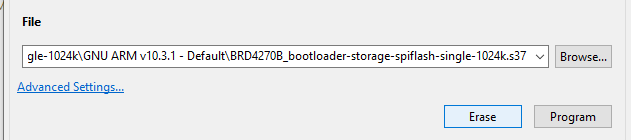
Finally, click the Program button.
Application Project Creation (if not already existing)#
If you have no previous application to flash to the device for testing, you can create a new 'Wi-SUN SoC Empty' project as described in Building and Connecting to a Wi-SUN Network. Otherwise, use your working Wi-SUN project.
Adding the 'Wi-SUN Over-The-Air Device Firmware Upgrade (OTA DFU)' Component#
To perform OTA upgrades:
The bootloader on your device must support OTA DFU.
The application running on your device must support OTA DFU.
In the Simplicity IDE perspective, open wisun_soc_empty.slcp and select the SOFTWARE COMPONENTS tab. Ensure Evaluationis checked in Quality panel:
Filter on DFU, and look for the Wi-SUN Over-The-Air Device Firmware Upgrade (OTA DFU) component.
Install the OTA DFU Component#
Check the OTA DFU Settings#
NOTE: It will take ~30 seconds for the Configure button to be active after installing the OTA DFU component.
There are two ways to change the OTA DFU component settings. The first way is through the SOFTWARE COMPONENTS view.
In the SOFTWARE COMPONENTS view, click Configure to access the corresponding GUI. Changes you make here will be reflected in
config/sl_wisun_ota_dfu_config.h.Verbose mode is enabled by default to follow the upgrade process in the device's console.
Host notifications are enabled by default to follow the upgrade process from the Border Router.
The OTA DFU service stack size in CPU word is set to 360 words (1440 bytes) to avoid stack overflow.
Set the TFTP service listening address to match the TFTP server IPv6.
Set the OTA DFU notification server address to match the notification server IPv6.
Optionally, you can change the Firmware image (gbl) file name on TFTP server to match your hardware. This can make it easier to manage various devices in the future. For the time being, keep using wisun_firmware.gbl.
The OTA DFU GUI reflects in
config/sl_wisun_ota_dfu_config.h. You can open it from the GUI, using the View Source button.

The settings must match between:
The TFTP server IPv6 (
fd00:6172:6d00::1)The
.gblfile nameThe CoAP Notification server IPv6 (
fd00:6172:6d00::2)The OTA DFU component
The
coap-servercommandThe
coap-clientcommands
TIP: Use the OTA DFU cheat sheet to check your settings.
Enable OTA DFU Verbose Mode#
In
config/sl_wisun_ota_dfu_config.h,SL_WISUN_OTA_DFU_VERBOSE_MODE_ENABLEDis set to1Uto get messages traced in the device's console during download. Once you get familiar with OTA DFU, you can disable verbose mode.
[wisun-btl] (0) Storage info: version: 196608, capabilities: 0, storageType: 0, numStorageSlots: 1
[wisun-btl] (7) Firmware upgrade started
[wisun-btl] (17) TFTP init done
[wisun-btl] (27) TFTP download started: tftp://[fd00:6172:6d00::1]:69/wisun_firmware.gbl
[wisun-btl] (429) download: received chunk 1, offset: 0x00000000
[wisun-btl] (853) download: received chunk 2, offset: 0x00000200
[wisun-btl] (1077) download: received chunk 3, offset: 0x00000400
[wisun-btl] (1302) download: received chunk 4, offset: 0x00000600
[wisun-btl] (1526) download: received chunk 5, offset: 0x00000800
[wisun-btl] (1949) download: received chunk 6, offset: 0x00000a00
[wisun-btl] (2174) download: received chunk 7, offset: 0x00000c00Enable OTA DFU Notifications#
In
config/sl_wisun_ota_dfu_config.h,SL_WISUN_OTA_DFU_HOST_NOTIFY_ENABLEDis set to1Uto get notification CoAP messages sent by the device to the notification server during download, everySL_WISUN_OTA_DFU_NOTIFY_DOWNLOAD_CHUNK_CNTchunks (default10U). This can be changed later on to a larger value to reduce the amount of notification messages. Setting it to a very large number will avoid all intermediate notifications while still keeping the final notification message, which is important to indicate file download completion and the validity of the new firmware.The notification server doesn't need to be the Border Router. It can be any other machine. Use a dedicated IPv6 address to make this clear.
Version 1 Application with OTA DFU Support#
Now that you have OTA DFU configured, you can set your Wi-SUN network to match your Border Router. Do this with the Wi-SUN Configurator.
Set the Wi-SUN Configuration#
Set the Wi-SUN Configuration to match the Border Router setup.
Add a Startup Text Indicating the Version of the Application#
Here, add the following to app.c/app_task() to get minimal information on your application and make sure you can tell which version is running through the startup messages that you'll get in the Serial 1 console when you reset the device.
printf("Version 1. Compiled on %s at %s\n", __DATE__, __TIME__);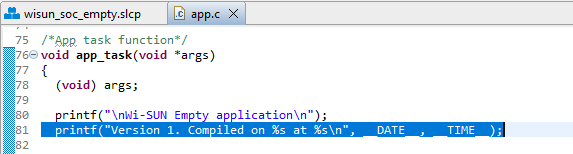
(Optional) Add a Startup Text Indicating OTA DFU Support#
Since it's interesting to know if OTA DFU is supported, add a second message if OTA DFU is supported.
To locate where active components are declared, select in app.c/app_task() the SL_CATALOG_WISUN_APP_CORE_PRESENT text on line 83, right-click, and select Open Declaration.
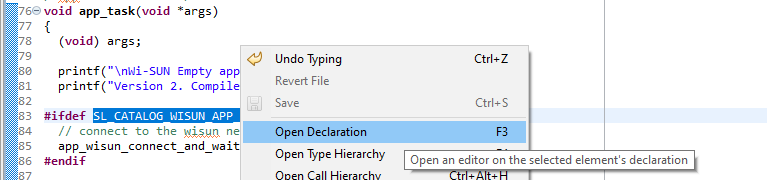
You end up in autogen/sl_component_catalog.h, where SL_CATALOG_WISUN_OTA_DFU_PRESENT is declared on line 33.
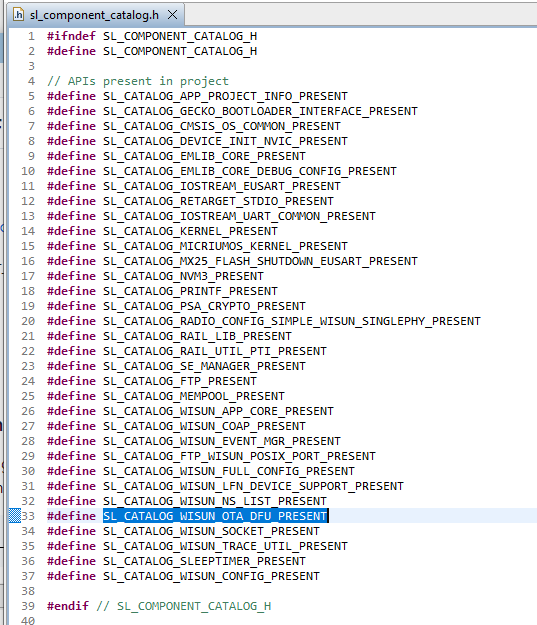
TIP: You also see that
SL_CATALOG_WISUN_COAP_PRESENTis declared on line 27, indicating that the CoAP component is also present. CoAP is a dependency for the OTA DFU component, so it has been installed automatically when you added OTA DFU (if not previously installed).
Back to app.c/app_task(), add the following code below your previous message:
#ifdef SL_CATALOG_WISUN_OTA_DFU_PRESENT
printf("OTA DFU is supported\n");
#endif
(Optional) Add More Information on OTA DFU Once Connected#
Once the device is connected to the Wi-SUN network the application can retrieve it's IPv6 global address and display information on how OTA DFU can be used.
This is interesting to add for the first OTA DFU tests, to get you familiar with the commands and the parameters.
In app.c, add the following code in the #include area:
#include "sl_wisun_ota_dfu_config.h"and the following code before the while (1) loop in app_task()
#ifdef SL_CATALOG_WISUN_OTA_DFU_PRESENT
sl_wisun_ip_address_t global_ipv6;
printf("OTA DFU will download chunks of '<TFTP_DIRECTORY>/%s' from %s/%d\n",
SL_WISUN_OTA_DFU_GBL_FILE,
SL_WISUN_OTA_DFU_HOST_ADDR,
SL_WISUN_OTA_DFU_TFTP_PORT
);
sl_wisun_get_ip_address(SL_WISUN_IP_ADDRESS_TYPE_LINK_LOCAL, &global_ipv6);
printf("OTA DFU 'start' command:\n");
printf(" coap-client -m post -N -B 10 -t text coap://[%s]:%d%s -e \"start\"\n",
app_wisun_trace_util_get_ip_str(&global_ipv6),
5683,
SL_WISUN_OTA_DFU_URI_PATH
);
printf("Follow OTA DFU progress (from node, intrusive) using:\n");
printf(" coap-client -m get -N -B 10 -t text coap://[%s]:%d%s\n",
app_wisun_trace_util_get_ip_str(&global_ipv6),
SL_WISUN_COAP_RESOURCE_HND_SERVICE_PORT,
SL_WISUN_OTA_DFU_URI_PATH
);
if (SL_WISUN_OTA_DFU_HOST_NOTIFY_ENABLED) {
printf("OTA DFU notifications enabled (every %d chunks)\n",
SL_WISUN_OTA_DFU_NOTIFY_DOWNLOAD_CHUNK_CNT
);
printf("OTA DFU notifications will be POSTed to notification server coap://[%s]:%d%s\n",
SL_WISUN_OTA_DFU_NOTIFY_HOST_ADDR,
SL_WISUN_OTA_DFU_NOTIFY_PORT,
SL_WISUN_OTA_DFU_NOTIFY_URI_PATH
);
printf("Follow OTA DFU progress (from notification server) using:\n");
printf(" coap-client -m get -N -B 1 -t text coap://[%s]:%d%s\n",
SL_WISUN_OTA_DFU_NOTIFY_HOST_ADDR,
SL_WISUN_OTA_DFU_NOTIFY_PORT,
SL_WISUN_OTA_DFU_NOTIFY_URI_PATH
);
}
#endif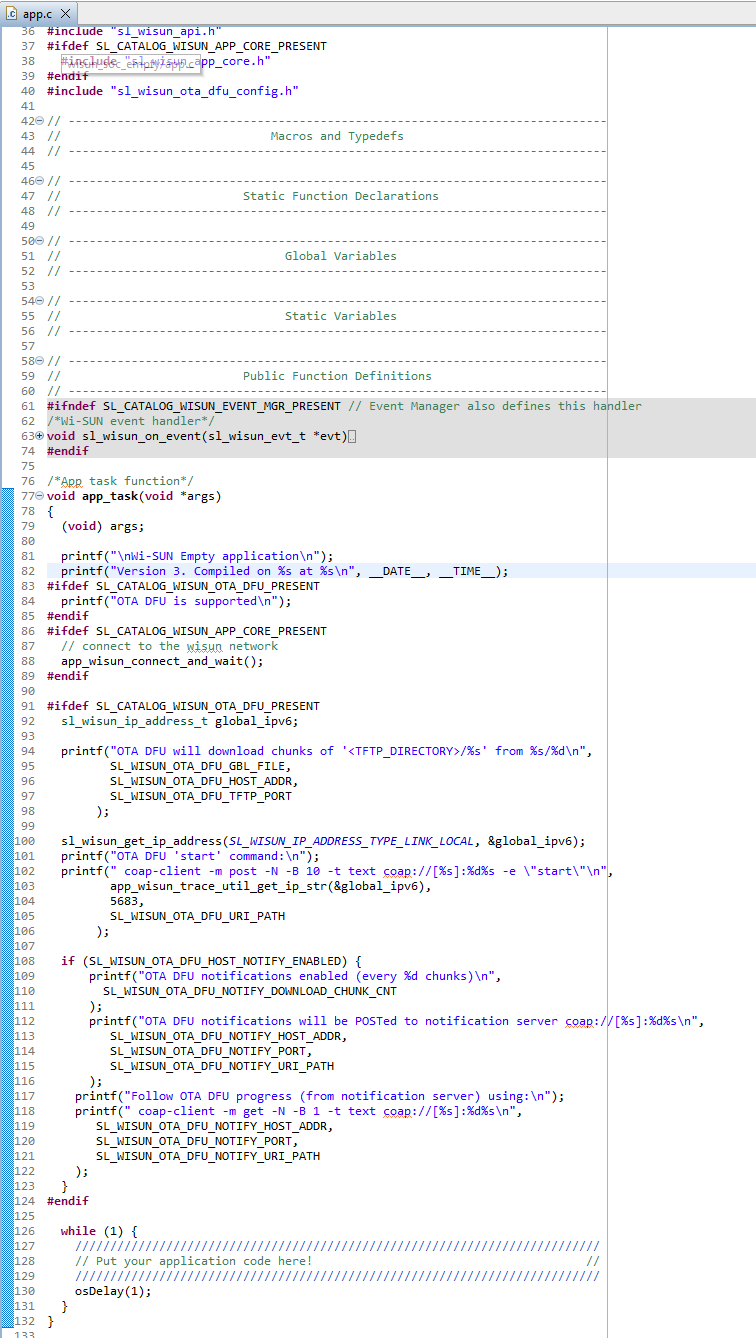
Rebuild the 'Version 1' Application#
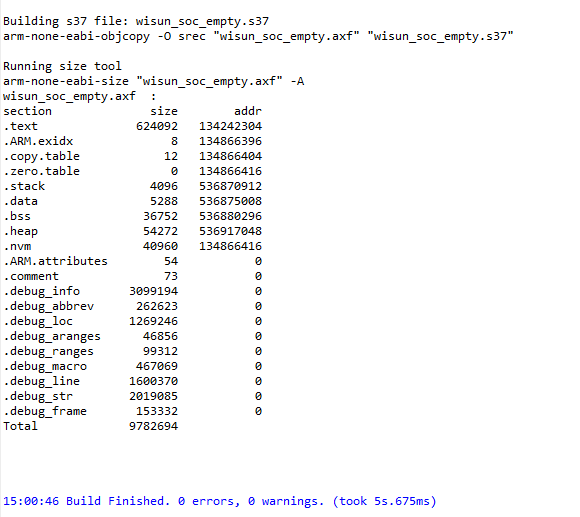
Unfortunately, with SiSDK 4.3.0, this will fail because of an assert from <simplicity_sdk>/app/wisun/component/ftp_posix_port/sl_wisun_ftp_posix_port.c line 160. The root cause is not the assert. The assert is here to stop you at this point such that you correct the underlying code and safely compile with no runtime issue to expect. If you don't solve the assert, you may get issues when running your code.
The point is that the TFTP code is using a data block size of 512 bytes by default, while the socket buffer is using 128 bytes per default. As a consequence, the TFTP packets won't fit in the socket buffer, so the socket buffer needs to be bigger.
With SiSDK 4.3.0, setting this was not done automatically in the generation flow when adding TFTP and the OTA DFU component, so this change needs to be done manually. This is improved in later SiSDK versions using the following condition in the .slcp file:
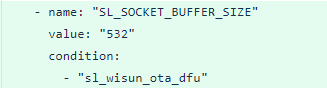
With SiSDK 4.3.0, you will experience this error:

As the error message indicates, the solution consists of increasing SL_SOCKET_BUFFER_SIZE to be higher than SL_TFTP_DATA_BLOCK_SIZE + 4.
You find the value of
SL_TFTP_DATA_BLOCK_SIZEusing Open Declaration (F3).
#define SL_TFTP_DATA_BLOCK_SIZE 512UL
Go to the
SL_SOCKET_BUFFER_SIZEdeclaration and set it to 512 + 4 = 516.
#define SL_SOCKET_BUFFER_SIZE 516U
Now you can compile without errors.
Manually Install the 'Version 1' Application#
Flash it manually (if it's the first OTA-capable application you flash, it needs to be flashed manually, since resources to flash it using OTA DFU are not present yet).
NOTE: If you use the Erase Feature, you will need to re-flash the bootloader then flash the application.
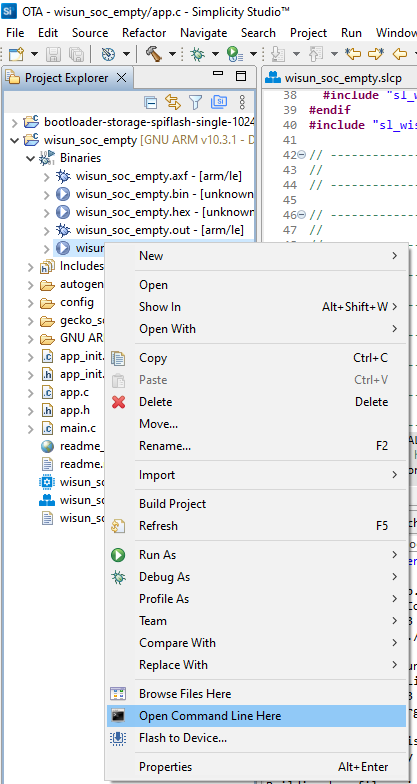
Open a console on the device.
Select Serial 1 and press Enter to connect.
Reset the device (using the RESET button on the WSTK/WPK).
The startup message indicates that:
You're running 'Version 1'
OTA DFU is supported
The 'Wi-SUN SoC Empty' example application is set for auto-connection to the Wi-SUN Network, so you see it starting to connect.

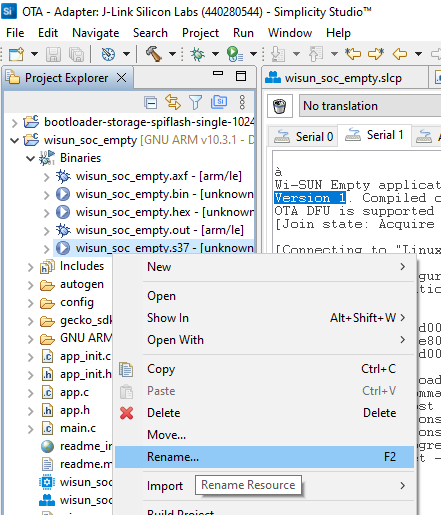
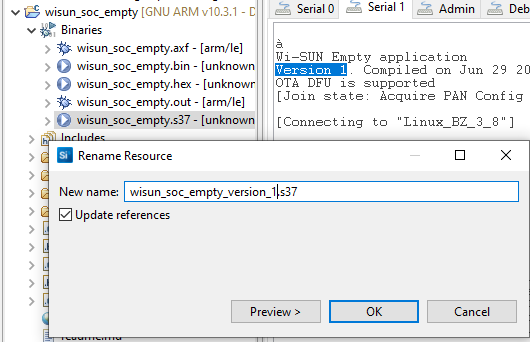
Rename the 'Version 1'Binary to Keep It#
Add _version_1 to the file name to clearly identify it.

Version 2 Application with OTA DFU Support#
Change the Startup Text for 'Version 2'#
printf("Version 2. Compiled on %s at %s\n", __DATE__, __TIME__);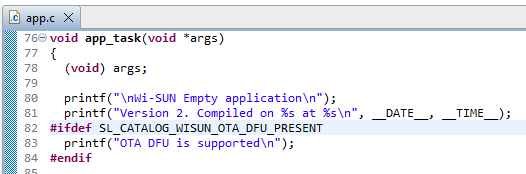
Rebuild the 'Version 2' Application#
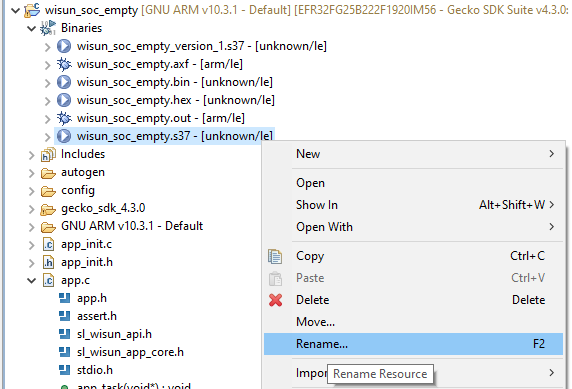
The wisun_soc_empty.s37 file is back in the Binaries folder. It now corresponds to your 'Version 2' application.
Rename the 'Version 2' Binary to Keep It#
Add _version_2 to the file name to clearly identify it.
Convert the 'Version 2' Binary to GBL Format#
The 'Version 2' binary needs to be converted to the GBL (Gecko BootLoader) format using Simplicity Commander. It will have a .gbl extension after conversion.
On Windows platforms, Simplicity Commander is by default installed under C:\SiliconLabs\SimplicityStudio\v5\developer\adapter_packs\commander.
TIP: To access Simplicity Commander easily, it's a good option to add the path to the
commander.exein your environment variables. Remember that command line windows only check environment variables upon starting, so you need to re-open them to benefit from the change.
Open a command window in the
C:\Users\username\SimplicityStudio\v5_workspace\wisun_soc_empty\GNU ARM v10.3.1 - Defaultfolder where binaries are stored.Check that the
.s37files are present:
C:\Users\username\SimplicityStudio\v5_workspace\wisun_soc_empty\GNU ARM v10.3.1 - Default>dir *.s37
29/06/2023 15:00 1 888 290 wisun_soc_empty_version_1.s37
29/06/2023 15:12 1 888 290 wisun_soc_empty_version_2.s37Create the GBL file for the application to transfer over OTA DFU
commander gbl create --app wisun_soc_empty_version_2.s37 wisun_soc_empty_version_2.gblTo reduce the size of the file to be transferred, you can compress the resulting file with either
--compress lz4or--compress lzmacommander gbl create --app wisun_soc_empty_version_2.s37 wisun_soc_empty_version_2_lz4.gbl --compress lz4commander gbl create --app wisun_soc_empty_version_2.s37 wisun_soc_empty_version_2_lzma.gbl --compress lzma
CAUTION: Only compress with the algorithms supported by your bootloader, otherwise the verification step will fail once downloaded.
C:\Users\username\SimplicityStudio\OTA\wisun_soc_empty\GNU ARM v10.3.1 - Default>commander gbl create --app wisun_soc_empty_version_2.s37 wisun_soc_empty_version_2.gbl
Parsing file wisun_soc_empty_version_2.s37...
Initializing GBL file...
Adding application to GBL...
Writing GBL file wisun_soc_empty_version_2.gbl...
DONE
C:\Users\username\SimplicityStudio\OTA\wisun_soc_empty\GNU ARM v10.3.1 - Default>commander gbl create --app wisun_soc_empty_version_2.s37 wisun_soc_empty_version_2_lz4.gbl --compress lz4
Parsing file wisun_soc_empty_version_2.s37...
Initializing GBL file...
Adding application to GBL...
Compressing using lz4...
Writing GBL file wisun_soc_empty_version_2_lz4.gbl...
DONE
C:\Users\username\SimplicityStudio\OTA\wisun_soc_empty\GNU ARM v10.3.1 - Default>commander gbl create --app wisun_soc_empty_version_2.s37 wisun_soc_empty_version_2_lzma.gbl --compress lzma
Parsing file wisun_soc_empty_version_2.s37...
Initializing GBL file...
Adding application to GBL...
Compressing using lzma...
Writing GBL file wisun_soc_empty_version_2_lzma.gbl...
DONEAs you can see, the best compression method is lzma:
Compression | Size (bytes) | None/Compressed ratio |
|---|---|---|
None | 629476 | 100 % |
lz4 | 544424 | 86 % |
lzma | 385996 | 61 % |
C:\Users\username\SimplicityStudio\v5_workspace\wisun_soc_empty\GNU ARM v10.3.1 - Default>dir *version_2*.gbl
29/06/2023 15:17 629 476 wisun_soc_empty_version_2.gbl
29/06/2023 15:18 544 424 wisun_soc_empty_version_2_lz4.gbl
29/06/2023 15:18 385 996 wisun_soc_empty_version_2_lzma.gblAt this point, you have all the resources you need to start using OTA DFU to upgrade from 'Version 1' (manually flashed) to 'Version 2' (using OTA DFU).
A running TFTP server on the Linux Border Router.
A bootloader with OTA DFU support, flashed to your device.
A 'Version 1' application with OTA DFU support, flashed to your device.
A 'Version 2' file in GBL format (you'll use the lzma-compressed file).
The 'Version 2' binary also has OTA DFU support, to get ready to accept future upgrades to a 'Version 3' application.
And you can follow the process using the notifications, which will be sent to the notification server by the device.

Transfer the 'Version 2' .gbl Files to the Linux Border Router#
From the machine where the .gbl files were created, use scp to copy the files to the Linux Border Router host. You can use your preferred file copy method.
scp wisun_soc_empty_*.gbl <linux_user>@<linux_hostname>:/tmp/NOTE: The rest of the operations will occur on the Linux Border Router.
Check 'Version 1' Connection to the Border Router#
On the Border Router#
In wsbrd_cli status, the MAC address of the device should be visible:
network_name: Linux_BZ_3_8
fan_version: FAN 1.1
domain: BZ
phy_mode_id: 8
chan_plan_id: 3
panid: 0xd4ec
size: CERT
GAK[0]: 36:b6:1e:81:fa:c4:88:b4:03:f7:b4:9b:38:b3:41:47
GAK[1]: 79:8b:b2:98:7f:ef:d3:55:4a:b8:cf:23:d4:a2:8f:5b
GAK[2]: 79:8b:b2:98:7f:ef:d3:55:4a:b8:cf:23:d4:a2:8f:5b
GAK[3]: 79:8b:b2:98:7f:ef:d3:55:4a:b8:cf:23:d4:a2:8f:5b
GTK[0]: 00:10:20:30:40:50:60:70:80:90:a0:b0:c0:d0:e0:f0
GTK[1]: 00:00:00:00:00:00:00:00:00:00:00:00:00:00:00:00
GTK[2]: 00:00:00:00:00:00:00:00:00:00:00:00:00:00:00:00
GTK[3]: 00:00:00:00:00:00:00:00:00:00:00:00:00:00:00:00
LGAK[0]: 62:80:53:11:03:45:b6:f5:16:67:e6:14:65:21:e4:99
LGAK[1]: 79:8b:b2:98:7f:ef:d3:55:4a:b8:cf:23:d4:a2:8f:5b
LGAK[2]: 79:8b:b2:98:7f:ef:d3:55:4a:b8:cf:23:d4:a2:8f:5b
LGTK[0]: 66:70:4e:08:8c:ce:82:c9:d2:aa:c7:62:83:18:97:b9
LGTK[1]: 00:00:00:00:00:00:00:00:00:00:00:00:00:00:00:00
LGTK[2]: 00:00:00:00:00:00:00:00:00:00:00:00:00:00:00:00
90:fd:9f:ff:fe:00:33:3a
`- 60:a4:23:ff:fe:37:a5:1dOn the Device#
Check the content of 'Serial 1'. By now, it should be connected if the Border Router and the device settings match and both are working as expected.
Since it's now connected, the information strings you prepared are now visible, providing hints to the user.
Information on TFTP settings
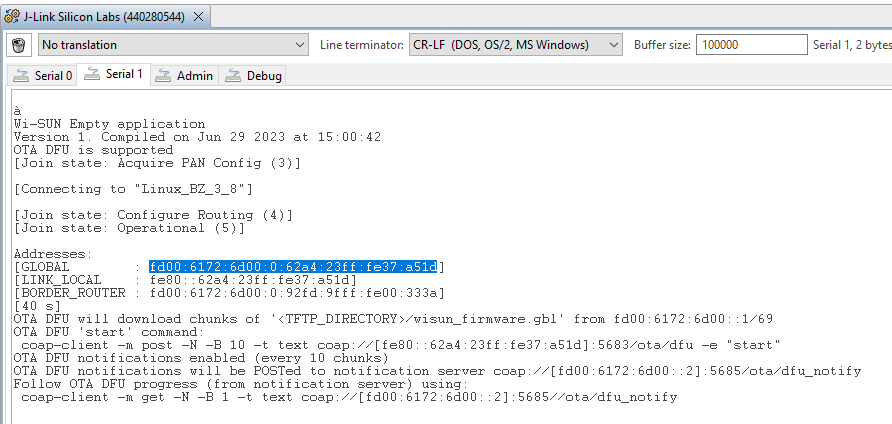
OTA DFU will download chunks of '<TFTP_DIRECTORY>/wisun_firmware.gbl' from fd00:6172:6d00::1/69
Information on the OTA start command (to be executed on the Border Router)
coap-client -m post -N -B 10 -t text coap://[fe80::62a4:23ff:fe37:a51d]:5683/ota/dfu -e "start"
Information on the notification settings
OTA DFU notifications enabled (every 10 chunks)OTA DFU notifications will be POSTed to notification server coap://[fd00:6172:6d00::2]:5685/ota/dfu_notify
Information on how to follow the OTA progress
Follow OTA DFU progress (from notification server) using:coap-client -m get -N -B 1 -t text coap://[fd00:6172:6d00::2]:5685/ota/dfu_notify
Store the Device's IPv6 GLOBAL Address#
Copy the GLOBAL IPv6 address either from the Addresses [GLOBAL : <IPv6>] section, or from the above info on the "start" command. This is the device's IPv6 address you will need to use for OTA DFU as the WISUN_NODE_IPV6_ADDR value.
On the Border Router, set a command line variable to make it easier to repeat the OTA process for other devices:
WISUN_NODE_IPV6_ADDR=fd00:6172:6d00:0:62a4:23ff:fe37:a51d (in the example)
TIP: You need to do this for each bash window you open.
Store the Border Router's IPv6 Address#
Copy the BORDER_ROUTER IPv6 address from the Addresses [BORDER_ROUTER : <IPv6>] section.
On the Border Router, set a command line variable to make it easier to repeat the OTA process for other devices:
WISUN_BR_IPV6_ADDR=fd00:6172:6d00:0:92fd:9fff:fe00:333a (in the example)
TIP: You need to do this for each bash window you open.
OTA DFU on the Linux Border Router#
Copy the .gbl file to the TFTP Server Directory#
Check the TFTP server directory from its config file:
sudo cat /etc/default/tftpd-hpa# /etc/default/tftpd-hpa
TFTP_USERNAME="tftp"
TFTP_DIRECTORY="/srv/tftp"
TFTP_ADDRESS=":69"
TFTP_OPTIONS="--secure"Copy the
.gblfiles in theTFTP_DIRECTORYfolder:
sudo cp /tmp/*.gbl /srv/tftp/.ls -l /srv/tftp/*.gbl-rw-r--r-- 1 root root 629476 Jun 29 15:38 /srv/tftp/wisun_soc_empty_version_2.gbl
-rw-r--r-- 1 root root 544424 Jun 29 15:38 /srv/tftp/wisun_soc_empty_version_2_lz4.gbl
-rw-r--r-- 1 root root 385996 Jun 29 15:38 /srv/tftp/wisun_soc_empty_version_2_lzma.gblCopy the
.gblfile of your choice to the name set asSL_WISUN_OTA_DFU_GBL_FILEinconfig/sl_wisun_ota_dfu_config.h.First, start testing with the un-compressed file.
sudo cp /srv/tftp/wisun_soc_empty_version_2.gbl /srv/tftp/wisun_firmware.gblCheck the presence of the
.gblfile:
ls -al /srv/tftp/*.gbl-rw-r--r-- 1 root root 629476 Jun 29 15:41 /srv/tftp/wisun_firmware.gbl
-rw-r--r-- 1 root root 629476 Jun 29 15:38 /srv/tftp/wisun_soc_empty_version_2.gbl
-rw-r--r-- 1 root root 544424 Jun 29 15:38 /srv/tftp/wisun_soc_empty_version_2_lz4.gbl
-rw-r--r-- 1 root root 385996 Jun 29 15:38 /srv/tftp/wisun_soc_empty_version_2_lzma.gblSee that the file sizes for wisun_firmware.gbl and wisun_soc_empty_version_2.gbl match, indicating that you're using the uncompressed file for the time being.
Check that you can Ping the Border Router#
ping $WISUN_BR_IPV6_ADDR -c 1PING fd00:6172:6d00:0:92fd:9fff:fe00:333a(fd00:6172:6d00:0:92fd:9fff:fe00:333a) 56 data bytes
64 bytes from fd00:6172:6d00:0:92fd:9fff:fe00:333a: icmp_seq=1 ttl=64 time=0.214 ms
--- fd00:6172:6d00:0:92fd:9fff:fe00:333a ping statistics ---
1 packets transmitted, 1 received, 0% packet loss, time 0ms
rtt min/avg/max/mdev = 0.214/0.214/0.214/0.000 msSuccessfully pinging the Border Router means that it's started and the IPv6 address that you retrieved from the device is correct.
Check that you can Ping the TFTP Server#
ping fd00:6172:6d00::1Successfully pinging the TFTP server means that it's IPv6 has been added to tun0and it is accessible from your devices.
Check that you can Ping the Notification Server#
ping fd00:6172:6d00::2Successfully pinging the notification server means that it's IPv6 has been added to tun0and it is accessible from your devices and from the Border Router.
Your devices will use coap 'POST' messages to store their OTA status.
You'll use coap 'GET' messages to check the devices status.
Note that:
You're not directly asking the devices for status, because:
Doing so, you reduce the traffic on your Wi-SUN network.
If a device reboots after the upgrade, it will not be able to respond anymore to CoAP requests, while the notification server will be able to tell if OTA was successful, since the last notification message will show the last notification received from the device.
Check that you can Ping the Node#
ping $WISUN_NODE_IPV6_ADDR -c 1PING fd00:6172:6d00:0:62a4:23ff:fe37:a51d(fd00:6172:6d00:0:62a4:23ff:fe37:a51d) 56 data bytes
64 bytes from fd00:6172:6d00:0:62a4:23ff:fe37:a51d: icmp_seq=1 ttl=63 time=74.9 ms
--- fd00:6172:6d00:0:62a4:23ff:fe37:a51d ping statistics ---
1 packets transmitted, 1 received, 0% packet loss, time 0ms
rtt min/avg/max/mdev = 74.892/74.892/74.892/0.000 msSuccessfully pinging the device means that it's connected to the Wi-SUN network and is working as expected. You can now test OTA DFU.
Check that CoAP is Running on the Node#
Send your coap-client GET method with -v 6 to get some level of debug information.
coap-client -m get coap://[$WISUN_NODE_IPV6_ADDR]:5683/ota/dfu -v 6TIP: Here add
-v 6to add verbosity and get more details on the CoAP command. Once you get used to the procedure, you may not want to keep using this method.
v:1 t:CON c:GET i:ded0 {} [ Uri-Path:ota, Uri-Path:dfu ]
v:1 t:ACK c:2.01 i:ded0 {} [ Content-Format:application/json ] :: '{\x0A"elapsed_t":"00:23:44",\x0A"downl_bytes":0,\x0A"flags": "0x00000000",\x0A"fw_update_started": 0,\x0A"fw_downloaded": 0,\x0A"fw_verified": 0,\x0A"fw_set": 0,\x0A"fw_stopped": 0,\x0A"fw_download_error": 0,\x0A"fw_verify_error": 0,\x0A"fw_set_error": 0\x0A}\x0A'
{
"elapsed_t":"00:23:44",
"downl_bytes":0,
"flags": "0x00000000",
"fw_update_started": 0,
"fw_downloaded": 0,
"fw_verified": 0,
"fw_set": 0,
"fw_stopped": 0,
"fw_download_error": 0,
"fw_verify_error": 0,
"fw_set_error": 0
}TIP: The
"elapsed_t"value is the time since connection to the Wi-SUN network, as long as OTA DFU hasn't been started.
On the device console, you see the CoAP 'Received packet' and 'Response packet'.
[CoAP-RHND-Service: Received packet]
{
"token_len": 0,
"coap_status": 0,
"msg_code": 1,
"msg_type": 0,
"content_format": 4294967295,
"msg_id": 57040,
"payload_len": 0,
"uri_path_len": 7,
"token": "n/a",
"uri_path": "ota/dfu",
"payload": "n/a",
}
[CoAP-RHND-Service: Response packet]
{
"token_len": 0,
"coap_status": 0,
"msg_code": 65,
"msg_type": 32,
"content_format": 50,
"msg_id": 57040,
"payload_len": 224,
"uri_path_len": 0,
"token": "n/a",
"uri_path": "n/a",
"payload":
{
"elapsed_t":"00:23:44",
"downl_bytes":0,
"flags": "0x00000000",
"fw_update_started": 0,
"fw_downloaded": 0,
"fw_verified": 0,
"fw_set": 0,
"fw_stopped": 0,
"fw_download_error": 0,
"fw_verify_error": 0,
"fw_set_error": 0
}
}TIP: You can check that the message index
i:ded0inv:1 t:CON c:GET i:ded0matches the"msg_id": 57040in the Device's console (57040 = 0xded0).
Start OTA DFU for the Wi-SUN Device#
At this point, you can trigger an OTA DFU for the device.
Checking coap-client Options#
Use coap-client --help to get the help. Below is an abstract with the version info and options used.
coap-client --helpcoap-client v4.1.2 -- a small CoAP implementation
(c) 2010-2015 Olaf Bergmann <bergmann@tzi.org>
usage: coap-client [-A type...] [-t type] [-b [num,]size] [-B seconds] [-e text]
[-m method] [-N] [-o file] [-P addr[:port]] [-p port]
[-s duration] [-O num,text] [-T string] [-v num] [-a addr] [-U] URI
URI can be an absolute or relative coap URI,
-B seconds break operation after waiting given seconds
(default is 90)
-e text include text as payload (use percent-encoding for
non-ASCII characters)
-m method request method (get|put|post|delete), default is 'get'
-N send NON-confirmable message
-v num verbosity level (default: 3)
Starting Firmware Download using coap-client#
coap-client -m post -N -B 3 -t text coap://[$WISUN_NODE_IPV6_ADDR]:5683/ota/dfu -e "start" -v 6OTA DFU Starting on the Border Router#
v:1 t:NON c:POST i:4186 {} [ Uri-Path:ota, Uri-Path:dfu, Content-Format:text/plain ] :: 'start'
v:1 t:NON c:2.01 i:0000 {} [ Content-Format:application/json ] :: '{\x0A"elapsed_t":"00:00:00",\x0A"downl_bytes":0,\x0A"flags": "0x00000001",\x0A"fw_update_started": 1,\x0A"fw_downloaded": 0,\x0A"fw_verified": 0,\x0A"fw_set": 0,\x0A"fw_stopped": 0,\x0A"fw_download_error": 0,\x0A"fw_verify_error": 0,\x0A"fw_set_error": 0\x0A}\x0A'
{
"elapsed_t":"00:00:00",
"downl_bytes":0,
"flags": "0x00000001",
"fw_update_started": 1,
"fw_downloaded": 0,
"fw_verified": 0,
"fw_set": 0,
"fw_stopped": 0,
"fw_download_error": 0,
"fw_verify_error": 0,
"fw_set_error": 0
}The "fw_update_started": 1 flag is set!
OTA DFU Starting on the Device#
[CoAP-RHND-Service: Received packet]
{
"token_len": 0,
"coap_status": 0,
"msg_code": 2,
"msg_type": 16,
"content_format": 0,
"msg_id": 16774,
"payload_len": 5,
"uri_path_len": 7,
"token": "n/a",
"uri_path": "ota/dfu",
"payload": "start"}
[CoAP-RHND-Service: Response packet]
{
"token_len": 0,
"coap_status": 0,
"msg_code": 65,
"msg_type": 16,
"content_format": 50,
"msg_id": 0,
"payload_len": 224,
"uri_path_len": 0,
"token": "n/a",
"uri_path": "n/a",
"payload":
{
"elapsed_t":"00:00:00",
"downl_bytes":0,
"flags": "0x00000001",
"fw_update_started": 1,
"fw_downloaded": 0,
"fw_verified": 0,
"fw_set": 0,
"fw_stopped": 0,
"fw_download_error": 0,
"fw_verify_error": 0,
"fw_set_error": 0
}
}
[wisun-btl] (0) Storage info: version: 196608, capabilities: 0, storageType: 0, numStorageSlots: 1
[wisun-btl] (7) Firmware upgrade started
[wisun-btl] (11) notify: coap://[fd00:6172:6d00::2]:5685/ota/dfu_notify
[wisun-btl] (18) TFTP init done
[wisun-btl] (21) notify: coap://[fd00:6172:6d00::2]:5685/ota/dfu_notify
[wisun-btl] (27) TFTP download started: tftp://[fd00:6172:6d00::1]:69/wisun_firmware.gbl
[wisun-btl] (442) download: received chunk 1, offset: 0x00000000
[wisun-btl] (866) download: received chunk 2, offset: 0x00000200
[wisun-btl] (1090) download: received chunk 3, offset: 0x00000400
[wisun-btl] (1315) download: received chunk 4, offset: 0x00000600
[wisun-btl] (1739) download: received chunk 5, offset: 0x00000800
[wisun-btl] (1964) download: received chunk 6, offset: 0x00000a00
[wisun-btl] (2189) download: received chunk 7, offset: 0x00000c00
[wisun-btl] (2414) download: received chunk 8, offset: 0x00000e00
[wisun-btl] (2920) download: received chunk 9, offset: 0x00001000
[wisun-btl] (3128) notify: coap://[fd00:6172:6d00::2]:5685/ota/dfu_notify
[wisun-btl] (3153) download: received chunk 10, offset: 0x00001200
[wisun-btl] (3377) download: received chunk 11, offset: 0x00001400
[wisun-btl] (3802) download: received chunk 12, offset: 0x00001600The
"ota/dfu""start"command has been receivedThe OTA DFU process started
The first chunks of
wisun_firmware.gblhave been receivedThe first two notifications have been sent to the notification server's IPV6
Monitoring OTA DFU Progress on Notification Server#
coap-client -m get -N -B 1 -t text coap://[fd00:6172:6d00::2]:5685/ota/dfu_notifyTIP: A more convenient way to follow the process is to use
watchas follows:
watch --interval 2 coap-client -m get -N -B 1 -t text coap://[fd00:6172:6d00::2]:5685/ota/dfu_notify
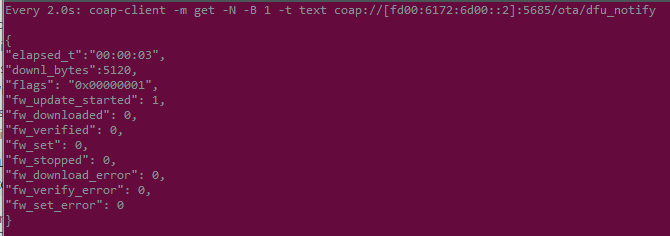
The
"elapsed_t"and"downl_bytes"will increase during image downloadThe
"fw_update_started"flag is1from the startThe
"fw_downloaded"flag will be1when download is complete (several minutes at 50 kbps/1 Hop)The
"fw_verified"flag will be1when verification is complete (this can take an additional ~20 sec)The
"fw_set"flag will be1when reboot is about to be triggered (using the NVIC_SystemReset() low-level function)Note that the device will send its last notification with
"fw_set"then reboot, so whatever you retrieve from the notification server is this message until you start a new upgrade.
Monitoring OTA DFU Progress on Device (intrusive!)#
You can also check the progress using a CoAP GET method on the device, but because this is using the Wi-SUN network, it has an impact on the OTA DFU duration if used frequently. The device will also stop responding for a while while rebooting and reconnecting, then respond with "fw_update_started": 0 once reconnected.
coap-client -m get coap://[$WISUN_NODE_IPV6_ADDR]:5683/ota/dfu{
"elapsed_t":"00:01:59",
"downl_bytes":204800,
"flags": "0x00000001",
"fw_update_started": 1,
"fw_downloaded": 0,
"fw_verified": 0,
"fw_set": 0,
"fw_stopped": 0,
"fw_download_error": 0,
"fw_verify_error": 0,
"fw_set_error": 0
}TIP: Using
watch --interval 10 coap-client -m get coap://[$WISUN_NODE_IPV6_ADDR]:5683/ota/dfu, you can get the request sent to the device every 10 seconds. This is a convenient way to follow the upgrade process, but it's even more intrusive than not usingwatch.
Checking OTA DFU Success on the Device#
In the device console, check the startup message, looking for 'Version 2'.
Wi-SUN Empty application
Version 2. Compiled on Jul 6 2023 at 13:27:37
OTA DFU is supported
[Join state: Acquire PAN Config (3)]
[Connecting to "Linux_BZ_3_8"]
[Join state: Configure Routing (4)]
[Join state: Operational (5)]
Addresses:
[GLOBAL : fd00:6172:6d00:0:b635:22ff:fe98:2527]
[LINK_LOCAL : fe80::b635:22ff:fe98:2527]
[BORDER_ROUTER : fd00:6172:6d00:0:92fd:9fff:fe00:333a]
[25 s]OTA DFU Cheat Sheet#
Below are all items used for OTA DFU that need to match between various parts of the setup. Check these in case of issues.
The TFTP server
The
.gblfileThe CoAP Notification server
The OTA DFU component
The
coap-servercommandThe
coap-clientcommandsThe bootloader
Below are the relationships between the settings:
Configuration | Setting on Linux Host | Setting on Node project |
|---|---|---|
TFTP Server IPv6 address | Command line: | OTA DFU Configuration file: |
TFTP Server Port | TFTP Server configuration file: | OTA DFU Configuration file: |
TFTP Directory | TFTP Server configuration file: | Location of |
| Command line: | OTA DFU Configuration file: |
OTA DFU Notifications | Command line: | OTA DFU Configuration file: |
Notification server IPv6 address | Command line: | OTA DFU Configuration file: |
OTA DFU notify URI path | Command line: | OTA DFU Configuration file: |
CoAP Notification server IPv6 | Command line: | OTA DFU Configuration file: |
CoAP Notification server UDP port | Command line: | OTA DFU Configuration file: |
CoAP Notification server dynamic resources count | Command line: | Number of devices concurrently performing OTA DFU |
OTA DFU control port | Command line: | CoAP Configuration file: |
OTA DFU control URI path | Command line: | OTA DFU Configuration file: |
OTA DFU start command | Command line: | OTA DFU Source file: |
OTA DFU stop command | Command line: | OTA DFU Source file: |
OTA DFU install command | Command line: | OTA DFU Source file: SL_WISUN_OTA_DFU_PAYLOAD_STR_REBOOT_AND_INSTALL |
Below are other items that need to be selected correctly:
Configuration | Compression component | project |
|---|---|---|
no compression | Bootloader Compression: |
|
lz4 compression | Bootloader Component: |
|
lzma compression | Bootloader Component: |
|
Configuration | Part | Bootloader Binary |
|---|---|---|
Bootloader binary for Series 1 | xG12 |
|
Bootloader binary for Series 2 | xG25 or xG28 |
|
NOTE: An application with OTA DFU support will crash during OTA if no OTA-capable bootloader is flashed to the device, because the application expects certain low-level functions to be available in the bootloader. This is a common pitfall when customers experiment with OTA DFU and start flashing their OTA DFU application to multiple devices: if they forget to also flash an OTA-capable bootloader they end up having unexpected crashes while their first test device works fine.
Application configuration | Bootloader configuration | Expected behavior |
|---|---|---|
Application with OTA DFU | Bootloader without OTA DFU | Crashes |
Application with OTA DFU | Bootloader with OTA DFU | Okay |
Application without OTA DFU | Bootloader without OTA DFU | Okay |
Application without OTA DFU | Bootloader with OTA DFU | Okay |