Multiprotocol with Sidewalk#
You can integrate different protocols with Amazon Sidewalk. This page provides a list of tutorials and examples created by Silicon Labs to showcase Amazon Sidewalk alongside other protocols.
Sidewalk Alongside BLE#
In the Amazon Sidewalk extension, there is a sample application that demonstrates concurrent operation of Amazon Sidewalk and standard BLE. The sample application is called Amazon Sidewalk - SoC Dynamic Multiprotocol Light and demonstrates a light bulb that can be switched via Bluetooth or Amazon Sidewalk (BLE or FSK radio layer).
Sidewalk and BLE Double Advertising#
This page describes how to add standard BLE advertising alongside your Amazon Sidewalk application.
Ⓘ INFO Ⓘ: By default, the standard BLE advertising will ONLY be available if your Sidewalk application is also running the BLE link.
Set Up the Project#
You can use the Hello Neighbor sample app as a starting point. Make sure your part supports the Bluetooth link. Refer to Prerequisites to learn which platforms are suitable.
First, modify the number of advertising channels authorized. By default, only one advertising set is allowed. In file config/sl_bluetooth_advertiser_config.h set SL_BT_CONFIG_USER_ADVERTISERS to 2.
Both BLE attributes (e.g. change the advertising name) can be configured in different places:
BLE Type | Configuration |
|---|---|
Sidewalk BLE | In c file : |
Classic BLE | In the GATT configuration : |
Ⓘ INFO Ⓘ: If the
gatt_configuration.btconfis missing, you need to add theStatic GATT Database and Configurationcomponent to generate this file.
Enable Extra Advertising#
To enable the standard BLE advertising based on your GATT configuration, the code snippet below should be added to your application.
// The advertising set handle allocated from Bluetooth stack.
static uint8_t advertising_set_handle = 0xff;
void start_standard_ble_advertising()
{
sl_status_t sc;
// Create new handle
sc = sl_bt_advertiser_create_set(&advertising_set_handle);
app_assert_status(sc);
// Generate data for advertising
sc = sl_bt_legacy_advertiser_generate_data(advertising_set_handle,
sl_bt_advertiser_general_discoverable);
app_assert_status(sc);
// Start advertising
sc = sl_bt_legacy_advertiser_start(advertising_set_handle,
sl_bt_advertiser_connectable_scannable);
app_assert_status(sc);
app_log_info("Started standard BLE advertising.");
}This function should be called after the Sidewalk BLE stack initialization to prevent an error. The Sidewalk BLE is initialized with the sid_start function. In the SoC Hello Neighbor sample application, it can be added in the init_and_start_link() function after the sid_start call:
#if defined(SL_BLE_SUPPORTED)
// Start advertising over standard ble after Sidewalk BLE is initialized
if (link_type_to_link_mask(SL_SIDEWALK_LINK_BLE) == link_mask) {
start_standard_ble_advertising();
}
#endifⒾ INFO Ⓘ: If
sl_bt_advertiser_create_setis failing, make sure that you have enough advertiser sets. Silicon Labs recommends only calling this function once after the BLE link have been initialized.
Now that the two BLE channels are initialized, you need to have a way to differentiate the origin of the packet. You can do that by comparing the advertising handle sent in the BT headers. If you use the sample provided above, you can see that the advertising handle is stored in the variable advertising_set_handle.
The following snippet shows how to retrieve the handle from an incoming BLE connection and thus know the packet source:
// sl_bt_on_event callback
# include "sl_bluetooth.h"
void sl_bt_on_event(sl_bt_msg_t *evt)
{
sl_status_t sc;
bd_addr address;
uint8_t address_type;
// Handle stack events
switch (SL_BT_MSG_ID(evt->header)) {
// ...
// -------------------------------
// This event indicates that a new connection was opened.
case sl_bt_evt_connection_opened_id:
if (evt->data.evt_connection_opened.advertiser == advertising_set_handle) {
app_log_info("BLE Connection opened from side application");
} else {
// If we don't have any info concerning the advertised ID we can assume that it is from sidewalk
app_log_info("BLE Connection opened from sidewalk");
}
break;
// ...
}
}Sidewalk and Bluetooth FUOTA#
The Bluetooth FUOTA (Firmware Upgrade Over-the-Air) requires a bootloader. Follow this section to install and configure a bootloader. For more information about bootloaders, see Bootloading.
Ⓘ INFO Ⓘ: Silicon Labs highly recommends that you perform the OTA in a non-sidewalk BLE channel.
Two methods are available for updating your application. An overview of both OTA methods are available below:
OTA Method | Pros | Cons |
|---|---|---|
Dual Bank | Resilient to transfer failures | Need more storage space in the application flash (we need twice the size of the application) |
In place | No backup if OTA fails (retries until success) | Requires less extra space in the Flash memory |
Dual-Bank Application Firmware Upgrade#
This OTA method downloads the new firmware in a storage space alongside the application. This ensures that the device doesn't enter an incorrect state if something goes wrong during the transfer. You can leverage double advertising to use BLE to download the firmware image.
Ⓘ INFO Ⓘ: If you really want to implement OTA though the Sidewalk BLE channel, we recommend you to use In-Place application to prevent the Sidewalk protocol from interfering with the download of the new application.
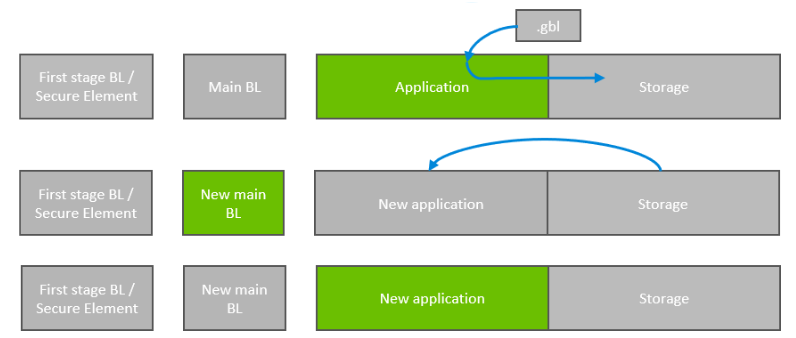
The complete schema can be found in section 4.2, Bootloader Upgrade on Application Bootloaders with Storage, in UG489: Silicon Labs Gecko Bootloader User’s Guide for GSDK 4.0 and Higher.
Enable Dual-Bank Application OTA in your Sidewalk Application#
Ⓘ INFO Ⓘ: To install a component in your project, you need to open it with Simplicity Studio. Open the
.slcpfile and select the SOFTWARE COMPONENT tab. You can search the component you need and click Install.
Install the component Application OTA DFU if not already done.
Erase the flash memory.
Flash the bootloader.
Search for the Bootloader - SoC Internal Storage project. Select the project with the correct storage size. The EFR32xG24B have a storage size of 1536kB.
More information on this bootloader can be found in section 7.3.7, Internal Storage Bootloader, in UG489: Silicon Labs Gecko Bootloader User’s Guide for GSDK 4.0 and Higher.
You may need to adapt the storage size to your application size. It should not overlap with the NVM3 section. In the Hello Neighbor sample, the storage size needs to be set to x094000 (instead of x0B4000). This value can be configured in the Common storage component in the bootloader project (not the sidewalk project).
Flash the sidewalk application.
Open the following file with Simplicity Studio:
config/sidewalk/sidewalk.asconf.Go to End device.
Connect to your device.
Create a new Virtual AWS device if needed and click FLASH MFG TO PHYSICAL DEVICE.
You should then be able to flash your new application (e.g. through the Simplicity Connect application) by connecting to the BLE channel. Instructions to create a .gbl file containing your new application and flash it through the Simplicity Connect application can be found in the bluetooth documentation.
In-Place OTA#
This OTA method makes your application restart in a special state and download the new version of the application. You should leverage double advertising to use BLE to download the firmware image.
Ⓘ INFO Ⓘ: By default, the Sidewalk BLE MAC address type is set to
SID_BLE_CFG_MAC_ADDRESS_TYPE_RANDOM_PRIVATE_RESOLVABLE, which is not compatible with this OTA method. This method needsSID_BLE_CFG_MAC_ADDRESS_TYPE_PUBLICMAC address type which can be changed in structuresid_ble_config_t ble_cfgof filesidewalk_<version>\component\sidewalk_radio_config\ble\app_ble_config.c.
The new version overwrites the original version. If something goes wrong during the transfer, the application is not functional anymore. If you have space in your Flash memory, consider using the Dual-Bank method.
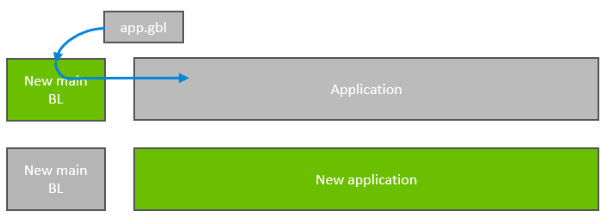
The complete schema can be found in section 4.1, Bootloader Upgrade on Bootloaders with Communication Interface (Standalone Bootloaders), in UG489: Silicon Labs Gecko Bootloader User’s Guide for GSDK 4.0 and Higher.
Enable In Place OTA in your Sidewalk Application#
Ⓘ INFO Ⓘ: To install a component in your project, you need to open it with Simplicity Studio. Open the
.slcpfile and go to SOFTWARE COMPONENT tab. You can search the component you need and click Install.
Install the component In-Place OTA DFU if not already done.
Erase the flash memory.
Flash the bootloader / apploader:
Search for the Bootloader - SoC <...> + AppLoader OTA DFU project.
Flash the Sidewalk application.
Open the following file with simplicity studio : config > sidewalk > sidewalk.asconf.
Go to End device.
Connect to your device.
Create a new Virtual AWS device if needed and click FLASH MFG TO PHYSICAL DEVICE.
You should then be able to flash your new application (e.g. through the SiConnect mobile application) by connecting to the BLE channel. Instructions to create a .gbl file containing your new application and flash it to the SiConnect mobile application can be found in the bluetooth documentation.
⚠ WARNING ⚠: If you are using Sidewalk BLE to perform the OTA (which is not recommended), make sure that your BLE address is configured to
SID_BLE_CFG_MAC_ADDRESS_TYPE_PUBLIC(configuration is done insidewalk_<version>\component\sidewalk_radio_config\ble\app_ble_config.c). Otherwise, the apploader will not be able to find the device when it restarts in OTA mode.
Troubleshoot#
My sidewalk application doesn't start#
Make sure that you followed the order described above.
If you still have issues:
Erase the flash.
Flash your sidewalk application.
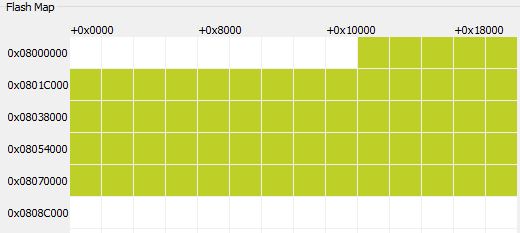
Using Simplicity Commander, you can see the main flash contents. You should see some free space at the beginning of the main flash:
Flash the bootloader.
Check that the bootloader is present on the flash.
Ⓘ NOTE Ⓘ: In step 3 if your Sidewalk application is flashed at the beginning of the main flash, make sure that the right OTA component is installed: either In-Place OTA DFU or Application OTA DFU (Double Bank OTA).
The screen shows the reserved space for the Bootloader - SoC <...> + AppLoader OTA DFU used in the In-Place OTA (In-Place OTA DFU component). The reserved space is smaller for the Bootloader - SoC Internal Storage used in Double Bank OTA (Application OTA DFU component).
Err -8 or no device info found#
Make sure that you flash your virtual AWS device info after flashing the bootloader and the Sidewalk application.