Building the Zigbee Host Locally#
This page describes how to build and configure the Zigbee Host Code on a Raspberry pi 4B or a similar ARM host platform. Note that all pre-compiled binaries have been compiled for arm32v7 and arm64v8 architectures.
Raspberry Pi Recommended OS#
To build the Z3Gateway and Zigbeed, it is important to build the application using the correct GCC toolchain version meant for that release.
For GSDK 4.4.0 and up (Including SiSDK), you can use Raspberry Pi OS Lite using Debian Version 12 (Bookworm), which uses GCC v12.2.
Configuring Zigbee Host Software#
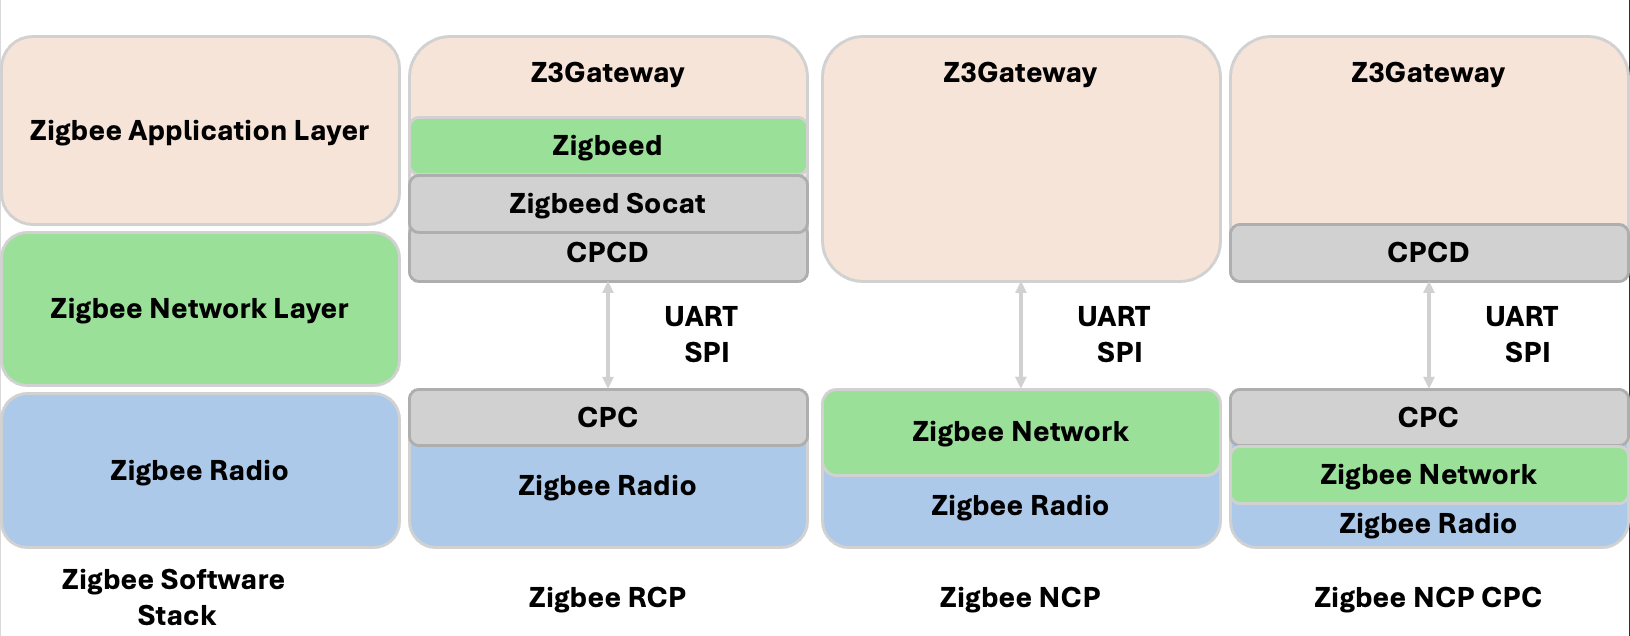
As mentioned in System Architecture, there are 3 different ways to configure the Zigbee Host Software depending on the configuration of the Radio Board:


Running Radio Board as a Zigbee RCP:
Z3Gateway (Application Layer)
Zigbeed (Zigbee Networking Layer)
Zigbeed-Socat (Communication Link between Zigbeed and CPCD)
CPCD (Communication Link between Host and the Radio Board)
Radio Board with a Zigbee RCP Application (Zigbee Radio)
Running the Radio Board as a Zigbee NCP (without CPCD):
Z3Gateway (Application Layer)
Radio Board with a Zigbee NCP Application (Zigbee Networking layer + Zigbee Radio)
Running the Radio Board as a Zigbee NCP (With CPCD):
Z3GatewayCPC (Application Layer with CPC Connection)
CPCD (Communication Link between Host and the Radio Board)
Radio Board with Zigbee NCP Application with CPCD Enabled (Zigbee Networking Layer + Zigbee Radio)
Z3Gateway#
Building Z3Gateway#
Regardless of the Radio Board Configuration, all multiprotocol Zigbee applications require you to build a Zigbee application program on the host. Silicon Labs offers two main Zigbee host applications: Z3Gateway or Z3GatewayCpc, both of which the project generation and build steps are the same.


Create a new Z3Gateway Project: File > New > Silicon Labs Project Wizard.
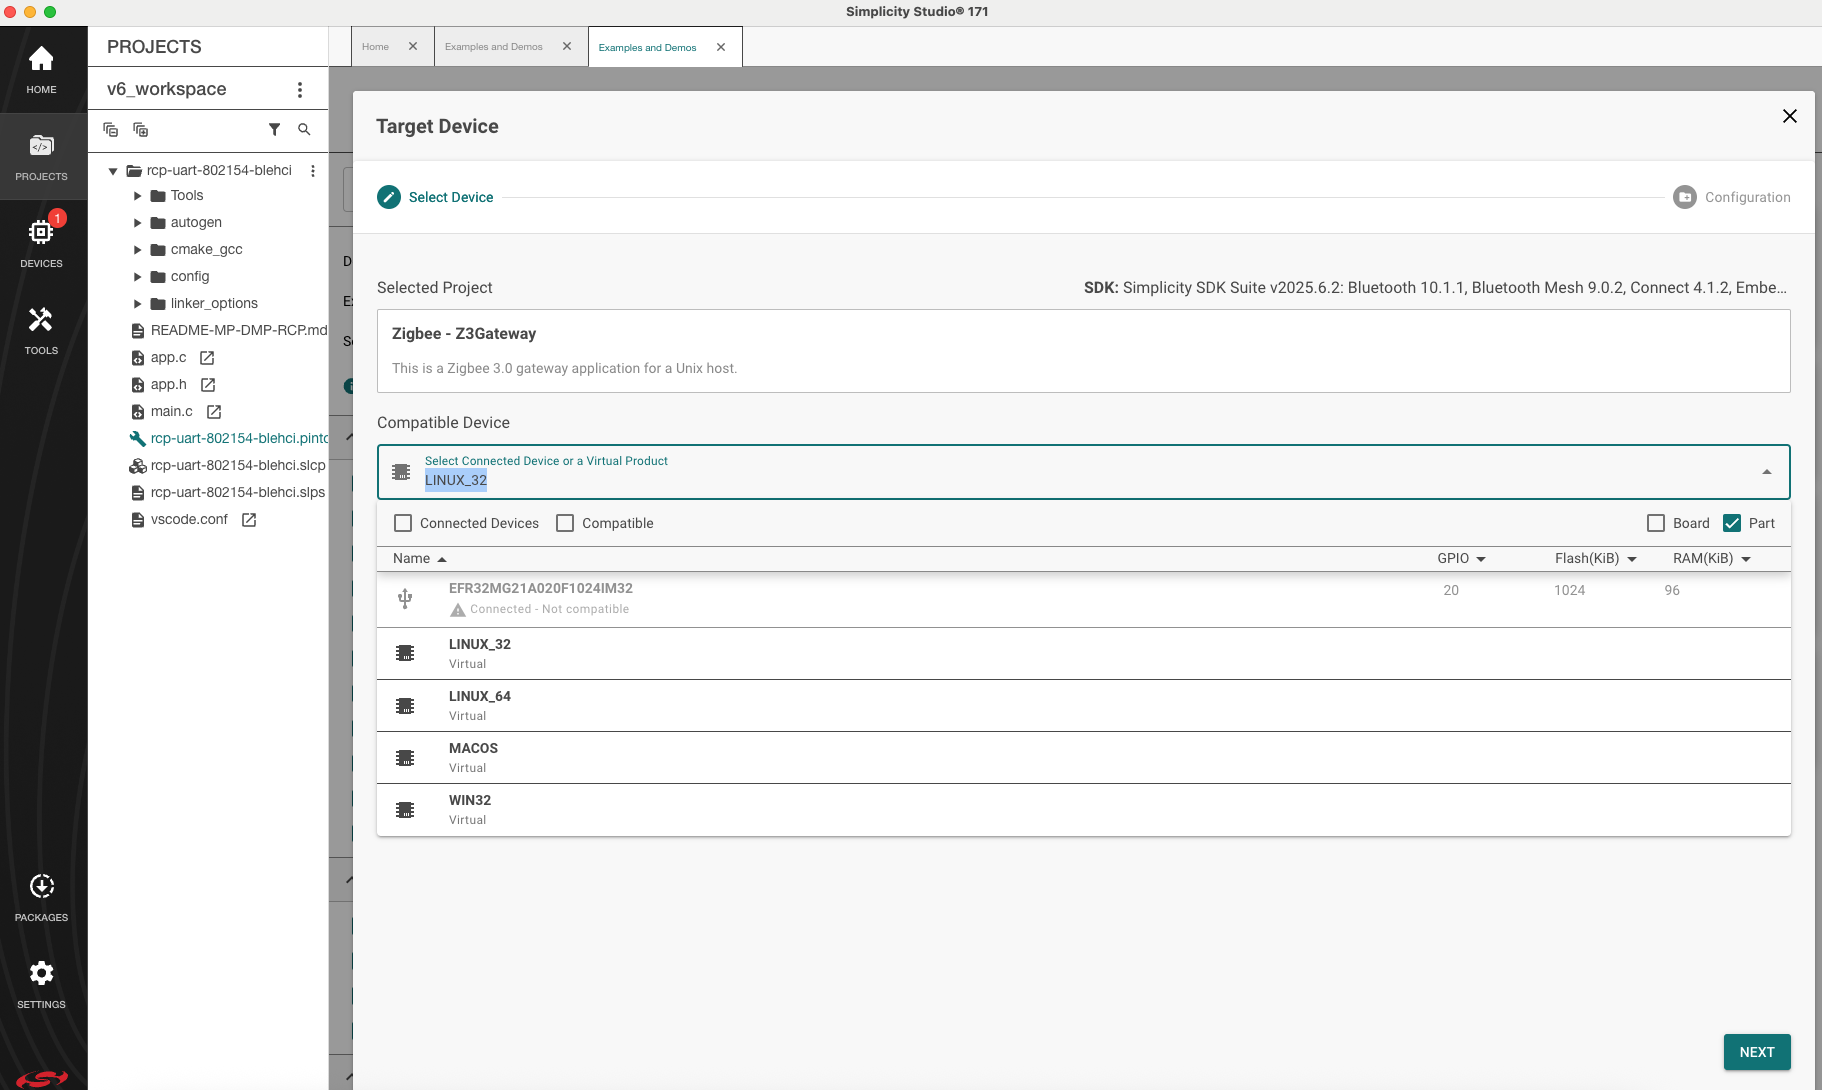
Select your Target Device: Linux 32 bit (Or Linux 64 bit depending on the host platform configuration).
Select your IDE / Toolchain: Makefile IDE.


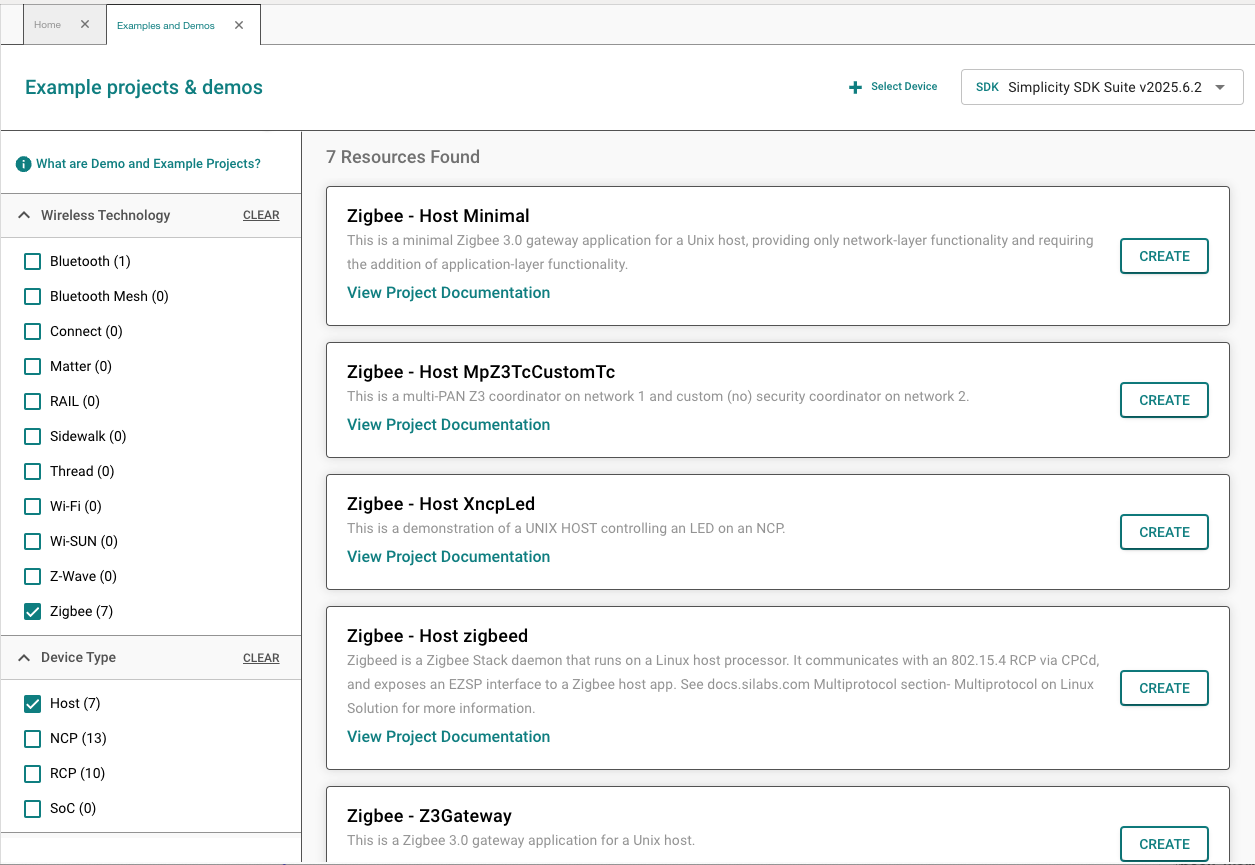
Select the Z3Gateway Project Required (Z3Gateway or Z3GatewayCpc).


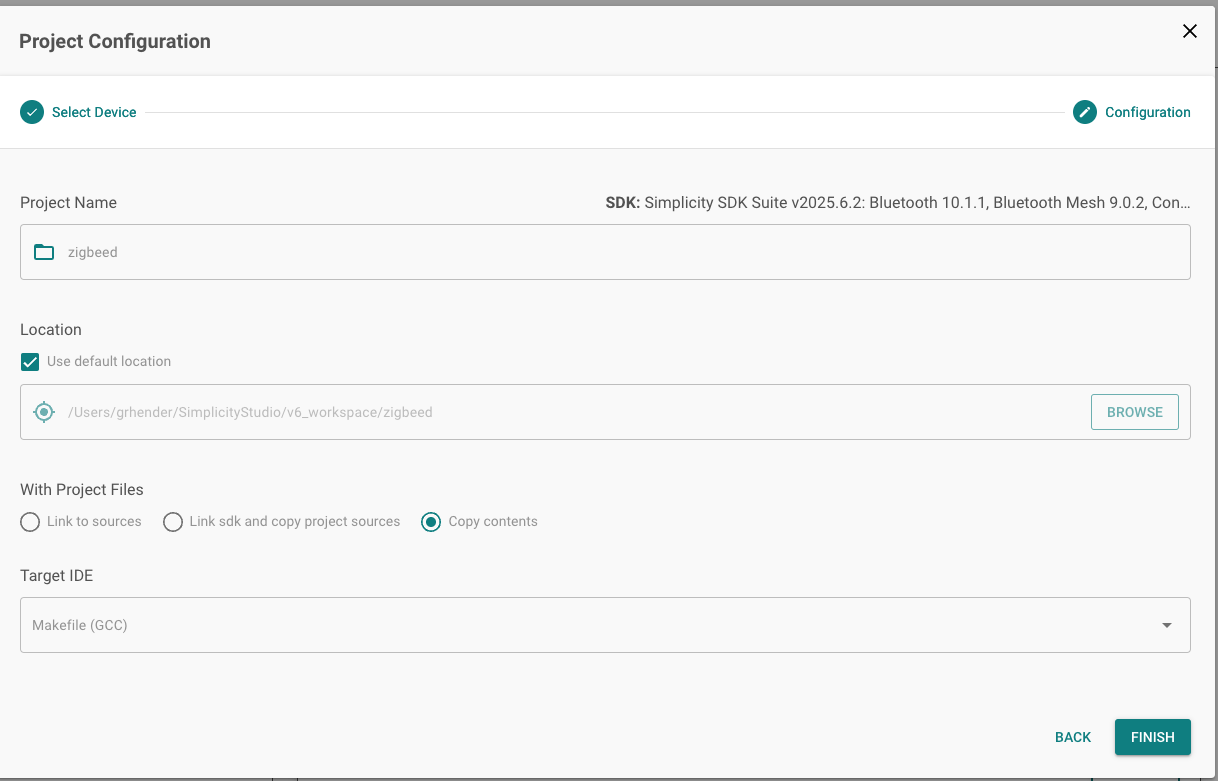
Before clicking Finish, it is recommended to select Copy Contents. This makes building the application simpler on the Raspberry Pi as it copies all required SDK files (rather than symlinking).
After clicking Finish, zip up the Z3Gateway Folder and SCP onto the Raspberry pi.
scp pi@<IP-Address>:/home/pi ./Z3Gateway.zipOn the Raspberry Pi, unzip the Z3Gateway folder.
CD into the Z3Gateway folder and build the Z3Gateway with the following command:
make -f <Z3Gateway_Project_name>.Makefile.Upon a successful build, you should see in your folder the directory:
./build/debug/<Z3Gateway_project_name>Executable.
Configuring Z3Gateway to use CPCD (Z3GatewayCPC)#
For Zigbee host applications that are required to use CPC, the Zigbee NCP/OpenThread RCP image should be built using the zigbee_ezsp_cpc component in place of the zigbee_ezsp_uart or zigbee_ezsp_spi component in the Z3GatewayHost SLCP file. This component allows the host app to connect directly to CPCd. The Z3GatewayCpc sample app provided in the GSDK already includes the proper components and can be generated and built as is for this purpose.
Zigbeed#
Supported Zigbeed Platforms#
Zigbeed is supported on the following platforms:
Debian-Bookworm: arm32v7, arm64v8, amd64 (x86_64), i386
Tizen-0.1-13.1: arm32, aarch64
Android 12: aarch64
openwrt:23.05.3 (as .ipk): aarch64_cortex-a72_gcc-12.3.0_musl
Building Zigbeed in Studio#
Depending on your Radio board configuration, you may need to run Zigbeed. Specifically, if you are running a Zigbee RCP with CPCD you must build and install zigbeed to run the Zigbee Networking Stack. The steps to build and run zigbeed are quite similar to building Z3Gateway.
Prerequisite: If you are going to build Zigbeed, you must build CPCD and install the libcpc.so libraries properly in order for zigbeed to build properly. For instructions on how to build CPCD and install the corresponding libraries, see Building CPCD Locally.
Create a new zigbeed project: File > New > Silicon Labs Project Wizard.
Select your Target Device: Linux 32 bit (Or Linux 64 bit depending on the OS).
Select your IDE / Toolchain: Makefile IDE.
Select the zigbeed project.
Before clicking Finish, it is recommended to select Copy Contents. This makes building the application simpler on the Raspberry Pi as it copies all required SDK files (rather than symlinking).


Depending on the underlying Host Running Zigbeed, you may need to select Zigbee Arm32 Component. This will pull in the proper library files to be built in the right host environment. Other components depending on your underlying host could be: zigbee_arm32, zigbee_arm64, or zigbee_x86_64.
After clicking Finish, zip up the zigbeed folder and SCP onto the Raspberry pi.
On the Raspberry Pi, unzip the zigbeed folder.
CD into the zigbeed folder and build the zigbeed with the following command:
make -f <zigbeed_project_name>.Makefile.Upon a successful build, you should see in your folder the directory:
./build/debug/<zigbeed_project_name>Executable.
Building Zigbeed using SLC#
The zigbeed.slcp project file is found in \<SDK Installation\>/protocol/zigbee/app/projects/zigbeed/zigbeed.slcp. It includes all the components necessary to build Zigbeed. The Makefile can then be generated using SLC-CLI as follows:
slc generate -s=../.. –-with=linux_arch_32,zigbee_arm32 -p=app/projects/zigbeed/zigbeed.slcp -d=app/zigbeed/outputNote: If you generated the app on your PC but want to build it on a Raspberry Pi, add the -cp option to copy the necessary files, including libraries, to the generation directory.
slc generate -cp -s=../.. –-with=linux_arch_32,zigbee_arm32 -p=app/projects/zigbeed/zigbeed.slcp -d=app/zigbeed/outputCopy the generation directory to your target ARM-based system. From within the generation directory, invoke make as follows make -f zigbeed.Makefile.
Configuring and Installing Zigbeed#
Zigbeed, unlike Z3Gateway also includes a configuration file. To Install the Zigbeed Configuration file, do the following:
Navigate inside your SDK and copy over the zigbeed.conf file to the Raspberry pi's directory here:
/usr/local/etc. Thezigbeed.confcan be found at ./app/multiprotocol/apps/zigbeed/usr/local/etc/zigbeed.conf.Copy the zigbeed binary that was built to:
/usr/local/bin/. Make sure that your zigbeed binary is calledzigbeed.
Zigbeed Service File#
If you want Zigbeed to be included in a system service, create a Zigbeed Service file named: zigbeed.service. An example of the service file is shown below:
[Unit]
Description=Zigbeed service
StartLimitIntervalSec=0
BindsTo=cpcd.service zigbeed-socat.service
After=cpcd.service zigbeed-socat.service

[Service]
Type=simple
Restart=always
RestartSec=1
User=root
ExecStart=/usr/bin/stdbuf -o0 /usr/local/bin/zigbeed
ExecStop=/bin/kill -WINCH ${MAINPID}
PIDFile=/run/zigbeed.pid
StandardOutput=syslog
StandardError=syslog
SyslogIdentifier=zigbeed

[Install]
WantedBy=multi-user.target
Once you copy the Zigbeed.service file to /etc/systemd/system, this Service will allow your pi to start zigbeed upon reboot and you can start the zigbeed service by calling:
sudo systemctl start zigbeedUnderstanding Zigbeed.conf File#
radio-url=spinel+cpc://cpcd_0?iid=1&iid-list=0: The Radio URL is a set of parameters passed to the Spinel Driver. This is used for CPCD to connect to Zigbeed.ezsp-interface=/tmp/ttyZigbeeNCP: This is the URL used to create the Socat Link. This is used for Z3Gateway to connect to Zigbeed.debug-level=5: This allows you to have Zigbeed Logs from Log level 0 (None) up to level 5 (Debug).verbose=: Print out Spinel Driver log messages.
Configuring Zigbeed Project for Further Customization#
By default, the Zigbeed project includes all the components necessary to build Zigbeed. It also includes the zigbee_xncp component by default, which support custom messaging between Zigbeed and the Zigbee host application.
By default, the project also uses the linux_arch_64 component to build for arm64v8. Select the linux_arch_32 component to build for arm32v7. Lastly, specify the correct Zigbee library component for the host architecture. Supported components include zigbee_arm32, zigbee_arm64, and zigbee_x86_64.
Custom EZSP Messaging in Zigbeed#
The XNCP component (zigbee_xncp) allows custom EZSP messages to be added to Zigbeed in the same way that they can be added to the Zigbee NCP. See Building a Customized NCP Application with Zigbee EmberZNet 7.x for more information on XNCP.
To implement custom messages between Zigbeed and the host app, you define and implement the format, parsing, and serialization of the message set. The serialized messages are conveyed between Zigbeed and host as opaque byte strings. This “extensible network co-processor” functionality is provided by the XNCP component. To send a custom message to the host, construct and serialize the message, and then send the resulting byte string to the host using the EmberZNet PRO API function emberAfPluginXncpSendCustomEzspMessage(). After enabling the XNCP Library component, the following callbacks are provided for custom 2-way messaging over EZSP:
sl_zigbee_af_xncp_incoming_custom_frame_cb: Processing of custom incoming serial frames from the EZSP host.
sl_zigbee_af_incoming_message_cb: Custom processing of received Zigbee application layer messages before passing these (through Incoming Message Callback frames) to the EZSP host. Note that custom outgoing serial frames from Zigbeed to the EZSP host should be provided as response frames to the host in reply to a Callbacks EZSP command or some custom host-to-Zigbeed EZSP command, where they can be handled by the following host-side (such as in zigbee_host_xncp_led host app) callback: void sl_zigbee_ezsp_custom_frame_handler(int8u payloadLength, int8u* payload).
The zigbeed.slcp project includes the source file protocol/zigbee/app/projects/zigbeed/zigbeed_custom_ezsp_commands.c that contains an example implementation for custom messaging on the zigbeed xncp side. The example implements a small set of custom messages that can be sent from zigbee_host_xncp_led app, which is supplied prebuilt in the docker container for convenience. This functionality can be tested as follows:
$ zigbee_host_xncp_led -p ttyZigbeeNCP
zigbee_host_xncp_led>custom set-led 1
zigbee_host_xncp_led>custom get-led
custom get-led
Send custom frame: 0x00
Response (state): 1 (OFF)
This example from zigbee_host_xncp_led.slcp and zigbeed_custom_ezsp_commands.c can be followed to implement other custom EZSP messages between a host app and Zigbeed.
Configuring Zigbeed-socat#
Zigbeed Socat is used to connect Zigbeed to the Host Application (for Example Z3Gateway).
To use Zigbeed Socat, you need to make sure that you install the socat package.
You can run Zigbeed Socat from the command line by following this command:
socat -x -v pty,link=/dev/ttyZigbeeNCP pty,link=/tmp/ttyZigbeeNCPCreating Zigbeed-socat Service File#
If you want Zigbeed-socat to be included in a system service, create a Zigbeed Service file named: zigbeed-socat.service. An example of the service file is shown below:
[Unit]
Description=Zigbeed socat helper service
StartLimitIntervalSec=0

[Service]
Type=simple
Restart=always
RestartSec=1
User=root
ExecStart=/usr/bin/socat -v pty,link=/dev/ttyZigbeeNCP pty,link=/tmp/ttyZigbeeNCP
ExecStop=/bin/kill -WINCH ${MAINPID}
PIDFile=/run/zigbeed-socat.pid
StandardOutput=syslog
StandardError=syslog
SyslogIdentifier=zigbeed-socat

[Install]
WantedBy=multi-user.target
Once you copy the Zigbeed-socat.service file to: /etc/systemd/system this Service will allow your pi to start zigbeed-socate upon reboot and you can start the zigbeed service by calling:
sudo systemctl start zigbeed-socat