Wi-Fi Enterprise Security#
Installation and Configuration of FreeRADIUS Server#
The following packages are required to install the freeradius server 3.09:
libtalloc-devel
openssl-devel
The steps for downloading as well as installing the freeradius tar ball are as follows:
# tar zxvf freeradius-server-3.0.9.tar.gz
# cd freeradius_3.09
# ./configure
# make
# make install Configure the freeradius server by following the steps below:
Edit the users file, which contains the “identity” and “password”.
# vim /usr/local/etc/raddb/usersAdd the following line at the start of the
usersfile.
test Cleartext-Password := "password"
For example, “user1” is an identity and “test123” is the password that has to be entered at client side i.e., in the sta_settings.conf file.
Edit 'eap' file, which contains the paths consisting of certificates and information about the EAP- Methods supported.
# vim /usr/local/etc/raddb/mods-enabled/eapIf Free-radius version is below 3.x “eap”, it will be located in raddb folder and will be named as “eap.conf”.
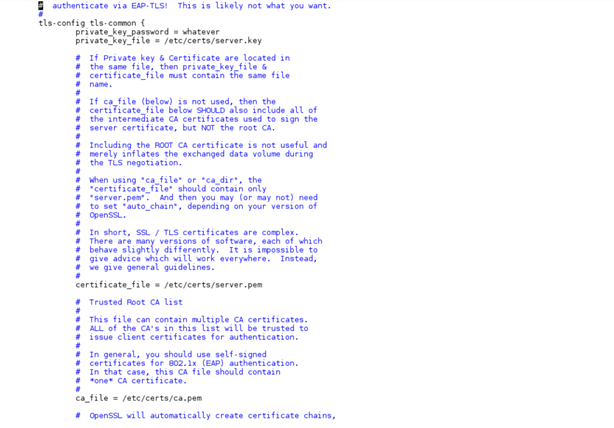
In tls-config tls-common section, changes are made to point to our certificates which are placed in /etc/certs folder.
tls-config tls-common {
#private_key_password = whatever
private_key_password = Wi-Fi
#private_key_file = ${certdir}/server.pem
private_key_file = /etc/certs/wifiuser.pem
#certificate_file = ${certdir}/server.pem
certificate_file = /etc/certs/wifiuser.pem
#ca_file = \${cadir}/ca.pem
ca_file = /etc/certs/wifiuser.pem
#dh_file = ${certdir}/dh
dh_file = /etc/certs/dh
}To start the Radius server, run the following command in the terminal:
# radiusd -XFor openssl versions of range 1.0.2 release - 1.0.2h release (or) in range 1.0.1 - 1.0.1t release (or) in range 1.1.0 - 1.1.0a release. Edit radiusd.conf file.
#vim /usr/local/etc/raddb/radiusd.confand change allow_vulnerable_openssl to yes or CVE-2016-6304:
allow_vulnerable_openssl =yes
OR
allow_vulnerable_openssl ='CVE-2016-6304'
In this case, `CVE-2016-6304` is the OpenSSL Vulnerability ID that the radius server will allow.Configuring Station to Connect to an EAP Enabled AP#
Navigate to the driver folder and copy the certs folder to /etc/ in your system, as it contains all the certificates required.
# cp -rvf certs /etc/Navigate to the driver folder and compile it, ensuring that the below options are enabled in wpa_supplicant.conf file.
# vim wlan/supplicant/linux/wpa_supplicant/.config
CONFIG_DRIVER_NL80211=y
CONFIG_IEEE8021X_EAPOL=y
CONFIG_EAP_MSCHAPV2=y
CONFIG_EAP_TLS=y
CONFIG_EAP_PEAP=y
CONFIG_EAP_TTLS=y
CONFIG_EAP_FAST=y
CONFIG_EAP_LEAP=y
CONFIG_PKCS12=y
CONFIG_TLS=internalCompile the driver.
# makeNavigate to the release folder and start the device in station mode.
# insmod rsi_91x.ko and
insmod rsi_sdio.ko
# service NetworkManager stop
# iw phy phyX interface add wifi0 type managed
X is the phy number it will vary, following command can be used to find the X value.
$ iw list |grep phy Run the supplicant after configuring sta_settings.conf according to the required EAP method. The network blocks listed below can be used as a reference.
# wpa_supplicant -i wifi0 -D nl80211 -c sta_settings.conf -ddddt > log &To connect using EAP-PEAP method, sta_settings.conf should be described, as shown below:
network={
ssid="SSID of Access Point"
key_mgmt=WPA-EAP
eap=PEAP
anonymous_identity="peapuser"
identity="test"
password="password"
}To connect using EAP-TTLS method, sta_settings.conf should be described, as shown below:
network={
ssid="SSID of Access Point"
key_mgmt=WPA-EAP
eap=TTLS
anonymous_identity="ttlsuser"
identity="test"
password="password"
}To connect using EAP-TLS method, sta_settings.conf should be described, as shown below:
network={
ssid="SSID of Access Point"
key_mgmt=WPA-EAP
eap=TLS
anonymous_identity="tlsuser"
identity="test"
password="password"
ca_cert="/etc/certs/wifiuser.pem"
client_cert="/etc/certs/wifiuser.pem"
private_key_passwd="Wi-Fi"
private_key="/etc/certs/wifiuser.key"
}To connect using EAP-FAST method, sta_settings.conf should be described, as shown below:
network={
ssid="SSID of Access Point"
key_mgmt=WPA-EAP
eap=FAST
anonymous_identity="fastuser"
identity="test"
password="password"
phase1="fast_provisioning=1"
pac_file="/etc/p1.pac"
phase2="auth=m**schapv2"
ca_cert="/etc/certs/wifiuser.pem"
private_key_passwd="wifi"
}EAP-LEAP has been used when Freeradius is the RADIUS Server. This has been verified with only Cisco AP.
To connect using EAP-LEAP method, sta_settings.conf should be described, as shown below:
network={
ssid="SSID of Access Point"
key_mgmt=WPA-EAP
eap=LEAP
identity="user1"
password="test123"
}To connect using EAP-LEAP for CCX, sta_settings.conf should be described, as shown below:
network={
ssid="SSID of Access Point"
key_mgmt=WPA-CCKM
eap=LEAP
identity="user1"
password="test123"
pairwise=TKIP
group=TKIP
proto= WPA2 WPA
scan_ssid=1
priority=2
}
# radiusd -X Configuration of AP and RADIUS Server to Use EAP Methods#
Hostapd is used as the RADIUS Server. The AP and the server are co-located (in the same system).
The following packages which must be installed are as follows:
libnl-devel
libsqlite3x-devel
openssl-devel
Configuration of the AP#
For AP mode connectivity, ensure that the dev_oper_mode is set in installation as given below and interface is detected after installation. See the Installing the driver section.
dev_oper_mode = 1Navigate to the scripts folder and Ensure that all basic configurations such as interface, ssid, country_code, beacon_int, channel etc. are updated in hostapd_eap.conf as mentioned in Wi-Fi Access Point (AP) Mode section.
Before starting the AP in EAP mode, ensure that in hostapd_eap.conf the following entities are enabled:
ieee8021x=1 own_ip_addr=192.168.2.1 /* IP address of AP */ /* RADIUS authentication server */ auth_server_addr=127.0.0.1 auth_server_port=1812 auth_server_shared_secret=testing123 /* shared secret must be the same as in /etc/certs/hostapd.radius_clients file */Run the following command to start the device in the AP mode:
# hostapd hostapd_eap.conf -ddddt >log & # sh dhcp_server.sh wifi1 where wifi1 is the interface name
Configuring hostapd as RADIUS Server#
The steps for configuring hostapd as RADIUS server are as follows:
Copy the certs folder available in scripts folder to /etc location, which will contain the certificates, hostapd.radius_clients, hostapd.eap_user and dh files.
Navigate to the scripts folder and copy the certs folder to the /etc location in your system.
# cp -rvf certs /etc/Check whether the interface in hostapd_server.conf is same or not as the name of AP interface name.
Example:
# vim hostapd_server.confinterface = wifi1, so that RADIUS server will listen on that interface name.
Start the RADIUS server in a new terminal after starting AP.
# hostapd hostapd_server.conf -ddddd
Note:
All the Credentials will be in /etc/certs/hostapd.eap_user file. A sample hostapd.eap_user file is present in the certs folder in the scripts folder.
The /etc/certs/hostapd.radius_clients file contains the IP required to communicate the shared secret between AP and RADIUS server. Here it is co-located, hence it is the loop-back address.
Steps to Connect EAP-TLS Using wpa_supplicant v 2.6 and Above#
Installing FreeRADIUS Server#
Download FreeRADIUS Server from the link below:
Link: https://freeradius.org/
Note: Try to download the latest release.
After downloading, the file name looks like this
freeradius-server-release_x_x_x.tar.gzUntar the above file
tar -xvf freeradius-server-release_x_x_x.tar.gz
Enter the directory after untar and run the following command:
cd freeradius-server-release_x_x_x/ ./configureIt will check the necessary prerequisites for the installation. You may get errors like libtalloc not found. Install them with:
dnf install libtalloc*After a successful execution of configuration with no errors, provide the make install command.
Connect the radius server installed machine (laptop or PC installed with radius server) to the target AP with a LAN cable.
Get the IP address from the AP by using the following commands:
dhclient <interface name> -r dhclient <interface name> -vOpen the AP configuration settings in the browser, as shown below:
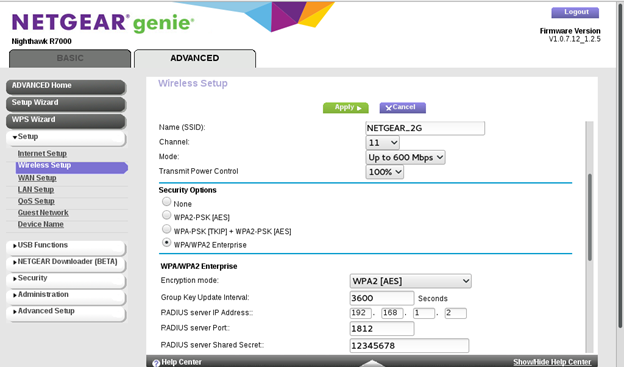
Refer to the image above to configure the AP settings.
Note: Block contains 'radius server shared secret ', Enter the shared Secret. Which is used to configure secret in client.conf as explained below.
Enter the IP address, which is obtained by dhclient.
Radius server Port number is 1812
After a successful configuration, go to directory: cd /usr/local/etc/raddb
Configure two files:
clients.conf [In this case, the "client" is the access point (AP) that connects to the Radius server.]
users [In this case, the "user" is the mobile phone or station that connects to the above AP].
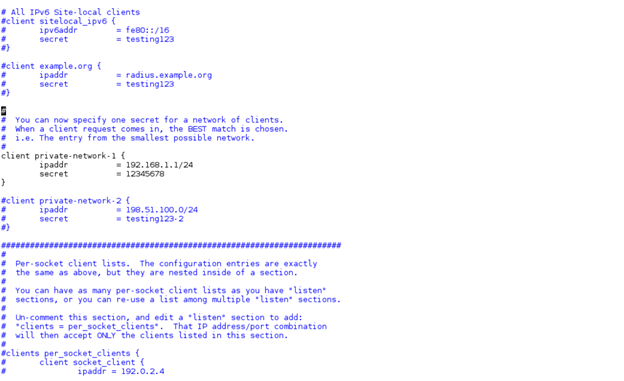
Open file /usr/local/etc/raddb/clients.conf. Configure network block as follows:
client private-network-1 {
ipaddr = <IP of AP>/24 // example : 192.168.1.1/24 secret = <shared secret> // shared secret configured in AP }Save and close the file.
Example:
Open the /usr/local/etc/raddb/users file and configure identity in the file, as shown below.
< identity > Cleartext-password :=< password for client >
Example: user1 Cleartext-password :="12345678"
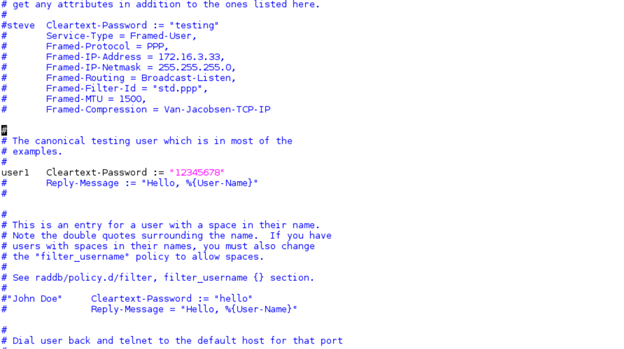
Note: Above 'user1' is the identity, 12345678 is the password to be entered in the station settings file or supplicant configuration file.
Save and close the file.
Generate certificates using the process given in the section below and copy certs to /etc folder.
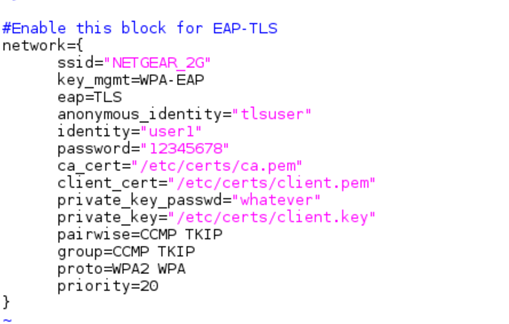
Configure the network block for EAP-TLS in the supplicant configuration file, as shown below.
The following information is configured in the configuration file below:
SSID of AP,
Identity
Password
Path for ca_cert, client_cert, private_key, and private_key_passwd which are generated using the process given below.
#Enable this block for EAP-TLS
network={ ssid="<SSID>" key_mgmt=WPA-EAP eap=TLS anonymous_identity="tlsuser" identity="<user>" password="<password>" ca_cert="/etc/certs/ca.pem" client_cert="/etc/certs/client.pem" private_key_passwd="whatever" private_key="/etc/certs/client.key" pairwise=CCMP TKIP group=CCMP TKIP proto=WPA2 WPA priority=20 }
Example:
15.Configure the certificate in the server by editing the following entries in the /usr/local/etc/raddb/mods-enabled/eap file.
tls-config tls-common {
private_key_password = whatever
private_key_file = /etc/certs/server.key
certificate_file = /etc/certs/server.pem
ca_file = /etc/certs/ca.pem
}Example:
To start the Radius server, run the following command:
radiusd -X
17.Connect the STA by running supplicant. STA should get connected to the AP if all the configurations are proper.
Generate Certificates#
Navigate to the /usr/local/etc/raddb/certs folder.
To remove all the previous certs, run the following command:
# rm -f *.pem *.der *.csr *.crt *.key *.p12 serial* index.txt*Generate the CA certificate
# vi ca.cnfYou can edit "input_password" and "output_password" fields to be the password for the CA certificate.
default_days and default_crt_days are the limits for validity of the certificates. The user can modify as per the requirement.
# make ca.pemThis step creates the CA certificate.
# make ca.derThis step creates the DER format of the self-signed certificate, which can be imported into Windows.
Generate the SERVER CERTIFICATE
The following steps will let you create a server certificate for use with TLS-based EAP methods, such as EAP-TLS, PEAP, and TTLS.
# vi server.cnfYou can edit the "input_password" and "output_password" fields to be the password for the server certificate.
default_days and default_crt_days are the limits for validity of the certificates. You can modify these per specific requirements.
# make server.pemThis step creates the server certificate.
# make server.csrEnsure that the certificate contains the XP extensions needed by Microsoft clients.
Generate the CLIENT CERTIFICATE
Client certificates are used by EAP-TLS, and optionally by EAP TTLS and PEAP. The following steps outline how to create a client certificate that is signed by the server certificate created above. You will have to have the password for the server certificate in the "input_password" and "output_password" fields of the server.cnf file.
# vi client.cnfYou can edit the "input_password" and "output_password" fields to be the password for the client certificate. You will have to give these passwords to the end user who will be using the certificates.
default_days and default_crt_days are the limits for validity of the certificates. The user can modify as per the requirement.
# make client.pemThis step creates the client certificate.
Note:
i) User can configure input_password and output_password in all three cnf files.
ii) default_days and default_crt_days are the limits for validity of the certificates. The user can modify as per the requirement
After creating all the certs, copy them to the /etc folder:
# cp certs/ /etc -rf