WLAN RF Test#
Introduction#
This application demonstrates how to configure the RS9116W to transmit Wi-Fi packets at varying data rates and power levels. The application can be used to assist with regulatory certification testing.
Setting Up#
To use this application, the following hardware, software and project setup is required.
Hardware Requirements#
PC or Mac
Silicon Labs RS9116 Wi-Fi Evaluation Kit
Host MCU Eval Kit. This example has been tested with:
Silicon Labs WSTK + EFR32MG21
STM32F411 Nucleo
Spectrum Analyzer and/or Power Analyzer
Software Requirements#
Embedded Development Environment
For Silicon Labs EFx32, use the latest version of Simplicity Studio.
For STM32, use Keil
Project Setup#
Silicon Labs EFx32 Host. Follow the the Getting Started with EFx32 to setup the example to work with EFx32 and Simplicity Studio.
STM32F411 Host. Follow the the Getting Started with STM32 to setup the example to work with STM32 and Keil.
Configuring the Application#
The application can be configured to suit your requirements and development environment. Read through the following sections and make any changes needed.
Host Interface#
By default, the application is configured to use the SPI bus for interfacing between Host platforms and the RS9116W EVK.
The SAPI driver provides APIs to enable other host interfaces if SPI is not suitable for your needs.
Bare Metal/RTOS Support#
To select a bare metal configuration, see Selecting bare metal.
Wi-Fi Radio Configuration#
Configure the following parameters in rsi_wlan_rf_test.c.
#define RSI_TX_TEST_POWER 4 // Tx RF power in the range [2:18] dBm
#define RSI_TX_TEST_RATE RSI_RATE_1 // WLAN data rate, see sapi/include/rsi_wlan_apis.h for details
#define RSI_TX_TEST_LENGTH 30 // Tx packet length in the range [24:1500] bytes in burst mode,
// [24:260 ] bytes in continuous mode
#define RSI_TX_TEST_MODE RSI_BURST_MODE // Selects burst mode or continuous mode
#define RSI_TX_TEST_CHANNEL 1 // Channel number in 2.4 or 5 GHz
#define RSI_ANTENNA 1 // 0 = RF_OUT2, 1 = RF_OUT1
#define RSI_ANTENNA_GAIN_2G 0 // Gain in 2.4 GHz band in the range [0:10]
#define RSI_ANTENNA_GAIN_5G 0 // Gain in 5 GHz band in the range [0:10]Run the Application#
After making any custom configuration changes required, build, download and run the application as described in the EFx32 Getting Started or STM32 Getting Started.
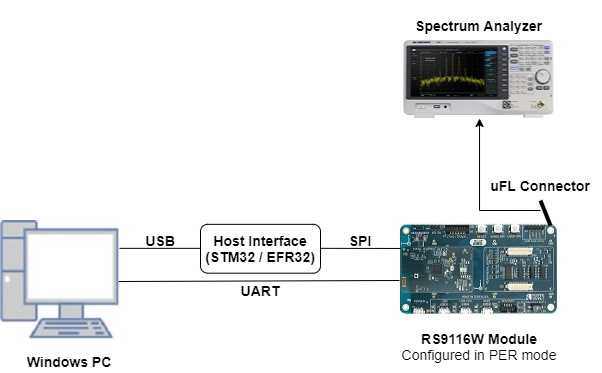
When the application runs, the RS9116W starts transmitting using the configuration settings. A power meter or spectrum analyzer may be used to monitor the RF output power and spectrum.
The following images provides example spectrums when the RS9116W is configured to transmit with the settings shown.
Transmit Spectrum Example : +4 dBm, 1 Mbit/s (DSSS)#
#define RSI_TX_TEST_POWER 4 // 4 dBm
#define RSI_TX_TEST_RATE 1 // 1 Mbit/s
#define RSI_TX_TEST_LENGTH 30 // 30 bytes
#define RSI_TX_TEST_MODE RSI_BURST_MODE // Burst mode
#define RSI_TX_TEST_CHANNEL 1 // Channel 1 = 2412 MHz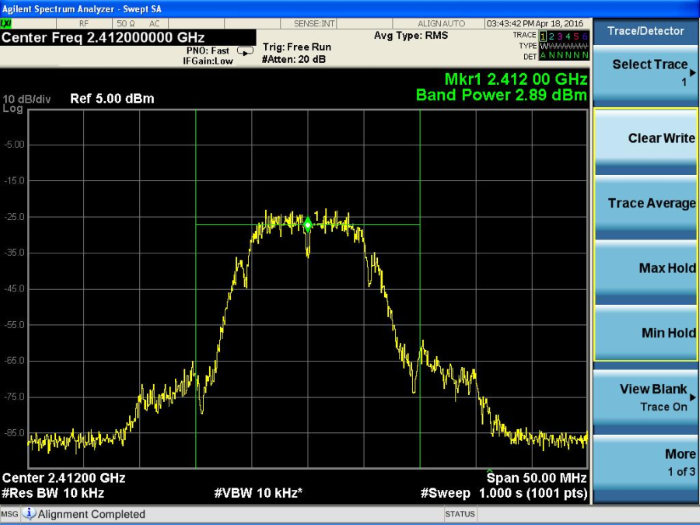
Transmit Spectrum Example : +12 dBm, 6 Mbit/s (OFDM)#
#define RSI_TX_TEST_POWER 12 // 12 dBm
#define RSI_TX_TEST_RATE 6 // 6 Mbit/s
#define RSI_TX_TEST_LENGTH 30 // 30 bytes
#define RSI_TX_TEST_MODE RSI_BURST_MODE // Burst mode
#define RSI_TX_TEST_CHANNEL 1 // Channel 1 = 2412 MHz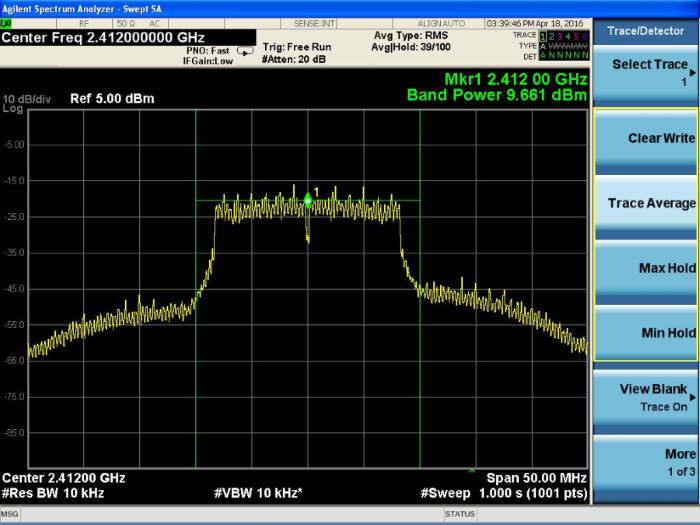
Selecting Bare Metal#
The application has been designed to work with FreeRTOS and Bare Metal configurations. By default, the application project files (Keil and Simplicity studio) are configured with FreeRTOS enabled. The following steps demonstrate how to configure Simplicity Studio and Keil to test the application in a Bare Metal environment.
Bare Metal with Simplicity Studio#
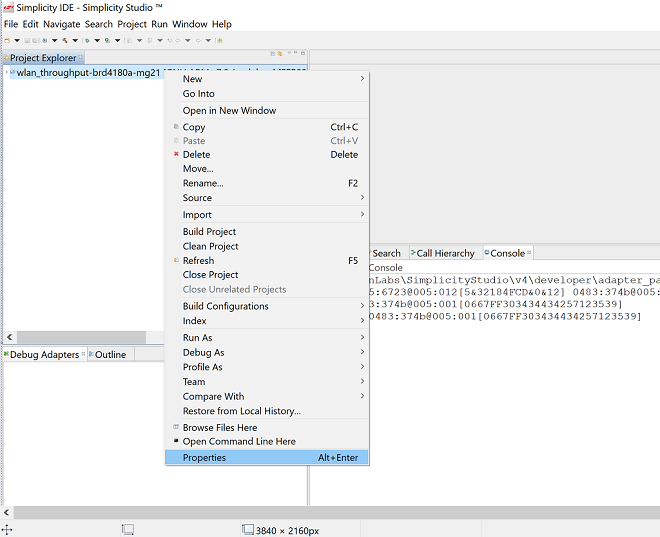
Open the project in Simplicity Studio
Right click on the project and choose 'Properties'
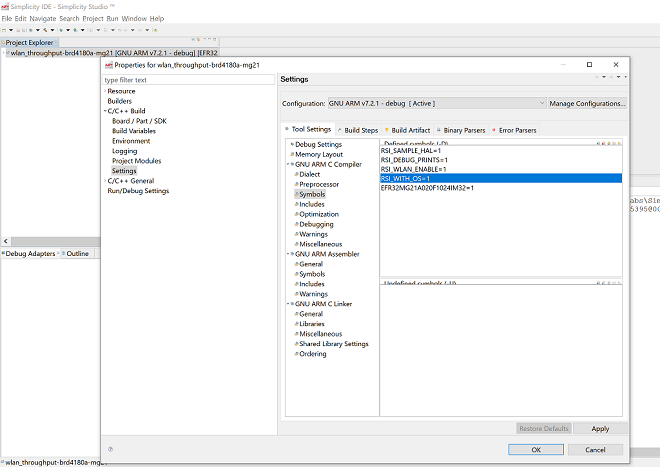
Go to 'C/C++ Build' | 'Settings' | 'GNU ARM C Compiler' | 'Symbols' and remove macro 'RSI_WITH_OS=1'
Select 'Apply' and 'OK' to save the settings
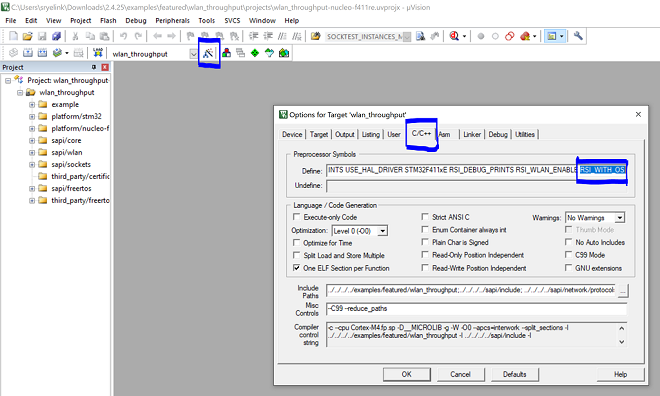
Bare Metal with Keil#
Open the project in Keil and select 'Options for Target'
Go to the 'C/C++' tab and remove 'RSI_WITH_OS' macro present under Preprocessor Symbols
Select 'OK' to save the settings