Firmware Update#
Introduction#
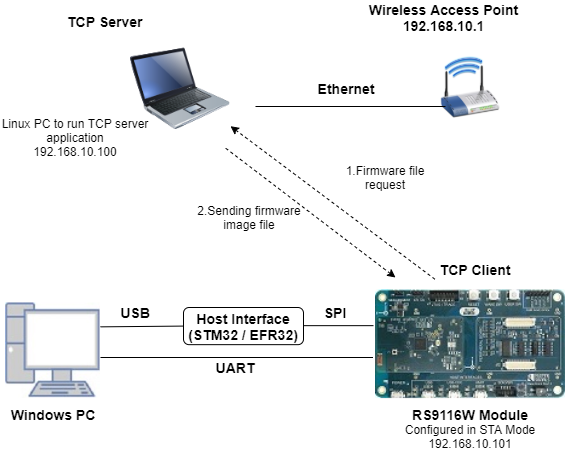
This application demonstrates how to update the RS9116W firmware via Wi-Fi by downloading an image from a remote TCP server. The TCP server may be hosted on a local PC (as demonstrated in this example), or alternately on a cloud service such as Amazon AWS or Microsoft Azure. The update process works as follows:
The RS9116W connects via Wi-Fi as a TCP client to a TCP update server
The RS9116W OTA application sends a firmware file request to the server
The server responds with the firmware file
The OTA application programs the firmware into the RS9116 flash memory and reboots
Setting Up#
To use this application, the following hardware, software and project setup is required.
Hardware Requirements#
PC or Mac (used to program the Host MCU)
Linux PC or Cygwin on Windows (to build and run the TCP server source provided)
Silicon Labs RS9116 Wi-Fi Evaluation Kit
Host MCU Eval Kit. This example has been tested with:
Silicon Labs WSTK + EFR32MG21
STM32F411 Nucleo
Wi-Fi Access point with a connection to the internet
Software Requirements#
Embedded Development Environment
For Silicon Labs EFx32, use the latest version of Simplicity Studio.
For STM32, use Keil
Installation of Build tools for Linux including the gcc compiler (or equivalent on PC or Mac)
For Ubuntu, use the following command for installation:
user@ubuntu:~$ sudo apt install build-essentialIf you don't have Linux, Cygwin for Windows may be used instead
Project Setup#
Silicon Labs EFx32 Host. Follow the the Getting Started with EFx32 to setup the example to work with EFx32 and Simplicity Studio.
STM32F411 Host. Follow the the Getting Started with STM32 to setup the example to work with STM32 and Keil.
Configuring the Application#
The application can be configured to suit your requirements and development environment. Read through the following sections and make any changes needed.
Host Interface#
By default, the application is configured to use the SPI bus for interfacing between Host platforms and the RS9116W EVK.
The SAPI driver provides APIs to enable other host interfaces if SPI is not suitable for your needs.
Bare Metal/RTOS Support#
To select a bare metal configuration, see Selecting bare metal.
Wi-Fi Configuration#
Configure the following parameters in rsi_firmware_update_app.c to enable your Silicon Labs Wi-Fi device to connect to your Wi-Fi network.
#define SSID "SILABS_AP" // Wi-Fi Network Name
#define PSK "1234567890" // Wi-Fi Password
#define SECURITY_TYPE RSI_WPA2 // Wi-Fi Security Type: RSI_OPEN / RSI_WPA / RSI_WPA2TCP Configuration#
#define DEVICE_PORT 5001 // TCP client port of the local RS9116 TCP client
#define SERVER_PORT 5001 // TCP server port of the remote TCP server
#define SERVER_IP_ADDRESS 0x6400A8C0 // Server IP address in little endian byte order:
// 192.168.0.100 -> 0x64=100, 0x00=0, 0xA8=168, 0xC0=192Testing Firmware Udpates#
Before a test of the RS9116 firwmare update application can be performed, the TCP server first needs to be setup and started.
Build and run the TCP Server#
Copy the TCP server application firmware_update_tcp_server.c provided with the application source to a Linux PC connected to the Wi-Fi access point.
Compile the application
user@linux:~$ gcc firmware_update_tcp_server.c-o ota_server.binRun the application providing the TCP port number (specified in the RS9116 app) together with the firmware file and path
user@linux:~$ ./ota_server.bin 5001 RS9116.NBZ.WC.GEN.OSI.x.x.x.rps
... where RS9116.NBZ.WC.GEN.OSI.x.x.x.rps is the firmware image to be sent to RS9116.
Running the Application#
After making any custom configuration changes requried, build, download and run the application as described in the EFx32 Getting Started or STM32 Getting Started.
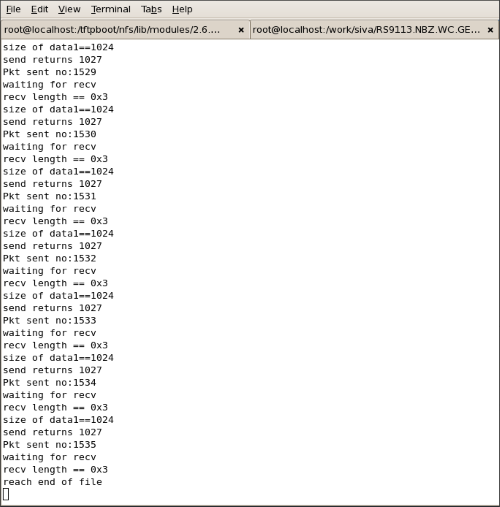
When the application runs and connects to the TCP server, the firmware image transfer occurs in chunks. The app requests a firmware chunk, the server sends the chunk, the app requests the next chunk, the server sends the chunk, and so forth until the entire transfer completes. As the transfer proceeds, progress is printed to the serial console. On completion, the console prints 'reach end of file'.
When the firmware update completes, the RS9116 should be rebooted after which it may take a few minutes to overwrite the old firmware with the new firmware in flash memory.
Selecting Bare Metal#
The application has been designed to work with FreeRTOS and Bare Metal configurations. By default, the application project files (Keil and Simplicity studio) are configured with FreeRTOS enabled. The following steps demonstrate how to configure Simplicity Studio and Keil to test the application in a Bare Metal environment.
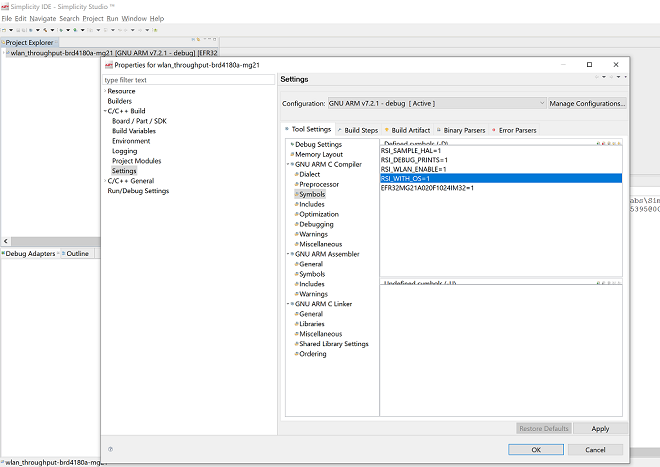
Bare Metal with Simplicity Studio#
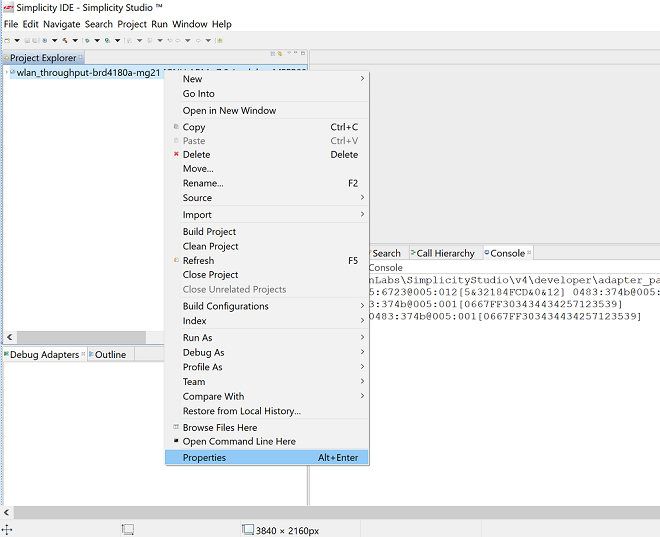
Open the project in Simplicity Studio
Right click on the project and choose 'Properties'
Go to 'C/C++ Build' | 'Settings' | 'GNU ARM C Compiler' | 'Symbols' and remove macro 'RSI_WITH_OS=1'
Select 'Apply' and 'OK' to save the settings
Bare Metal with Keil#
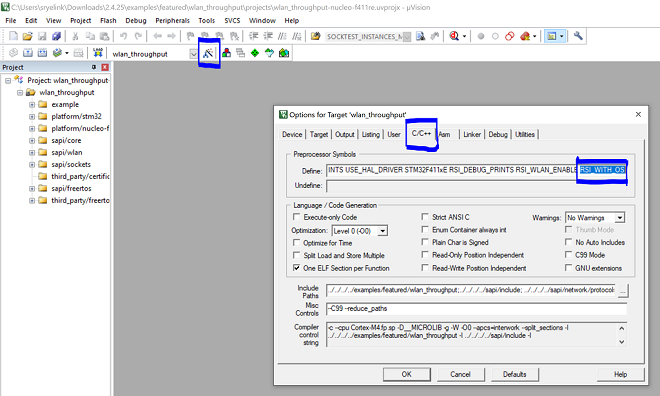
Open the project in Keil and select 'Options for Target'
Go to the 'C/C++' tab and remove 'RSI_WITH_OS' macro present under Preprocessor Symbols
Select 'OK' to save the settings