The Z-Wave Development Kits#
The Z-Wave Development Kit is meant to help you evaluate Silicon Labs’ Z-Wave modules and get you started with developing your own Z-Wave product.
The Z-Wave Development Kit is designed especially for embedded Z-Wave software and hardware development. The kit includes sample embedded applications for quick prototyping, Z-Wave protocol sniffer tools for analyzing and resolving issues, and Z-Wave RF modules for building prototypes.
User’s Guides for the development kits are also available through Simplicity Studio, which is described in Install Simplicity Studio.
Development Kit Hardware by 800 Series#
For the latest news of the Z-Wave 800 Series hardware, refer to the following pages:
800 Series modules: https://www.silabs.com/wireless/z-wave/800-series-modules
800 Series EFR32ZG23 SoCs: https://www.silabs.com/wireless/z-wave/800-series-modem-soc
800 Series EFR32ZG28 SoCs: https://www.silabs.com/wireless/z-wave/efr32zg28-z-wave-800-socs
Z-Wave 800 Series Pro Kit#
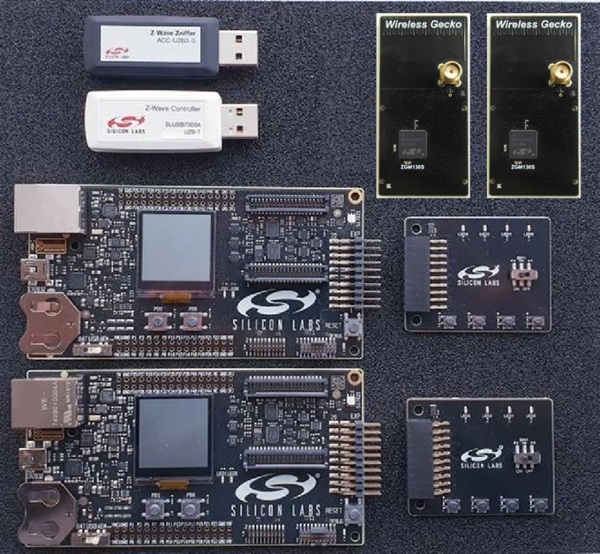
The Z-Wave 800 Pro Kit contains the following:
2 pcs. BRD4002A – Wireless Starter Kit Mainboard (WSTK).
1 pc. BRD4204D – Z-Wave and Z-Wave Long Range EFR32ZG23 868-915 MHz 14 dBm Radio Board.
1 pc. BRD4205B – Z-Wave and Z-Wave Long Range ZGM230S Radio Board.
2 pcs. BRD8029A – Buttons and LEDs Expansion Board (EXP board).
Note: the Expansion Board is no longer used in SDK versions 7.23 and above. Functionalities previously available on the Expansion Board have been mapped to hardware on the WSTK, with some being only accessible via the Command Line Interface. For details, refer to the README file in each sample application’s directory.
1 pc. SLUSB7000A – UZB7 – Controller USB stick.
2 pcs. ANT-SS900 868-915MHz Compressed Whip Antenna.
1 pc. 10-pin 1.27 mm IDC debug cable.
Note: the UZB-S USB stick network sniffer is not part of the Z-Wave 800 Pro Kit. A second Kit can be configured for use as a Z-Wave network sniffer. For instructions, refer to Appendix B: Configuring the Development Kit as a Network Sniffer.
Other Pro Kits featuring EFR32ZG28 hardware (with an increased flash size) are also available:
With a 14 dBm radio board: https://www.silabs.com/development-tools/wireless/efr32xg28-pro-kit-14-dbm
With a 20 dBm radio board: https://www.silabs.com/development-tools/wireless/efr32xg28-pro-kit-20-dbm
Prepare the Hardware#
Before installing any software or before powering any of the hardware, start by preparing the needed hardware.
Connect the radio board BRD4204D/BRD4205B to the mainboard BRD4002A.
If using SDK version 7.22 or below, connect the EXP board BRD8029A to the extension port of the mainboard BRD4002A.
Set the Power switch of the WSTK mainboard in AEM position.
Connect the mainboard BRD4002A using a USB cable to the PC.
Familiarize yourself with the hardware by locating the push buttons, LEDs, etc.
Z-Wave Thunderboard Kits#
The Z-Wave Thunderboard Kits are small form factor, cost-effective, all-in-one development platforms equipped with a USB Type-C connector.
These development boards can be configured to act as end devices, network controllers or network sniffers.
Note: some sample applications support only a different or reduced set of functionalities on these development boards due to hardware limitations.
Z-Wave 800 Series Development Kit#
The contents of the Z-Wave 800 Series Development Kit are the following:
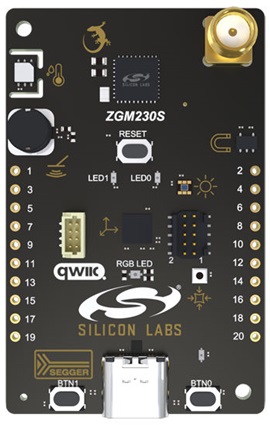
1 pc. BRD2603A – ZGM230s +14 dBm Dev Kit Board.
1 pc. ANT SS900 – 868-915 MHz Antenna
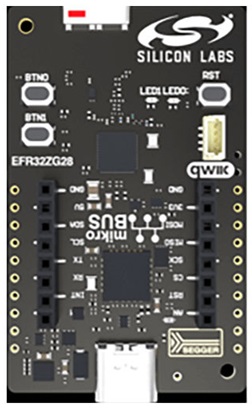
EFR32xG28 Explorer Kit#
The EFR32xG28 Explorer Kit contains a single xG28 Explorer board (BRD2705A) with an integrated antenna.
Development Kit Hardware by 700 Series#
To get the latest news of the Z-Wave 700, refer to:
The Z-Wave Long Range 700 Starter Kit contains the following:
2 pcs. BRD4001A – Wireless Starter Kit Mainboard (WSTK).
2 pcs. BRD4207A – Z-Wave and Z-Wave Long Range ZGM130S Radio Board intended end device development.
2 pcs. BRD8029A – Buttons and LEDs Expansion Board (EXP board).
1 pc. SLUSB001A – UZB7 – Controller USB stick.
1 pc. UZB-S – (ACC-UZB3-S) UZB-S USB stick network sniffer.
2 pcs. ANT-SS900 – 868-915 MHz Compressed Whip Antenna.
2 pcs. ENRM002 – 1m USB A <-> USB Mini B cable.
For a more in-depth description of the various hardware components, refer to How to Use Z-Wave Pre-Certified Apps [1].
Prepare the Hardware#
Before installing any software or before powering any of the hardware, start by preparing the needed hardware.
Connect the radio board BRD4207A to the mainboard BRD4001A.
Connect the EXP board BRD8029A to the extension port of the mainboard BRD4001A.
Set the Power switch of the WSTK mainboard in AEM position.
Connect the mainboard BRD4001A using a USB cable to the PC.
Familiarize yourself with the hardware by locating the various push buttons, LEDs, etc.
BRD4207A Radio Board with ZGM130S used for end device development
BRD8029A EXP Board