Fundamentals#
The Zigbee OTA File Format#
The OTA file format is defined in the Zigbee Cluster Library Specification in the “OTA File Format” section of the “Over-The-Air Upgrade” chapter. Images are composed of a Zigbee OTA header, followed by one or more blobs of proprietary bootloader data, and an optional cryptographic signature appended to the end. The OTA server only needs to read the OTA header to serve up the file, and thus can serve up files for different manufacturers and/or different products. The following figure shows an example of the layout of the file format:
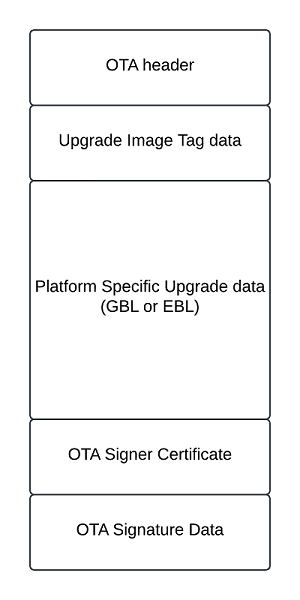
The OTA header contains general information about the update, like the manufacturing code, OTA image version, total image size, and the Zigbee stack version. The upgrade image tag data defines if there is encryption and what encryption is used. It also defines the lengths of the OTA Signer Certificate and OTA Signature Data. More details can be found in Chapter 11.4 of the ZCL Specification.
Creating OTA Images#
Silicon Labs has created the "Image-builder" tool that generates OTA images from compiled binaries. The non-ECC version of Image-builder is included with the Simplicity SDK release in the tool/image-builder sub-directory. For more information on Image-builder, see AN716: Instructions for Using Image Builder.
OTA signing refers to signing the OTA image file and is independent of any signature or encryption that may be present on the update image file inside the OTA wrapper file. Currently, only the Smart Energy Profile has support for signatures on images.
Refer to OTA Image Creation for examples on how to generate an OTA file.
OTA File Storage on OTA Server#
The OTA server application looks for OTA files in a directory called "ota-files" that is a sub-directory in the current working directory from which the server application is launched. For NCP and RCP sever setups, the Zigbee host application will automatically check the ota-files folder that is located in the same folder/path as the Zigbee host image (i.e. Z3Gateway binary) for ".ota" files. When the host application is initialized, it scans the ota-files directory for valid images. Users can also manually trigger a rescan of this directory if new images are added after startup. See Setting up a Server for more information.
OTA Storage on OTA Client#
Once an upgrade image is received by the client, it is saved in external flash or internal flash, depending on which bootloader is used.
If using a SPI Storage Bootloader, the new image will be saved into SPI flash.
If using an Internal Storage Bootloader, the new image will be saved into internal flash.
The offset of the new image is set in the OTA Simple Storage EEPROM Driver software component. There are two typical settings.
Using slot-manager: The slot offset is defined in the bootloader. In the application, set Gecko Bootloader Storage Support to any selection except Do not use slots. In this case, the OTA Storage Start Offset and OTA Storage End Offset will not be used.
Using absolute offset: In the application, you must set Gecko Bootloader Storage Support to Do not use slots. In this case, the Storage Slot To Save Images To will not be used. The OTA Storage Start Offset and OTA Storage End Offset must be set correctly. Additionally, the OTA Storage Start Offset must equal the start offset of a slot defined in the bootloader, and the OTA Storage End Offset must equal the start offset plus the slot size of that slot.*
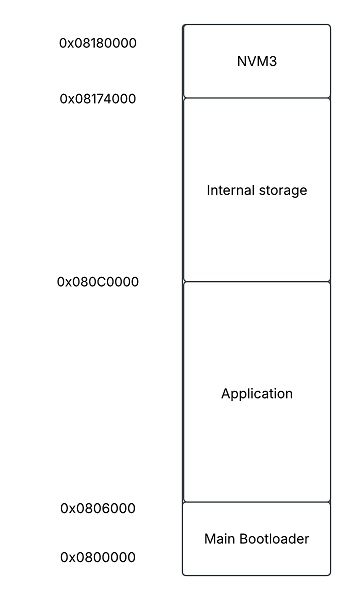
The image below displays the memory layout of the EFRMG24 device. The internal storage area is the area that can be used to store the OTA image(s) with the two storage mechanisms described above.
Note: More information on these configurations can be found in Setting up Bootloader.
Slot Manager#
The location and size of the storage slots can be configured using the Bootloader Storage Slot Setup Component (supports a maximum of three configurable storage slots). The addresses input here are absolute addresses (they are not offsets from the base address). For more information, refer to UG489: Silicon Labs Gecko Bootloader User's Guide for GSDK 4.0 and Higher or Silicon Labs Gecko Bootloader User’s Guide for Series 3 and Higher.
Specific Storage#
When using specific addressing for the storage, the configuration is limited to only one slot. The image below shows an internal flash storage configuration for an MG24 with a slot size of 737kB. Keep in mind this configuration must be completed in the bootloader project.
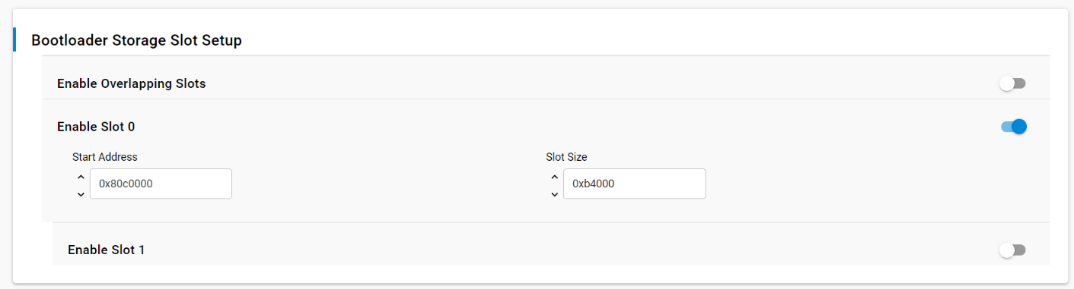
Image Transfer#
The server is responsible for telling clients when new update images are available through the Image Notify Command. Clients can be upgraded or downgraded, and the server knows which devices need updates and what version to use. This information might come from the backend system.
For router clients, the server can send a message to notify them about new updates. Zigbee end device (ZED) clients, however, may not be awake to receive such notifications. All clients (both ZR and ZED) need to check the server regularly via a Query Next Image Request Command to see if there are any updates available. Sending notifications about updates is optional.
When a client checks in with the server, it checks whether a newer OTA image than the one currently running is available. If there is a newer version, the client will begin the OTA by requesting a block of the new update. Since the OTA image is larger than the maximum payload size of a Zigbee packet, it needs to be broken into blocks and transferred block-by-block. The transfer speed needs to balance between occupying Zigbee bandwidth and the time it takes to complete the transfer. Transferring the OTA image quickly uses more bandwidth in a shorter time, which can decrease network performance due to increased retries of Zigbee packets.
For more information on how to speed up the OTA transfer, refer to Speeding Up OTA.
The following diagram illustrates the process for exchanging OTA packets:
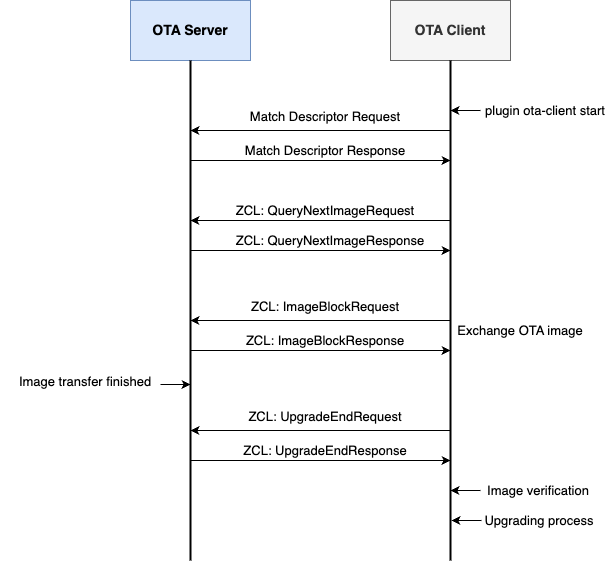
When initiating the OTA (Over-the-Air) update process, the client begins by discovering the OTA server and its capabilities through a match descriptor request. The server responds with a match descriptor response that contains ZCL data about the server's capabilities, providing the client with the necessary information to proceed.
With this data, the client sends a QueryNextImageRequest to check if a new firmware image is available. The server replies with a QueryNextImageResponse, indicating whether an update exists. If an image is available, the response includes key details such as the manufacturer code, firmware version, and hardware version.
Based on this information, the client determines whether to begin the OTA image download. If it proceeds, the image is transferred in blocks. This block-by-block approach helps minimize the impact on network bandwidth by spreading the data transfer over time.
Once the entire image has been received, it is stored in the client's non-volatile memory. The client then sends an UpgradeEndRequest to the server, signaling the completion of the image transfer. In response, the server issues an UpgradeEndResponse, which includes the manufacturer code, image type, and a scheduled time for the device to apply the upgrade.