Zigbee OTA Hands-On Tutorial#
This hands-on guide assumes users have already set up a client and a server and are familiar with the OTA image creation process. The firmware bump and ota image generation can be found in step 4.
Step 1: OTA Server Setup (Host-NCP)#
Follow the steps in Setting up a Server to build the server, which consists of a host application (Z3Gateway) and an EFR32-based NCP. The default Zigbee - Host Gateway (Z3Gateway) application is preconfigured as a server out-of-the-box with the following components:
OTA Bootload Cluster Common Code.
OTA Bootload Cluster Server.
OTA Bootload Cluster Server Policy.
OTA Bootload Cluster Storage Common Code.
OTA POSIX Filesystem Storage Module.
A sample NCP application should also work out-of-the-box in combination with the Z3Gateway to run an OTA server. To get the server running, refer to Run the OTA Server.
Once the server is running, the client needs to be set up in order to form a network.
Step 2: Create and Configure the Client (MG24 SoC)#
Build a client as described in Setting up a Client. Make sure all the components and configurations are correct as summarized below:
Over-the-Air Bootloading Cluster configured as a client in the ZAP configurations.
OTA Bootload Cluster Common Code component is installed.
OTA Bootload Cluster Client component is installed.
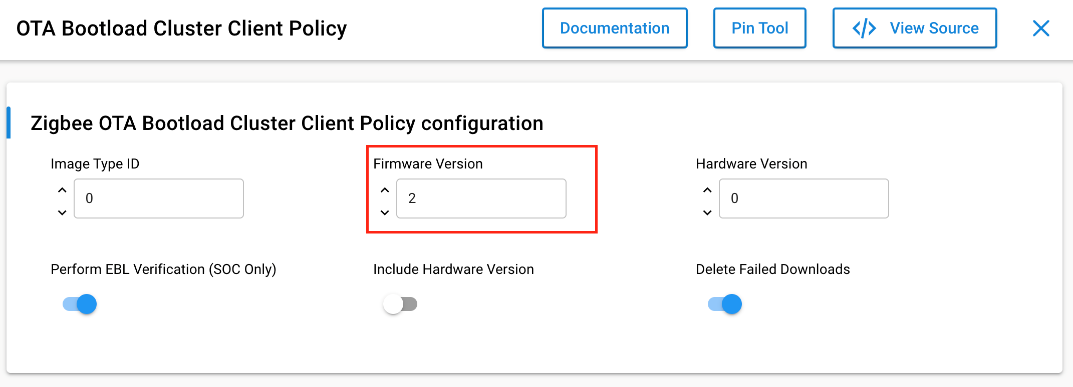
OTA Bootload Cluster Client Policy component is installed.
OTA Bootload Cluster Platform Bootloader component is installed.
OTA Bootload Cluster Storage Common Code component is installed.
OTA Simple Storage Module component is installed.
OTA Simple Storage EEPROM Driver component is installed.
Enable SOC Bootloading Support
Set the Storage Start Offset to 135004160
Set the Storage End Offset to 135741440
Step 3: Form a Network#
The network needs to be initialized on the server side. On the Z3Gateway host console, input the commands below.
Form a centralized network with the server acting as the Coordinator:
> plugin network-creator start 1
Open the network for joining on the server:
> plugin network-creator-security open-network
If done correctly, you should see the following:
NWK Creator Security: Open network: 0x00
pJoin for 254 sec: 0x00
NWK Creator Security: Open network: 0x00 Once the network is created and opened, the client (end device) needs to join within the allotted window. On the client's CLI console, input the commands below to join the server's network:
Leave the existing network:
> network leave
Join the network by starting network steering:
> plugin network-steering start 0
If the client joins the server's network successful, you should see a dialog about trust center interactions in the server's console.
More information on forming and joining networks can be found in QSG180: Zigbee EmberZNet SDK v7.x Quick-Start Guide.
Step 4: Generate and Transfer OTA Image#
On a PC that has Simplicity Studio and the Simplicity Commander executable, locate the client's .slcp file and open it. Under the OTA Bootload Cluster Client Policy component, bump the Firmware Version parameter to be above the existing version.
Once this is completed, the project can be rebuilt. The existing .s37 project file can be used to generate the OTA file that will be transferred. For this, Simplicity Commander must be used. More information on installing and running commander can be found in Simplicity Commander User Guide.
Create a .gbl image:
> commander.exe gbl create ./<client_name>.gbl --app ./<client_name>.s37
Now use image builder to generate the .ota file, more information on using image builder can be found in AN716: Instructions for Using ImageBuilder:
> image-builder-windows.exe --create <client_ota_file_name>.ota --version 2 --manuf-id 0x1002 --image-type 0 --tag-id 0x0000 --tag-file <client_gbl_name>.gbl --string "<client_ota_file_name>"
Once the OTA image is created, transfer it to the ota-files folder located in the same directory as the Z3Gateway executable. For example:
> ls
<Z3Gateway binary> ota-files
Inside the ota-files directory, you should place your new .ota file.
Step 5: Run the OTA#
Make sure both the client and server devices have Over-the-Air Bootloading Cluster printing enabled by running the following commands:
On the OTA Client:
plugin ota-storage-common printImagesOn the OTA Server:
plugin ota-storage-common printImages
In both cases, output should print to the CLI. If no output is visible, go back and verify the configuration of the application and its 'Debug Print' configuration.
Make sure that the client is running the older version of the client software. From the OTA client’s CLI type the following command.
You should see the corresponding output:
Z3Light>plugin ota-client info Client image query info Manuf ID: 0x1002 Image Type ID: 0x0000 Current Version: 0x00000001 Hardware Version: NA Query Delay ms: 300000 Server Discovery Delay ms: 600000 Download Delay ms: 0 Run Upgrade Delay ms: 600000 Verify Delay ms: 10 Download Error Threshold: 10 Upgrade Wait Threshold: 10Note that the current version field says 0x00000001.
Verify that the OTA Server has newer image in its OTA storage. From the OTA server’s CLI type the following command. You should see the corresponding output:
plugin ota-storage-common printImages Z3Gateway>Image 0 Header Version: 0x0100 Header Length: 56 bytes Field Control: 0x0000 Manuf ID: 0x1002 Image Type: 0x0000 Version: 0x00000002 Zigbee Version: 0x0002 Header String: <client_ota_file_name> Image Size: 331502 bytes Total Tags: 1 Tag: 0x0000 Length: 331440 1 images in OTA storage.Note that the version number is 0x0000002. The exact size of the image may vary.
Erase any previous version file that has been saved in the client. This is not necessary, but used in this example for simplicity. Enter the following command on the client if needed:
plugin ota-storage-common delete <image_number>To verify that the client is connected to the server, type info on both the client and the server. The PAN IDs should be the same.
Start the OTA Client’s state machine on the client: plugin ota-client start.
If all goes well, you should see the following output:

Note: The download may take up to 10 minutes.