Advanced Topics#
Security#
To secure and OTA image, users can implement two security mechanisms: encryption and signing. To implement these features, users must first modify their client's bootloader project under the Booloader Core component.
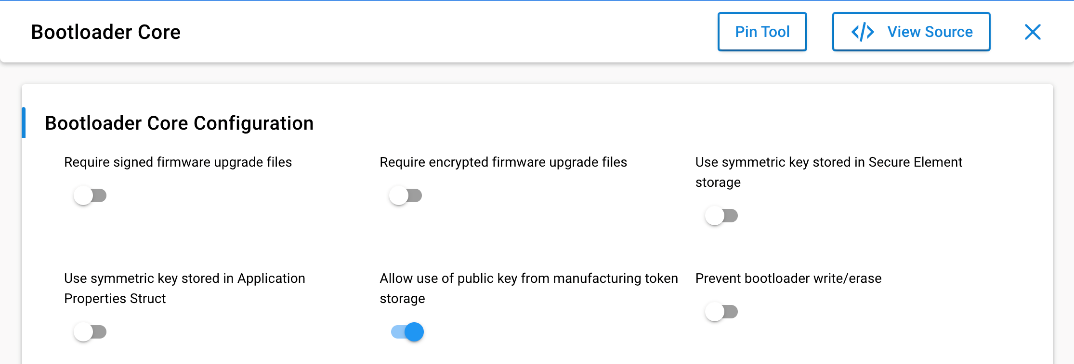
Below is a description of each configurable parameter.
| Parameter | Default Value | Description |
|---|---|---|
| Require signed firmware upgrade files | FALSE | Require that firmware upgrade files are authenticated using asymmetric signature verification. |
| Require encrypted firmware upgrade files | FALSE | Require that firmware upgrade files are encrypted. |
| Use symmetric key stored in Secure Element storage | FALSE | Use the symmetric key stored in Secure Element storage for encryption and decryption. |
| Use symmetric key stored in Application Properties Struct | FALSE | Use the symmetric key stored in Application Properties Struct for encryption and decryption. |
| Allow use of public key from manufacturing token storage | TRUE | Allow use of the public key from the manufacturing token storage for signature verification if the public key is not stored in Secure Element. |
| Prevent bootloader write/erase | FALSE | Write lock bootloader area before entering application. The bootloader area in flash will be locked until the next reboot. This does not affect bootloader upgrades, but prevents the application running in main flash from disturbing the bootloader. |
Below is a short guide on how to sign and encrypt and OTA image using Simplicity Commander.
Encryption#
Encrypted images protect the new application image from inspection or tampering by using a symmetric encryption key. This will imply that you need to generate the OTA file with encryption and decrypt the image on the client side.
For more information about the Gecko Bootloader and encrypted GBL images, including changing the bootloader type and loading an encryption key onto the device, see UG489: Silicon Labs Gecko Bootloader User's Guide for GSDK 4.0 and Higher or Silicon Labs Gecko Bootloader User’s Guide for Series 3 and Higher.
Step 1: Set Up the Bootloader#
Enable "Require encrypted firmware upgrade files" AND "Use symmetric key stored in Application Properties Struct" in the bootloader's Bootloader Core component.
Generate the gbl decryption key using 'commander util genkey --type aes-ccm --outfile aes_key.txt'.
Since "Use symmetric key stored in Secure Element storage" is not used for this short guide, run 'commander convert <bootloader>.s37 --aeskey aes_key.txt --outfile <bootloader_out>.s37' to add the key to the bootloader project.
Rebuild and flash the resulting bootloader .s37 image into the device.
Step 2: Generate an Encrypted GBL File#
Bump the client's firmware version and rebuild the project.
Generate the encrypted .gbl file using the command
commander gbl create <updated_name>.gbl --app ./<project_name>.s37 --encrypt aes_key.txt.Run the image builder on the resulting .gbl and proceed with OTA transfer.
Signing#
Step 1: Bootloader Setup#
Enable "Require signed firmware upgrade files" in the client's Bootloader Core component.
Rebuild and flash the resulting bootloader .s37 image into the device.
Step 2: Generate Keys#
Generate a private & public key pair using commander using command
commander util genkey --type ecc-p256 --privkey sign_key.pem --pubkey sign_pubkey.pem --tokenfile sign_pubkey.txt.Flash the key into the client with the command
commander security writekey --sign sign_pubkey.pem --device EFR32MG21A010F1024 --serialno <device_serial_no>.
Step 3: Sign the Image with the Private Key and OTA Transfer#
Sign the image with command
./commander gbl create <updated_name>.gbl --app <project_name>.s37 --sign sign_key.pem.Run the image builder on the resulting .gbl and proceed with OTA.
Note that signing and encrypting the project image, as well as the bootloader modifications, can be done simultaneously. They were separated above for clarity. If done correctly, following the OTA image download on the client side, the client should print the following:
Starting EBL verification
EBL passed verification.
Custom verification passed: 0x00after the upgrade is downloaded.
More information on how to provision a security key into the bootloader can be found in section 3.3 Provision GBL Decryption Key of AN1218: Series 2 Secure Boot with RTSL.
Note: Secure Boot is NOT required to implement encryption and signing for an OTA image.
Speeding Up OTA#
Below are mechanisms to speed up the OTA transfer process.
1. Compression#
Application update images may also be generated with compression. Signature and encryption operations on a compressed GBL work identically to on an uncompressed GBL. To use compressed upgrade images, a decompressor for the relevant compression algorithm must be added to the bootloader. There are two compression algorithms supported by the bootloader.
LZ4 GBL compression
The LZ4 compressed GBL upgrade files. LZ4 is a lossless data compression algorithm that is focused on compression and decompression speed. It belongs to the LZ77 family of byte-oriented compression schemes. The goal of the LZ4 algorithm is to provide a good trade-off between speed and compression ratio.
LZMA GBL Compression
The Lempel–Ziv–Markov chain algorithm (LZMA)-compressed files. LZMA is an algorithm used to perform lossless data compression. This algorithm uses a dictionary compression scheme somewhat similar to the LZ77 algorithms.
The desired decompression mechanism should be added to the bootloader project as a component under Platform → Bootloader → Core. For more information, visit section 7.2 Compressed Upgrade Images of UG489: Silicon Labs Gecko Bootloader User's Guide for GSDK 4.0 and Higher or Silicon Labs Gecko Bootloader User’s Guide for Series 3 and Higher.
To generate a compressed application image with Simplicity Commander, follow the command line syntax below:
./commander gbl create <gblfile> --app <filename> --compress <compression algorithm> --encrypt <keyfile>
For example:
./commander gbl create app.gbl --app example.s37 --compress lz4
The effect of the two compression mechanisms is summarized below:
Compression Algorithm | Bootloader Size Requirement | Application Upgrade Size Reduction (typical) |
|---|---|---|
LZ4 | < 1 kB | ~ 10% |
LZMA | ~5 kB flash, 18 kB RAM | ~ 30% |
For more information, refer to the GBL File Creation with Compression section in the Simplicity Commander User Guide.
2. Modify Sleepy End Device (SED) Polling Frequency#
End devices must enter a sleep mode between each page/block request transmission, which increases the overall OTA transmission time. The best way to reduce the impact of the sleep mechanism is to reduce the SED's short poll time, so that it may request and receive data faster. Users can do this by calling sl_zigbee_af_set_short_poll_interval_ms_cb() in the ota-client.c::startDownload() function, and resetting the original short poll value in sl_zigbee_af_ota_client_download_complete_cb(). This results in a significant decrease in OTA transfer time.
The only times this will have any negative effects are if either the server is too far away or you have a battery that needs longer recharge time. A server being far away would only be an issue if the time it took for a server to respond to a request took longer than a poll time. If this was the case, then you would end up with redundant data requests (more than one poll for the same page), and less than perfect efficiency. The other problem of having a battery that needs longer recharge time usually only comes into play when regarding coin cell batteries which may need more time between requests to let the battery recharge. With either of these cases, you may still benefit from reducing the short poll time to a faster rate than the short poll time during normal application behavior.
3. Decrease Client Download Delay#
The SL_ZIGBEE_AF_PLUGIN_OTA_CLIENT_DOWNLOAD_DELAY_MS value, configured in the ota-client-config.h file, controls how often a new block of data (or page) is requested during a download by the client. This value can be decreased to speed up the OTA upgrade. It may also be set to 0, indicating requests will be as fast as the server responds.
Specifying Your Own Manufacturer ID#
Follow these steps to specify a manufacturer ID other than 0x1002, which is the Silicon Labs-specific manufacturing ID.
Each member of the Connectivity Standards Alliance (CSA) has its own manufacturer ID. The list of manufacturer IDs is maintained in CSA Document 05-3874 Manufacturer Code Database. If your company does not have a manufacturer ID, then it must request one from the CSA (https://csa-iot.org/).
When configuring the OTA Client in the Project Configurator, do the following:
Select the CONFIGURATION TOOLS tab and open the Zigbee Cluster Configurator.
Click on ZCL GLOBAL OPTIONS.
In the Product Manufacturer text box entry, select or enter your own manufacturer code.
Save the change.
Re-compile the application.
When generating the Zigbee OTA image file, do the following.
Specify your own manufacturer ID by passing that value to the
--manuf-idargument when executing the image-builder command.
Modifying the OTA Client to Use a Different EEPROM#
Many different external storage parts are available, and the choice of which one is used is based on many different factors. AN772: Using the Ember Application Bootloader and UG489: Silicon Labs Gecko Bootloader User's Guide for GSDK 4.0 and Higher or Silicon Labs Gecko Bootloader User’s Guide for Series 3 and Higher detail several different parts supported by Silicon Labs and their various device parameters.
If the external storage part does not support read-modify-write, then the Project Configurator configuration must be updated. The following describes the process:
Open the OTA client’s Project Configurator.
Select the SOFTWARE COMPONENT tab.
Select the OTA Simple Storage EEPROM Driver plugin and disable the option labeled EEPROM Read-modify-write device Support.
Re-compile the application.
Note: A new Bootloader will be required to support the change in EEPROM. You must load a new bootloader by following the steps in <link to Setting up Bootloader> and selecting one appropriate to the bootloader you are using.
Using a Cross-Compiler for the OTA Server#
It is possible to use a cross-compiler for building the OTA server for another target system. For example, building on an x86 Windows PC for an ARM Linux system. This process is relatively straight forward once the cross-compiler is properly installed and configured. To do this you must run make and pass it the name/location of the compiler and linker on the command-line.
For example:
make CC=/opt/crosstool/gcc-4.0.1-glibc-2.3.5/arm-unknown-linux-gnu/bin/arm-unknown-linux-gnu-gcc LD=/opt/crosstool/gcc-4.0.1-glibc-2.3.5/arm-unknown-linux-gnu/bin/arm-unknown-linux-gnu-gccThe Makefile expects a GCC style command-line compiler, and it uses the compiler command (rather than the linker command directly) for linking.