AWS MQTT Subscribe-Publish Sample#
1. Purpose/Scope#
This application demonstrates how to configure RS9116 as an IoT devices and securely connect to AWS IoT Core to subscribe and publish on a topic.
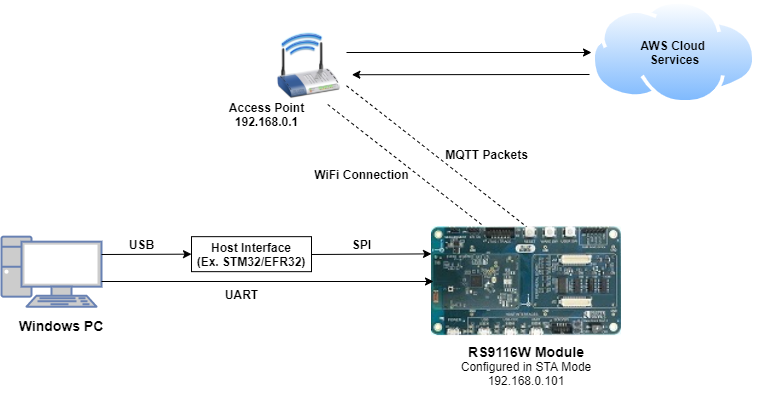
In this application, RS9116W EVK is configured as Wi-Fi station and connects to an Access Point which has an internet access. After successful Wi-Fi connection, application connects to AWS Core and subscribes to a topic. Publishes a message on subscribed topic and application waits to receive the data published on subscribed topic from the cloud.
Overview of AWS SDK#
AWS IoT Core is a cloud platform which connects devices across AWS cloud services. AWS IoT provides a interface which allows the devices to communicate securely and reliably in bi-directional ways to the AWS touch-points, even when the devices are offline.
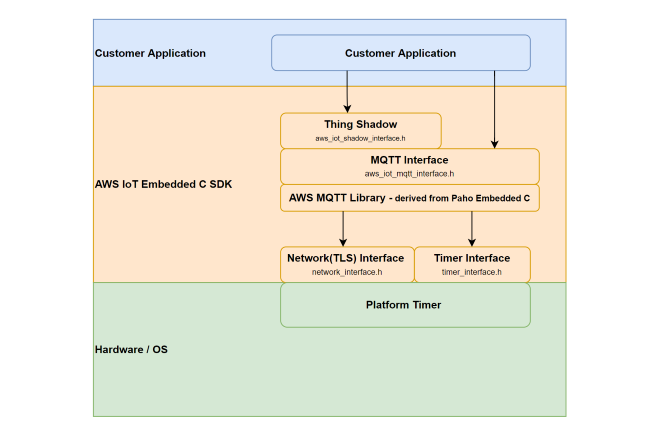
The AWS IoT Device SDK allow applications to securely connect to the AWS IoT platform.
2. Prerequisites / Setup Requirements#
Before running the application, the user will need the following things to setup.
2.1 Hardware Requirements#
Windows PC with Host interface (UART/ SPI).
Silicon Labs RS9116 Wi-Fi Evaluation Kit
Host MCU Eval Kit. This example has been tested with:
Silicon Labs WSTK + EFR32MG21
Wireless Access point
2.2 Software Requirements#
Embedded Development Environment
For STM32, use licensed Keil IDE
For Silicon Labs EFx32, use the latest version of Simplicity Studio
Amazon AWS account
Python 3 installation
3. Application Build Environment#
3.1 Platform#
The Application can be built and executed on below Host platforms
3.2 Host Interface#
By default, the application is configured to use the SPI bus for interfacing between Host platforms and the RS9116W EVK.
The SAPI driver provides APIs to enable other host interfaces if SPI is not suitable for your needs.
3.3 Project Configuration#
The Application is provided with the project folder consists of Keil and Simplicity studio (ssl) project files.
Keil project :
The Keil can be executed on STM32 platform.
Project Path :
<SDK>\examples\snippets\wlan\cloud_apps\aws_iot\mqtt\projects\aws_iot_mqtt-nucleo-f411re.uvprojx
Simplicity Studio :
The Simplicity Studio project is used to evaluate the application on EFR32MG21.
Project Path : If the Radio Board is BRD4180A or BRD4181A, then access the path
<SDK>\examples\snippets\wlan\cloud_apps\aws_iot\mqtt\projects\aws_iot_mqtt-brd4180a-mg21.slsprojIf the Radio Board is BRD4180B or BRD4181B, then access the path
<SDK>\examples\snippets\wlan\cloud_apps\aws_iot\mqtt\projects\aws_iot_mqtt-brd4180b-mg21.slsproj
3.4 Bare Metal Support#
This application supports only bare metal environment. By default, the application project files (Keil and Simplicity studio) are provided with bare metal configuration in the SDK.
4. Application Configuration Parameters#
The application can be configured to suit user requirements and development environment. Read through the following sections and make any changes needed.
4.1 Open rsi_subscribe_publish_sample.c file#
4.1.1 User must update the below parameters#
SSID refers to the name of the Access point.
#define SSID "SILABS_AP"SECURITY_TYPE refers to the type of security. In this application STA supports Open, WPA-PSK, WPA2-PSK securities.
Valid configuration is:
RSI_OPEN - For OPEN security mode
RSI_WPA - For WPA security mode
RSI_WPA2 - For WPA2 security mode
#define SECURITY_TYPE RSI_WPA2PSK refers to the secret key if the Access point configured in WPA-PSK/WPA2-PSK security modes.
#define PSK "1234567890"To configure IP address
DHCP_MODE refers whether IP address configured through DHCP or STATIC
#define DHCP_MODE 1To configure MQTT Topic
RSI_MQTT_TOPIC refres to the topic to which the device subscribes and publishes
#define RSI_MQTT_TOPIC "$aws/things/Test_IoT/shadow/update"Note: To configure, STA IP address through DHCP then set DHCP_MODE to "1" and skip configuring the following DEVICE_IP, GATEWAY and NETMASK macros. (Or) To configure, STA IP address through STATIC then set DHCP_MODE macro to "0" and configure following DEVICE_IP, GATEWAY and NETMASK macros.
The IP address needs to be configuring to the RS9116W EVk should be in long format and in little endian byte order.
Example: To configure "192.168.10.10" as IP address, update the macro DEVICE_IP as 0x0A0AA8C0.
#define DEVICE_IP 0X0A0AA8C0IP address of the gateway should also be in long format and in little endian byte order
Example: To configure "192.168.10.1" as Gateway, update the macro GATEWAY as 0x010AA8C0
#define GATEWAY 0x010AA8C0IP address of the network mask should also be in long format and in little endian byte order.
Example: To configure "255.255.255.0" as network mask, update the macro NETMASK as 0x00FFFFFF
#define NETMASK 0x00FFFFFF4.2 Open rsi_wlan_config.h file. User can also modify the below parameters as per their needs and requirements.#
#define CONCURRENT_MODE RSI_DISABLE
#define RSI_FEATURE_BIT_MAP FEAT_SECURITY_OPEN
#define RSI_TCP_IP_BYPASS RSI_DISABLE
#define RSI_TCP_IP_FEATURE_BIT_MAP (TCP_IP_FEAT_DHCPV4_CLIENT|TCP_IP_FEAT_SSL |TCP_IP_FEAT_DNS_CLIENT)
#define RSI_CUSTOM_FEATURE_BIT_MAP FEAT_CUSTOM_FEAT_EXTENTION_VALID
#define RSI_EXT_CUSTOM_FEATURE_BIT_MAP (EXT_FEAT_256K_MODE | BIT(1) | BIT(3) | BIT(27))
#define RSI_BAND RSI_BAND_2P4GHZPower save configuration
By default, the application is configured without power save.
#define ENABLE_POWER_SAVE 0If user wants to run the application in power save, modify the below macro.
#define ENABLE_POWER_SAVE 14.3 Configure below parameters in aws_iot_config.h file#
//AWS Host name
#define AWS_IOT_MQTT_HOST "xxxxxxxxxxxxx-ats.iot.us-east-2.amazonaws.com"
//default port for MQTT
#define AWS_IOT_MQTT_PORT "8883"
// MQTT client ID should be unique for every device
#define AWS_IOT_MQTT_CLIENT_ID "Test_IoT" 4.4 To Load certificate#
rsi_wlan_set_certificate() API expects the certificate in the form of linear array. Convert the pem certificate into linear array form using python script provided in the SDK <SDK>/resources/certificates/certificate_script.py.
For example : If the certificate is ca-certificate.pem, enter the command in the following way:
python certificate_script.py ca-certificate.pem
The script will generate ca-certificate.pem in which one linear array named ca-certificate contains the certificate.Root CA certificate, Device private key and Device client certificate needs to be converted as mentioned above
After the conversion, place the converted files in <SDK>/resources/certificates/ path and include the certificate files in rsi_subscribe_publish_sample.c
Replace the default Device certificate and Private key certificate include in the application with the converted pem file name.
// Certificate includes
#include "aws_client_certificate.pem.crt.h"
#include "aws_client_private_key.pem.key.h"
Replace the default Device certificate and Private key certificate given in `rsi_wlan_set_certificate()` API in the application with the converted pem array.
// Load Security Certificates
status = rsi_wlan_set_certificate(RSI_SSL_CLIENT, aws_client_certificate, (sizeof(aws_client_certificate) - 1));
status =
rsi_wlan_set_certificate(RSI_SSL_CLIENT_PRIVATE_KEY, aws_client_private_key, (sizeof(aws_client_private_key) - 1));NOTE : For AWS connectivity, StarField Root CA Class 2 certificate has the highest authority being at the top of the signing hierarchy.
The StarField Root CA Class 2 certificate is an expected/required certificate which usually comes pre-installed in the operating systems and it plays a key part in certificate chain verification when a device is performing TLS authentication with the IoT endpoint.
On RS9116 device, we do not maintain root CA trust repository due to memory constraints, so it is mandatory to load StarField Root CA Class 2 certificate for successful mutual authentication to AWS server.
The certificate chain sent by AWS server is as below: id-at-commonName=Amazon,id-at-organizationalUnitName=Server CA 1B,id-at-organizationName=Amazon,id-at-countryName=US id-at-commonName=Amazon Root CA 1,id-at-organizationName=Amazon,id-at-countryName=US id-at-commonName=Starfield Services Root Certificate Authority ,id-at-organizationName=Starfield Technologies, Inc.,id-at-localityName=Scottsdale,id-at- stateOrProvinceName=Arizona,id-at-countryName=US)
On RS9116 to authenticate the AWS server, firstly Root CA is validated (validate the Root CA received with the Root CA loaded on the device). Once the Root CA is validation is successful , other certificates sent from the AWS server are validated. RS9116 don't authenticate to AWS server if intermediate CA certificates are loaded instead of StarField Root CA Class 2 certificate and would result in Handshake error. StarField Root CA Class 2 certificate is at https://certs.secureserver.net/repository/sf-class2-root.crt
Reference links : https://aws.amazon.com/blogs/security/how-to-prepare-for-aws-move-to-its-own-certificate-authority/
5. Testing the Application#
User has to follow the below steps for the successful execution of the application.
5.1 Loading the RS9116W Firmware#
Refer Getting started with a PC to load the firmware into RS9116W EVK. The firmware file is located in <SDK>/firmware/
5.2 Building the Application on Host Platform#
5.2.1 Using STM32#
Refer Getting started with STM32
Open the project
<SDK>\examples\snippets\wlan\cloud_apps\aws_iot\mqtt\projects\aws_iot_mqtt-nucleo-f411re.uvprojxBuild and Debug the project.
Check for the RESET pin:
If RESET pin is connected from STM32 to RS9116W EVK, then user need not press the RESET button on RS9116W EVK before Free run.
If RESET pin is not connected from STM32 to RS9116W EVK, then user need to press the RESET button on RS9116W EVK before Free run.
Free run the project.
Then continue the common steps from Section 5.3
5.2.2 Using EFX#
Refer Getting started with EFX32
Open Simplicity Studio and import the project
<SDK>\examples\snippets\wlan\cloud_apps\aws_iot\mqtt\projectsSelect the appropriate .slsproj as per the Radio Board type mentioned in Section 3.3
Compile and flash the project in to Host MCU
Debug the project
Check for the RESET pin:
If RESET pin is connected from EFX32 to RS9116W EVK, then user need not press the RESET button on RS9116W EVK before free run
If RESET pin is not connected from EFX32 to RS9116W EVK, then user need to press the RESET button on RS9116W EVK before free run
Free run the project
Then continue the common steps from Section 5.3
5.3 Common Steps#
Configure the Access point with Internet connection in OPEN/WPA-PSK/WPA2-PSK mode to connect module in STA mode.
Configure the application with the configurations mentioned in Section 4 for the AWS IoT Thing created. [ Refer to Appendix on how to create a Thing ]
Application will Subscribe to the RSI_MQTT_TOPIC and Publishes message "{"state":{"desired":{"toggle":1}}}" to the same topic.
It receives the publish message sent, as it has subscribed to the same topic.
Upon receiving the Publish message it processes the message "{"state":{"desired":{"toggle":1}}}" and toggles LED.
The Terminal Logs appears as shown below
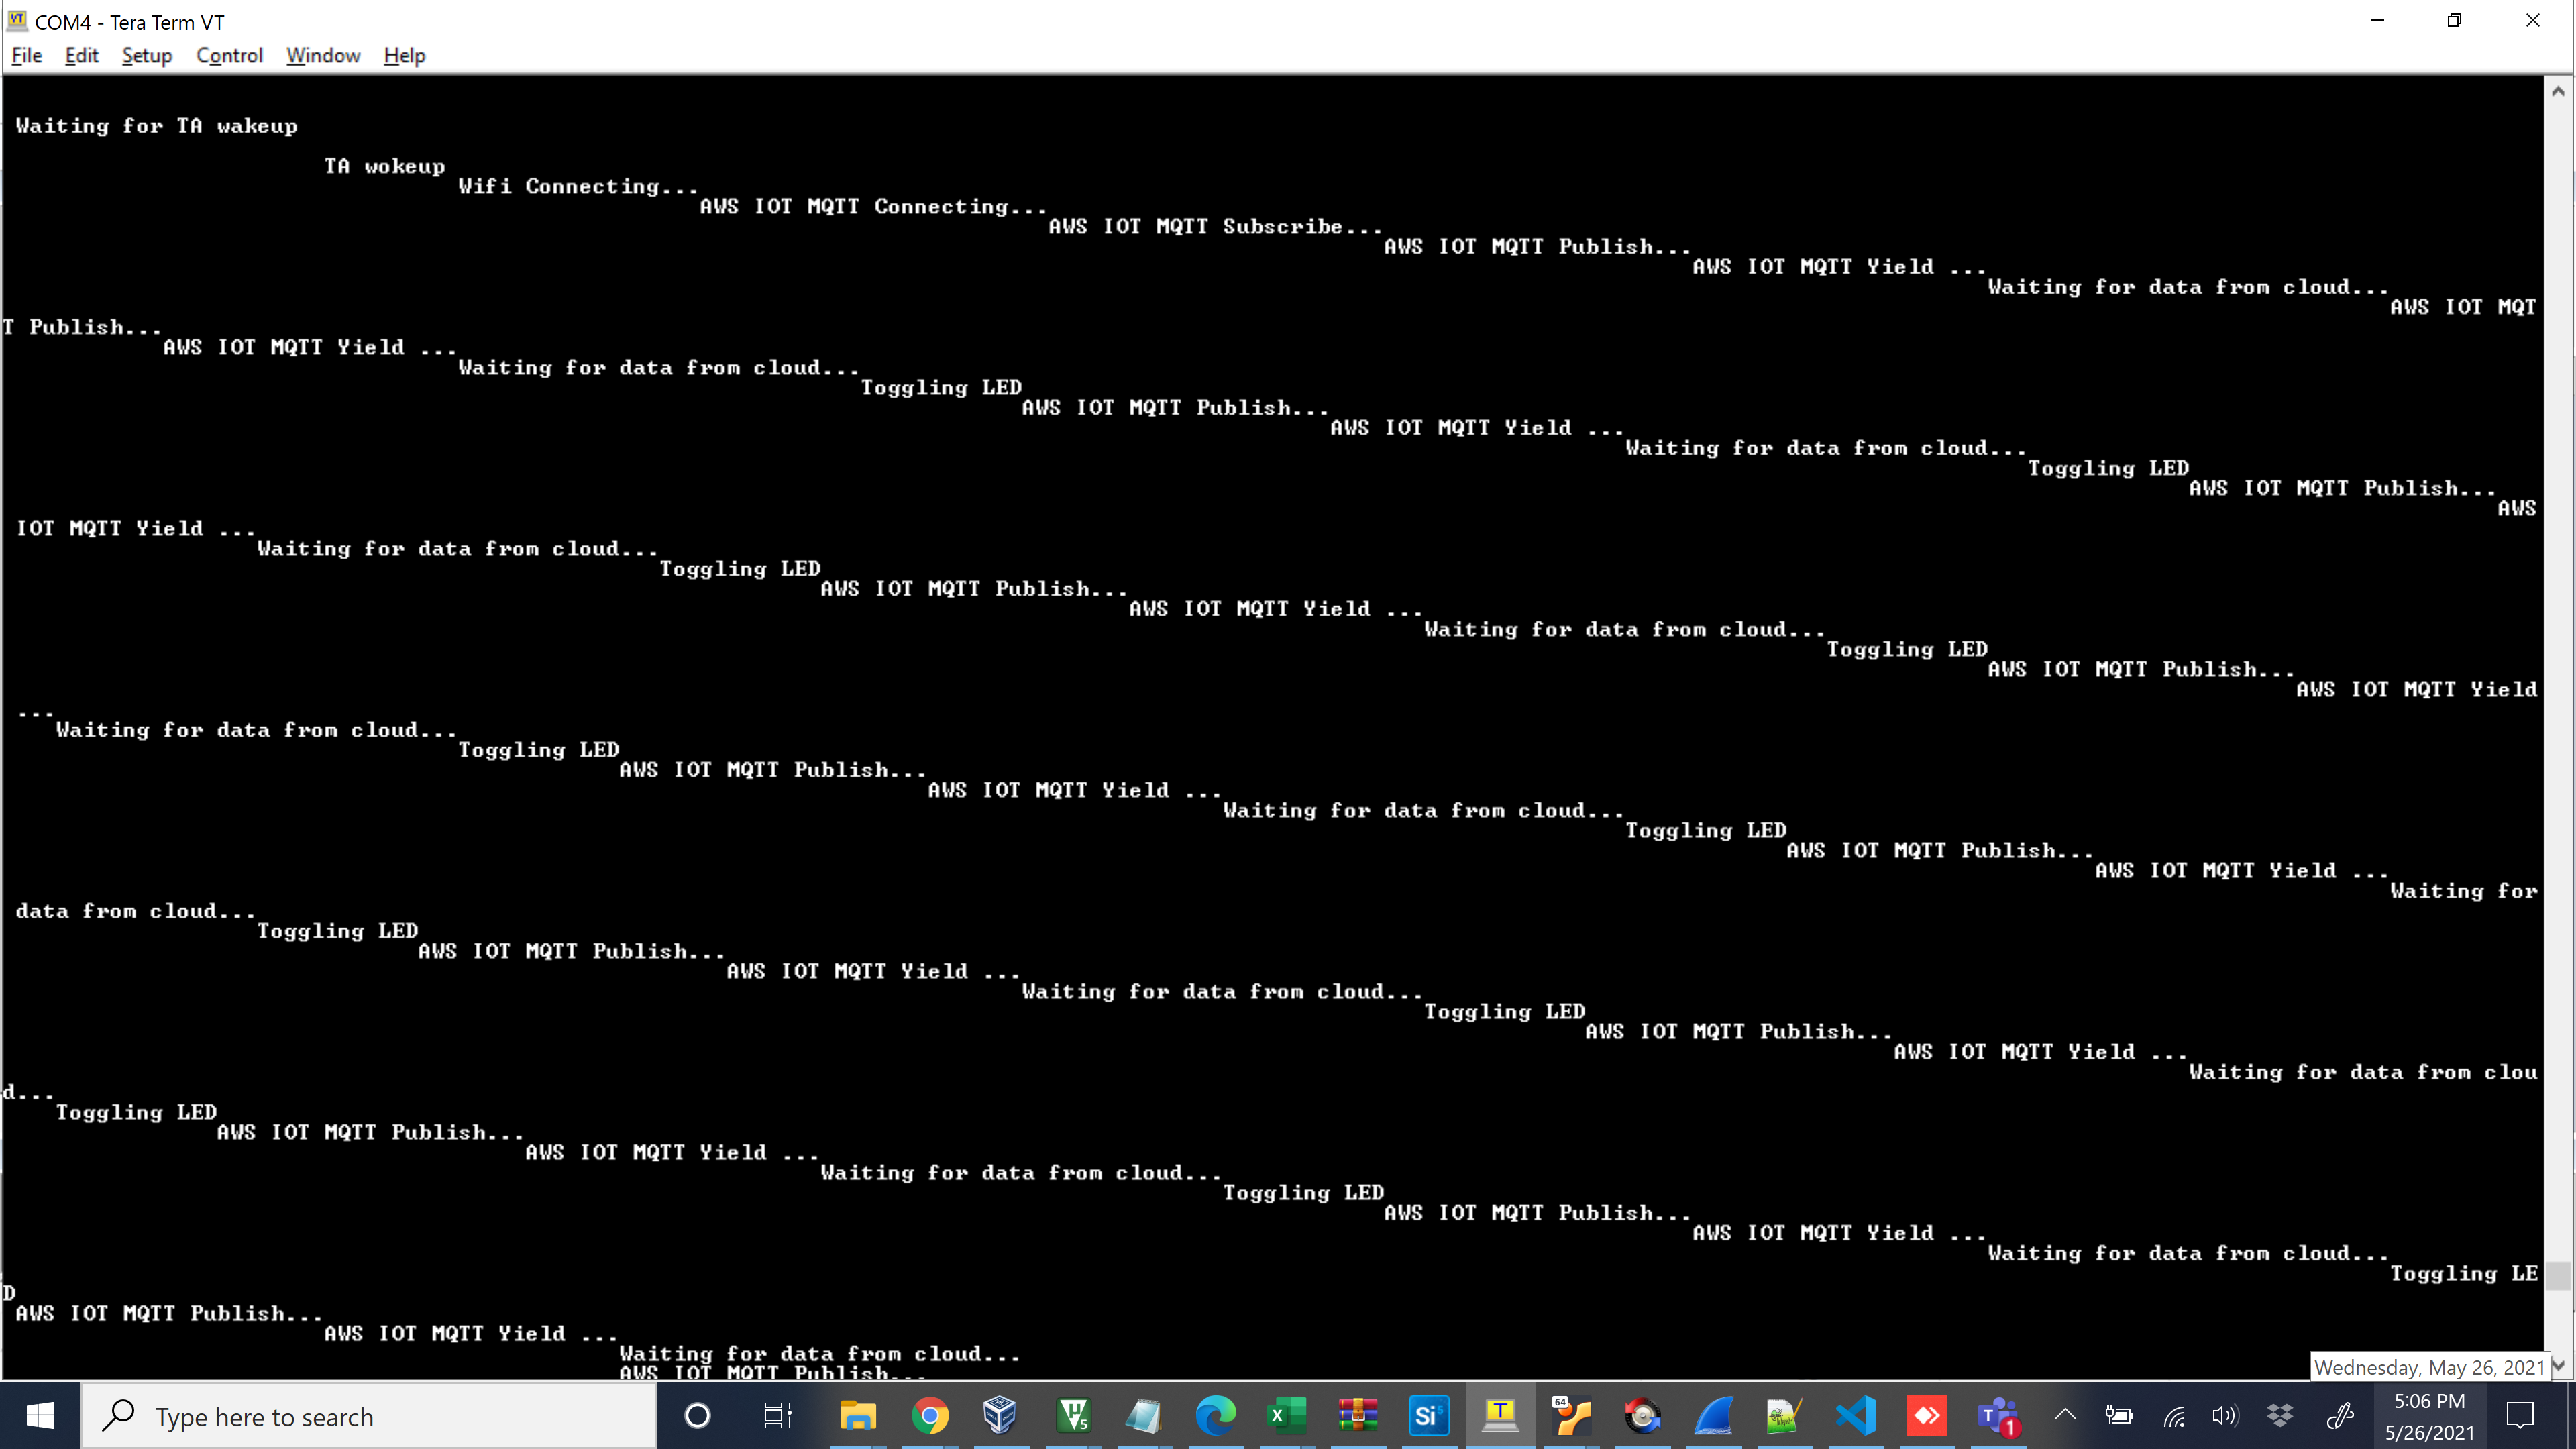
You should be able to see the LED toggling on the board
Appendix#
Create an AWS Thing#
Create a thing in the AWS IoT registry to represent your IoT Device.
In the AWS IoT console, in the navigation pane, choose Manage, and then choose Things.
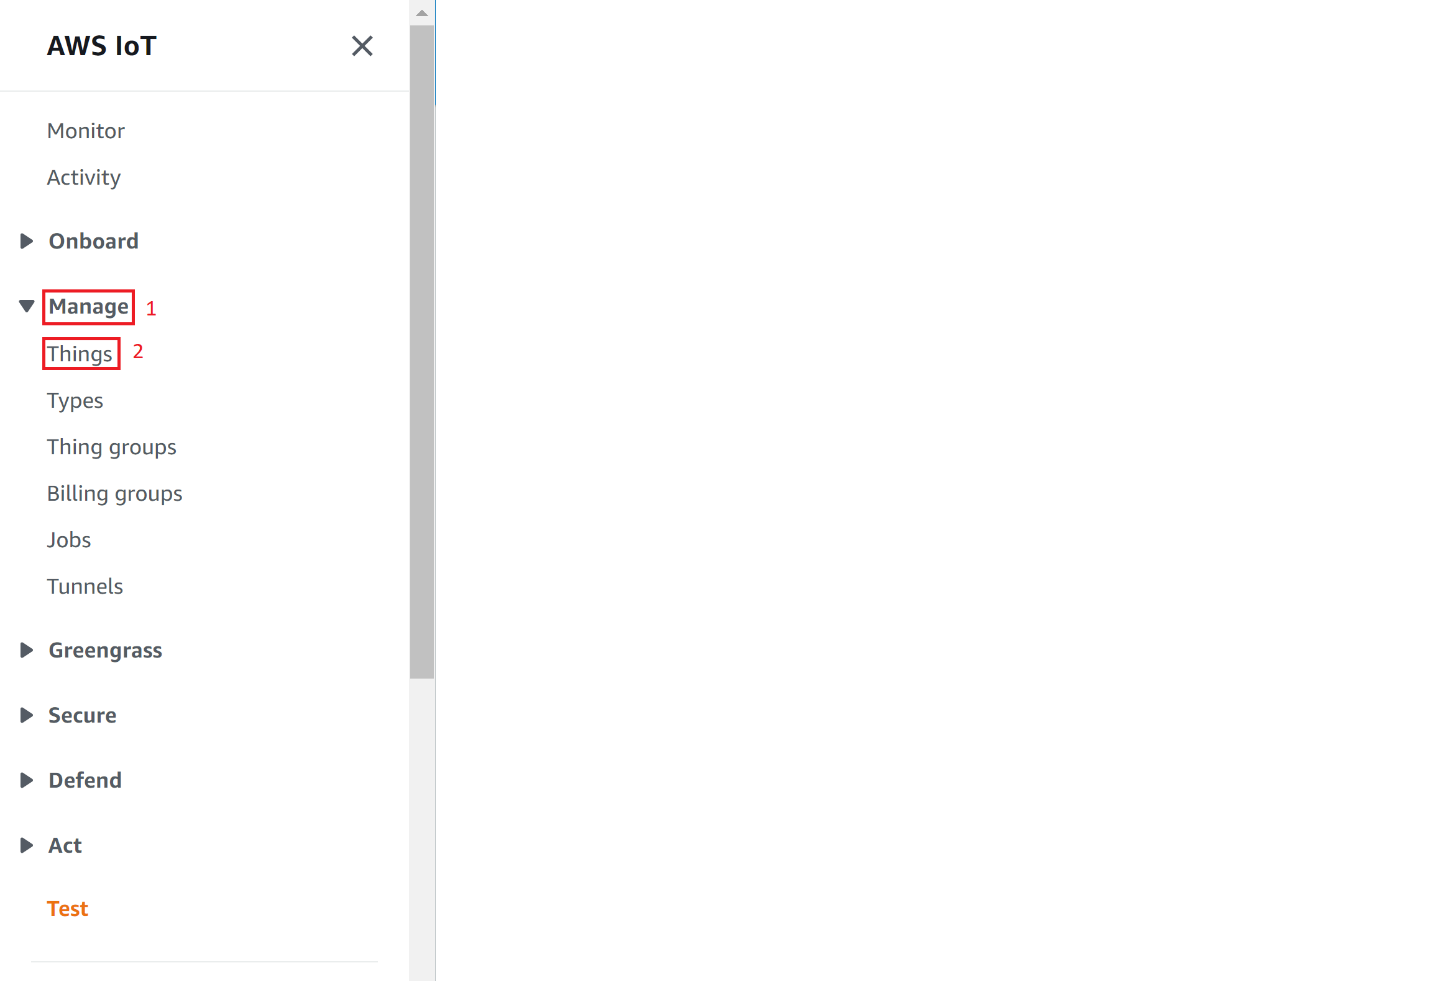
If a You don't have any things yet dialog box is displayed, choose Register a thing. Otherwise, choose Create.
Click on Create.

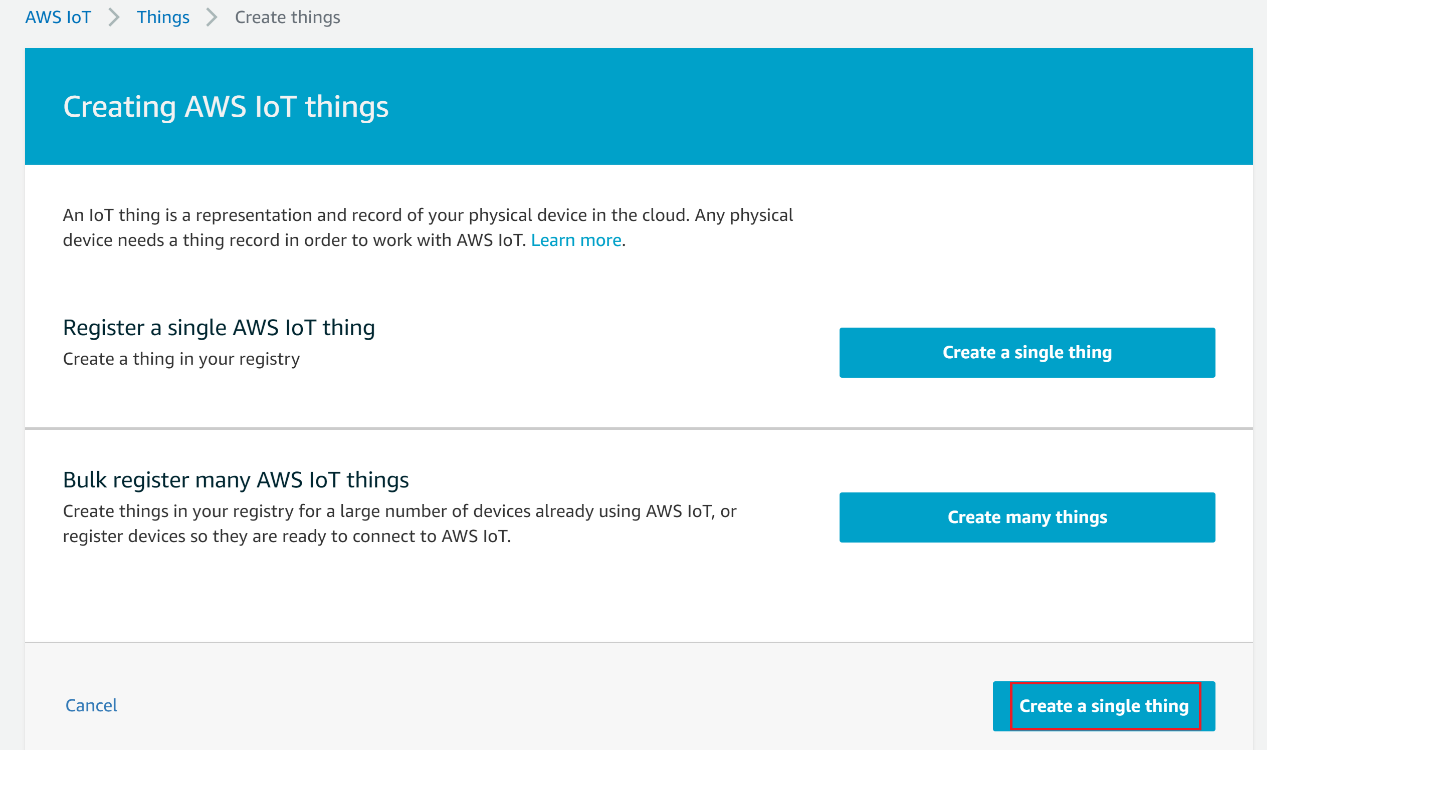
On the Creating AWS IoT things page, choose Create a single thing.
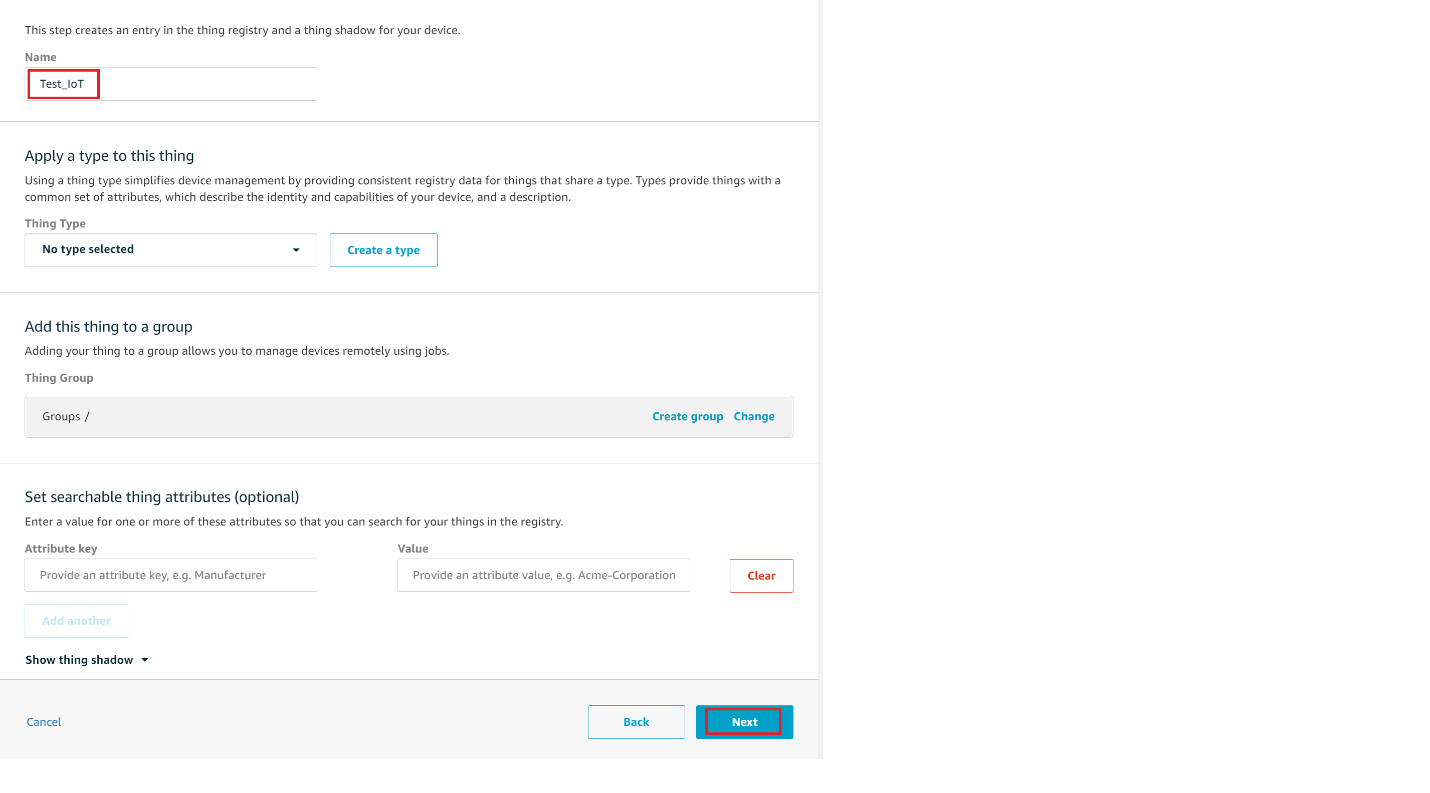
On the Add your device to the device registry page, enter a name for your IoT thing (for example, Test_IoT), and then choose Next. You can't change the name of a thing after you create it. To change a thing's name, you must create a new thing, give it the new name, and then delete the old thing.
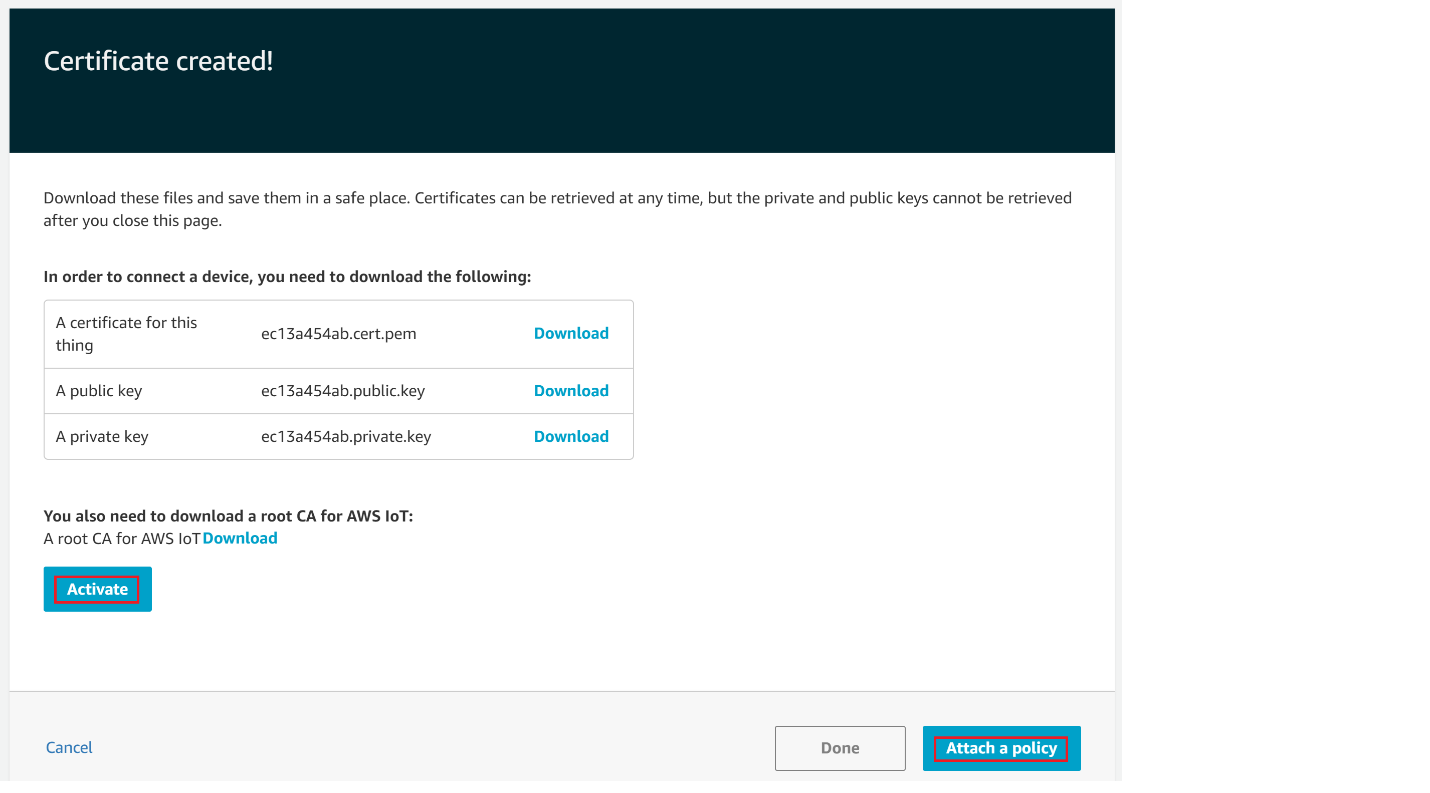
On the Add a certificate for your thing page, choose Create certificate.
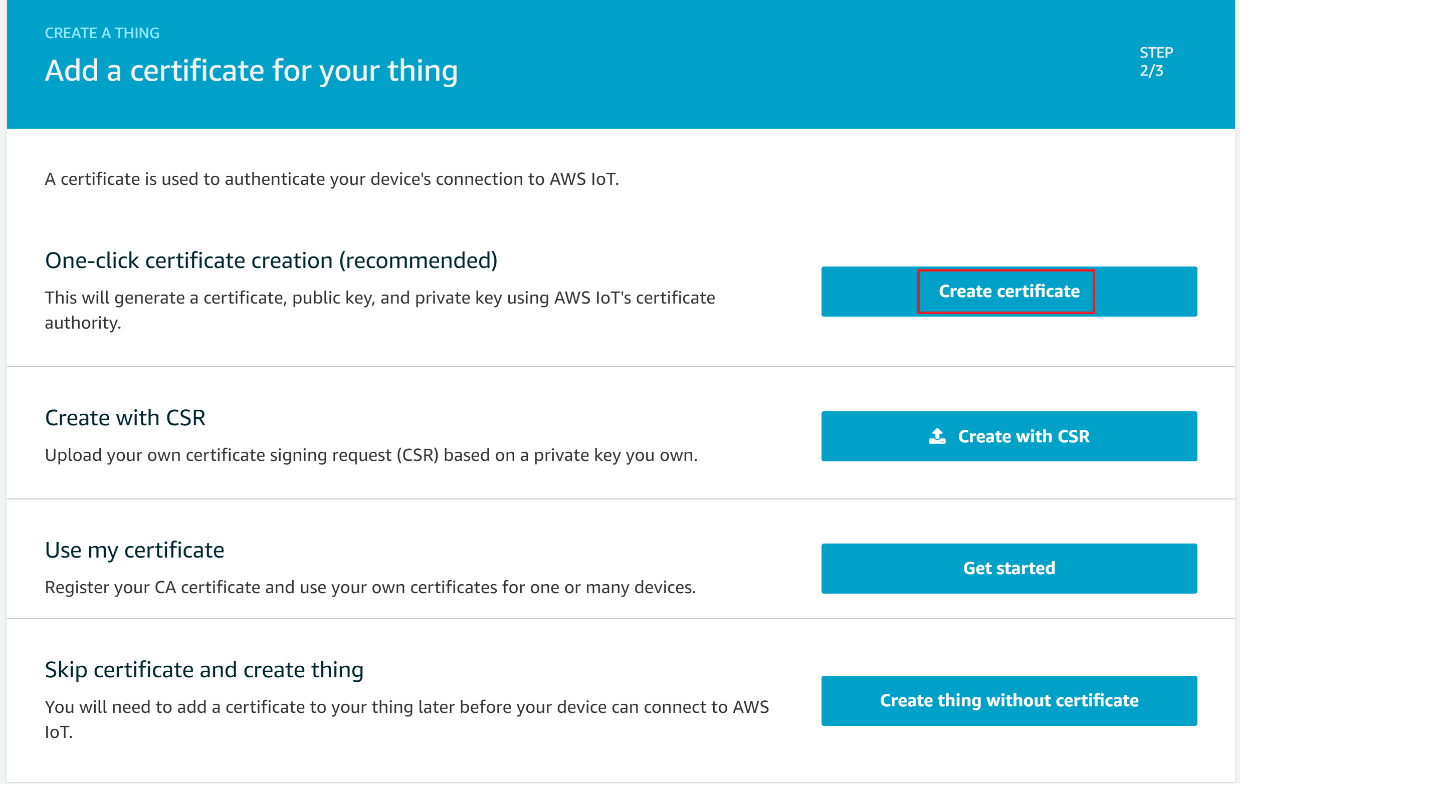
Choose the Download links to download the certificate, private key, and root CA certificate.
Warning: This is the only instance you can download your certificate and private key. Make sure to save them safely.
Choose Activate.
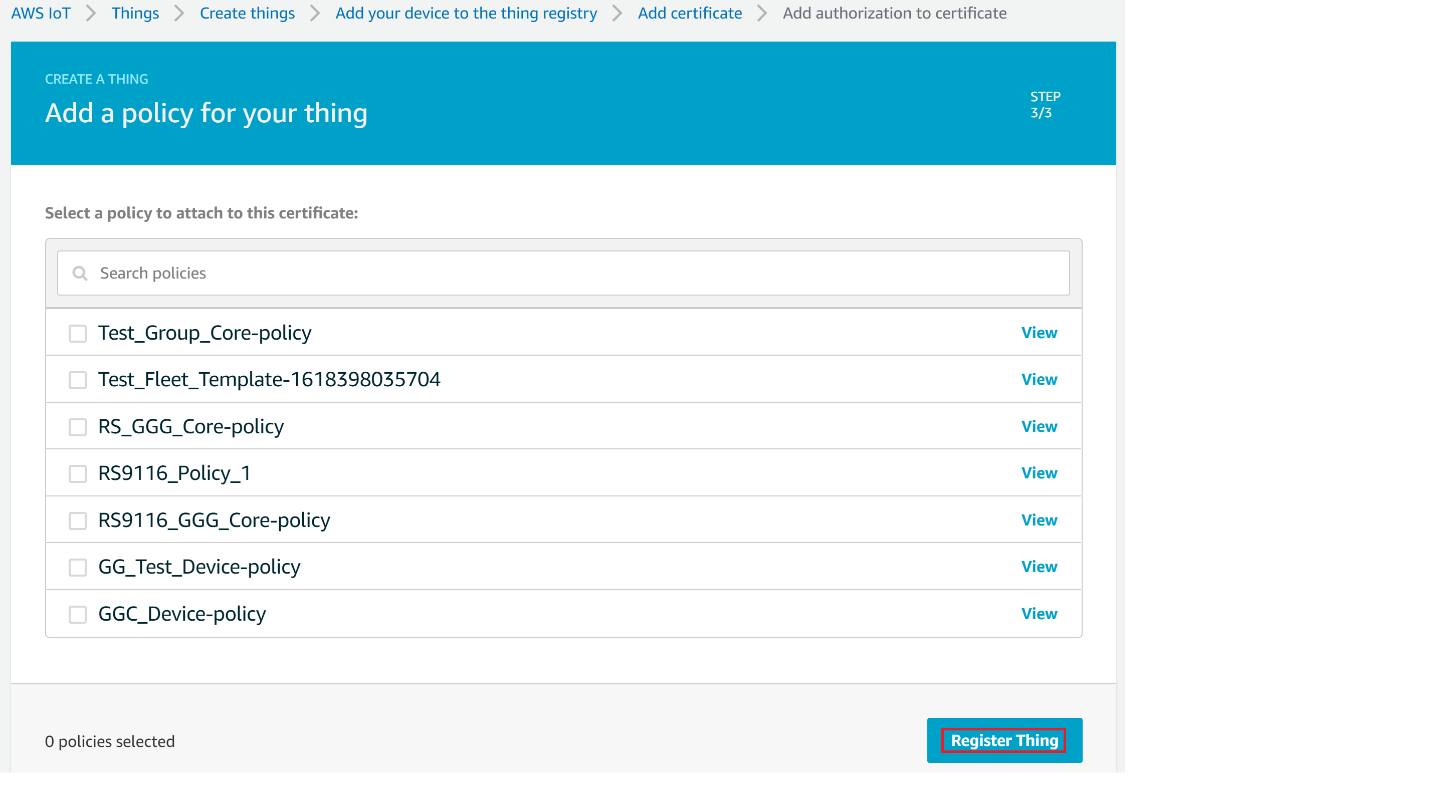
Choose Attach a policy.
Choose the Policy created and then choose Register Thing.
Note : If you don't have any policy created, follow the steps in Create Policy section in the below and then choose the created Policy
View list of devices as shown
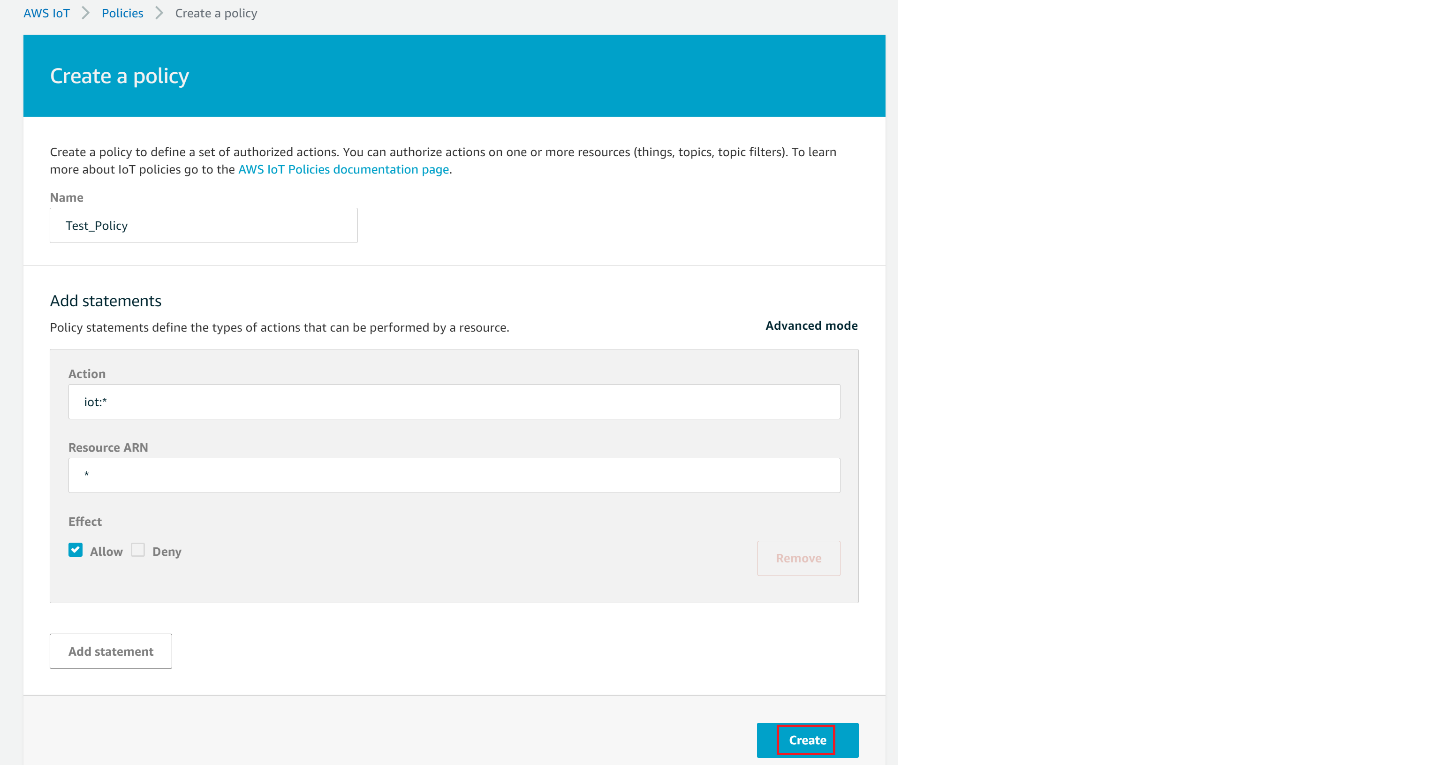
Create Policy#
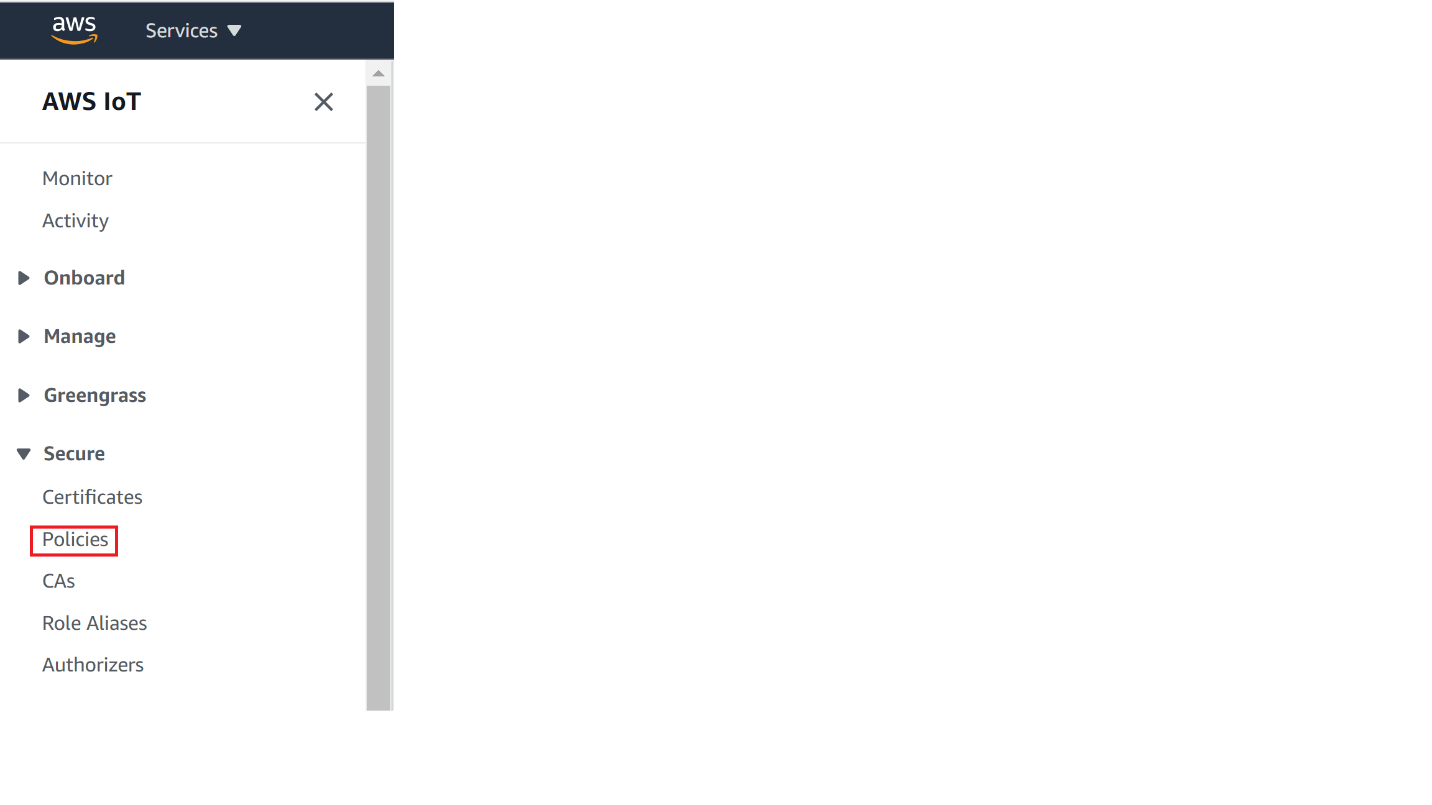
Navigate to AWS IoT console
Choose Policies under Secure
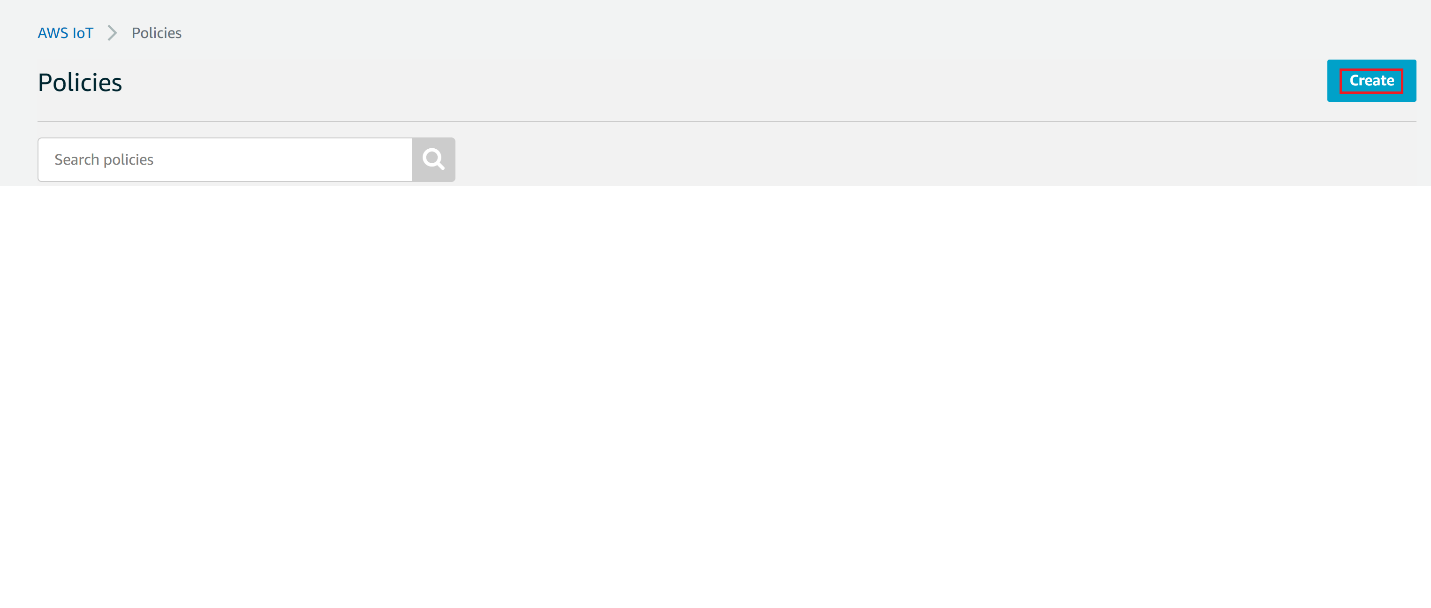
Click on Create
Give the Name to your Policy, Fill Action and Resource ARN as shown in below image, Click on Allow under Effect and click Create