Azure Telemetry C2D#
1. Purpose / Scope#
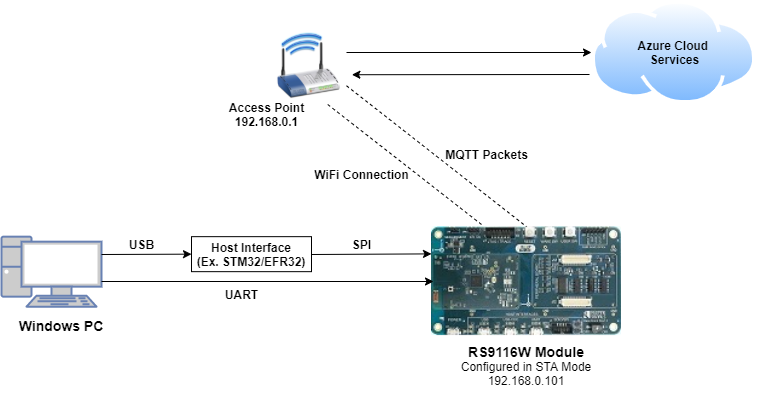
This application demonstrates how to configure RS9116 as an Azure device endpoint and how to establish connection with Azure IoT Hub and send telemetry messages to Hub from device (D2C) and receive the messages from the IoT Hub (C2D).
2. Prerequisities / Setup Requirements#
Before running the application, the user will need the following things to setup.
2.1 Hardware Requirements#
Windows PC with Host interface (UART/ SPI).
Silabs RS9116 Wi-Fi Evaluation Kit
Host MCU Eval Kit. This example has been tested with:
Wi-Fi Access point
2.2 Software Requirements#
Embedded Development Environment
For STM32, use licensed Keil IDE
For Silabs EFx32, use the latest version of Simplicity Studio
Standard Azure Account.
Python 3 installation
3. Application Build Environment#
3.1 Platforms#
The Application can be built and executed on below Host platforms
3.2 Host Interface#
By default, the application is configured to use the SPI bus for interfacing between Host platforms and the RS9116W EVK.
The SAPI driver provides APIs to enable other host interfaces if SPI is not suitable for your needs.
3.3 Project Configuration#
The Application is provided with the project folder consists of Keil and Simplicity studio (ssl) project files.
Keil project :
The Keil can be executed on STM32 platform.
Project Path :
<SDK>\examples\snippets\wlan\cloud_apps\azure_iot\projects\azure_iot-nucleo-f411re.uvprojx
Simplicity Studio :
The Simplicity Studio project can be executed on EFR32MG21.
Project Path :
If the Radio Board is BRD4180A or BRD4181A, then access the path
<SDK>\examples\snippets\wlan\cloud_apps\azure_iot\projects\azure_iot-brd4180a-mg21.slsprojIf the Radio Board is BRD4180B or BRD4181B, then access the path
<SDK>\examples\snippets\wlan\cloud_apps\azure_iot\projects\azure_iot-brd4180b-mg21.slsproj
3.4 Bare Metal Support#
This application supports only bare metal environment. By default, the application project files (Keil and Simplicity studio) are provided with bare metal configuration in the SDK.
4. Application Configuration Parameters#
The application can be configured to suit user requirements and development environment. Read through the following sections and make any changes needed.
4.1 Open rsi_azure_telemetry_c2d.c file.#
4.1.1 User must update the following parameters#
SSID refers to the name of the Access point.
#define SSID "SILABS_AP"SECURITY_TYPE refers to the type of security. In this application STA supports Open, WPA-PSK, WPA2-PSK securities.
Valid configuration is:
RSI_OPEN - For OPEN security mode
RSI_WPA - For WPA security mode
RSI_WPA2 - For WPA2 security mode
#define SECURITY_TYPE RSI_WPA2PSK refers to the secret key if the Access point configured in WPA-PSK/WPA2-PSK security modes.
#define PSK "1234567890"To configure IP address
DHCP_MODE refers whether IP address configured through DHCP or STATIC
#define DHCP_MODE 1Note: If user wants to configure STA IP address through DHCP then set DHCP_MODE to "1" and skip configuring the following DEVICE_IP, GATEWAY and NETMASK macros. (Or) If user wants to configure STA IP address through STATIC then set DHCP_MODE macro to "0" and configure following DEVICE_IP, GATEWAY and NETMASK macros.
The IP address needs to be configuring to the RS9116W EVk should be in long format and in little endian byte order.
Example: To configure "192.168.10.10" as IP address, update the macro DEVICE_IP as 0x0A0AA8C0.
#define DEVICE_IP 0X0A0AA8C0IP address of the gateway should also be in long format and in little endian byte order
Example: To configure "192.168.10.1" as Gateway, update the macro GATEWAY as 0x010AA8C0
#define GATEWAY 0x010AA8C0IP address of the network mask should also be in long format and in little endian byte order.
Example: To configure "255.255.255.0" as network mask, update the macro NETMASK as 0x00FFFFFF
#define NETMASK 0x00FFFFFF4.2 Open rsi_wlan_config.h file. User can also modify the below parameters as per their needs and requirements.#
#define CONCURRENT_MODE RSI_DISABLE
#define RSI_FEATURE_BIT_MAP FEAT_SECURITY_OPEN
#define RSI_TCP_IP_BYPASS RSI_DISABLE
#define RSI_TCP_IP_FEATURE_BIT_MAP (TCP_IP_FEAT_DHCPV4_CLIENT|TCP_IP_FEAT_SSL |TCP_IP_FEAT_DNS_CLIENT)
#define RSI_CUSTOM_FEATURE_BIT_MAP FEAT_CUSTOM_FEAT_EXTENTION_VALID
#define RSI_EXT_CUSTOM_FEATURE_BIT_MAP (EXT_FEAT_256K_MODE | BIT(1) | BIT(3) | BIT(27))
#define RSI_BAND RSI_BAND_2P4GHZPower save configuration
By default, the application is configured without power save.
#define ENABLE_POWER_SAVE 0If user wants to run the application in power save, modify the below macro.
#define ENABLE_POWER_SAVE 14.3 Configure below parameters in azure_iot_config.h file#
#define MAX_NW_RETRY_COUNT 5 ///< Network retry count value
#define MAX_NTP_RETRY_COUNT 5 ///< NTP retry count value
#define RECV_TIMEOUT_VAL 5000 ///< rsi_recv() Time Out in ms
#define TIMEOUT_VAL_NTP_MS 1000 ///< NTP Time Out in ms
#define NTP_SERVER_PORT 123 ///< NTP Port
#define DNS_REQ_COUNT 5 ///< DNS REQUEST retry Count
#define MQTT_KEEPALIVE_VAL 4 * 60 ///< MQTT Keepalive value
#define CONNECTION_STRING \
"HostName=xxxxxxx.azure-devices.net;DeviceId=xxxxx_Device_SelfSign;x509=true" ///< Connection string
#define MESSAGE_COUNT \
5 ///< Number of D2C messages sent to Azure Hub and also minimum number of C2D messages to be received by application
#define CLIENT_PORT 4002 ///< Client port4.4 To Load Certificate#
rsi_wlan_set_certificate() API expects the certificate in the form of linear array. Convert the pem certificate into linear array form using python script provided in the SDK <SDK>/resources/certificates/certificate_script.py.
For example : If the certificate is ca-certificate.pem, enter the command in the following way:
python certificate_script.py ca-certificate.pem
The script will generate ca-certificate.pem in which one linear array named ca-certificate contains the certificate.Root CA certificate, Device private key and Device client certificate needs to be converted as mentioned above
After the conversion, place the converted files in <SDK>/resources/certificates/ path and include the certificate files in rsi_azure_telemetry_c2d.c
Replace the default Device certificate and Private key certificate in the application with the converted pem file name.
// Certificate includes
#include "azure_client_certificate.pem.crt.h"
#include "azure_client_private_key.pem.key.h"
#include "azure_starfield_ca.pem.h" Replace the default Device certificate and Private key certificate given in rsi_wlan_set_certificate() API in the application with the converted pem array.
// Load Security Certificates
status = rsi_wlan_set_certificate(RSI_SSL_CLIENT, azure_client_certificate, (sizeof(azure_client_certificate) - 1));
status =
rsi_wlan_set_certificate(RSI_SSL_CLIENT_PRIVATE_KEY, azure_client_private_key, (sizeof(azure_client_private_key) - 1));NOTE : For Azure connectivity, Baltimore Root CA certificate has the highest authority being at the top of the signing hierarchy.
The Baltimore Root CA certificate is an expected/required certificate which usually comes pre-installed in the operating systems and it plays a key part in certificate chain verification when a device is performing TLS authentication with the IoT endpoint.
On RS9116 device, we do not maintain root CA trust repository due to memory constraints, so it is mandatory to load Baltimore Root CA certificate for successful mutual authentication to Azure server.
On RS9116 to authenticate the Azure server, firstly Root CA is validated (validate the Root CA received with the Root CA loaded on the device). Once the Root CA validation is successful , other certificates sent from the Azure server are validated. RS9116 don't authenticate to Azure server if intermediate CA certificates are loaded instead of Baltimore Root CA certificate and would result in Handshake error. Baltimore Root CA certificate is at https://www.digicert.com/kb/digicert-root-certificates.htm
5. Testing the Application#
Follow the steps below for the successful execution of the application.
5.1 Loading the RS9116W Firmware#
Refer Getting started with a PC to load the firmware into RS9116W EVK. The firmware file is located in <SDK>/firmware/
5.2 Building the Application on Host Platform#
5.2.1 Using STM32#
Refer Getting started with STM32
Open the project
<SDK>\examples\snippets\wlan\cloud_apps\azure_iot\projects\azure_iot-nucleo-f411re.uvprojxBuild and Debug the project.
Check for the RESET pin:
If RESET pin is connected from STM32 to RS9116W EVK, then user need not press the RESET button on RS9116W EVK before Free run.
If RESET pin is not connected from STM32 to RS9116W EVK, then user need to press the RESET button on RS9116W EVK before Free run.
Free run the project.
Then continue the common steps from Section 5.3
5.2.2 Using EFX#
Refer Getting started with EFX32
Open the project
<SDK>\examples\snippets\wlan\cloud_apps\azure_iot\projects\azure_iot-brd4180b-mg21.slsprojCompile and flash the project in to Host MCU
Run/debug the application
Check for the RESET pin:
If RESET pin is connected from EFX32 to RS9116W EVK, then user need not press the RESET button on RS9116W EVK before free run
If RESET pin is not connected from EFX32 to RS9116W EVK, then user need to press the RESET button on RS9116W EVK before free run
Free run the project
Then continue the common steps from Section 5.3
5.3 Common Steps#
Configure the Access point with Internet connection in OPEN/WPA-PSK/WPA2-PSK mode to connect RS9116W EVK STA mode.
Load the required certificates
Login into Azure account. Create IoT Hub in Azure portal. Add IoT Device in the Hub created.
Update the connection string in
azure_iot_config.hwithPrimary key of the IoT Device for Symmetric key authentication
For example : "HostName=example.azure-devices.net;DeviceId=example_Device_SymKey;SharedAccessKey=TAEw6g7gEJh6zB74ykuiUnA8UbUhsSApuqFIgd/YB6Y="
Connection string for IoT Device with X.509 self signed authentication
For example : "HostName=example.azure-devices.net;DeviceId=example_Device_SelfSign;x509=true"
Note: Connection string can be generated as specified in Appendix section Register a New X.509 Authenticated Device with IoT Hub for X509 and for Symmetric Key follow Register IoT Device with symmetric key authentication in IoT Hub section.
By default, application tries to connect to Azure Hub using X.509 self signed authentication mechanism.
Connect any serial console for prints.
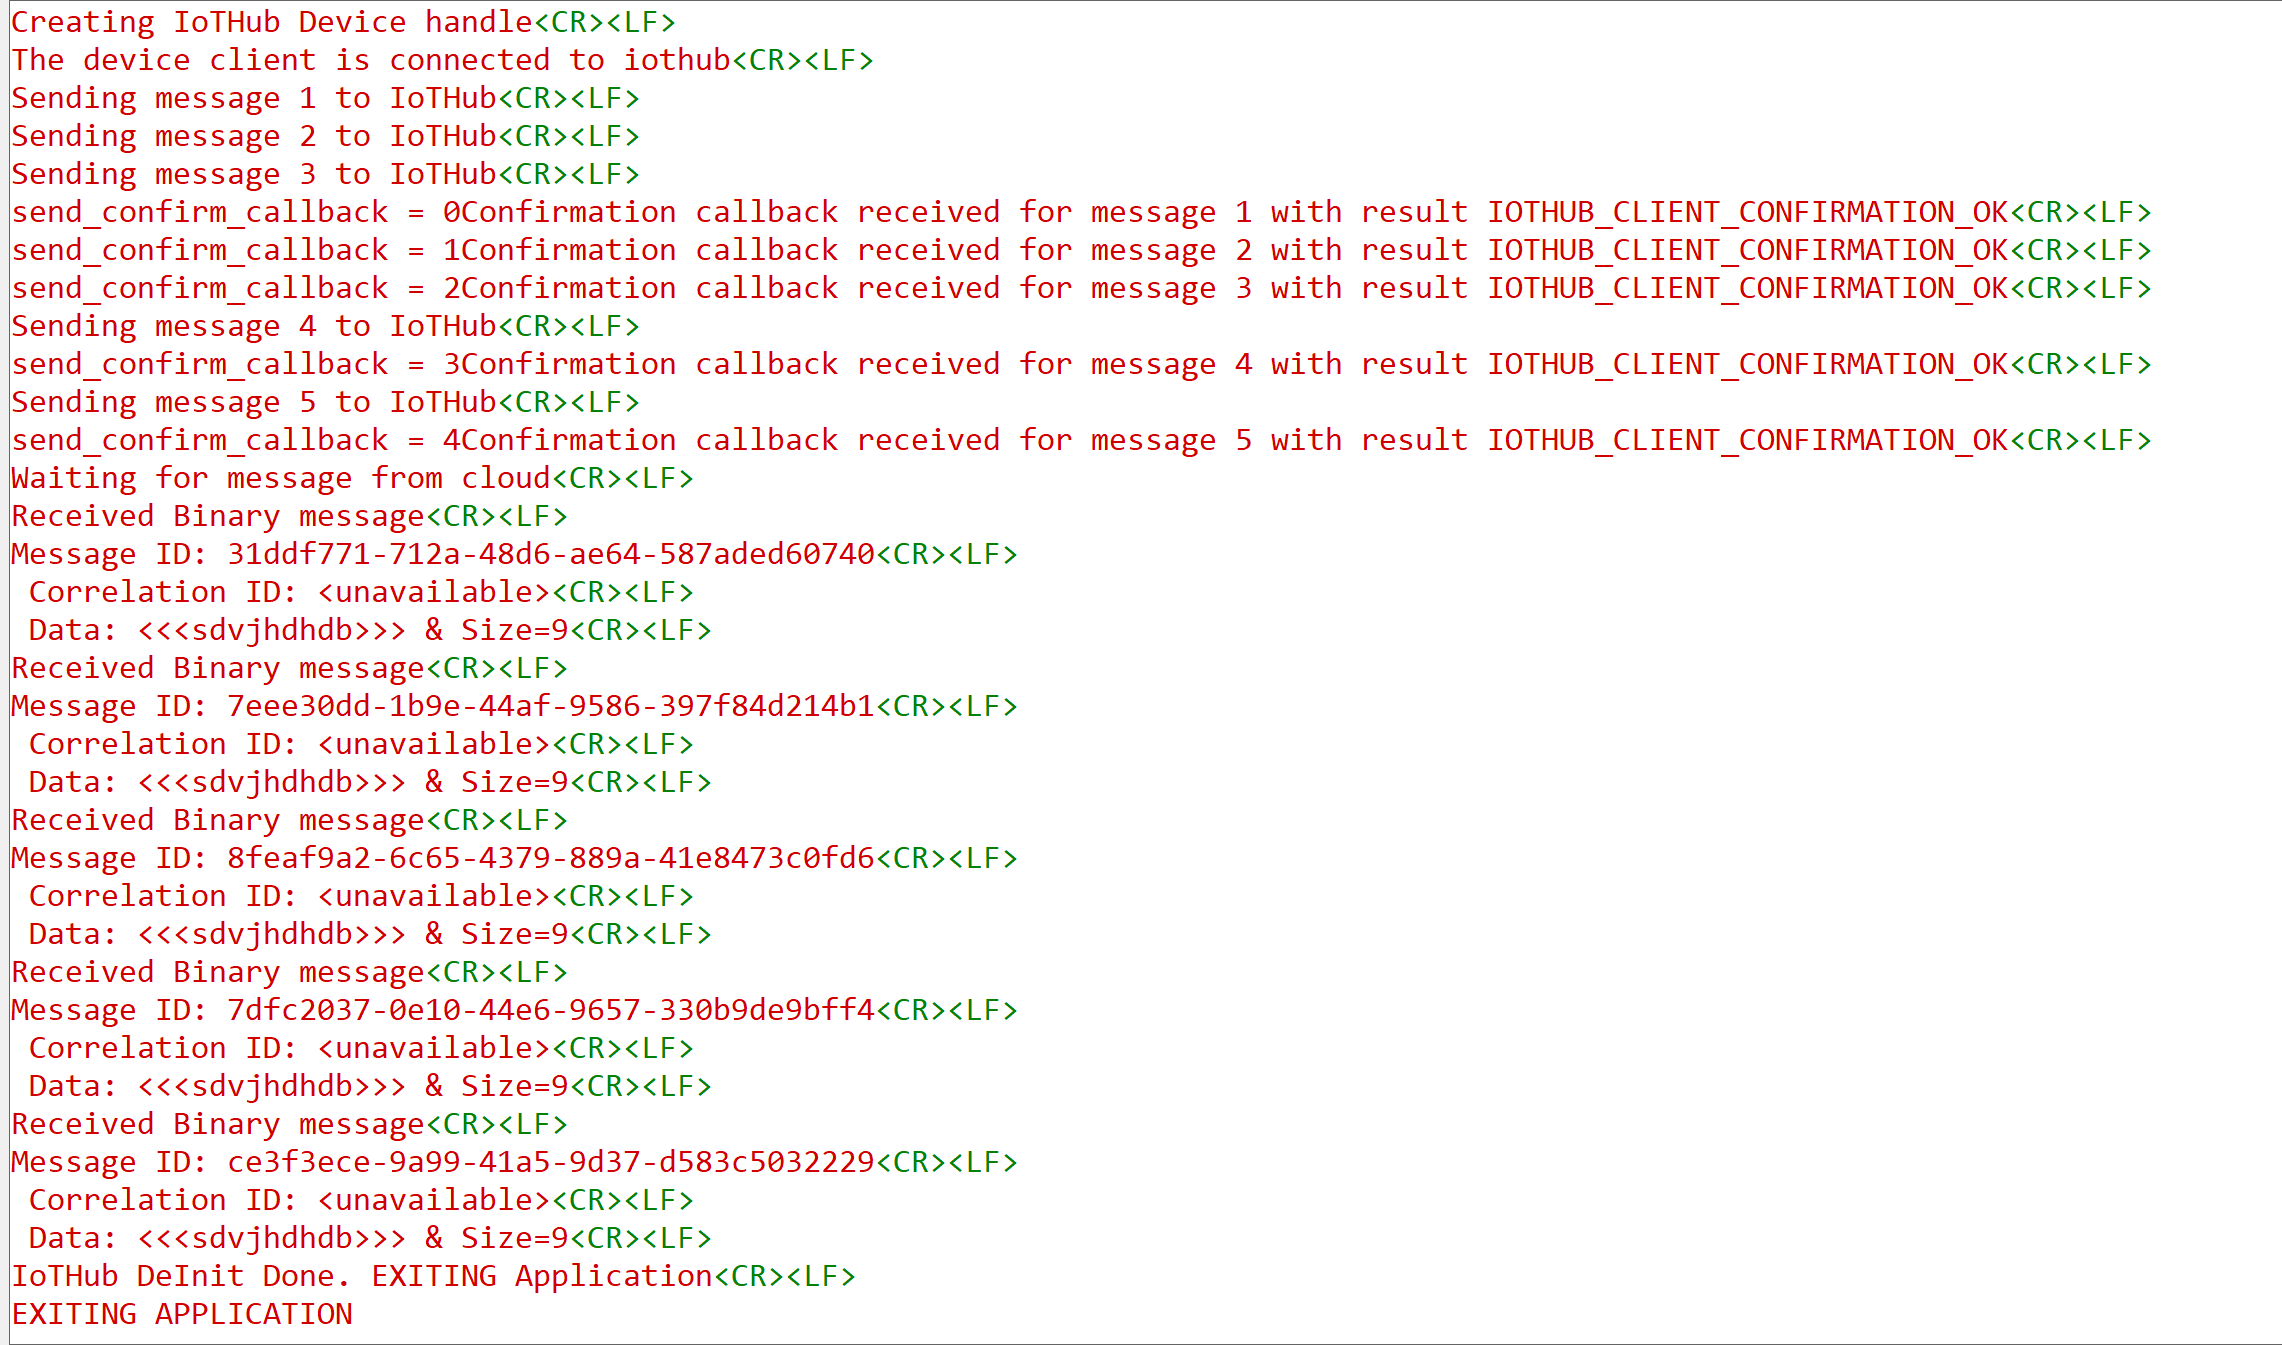
Compile and run the application. 8 The example application on execution will send 5 telemetry messages to Azure Hub and waits to receive atleast 5 C2D messages.
Following logs will be displayed on the console
Refer to Appendix section Steps to check Telemetry message on Azure cloud to check the application sent messages on cloud.
Refer to Appendix section Steps to send c2d message from the cloud to how to send C2D messages from Azure Hub
Note the following :
NOTE-1 :
If the requirement is to continue the application flow after SDK De-Init i.e Reconnect to the Azure Hub to send and receive messages, following Steps need to be followed :
- Change the state variable to RSI_WLAN_IOTHUB_LL_INIT_STATE in state RSI_WLAN_IOTHUB_LL_DEINIT_STATE.
- Add delay of 10sec for application to properly terminate the socket connections
- Refer the snippet shared below :
**case RSI_WLAN_IOTHUB_LL_DEINIT_STATE**: {
IoTHubDeviceClient_LL_Destroy(device_ll_handle);
IoTHub_Deinit();
// Reset all the global variables
messages_sent = 0;
g_message_count_send_confirmations = 0;
g_message_recv_count = 0;
g_continueRunning = true;
LOG_PRINT("IoTHub DeInit Done. Re-INIT Application\r\n");
rsi_wlan_app_cb.state = RSI_WLAN_IOTHUB_LL_INIT_STATE ;
rsi_delay(10000);
#ifdef RSI_WITH_OS
rsi_semaphore_post(&rsi_mqtt_sem);
#endif
break;
NOTE-2 :
- rsi_recv() timeout value is by default configured as 5 seconds (RECV_TIMEOUT_VAL value in azure_iot_config.h)
- If there is no data from Azure Hub, application thread will be blocked for 5 seconds in rsi_recv()
- RECV_TIMEOUT_VAL can be modified to value less than 5 seconds to reduce the wait time in rsi_recv()
NOTE-3 :
- There may be a delay observed in sending MQTT Keepalive packets from the application.
- The delay will be observed if application thread is waiting in rsi_recv() (Refer NOTE-2) when Keepalive timeout expires.
- The maximum delay obseved will be RECV_TIMEOUT_VAL.
- Reducing the RECV_TIMEOUT_VAL will reduce the delay seen to send MQTT Keepalive packets.Appendix#
Appendix-1 : Azure Account creation and IoT Device Registration
1.1 Azure Account creation
Azure offers a free 30-day trail account for all new account holders, later depending on the services you will be charged in Pay-as-you-go way.
You can follow the below steps or refer on how to create an Azure Account.
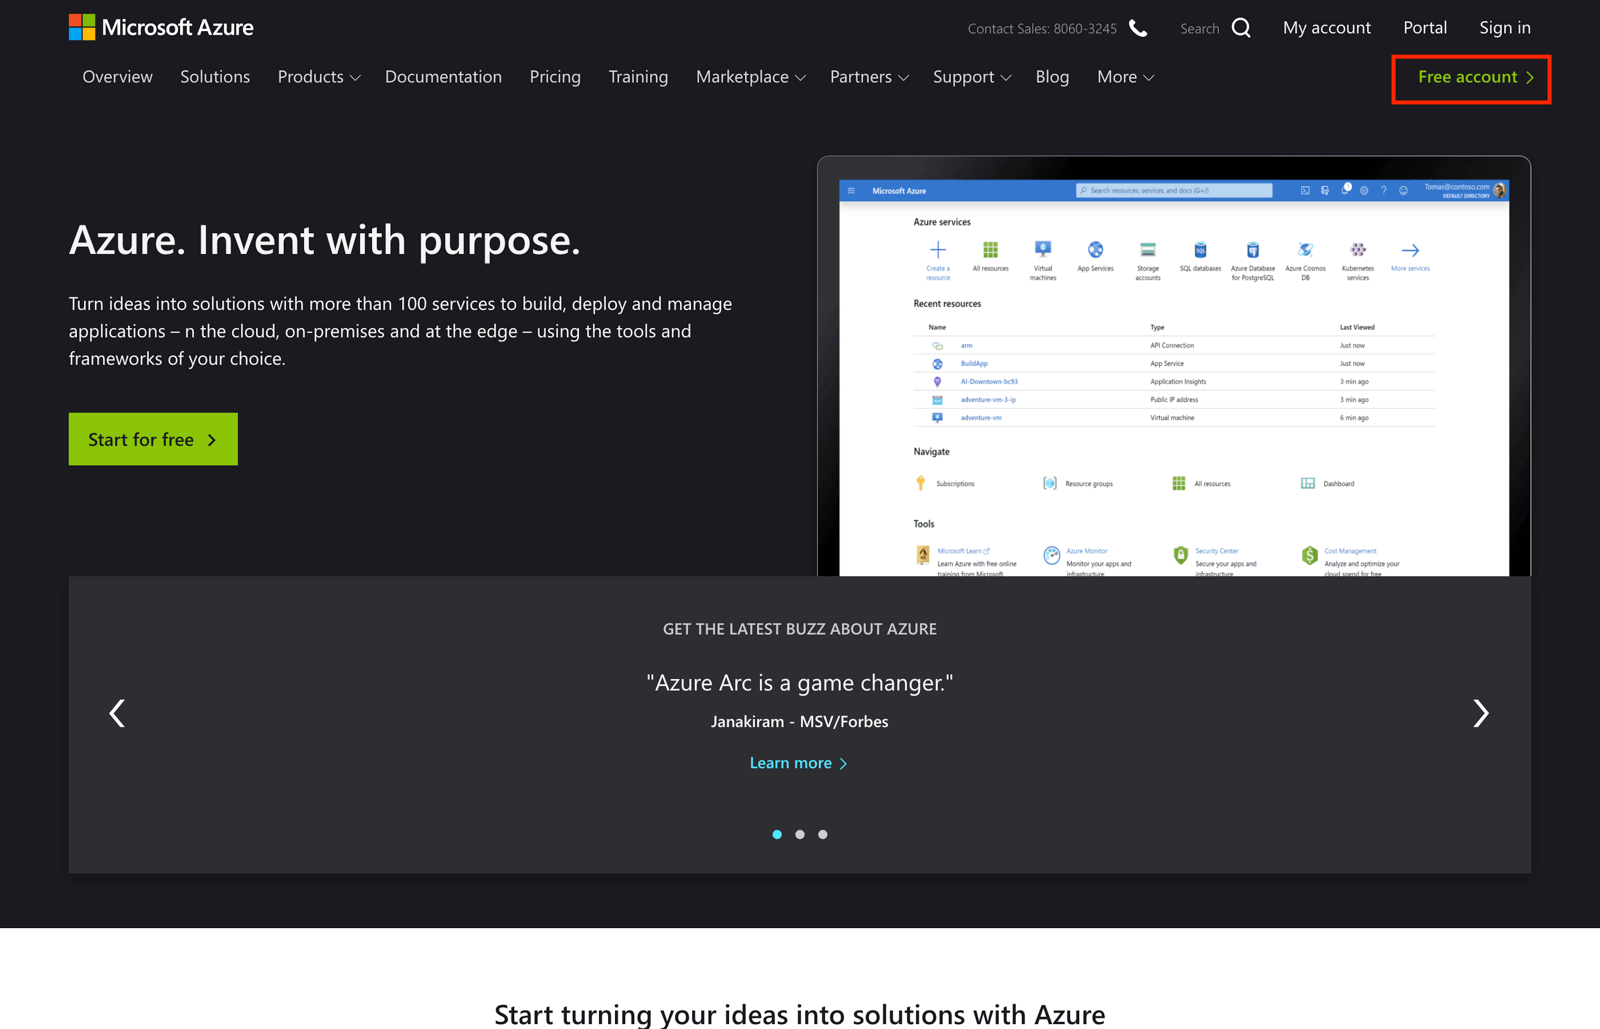
Step 1: Navigate to https://azure.microsoft.com/
Step 2: Click on “Free Account” in the top right
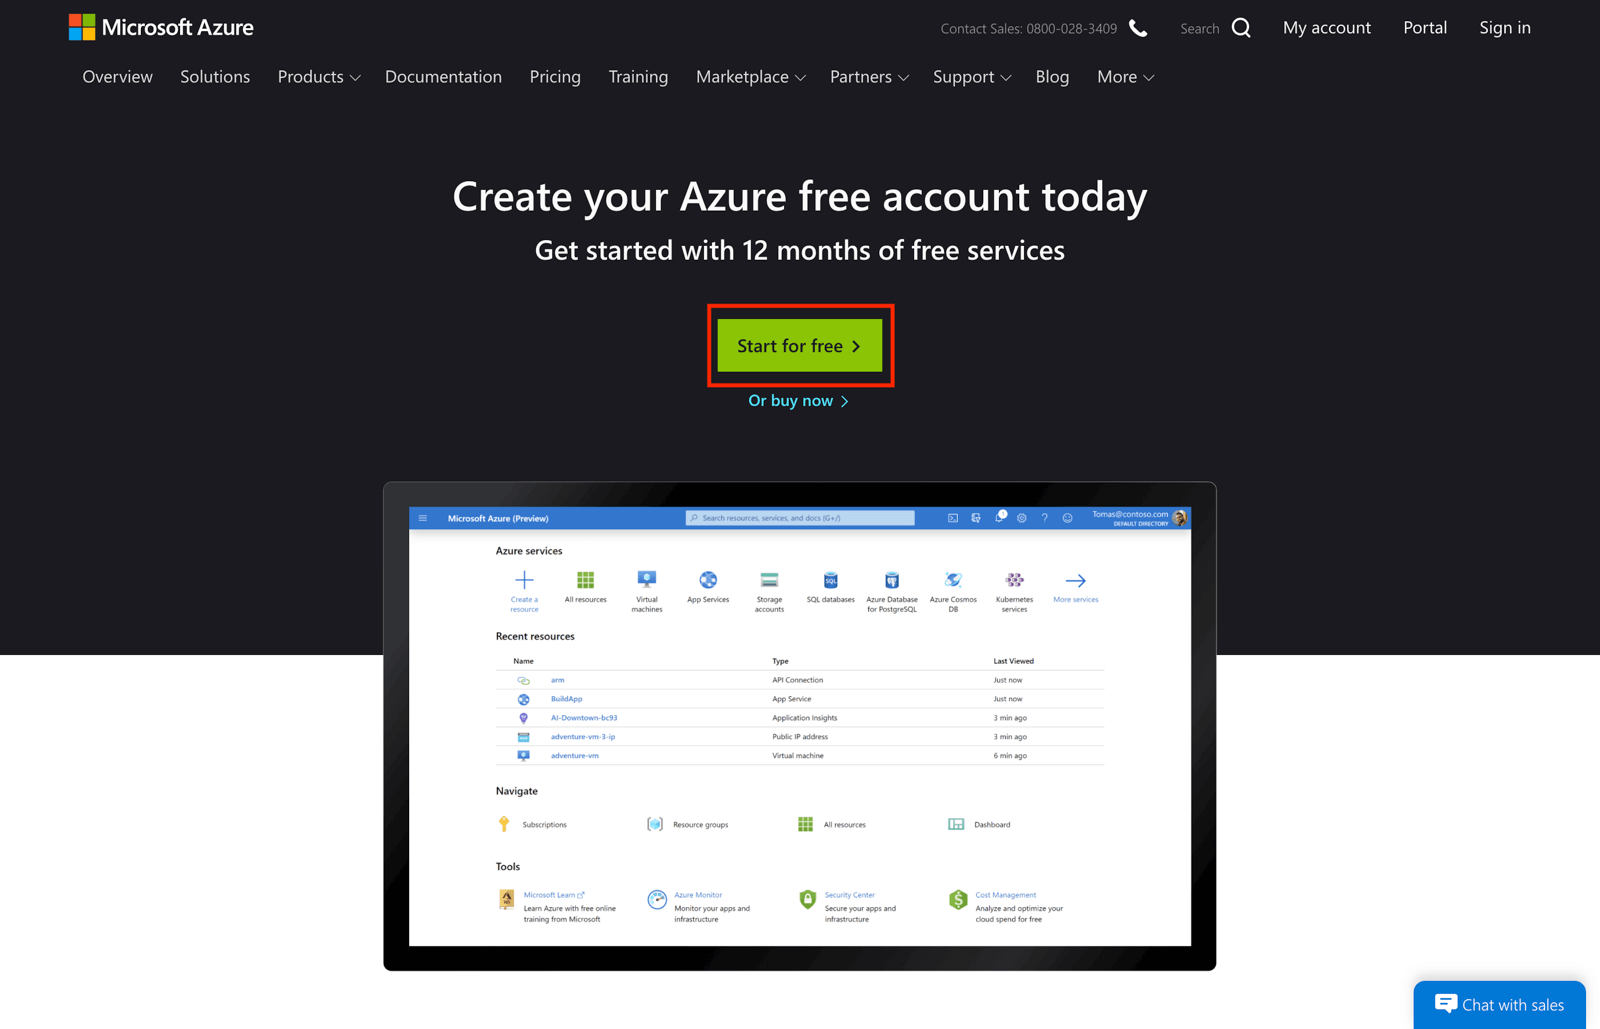
Step 3: Confirm that you wish to "Start for free".
Step 4: Enter the details requested to register to Microsoft Azure account. (Details like email, username, password etc...)
Step 5: Finally, agree to the Microsoft Azure terms and conditions to complete the setup process.
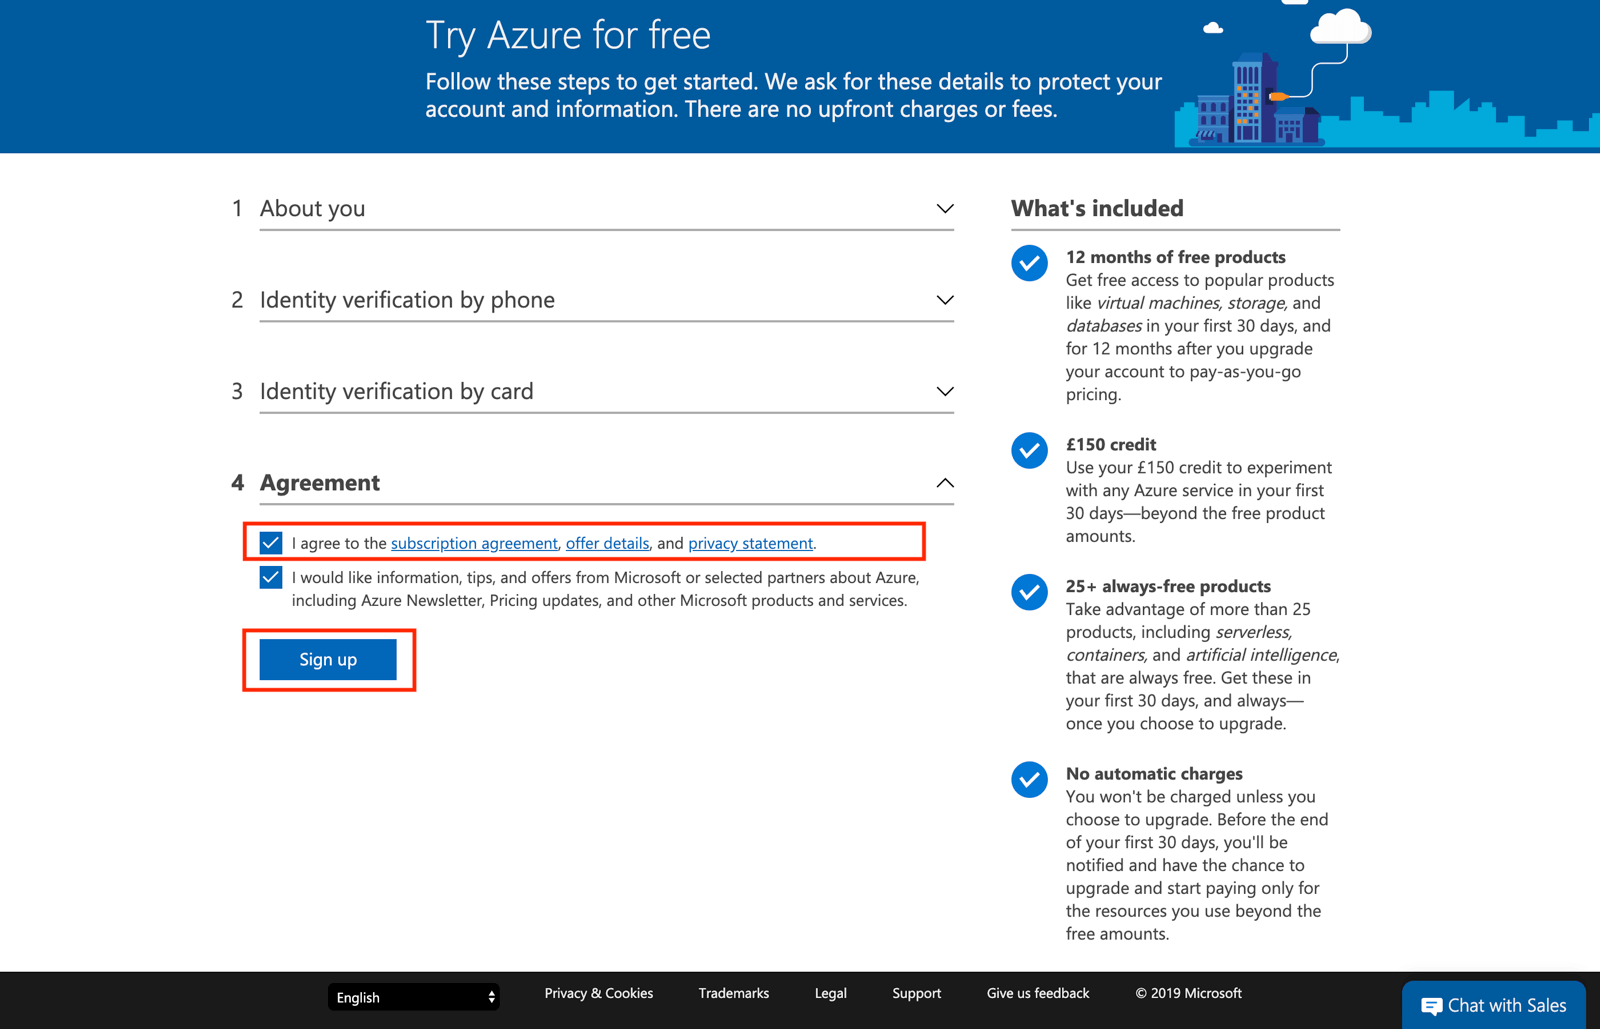
Step 6: At this stage you should be getting an Azure Link for your Azure Account.
You have now successfully created Azure account and you will be able to access all Azure Services.
1.2 Azure IoT Hub Creation
Follow the steps below or refer how to create an IoT Hub Azure IoT Hub acts as a Gate way between IoT Devices and Azure Cloud Services, Lets create a new IoT Hub service
Step 1: Login to your Azure account here https://portal.azure.com/#home

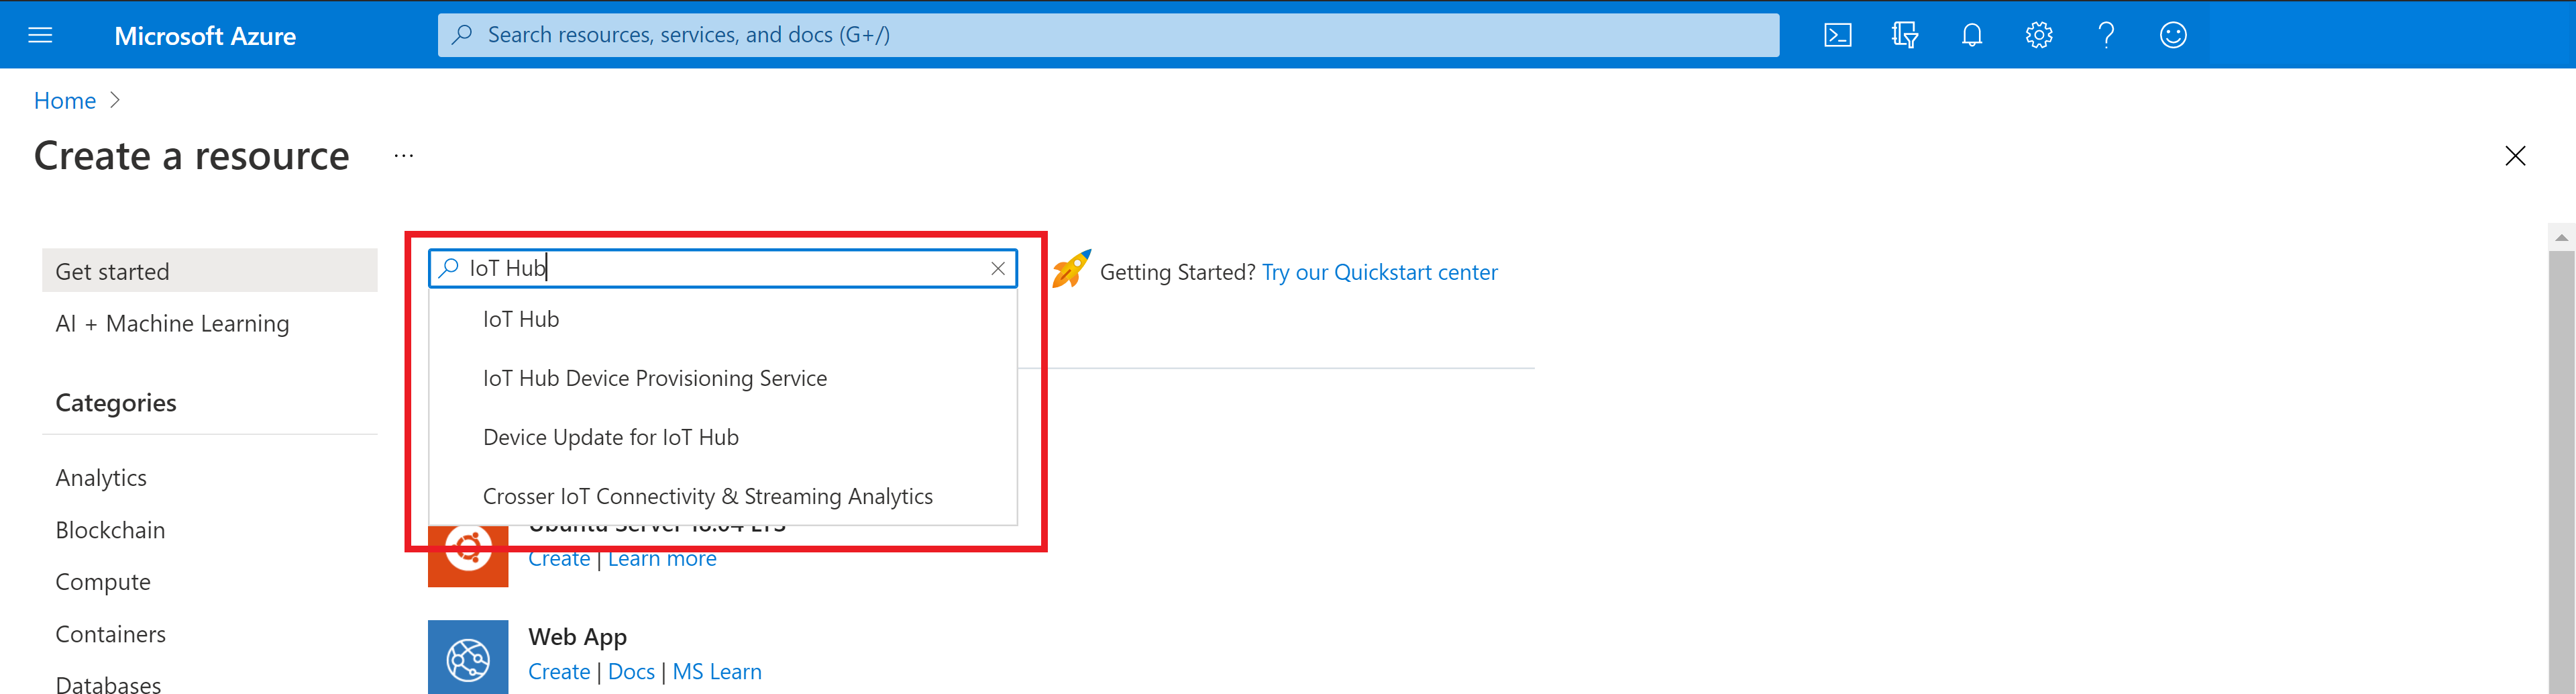
Step 2: Search for “IoT Hub” or Click on the “Create a resource icon”

Step 3: Search for “IoT Hub” in the marketplace
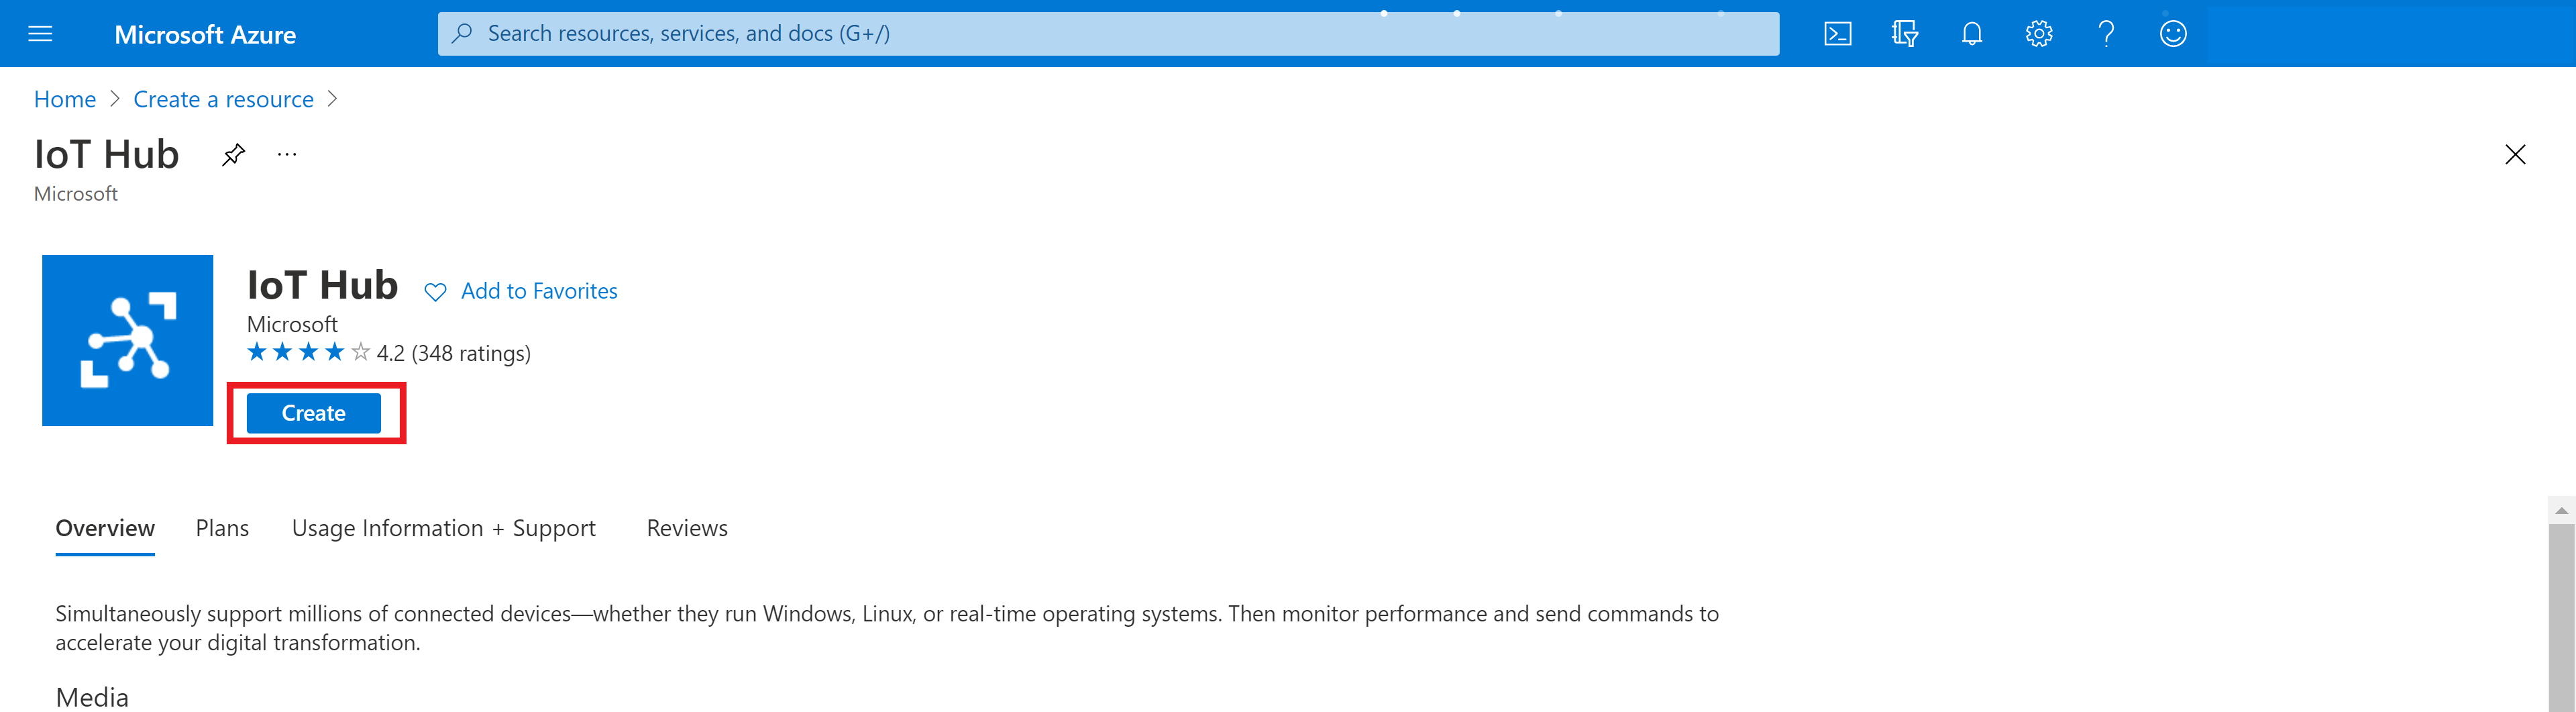
Step 4: This will open a page given below, select “Create”
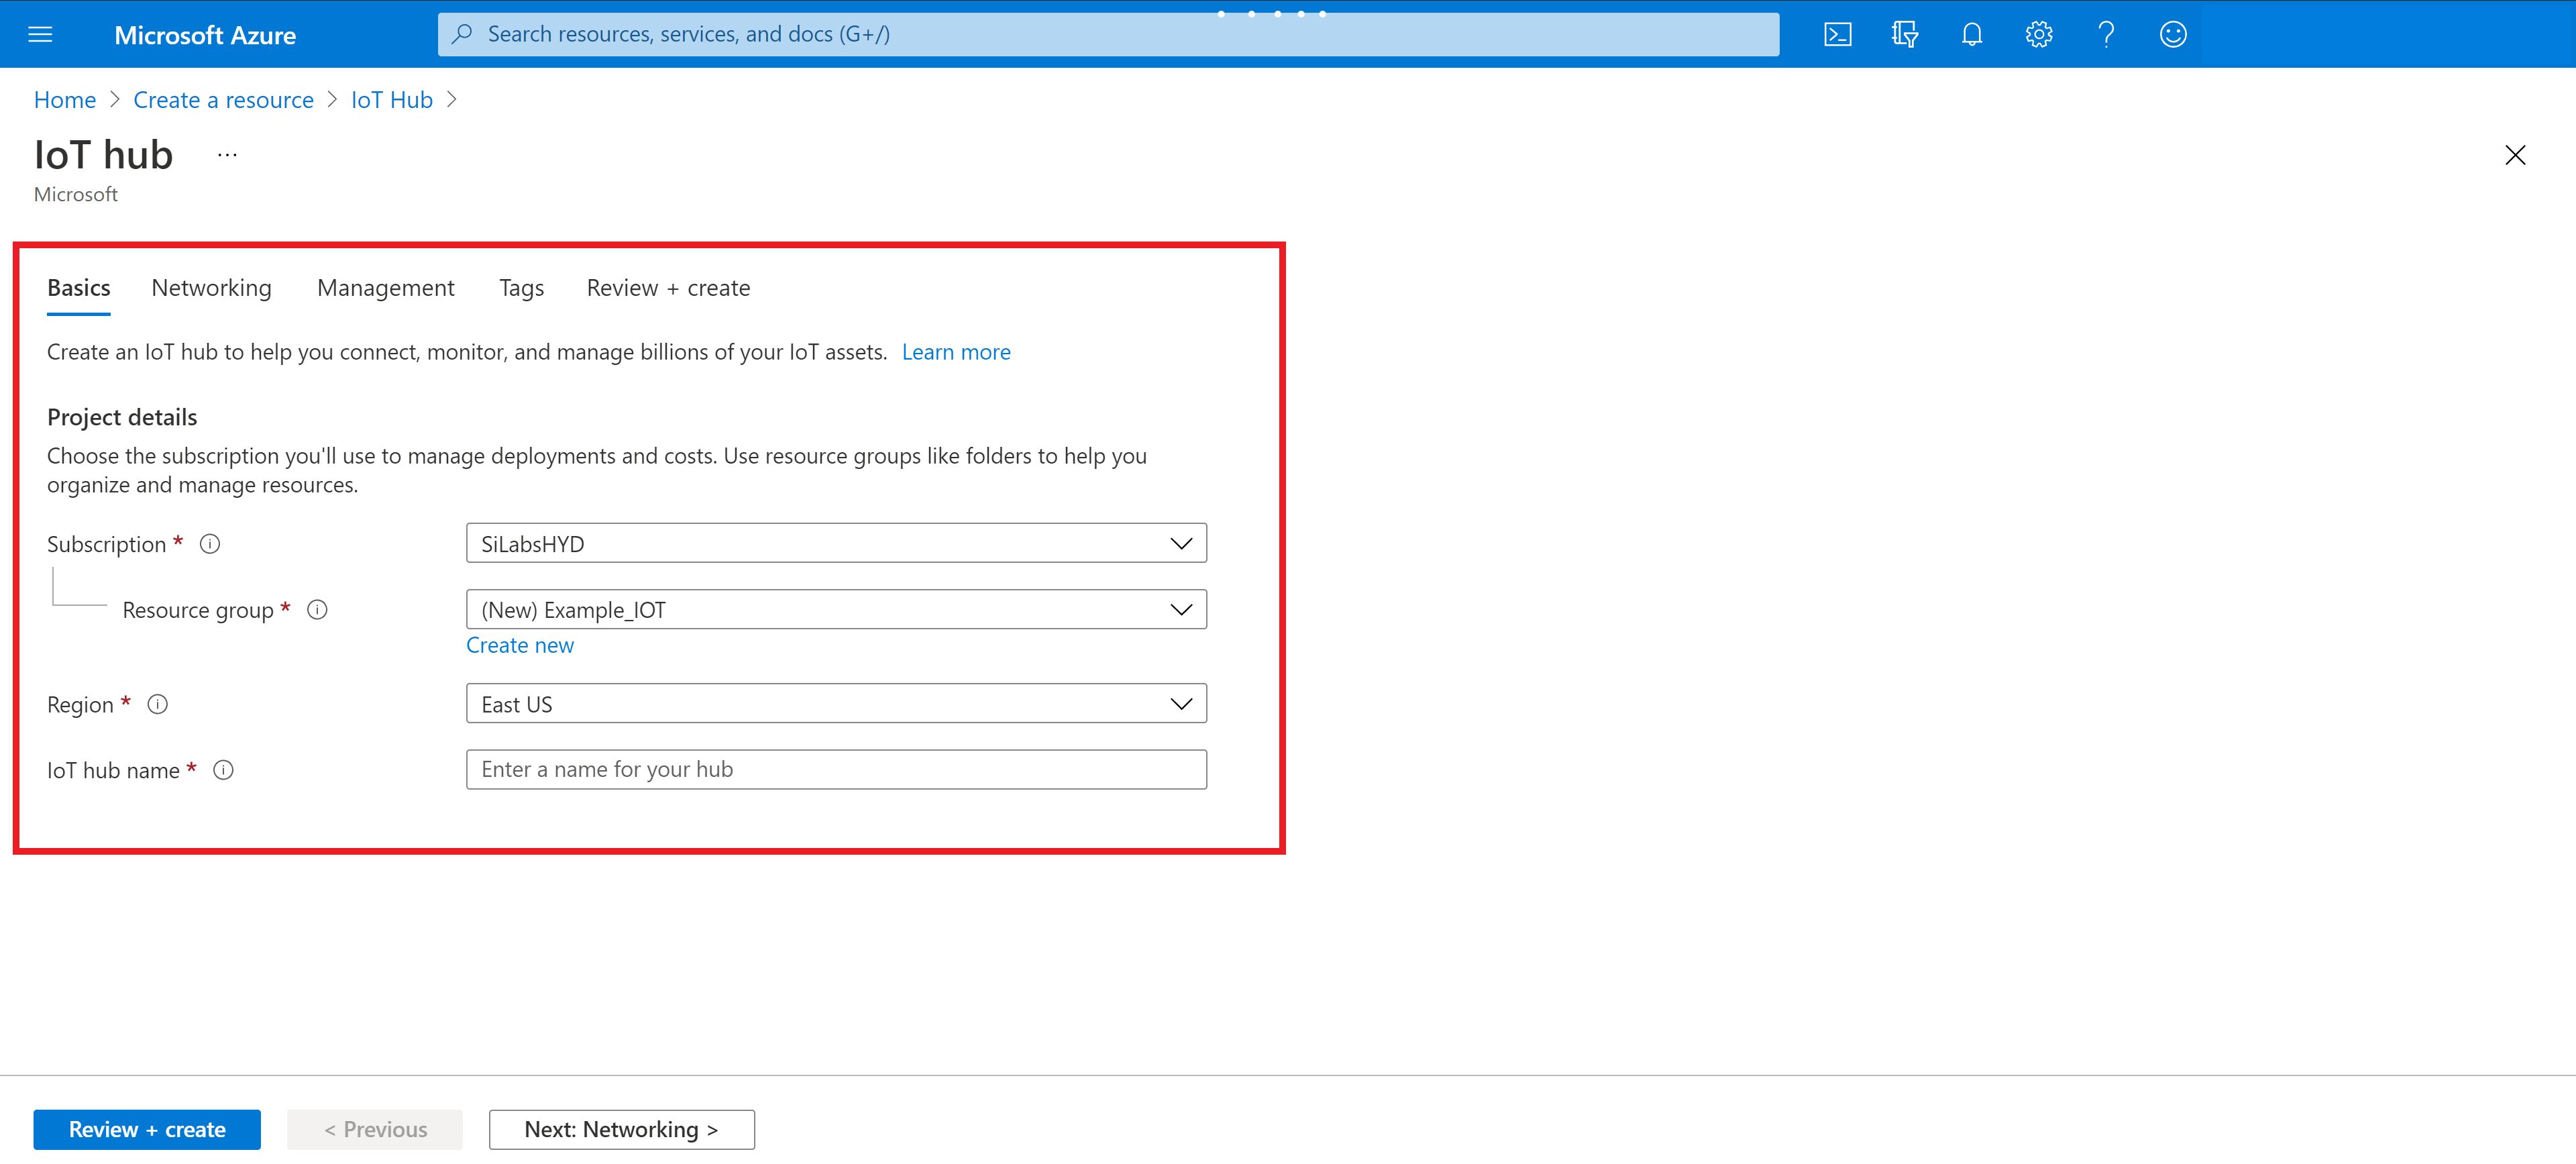
Step 5: Update the Basic details with below information
Subscription: Select the subscription to use for your hub.
Resource Group: Select a resource group or create a new one. To create a new one, select Create new and fill in the name you want to use. To use an existing resource group, select that resource group.
Region: Select the region in which you want your hub to be located. Select the location closest to you.
IoT Hub Name: Enter a name for your hub. This name must be globally unique.
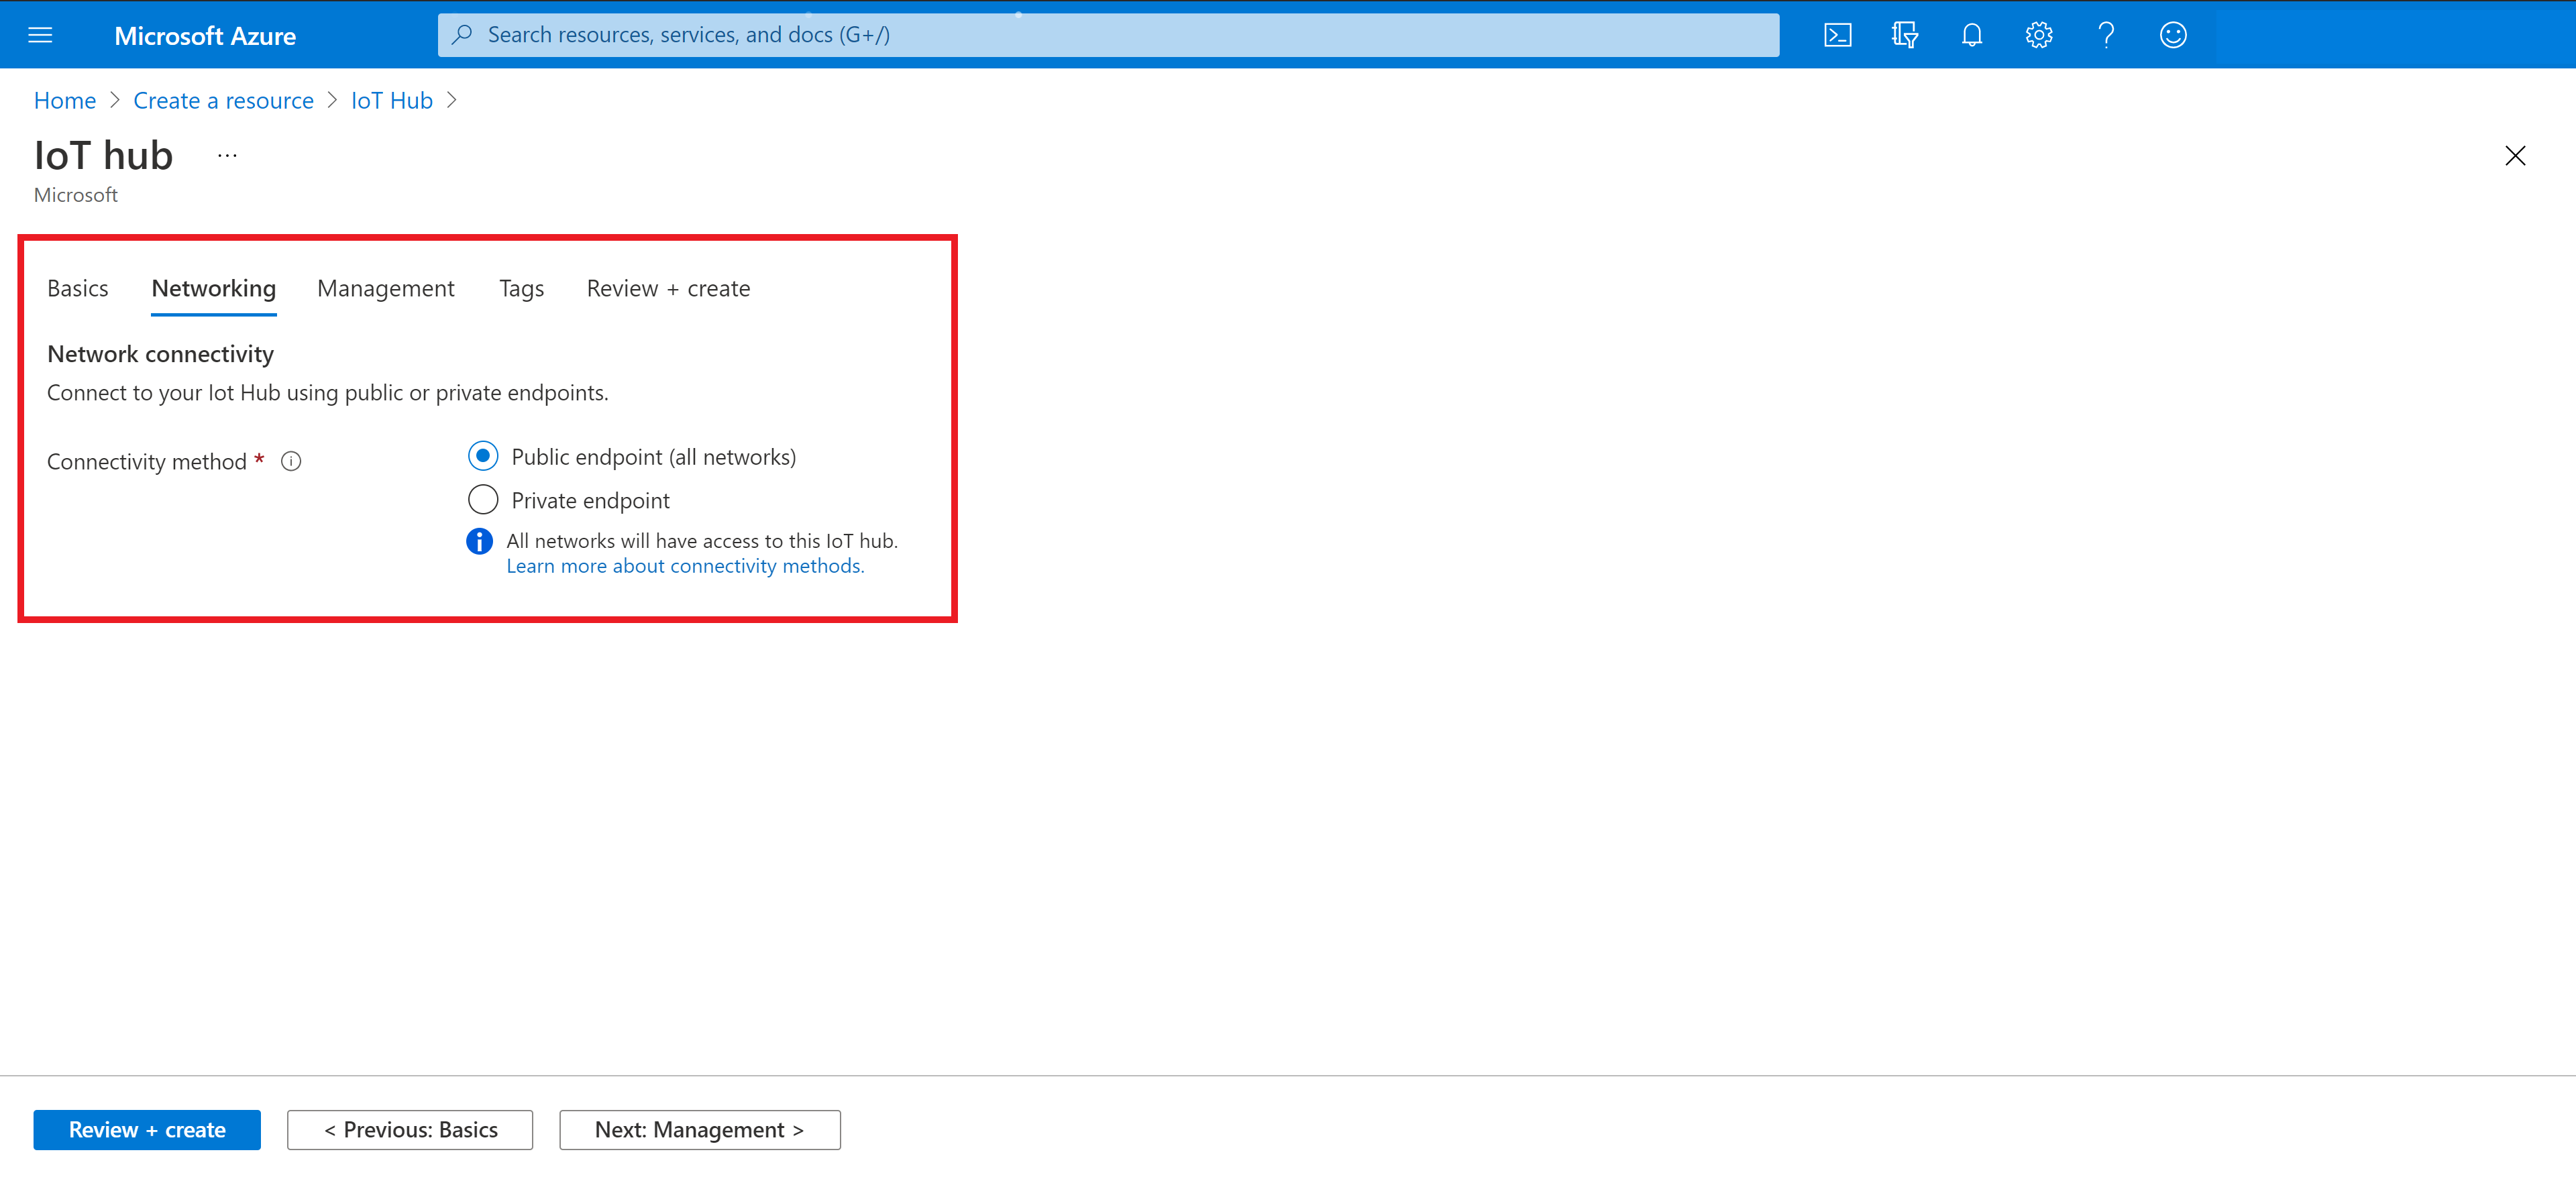
Step 6: Next update the Networking details to continue creating your hub.
Choose the endpoints that can connect to your IoT Hub. You can select the default setting Public endpoint (all networks), or choose Public endpoint (selected IP ranges), or Private endpoint. Accept the default setting for this example.
Step 7: Next update the Management deatils to continue creating your hub.
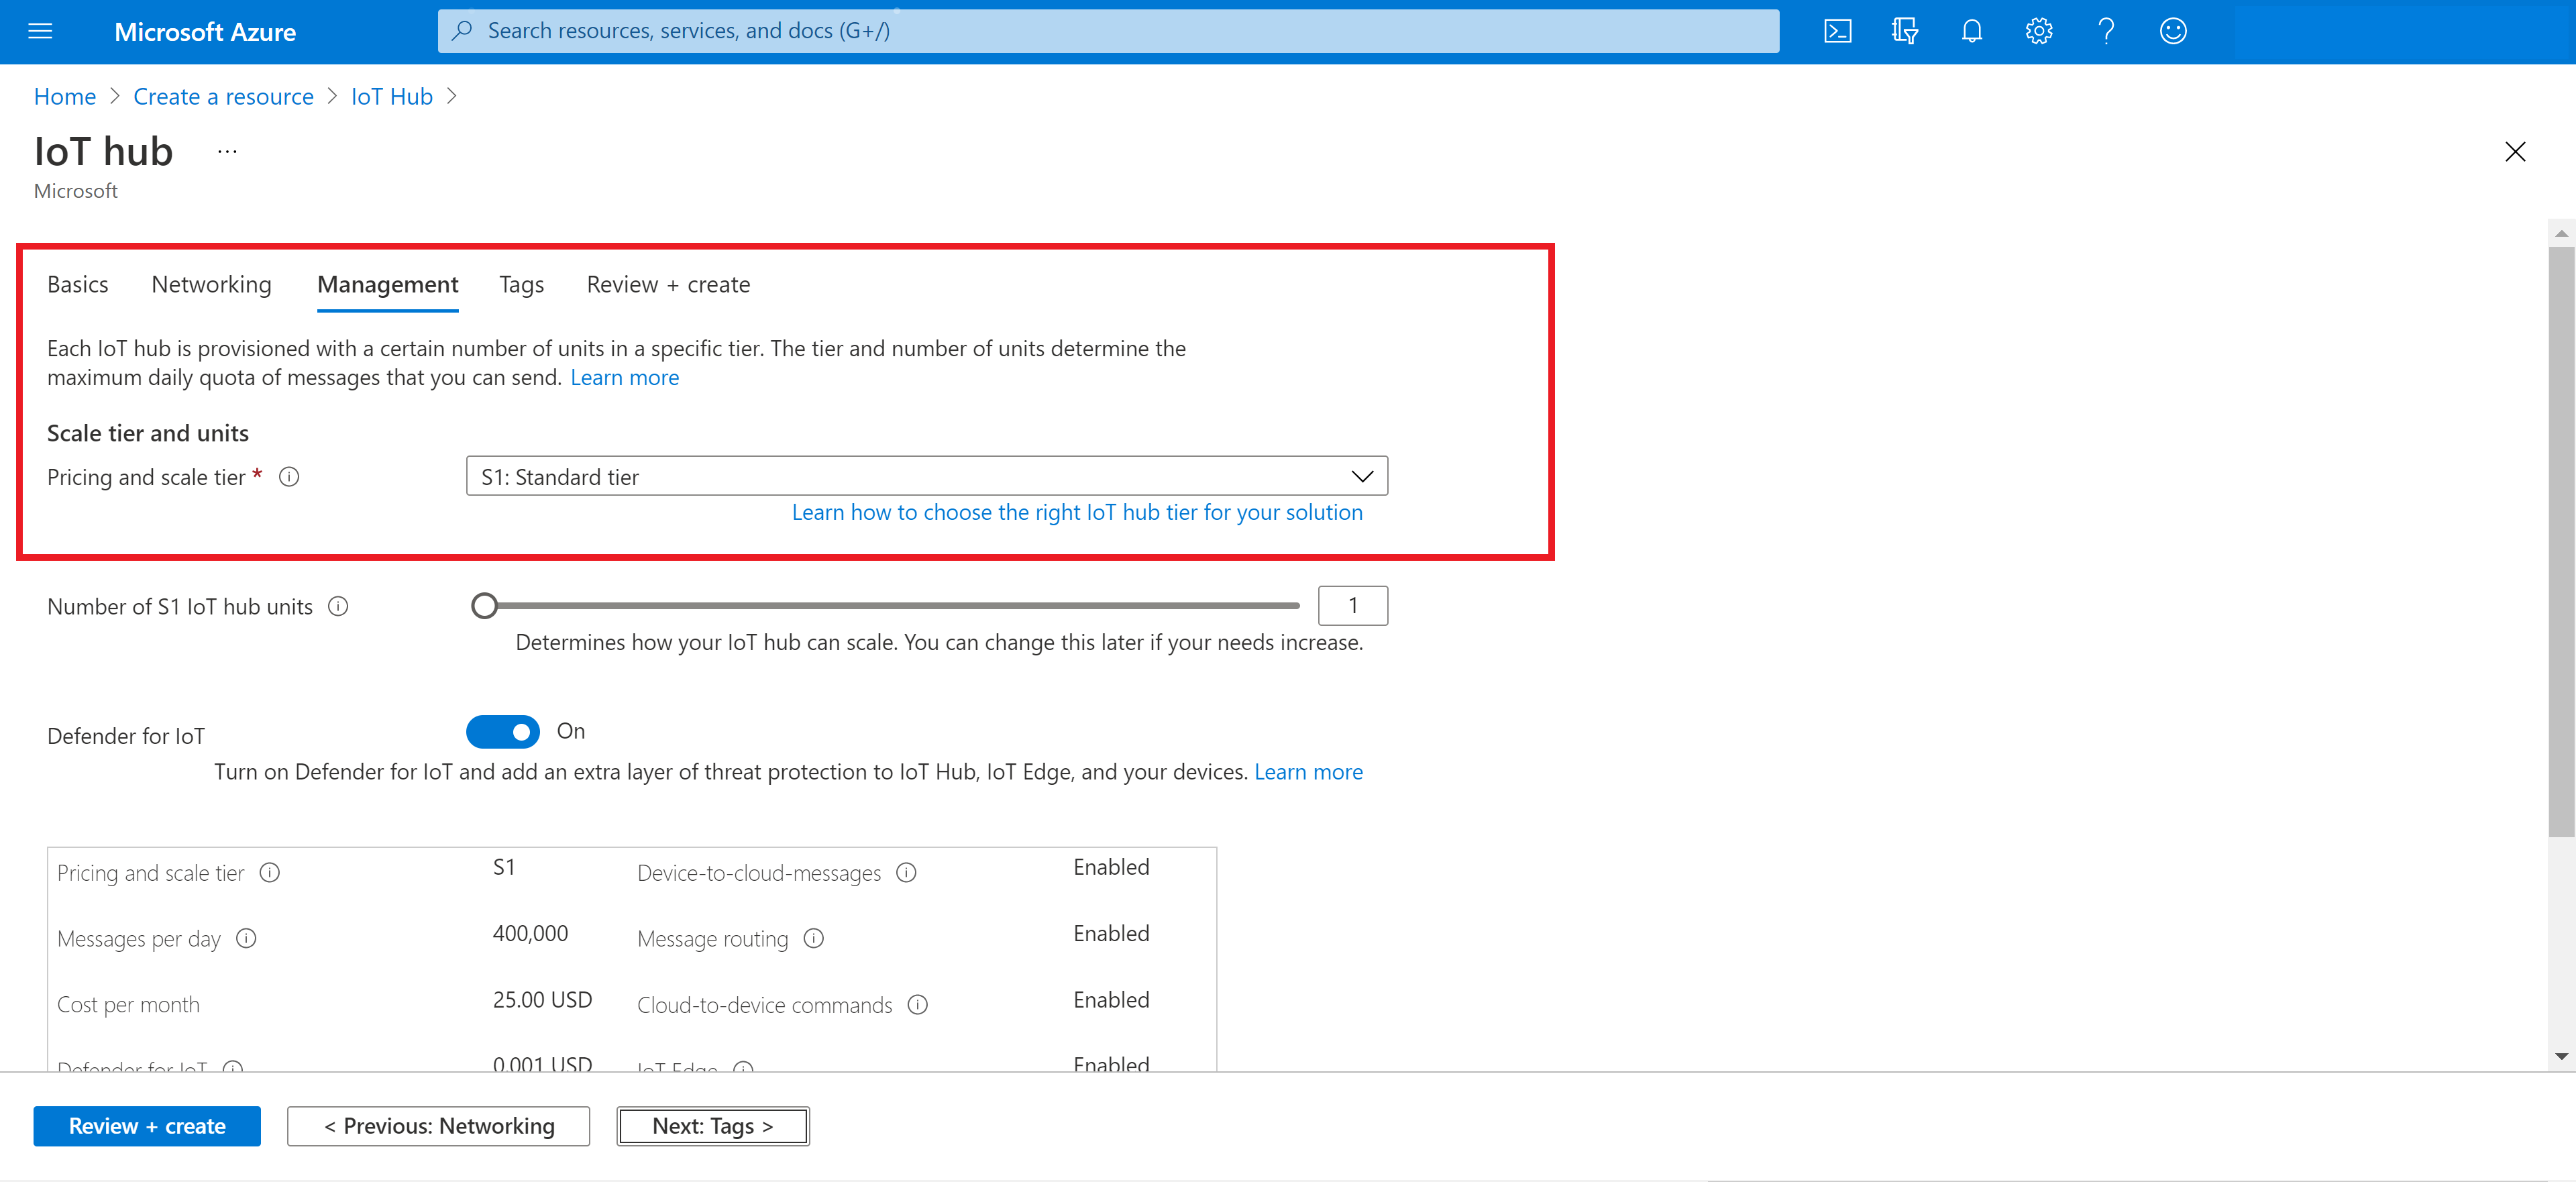
Select your required Azure IoT Hub tier.
Step 8: Skip “Tags”
Step 9: Next click on Review and Create > Create
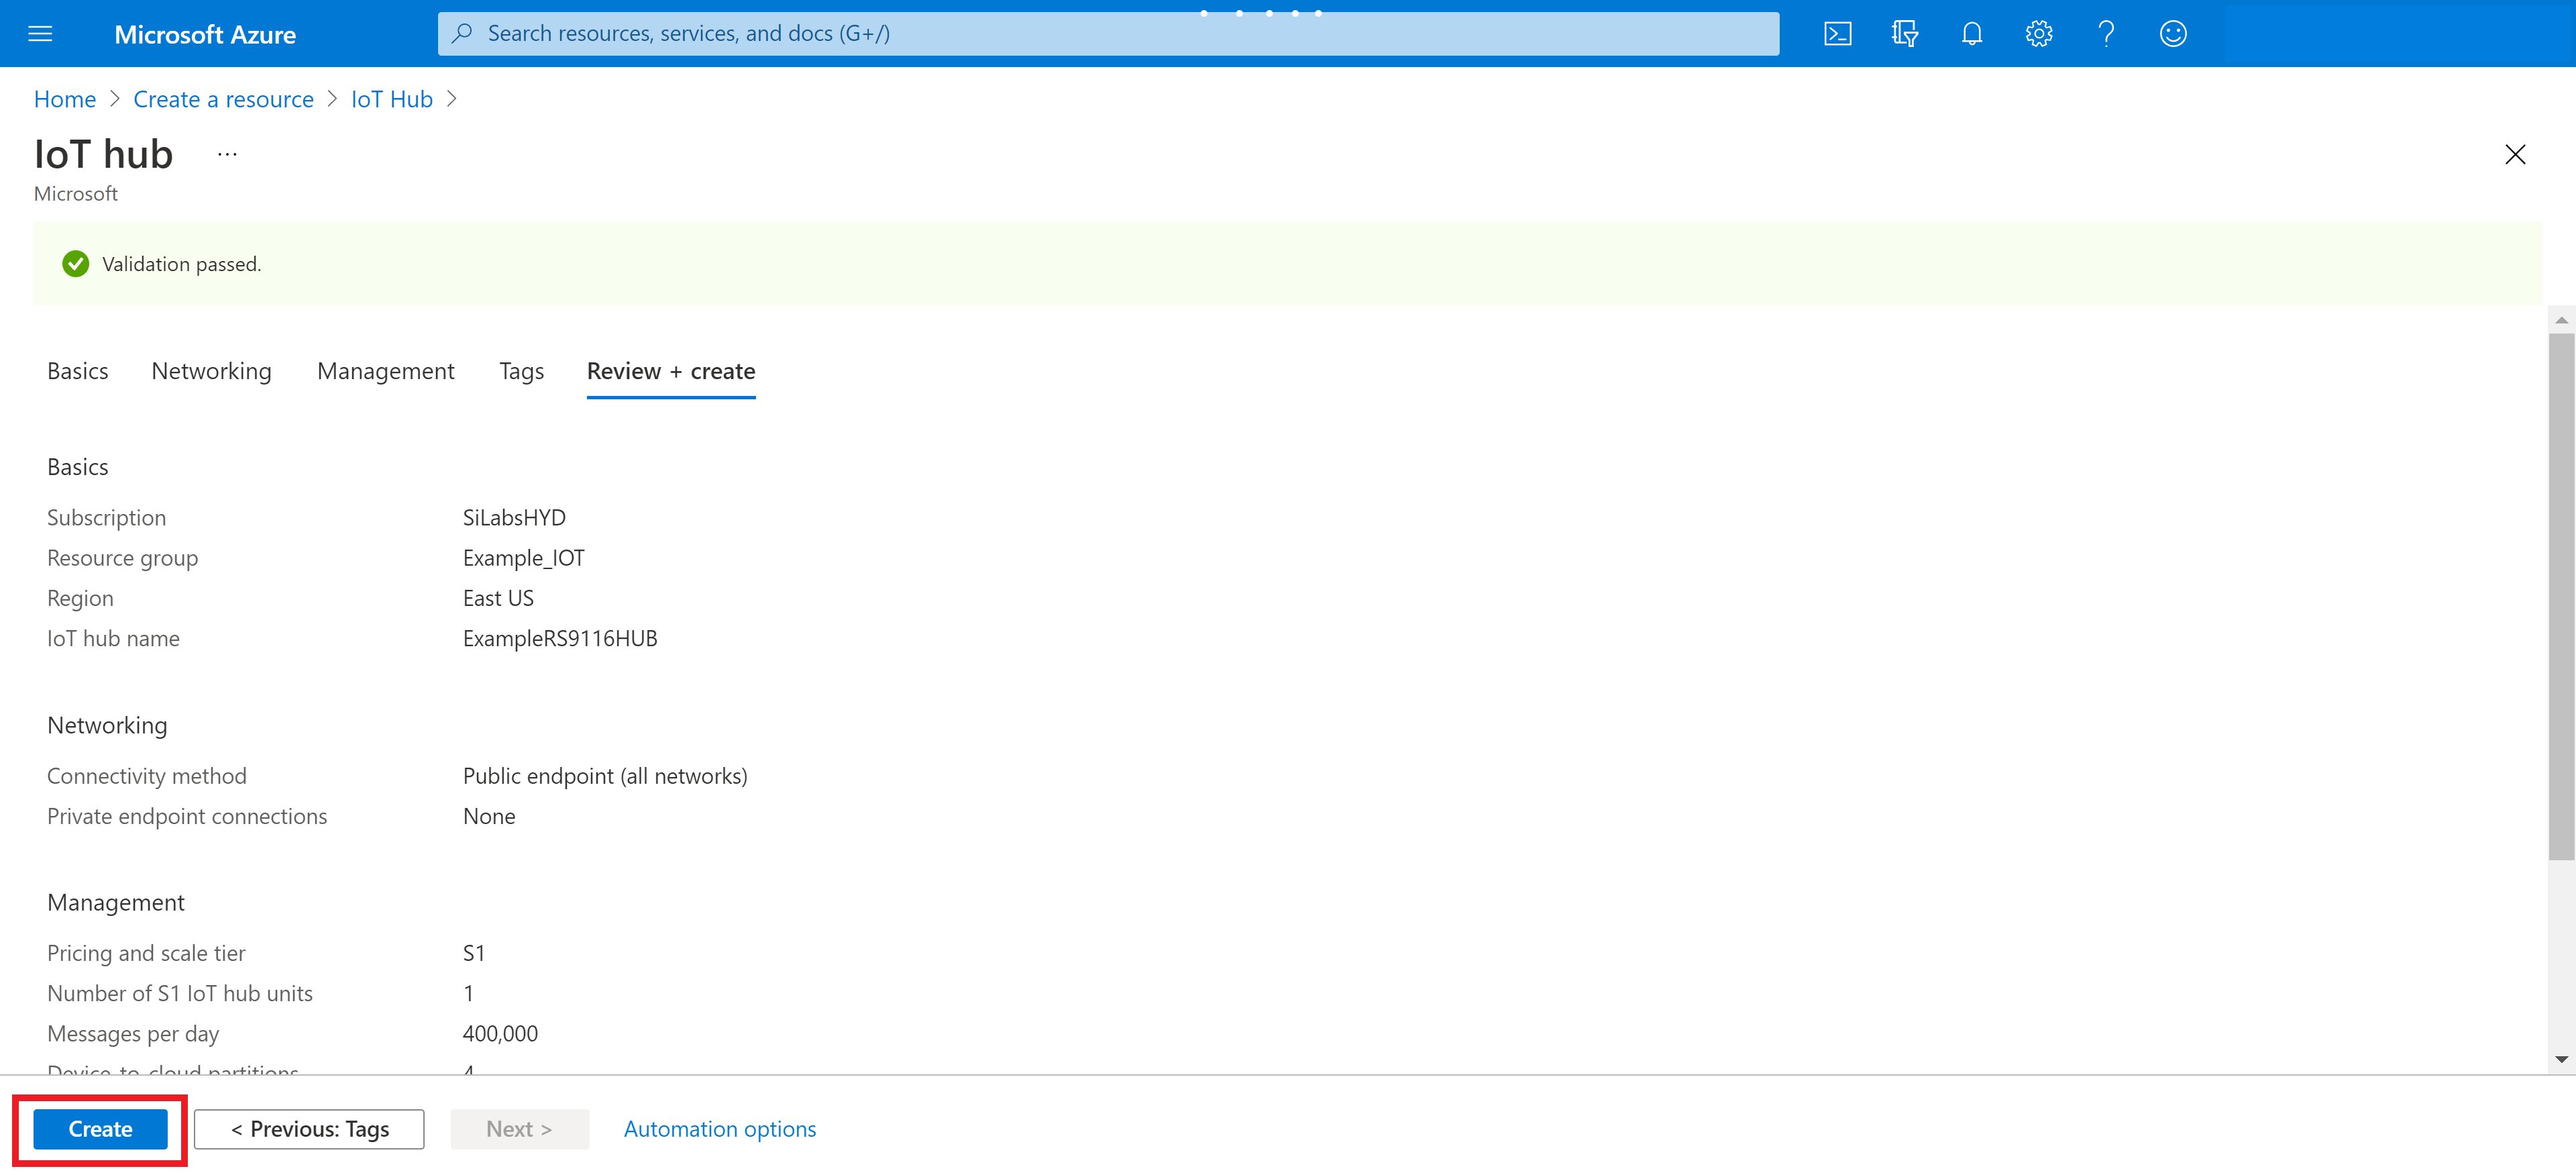
This should create your IoT Hub.
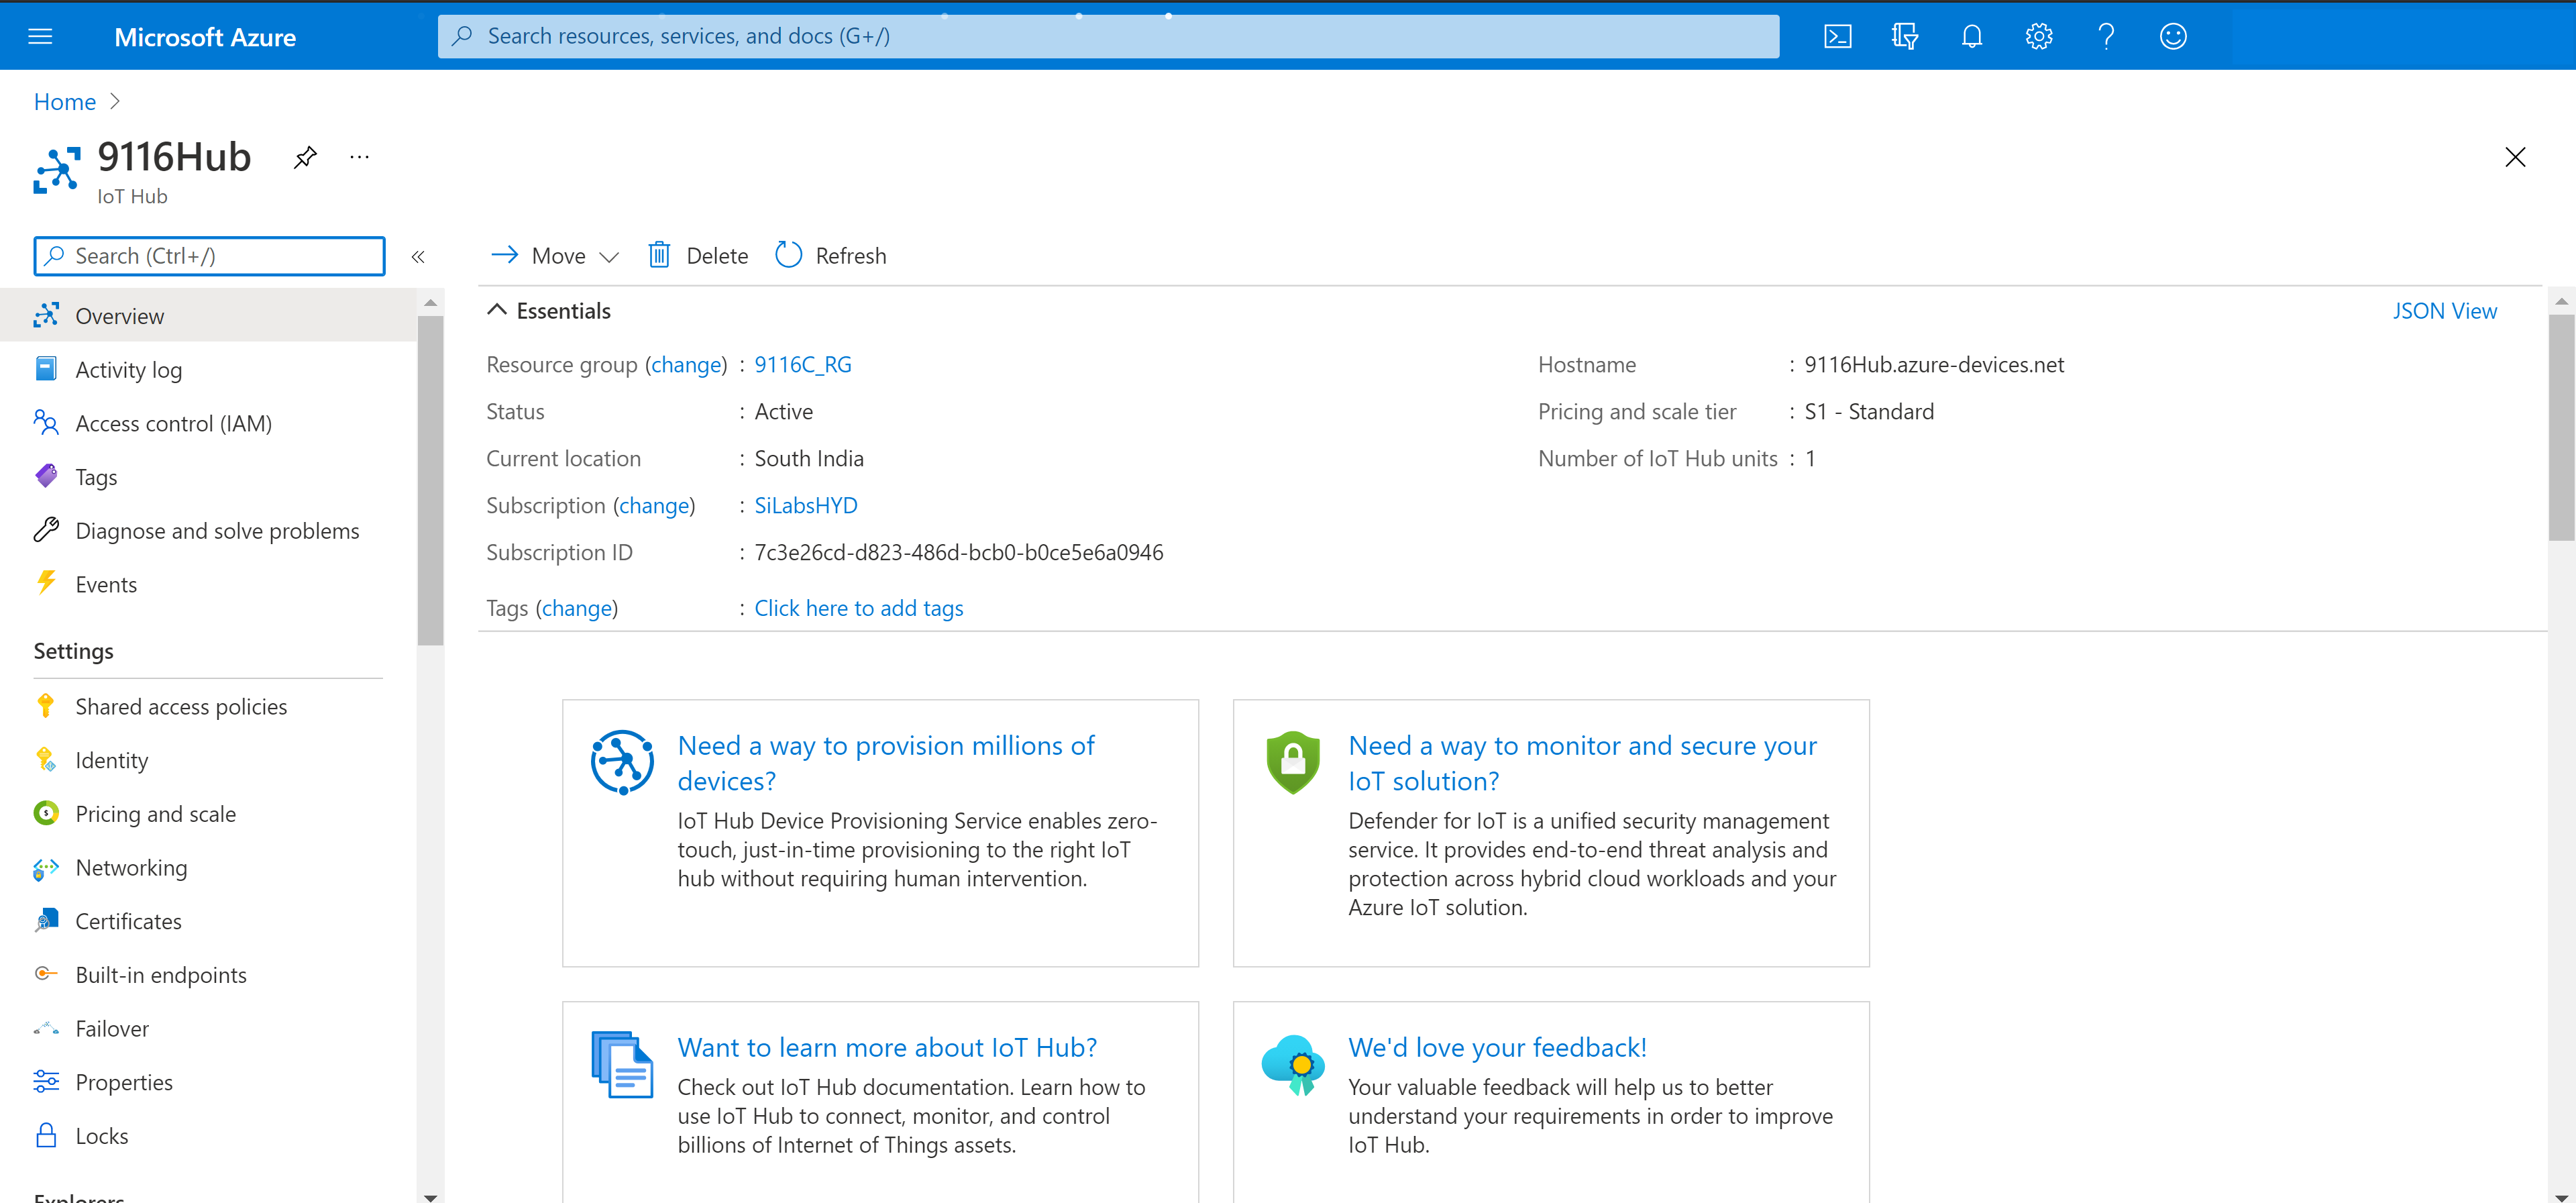
Step 10: In the Azure Portal you should see your IoT Hub resource
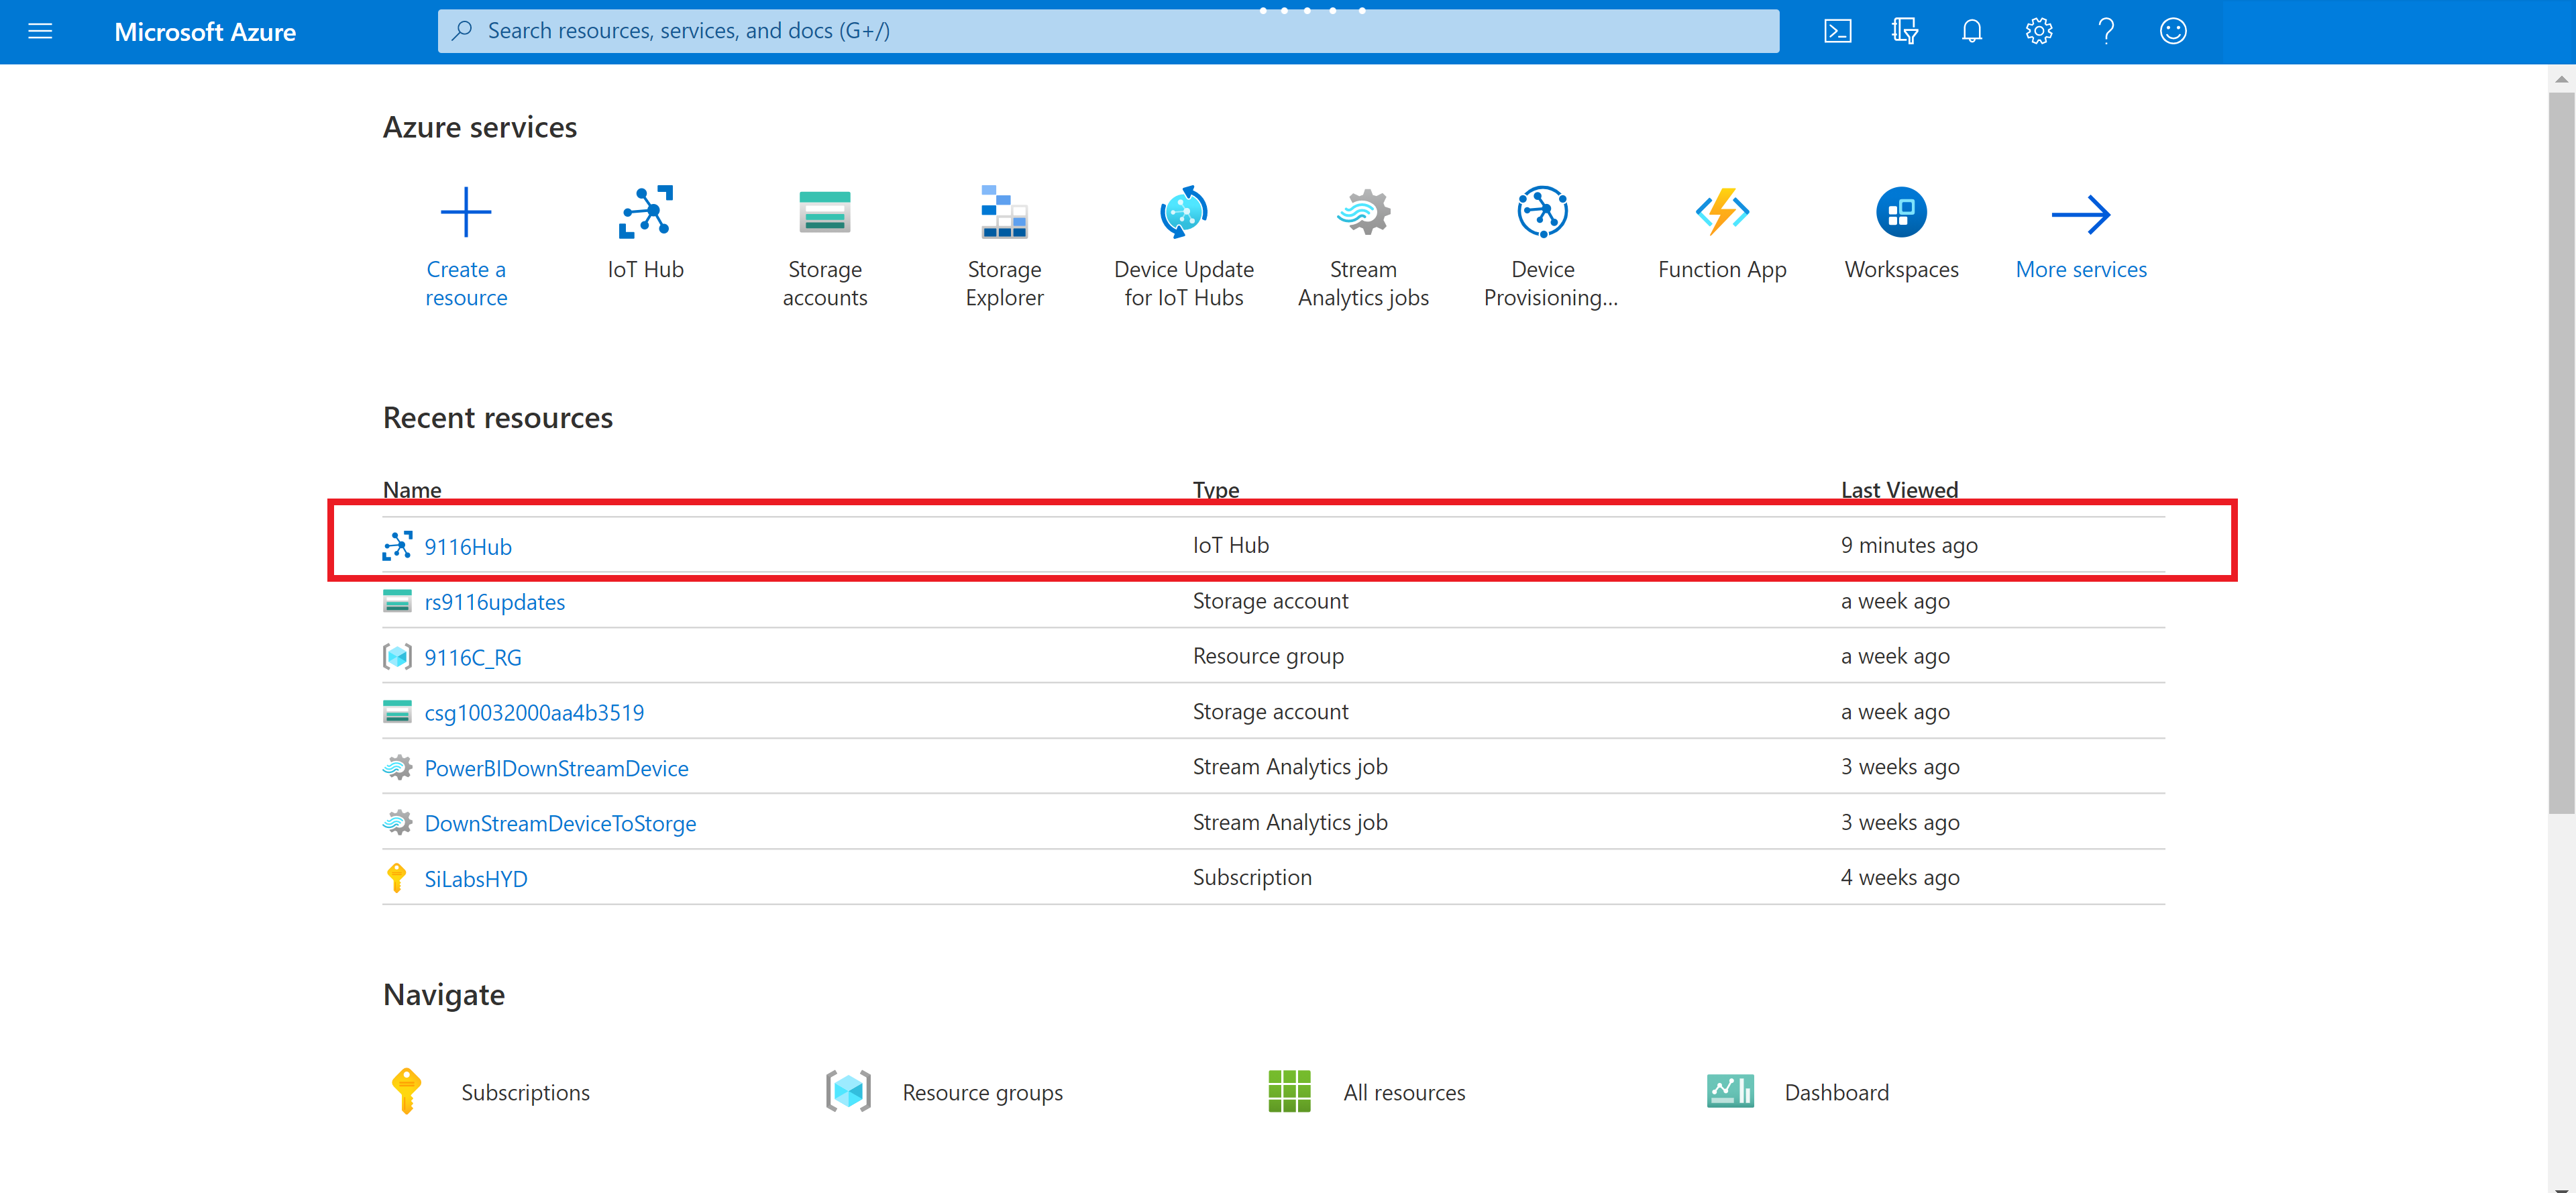
We have IoT Hub ready, Next steps will walk through Device creation and attaching device to IoT Hub.
1.3 IoT Device registration
1.3.1 - Register IoT Device with symmetric key authentication in IoT Hub:
Create a device identity in the identity registry in your IoT hub. A device cannot connect to a hub unless it has an entry in the identity registry.
Follow the steps below or refer Register a device with Symmetric Key
Step 1: Navigate to your IoT Hub resource,
Step 2: Open “IoT Devices” and select “New” to register a device.
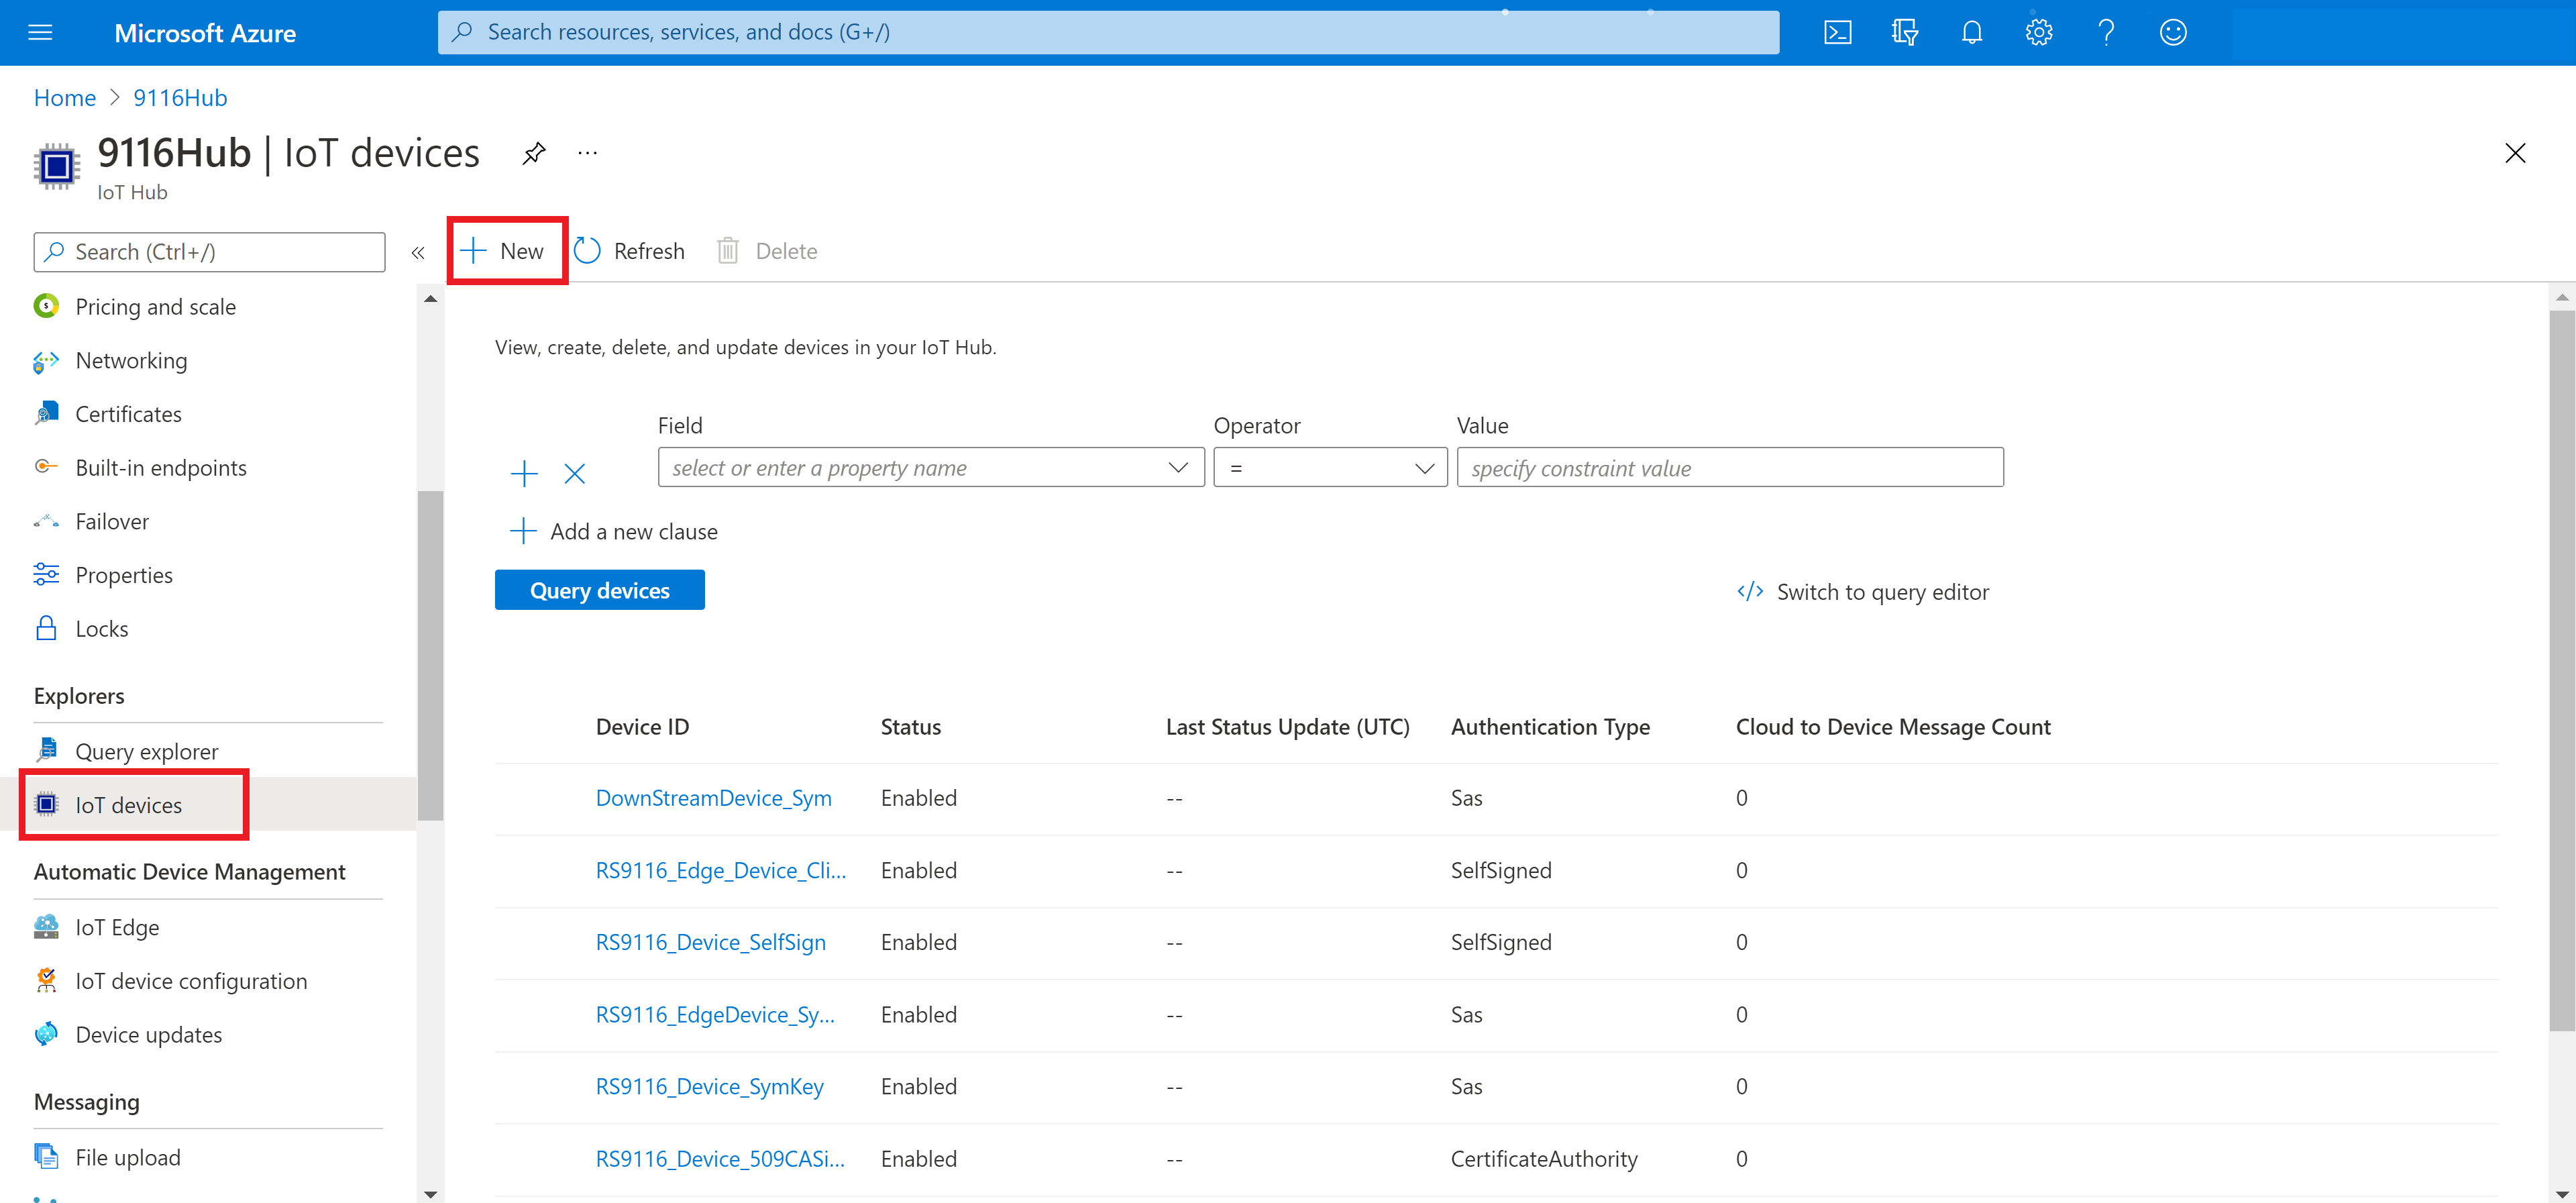
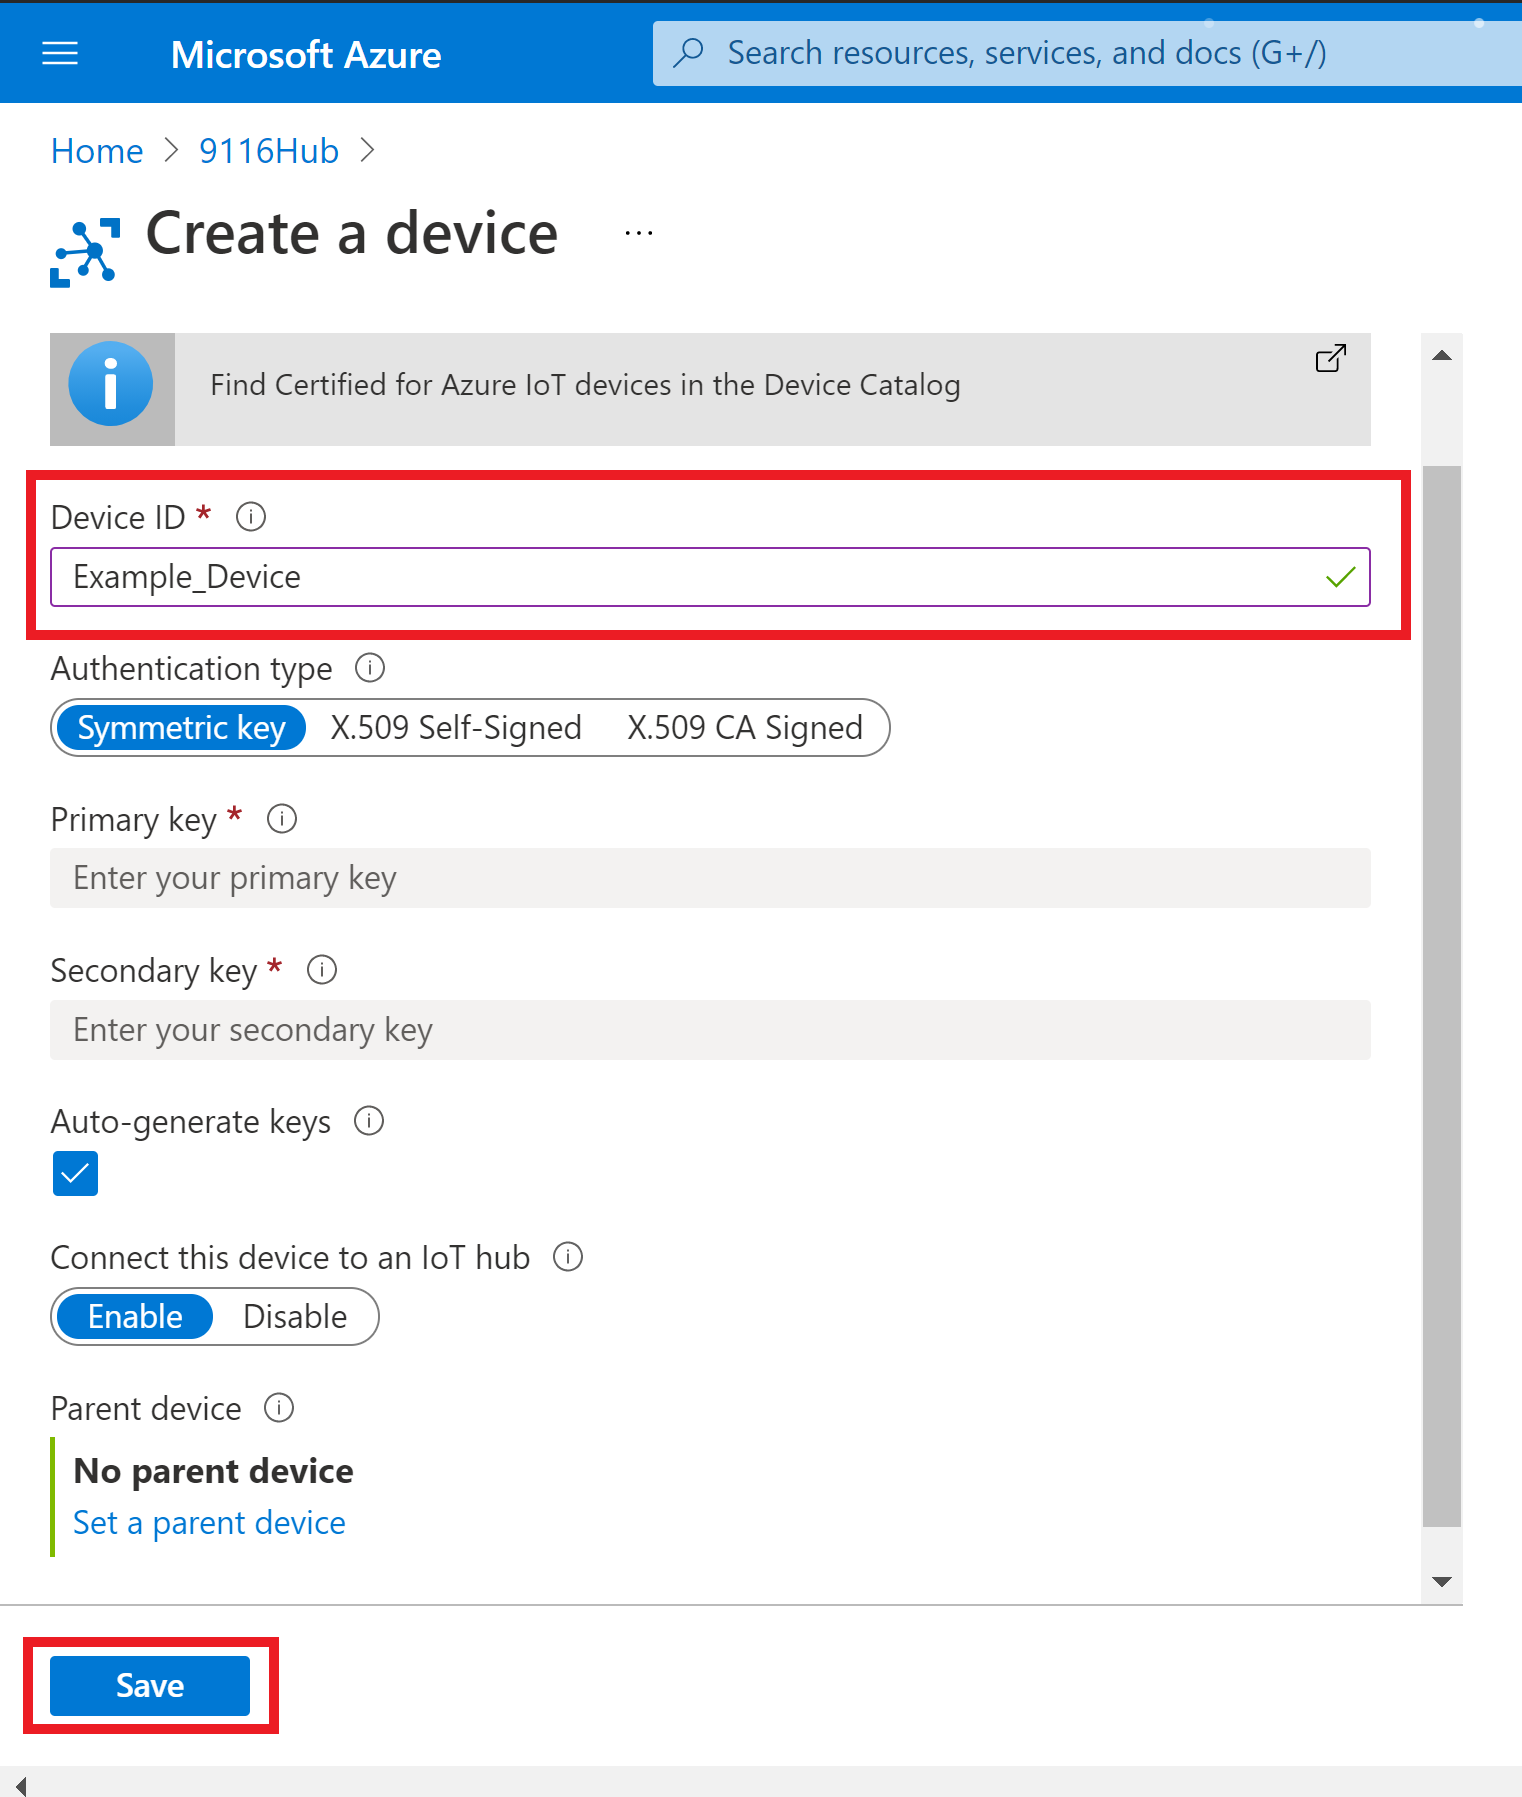
Step 3: In Create a device, provide a name for your new device and select authentication type as "Symmetric key" and Save. This action creates a device identity for your IoT hub.
Step 4: After the device is created, open the device from the list in the IoT devices pane. Select Device created and copy the Primary Connection String for use later.
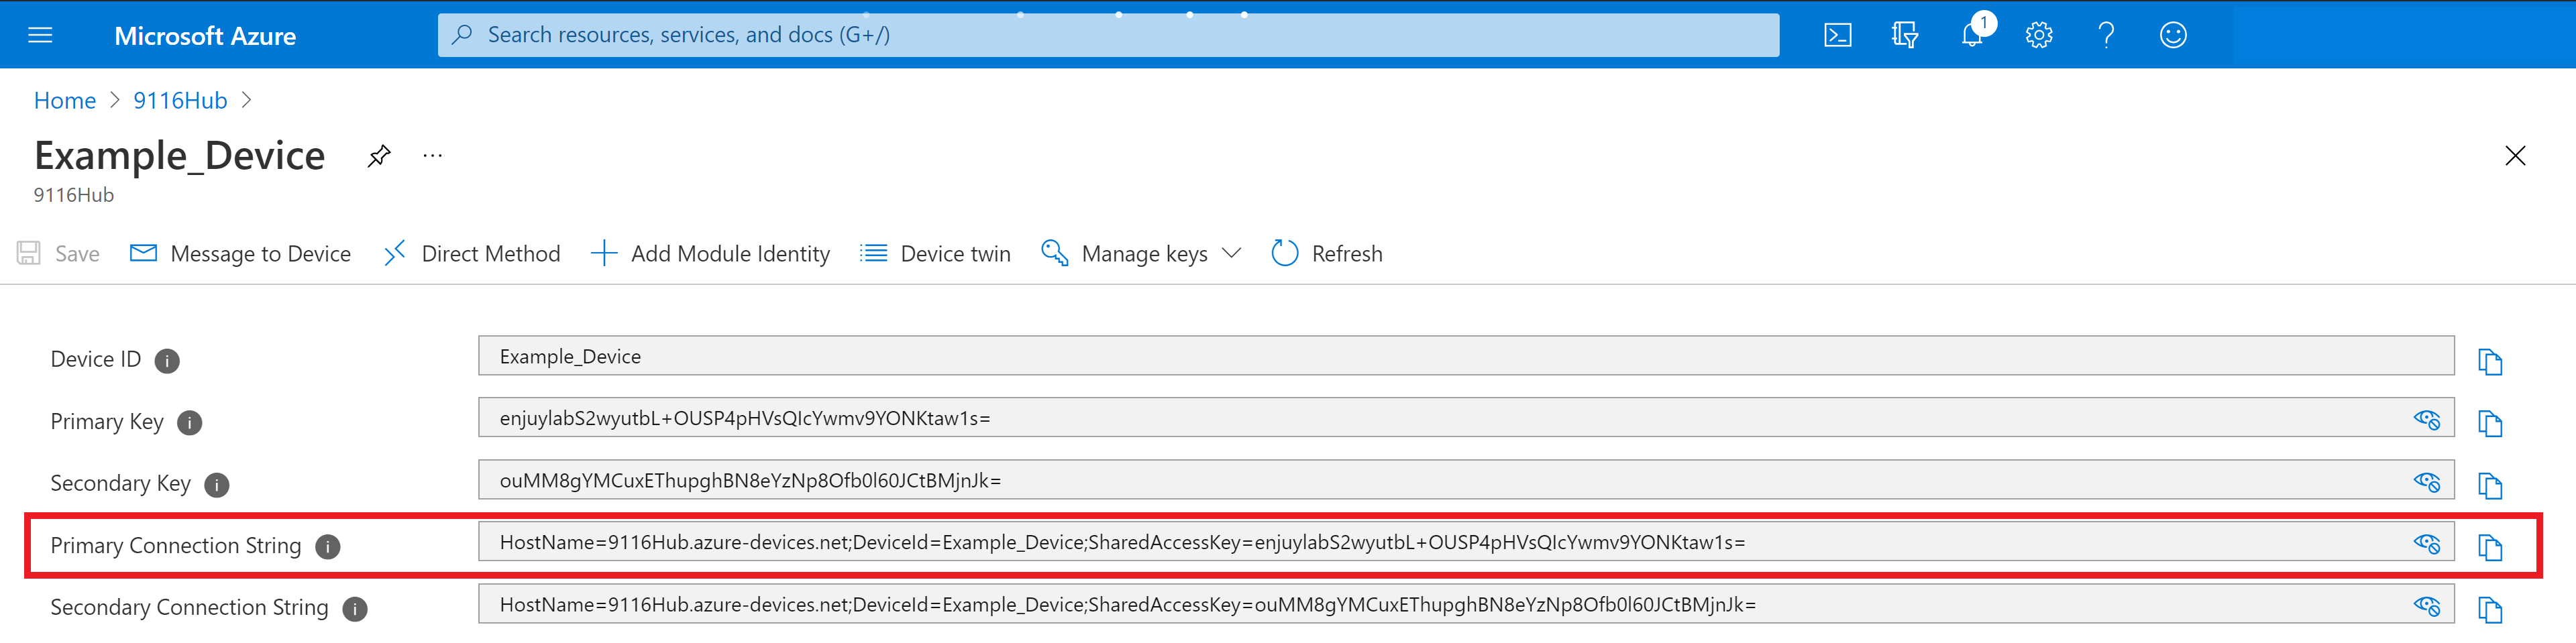
Step 5: The primary connection string is used in application to connect device to IoT Hub.
Device is now successfully registered to IoT Hub with Symmetric key authentication type.
1.3.2 - Register a New X.509 Authenticated Device with IoT Hub
For X.509 self-signed authentication, sometimes referred to as thumbprint authentication, you need to create certificates to place on your device. These certificates have a thumbprint in them that you share with IoT Hub for authentication.
Follow the steps below or refer to the Register a X.509 Device
Step 1: Generating X509 Self Signed certificates
Generate the IoT device's x509 Certificate and the Private Key Certificate by using the below OpenSSL command from a Powershell window
Openssl req -newkey rsa:2048 -nodes -keyout mydevkitkey.pem -x509 -days 365 -out mydevkitcertificate.pem
mydevkitkey.pemis the Private Key filemydevkitcertificate.pemis the x509 device certificate file
Step 2: Capture the x509 certificate's Fingerprint either SHA1 or SHA256 type.[your choice]
command for SHA-1 : openssl x509 -in mydevkitcertificate.pem -fingerprint -noout.
Command for SHA-256 : openssl x509 -in mydevkitcertificate.pem -fingerprint -noout -sha256
Copy the fingerprint hexadecimal number with 40 length [have considered SHA1 type].
Remove the ':' from the fingerprint and it will look as shown below :
3989467851D9C76811C3B1DF939AE0A103E838CA
Step 3: Go to Azure Portal-IoTHub to create new device with authentication type as X.509 Self-signed
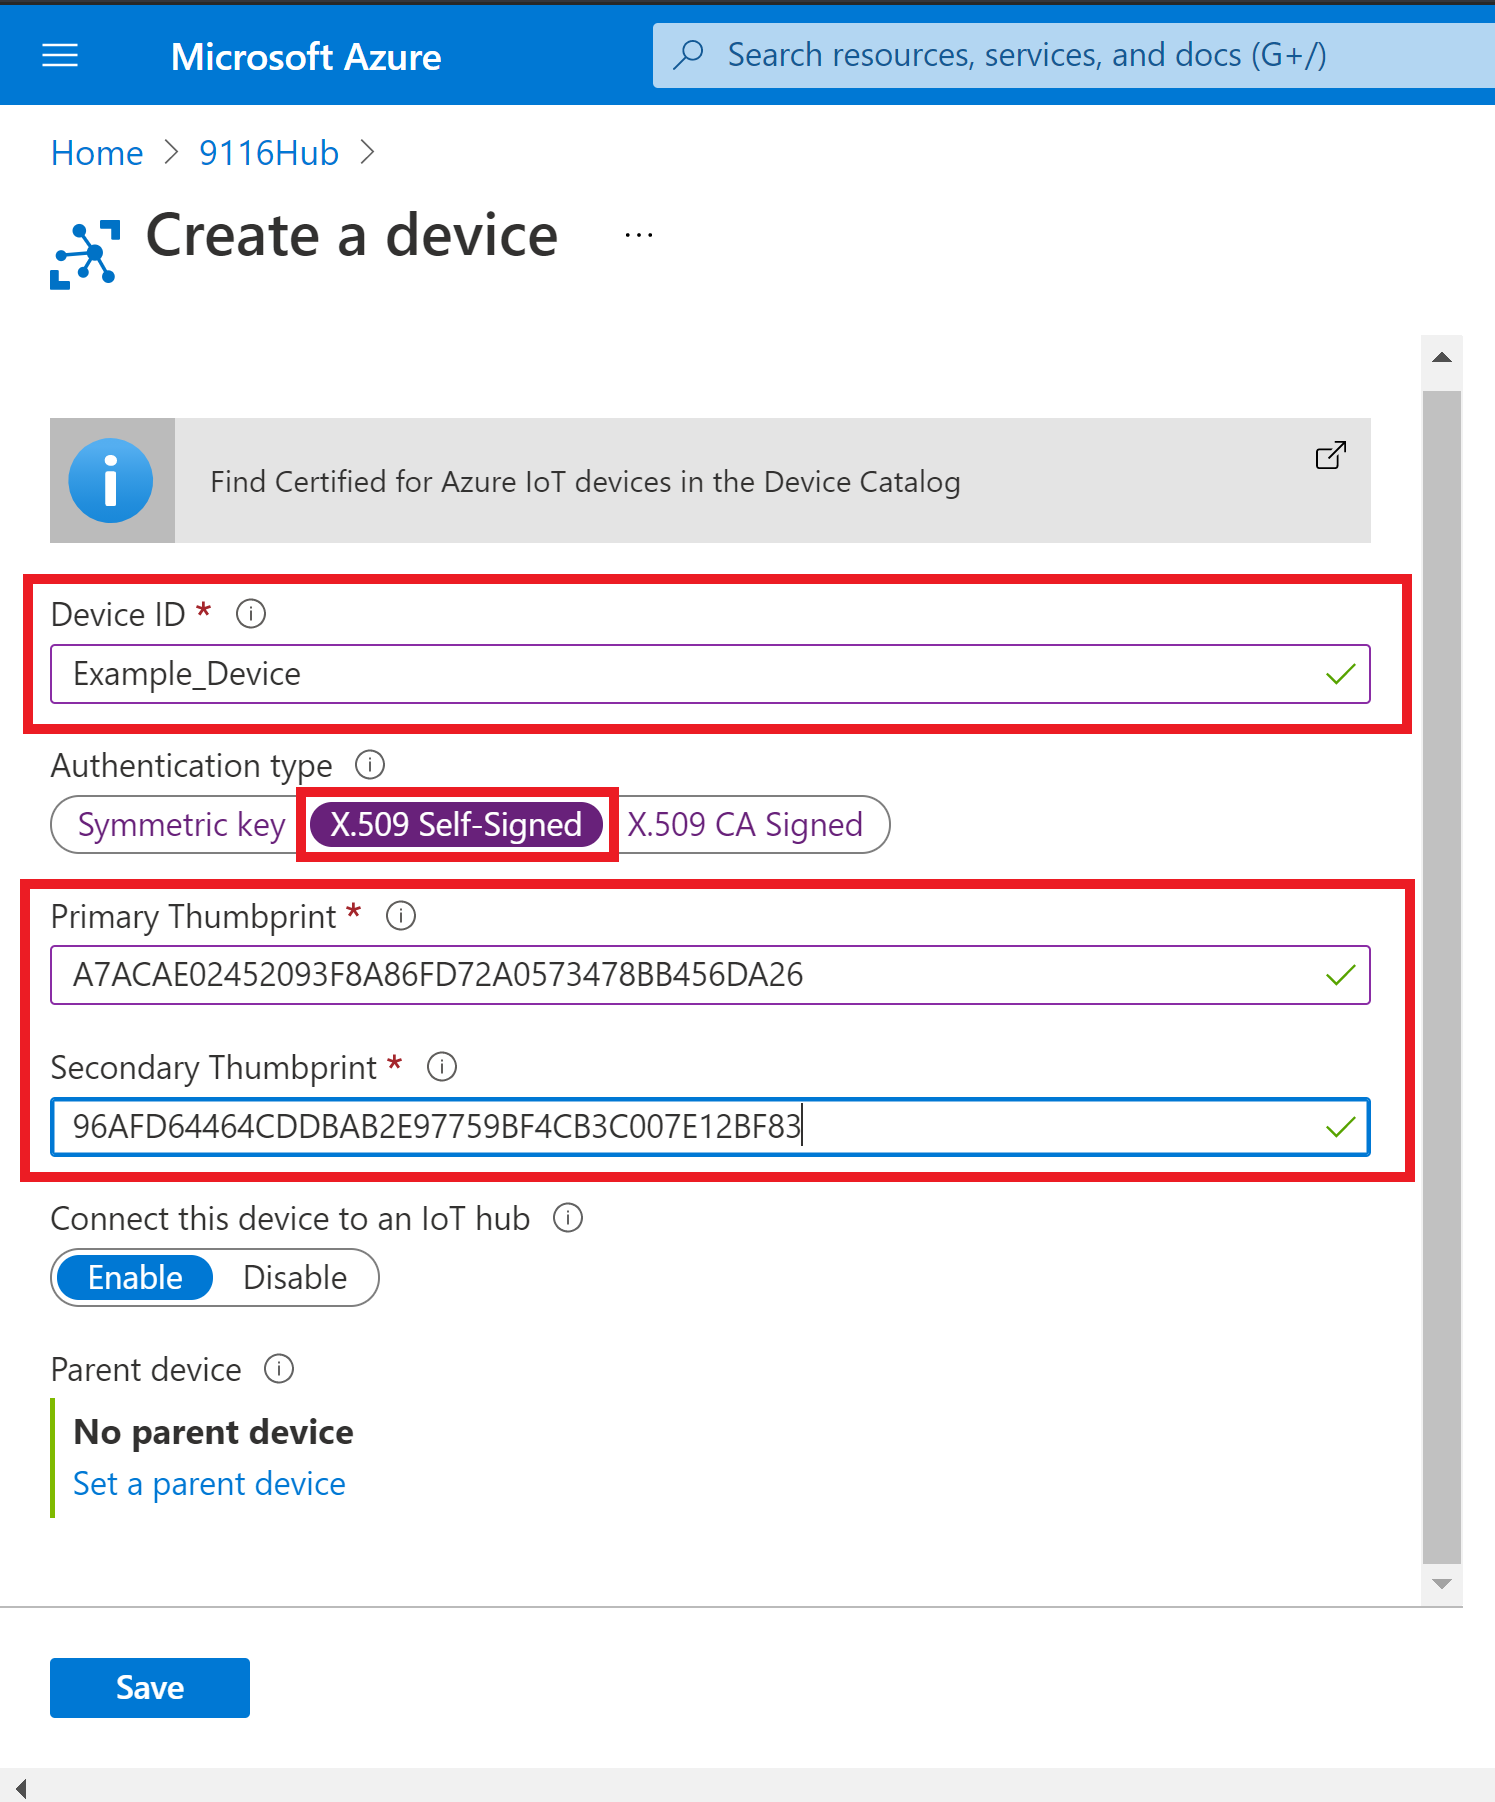
Step 4: Connection string to be given in the application should be as follows
HostName=<Hub name>;DeviceId=<Device id(myselfsigned)>;x509=true
Device is now successfully registered with the IoT Hub with X.509 self signed authentication type.
Appendix-2 : Steps to check Telemetry message on Azure cloud
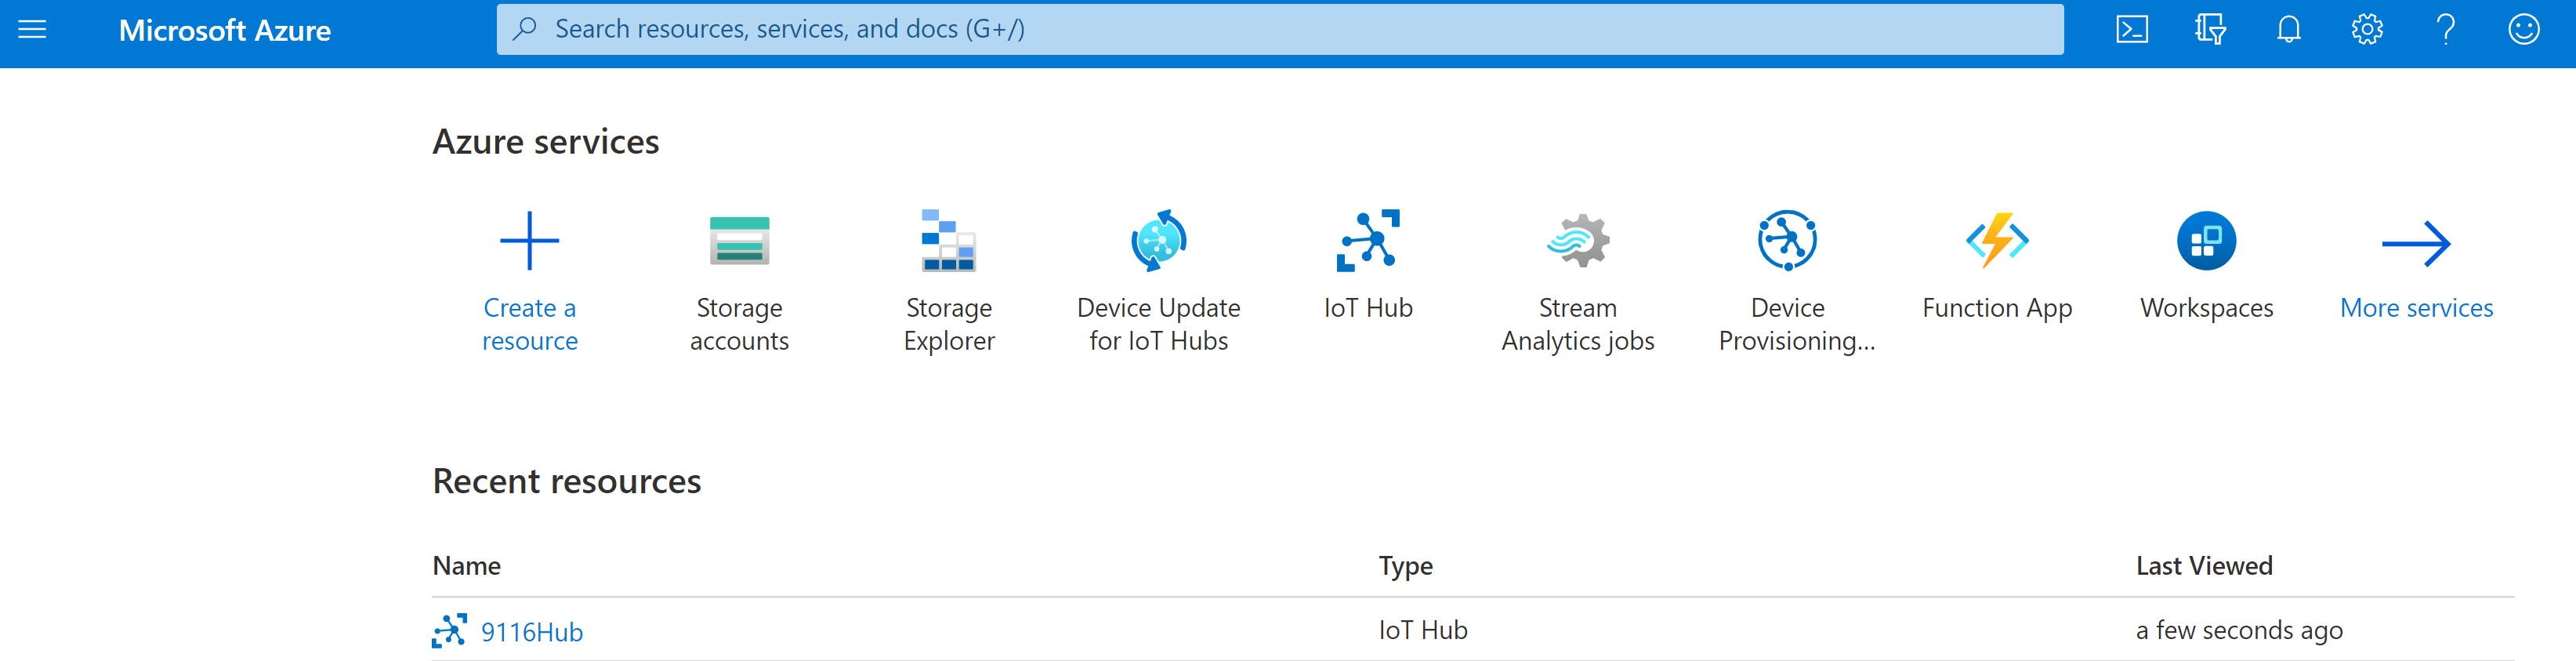
Login to Azure portal.
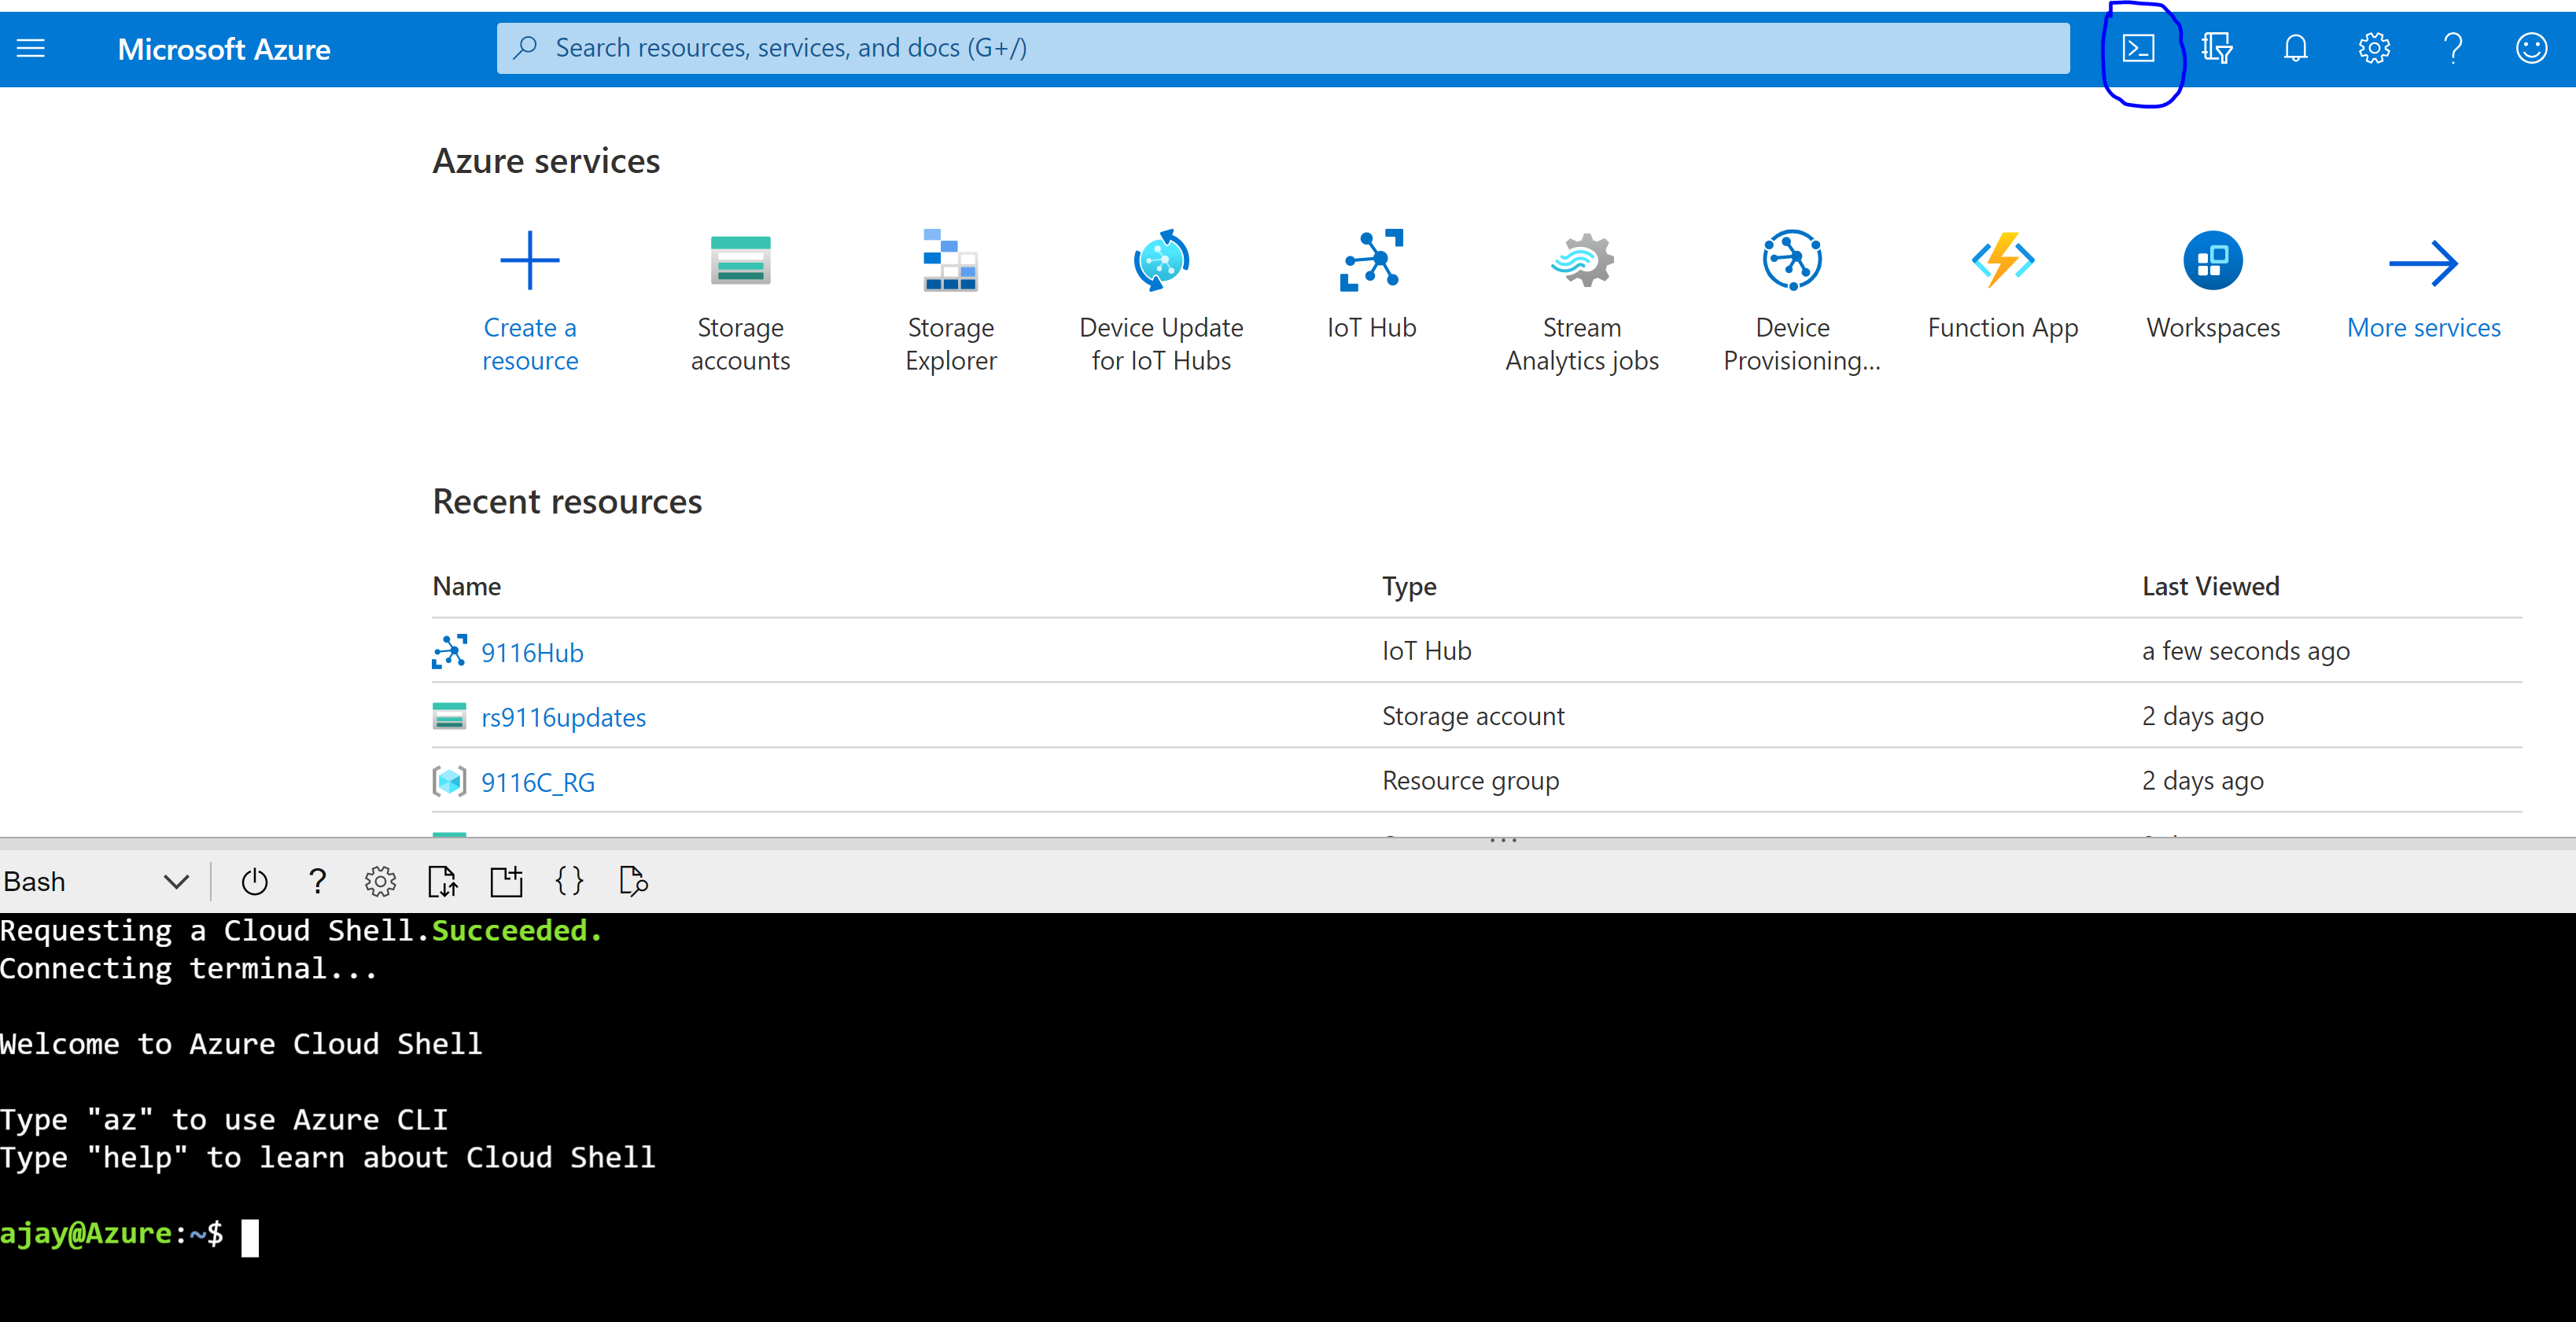
Click on Cloud shell in the portal.

To check the telemetry message sent from application, type the below command in the shell:
az iot hub monitor-events --hub-name {YourIoTHubName} --output table
The received telemetry message will be displayed as follows
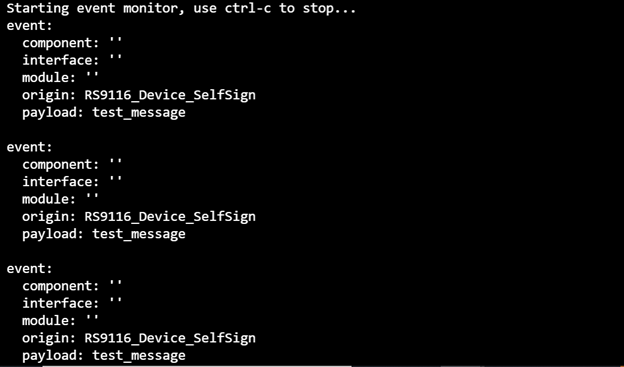
Appendix-3 : Steps to send c2d message from the cloud
az iot hub monitor-events --hub-name 9116Hub --output table
Login to Azure portal.
Go to the Hub that the device is created in
Click on Cloud shell in the portal.
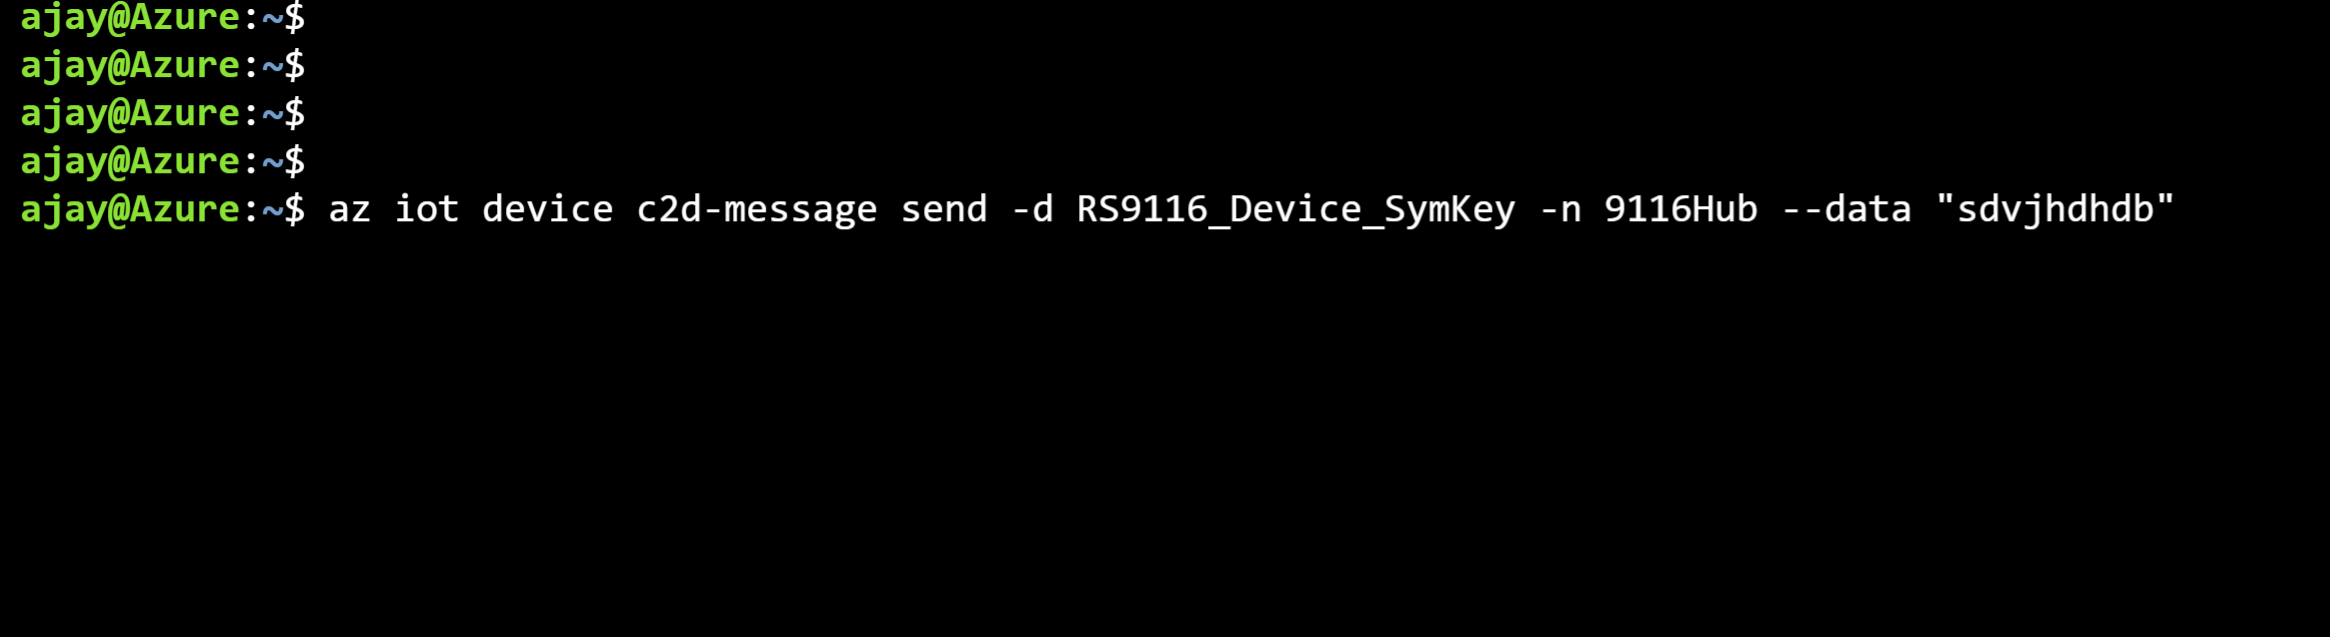
To send C2D message from the cloud, type the below command in the azure cli: az iot device c2d-message send -d RS9116_Device_SelfSign -n 9116Hub --data "sdvjhdhdb"
The device upon receiving the messages will display on the terminal.